
How to add conditional fields to WooCommerce checkout
Do you want to create conditional logic for your store? You’ve come to the right place. In this guide, you’ll learn how to add conditional fields to the WooCommerce checkout.
The checkout is one of the most crucial pages for any eCommerce store. There are millions of sites out there competing for the same users. So to be ahead of your competitors, you should customize and optimize your checkout as much as possible. One of the most interesting options to do this is to add conditional fields to your WooCommerce checkout.
These fields allow you to create conditional logic and display only the fields that the customers need to fill in on the checkout page to speed up the purchase process. So, let’s better understand what conditional fields are and how they can help you take your store to the next level.
What are conditional fields?
Conditional fields are fields that have conditional logic so that when the condition is met another field appears or is hidden. To create conditional logic, you need at least one parent field and one or more child fields that depend on the values that the parent field takes. For example, if you offer your customers the possibility to pay with PayPal or credit card, you may want to display the credit card detail fields only if the users select the Credit Card option. If they want to pay with PayPal, those fields won’t appear. This way, you improve the user experience on your site and boost your conversion rates.
What is conditional logic?
You must have a clear idea of what conditional logic is before we start so let’s dig a bit deeper. When you create conditional logic you want the conditional field to do X if the condition is met or true, but do Y if the condition is false or not met.
if(condition){action}
Following our credit card example, we only want the credit card detail fields to appear if the customer selects the credit card payment option. This example is pretty easy but conditional logic can reach a higher level of complexity when you work with several field types and/or add multiple conditions and actions.
On the WooCommerce checkout page, you can set a condition for a single field. The value that the customer enters in that field will be checked against the settings and if the condition is met, the action would be to display the field.
To create conditional logic on the checkout page, you need to use at least two fields. A parent and its child. The field where the values are checked is called the parent field. And the one where you create the conditional logic to make it appear or not only if the condition is true is the child field. As we’ll see in this guide, a parent field can have multiple child fields and multiple conditionals applied to it.
How to add conditional fields to WooCommerce checkout
In this section, we’ll see how to use and add conditional logic and conditional fields to the checkout in WooCommerce. Creating useful conditional logic programmatically requires a lot of coding so we recommend you use a plugin. For this demonstration, we’ll use Checkout Manager.
This plugin allows you to add, customize, and delete different types of fields on the checkout page. On top of that, you can apply unlimited conditional validations using multiple custom fields on the WooCommerce checkout page. With more than 80,000 active downloads, it’s one of the best checkout plugins out there. It has a free version with basic features that you can download from here and three premium plans that start at 19 USD.

We’ve divided the post into different sections so you can jump directly to the section you’re interested in. Without further ado, let’s see how to add conditional fields to the checkout page in WooCommerce.
- How to create conditional logic
- Conditional logic with multiple child custom fields
- How to use multiple custom fields and chained conditionals
- What you can’t do when using conditional logic
1. How to create conditional logic
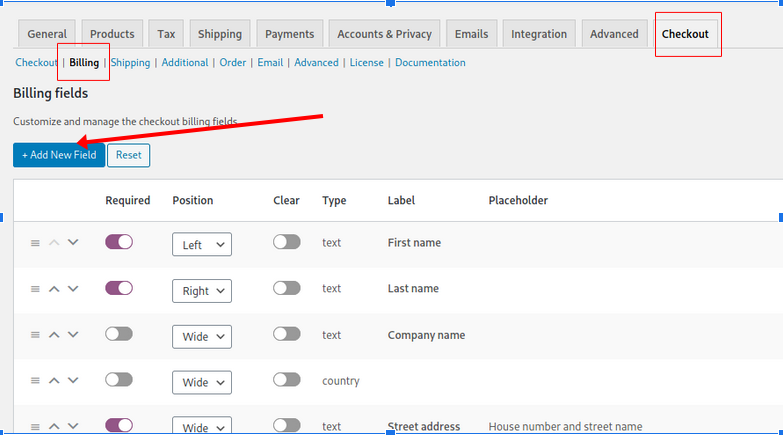
So, now that you have a clear idea of what conditional logic is and how it works, let’s see how to create a conditional logic field using the WooCommerce Checkout Manager plugin. Let’s create a condition to display a message when a user types “admin” as the first name in the billing form. To do that, first, go to WooCommerce > Checkout > Billing in your WordPress dashboard. There, press the Add New Field button.
A window will open. That’s the field editor of the new field. There, select Message as the type and fill out the options such as Label, Type, and Message. Additionally, select the First name as the parent field on the right column. Finally, write “admin” under the First Name and hit Save.
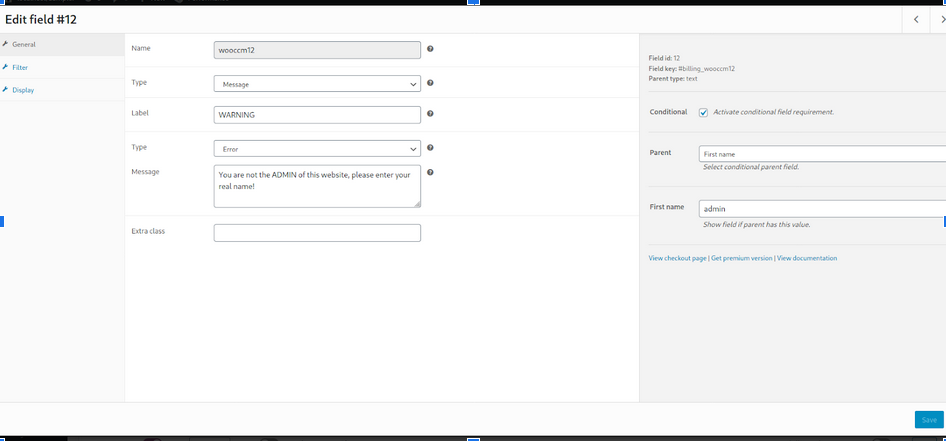
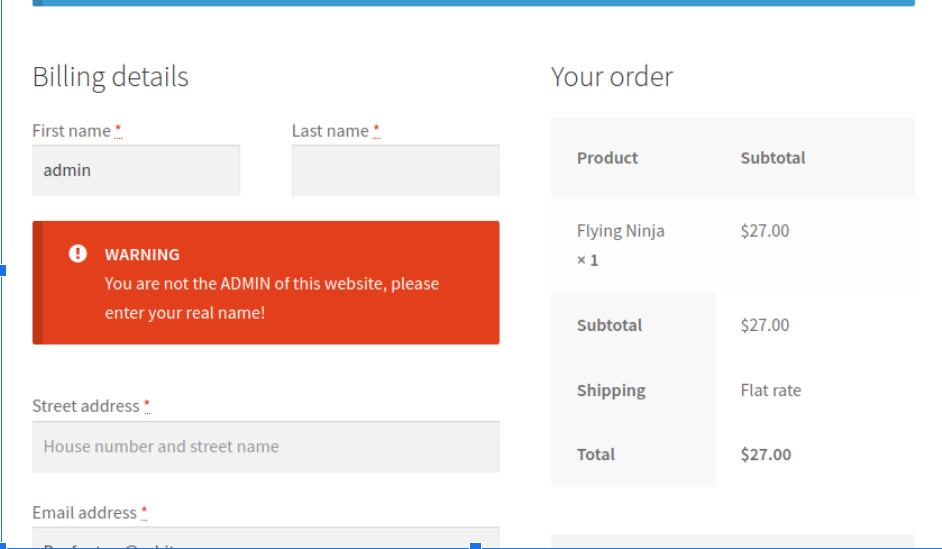
As you can see, we are setting the First name field as the parent field. Now it’s time to test it. So, go to your checkout page on the frontend and type “admin” in the first name field. You should see a warning message like this.
This is a simple example but conditionals can include many fields and things can get very complex when using many conditionals and custom fields. So, to manage them easily, you can see which field has a condition and the parent field in the field manager screen of the corresponding checkout form (Billing, shipping, additional).

That’s how you can add a conditional field to the checkout in WooCommerce using Checkout Manager. Now, let’s have a look at a more complex example. And of course, the best of all is that there is no limitation on how many custom fields can apply the same or different conditions to the same parent field.
2. Conditional logic with multiple custom child fields
Now, let’s say you want to give your shoppers the option to receive the products they’ve purchased in one of your distribution centers or to choose a standard delivery to a specific location. For this, you can use a radio type field so customers can choose one of the two options.
Create a new parent field
So, first, go to WooCommerce > Checkout and create a radio type field. For this example, we’ll call this field “Delivery”. 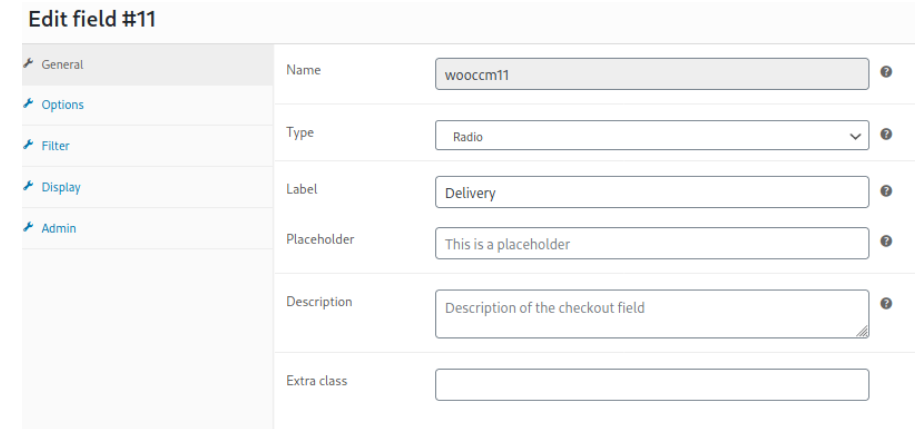 Then enter the Options. We’ll call them Takeaway and Delivery. Here, you can also select a price for each option and set one as the default one.
 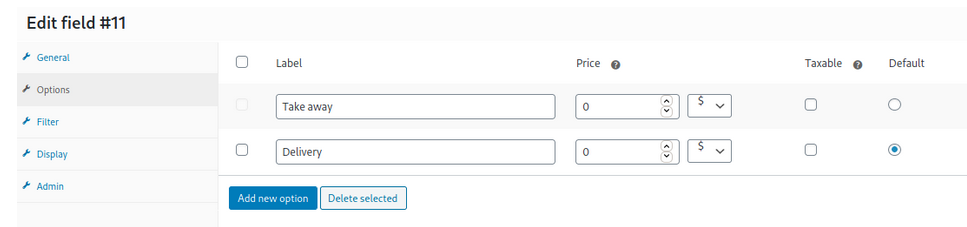 As we want to display different fields to the customers depending on the checkbox they select, we’re going to use some of the default WooCommerce checkout fields for the Delivery option. This way, shoppers can fill out their details to receive their products at an address that they choose. So, edit the default WooCommerce fields: state, city, postcode, and street address. Then, create the same conditional logic for each one of them. Additionally, we’ll create a conditional and select the radio field type Delivery as the parent field and display the State field if the users select the Delivery option.
 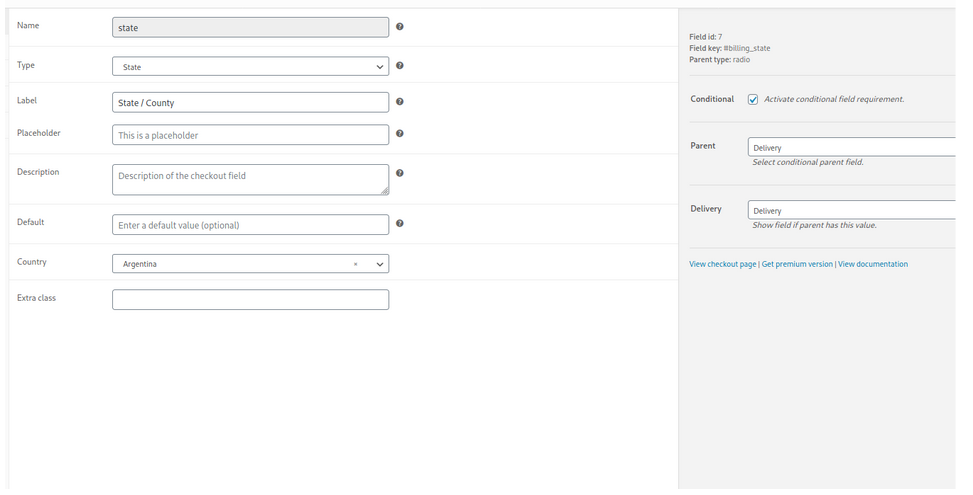 Of course, you can do the same for all these fields or some of them. In this example, we’ll create a conditional the following fields:
- billing_state
- billing_city
- billing_postcode
- billing_address_1
Create custom child field
Then, you need to create a new custom field that will appear when the customer selects the Takeaway option so you can send the product to one of the distribution centers. Once again, go to the plugin’s settings and create a Select field type. Activate the conditional checkbox, select Delivery as the parent, and call it Take away under Delivery. 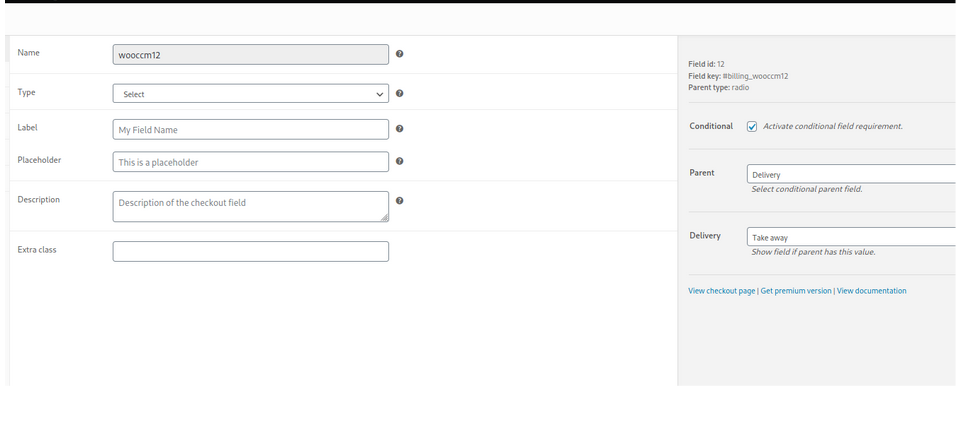 After that, you need to create the addresses for the distribution centers. So, go to the Options section and add a few addresses. Finally, save the changes. Now, it’s time to check the frontend. Go to the checkout page and select some of the options you have just created. For example, when the users select the Takeaway option, you can choose one of the distribution centers.
 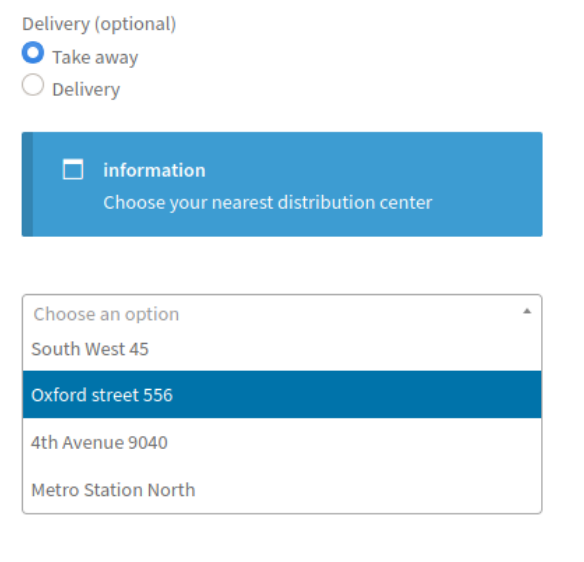 On the other hand, if they select Delivery, they have to enter the address where they want to receive their products.
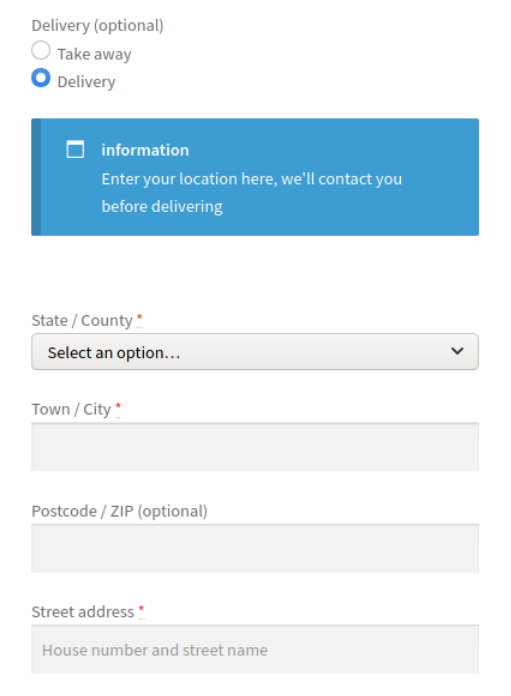 NOTE: We’ve added two more fields to display the informational message, one for each option, using the same conditionals we used in the other fields. Now you know how to add conditional fields to the WooCommerce checkout using more complex logic. However, you can take it a bit further and create even more complex logic. Let’s see how to create chained conditionals.
3. How to use multiple custom fields and chained conditionals
When you work with many conditionals that are related, things can get pretty complex. Chained conditionals are a great example of this. It’s when there’s a conditional applied to a field that has another conditional on a different field. To better understand it, you can think of a conditional with a sub-conditional, which has another sub-conditional, and so on. The hierarchy level of the conditionals and the number of custom fields that you can use is unlimited so you can create very complex logic with many dependencies.
Creating a chained conditional
So, let’s create a more complex example using chained conditionals. Let’s say you want to provide your customers with the option to add an extra package to their order. The options will be Paperboard, Gift, and Styrofoam. First, add a checkbox field type so the customer can ask for the Extra package. 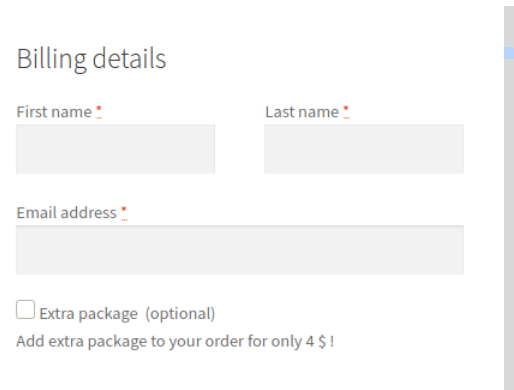 In the Price tab of the field editor, enter the price you want to add to the current order when the customer selects the Extra Package checkbox. Then, you need to work on the options of packaging you’ll offer your customers. We’ll allow shoppers to select more than one option so we’ll create a Multi-select field type. Add a label and select Extra Package as the parent field so your conditional logic looks like this:
  Then, go to the Options tab and create the options for your customers.
 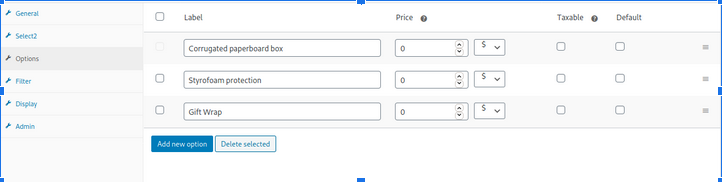 On this screen, you can set a different price for each alternative. Since we’ve already set the price when we created the checkbox field, we won’t use that option here. Once you finish that, it’s time to check the frontend. If everything works correctly, you should be able to select multiple options when checking the Extra packaging field:
  We’ve used a single conditional here to display a multi-select field. Now, let’s create a chained conditional with each of the options/values of the parent field.
Add multiple options
So, let’s pick the Gift wrap option and apply some conditionals. Let’s create a radio custom field and fill out the editor as follows. 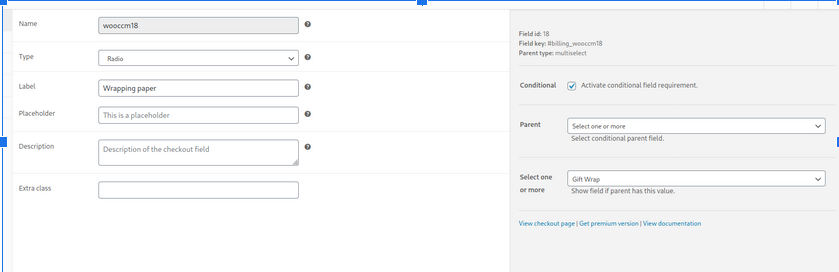 We are going to offer several paper prints for gift wraps, so we are going to use this field to let customers choose one of them. To do that, go to the Options section and set up the paper prints for the radio field. We’ve configured the options like this:
 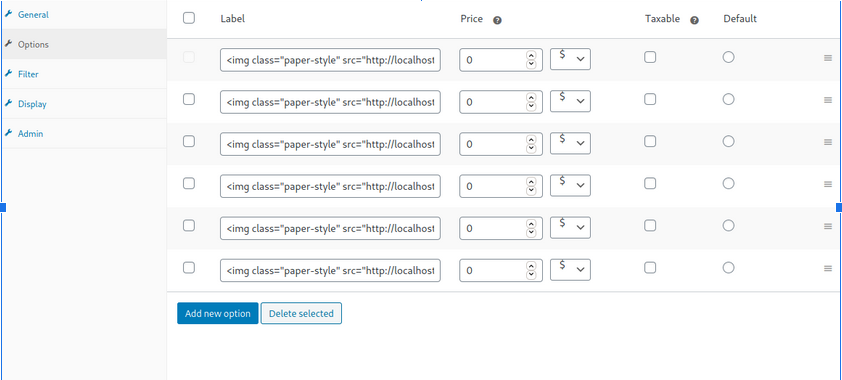 And on the frontend, you’ll see something like this:
  As we’re displaying gift wraps, it’s better to show images instead of text. To display images in each option, we’ve used some images that we had previously uploaded to the library. You can enter images for the label of each option with the following code:
 <img class=”paper-style” src=”#path of your image url”> So far, you’ve created a chained conditional logic that includes two levels and two conditions that depend on each other. Extra packaging ->(condition 1)-> Packaging type ->(condition 2)-> Gift Wrap
Adding another conditional level
Let’s take things a bit further and add a new level of conditional. In the last screenshot, you’ll see that there is a new field called Gift Card to give users the option to add a dedicated gift card to the package. For that, we’ll charge an additional $4. On top of that, we are going to use a conditional to display a new custom field and let users enter the text they want to print on the gift card. So, let’s create a new checkbox field and set it up as follows: 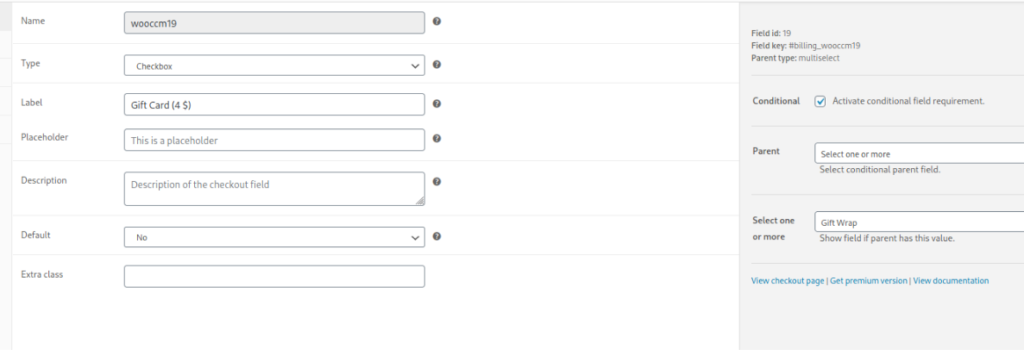 You can see how we are referring to the same parent field, and using the same condition that we used for the Gift Wrap in the previous step. Then, add a text area so users can type the text they want to see in the gift card and configure it like this:
 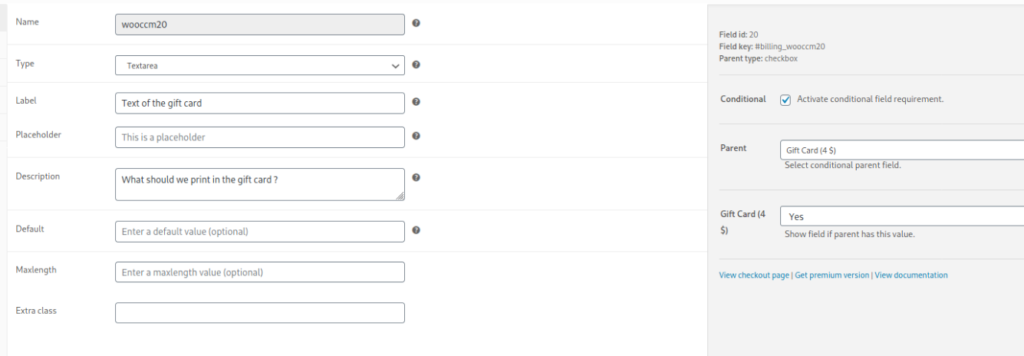 This is the last conditional. It has the Gift card custom field as the parent field and the Text of the gift card as the child field. So now, when shoppers select the Gift card option, they’ll see this:
 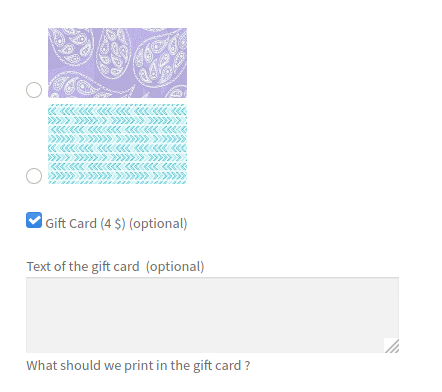 And that’s how you create complex logic and add several conditional fields to the checkout page in WooCommerce. We’ve chained three conditionals and several custom fields in this order: Extra packaging ->(condition 1)-> Packaging type ->(condition 2)-> Gift Wrap ->(condition 3)->Gift Card
4. What you can’t do when using conditional logic
Use fields from different forms
In WooCommerce, conditional fields must refer to a parent field located in the same form. There are three forms on the checkout page: Billing, Shipping, and Additional forms. Each of them works as a separate form and can’t have conditionals that depend on fields from another form.
Conditional on fields with no value (button, heading, messages)
You can’t use buttons, messages, and heading field types as parent fields because they don’t have any value to check if the condition is met.
Edit the fields’ IDs or names
To grant proper integration with WooCommerce, you can’t edit the field names and IDs. This applies to both the default WooCommerce fields and any custom fields that you add.
Trigger a different action other than displaying/hiding a field
In WooCommerce, conditionals fields can do a single action: display the specified field when the condition is true. This means that, unfortunately, you can’t add a discount, a product, edit the order, or do any other action when the condition is met.
Apply conditionals to fields values outside the checkout
Finally, conditionals can only check the values of another checkout field on the same form. So, you can’t check conditions that check product quantity, total price, user role, or anything else that’s not a checkout field value.
Conclusion
All in all, conditional logic can help you improve user experience and boost conversion rates on your site. That’s why adding conditional fields to your WooCommerce checkout is a great way to take your store to the next level.
In this guide, you have learned how to create and set up additional fields using the WooCommerce Checkout Manager plugin. We’ve added custom fields and created both simple conditional logic as well as more complex examples with chained conditionals. Finally, we had a look at the limitations of conditional logic in WooCommerce.
Here, we’ve seen a few examples but that’s just the tip of the iceberg. There are a lot of things you can do with conditional fields to improve your checkout. So, we recommend you create custom fields and play around with the conditional.
For more information on how to make the most of your checkout, you can check out our guide to optimize the WooCommerce checkout and our tutorial to disable the postcode validation. Let us know if you have any questions or doubts to add conditional fields to the checkout. We’ll be happy to help you out!

When I try to set a conditional field with ‘message’ as the type, ‘message’ is grayed out in the drop down box. I can make a ‘text’ type field and have it pop up when the condition is met in the parent but I need a message to pop up not a field. Can you help with this. Note: ‘button’ is also grayed out but I have all the other options in the list.
Hi Debbie
inputs fields may look different depending on the browser you use. Also, any other undesired styling might come from your WP theme.
Cheers!
For example, if I create a radio field with the options “pickup” and “delivery”, I need that when selecting “pickup” it shows me the delivery method “local_pickup:x” and if I select “delivery” it loads me for example “flat_rate:x”… I have been looking for the solution and I have not been able to achieve it.
Hi Fransisco.
You must be doing something wrong, this is precisely what’s explained in the post.
We have two shipping options and one courier do not ship to PO Boxes. We are looking for a way to add a checkbox below the address section “Click here if you are shipping to a PO BOX”
If the customer ticks the box then a shipping method will be hidden.
Can Checkout Manager facilitate this?
Hello mate
I’m afraid our plugin cant hook in to the shipping methods
We provide in person training and use the website for registration, creating WC products for each course. If a company representative selects a course and selects quantity of 5 (they want to register 5 of their people), can we use this to capture Name/Email/etc for each of the 5 participants? Further, can WC take info from these fields and generate “you’ve been register for..” for each of the registrants?
Dear Sebastopolys
Can I have a condition so that a child filed to display, only if someone entry ANY value to parent field?
That is i.e.Q
Parent: [Give your Name]
Child: [Give your Last name]
Child must appears only when somenone writes his/her name in Parent field.
How can that be achieved?
Thank you in advanced
Best
John
Hi Jhon
I’m afraid plugin can’t apply a condition if parent field is not empty.
This will work only for specific values of field
Regards
Hello,
I am looking for a way to setup an extra checkout field with a checkbox, to select wether you want an extra service added to certain products or categories. The service includes a fee, and the fee is fixed, but must be multiplied with the number of products in the basked, of the particular products or category.
Please let me know if this is possible with the plugin “Checkout Manager”!
Best regards,
Kjeld
Hello mate
I’m afraid this is not possible with our plugin
But you can add an extra fee to each product trought the woocommerce settings
Kind regards
I am trying to exclude certain SKUs, in our case flammable sunscreen sprays, from being ordered to PO Boxes. All other products we are perfectly happy shipping to PO Boxes, just the sprays.
Can your plugin achieve that and if so how? Thanks in advance!
Hi there, tanks for passing by
I’m afraid plugin cannot do what you need.
You’ll need to apply a custom solution.
Hello, There are ways to select the elements of each accordion, close the current one and open the next one, like a wizard!
Hello,
Is it possible with conditional fields if company name is “test” different fields to be shown at checkout?
Thank you for your time.
How to detect the conditional with the datepicker? What string should be use?
Hello – is it possible for a conditional field to appear depending on what product is in the basket? For example, we sell both tickets for events and normal products that get shipped out. If a customer has added a course, can we add a custom conditional field to the checkout that asks for dietary requirements and the name(s) of attendees?