How to Add Custom Code to WooCommerce
Setting up code snippets and configuring WooCommerce files can be confusing for beginner users. Additionally, making mistakes with these files can have terrible results and even crash your site. This is why in this guide, we’ll show you different methods to add custom code to WooCommerce.
We’ve previously seen how you can manually customize your store. Whether it is your Shop page, My Account page, Cart Page, or product pages, you can manually customize them by adding custom code. You can also use code to configure various elements of WooCommerce to personalize the shopping experience and stand out from your competitors. All this requires adding code snippets to your website.
Before we look at the different methods to do so, let’s see some of the main benefits of learning how to add custom code.
Why add and customize code in WooCommerce?
One of the key features of WooCommerce is its customizability. With its already diverse and flexible options as well as various plugins and addons available, WooCommerce stands out as one of the most customizable eCommerce platforms. However, there are several requirements you need to follow to add custom code.
Whether it is to change the Proceed to checkout text, remove Add to Cart buttons, or change the appearance of your site, you’ll need to use custom functions and use WooCommerce hooks. Developers and anyone familiar with coding skills know how important it is to be able to add snippets the right way. This allows you not only to edit your store but also add functionalities to it. The good news is that open-sourced nature of both WooCommerce and WordPress makes it a much more approachable process.
WooCommerce fully endorses its users to customize its code, although this process involves editing core files which has some risks.
We’ve previously seen many guides on how to configure various elements and files using code snippets. This time, we’ll focus on the first part of that process and see different methods to add custom code to WooCommerce the right way.
How to Add Custom Code to WooCommerce
There are different ways to add code snippets to WooCommerce:
- With the In-built WordPress Theme Editor
- Using a dedicated plugin
- Using FTP to access Theme Files
- By configuring WooCommerce Template files
- By creating a new custom plugin
Let’s have a look at each method step-by-step.
NOTE: All these methods require editing core files which involve some risks. That’s why before you start, it’s a good idea to backup your site.
1) Add Custom using the In-built WordPress Editor
The default method to add custom code to WooCommerce is by using the in-built theme editor. You can access the functions.php and add PHP code directly to it. However, if there are mistakes in the code or you delete parts of the code, your website may be seriously affected. That’s why we recommend using a child theme and adding an extra layer of security.
To open the functions.php file in your Theme Editor, go to Appearance > Theme Editor on your dashboard. Then, click on functions.php on the Theme Files sidebar towards the right.

Adding Custom Code to the functions.php file
Now, you can add custom code to WooCommerce from the Theme Editor. For this demo, we’ll change the default “No products in the cart” text for “Your Cart is currently empty, we recommend checking out our featured products!”:
remove_action( 'woocommerce_cart_is_empty', 'wc_empty_cart_message', 10 );
add_action( 'woocommerce_cart_is_empty', 'quadlayers_empty_cart_message', 10 );

function quadlayers_empty_cart_message() {
$html = '<div class="col-12 offset-md-1 col-md-10"><p class="cart-empty">';
$html .= wp_kses_post( apply_filters( 'wc_empty_cart_message', __( 'Your Cart is currently empty, we recommend checking out our featured products!', 'woocommerce' ) ) );
echo $html . '</p></div>';
}
Simply paste this script in your Theme Editor and Update the file to apply the changes.

Check out the front end and you should see something like this:
![]()
Adding the code is one thing, but it’s also important to understand how the code works.
The above code adds a custom WooCommerce hook that applies a certain action to replace the default Empty Cart Message with a custom message that we’ve added to the code. To change the text, simply replace the text message in this line:
$html .= wp_kses_post( apply_filters( 'wc_empty_cart_message', __( 'Your Cart is currently empty, we recommend checking out our featured products!', 'woocommerce' ) ) );
If you want to learn more about customizing your “No Products in the Cart” message and make the most of it, check out this full guide.
As mentioned before, adding code this way is quick and easy, but it involves a fair number of risks. For example, using the wrong code might break or crash your website. Additionally, there may be compatibility issues with your custom code which can affect some functionalities, plugins, or themes. Moreover, if you add your code to the function.php of the parent theme and then you change or update your theme, you may lose the custom code that you’ve added.
This is why, if you’re a beginner, we recommend you try the second method and use plugins to add custom code to WooCommerce.
2) Add Code using Plugins
Using a plugin is more beginner-friendly when it comes to adding snippets. You can easily control what bits of code you enable on your website and any code you add will be saved even if you change your theme. Additionally, you can activate or deactivate any code at any point.
For our demo, we’ll be using the Code Snippets plugin. It’s one of the most popular plugins to add custom code to any site.
First, install the plugin by opening your WP Admin Dashboard and going to Plugins > Add New. Use the search bar on the top right and search for Code Snippets. Then, click Install and finally activate the plugin.
After activation, you are ready to add code and customize your WooCommerce store. Go to Snippets > Add New to add new code.

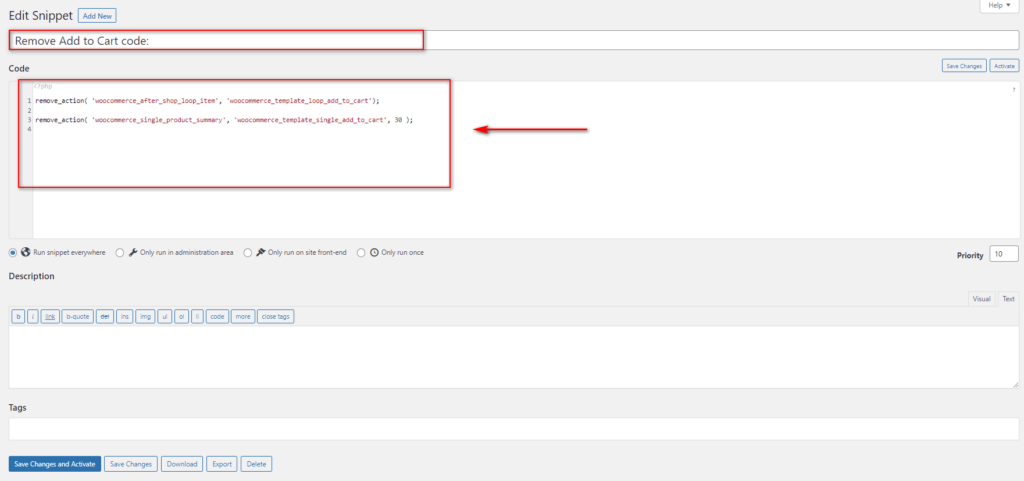
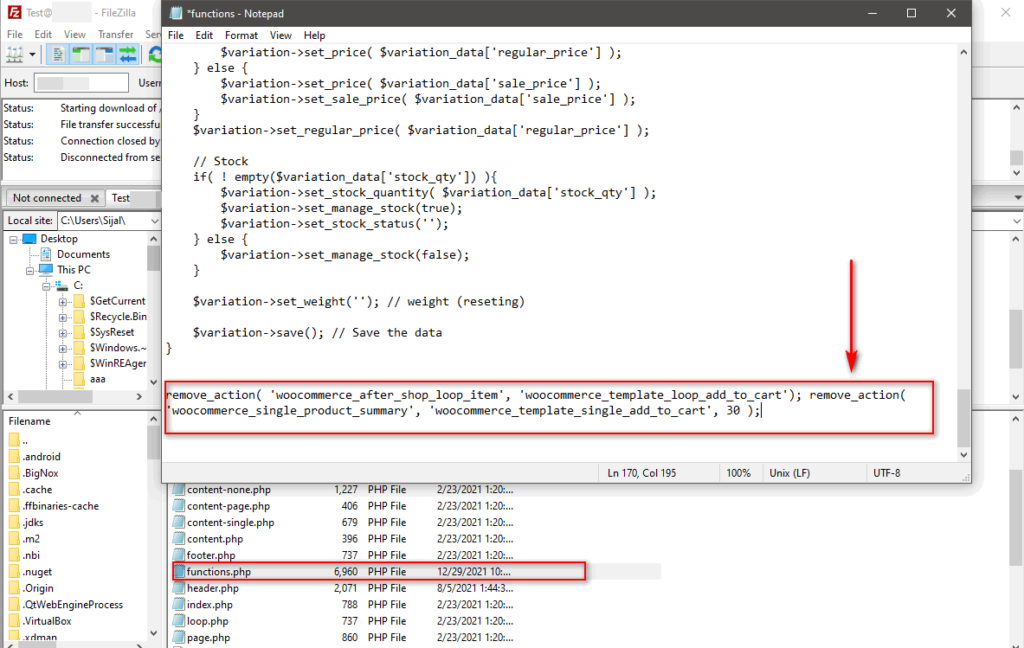
Name your code snippet and add your code to the Code section. For the demo, we’ll use the code below to hide the Add to cart button.
remove_action( 'woocommerce_after_shop_loop_item', 'woocommerce_template_loop_add_to_cart');

remove_action( 'woocommerce_single_product_summary', 'woocommerce_template_single_add_to_cart', 30 );
After that, you can decide whether you want to run the code on your whole website or choose between running it on the back-end or the front-end only. Alternatively, you can run this code only once.
Similarly, you can also choose to set a priority for your code and add a snippet description as well as tags.
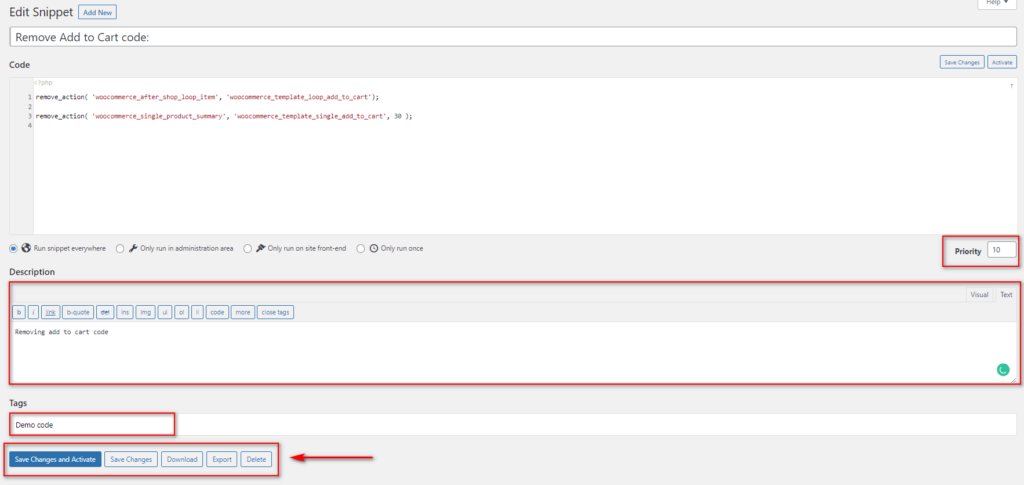
Once you set up all the details, click Save Changes or Save Changes and Activate to add your new code.
If you want to deactivate or activate your code individually, go to Snippets > All Snippets and you can individually disable or enable any of your snippets.
3) Add Custom Code Using an FTP client
If all of these options aren’t available to you and you need to add custom code to your WooCommerce store manually, you may have to do so by using an FTP client. There are several tools out there, but for this tutorial, we’ll use FileZilla.
NOTE: We do NOT recommend this method if you aren’t used to using an FTP client or configuring your server and its files. Moreover, this might require access to your cPanel and FTP. Messing up these files can have severe effects on your website, so we highly suggest you stick with the above methods if you want less risk involved in adding custom code to your site.
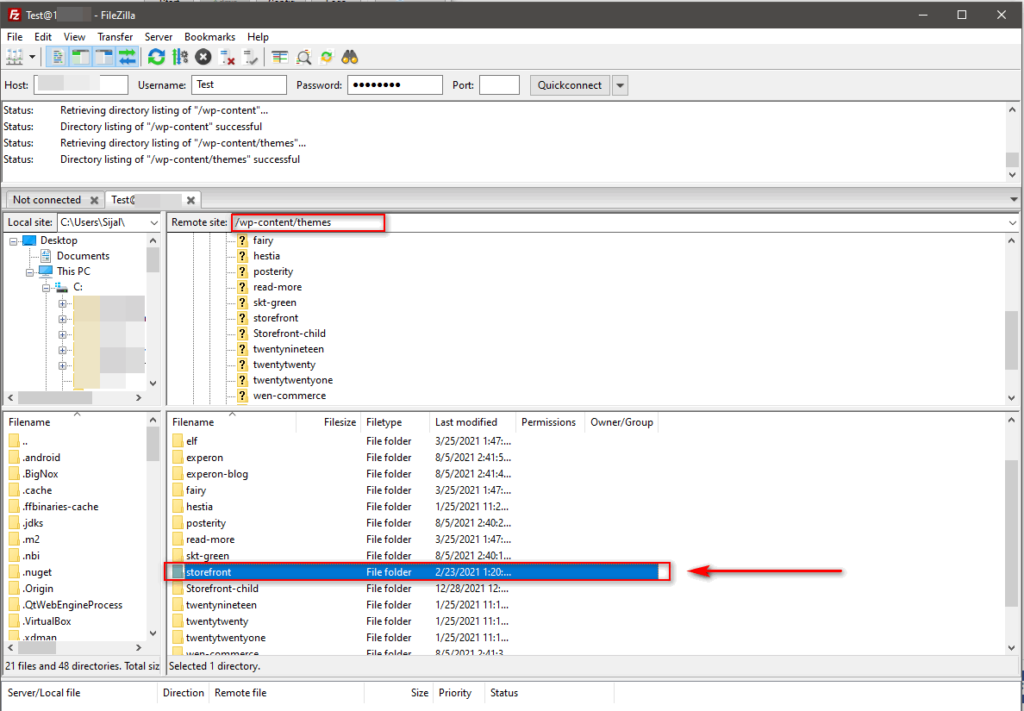
First, open FileZilla or your preferred FTP client and connect it to your website. Then, locate your theme files in your website’s directory. These are normally in the /wp-content/themes directory in your server. Click on the folder of your current theme or the child theme that you may be configuring.
Open your theme’s folder, right-click on the functions.php file inside it, and then press View/Edit.
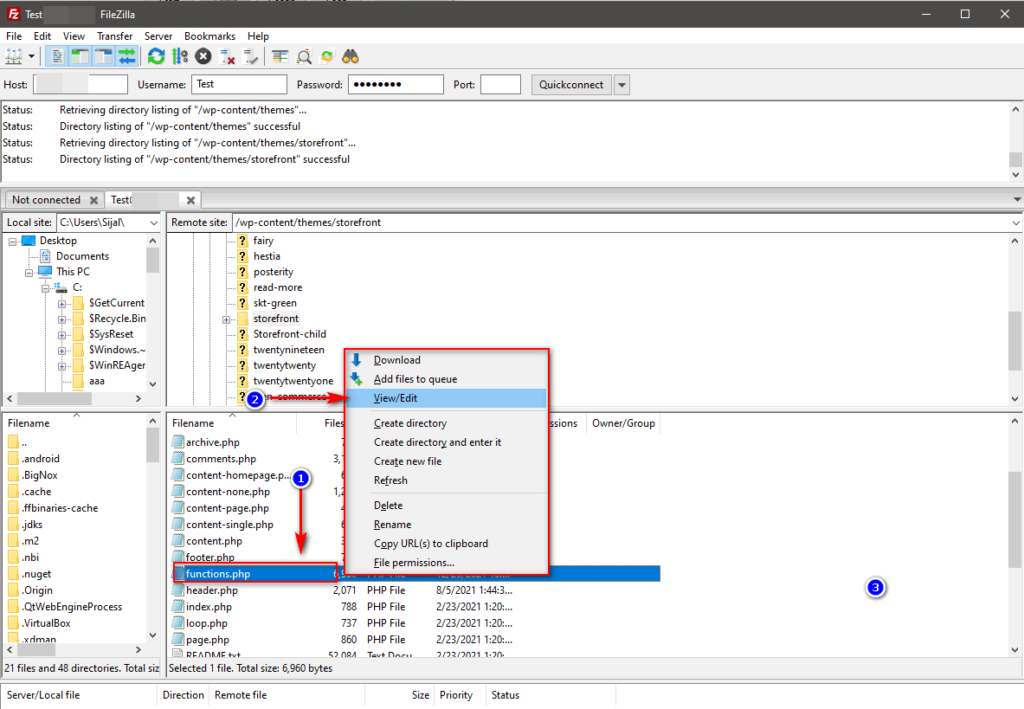
Here, using the file editor, you can paste the code at the end of the file and save it. For this, we’ll use the same code as above to hide the Add to Cart button:
remove_action( 'woocommerce_after_shop_loop_item', 'woocommerce_template_loop_add_to_cart');

remove_action( 'woocommerce_single_product_summary', 'woocommerce_template_single_add_to_cart', 30 );
Another interesting alternative to add code is to customize WooCommerce template files.
4) Add Code by Customizing the WooCommerce Template files
Editing templates is one of the fastest ways to configure all the elements of your WooCommerce store and all its pages. This includes your Checkout page, Product page, Shop page, and many others.
The good news is that you can edit the WooCommerce template files in a similar as above by using the in-built WordPress plugin editor. To access it, on your admin dashboard, go to Plugins > Plugin Editor.
Then, use the Select Plugins drop-down on the top right, choose WooCommerce, and click Select.

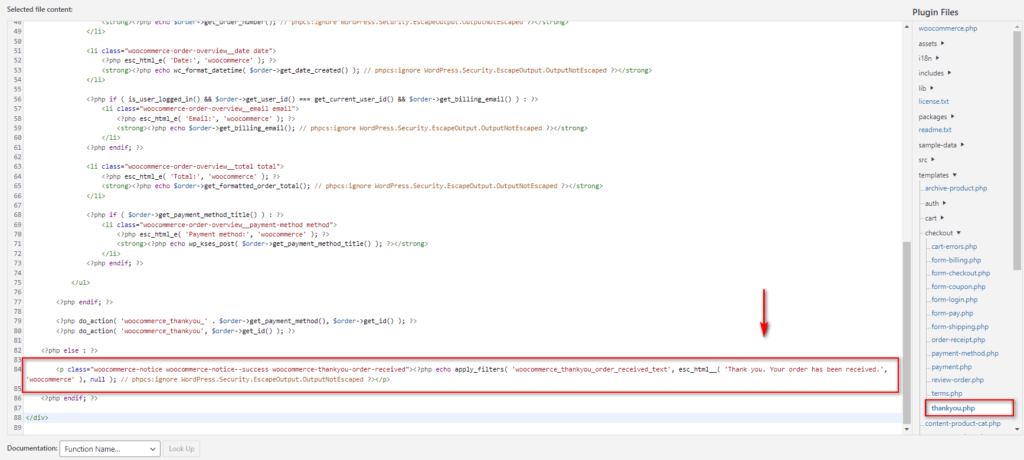
This will update the Plugin Files list below that you can use to configure WooCommerce files and templates. For our demo, we’ll edit the Thank you page of the checkout. So under the Plugin Files list, select Checkout > thankyou.php.
Then, scroll down and change the Order received text by replacing the text in this line:
<p class="woocommerce-notice woocommerce-notice--success woocommerce-thankyou-order-received"><?php echo apply_filters( 'woocommerce_thankyou_order_received_text', esc_html__( 'Thank you. Your order has been received.', 'woocommerce' ), null ); // phpcs:ignore WordPress.Security.EscapeOutput.OutputNotEscaped ?></p>
For example, to change the Order received message to something like “Thank you for purchasing from us. You will receive the mail soon regarding the instructions.”, paste this code:
<p class="woocommerce-notice woocommerce-notice--success woocommerce-thankyou-order-received"><?php echo apply_filters( 'woocommerce_thankyou_order_received_text', esc_html__( 'Thank you for purchasing from us. You will receive the mail soon regarding the instructions..', 'woocommerce' ), null ); // phpcs:ignore WordPress.Security.EscapeOutput.OutputNotEscaped ?></p>
Here we’ve just updated the hook text to something more fitting for our needs. Once you’re happy with the changes, press Update File.
If you want to learn more about configuring template files, check out our guide on how to customize WooCommerce template files.
5) Add Code by Creating a New Custom Plugin
Creating an entirely new plugin is also an option when it comes to adding custom codes to WooCommerce. This is a bit more advanced user option and we recommend you to use this method only if you want a certain feature attached to a stand-alone plugin. In this way, you can always choose to activate/deactivate the plugin whenever a certain feature is required or not required respectively.
Moreover, this can be a great solution if you have to manage multiple sites too. You can just attach a feature to the sites with the plugin instead of manually adding the code to them.
In addition, WordPress itself makes it quite easy to create and use new plugins. All you have to do is simply create a new plugin folder in your website’s directory and add a few codes to its PHP file. Firslty, you need to connect to your website using FTP first. We’ll be using Filezilla for our guide but the process should be similar for any other FTP client.
Before you start, however, we highly suggest you backup your website.
Creating New Plugin Folder to add Custom Code to WooCommerce
After you have connected your website with the FTP, open your site’s director. Then, navigate to your /wp-content/plugins folder.
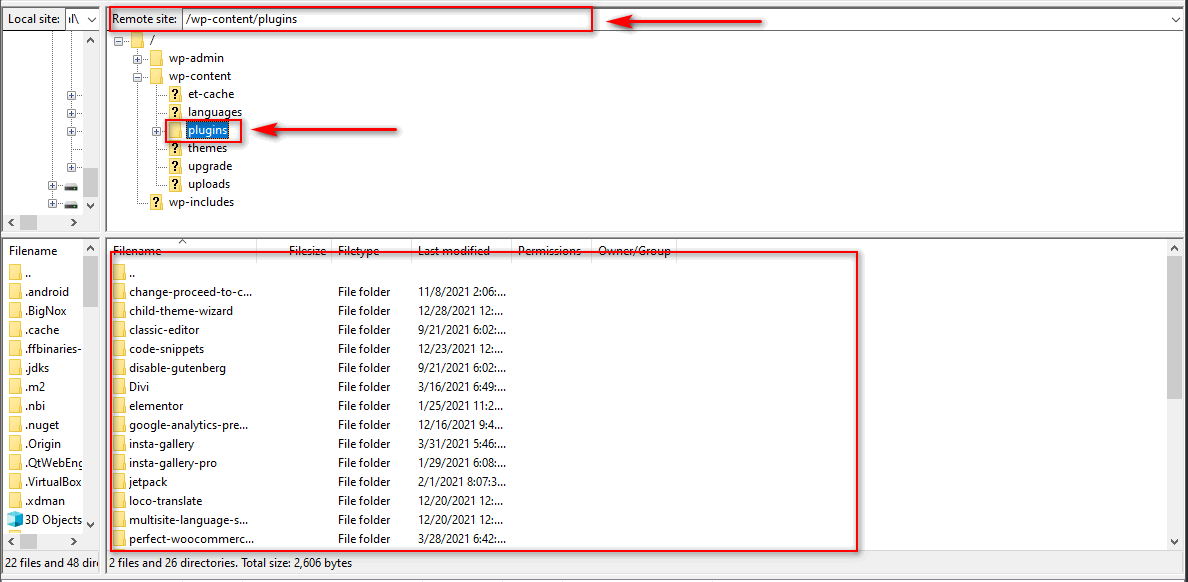
Now, create a new directory in the plugins folder and name it according to your code and expand it. For our demo, we’ll name it Remove-Add-To-Cart.
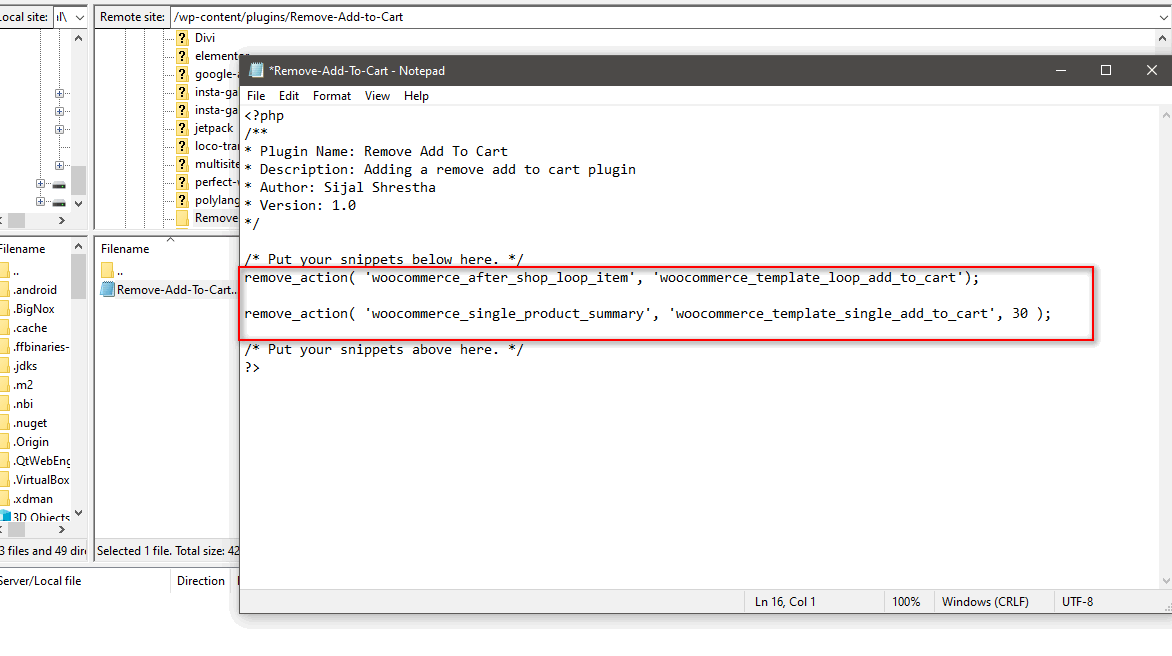
Then, right-click on the folder to click on Create new file. Here, you need to create a .php file with the same name as your folder. So, we’ll name our file Remove-Add-to-Cart.php.
Once the file is created, go ahead and open it by right-clicking on it and clicking on View/Edit.
Next, we’ll add a few lines of code to add plugin name, description, and author name to it:
<?php
/**
* Plugin Name: Remove Add To Cart
* Description: Adding a remove add to cart plugin
* Author: Sijal Shrestha
* Version: 1.0
*/

/* Put your snippets below here. */
/* Put your snippets above here. */
?>
Adding custom code to the new plugin
Now, you can start adding your custom code to the plugin. You need to add in your custom code between the /*Put your snippets here */ section. As a reminder, these lines are simply comments so they won’t affect your code and you can remove them if you’d like.
<?php
/**
* Plugin Name: Remove Add To Cart
* Description: Adding a remove add to cart plugin
* Author: Sijal Shrestha
* Version: 1.0
*/

/* Put your snippets below here. */

remove_action( 'woocommerce_after_shop_loop_item', 'woocommerce_template_loop_add_to_cart');

remove_action( 'woocommerce_single_product_summary', 'woocommerce_template_single_add_to_cart', 30 );
/* Put your snippets above here. */
?>
Next, save your file and you should see that the plugin is listed on your WP Admin Dashboard under the Plugins page.
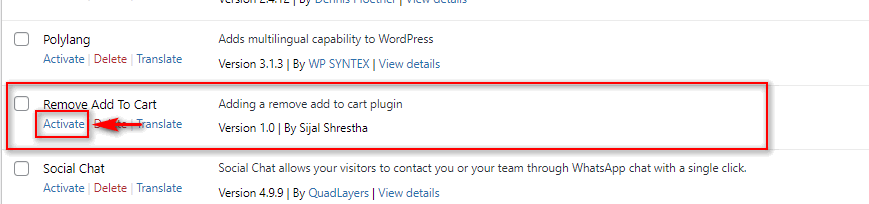
Activate the plugin and your custom code should run perfectly. You can also zip the plugin folder if you’d like and use it to install it on different websites. Simply download the folder from your FTP client and compress the folder.
Then, you can use this zip to install your plugin on any website. If you need more help on it, we also have a detailed to install a WordPress plugin manually.
Which method should you use to add custom code?
We’ve seen different methods, but what’s the best one to add snippets? While using an FTP client and manually accessing your files can be quite quick and easy, there can be significant risks involved when adding custom codes this way. That’s why to minimize risks, we recommend using a dedicated custom code plugin instead, especially if you don’t have advanced coding skills.
This method is a lot less risky and it can have additional advantages such as:
- Being able to keep track of different codes and enabling/disabling them whenever you want
- Adding conflicting code and enabling/disabling them alternatively if needed
- Checking for compatibility with the theme/installations
- Easier to debug and recover from issues
Using a dedicated plugin to add custom code to WooCommerce provides you with an easy way to configure your hooks while minimizing possible issues. However, if you want to ensure that your newly added code doesn’t cause issues or crash your website, we recommend you have a look at the following tips.
Best practices when adding custom code to WooCommerce
1) Using Child Themes
Using a child theme is one of the first things we recommend if you are going to add custom code to your functions.php file. Regardless of the code you edit or add, with a child theme you ensure that you will be able to revert any changes at any time without modifying your core theme files.
Additionally, an important thing to consider with code changes and modifying stylesheets is that if you were to update your WordPress theme you may lose all the changes. This is because your funcitons.php file will be overwritten with a theme update and remove all your custom code. This is why adding code to the parent theme isn’t a recommended practice.
With a child theme, you make sure that you won’t lose your customization even after you update your parent theme. Additionally, if your theme breaks you can always revert your changes and start all over again.
You can either create a child theme programmatically or use a dedicated plugin. In this section, we’ll show you how to create a child theme using a plugin since it’s an easier process.
Creating a Child theme using a plugin
Creating a child theme using a plugin is a straightforward and beginner-friendly process. There are many plugins that you can use. For this demo, we’ll use Child Theme Wizard.

First, open your WP Admin Dashboard and head to Plugins > Add new. Then, use the search menu on the top right to search for Child Theme Wizard. Click Install and then press Activate once the button switches.
You can then access the plugin’s features by clicking on Tools > Child Theme Wizard.
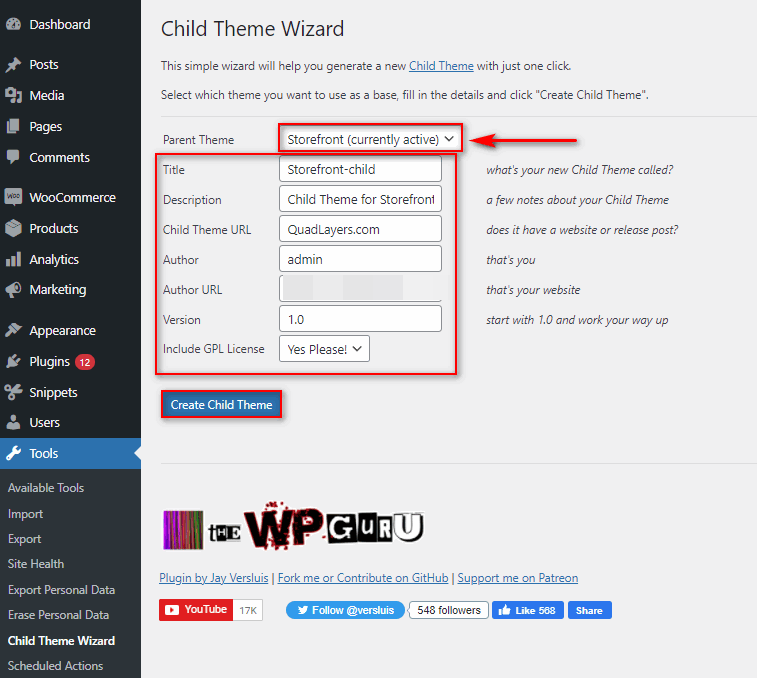
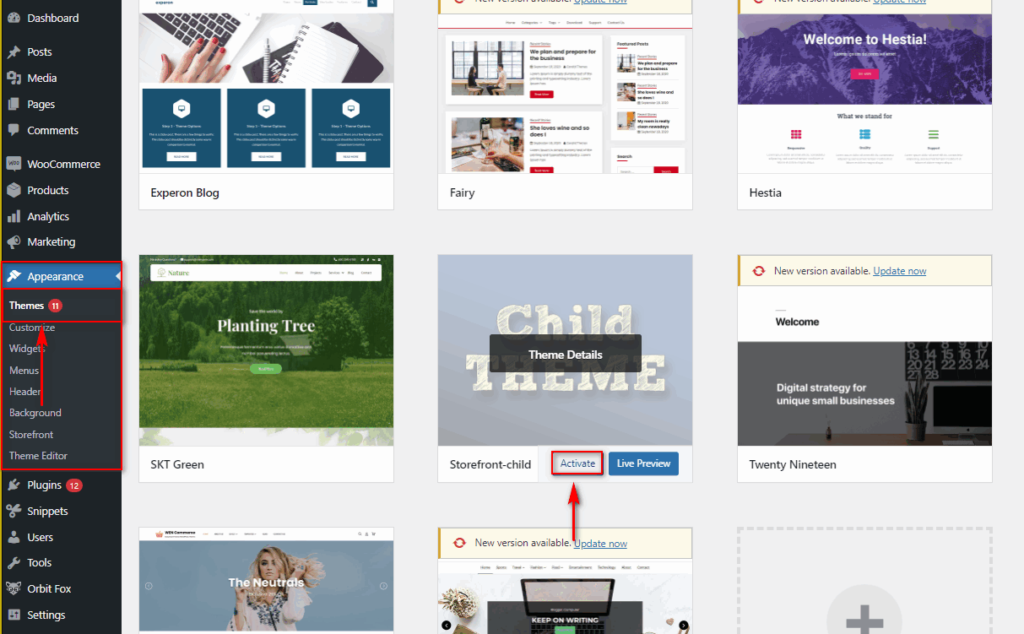
To create a new child theme, use the parent theme field to choose the theme you’d like to make a child theme for. For our demo, we’ll use the Storefront theme.
Then, add details such as Title, Description, URL, and more. Once you’re done, click Create Child Theme and you should be done.
Now switch to your child theme by navigating to Appearance > Themes on your sidebar and pressing Activate on your newly created child theme.
That’s it! Now you can freely add your custom code to your function.php file under the newly created child theme.
2) Using WordPress Backup plugins and setting up backups
One of the most important things to do when modifying any WordPress/WooCommerce file or changing any of the files in your installation is setting up backups. While WooCommerce is quite flexible, incompatible or malfunctioning code can create severe issues.
In some cases, it may crash or even break your website and cause downtime for your WooCommerce business. This is why we highly recommend you create regular backups. So before adding any custom code to your site, remember to create a backup that you can come back to in case things go wrong.
For more information about this, check out our dedicated guide on how to create backups in WordPress.
3) Learning about how the code work and how WooCommerce hooks and functions are used
Most of the custom code for WooComerce uses hooks to perform certain actions or change certain elements. That’s why it’s a great idea to learn how these filters work and how they’re applied to your website before your custom code. Not only does this prevent you from using an incomplete or malfunctioning code but also ensures that you can customize it so it works better for your needs.
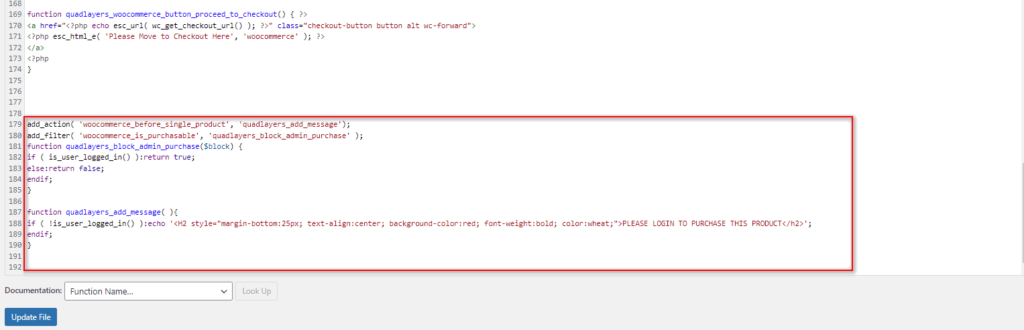
For example, let’s have a look at this snippet that disables purchasing if you’re not logged in:
add_action( 'woocommerce_before_single_product', 'quadlayers_add_message');
add_filter( 'woocommerce_is_purchasable', 'quadlayers_block_admin_purchase' );
function quadlayers_block_admin_purchase($block) {
if ( is_user_logged_in() ):return true;
else:return false;
endif;
}
function quadlayers_add_message( ){
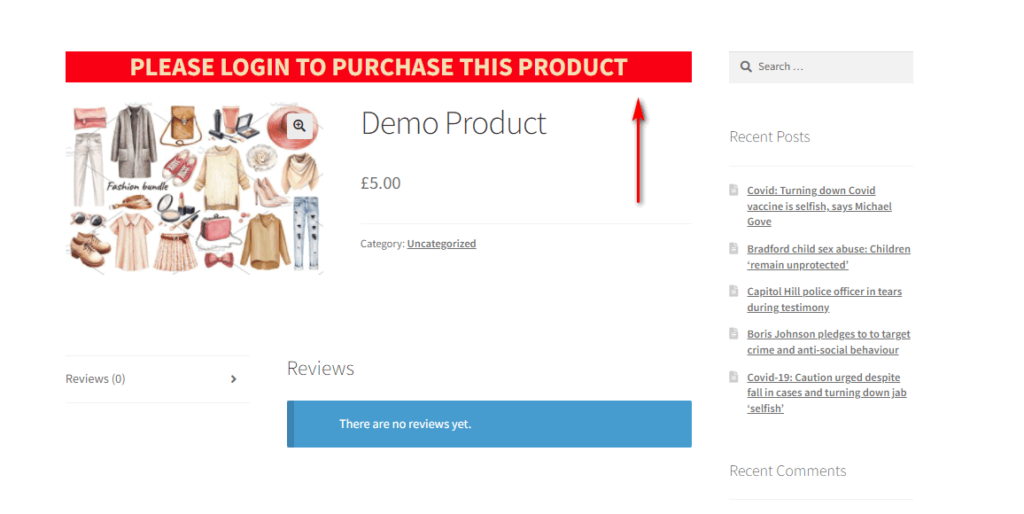
if ( !is_user_logged_in() ):echo '<H2 style="margin-bottom:25px; text-align:center; background-color:red; font-weight:bold; color:wheat;">PLEASE LOGIN TO PURCHASE THIS PRODUCT</h2>';
endif;
}
This is how the WooCommerce hooks work here:
- The action hook is used to print a message using the function QuadLayers_add_message function whereas the filter hook uses the quadlayers_block_admin_purchase function to disable the Add to Cart button
- An IF statement is used in both these functions to check whether the user is logged in or not
- The woocommerce_is_purchasable hook is applied if the conditional IF statement returns true
- We’ve also applied some additional CSS to change the text styling of the message as well as adding custom colors
Let’s go ahead and add this to the function.php file of our child theme:
This gives us this result on the front end:
If you want to learn how WooCommerce custom code works, check out our guide on how to use WC hooks.
Conclusion
In summary, learning how to add custom code to WooCommerce can be a key part of customizing your shop experience. The more things you customize, the more you can stand out from your competitors. By adding code snippets, you remove avoid having to rely so much on plugins and have more flexibility.
In this guide, we’ve seen different methods to add code snippets:
- By using the in-built theme editor to edit functions.php file
- With a dedicated WordPress plugin to add custom code snippets
- Using FTP to access function.php file manually
- Using the plugin editor to manually edit WooCommerce templates
- Using FTP to create a new plugin with the custom code.
All these methods allow you to easily customize and configure your WooCommerce website. All these methods require a basic level of coding skills, but using a plugin is the most beginner-friendly method. Editing the functions.php file from the in-built editor is easy but it has some risks that you need to be aware of. The same applies if you want to directly customize the WooCommerce template files. Finally, using an FTP client is a slightly more advanced method as it requires certain knowledge to configure server files.
Have you added snippets to your WooCommerce store? Which method did you use? Do you know of any other ways that we should add? Let us know in the comments section below!
Finally, if you’re looking for additional code snippets and ways to customize your store programmatically we’ve got something for you. If you liked this guide, check out these articles that will help you make the most of your WooCommerce store:
