
How to Add Custom Product Tabs in WooCommerce
Do you want to add custom product tabs to your WooCommerce Product page? You have come to the right place. In this article, we will show how to show custom product tabs on the product page of your online store.
But before we dive into that, let’s better understand what product tabs are and why you may want to add a custom product tab to your WooCommerce product page. Let’s begin with the basic idea of product tabs in short.
What are Product Tabs in WooCommerce?
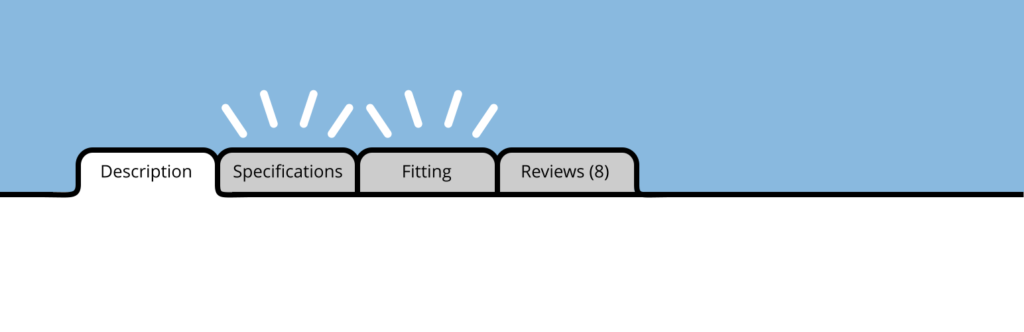
Product tabs help organize the product page by grouping similar information into one or more tabs. Each individual tab holds a particular set of data and is separated from the rest of the product details. That way, the information becomes easily accessible, less cluttered, visually pleasing, and easy to follow.

Most of the products these days have a lot of essential information that must be communicated to the shopper. But, accommodating all that information in a single place can be tricky. That’s why you will often see multiple product tabs on product pages like a short description, long description, technical specs, reviews, and more.
I hope this gives you an idea of product tabs. Now, let’s have a look at some of the reasons why you may need to add custom product tabs in WooCommerce.
Why Add Custom Product Tabs in WooCommerce?
Above, we have seen that product tabs are a great means of organizing product information. However, the default tabs don’t have enough space to fill in all the additional information. What if you want to include a long description, technical specifications, datasheets, video tutorials, etc.? You will find it hard to organize all that information with the default tabs.
However, by adding a custom product tab for each set of information, you can organize the product details in a much better way. It also gives you the freedom to add all the necessary info without worrying about filling up the page and overwhelming the user.
On the customer front, product tabs make it easier for the shoppers to spot the information they are interested in and ignore the rest. For example, a regular user might not be interested in the detailed technical specifications and will suffice from the product description and long description. However, a tech-savvy person will be more interested in the technical specs and datasheets which make it easier for them to find their required information.
Moreover, as a store owner, you can leverage the custom tabs to highlight key company policies that a user must be aware of. For example, you can add an FAQs tab to answer the most frequently asked questions. Similarly, you can add a return policy under a separate tab, etc.
Therefore, it is always recommended to organize your product information into easy-to-follow product tabs. So that your user gets what they want in the easiest way possible without going through any hassle.
By now, I hope you have understood the importance of custom WooCommerce Product tabs. Now let’s move on to the next step and add custom product tabs in WooCommerce.
How to Add Custom WooCommerce Product Tabs
We can add custom product tabs in WooCommerce in 2 major ways:
- Using a plugin
- Programmatically
Let’s have a look at both of these methods one by one. We’ll start with the plugin method. So, let’s dive in.
1. Add Custom Product Tabs Using a Plugin
There are multiple WordPress plugins to add custom WooCommerce product tabs, so feel free to use any of these. However, for demonstration, we will be using the Custom Product Tabs for WooCommerce plugin developed by YIKES, Inc.
The plugin comes in both free and premium versions. The free version covers the basic requirements. However, if you are interested in more advanced features, you can opt for the premium plans, which start from $29.99 per annum with 1 year of updates and support.
Now let’s see how we can use the plugin to add custom product tabs in WooCommerce. Let’s go!
1.1. Install and Activate the Plugin
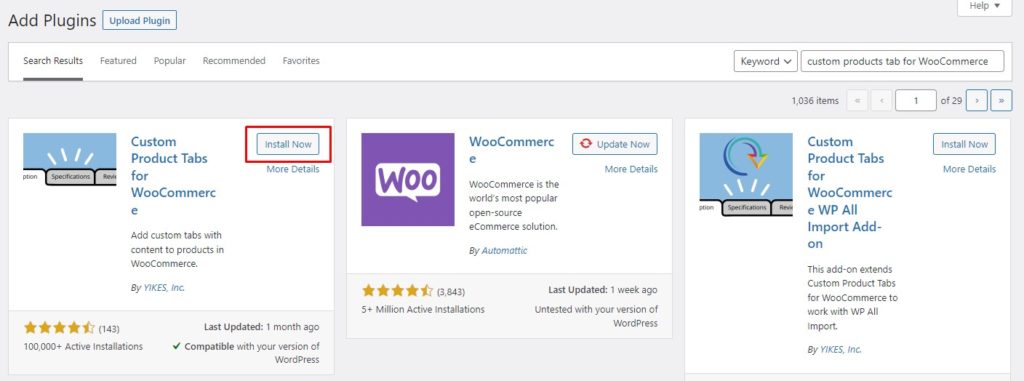
First off, you need to install and activate the plugin on your site. To install the plugin, go to your WP Admin Dashboard and navigate to Plugins > Add new. Search for the Custom Product Tabs for WooCommerce plugin by YIKES, Inc. and click on the Install Now button to install the plugin. Once the installation is complete, hit Activate to activate the plugin on your site.
If you want to use the premium version or a premium plugin, you’ll need to install the plugin manually.
Great! You have now successfully installed the plugin on your site. It’s time to add custom product tabs using the Custom Product Tabs for WooCommerce plugin.
1.2. Add Custom Product Tabs to WooCommerce Products
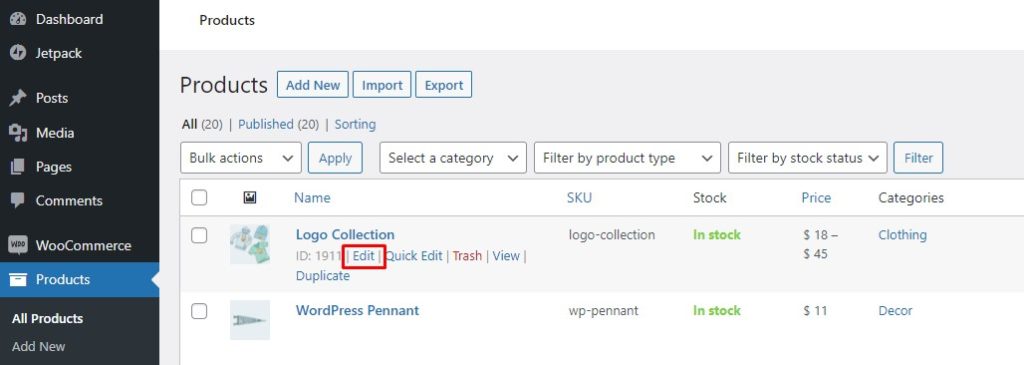
After the plugin is active, you can add custom product tabs to a WooCommerce product from the Product Edit page. From your WP Admin Dashboard, navigate to Products > All products. Now, hover over the product you wish to add custom tabs to and click on Edit.
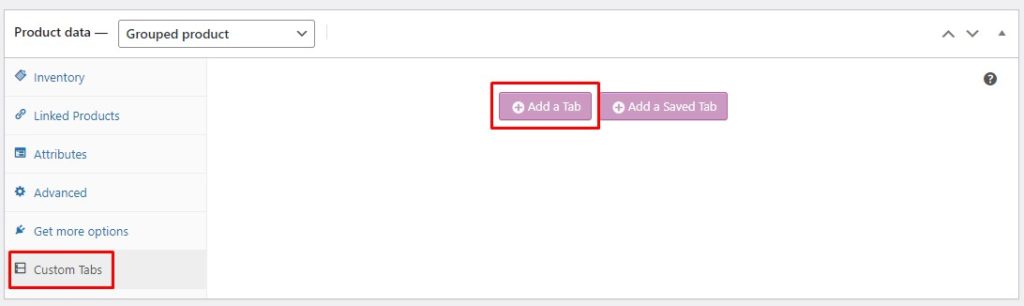
This will open up the Product Edit page. Scroll down to the Product Data section and click on Custom Tabs. You will get two options, Add a Tab and Add a saved tab(more on that later). Click on the Add a Tab button, and it will open up the New Custom Tab form.
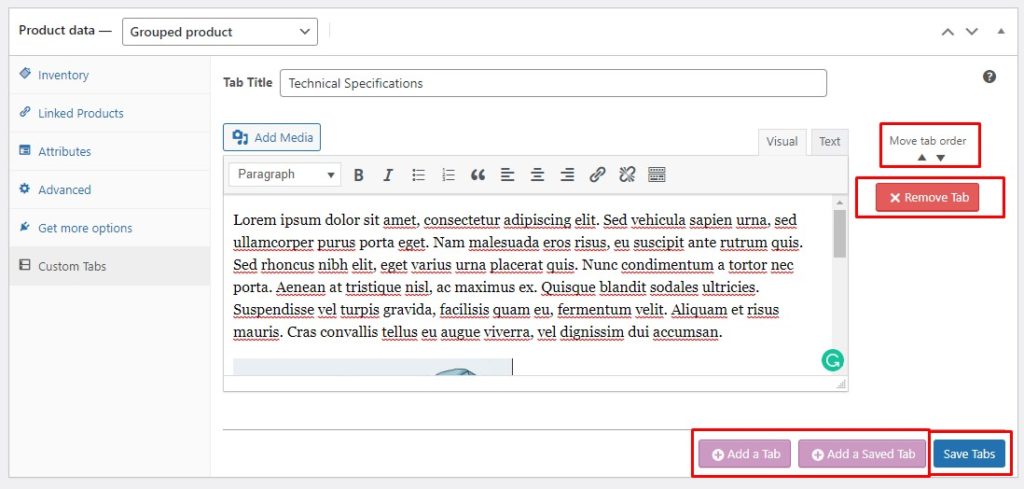
In the New Tab form, specify the Tab title and add relevant content. Feel free to add text, images, links, multimedia, etc. Moreover, you can add multiple custom tabs by clicking on the Add a Tab button at the bottom. If you have more than one custom tab, you can change their order via the Move Tab Order arrows. Once you are done, hit Save Tabs to save your newly created custom tabs.
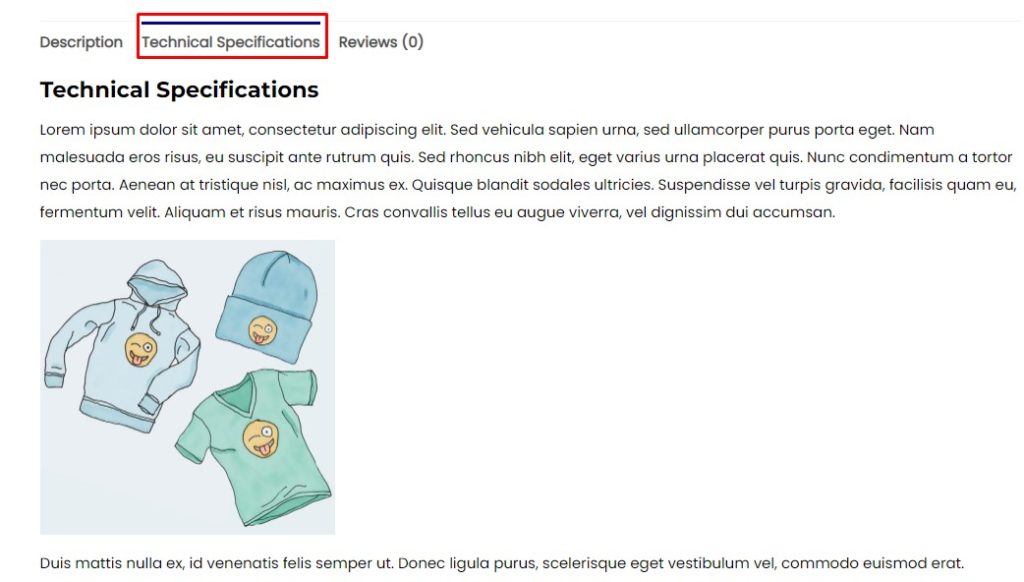
Voila! As easy as that. You have now created your very own custom product tab. Now, navigate to the front-end of your product page to see the custom tab live on your site.
However, adding a custom tab to multiple products, one by one, can be exhausting and is not an efficient approach. That’s why the plugin comes with a Saved Tabs feature.
Let’s have a look at Saved Tabs and see how we can add them to WooCommerce products.
1.3. Create Saved Tabs
Saved Tabs act as templates that you can save for later use. Once you have created a Saved Tab, you can add it to a product in just a few simple steps. Thus, Saved Tabs make adding custom tabs to multiple products quick and easy.
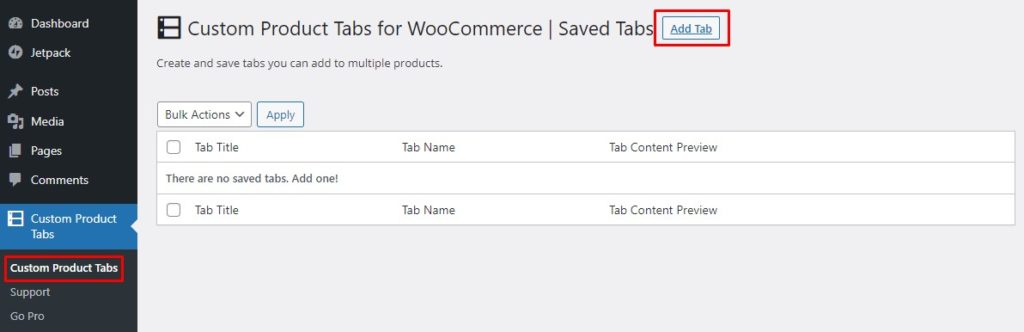
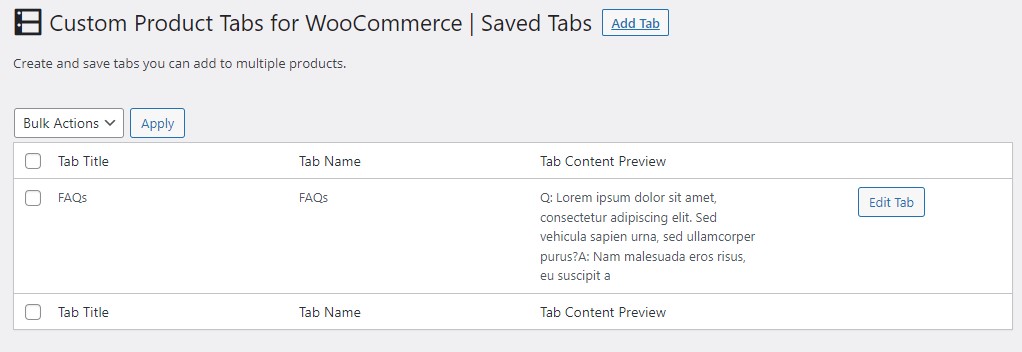
To create a Saved Tab, go to your WP Admin Dashboard and click on Custom Product Tabs. Here, you will see a list of all the Saved Tabs you have created previously. Now, click on the Add a Tab button on the top, and it will take you to the New Tab form.
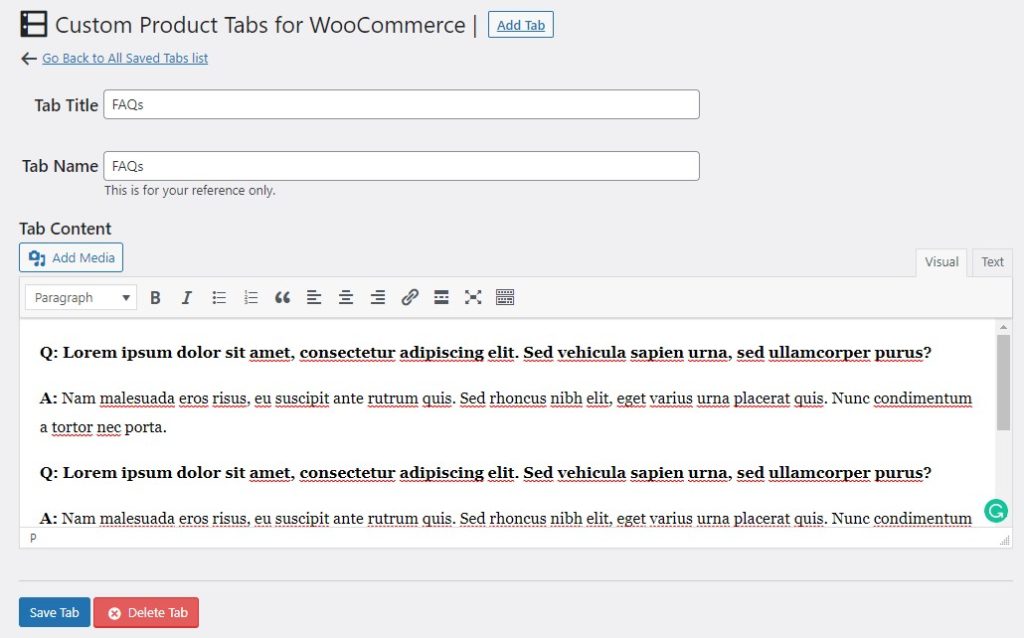
In the New Tab form, specify the Tab title and add a name for your reference. Next, add the Tab content. This may include text, images, multimedia, links, etc. Once you are satisfied with all the changes, click on the Save Tab button to save the tab.
Just like that, you can add as many tabs as you want for later use. To find all the Saved Tabs you have created, just go to WP Admin Dashboard > Custom Product Tabs. Here, you will find all your Saved Tabs, and you can edit, delete or add new tabs from here.
Once you have created your own Saved Tabs, you can add them to any product in just a few clicks. Let’s see how to do that.
1.4. Add Saved Tabs to WooCommerce Products
Adding a Saved Tab to a product follows a similar process as adding a regular tab. Go to the Product Edit page and scroll down to the Product Data section. Click on Custom tabs and then click on Add a Saved Tab button.
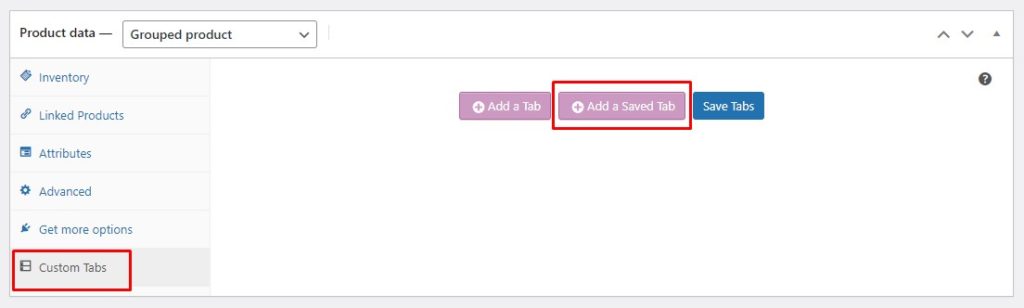
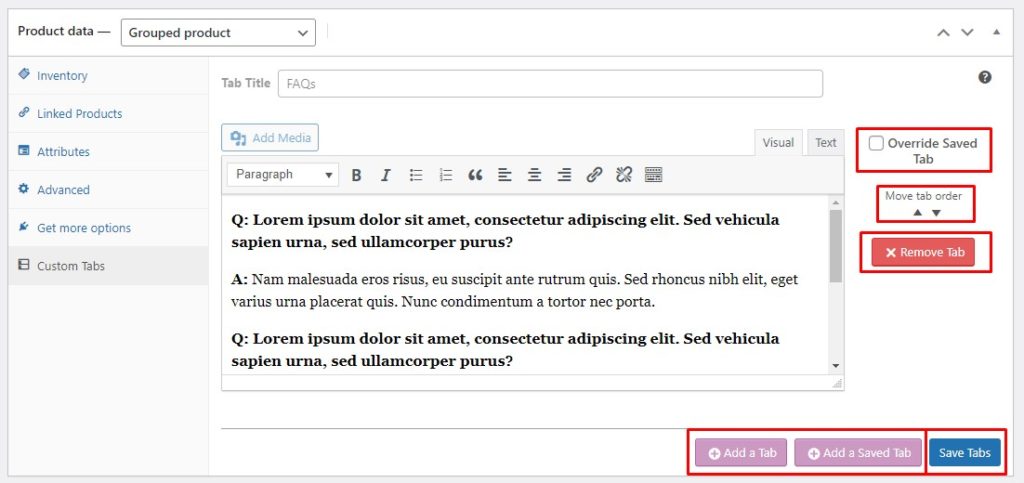
Choose from the list of Saved Tabs the tab you want to add. It will load all the selected tab’s data. Now, you can just save it as it is or make amendments to it as per your requirements. You can further add more custom tabs by clicking on the respective buttons and reorder the tabs as per your preference.
Lastly, there is a checkbox to override a Saved Tab. Basically, it de-links the tab from the original Saved Tab. Thus, in the future, if you make any changes to your saved tab, they will not be reflected for this product.
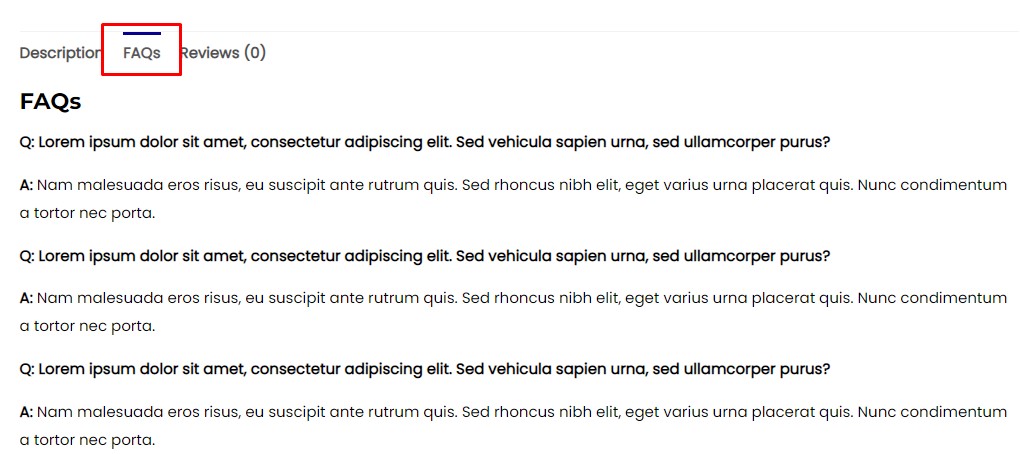
Once you have saved the custom product tab, it will immediately appear on the product page. To verify, just navigate to the front-end of your website and go to that product page and see your custom tab in action.
Above, we have seen how to add custom product tabs in WooCommerce using a third-party plugin. However, there is another way to achieve the same functionality, i.e., using custom code snippets. Let’s see how you can add custom products tabs to the WooCommerce product page programmatically.
2. Add Custom Product Tabs Programmatically
Before we jump into the code snippets to add custom product tabs in WooCommerce, let’s first see how to add code snippets to WooCommerce.
2.1. Access the Code Editor for WordPress
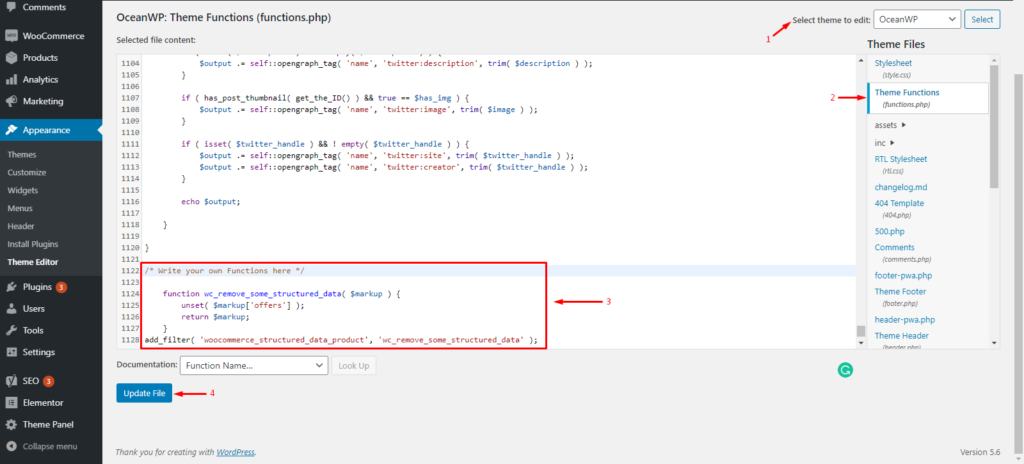
First off, we highly recommend you create a full backup of your site and use a child theme to edit the functions.php file. If you don’t know, check out our guide on how to create a child theme. Alternatively, check out these child theme plugins if you don’t want to do it manually.
Once you are done creating a child theme, go to your WP Admin Dashboard and navigate to Appearance > Theme Editor. Make sure to select the child theme and open the functions.php file. Now you can add your custom code snippets at the end of the functions.php file. Once done, click on the Update File button for the changes to take effect.
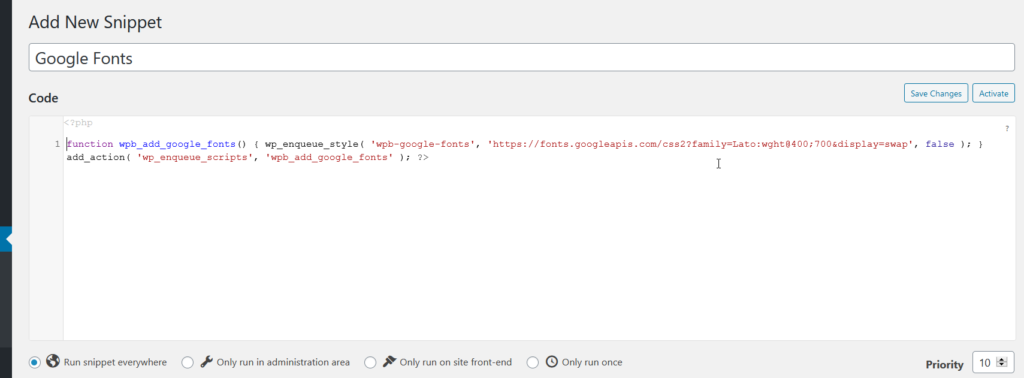
Alternatively, you can use the Code Snippets plugin to add custom code snippets to your site. First off, you need to install the plugin from the WordPress repository. Just go to WP Admin Dashboard > Plugins > Add new. Search for the Code Snippets plugin and install it on your site.
Afterward, go to the plugin setting from your WP Admin Dashboard and click on Add New Snippet button to add your custom code snippet. Just like that, you can add as many custom code snippets as required.
One cool thing about using this plugin is that you won’t need to create any child theme as the plugin takes care of the code snippets on its own. However, having a child theme is still recommended to secure your site if something goes wrong.
Now that you have learned how to add code snippets to a WordPress site, let’s see how we can add custom product tabs in WooCommerce using custom code snippets.
2.2. Add Custom Product Tabs to All Products in WooCommerce
Adding a custom product tab to all products at once can be really efficient for information remains the same across all the products. For instance, you can add FAQs that largely remain the same across all the products or at least for a specified category of products.
The following code snippet can be used to add a global custom product tab and also populate it with relevant content.
//Add a new custom product tab
add_filter( 'woocommerce_product_tabs', 'ql_new_custom_product_tab' );
function ql_new_custom_product_tab( $tabs ) {
//To add multiple tabs, update the label for each new tab inside the $tabs['xyz'] array, e.g., custom_tab2, my_new_tab, etc.
$tabs['custom_tab'] = array(
'title' => __( 'Custom Product Tab', 'woocommerce' ), //change "Custom Product tab" to any text you want
'priority' => 50,
'callback' => 'ql_custom_product_tab_content'
);
return $tabs;
}
// Add content to a custom product tab
function ql_custom_product_tab_content() {
// The custom tab content
//You can add any php code here and it will be shown in your newly created custom tab
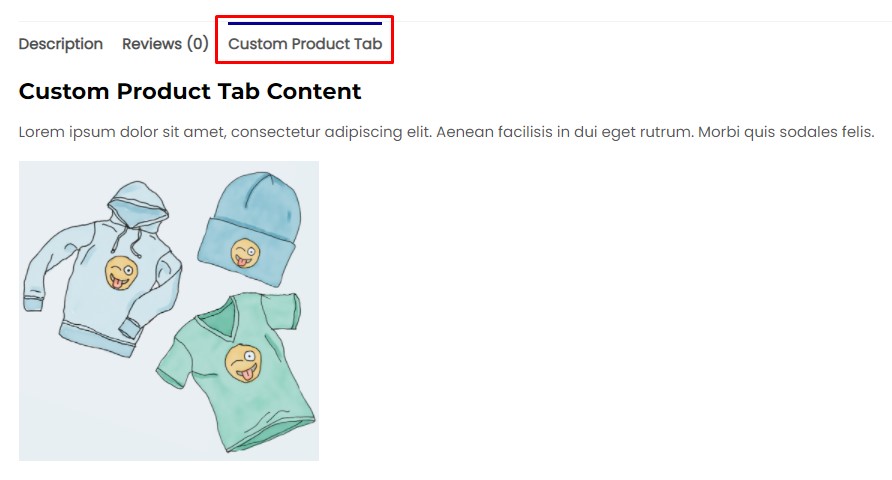
echo '<h2>Custom Product Tab Content</h2>';
echo '<p>Lorem ipsum dolor sit amet, consectetur adipiscing elit. Aenean facilisis in dui eget rutrum. Morbi quis sodales felis.</p>';
echo '<img src="http://hypernova/wp-content/uploads/2021/10/logo-1.jpg" width="300" height="400" align="center">';
}
Done! Now, you can navigate to the front-end of your site and verify the changes.
Now, the above snippet can only be used to add a custom product tab to all products in WooCommerce. But what if you need to add custom product tabs to only specific products? Well, we have a snippet for you that will get the job done. Let’s have a look.
2.3. Add Custom Product Tabs to Specific Products Only
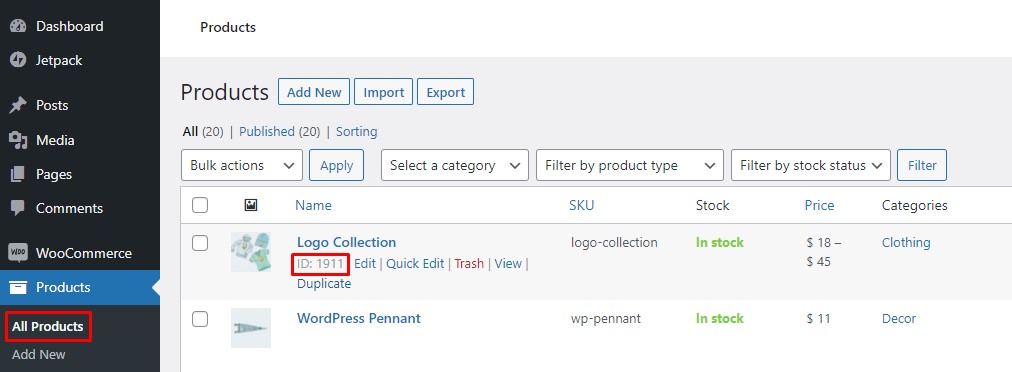
First off, you need to grab the Product-ID of the product, to which you want to add a custom tab. Just go to your WP Admin Dashboard and navigate to Products > All Products. Hover over your desired product, and it will display the Product-ID. Save this Product-ID as we need to add it to our code snippet later on.
Copy and paste the following code snippet into the functions.php file or the Code Snippets plugin, whichever method you use. Just remember to replace the placeholder Product-ID with your actual Product-ID.
//Add a new custom product tab
add_filter( 'woocommerce_product_tabs', 'ql_specific_custom_product_tab' );
function ql_specific_custom_product_tab( $tabs ) {
global $product;
//Grabs the Product ID. Replace it with your actual Product ID
if( $product->get_id() == 1911 ) {
// Adds the new tab
//To add multiple tabs, update the label for each new tab inside the $tabs['xyz'], e.g., custom_tab, my_new_tab, etc.
$tabs['specific_product_tab'] = array(
'title' => __( 'Specific Product Tab', 'woocommerce' ), //change "Specific Product tab" to any text you want
'priority' => 50,
'callback' => 'ql_specific_product_tab_content'
);
}
return $tabs;
}
//Add content to a custom product tab
function ql_specific_product_tab_content() {
// The custom tab content
//You can add any php code here and it will be shown in your newly created custom tab
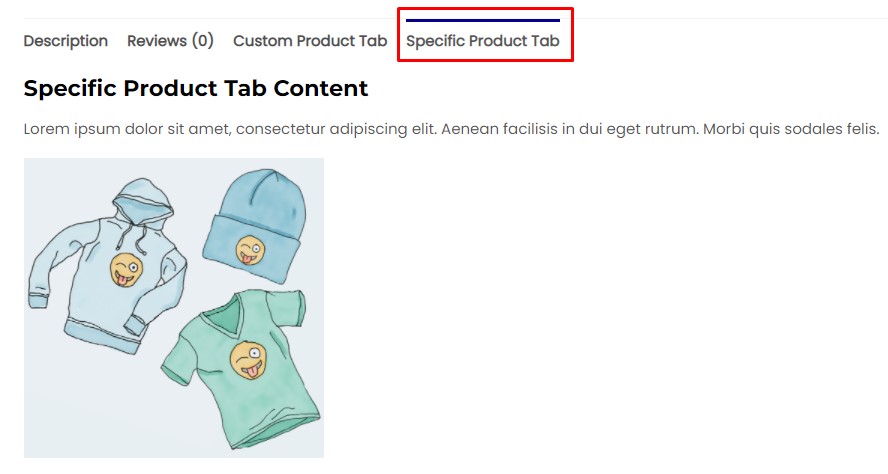
echo '<h2>Specific Product Tab Content</h2>';
echo '<p>Lorem ipsum dolor sit amet, consectetur adipiscing elit. Aenean facilisis in dui eget rutrum. Morbi quis sodales felis.</p>';
echo '<img src="http://hypernova/wp-content/uploads/2021/10/logo-1.jpg" width="300" height="400" align="center">';
}
That’s it. Your newly created custom product tab is now applied to your desired product and will only be shown for that product.
By now, you have seen the code snippets to add custom product tabs in WooCommerce for individual products and all products. Let’s move a bit further and look at a few more code snippets to customize the product tabs.
2.4. Rename Product Tabs
Sometimes, you may need to replace the title of your custom tab or even change the name of a default tab. For example, you might want to change the Reviews tab to Ratings in the case of a TV show or a movie. Using the below code snippet makes it easy for you to change the title of your custom product.
//Rename product tabs in WooCommerce
add_filter( 'woocommerce_product_tabs', 'ql_rename_product_tabs', 98 );

function ql_rename_product_tabs( $tabs ) {
//Replace the tab label inside $tabs['xyz'] array with your actual tab label
$tabs['reviews']['title'] = __( 'Ratings' ); // Rename the reviews tab
$tabs['custom_tab']['title'] = __( 'Custom Tab Updated' ); // Rename the user created custom tab.
return $tabs;
}
Great! Your product tabs have now been renamed. You can now navigate to the front-end of your site and verify the changes yourself.

2.5. Reorder Tab
The following code snippet allows you to change the order of the product tabs. It works on the basis of a priority value.
The smaller number indicates a higher priority, and a higher number indicates a lower priority. So the highest priority tab is displayed first followed by the tab next in line, and the lowest priority tab will be at the last position.
If you have a look at the code below, it uses a few product tabs to demonstrate how it works. You can add more product tabs if needed and then reorder them as per your preference. Just make sure to replace tab titles with your actual tab titles.
//Reorder product tabs in WooCommerce
add_filter( 'woocommerce_product_tabs', 'ql_reorder_product_tabs', 98 );

function ql_reorder_product_tabs( $tabs ) {
//reorder tabs based on the priority value
//Replace the tab label inside $tabs['xyz'] array with your actual tab label
$tabs['description']['priority'] = 5; // Description first
$tabs['custom_tab']['priority'] = 10; // Custom tab second.
$tabs['specific_product_tab']['priority'] = 15; // Product specific tab third.
$tabs['reviews']['priority'] = 20; //Reviews last
return $tabs;
}
That’s it! You have now sorted the products tabs in your own custom order. Now you can navigate to the front-end of your WooCommerce store to verify the changes.

2.6. Remove Tabs
Now, you have added all these tabs, but what if you want to remove them now? Well, it turns out that there is a code snippet that can remove all the unwanted product tabs from your product page.
The following code snippet works well for both default and custom product tabs. Just remember to change the tab title with your actual tab title.
//Remove product tabs in WooCommerce
add_filter( 'woocommerce_product_tabs', 'ql_remove_custom_product_tabs', 98 );
function ql_remove_custom_product_tabs( $tabs ) {

//Replace the tab label inside $tabs['xyz'] array with your actual tab label
unset( $tabs['reviews'] ); // Remove the reviews tab
unset( $tabs['description'] ); // Remove the description tab
unset( $tabs['custom_tab'] ); // Remove the user created custom tab.
return $tabs;
}
That’s it. Your unwanted product tabs have now successfully been removed. You can now navigate to the front-end of your WooCommerce store and verify the changes.
Above, we have seen how to add custom product tabs in WooCommerce using third-party plugins and programmatically. Let’s now move on and see a few other ways to organize WooCommerce products.
BONUS: How to Sort WooCommerce Products
Sorting your products in a specific order does two things. First, it allows you to highlight certain products by bringing them to the top of the page. Second, it makes finding or scrolling through the products easier for the customers as the products are organized in a logical way.
Product Sorting Options in WooCommerce
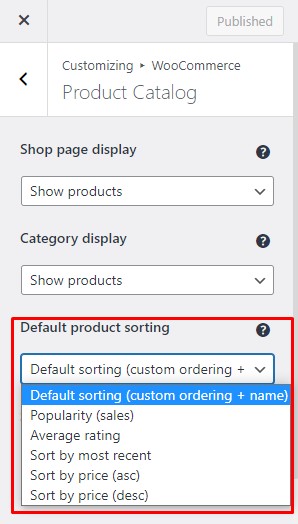
By default, WooCommerce offers six sorting options and allows you to select one of them as your default sorting method. These options include:
Default sorting (custom sorting + name): Products, by default, are sorted based on their name, but at the same time allow you to custom sort the products. This is useful for highlighting products that don’t fit a single criterion.
Popularity (sales): Sorts the items by the number of sales in descending order bringing your best-selling items to the top.
Average Rating: Sorts the products by their average rating in descending order. Products with the highest rating get the top position, followed by the next, and so on.
Sort by Most Recent: Sorts the products based on the time they are added to the store. This brings your latest products to the top, which is good for highlighting the latest additions.
Sort by Price(asc, desc): Sorts the product based on their price in ascending or descending order, as per your choice.
Change the Default Product Sorting Method in WooCommerce
Now, in order to change the default sorting method in WooCommerce, go to WP Admin Dashboard and navigate to Appearance > Customize. This will take you to the Theme Customizer.
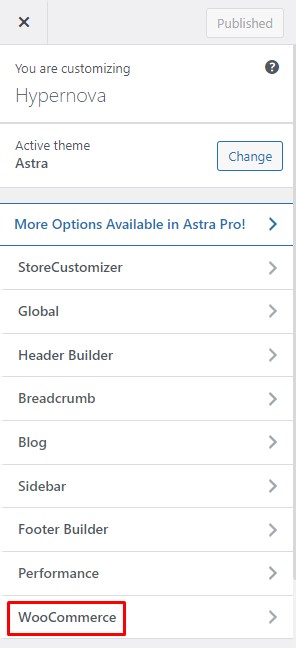
Inside the Theme Customizer, go to the Product Catalog menu. Now, go to the default product sorting section and click on the drop-down menu. Select your preferred sorting method and hit Publish to save the changes.
Bravo! You have now selected your preferred method of product sorting. However, these are not the only ways to sort your products. There are many other ways and methods by which you can sort WooCommerce products. If you are interested, check out our detailed guide on how to sort WooCommerce products.
Conclusion
All in all, custom product tabs are really beneficial as they help you present information about a product in a more organized way. Organizing the product information in individual tabs makes it easy for the customers to spot their required information and make a better purchase decision.
Moreover, it also allows the store owners to add all essential information about the product without filling up an entire page and overwhelming the user. In a way, it’s a win-win for everybody.
To summarize, we have seen multiple ways to add custom product tabs in WooCommerce:
- Using a plugin
- Programmatically
We started off with the Custom Product Tabs for WooCommerce plugin and saw how to add custom product tabs using the plugin. We also saw its Saved Tabs feature that allows us to Save frequently used tabs for later use.
Afterward, we had a look at the code snippets to add custom product tabs in WooCommerce. We saw snippets to add product tabs to all products as well as specific products only. Moreover, we also had a look at the code snippets to rename, reorder, and remove products tabs. Lastly, we wrapped up by looking at the WooCommerce product sorting options to organize the shop page.
Have you tried adding custom product tabs in WooCommerce? What methods did you use? And How was your experience? Let us know in the comments below.
If you want to learn more about improving your WooCommerce website, here are some posts that might interest you:

Product tabs are very useful if you want to extend the default tabs of WooCommerce. There are a lot of free plugins that can help you with the global tab add, and you don’t even need a plugin for that as you point out in this article. If you want to add a custom tab per product then you will need a pro plugin like YIKES. A good article that will help a lot of store owners to extend their shop.
Thanks for the appreciation, Dragos. I’m glad you found the content helpful. I agree. There is no need for a plugin if you are comfortable with programming. However, plugins are the best solution for people with no programming knowledge as they allow them to add the same functionality without any coding. So, IMO, both the solutions are practical, and one should go with the one they are most comfortable with, keeping in mind the pros and cons of each.
Good article that helped me expand my store. But suppose I want to show the custom field in a specific product type, not with its ID, but just when it is simple product, virtual, and downloadable. How do I write such a code?
Thank you again for this wonderful article
Hi Hatem, I’m glad you found the content helpful.
If you want to add custom tabs to products by category, you will have to use a premium plugin. Feel free to check our list of best WooCommerce product tab plugins to see what works best for you. Alternatively, you can use a custom code snippet to get the job done. For code snippet, this Stackoverflow thread might help you.
Hi!
Thank you for a great article! Could you kindly provide an example of what the code should look like if I need 2 new global tabs? Got the first one to work perfectly – thanks so much! 🙂
Hi Julie, You’re welcome 🙂 I’m glad you found it helpful!
To add multiple tabs just repeat the following part multiple times inside the same function but with a different label for the tabs array, e.g., $tabs[‘custom_tab2’], and update the title as well.
$tabs['custom_tab2'] = array('title' => __( 'Custom Product Tab 2', 'woocommerce' ),
'priority' => 50,
'callback' => 'ql_custom_product_tab2_content'
);
Also, you need to create a separate function for the content of each tab and update the ‘callback’ value of the above code with the name of the respective function. e.g.
function ql_custom_product_tab2_content() {

//your content goes here

}
Thank you so much! That worked perfectly 😊
Great to know. You’re welcome 🙂
Does the plugin work with Divi Theme? I’ve read some past user commentary about Divi not recognizing custom woocommerce product tabs created by a plugin.
Hello John, we haven’t tested the plugin with Divi. Let us know if you give it a try
Hi, this is useful and awesome, thanks for sharing.
One question: if I need to add the tab to 2 Specific Product, how should i change the code?
//Grabs the Product ID. Replace it with your actual Product ID
if( $product->get_id() == 1911, 1922 )
Like this, or?
Thank you very much!
Hi Lucas, I’m glad you found the guide helpful. The code snippet for 2 products would look like this:
if( $product->get_id() == 1911 || $product->get_id() == 1922 )Hi, Thanks for providing such helpful information. I have found that when adding a tab to a specific product, the tab does work correctly and appears at the correct product page by using the product ID. However on other products on our site, there are still traces of the tab being displayed. Tab for specific products is displayed correctly, same tab appears but only the css elements such as color and border radius are shown on other products.
the name of the tab for the specific product are not shown on the other product pages, but the partial tab css elements are still being displayed.
Thank you very much for your article.
But I found that the YIKES plugin doesn’t work for elementor sites anymore, I tried many sites and it doesn’t work
You’re welcome, Tallie! We haven’t tested it with Elementor, so we can’t confirm this. You may try contacting developer support. If there is a bug, they might have a fix for it. Meanwhile, you can try adding custom product tabs using the custom code snippets, as explained in the article.
Thank you for the A to Z details about adding a tab on the Product page. I was trying to add a tab for FAQs sections, and I did it successfully. but questions are should I do it Programmatically? as we need it for every product page, it will make the website faster?
Hi Andria,
If you are comfortable with tweaking codes, that’s the best method. To speed up WordPress, you should minify static files and use a caching plugin.