
How to Add Custom Upload Field in WooCommerce
Do you want to include an upload field on your checkout page? You’ve come to the right place. In this article, we will show you how to add a custom upload field in WooCommerce step-by-step.
With over 5 million active downloads, WooCommerce is the most popular eCommerce platform in the world. When it comes to creating an online store, it is the top choice for many store owners and for good reason. WooCommerce makes the whole online experience seamless and straightforward for both customers and store owners.
Apart from being easy to set up and use, WooCommerce also comes with tons of features that provide you with a lot of flexibility. Either by using plugins or with a bit of coding, you can add any functionalities you need to improve the shopping experience and boost your sales.
It’s no secret that to achieve that, your checkout should be optimized and distraction-free. One way to enhance user experience is by adding a custom upload field to your WooCommerce store. This way, you can allow your customers to upload files during the checkout process and confirm the order immediately instead of having to keep the purchase pending until they send you additional documentation via email.
Before we go into the details, let’s better understand why adding a custom upload field to your store is a good idea.
Why Add a Custom Upload Field in WooCommerce?
There are several situations in which shoppers may need to upload documents when buying a product online.
Some hotels may ask their customers to attach some kind of identification -normally an ID card or passport- when they book online. In many countries, hotels have to provide information about their guests to the Police or local authorities every day, so they may ask you for an ID before you arrive to speed up the check-in process.
Similarly, some sites that sell flight or train tickets online require passengers to upload their ID or passport during the booking process. If you need to change your ticket, ask for a refund, or claim some kind of compensation for a delay, the company may ask you to upload certain documents such as passport or ID, the ticket that you purchased, and so on.
Additionally, wholesale online stores have customers that buy products in bulk and spend thousands of dollars in a single transaction. In these cases, as a security measure, they may require users to upload some proof of identity.
On top of that, a clothing store that offers the option to buy customized T-shirts may ask customers to send their own designs to get them printed. For that, they need to let users upload files so that they can upload their designs.
Finally, having the option to upload files is very useful for stores that sell services that require a previous certification such as diving, paragliding, and so on.
Even if it may not be mandatory in every single case, adding a custom upload field to your checkout page can make the process effortless and much more convenient for both parties.
Now that we better understand when you should add a custom upload field to your WooCommerce store, let’s see how to do it.
How to Add Custom Upload Field in WooCommerce
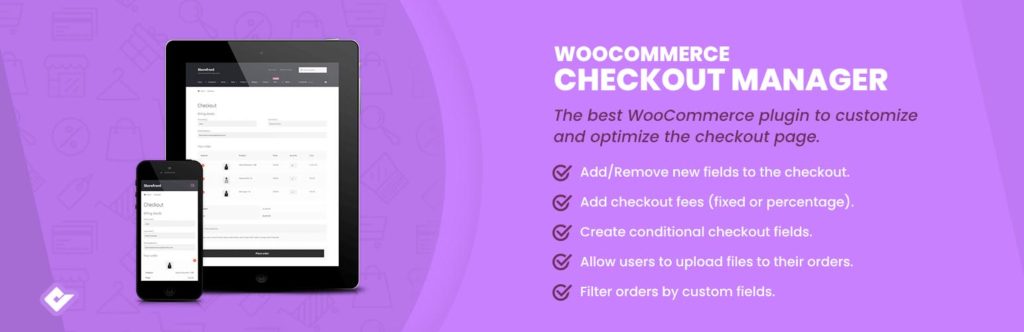
The easiest way to add a custom upload field in WooCommerce is to use a plugin. For this demonstration, we will use Checkout Manager for WooCommerce, a freemium tool with more than 90,000 active installs.
This plugin has a lot of features to help you customize your checkout and includes the option to add a custom field. To know more about all the functionalities that this tool offers, check out the product page.
Step 1: Install Checkout Manager for WooCommerce
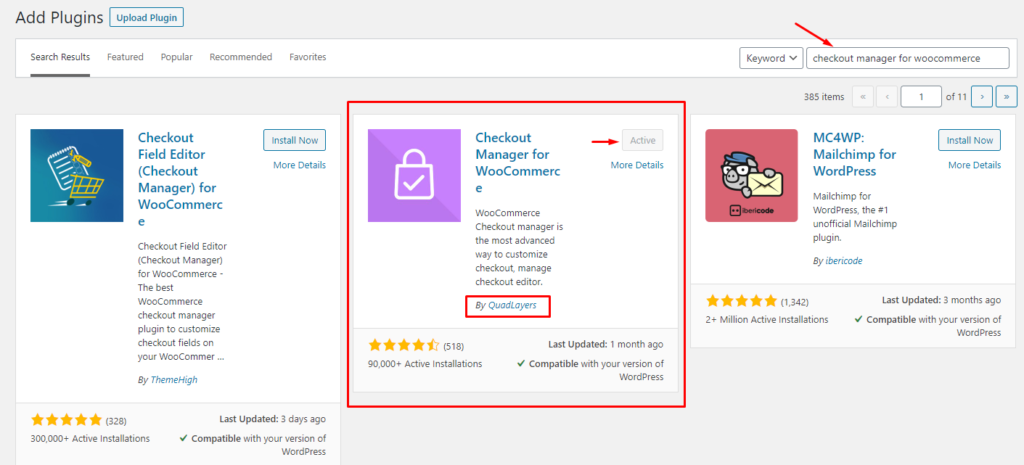
First, you need to install the plugin. In your WordPress Admin Dashboard, navigate to Plugins > Add new.
Then, search for the Checkout Manager for WooCommerce plugin by QuadLayers and click on the “Install Now” button. Once the plugin is installed, press “Activate”.
Now it is time to configure the plugin. Let’s start by adding a new custom upload field to the WooCommerce checkout page.
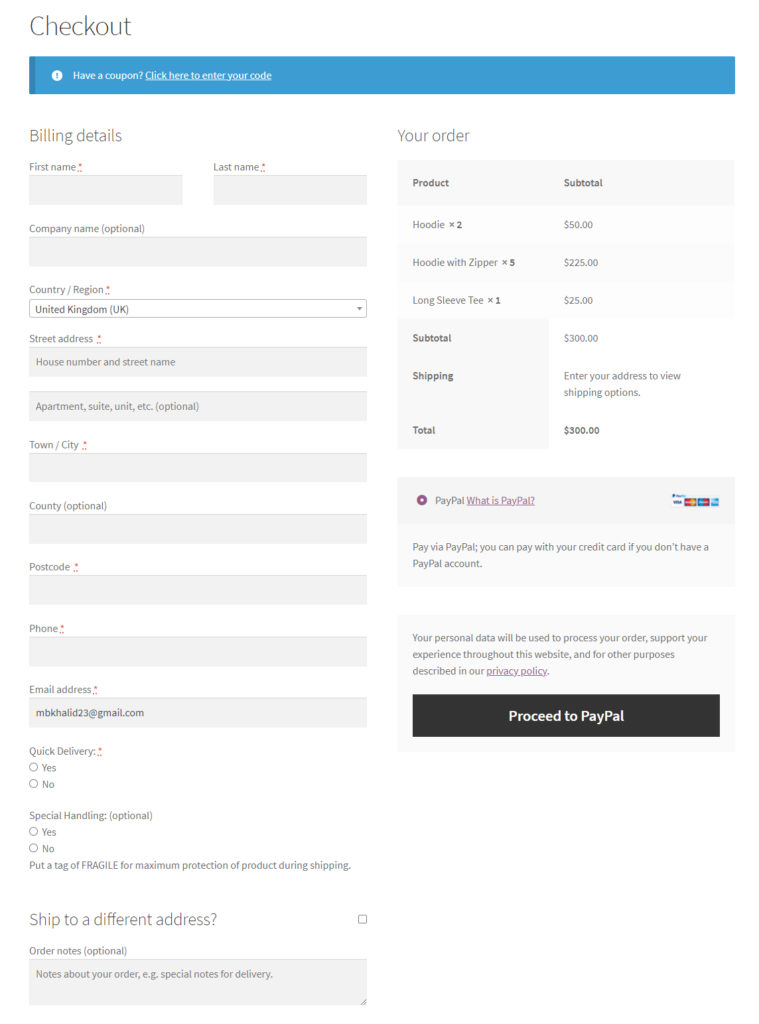
Before that, let’s see how the checkout page looks. As you can see, there aren’t any fields that allow customers to upload files.
Let’s see how to set up Checkout Manager to let shoppers add files during checkout.
Step 2: Add Custom Upload field in the WooCommerce Checkout Page
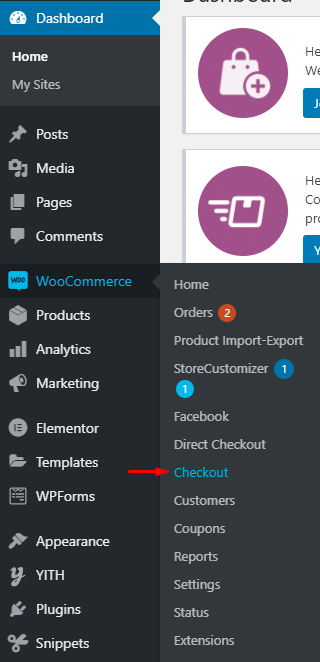
In your WordPress Dashboard, navigate to WooCommerce > Checkout. There you will find all the settings for Checkout Manager.
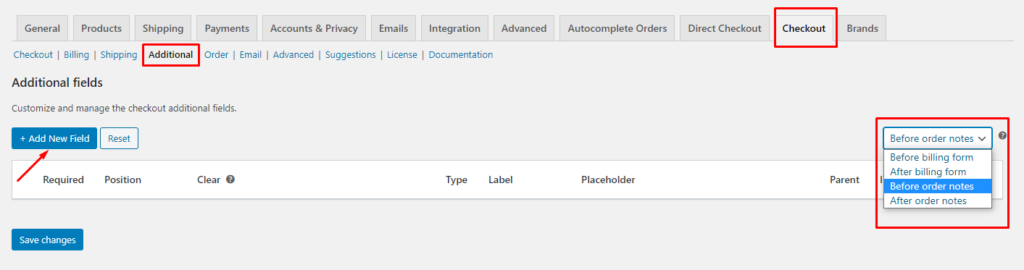
Go to the Checkout tab and head to the Additional section to open the additional fields settings.
NOTE: In this example, we’ll add the field on the Additional section but you can add it to the Billing, Shipping, or any section of the checkout you want by simply going to the corresponding area under the Checkout tab.
On the right corner, you will see a dropdown menu that allows you to select the position where you want to display these additional fields. Click on the “Add New Field” button to start creating a new additional field.
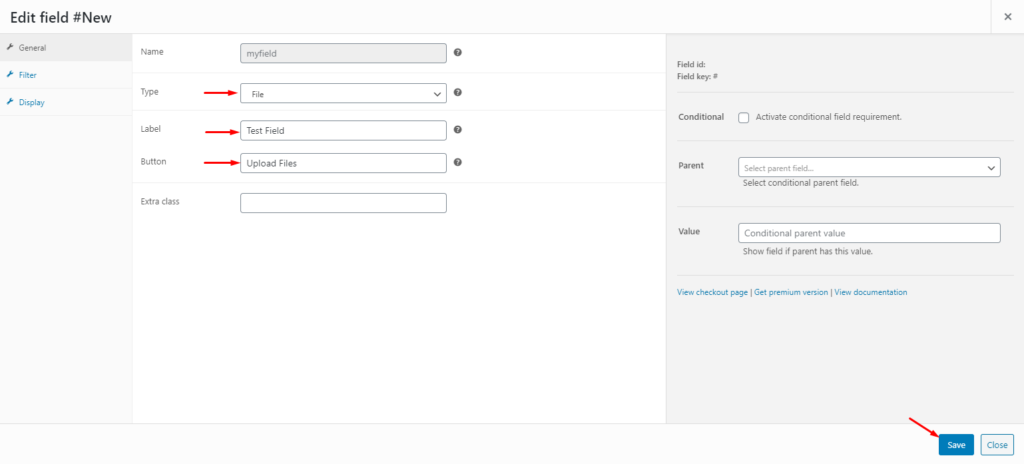
Set up the Custom Upload field
After that, you will go to a new page with a settings menu. Here you can specify the parameters for the field you want to add. Since we want to add a custom upload field, select File under Type and set the custom label and button text. Then, press “Save”.
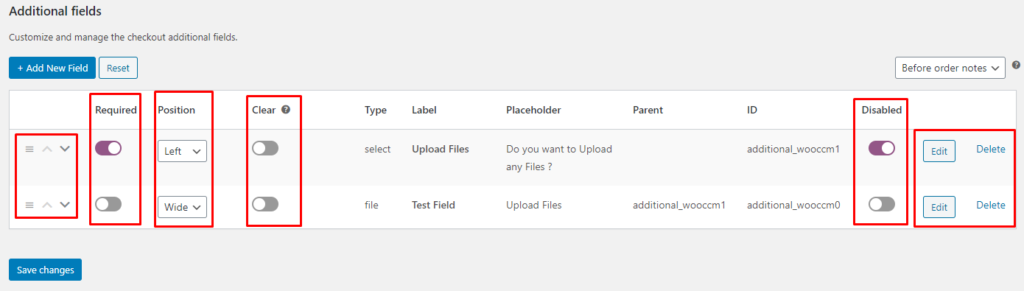
After you have created some additional fields, you can manage the different parameters from the additional fields settings menu. These parameters include:
- Reposition: You use the up and down arrows to move a field up or down. Alternatively, you can click and drag the three horizontal lines icon to reposition a field.
- Required: Enabling the required field makes the field mandatory. This means the user can’t continue until they fill in that field.
- Position: You can select the position in which you want to display the field. There are three options to choose from: left, right, or wide.
- Clear: Enabling this disallows any other field to appear either left or right of this particular field.
- Disable: By checking the disable button, that specific field won’t be displayed on the checkout page.
- Edit and Delete: As the name suggests, you can edit or delete a particular field by clicking on the respective button.
Once you have configured all the settings, save the changes.
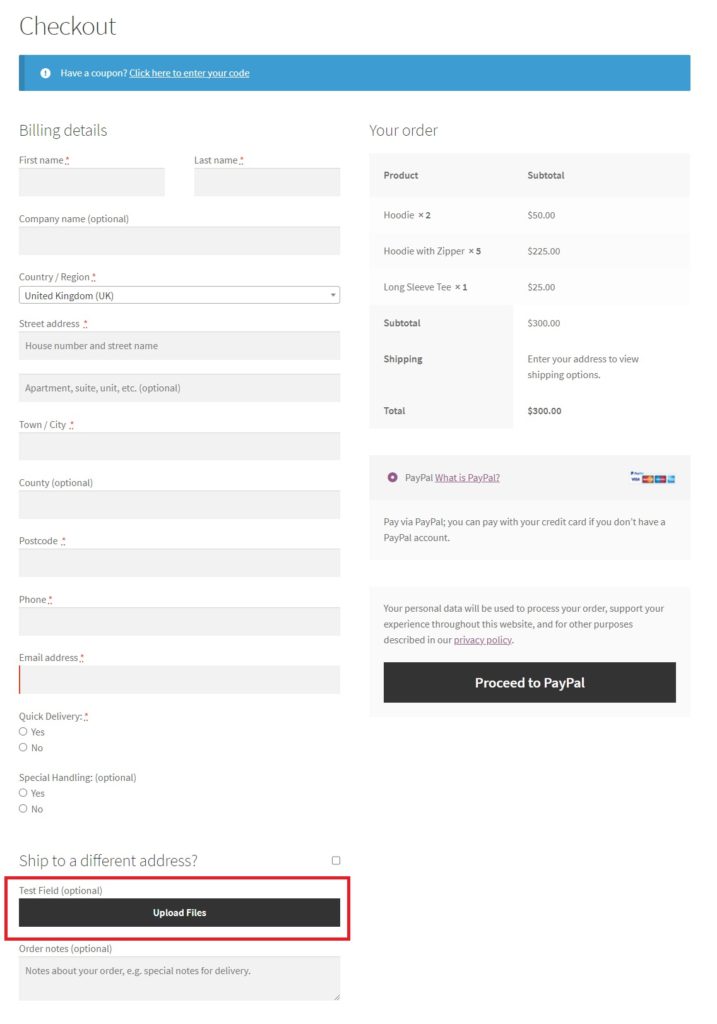
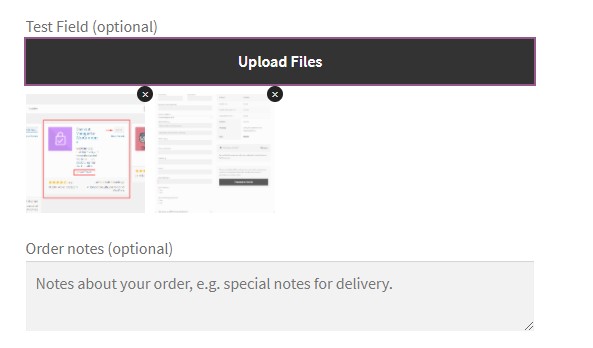
Now let’s have a look at our site from the front end to see the changes. As you can see, now there’s a button to upload files. From the 2 custom fields that we created, only the Test Field is activated and isn’t mandatory so it appears as optional on the checkout page.
That’s it! This is how simple it is to add a custom upload field in WooCommerce. Using this button, customers can upload any file or even upload multiple files during the checkout process. The uploaded files will be saved on the orders page along with other details of the order. Additionally, you will be able to manage all the files that users upload through the admin order dashboard.
But that’s not all you can do with Checkout Manager. Having an optimized checkout is key to increase conversion rates, so you should only display the fields that the customer must fill in to complete the order. Let’s see how you can add conditional fields that only appear when a certain condition is met.
Bonus: Add a Conditional Field in WooCommerce
A conditional field has two parts: a parent field and a child field. The child field depends on the input of the parent field. This means that it isn’t visible by default but appears when the parent field takes a specific value.
For example, if you want to add a custom upload field to your WooCommerce store that will only be required under specific circumstances, the best solution is to create a conditional field so the field only appears when it’s needed.
We’ll do this in two steps. First, we’ll ask the user whether they want to upload a file or not. If they say “Yes”, and only then, the upload files field will become visible. In this example, our first question will be the parent field and the upload files button will be the child field.
Now that we know what a conditional field is, let’s see how to add it to WooCommerce using the Checkout Manager plugin.
Create a conditional field with Checkout Manager
First, let’s add the parent field. Following the same example, we’ll add it to the Additional section but you can add it in the Billing, Shipping, or any section of the checkout you want.
Go to WooCommerce > Checkout, head to the Checkout tab, and open the Additional section. Press the “Add New Field” button and set the parameters for the parent field. Using the above example, we’ll choose Select as the “Type” and add a custom label and placeholder text.
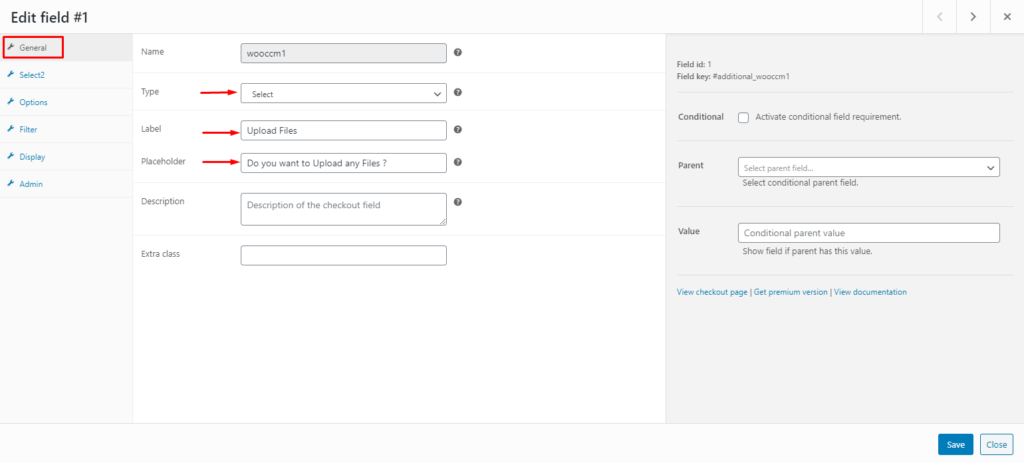
Then go to the Options tab on the left side and set all the possible options the user can select. In this example, we’re asking a question to the user that can only have two answers: “Yes” or “No”. As the answer to this question doesn’t add any extra charge (such as fast delivery or international shipping for example), we set the price to 0. Once you have configured all the parameters, save the changes.

Create the child field
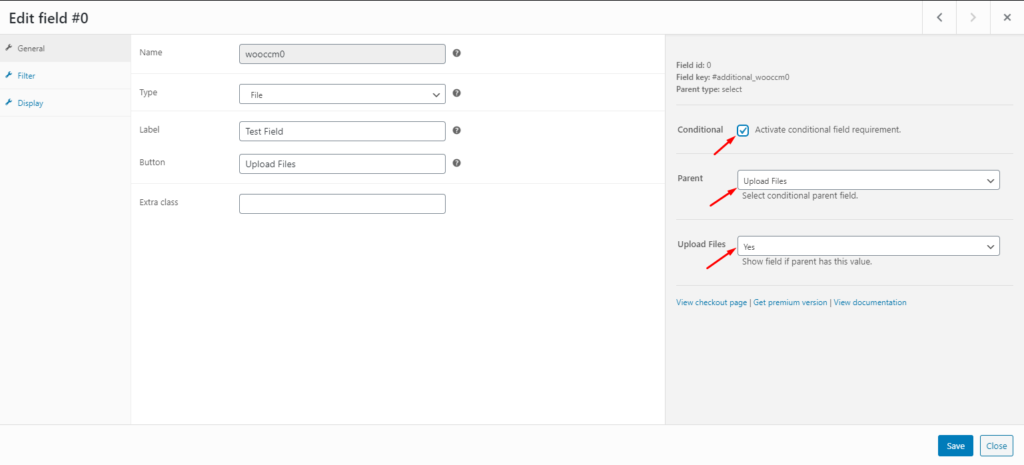
Next, you need to create the child field -the custom upload field-, and set up the conditional parameters.
To do that, create a field, set the type, label, and button placeholder. Then go to the right section and check the “Activate Conditional Field Requirement” box. After that, choose the field you have just created in the previous step as the parent field and select the value of the parent field for which the child field should be activated. In this case, we only want to display the upload file when the user replies “Yes” to the first question.
Once you’re done, remember to save the changes.
That’s it! You have now successfully set up a conditional field on your WooCommerce checkout page.
Now go to your checkout page and check that the conditional field works correctly. Initially, only the parent field will be displayed, but if you select “Yes”, the upload files button will appear.
For more information on how to add conditional fields to WooCommerce, have a look at our complete guide.
Conclusion
All in all, adding a custom upload field in WooCommerce checkout can come in handy as it allows your customers to upload any required files during the checkout process.
There can be several situations in which users may need to upload files or images. For example, ID verification for online hotel bookings, when purchasing plane tickets, custom design for clothing, exchange or refund of items, or services that require certain certification. That’s why allowing your shoppers to upload files on the checkout makes the whole process simpler and more convenient.
In this article, we have discussed:
- Benefits of adding a custom upload field
- Step-by-step instructions on how to add a custom upload field in WooCommerce with Checkout Manager
- What conditional fields are and how they work
- How you can add a conditional field in WooCommerce to optimize the checkout
Have you added a custom upload field to your store? Do you know of any other methods that we should include? Let us know in the comments below!
