
How to Add Delivery Date in WooCommerce
Do you own a WooCommerce store and want to show your customers the expected delivery date of their orders? If so, you have come to the right place. In this article, we will guide you on how to add a delivery date in WooCommerce.
But before we go into that, let’s first better understand why we need to add a delivery date in WooCommerce. What value does it provide to your customers? And how will it improve your online store’s experience?
Let’s find out.
Why Add Delivery Date in WooCommerce?
Displaying the delivery date to the customers during the purchase process has become a crucial aspect of online shopping. Almost all your buyers now expect you to give them an estimated delivery date. If you look at the biggest eCommerce marketplaces like Amazon, eBay, etc., they always display an approximate delivery date.
From the buyer’s perspective, they are more likely to proceed with the order when they know when to expect the delivery. Otherwise, cart abandonment is a common phenomenon in eCommerce.
Another common issue that comes up very often is the non-availability of the customer to receive the order. In such cases, allowing your buyers to choose their preferred delivery date while placing the order can be a good idea. By doing so, they can select a suitable date when they are sure of their availability.
By now, I hope you understand the value of delivery date in eCommerce. Now let’s see how we can add a delivery date in WooCommerce.
How to Add Delivery Date in WooCommerce?
WooCommerce, by default, does not have the option to add a delivery date, so we will be using third-party plugins. Let’s have a look at a few plugins so you can choose whatever works best for you.
Plugins to Add Delivery Date in WooCommerce
Delivery dates are usually mentioned on the checkout page. While there are many plugins to customize the checkout page and add the delivery date to them, here are some of the best ones.
Order Delivery Date for WooCommerce
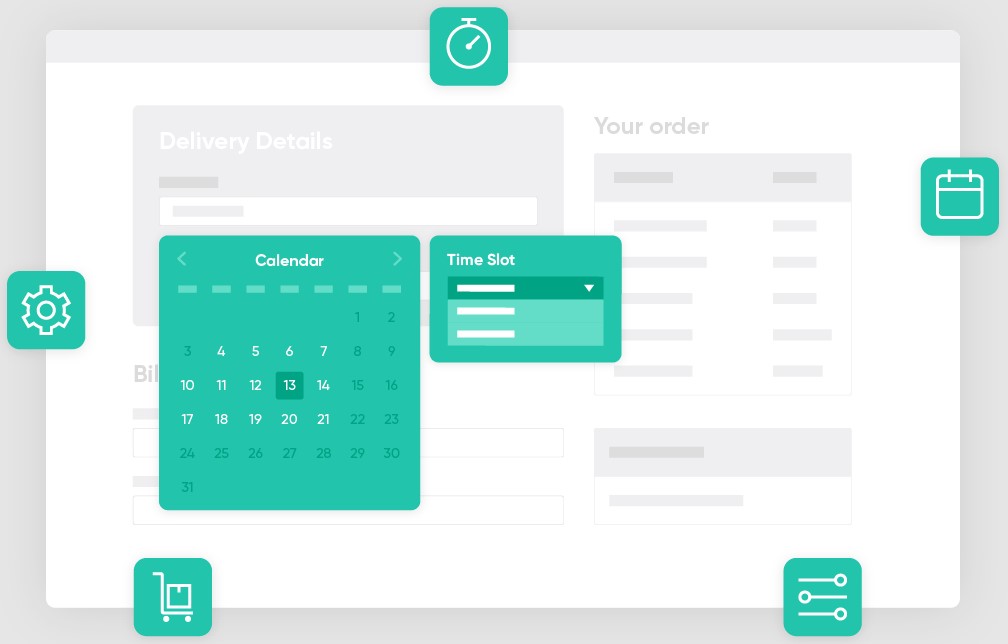
Order Delivery Date for WooCommerce is a popular plugin with over 10,000 active installations. The core function of the plugin is to enable the delivery date and time slot fields on the checkout page.
Coming to the features, it allows you to select the days on which you deliver orders. You can also limit the maximum deliveries per day, mark the fields mandatory, set minimum delivery time, and more. On top of that, you can also add holidays which will then be excluded from your calendar.
Moreover, the plugin offers decent customization options. You can customize the formatting of the calendar, choose a calendar theme, and color code the calendar. Lastly, with the pro version, you get loads of additional features like bulk create delivery slots, same and next day delivery, two-way deliveries sync, and much more.
Features
- Enable delivery date and time slot fields on the checkout
- Set minimum delivery time
- Set max orders deliveries per day
- Add holidays to your calendar
- Highly customizable
Pricing
The plugin comes with both free and premium plans. The free version covers all the basic requirements, whereas the premium plans target more advanced users. Premium plans start at 149 USD per year for a single site.
WooCommerce Delivery Slots
WooCommerce Delivery Slots is another feature-rich plugin to add a delivery date in WooCommerce. The plugin lets your customers select a delivery date and time at checkout.
One cool feature of the plugin is it lets the buyer choose a delivery date and time slot before placing the order. A reservation table is displayed from which the users can pick a delivery slot. You can also limit deliveries on per day and time slot basis.
Moreover, you can add an additional fee for same-day and next-day deliveries. You can even disable same-day and next-day deliveries if you wish. Besides, you can add holidays to your schedule. Holidays will be grayed out on the calendar, and buyers won’t be able to select them.
Lastly, the plugin offers a minimal and modern look that can be customized to match the look and feel of your site.
Features
- Enable delivery date and time slot at checkout
- Pick a delivery slot before shopping
- Limit maximum orders per day and per time slot
- Charge additional fee for same day and next day deliveries
- Add holidays to your deliveries schedule
- A modern look that can be customized to match your site’s design
Pricing
WooCommerce Delivery Slots is a premium plugin that starts at 129 USD per year with 1 year of updates and support. Moreover, you get a 30-day money-back guarantee in case you are not satisfied with the product.
Add Delivery Date Using Order Delivery Date for WooCommerce Plugin
In the previous section, we have already discussed the features and functions of the plugin. Now let’s see how you can add a delivery date in WooCommerce using the plugin.
But before we continue, please make sure that you have set up WooCommerce without missing any steps and used one of the WooCommerce compatible themes. This will ensure that there are no plugin or theme conflicts when you use the plugin.
Install and Activate the Plugin
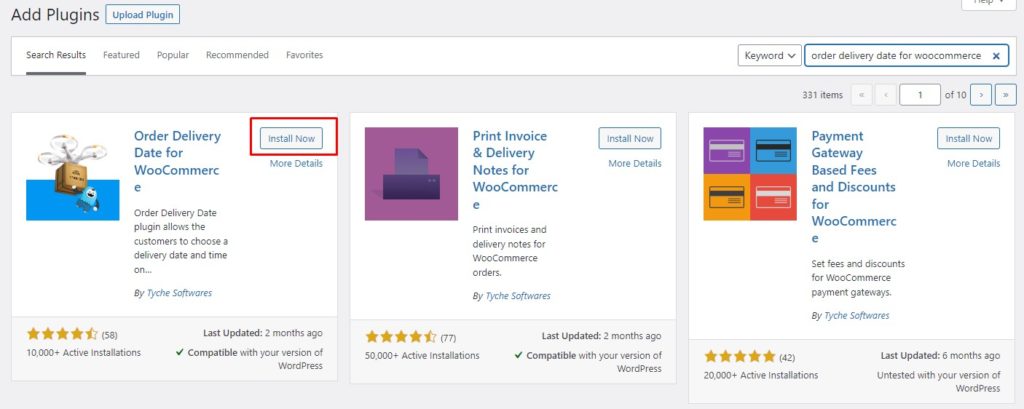
First, go to your WP Admin Dashboard and navigate to Plugins > Add new. Search for the Order Delivery Date for WooCommerce plugin and click the Install Now button. Once the plugin is installed, hit Activate to activate it.
If you want to use the premium version of the plugin, you’ll have to upload and install it manually. Please have a look at our detailed guide on how to install a WordPress plugin manually for more information on it.
Now, since the plugin is active, let’s enable the delivery date on the WooCommerce checkout page.
Enable Delivery Date on Checkout Page
To enable delivery date on checkout, go to the WP Admin Dashboard and navigate to Order Delivery Date. Under the General Settings tab, click on Date Settings.
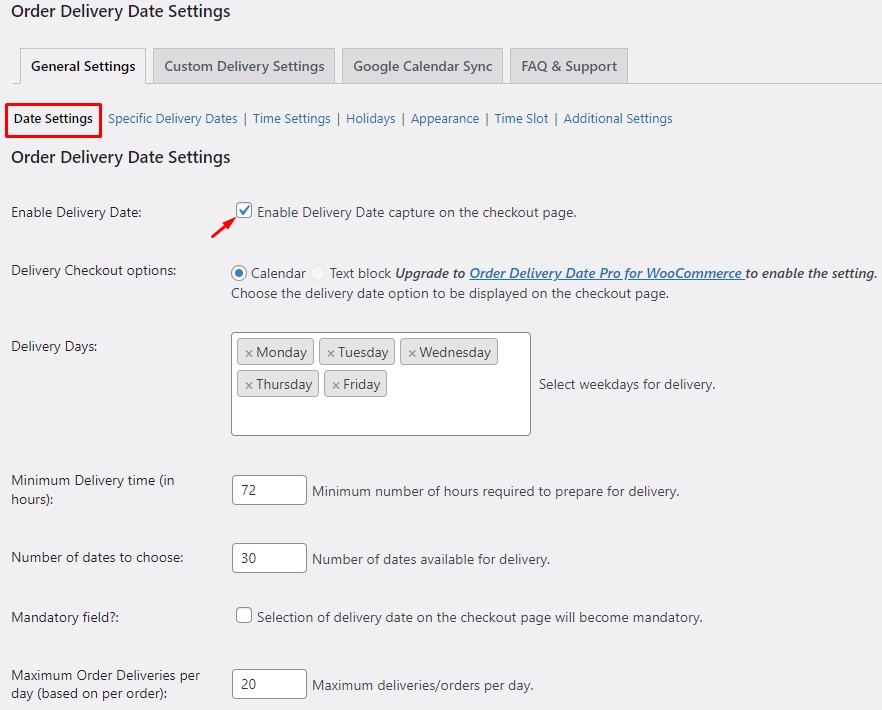
Here, you can set your preferences. You can select the weekdays for delivery, set a minimum delivery time, and a maximum number of deliveries per day, and mark the field as mandatory if required.
Before saving the changes, make sure to check the Enable Delivery Date box. It will add the delivery date field on your checkout page. Once you have saved the changes, go to the checkout page to verify the changes.
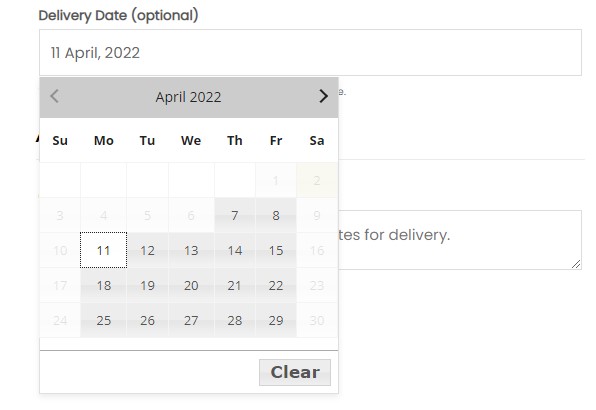
Great! You have successfully added the delivery date field on your checkout. Let’s move on and explore a few other related features of the plugin.
Add Holidays to Your Calendar
With this plugin, you can easily set up holidays in your calendar. Holidays will be grayed out, and the buyers will not be able to select any holiday as the delivery date.
To add holidays to your calendar, go to your WP Admin Dashboard and navigate to Order Delivery Date. Under the General Settings tab, click on Holidays.

Now, give a name for the holiday for your reference. Select To and From dates (leave the To field empty for one day’s holiday).
In case you take an annual holiday on the same days, check the Allow Recurring box to mark it as a recurring event. So, the holidays will be automatically applied to next year onwards. Holidays added will be displayed under the Holidays section on the same page.
That’s it! You have now seen how to add holidays to your delivery calendar. Let’s have a look at some of the customization options available.
Customize the Delivery Date Field and Calendar
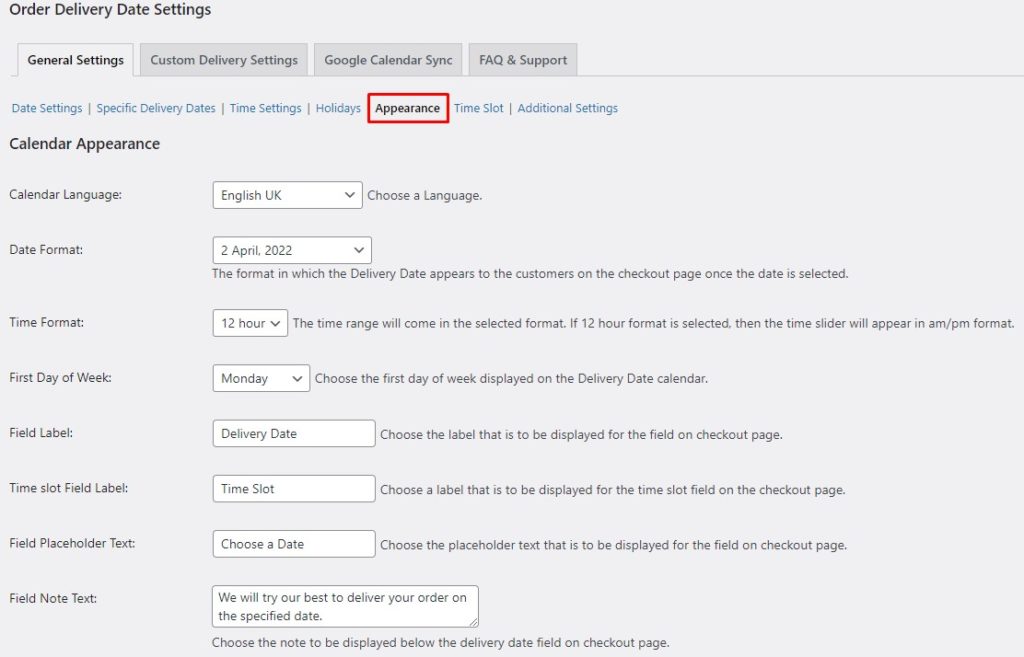
Navigate to the Appearance menu under the General Settings tab to reveal all the customization options. On top, you’ll find customizations related to the formatting.
Here, you can change the date and time format and choose the first day of the week. Similarly, it allows you to set a label for the delivery date field, add a placeholder text, and more.
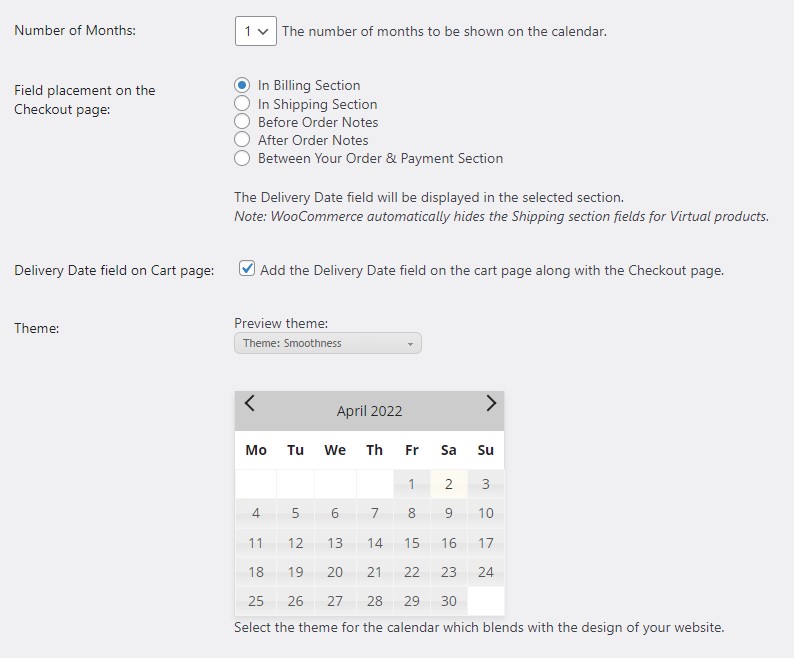
If you scroll further, you will find an option to change the placement of the delivery date field among several WooCommerce checkout page sections.
Moreover, you can add the delivery date field on the Cart Page too. Additionally, you can choose your preferred calendar theme to modify the look of your calendar.
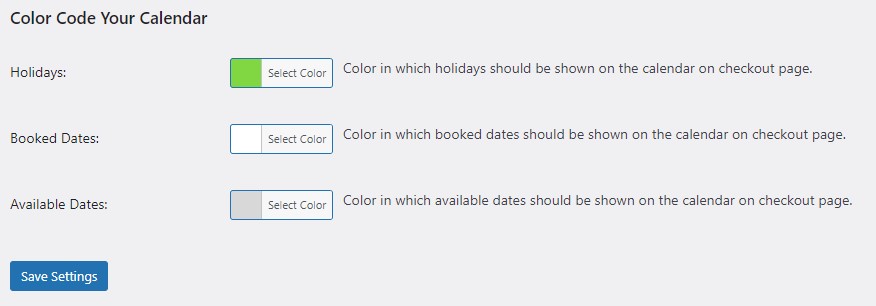
Lastly, you have the option to color-code your calendar. You can choose different colors for available dates, booked dates, and holidays. Color coding is great for differentiation between the three categories and makes it easier for the buyers to spot available slots.
That’s all for the customizations. Now let’s have a look at another super handy feature of this plugin, which is Time Slots.
Add Time Slots Feature to WooCommerce Checkout
Along with the delivery date, you can allow your buyers to select their preferred time slots to receive their delivery.
To add Time Slots, go to the WP Admin Dashboard, and navigate to Order Delivery Date. Under the General Settings tab, head over to Time Slots.
Make sure to check the Enable Time Slot Capture box. This will enable time slots on your checkout page alongside the delivery date. You can also mark the field as mandatory.
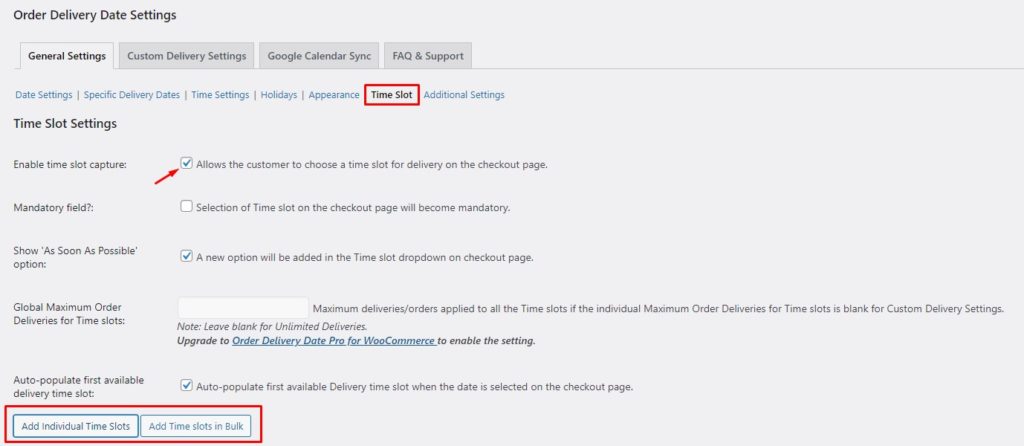
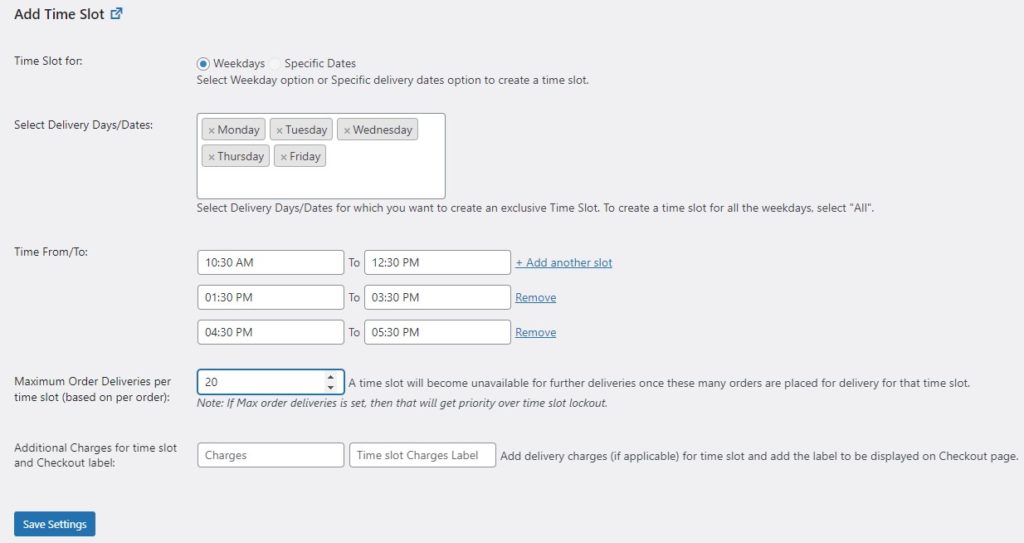
Once you have enabled the Time Slots field, it is time to create new time slots. Click on the Add Individual Time Slots option. It will reveal a form. Now you need to specify the delivery days and add custom time slots. Time slots will be applied to all the days selected.
Additionally, you can limit the maximum number of orders delivered per day. Once the limit is reached, that time slot will become unavailable for the buyers.
Lastly, you can even add charges for special time slots if you need to. Once you have configured everything, save the settings to apply all the changes.
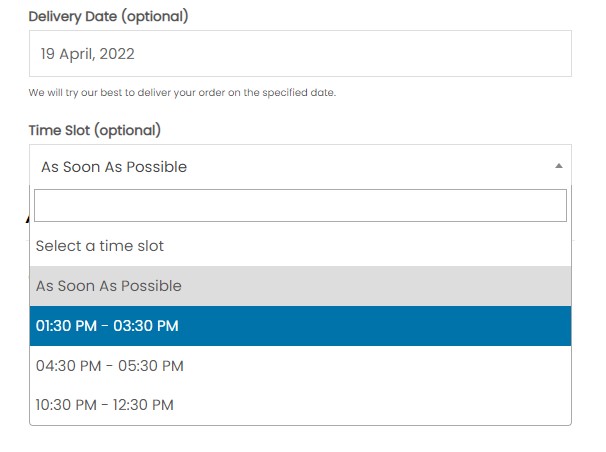
Done! That’s how easy it is. You can go to your checkout page and verify the changes yourself.
So that was all about the delivery date. So far, you have seen how to add a delivery date in WooCommerce. Let’s see some other ways to improve your customer’s shopping experience.
BONUS: Enable Shipping Address in WooCommerce
By default, WooCommerce does not come up with the option of adding a separate shipping address. It assumes that the billing address is also the shipping address.
However, sometimes, your customers might want to add a different shipping address. Therefore, you need to enable the shipping address field in WooCommerce to let your customers add a different shipping address if they need it.
To add the shipping address field in WooCommerce, we will use the Checkout Fields Manager plugin by QuadLayers. Let’s see how we can enable shipping addresses using the plugin.
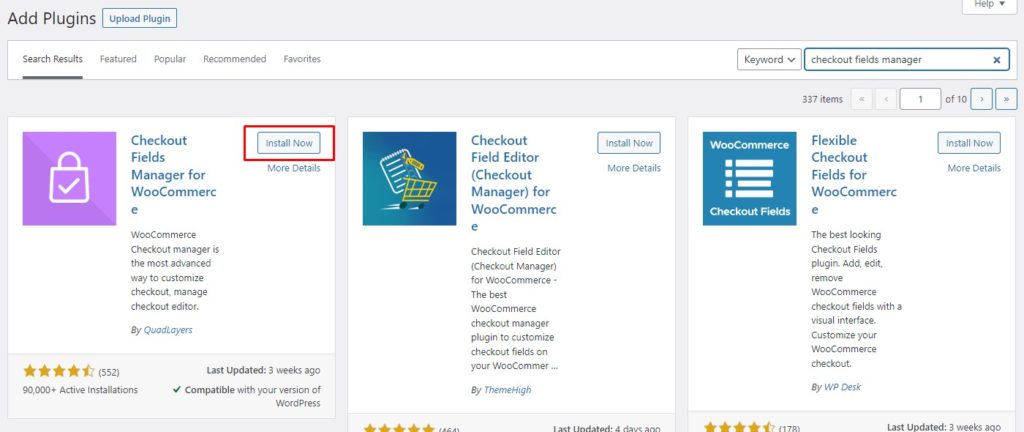
First off, we need to install the plugin. Go to your WP Admin Dashboard and navigate to Plugins > Add New. Search for the Checkout Fields Manager plugin by QuadLayers. Click on the Install Now button to install the plugin. Afterward, hit Activate to activate the plugin on your site.
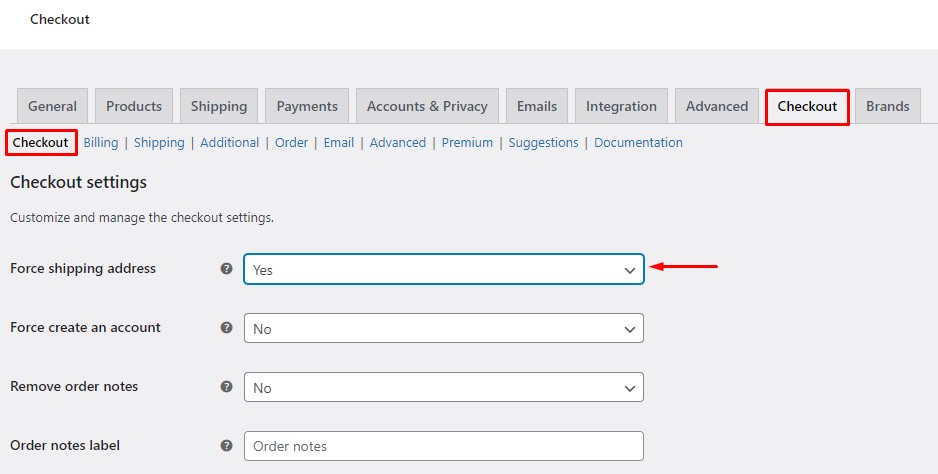
Once the plugin is active, go to the WP Admin Dashboard and navigate to WooCommerce > Checkout. Change the Force Shipping Address field to Yes and Save it for the changes to take effect.
That’s it! The shipping address field is now added to your checkout page. However, this is not the only way to enable shipping addresses. For reference, please check out our complete guide on how to enable shipping addresses in WooCommerce.
Furthermore, you can even use this plugin to edit or reorder checkout fields, add custom fields to checkout, or even add product images to checkout.
Conclusion
All in all, as a store owner, improving your customer’s shopping experience is your top priority. Letting the customer know when they can expect their order to arrive is a basic thing that everyone expects now.
Moreover, allowing your customers to select their preferred date for delivery can further enhance your user experience. Therefore, we believe, showing a delivery date is a must that every store should offer.
In this article, we have seen how to add a delivery date in WooCommerce using the Order Delivery Date plugin. We started off with the installation of the plugin. Then we saw how we can enable delivery date on the checkout page.
Afterward, we explored other features of the plugin like adding holidays to the calendar and adding custom time slots. Moreover, we saw the customization options to customize the delivery date field and delivery calendar. Lastly, we had a look at how to enable shipping addresses in WooCommerce.
Have you ever considered adding the delivery date in WooCommerce? How do you think it impacts the user experience? Let us know your thoughts in the comments below.
In the meantime, have a look at some more of our posts that can help you to improve your WooCommerce store:
