
How to Add Fees to WooCommerce Checkout
Do you want to add extra fees to the checkout? This guide will show you different methods to add fees to the WooCommerce checkout and maximize your revenue.
If you’re running an online store, you may need to charge your customers additional fees during checkout. For example, you may have to include fees for shipping and delivery, payment method charges, and so on. The good news is that WooCommerce provides a lot of flexibility and allows you to customize and add these charges to your online store. In this article, we will show you how to add fees to the WooCommerce checkout.
Before we have a look at the different options to do so, let’s dig a bit deeper and analyze when it makes sense to charge users extra fees.
When to Add Fees to the WooCommerce Checkout?
There can be many situations where you need to add fees during checkout. Some of the most common ones are:
i. Handling Fees
Handling fees are the additional charges that you include when the products you have to deliver are considered delicate or fragile. They include products that can be easily damaged and need to be moved with extra care. They usually have special packaging too. So if you sell this type of product, you can add an extra fee to protect these special items and prevent them from damaging while shipping.
ii. Express Delivery
When a shopper purchases a product from an online store, the delivery takes a certain amount of time depending on where the product has to be delivered and the companies that the store uses for it. However, the products might need to be delivered immediately in some cases, so some delivery services offer fast or 24-hour delivery for an additional fee. If this is something that your users might be interested in, you could offer it in your store.
iii. Shipping Regions
Even though online stores can deliver products globally, shipping charges might vary from country to country or even state to state within a country. That’s why it makes sense that you charge different shipping fees depending on where you need to deliver your products. For example, if you have a store in New York, you could offer free shipping for deliveries in New York but charge a small fee for deliveries in other cities in the United States and a higher fee for international deliveries.
iv. Payment Gateways
Payment gateway charges or transaction charges are also one of the additional fees that you might need to add during checkout. With the increasing use of online payments, some payment services charge a commission for every transaction they facilitate. So you might need to transfer all or part of these fees to your customers depending on the payment methods that you accept in your online store.
v. Taxable Amount
Some online stores include the tax in the product price but others don’t. If you’re in the second group, then you might want an option to calculate and add the tax during the checkout. Furthermore, tax rates can vary from country to country and even sometimes from state to state so adding the tax fee during the checkout can be a good option.
How to Add Fees to WooCommerce Checkout
There are 3 ways to add extra fees to the WooCommerce checkout:
- From WooCommerce
- Using a plugin
- Programmatically (via code)
Each of these methods has pros and cons and gets the job done so choose the one that best suits your needs and skills.
1. Add Fees to WooCommerce Checkout from WooCommerce
To add additional charges directly through WooCommerce, make sure that you have set up WooCommerce correctly.
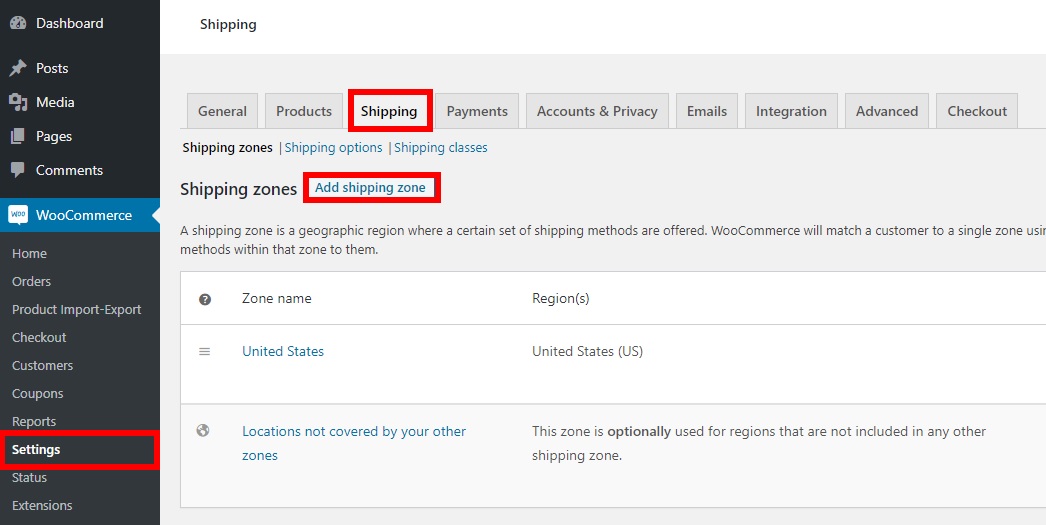
After that, in your WordPress dashboard go to WooCommerce > Settings and open the Shipping tab. Then, click Add Shipping Zone.
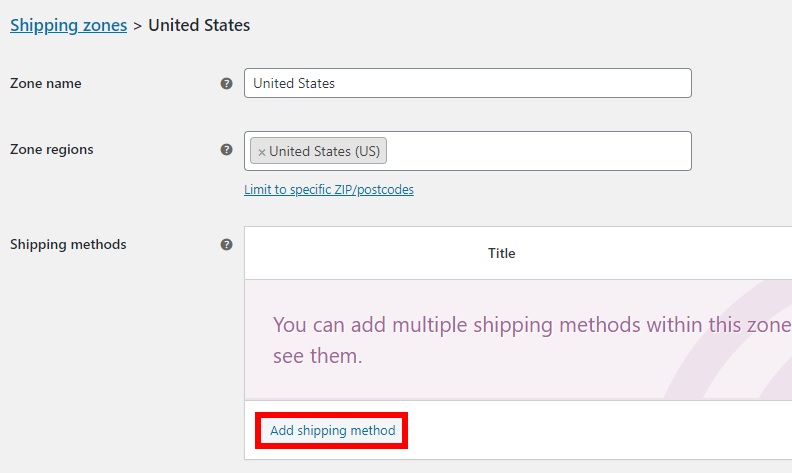
Here, you can add shipping zones by adding their names, regions, and shipping methods. Enter the zone name and regions you want to create and then press Add shipping method.
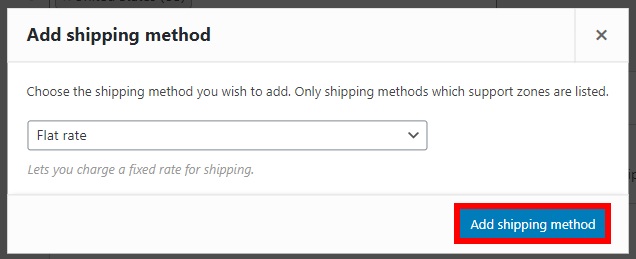
Here you can add three types of shipping methods:
- Flat rate
- Free shipping
- Local pickup
Since we are going to add extra fees, we’ll choose a flat rate. Once selected, click Add shipping method.
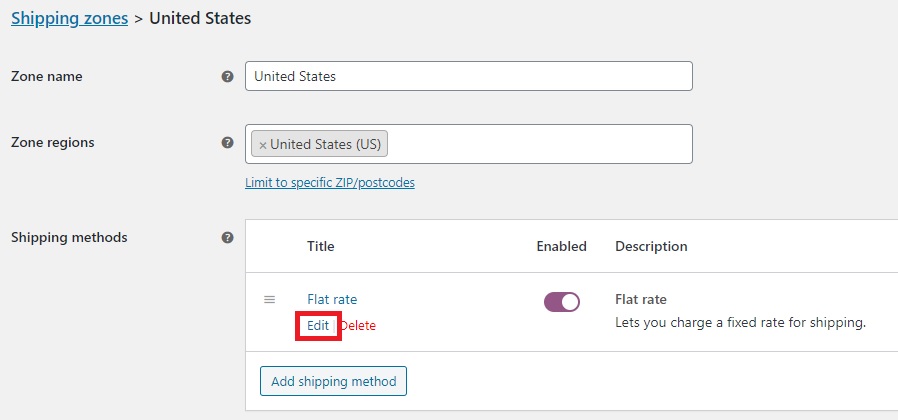
Now it’s time to add the shipping charges. Click Edit under the shipping method you have just created.
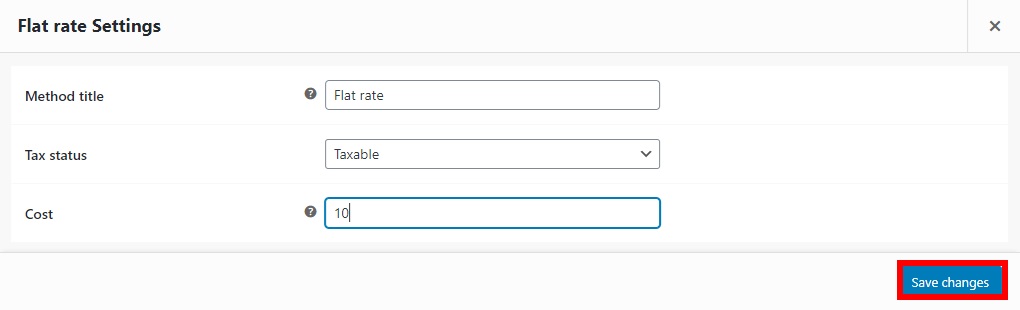
You’ll see a new screen where you can change the method title, tax status, and cost of the shipping. Simply add your desired rate for the shipping and don’t forget to save changes.
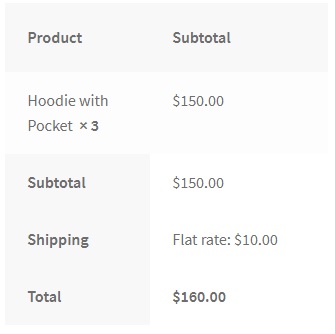
Now let’s have a look at the front end. When a customer buys a product and the shipping is in the United States, you’ll charge them a shipping rate of $10 as shown below.
From the Shipping tab, you can also add different shipping rates and methods for a particular shipping zone and you can enable or disable the shipping methods depending on the situation. Additionally, you can add more shipping zones and charge different rates for each of them to better manage the shipping prices and methods in your online store.
Adding fees with the default WooCommerce settings is easy but doesn’t provide many options and features. So, if you want more flexibility when you add fees to the WooCommerce checkout, you can use a plugin.
2. Add Fees to WooCommerce Checkout Using a Plugin
Checkout Manager for WooCommerce is one of the best plugins to customize and add extra fees to the checkout. It gives you more control and options to include fields than the default WooCommerce settings. Similarly, it also has conditional logic which can be a great help to create more complex situations. In this process, we will show you how to add extra fees both with and without the conditional logic.

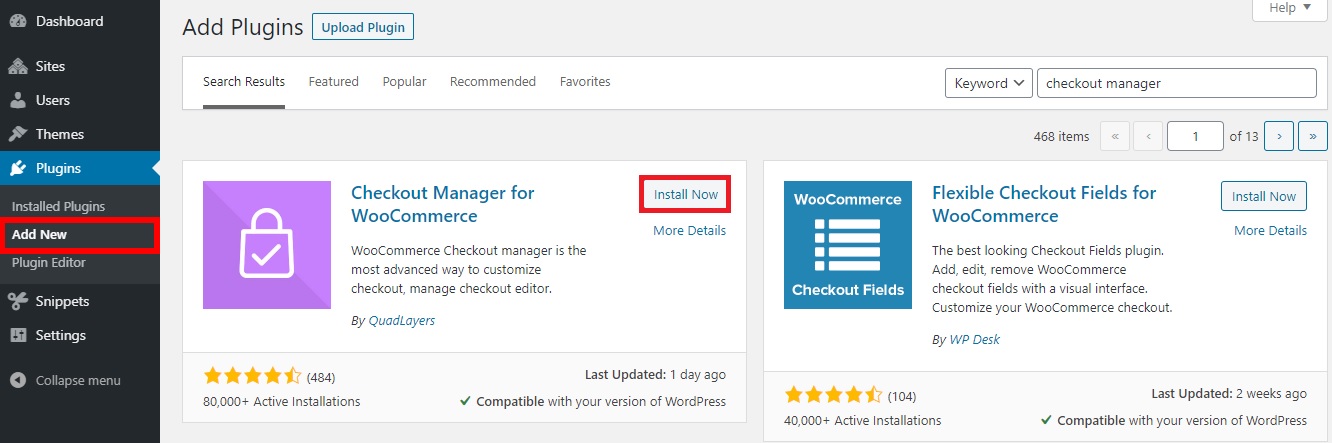
To start using this plugin, you’ll need to install it. So in your WordPress dashboard, go to Plugins > Add new and search for Checkout Manager for WooCommerce. Click Install Now and then Activate to complete the setup.
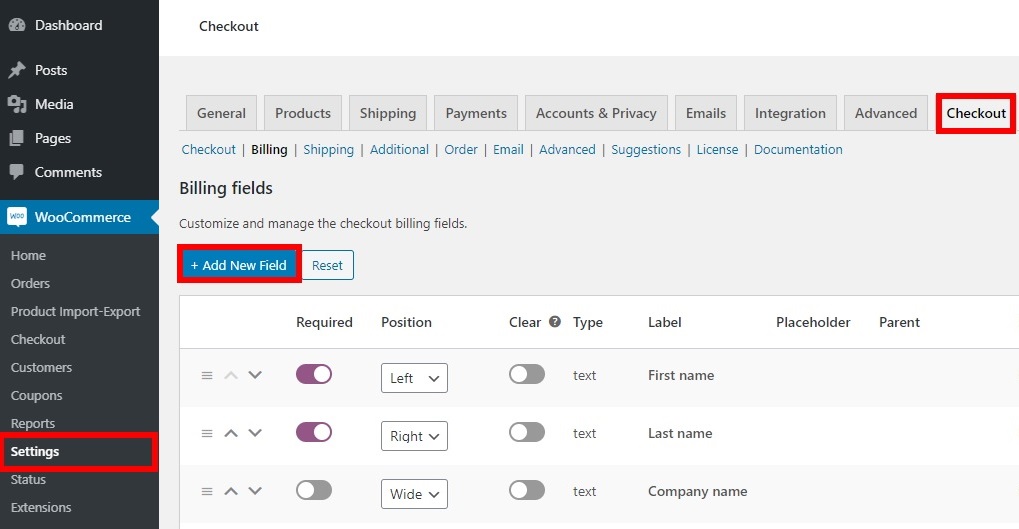
Now, go to WooCommerce > Checkout and open the Billing tab under it. You’ll see several billing fields that you can enable or disable for the checkout. For now, let’s click Add New Field.
Now you’ll be able to select the field options you want to add to your new field. You can create any type of field here. Let’s see how to add the extra fees with and without conditional logic.
2.1. Add Extra Fees Without Conditional Logic
Adding fields for extra fees without conditional logic is pretty straightforward. For example, let’s create a field so that customers can select fast delivery during checkout. We’ll use simple radio buttons for it but you can use other field options depending on your needs.
These are the options we selected in Checkout Manager to add a fast delivery option.
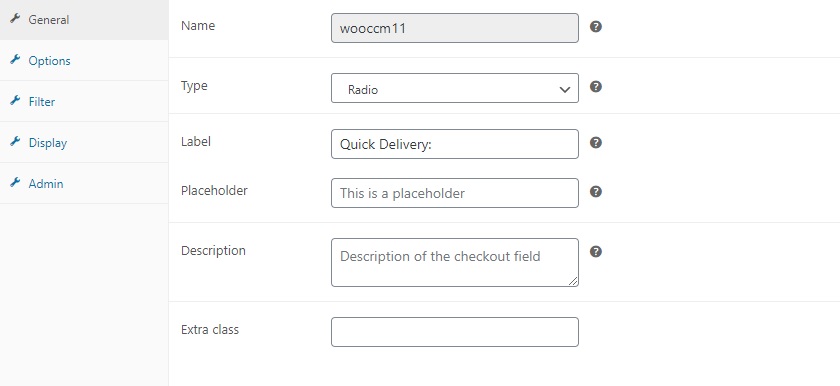
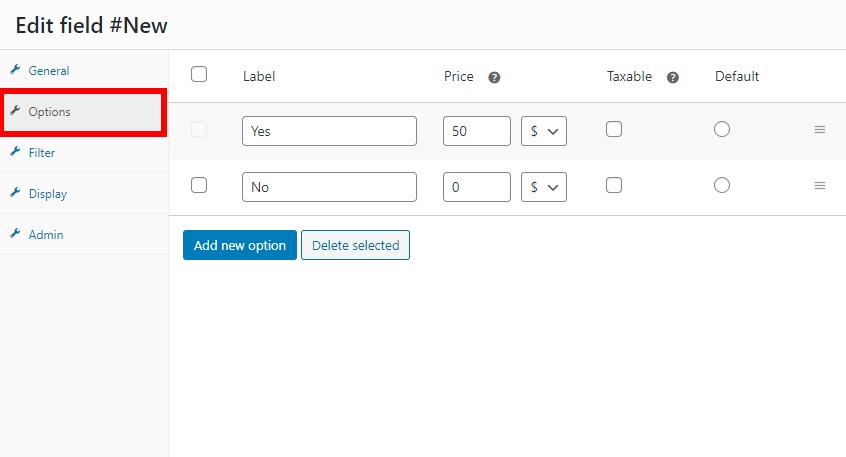
After you have entered the details, go to Options, add the fields, and enter the price you want to charge for quick delivery. Then, save the changes.
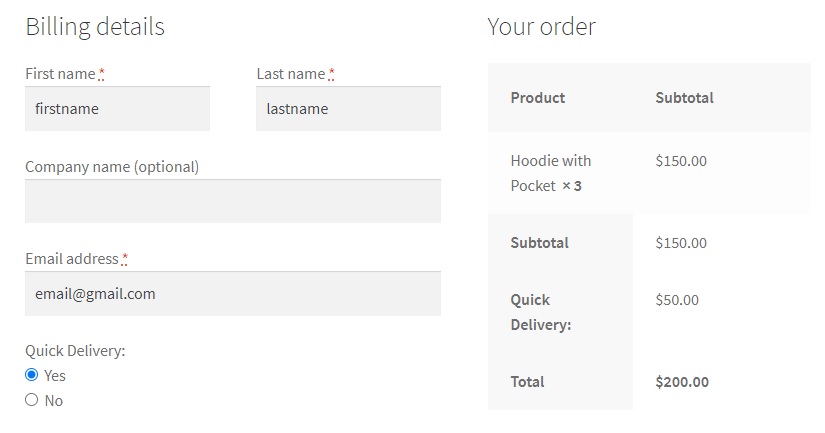
The additional fee will be added to the total amount when the customers select “Yes” under Quick Delivery. Additionally, under Your Order, you’ll see the name and amount of the extra fee so that customers have the breakdown of the price.
Now, let’s use conditional logic to create a more complex example.
2.2 Add Extra Fees With Conditional Logic
When we create conditional logic, it means that the conditional field will do a certain action if the condition is met or true, but do something else if the condition is not met or false.
Even though this can become quite complex if there are many conditionals, the Checkout Manager makes adding extra fees to the WooCommerce checkout with conditional logic easy. For this, you’ll need to create a parent field and a child field. For more information on how to do that, check out our guide on adding conditional fields to the checkout.
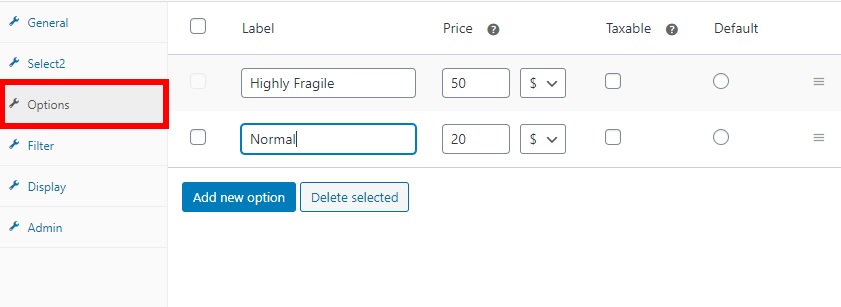
In the following example, we will add a fee for special handling during shipping. If the customer wants special handling, a “Fragile” tag will be placed on the product. Additionally, we’ll use conditional logic to add two different extra charges: one for “Highly Fragile” products and another one for just “Fragile” items.
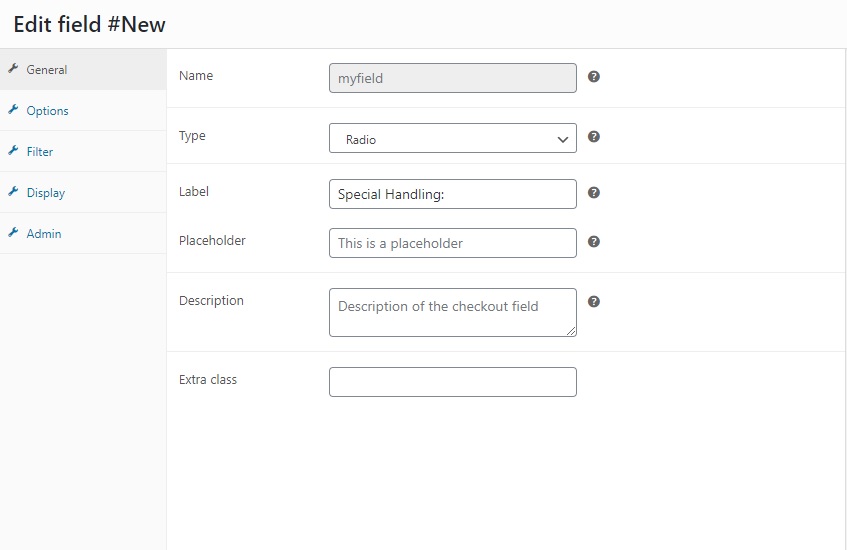
Create the parent field
First, you need to create a parent field and enter the required details. Here we’ll add field options for the special handling.
Then, go to Options and add the required information to add fees when the shoppers select the Special handling option. After that save the changes.
Create the child field
Now, you’ll need to create the child field with conditional logic. Click Add New Field and enter the details for your child field. In this case, the child field is the extra charge for fragile items.
To use conditional logic, check the box to activate conditional logic on the right side of the screen. Then, select the parent field which, in this case, is “Special Handling:”. Since the fragile charge can only be used when the customer wants special handling, select “Yes” for the next option.

After that, go to Options and add the options to determine whether the tag should be highly fragile or just normal. After that, add the required fees for both the options and save the changes.
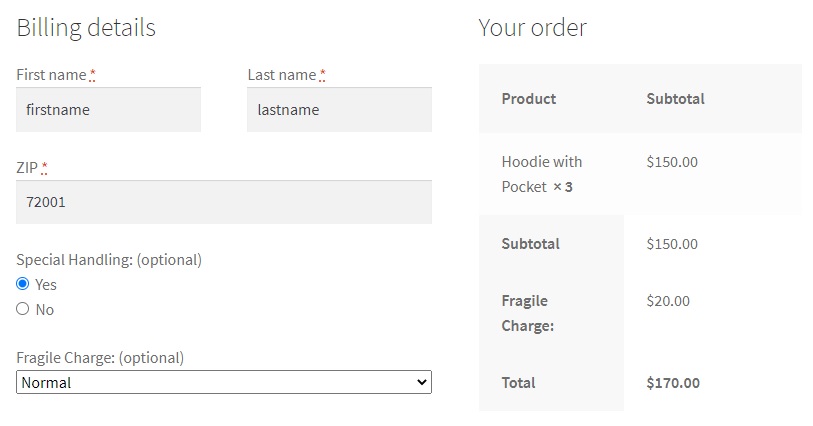
That’s it, you’ve just added fees to the WooCommerce checkout using conditional logic! From now on, you’ll add fragile charges to the customer’s total amount if they select the special handling option. As you can see in the image above, the users can clearly see the breakdown of each component of the price in their order.
3. Add Fees to WooCommerce Checkout Programmatically
Using codes to customize your store isn’t everyone’s cup of tea, but it gives you much more control over customizations for your website compared to plugins. So, if you have coding skills, you can also add fees to the WooCommerce checkout programmatically.
To do this, you’ll need to edit the functions.php file, so before you continue we recommend you backup your website. Editing these files is a delicate process and misplacing even a single character in a code can break your website. Additionally, make sure you use a child theme. You can create one or use any of these plugins.
To access your functions.php file, in your WordPress dashboard go to Appearance > Theme Editor. You can add the code snippets there or use plugins like Insert Headers and Footers or Code Snippets.
We can add a great number of different extra charges to the checkout. Here we’ll show you a few of the most common examples that you can take as a base to take your checkout to the next level.
3.1. Add a Fixed Fee to the Checkout
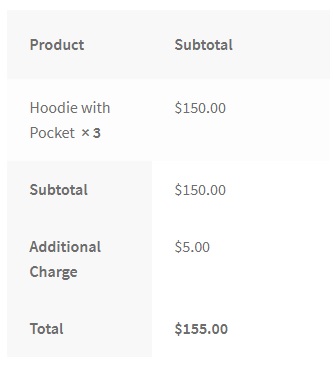
Most of the time, the additional fees that we add on the checkout page are fixed fees. For example, the express delivery and special handling fees that we saw before. To add this type of extra charge, use the following code and edit the required text for the field name. In our case, we’ll call it “Additional Charge” and the fee will be $5.
add_action('woocommerce_cart_calculate_fees', function() {
if (is_admin() && !defined('DOING_AJAX')) {
return;
}
WC()->cart->add_fee(__('Additional Charge', 'txtdomain'), 5);
});
With this code, a flat fee of $5 called Additional Charge will be automatically added to the total of the customers’ checkout page.
3.2. Add a Percentage Based Fee
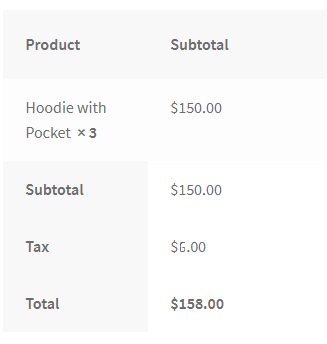
While most fees added during checkout are fixed, some of them can be based on percentages such as taxes and payment gateways charges. If you want to add something like this to your online store, then the following code will be helpful for you. In this case, we’ll add a tax of 5% to the total price of the order (products + shipping).
add_action('woocommerce_cart_calculate_fees', function() {
if (is_admin() && !defined('DOING_AJAX')) {
return;
}
$percentage = 0.04;
$percentage_fee = (WC()->cart->get_cart_contents_total() + WC()->cart->get_shipping_total()) * $percentage;
 WC()->cart->add_fee(__('Tax', 'txtdomain'), $percentage_fee);
});
Now, after adding these codes to the theme files, the additional fee will be automatically calculated with the given percentage. Then, the fee will be added to your customers’ total during checkout which is 4% of the total amount. The tax amount is rounded off to the decimal value in this case.
3.3. Add Fixed fee to specific products
Another interesting option is to add a fixed fee to specific products. For example, if you have products that require special handling or shipment, you can automatically add a special fee to them. If that’s your case, you can use the following script:
/* Add fee to specific product*/
add_action('woocommerce_cart_calculate_fees', 'add_fees_on_ids');
function add_fees_on_ids() {
   if (is_admin() && !defined('DOING_AJAX')) {return;}
   foreach( WC()->cart->get_cart() as $item_keys => $item ) {
     if( in_array( $item['product_id'], fee_ids() )) {
     WC()->cart->add_fee(__('Additional Charge'), 10);
     }
   }
}
function fee_ids() {
   return array( 652,645,625 );
}
In this example, we add a fixed fee of $10 when the user adds products with ID 652, 645, and 625. Simply take the code as a base and adjust the fee you want to charge and the ID of the products you want to apply it to.
Conclusion
All in all, adding extra fees to the checkout can be helpful in different situations:
- Express delivery
- Special handling options
- Payment method fees
- Shipping fees depending on the country or region
- Tax
Regardless of the type of extra fees you add, make sure that they’re clear for the customers. Hidden fees are one of the main causes of cart abandonment so we recommend you’re transparent with your fees.
In this tutorial, we have shown you 3 different ways to add fees to the WooCommerce checkout:
- From WooCommerce
- With a plugin
- Programmatically
Which one is the best for you? It depends. WooCommerce allows you to include additional fees but default but it has very limited options when it comes to adding fields and options. If you want more flexibility to add fees with more fields and conditional logic but without using any code, Checkout Manager for WooCommerce is a great alternative. It’s a freemium plugin that will help you customize your checkout and take it to the next level.
Alternatively, if you want flexibility but you don’t want to install any plugin, you can customize your online store using code. This provides you with a lot of options and allows you to do virtually anything but you need coding skills.
For more information on how to improve your checkout, have a look at some of these guides:
- WooCommerce Checkout – The complete guide
- Best WooCommerce checkout plugins
- How to customize the WooCommerce checkout page
Did you have any issues adding extra fees to the checkout in your store? Let us know in the comments section below!

thanks for the well-written article. I would like to ask a question now, trying to explain better. up to now we have used the plugin to manage the extra for cash on delivery payments. now we want to take advantage of the Woo Blocks plugin, which, however, does not agree with all plugins. Do you have a suggestion on how to insert an extra when the user selects as a payment method on delivery, via phpfunctions?
thanks great article
You’re welcome Taj
I’m currently using a 3.5% percentage based fee for shipping/handling to cover my PayPal expenses. I’ve been using this one for a while:
add_action( ‘woocommerce_cart_calculate_fees’,’woocommerce_custom_surcharge’ );
function woocommerce_custom_surcharge() {
global $woocommerce;
if ( is_admin() && ! defined( ‘DOING_AJAX’ ) )
return;
$percentage = 0.035;
$surcharge = ( $woocommerce->cart->cart_contents_total + $woocommerce->cart->shipping_total ) * $percentage;
$woocommerce->cart->add_fee( ‘Handling’, $surcharge, true, ” );
}
However, I’m thinking about offering Afterpay on the site, which allows people to pay later, but they charge a 7% fee. wondering if there is a way to add a 7% percentage based fee charge if someone wants to check out via that method?
Thanks for great article! I used the last method on my site and it is working but I wanted to add an if condition to check if the total of the product is less than $150 then the extra fees is added otherwise it is not added. How to add that pls help. Thanks in advance.
Hi Anne, thanks for your comment.
Check out this post (section 2.4) that teaches you how to apply a discount depending on the subtotal cart value.
For more information about conditional fields, have a look at this guide.
Hi German, Thank you for the quick response and help.
Thanks for this solution! I can get this to work for all my parent products but not for any of the variations. Can you tell me what the code would be so that I can add a packaging fee to product variations? Thanks!
Hi Wendy, the code in the post only works for simple products. The code for variable products is more complex
That was awesome and timely. Used and worked perfectly thank you. Just curious how would you add different fees for different products using the functions.php method I tried to just add it multiple times but of course it said I can’t call that function it was already called I am not sure where to truncate the code to place in the snippet to get it to work,
Hi Andy, you can adjust the code to add fees to different products. Another solution is to use the same code and change the product IDs. If you do this, make sure you change the name of the function every time you use it.
hello great article!
whats the code to add extra percentage fee only when someone uses paypal?
Thanks Nikolaos. The logic is similar to the snippet in 3.3 but in the conditional you should use payment methods (PayPal in your case) instead of products
Hi, Great article!
add_action(‘woocommerce_cart_calculate_fees’, function() {
if (is_admin() && !defined(‘DOING_AJAX’)) {
return;
}
WC()->cart->add_fee(__(‘Additional Charge’, ‘txtdomain’), 5);
});
I’m wondering, how to add fee per qty?
Thanks in advance.
Can we set it up so that the customer can manually add a fee/charge at the checkout?
Can I setup a checkmark box to give our customers the option to pay the processing fee at checkout?
Solved my problem! I couldn’t figure out how to add a card processing fee, since the PayPal gateway was taking fees from me. After reading this article I found it was easiest just to turn on Shipping, even though I’m selling virtual tickets, and then customize the Shipping zone to say “Card processing fee” with a flat rate of $3.50 added onto each order. Worked well! Thank you!
I am trying to figure out how to do the same thing except using category ID not product ID’s. Any thoughts?
Please I need help with something.
I have an e-commerce store running with WCFM.
This is what I want to do:
1. Divide the Shipping total at the checkout by 3, where three represents the Business Owner, Vendor, and the Customer
2. Take the result of the divided shipping total and add it to the merchant’s commission which he will pay to the Business Owner.
Any help will do
Hello Christian
Please open a ticket at http://www.quadlayers.com/account/support
Great Tip! Saved me $50 per year for a plugin. Thanks.
Glad to hear our guide was helpful, Phil.