Do you want to customize your website’s typography? You’ve come to the right place. In this guide, we’ll show you different methods to add Google Fonts to your WordPress site step-by-step.
By default, WordPress themes come with some specific fonts and when you publish content, these fonts are rendered in the frontend. However, sometimes you might want to use a custom font on your site to give it the perfect look and feel for your brand. That’s why today, we are going to show you how to include Google Fonts on your site!
Why add Google Fonts to WordPress?
The font you use has a great impact on your site. On the one hand, it affects your website’s design and how it looks. The font is one of the first things visitors see when they come to your site so it has to match the style of your business. On the other hand, it can also have an impact on user experience. For example, if the font is hard to read, your visitors will have trouble finding what they want and leave your site. So, having the right font will not only make your site look better but also improve users’ experience.
That’s why we highly recommend you use a user-friendly font that transmits the essence of your business. There are several font services such as Adobe’s Typekit and Friconix. However, the best one out there is Google Fonts, a free service with thousands of font families there that are ready to integrate with your website.
And the best part is that adding Google Fonts to WordPress is pretty easy and it only takes 5 minutes. There are several ways to do it.
Methods to add Google Fonts to your WordPress site
There are different methods to include Google Fonts in WordPress:
- Using plugins
- Editing the functions.php file
- Via Style.css
- Editing the header.php file
All these options get the job done so choose the one that best fits your skills and needs. Before we have a closer look at each of these methods, you should check if your theme comes with Google Fonts integration.
Check Google Font Integration
Most WordPress themes come with a dedicated theme panel. From there, users can customize the entire theme without writing any code. Some themes like GeneratePress come with integrated Google Fonts support. This means that you don’t need to use plugins or custom codes to integrate the fonts. This can save you some time and make things easier for you.
If you use a theme that comes with the integration with Google Fonts, you can make changes to your site’s typography from the theme panel or the WordPress customizer. So, before you start with the process to include Google Fonts on your site, we recommend you check if your theme already comes with Google Fonts.
Now, let’s have a look at each method to add Google Fonts to your WordPress site.
1) Using Plugins
One of the easiest ways to add Google Fonts to WordPress is to use a plugin. One of the best ones out there is Google Fonts Typography. This is a free tool that will help you include Google Fonts on your site without writing a single line of code.
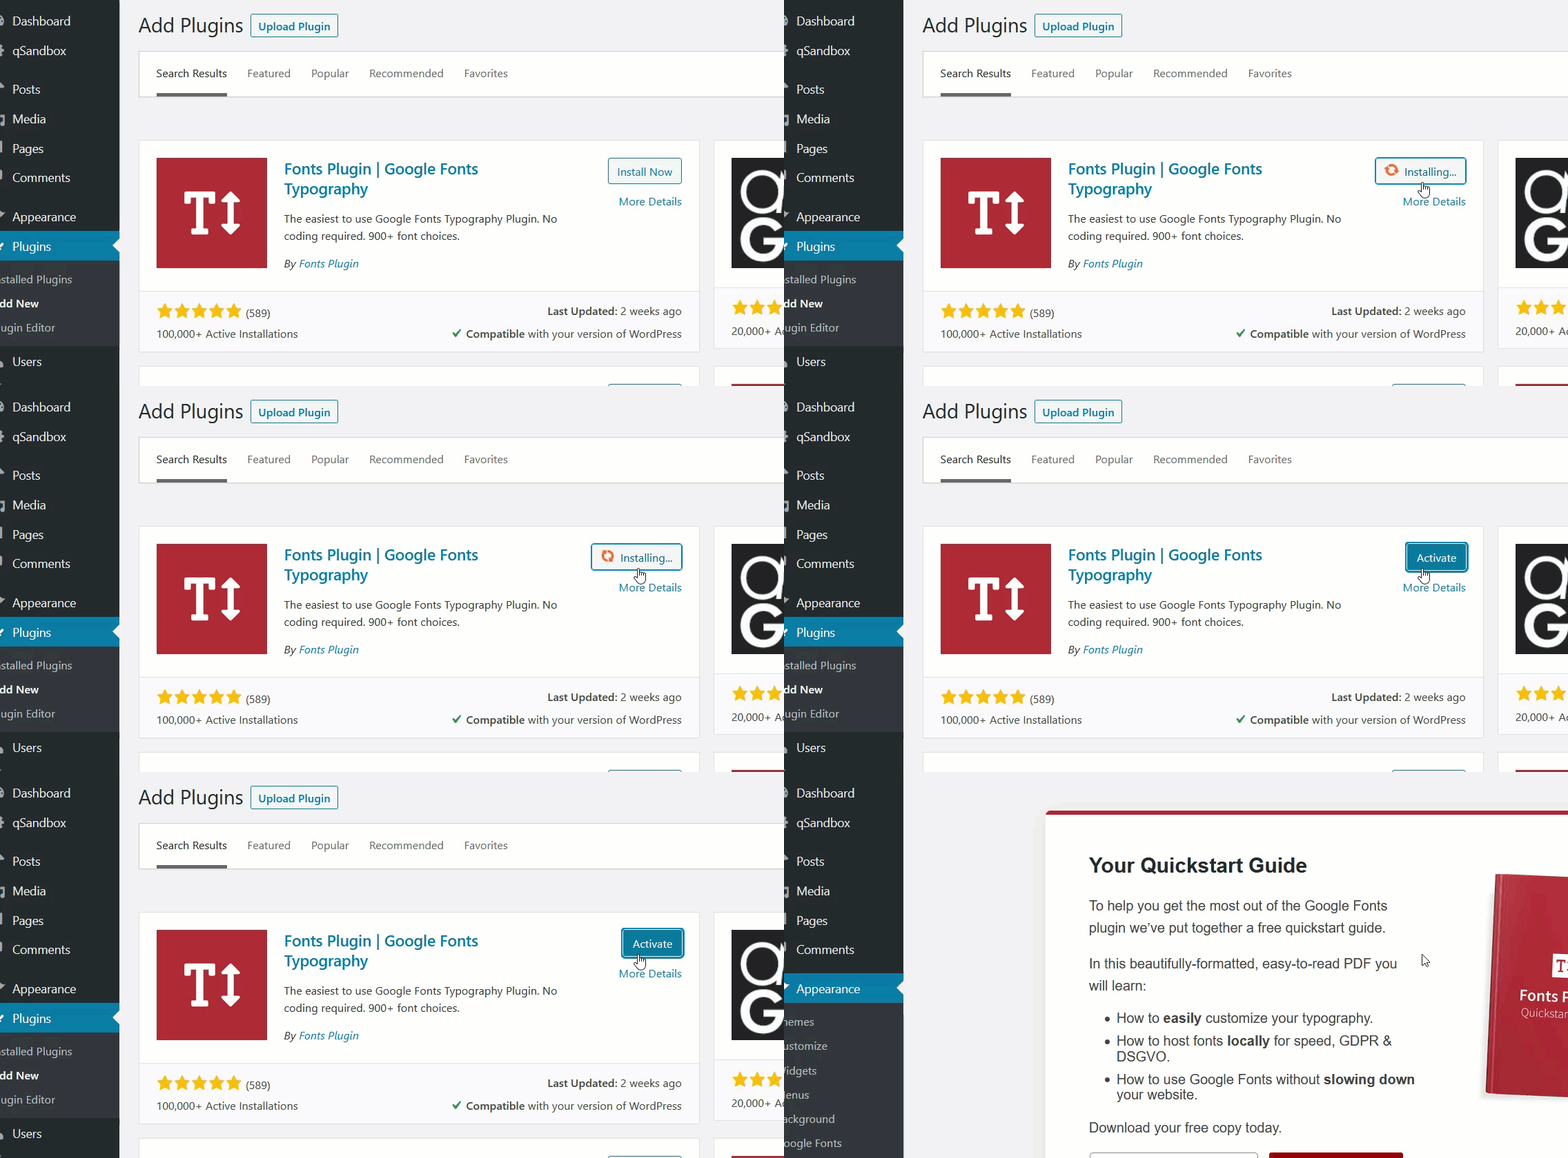
First, install and activate the plugin on your website.
After that, go to Plugins and check the plugin’s settings.
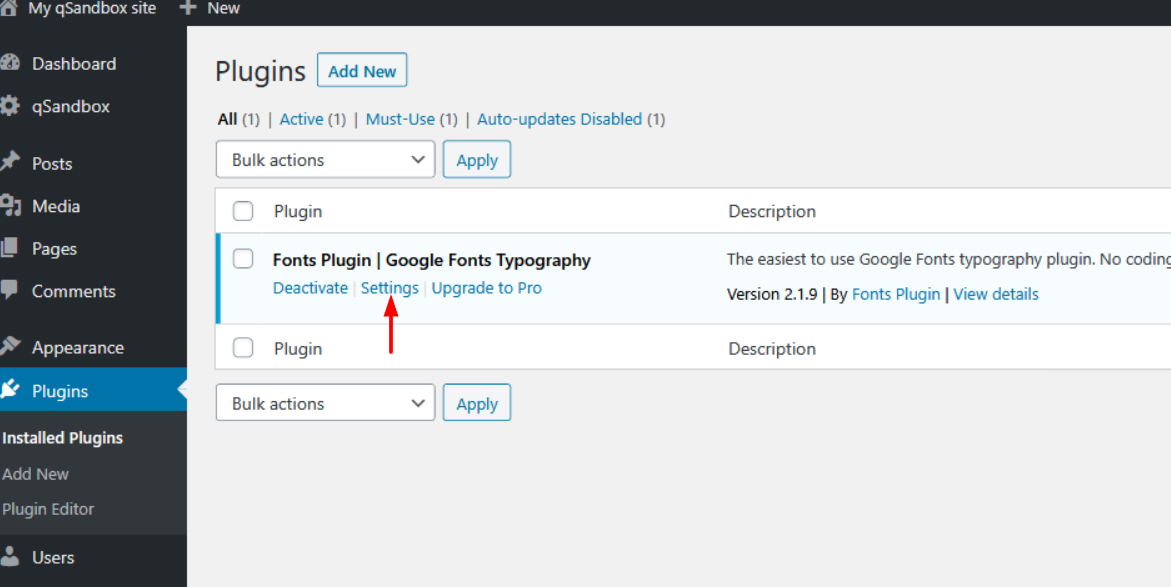
When you click on it, you will be redirected to the WordPress customizer.
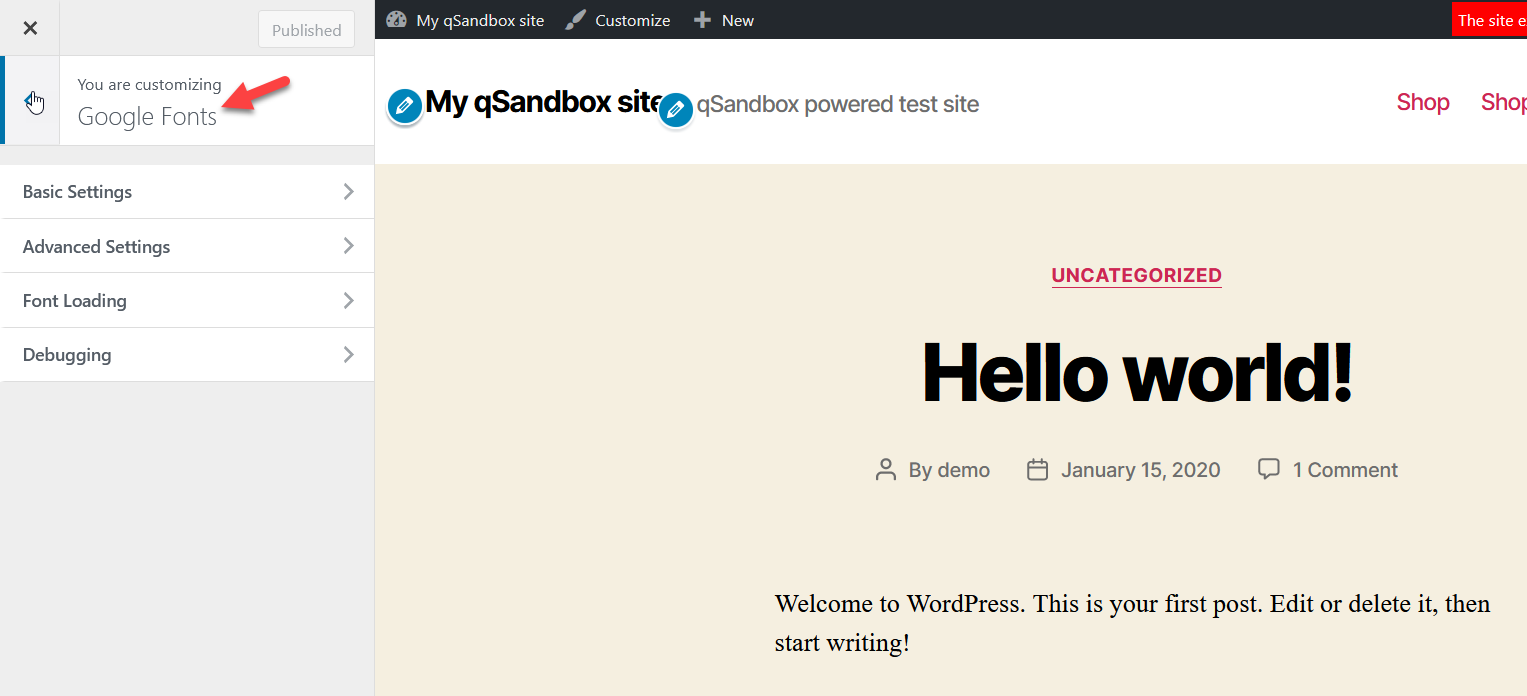
From there, you can take control of your website’s typography. You will see four main configurations:
- Basic settings
- Advanced settings
- Font loading
- Debugging
Let’s have a look at what both the basic and advanced settings have to offer.
Basic settings
From the basic typography section, you can choose your default font family for the body, heading, and input fields.
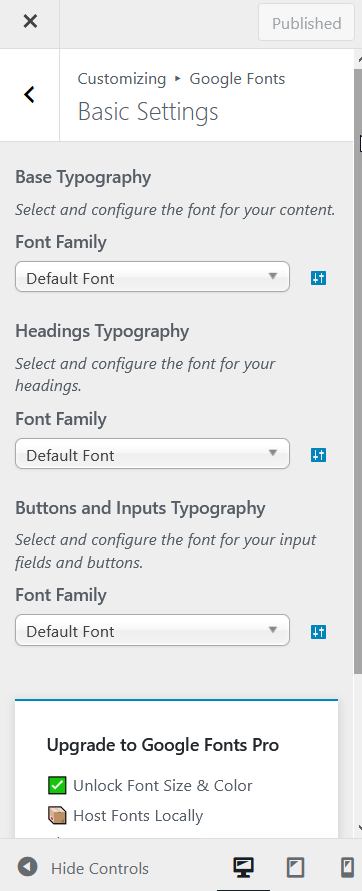
From the dropdown under each Font Family section, you will be able to choose any of the hundreds of Google Fonts. If you know the font you want, simply type it using the search feature.
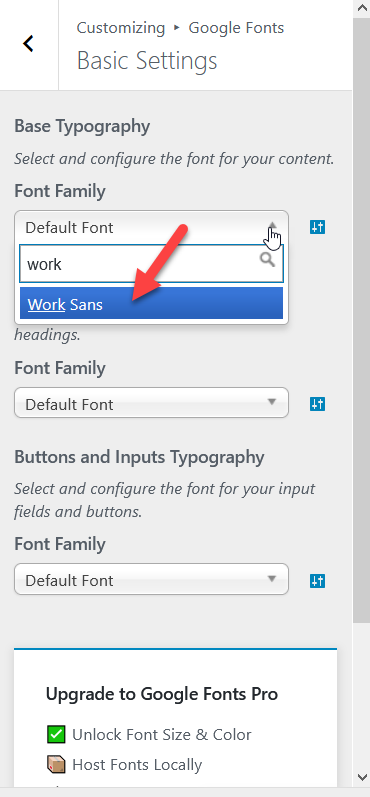
For this tutorial, we will be using the Work Sans font. After choosing a font from the dropdown, changes will be reflected instantly and you’ll see the live preview with the new font. On top of that, you will be able to specify a custom font-weight and style.
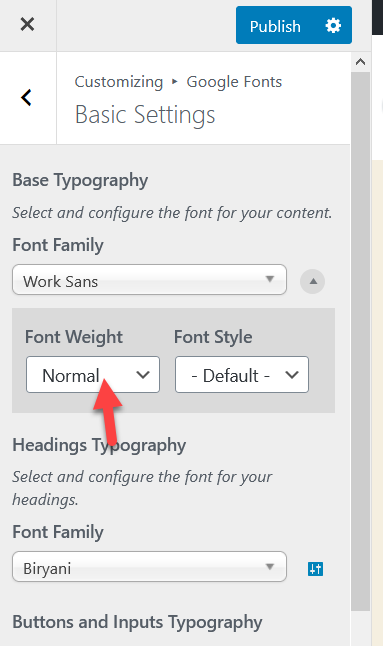
Once you finish, publish the changes.
Advanced settings
Under the Advanced settings, you can choose the font family for your branding, navigation, content, sidebar, and footer.

This is a great feature if you are planning to use different fonts on different parts of your website. After you select a font from the dropdown, publish the changes.
Google Fonts’ free version comes with limited features but there’s also a premium version available that starts at 29 USD for one site.
This pro version will help you configure things like font size, color, optimization, and custom elements. It’s a great choice if you want to take control of all your typography options. On the other hand, if you don’t want to spend money on this, you can make these changes using a bit of CSS.
2) Edit the functions.php file
Another option to add Google Fonts to your WordPress site is to edit the functions.php file. Before you move forward with this method, make sure that you are using a child theme. If you don’t know how to do it, you can read about how to create a child theme or use a child theme plugin.
For this method, you can either directly edit the functions.php file or use a plugin. If you’re a beginner, we recommend you use the Code Snippets plugin to add custom code to your site. In this guide, we will use Code Snippets.
NOTE: It’s worth noting that if you use Code Snippets, you don’t need to create a child theme. However, we always recommend having one.
So, to edit the functions.php using Code Snippets, first, install and activate the plugin.

Then, go to the plugins’ settings. From there, you can add a new snippet to your site.
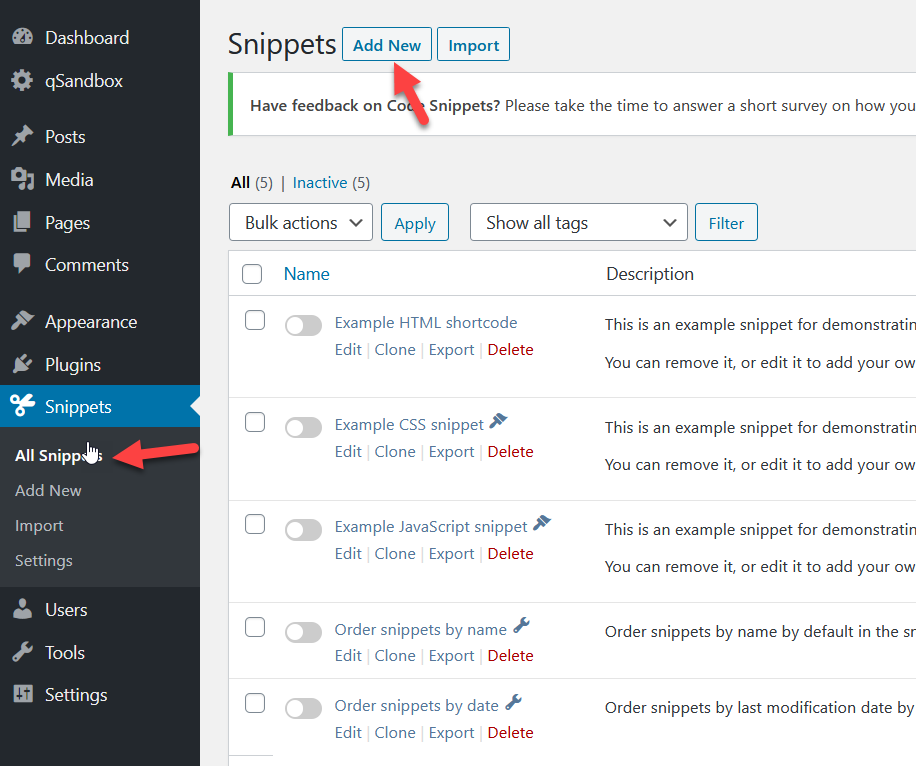
Select a font
In a new tab, open Google Fonts and select a font family to use on your website. You can use the search font feature on the site or simply browse. In our case, we will use the Lato family.

Once you have selected a font, you will go to the font’s page. You’ll see the preview option where you can test the font before adding it to your site. After that, select the styles you want to use. For example, we are going to choose the Regular and Bold styles.

You can review your selections on the right panel.

After adding the styles, you’re ready to embed them in WordPress. To do that, copy the link of the font family from the Embed tab.

Add the font to your site
Now, copy the following snippet and paste it in the Code Snippets plugin.
<?php
function wpb_add_google_fonts() {
   wp_enqueue_style( 'wpb-google-fonts', 'https://fonts.googleapis.com/css2?family=Lato:wght@400;700&display=swap', false );
   }

   add_action( 'wp_enqueue_scripts', 'wpb_add_google_fonts' );
?>
Make sure you replaced the font URL with the fonts you’ve selected.
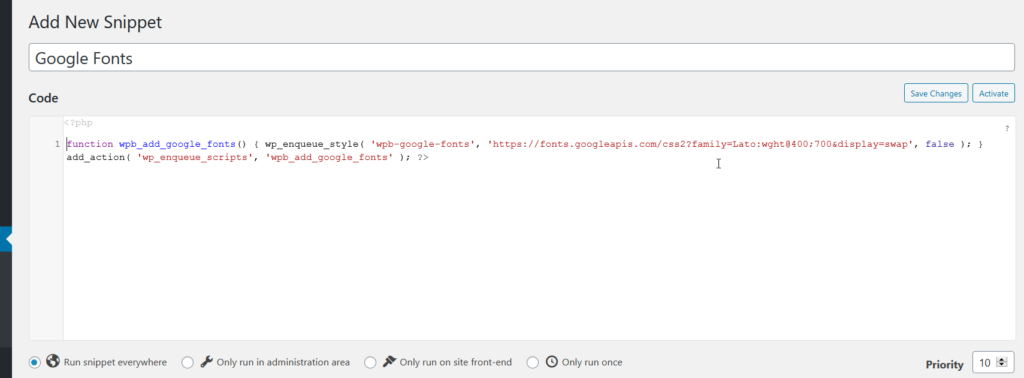
After that, save the snippet and activate it. You have successfully added Google Fonts to your WordPress site!
If you don’t want to use a plugin for this task, simply paste the above code in your child theme’s functions.php file using an FTP client.
Apply the new font
After that, you can apply the new font with a bit of CSS. For example, to edit the body font, you can add the following code to the Additional CSS section in the customizer.
body {
font-family: 'Lato', sans-serif;
}
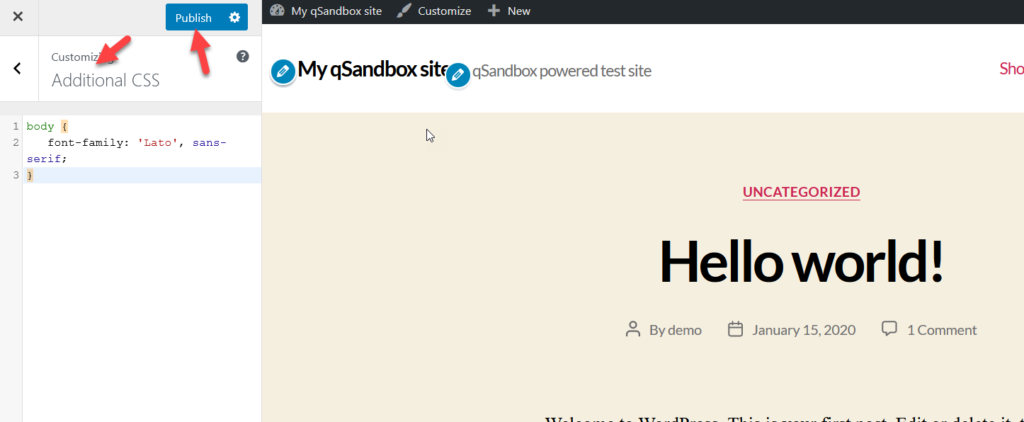
After you publish the change, you’ll see how the font of the body changes. Since you are using the customizer, you’ll immediately see the changes in the preview section.
If you need to modify any other elements on your site, you need to modify the above code and specify the elements you want to change and the font family. For example, if you want to change all the h3 headers to the new font, you’d write something like this:
h3 {
font-family: 'Lato', sans-serif;
}
This way, you will be able to add unlimited Google Font families and customize your WordPress site.
3) Customize the style.css (@import)
Another way to add Google Fonts to WordPress is via the style.css file. This time, instead of using PHP codes, you will edit the website’s style.css to add new font families.
Select the font
First, go to Google Fonts and select the ones you want to use on your site. Under the Embed section, select the @import mode.

Add the font to your site
Now, the panel will show you a unique CSS code. Simply copy the code and paste it in the Additional CSS in your WordPress dashboard.

Then, press the Publish button.
Apply the new font
After that, you can decide where you want to apply the new font. For example, we have chosen the Kufam font in cursive, so to modify the body font, use the following CSS code:
body {
font-family: 'Kufam', cursive;
}
As you can see, the live preview section automatically updates and displays the changes.
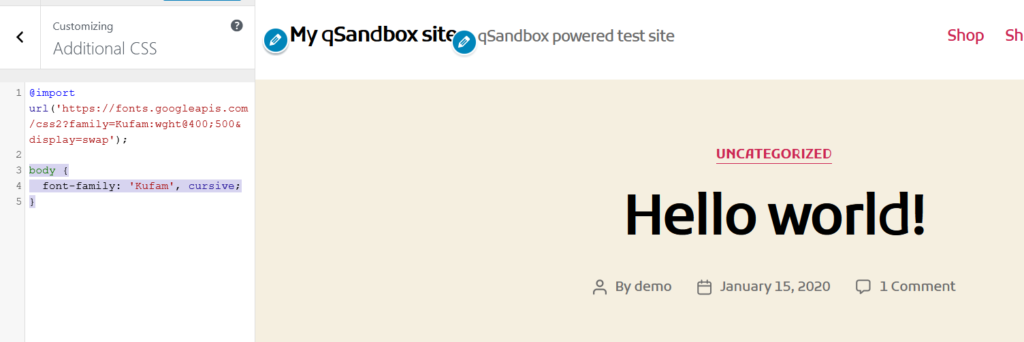
Similarly, if you want to apply the new font to all the h2 headings, the code you need to use is:
h2 {
font-family: 'Kufam', cursive;
}
This is another very simple method that even beginners can use. And the good thing is that you don’t need any plugins.
4) Edit the header.php file
The fourth method to add Google Fonts to your WordPress site is by editing the header.php file. We have previously seen how to edit the header in WordPress so if you have read that post, this will be easy. Don’t worry if you haven’t. In this section, we will show you how to include new fonts. Even though it involves a bit of coding, it’s pretty simple even for beginners.
For this you’ll need:
- The Google Font’s link
- The path to your style.css file
Let’s see how to get each of them.
Get the Google Font’s link
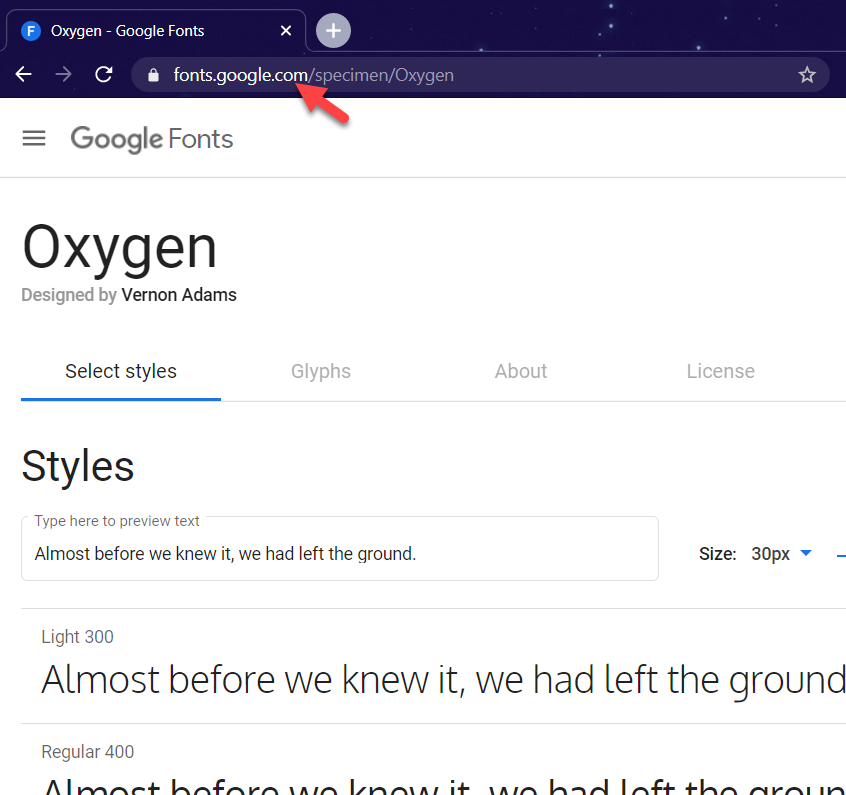
The font’s link can be fetched from the Google Fonts website. Search for the font you are planning to use and select it.
In the address bar, you will see the font’s URL.
Get the style.css path
Now, let’s see how to find the style.css path. If you have cPanel access, log in to your site’s control panel and open the file manager. In the wp-content folder, you will see a folder called themes. That’s where all your installed themes live. Before moving forward, you need to know what the active theme of your website is.
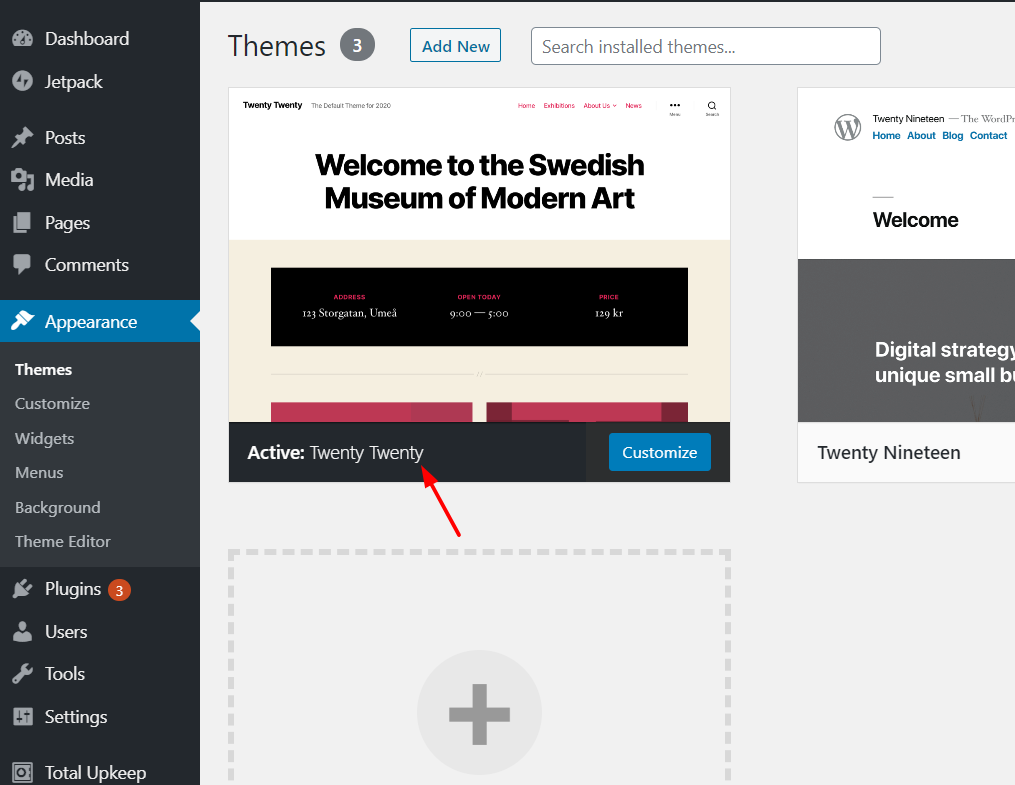
You can find your active theme under the Appearance section in the WordPress dashboard.
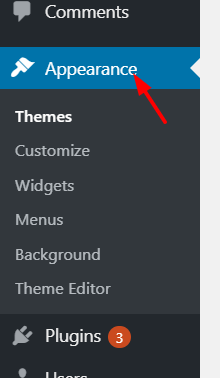
For example, in our case, it’s Twenty-Twenty.
In the cPanel, we’ll go to wp-content > themes > twentytwenty.

In the left panel, you will see the path to your theme files. Copy it.

Following our example, we got something like this: public_html/wp-content/themes/twentytwenty. Now, all you need to do is remove the public_html part, add the domain name there, and mention the /style.css file at the end of the code. So the new code will be something like this www.example.com/wp-content/themes/twentytwenty/style.css.
When you open the URL on your browser, the style.css file will load. If you get a 404 error page, it means that the path to your style.css file is wrong.
Add the Google Font’s link and style.css to the header
Once you’ve got the font’s link and style.css path, all you need to do to add Google Fonts to your WordPress site is copy the code from below, and paste it in the themes header.php file.
<link href="https://fonts.googleapis.com/css2?family=Oxygen&display=swap" rel="stylesheet">
<link rel="stylesheet" type="text/css" href="http://yoursite.com/wp-content/themes/yourtheme/style.css" media="all">
Remember to replace the URL with your font and change the path to your style.css with your own.
If you don’t feel comfortable modifying the header.php file, you can use the Insert Headers and Footers plugin to add the code. Let’s have a look at how to use this tool.
Change header.php with a plugin
First, install and activate Insert Headers and Footers on your site.

After that, go to Settings > Insert Headers and Footers.
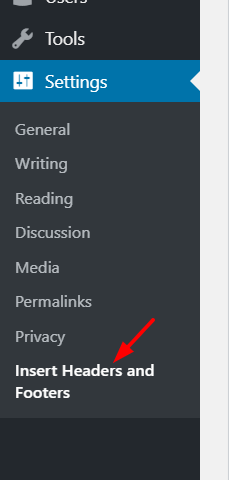
You will see three blocks there.
- Header
- Body
- Footer

As you will add the code to the header section, paste the above code with your font’s URL and style.css path in the Scripts in the Header section. Then, remember to save the changes.
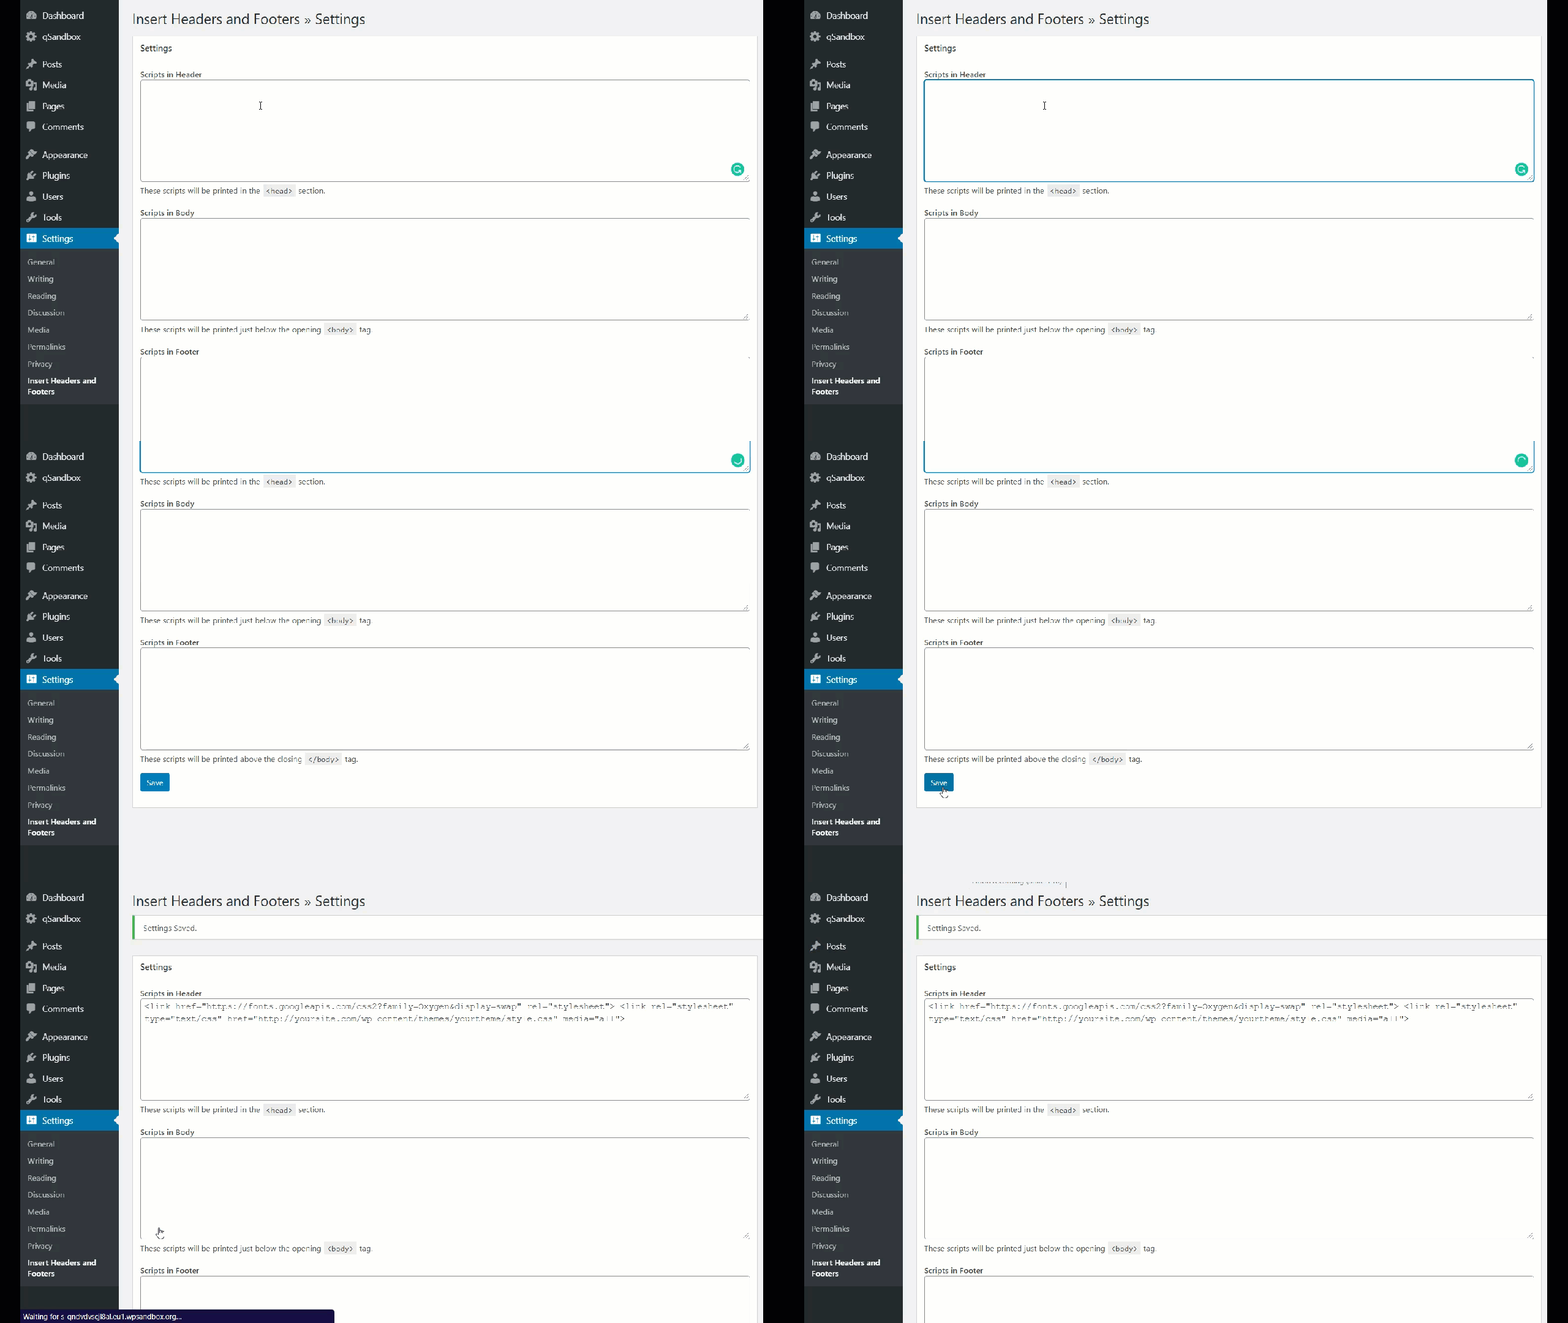
You can leave the body and the footer sections empty as you won’t make any changes there.
The code you have just pasted will go right above the </head> tag. If you are not using the plugin, make sure you paste the HTML code in the <head> section. Otherwise, it won’t work!
That’s it, you have completed the integration and added Google Fonts to your site!
Google Fonts Pro Tips
Adding Google Fonts to your site is just the first step. After that, we recommend you check out some of our pro tips that will help you optimize your site even more.
Host Google Fonts Locally
Google Fonts is an online library that contains a lot of free fonts. When you use their service to embed fonts on your site, you will send requests to their servers and fetch the requested content. If the Google Fonts server is facing technical issues, that can affect your website’s performance too.
To get rid of that issue, you can consider hosting the fonts on your local server. If you do this, you won’t need to send additional external requests. However, keep in mind that that can take up your server’s resources.
Enable DNS Prefetching
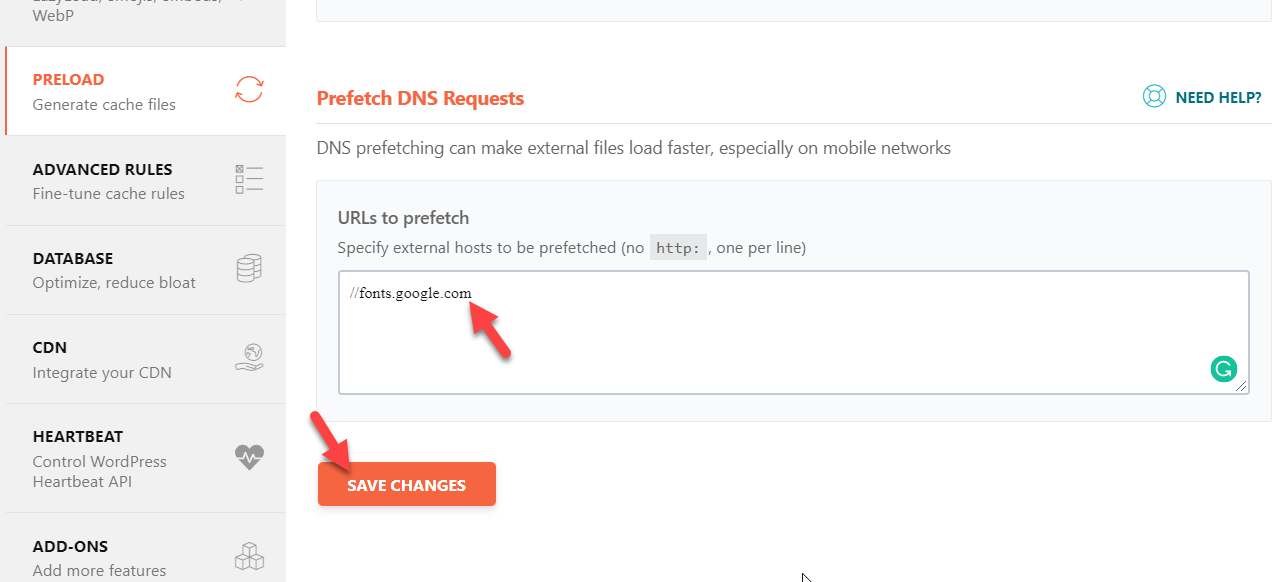
Most WordPress caching plugins come with a feature called DNS prefetching. The idea is that when you send external HTTP requests, your website will get slower. To fix that, you can use the DNS prefetching feature that allows you to enter external URLs that you can fetch to reduce the external requests.
Here’s an example from the DNS prefetching section from the WP Rocket plugin.
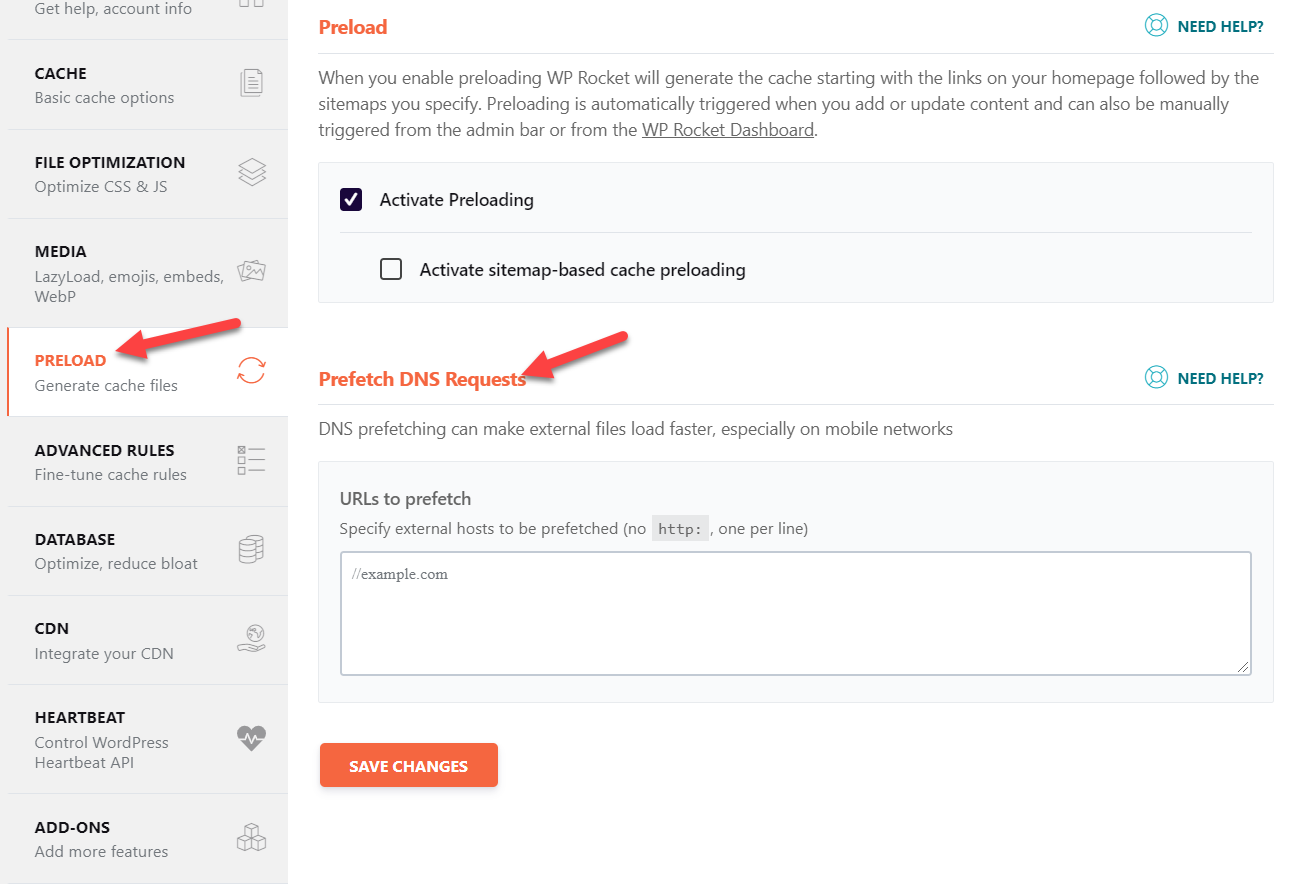
All we need to do is type the Google Fonts domain under the URLs to prefetch section and save the changes.
Limit Font Weights
To customize the fonts, you can use the font weights. There are many font-weight options available such as:
- Thin
- Extra-light
- Light
- Regular
- Medium
- Semi-bold
- Bold
- Extra-bold
- Black

Normally, sites use the Regular font-weight and Bold for titles. So, when you select styles, choose only the styles you are planning to use. Otherwise, adding extra weights to the server that you won’t use will result in increased HTTP requests.
Conclusion
All in all, if you add Google Fonts to WordPress you’ll be able to customize the typography of your site. Not only will your website look better but you’ll also provide your customers with a better experience.
We’ve seen different methods to do this:
- With plugins
- Through the functions.php file
- Via Style.css
- Editing the header.php file
So which method should you use? They will all get the job done so it depends on your skills and preferences. If you’re not comfortable with coding, we recommend you use the plugin method. Google Fonts Typography is very easy to use and will be a great addition to your website. However, if you don’t want to add more plugins to your site, you can edit your theme’s functions.php file using the Code Snippets plugin or via FTP. Additionally, the style.css @import method is another quick and easy way to add Google Fonts with a few lines of CSS code. Alternatively, you can also add your font’s URL and style.css path to the header.php file.
If you liked this article, please share it with your friends on social media. For more interesting posts to improve your site, check out our blog section.
Which method are you planning to use? Do you know any others? Let us know in the comments section below!

I have read your blog on How to add Google Fonts to WordPress. It was very interesting and helpful but I can add some extra points in your article. Here some extra points:
1.Find the Google Font. All Google fonts are searchable.
2.Get the Code to Insert into the Website.
3.Insert the First Piece of Code into .
4.Add the Second Piece of CSS Code.
These are some extra points to add to your article. Readers if you are confused about your web and App development , you can get a free consultation at Alakmalak technologies.Visit our site for more information.