
How to Add Weight Based Shipping in WooCommerce
Setting up the proper shipping rates based on your business is important to secure your profit and provide the correct shipping services to your customers. Rather than just providing a flat rate shipping, it’s much more conducive to your business’s success if you enable shipping based on weight, type of products, and sizes. This is why we’ve brought you our guide on how to add weight based shipping in WooCommerce.
But first, let’s take a look at what Weight Based Shipping is and how it can be useful for your business.
What is Weight-Based Shipping?
By default, WooCommerce mostly lets you manage shipping based on regions and set different shipping options such as flat pricing, free delivery, and local pickup. Of course, you can add different rates for different zones but these shipping prices do not take the weight of your customer’s order into account. And since shipping prices increase quite a lot when you consider large amounts and weights, any good business handling orders with tons of difference in weight and amount should consider enabling more flexible shipping options.
This is where Weight Based shipping comes into play. So, you should provide different shipping options and prices based on the weight of your customer’s orders.
Why Add Weight-based shipping in WooCommerce?
Setting up delivery and shipping services for your products can be quite a hassle especially if you have a wide variety of products differing in sizes and weights. Taxes, shipping charges, and additional fees become quite difficult to manage and you might be taking losses if you don’t have these straightened out. This becomes even more difficult when you include country shipping.
Therefore, you may want to use weight-based shipping if you have many factors affecting your shipping. With weight-based shipping, you can designate different shipping charges for items of different weight classes. Then, you can ensure that items of less weight have low shipping costs along with fair costs for shipping more weighty items.
Of course, there are a lot more variables involved in weight-based shipping like amount, the mass of total products, destination, and more. You also need to allow more flexible shipping prices if the customer is buying products in bulk.
This is why we’ve brought you our guide on how to add weight based shipping in WooCommerce. First, let’s take a look at how you can add weight-based shipping in a more beginner-friendly way.
How to Add Weight Based Shipping in WooCommerce?
Our article today covers adding weight-based shipping in two different ways:
- Using Plugins
- Programmatically
Let’s cover using a plugin first.
But before we begin, please make sure that you have set up WooCommerce without missing any of the major steps. It’s also better to use one of the WooCommerce compatible themes for your website. This will help you avoid any possible theme or plugin conflicts during the process.
1. Add Weight based shipping in WooCommerce using a plugin
The easiest way to add Weight based shipping in WooCommerce is by using a dedicated WordPress plugin. These plugins are quite easy to set up and they let you handle the different weight and destination rules. They even enable more flexible shipping prices, and more.
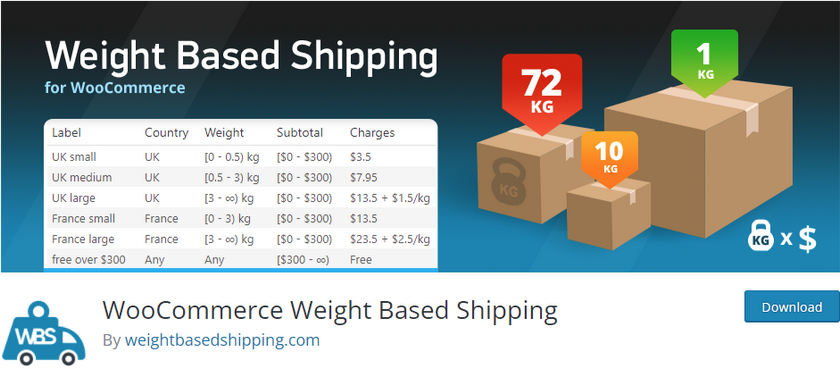
For our demo, we’ll be using the WooCommerce Weight Based Shipping plugin. It is a very easy-to-use plugin with the exact features that you need for weight-based shipping. The shipping cost of the order weight can be easily calculated for the customers with the help of this plugin.
1.1. Install and Activate the plugin
Like any plugin, you’ll have to install and activate it before you use it. Go ahead and install the plugin by opening your Dashboard and clicking on Plugins > Add New.
Then, use the search bar on the top right to search for WooCommerce Weight Based Shipping. Click on Install Now on the plugin’s tab and then Activate it once the button switches.
You can also use the premium version of the plugin if you want to unlock some more additional features. But to activate it, you’ll have to manually upload the plugin and install it. Have a look at our guide on how to install a WordPress plugin manually for more information.
1.2. Setting Weight Based Shipping rules using a plugin
Once the plugin is activated, open your WooCommerce shipping settings from WooCommerce > Settings on your WordPress dashboard. Then, open the Shipping tab and click on Weight Based Shipping. You can now start adding your custom shipping rules.
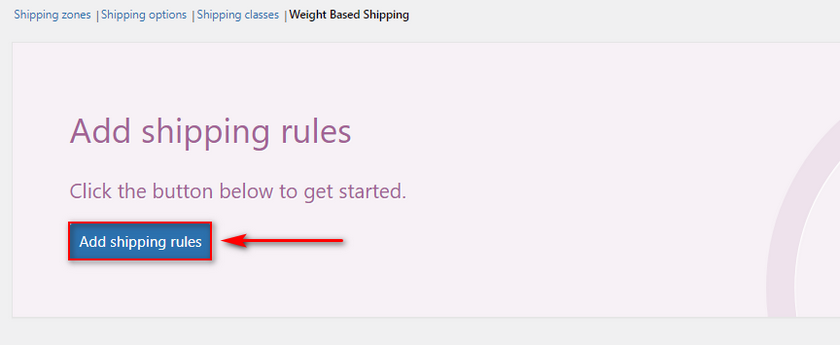
Let’s start by clicking Add Shipping rules.
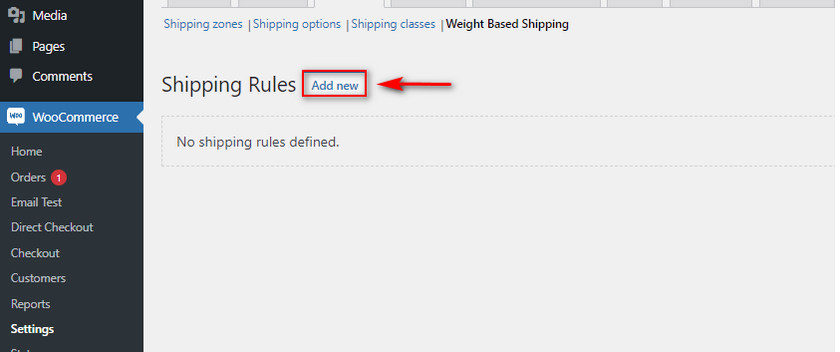
Next, click on Add New and you’ll be taken to the Rule Settings window.
First, let’s start by adding a label and a title for your Weight Based Shipping. Then, you can choose whether or not you want the shipping charges to be taxable.
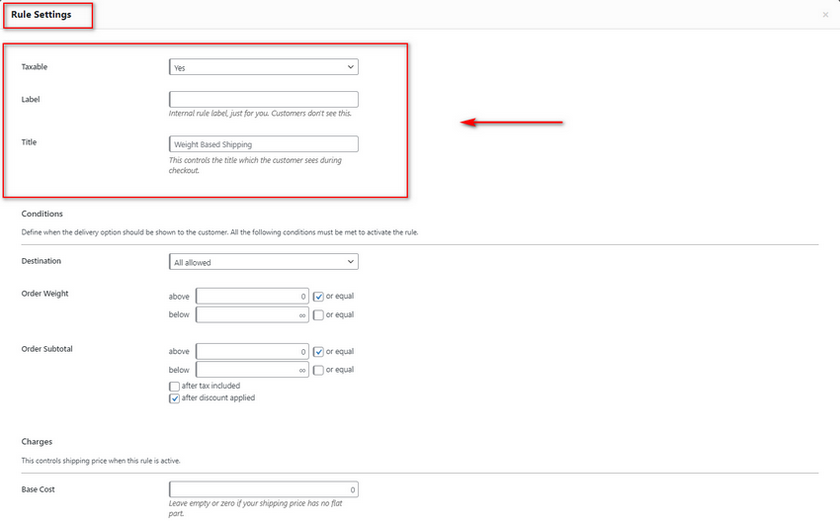
Next, let’s set up the conditions for the Weight based shipping.
1.3. Setting Conditionals for the Weight Based Shipping
Use the destination option to choose whether you’d like the weight-based shipping to apply to all Shipping destinations or specific countries/locations.
The next few fields are very important to set up your Weight based shipping. With the Order weight options, you can set the limit to apply to your conditions. So for example, we’ll set this field as above or equal to 1 kg and below 10 kg. This means that our current weight-based shipping charges will only apply if the cart’s total weight is between 1 and 10kgs.
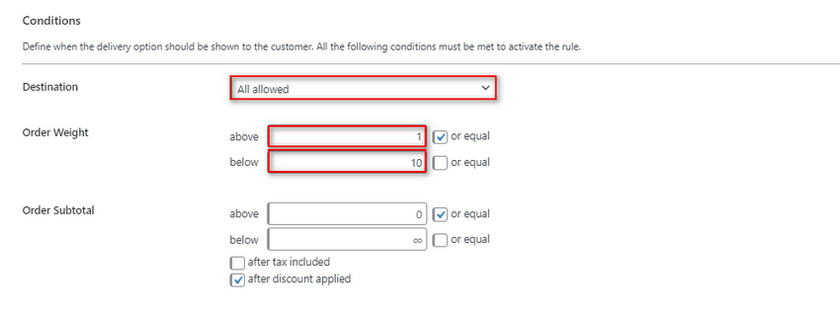
Next, you can also use the Order subtotal to check your cart’s total prices too. This way, you can ensure that this weight-based shipping only applies to cart total within a certain limit. You can leave this field as-is if you don’t want your weight-based shipping conditions to check your cart subtotal.
The charges section lets you define the base charge of your current weight-based shipping rule. First, go ahead and set your base cost.
Next, we can also change the cost to add extra charges if the total weight is over a certain limit. So, for the base cost of items between 1 and 5 KG, we’ll set the extra charge option to £50. Next, we define the changed cost so that additional charges are applied if the cart total is over 5KG. So if we apply this to this current setting:
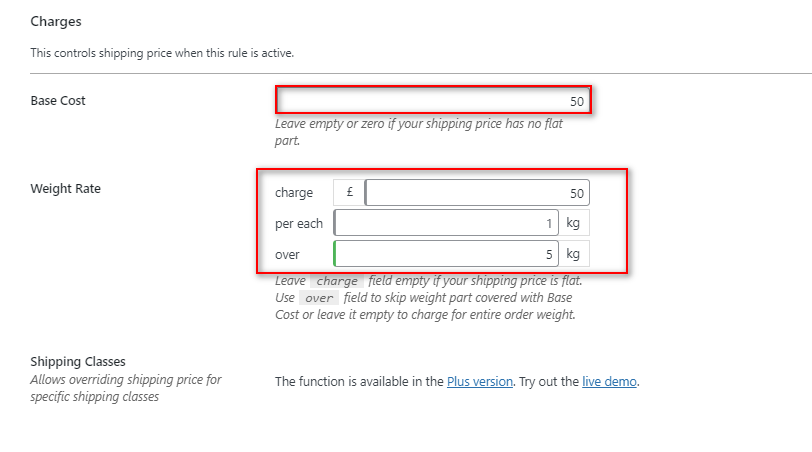
The plugin will automatically add £50 to the shipping charge for every kg added over the 5KG threshold.
Finally, you can also set a threshold so there’s a limit to the maximum shipping charges for your shop. You can leave this field as it is if you don’t want to add a limit to your weight-based shipping.
Close the window by clicking anywhere on your page and clicking on Save Changes. This will save your rule and it should now work perfectly for your shop items
How Does Weight-Based Shipping work?
For preview purposes, we’ve set this single item’s weight as 5KG.
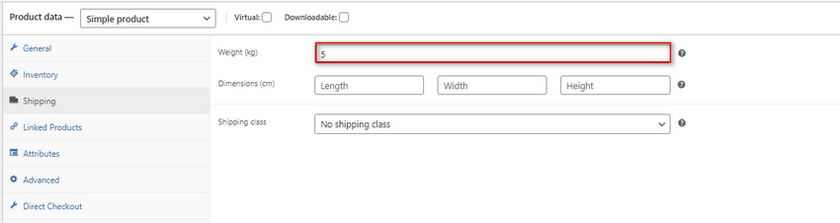
If we add this as a single item to our cart, we should see our custom shipping option on our checkout page.
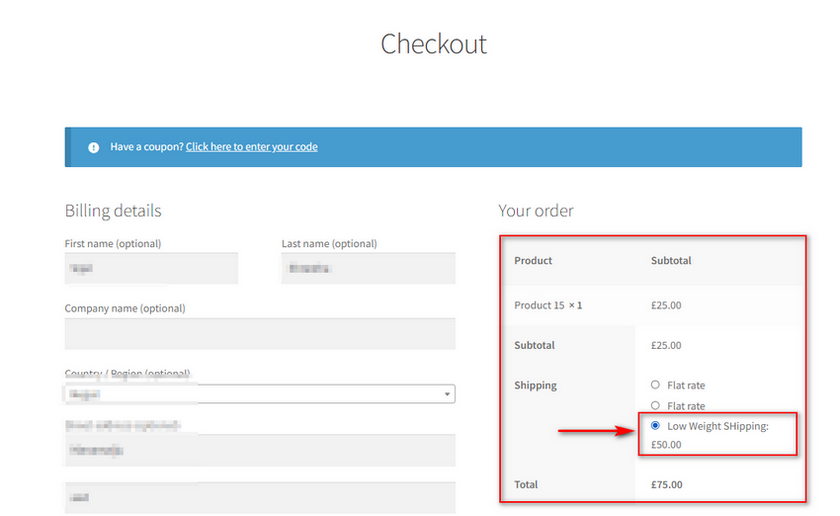
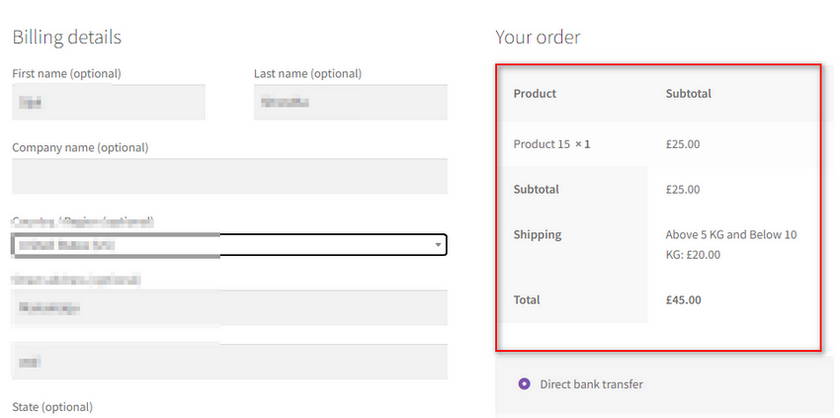
Now, let’s add the items so the total weight is at 8KG and see how the charges change based on our settings. (By our shipping rule, the total cost should be £50 + £50(per kg added above 5 KGs.)
This way you can set customizable Weight Based Shipping rules in WooCommerce that can easily be flexible to fit different weights and change charges quite easily. The plugin makes it very convenient to configure and change your rules on the go and you can set different rules to cover different weight classes.
However, if you’d like to add weight-based shipping in WooCommerce without a plugin you can also consider doing so.
2) How to add Weight-Based Shipping Programmatically
To add a custom weight-based shipping in WooCommerce, you can use WooCommerce hooks to add a custom function that checks the total cart weight and then adds a different shipping rate to it.
However, doing this step programmatically requires you to have a few extra steps done beforehand.
Note: We will be changing some of the core files of your website in this section. So, it’s best to backup your website and create a child theme using one of the child theme plugins before you do so. This will make sure that you don’t lose any changes even if you have to update the theme or revert to previous changes.
2.1. Add the flat rates and tracking flat rate ID
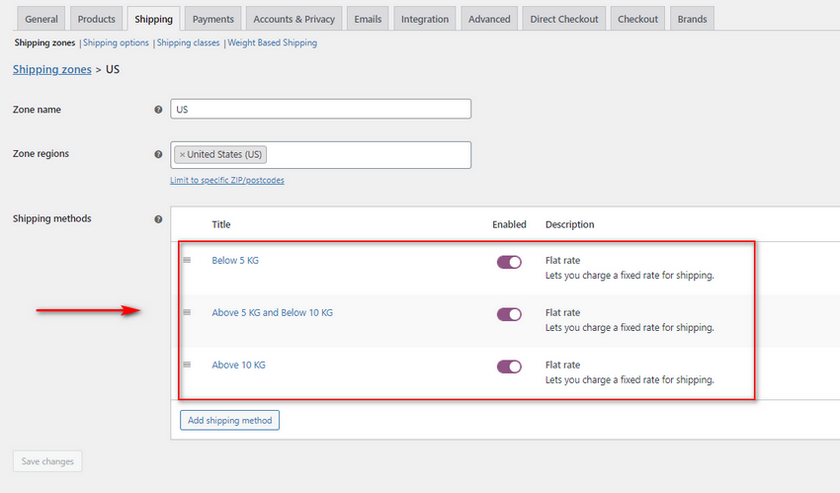
First, you need to create 3 individual shipping rates. You can do this by clicking on WooCommerce > Settings > Shipping. Then, click on your Shipping zone and add 3 different weight charges. For our demo, we’ll add 3 flat rate shipping based on a certain weight condition. These are:
- Below 5 KG
- Above 5 KG and below 10KG.
- Above 10KG
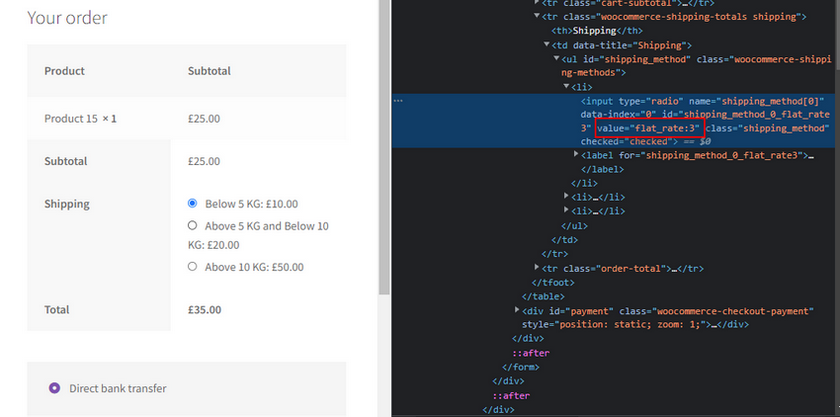
Now, go ahead and track your flat rate ID using the Inspect tool. Add an item to your cart and by default, you should see all 3 flat rate shipping on your checkout page. Right-click on the radio button for the shipping option and click on Inspect. The Elements tab should show you the HTML/CSS properties of your Shipping option.

The value field should show you your flat_rate id. For example, for this shipping option, it says flat_rate:3. That is the flat rate id for our <5 KG shipping.
Do the same for your other shipping rates. Here, we’ll be using:
- Flat_rate:3
- Flat_rate:4
- Flat_rate:5
Display different flat rates based on Weight programmatically
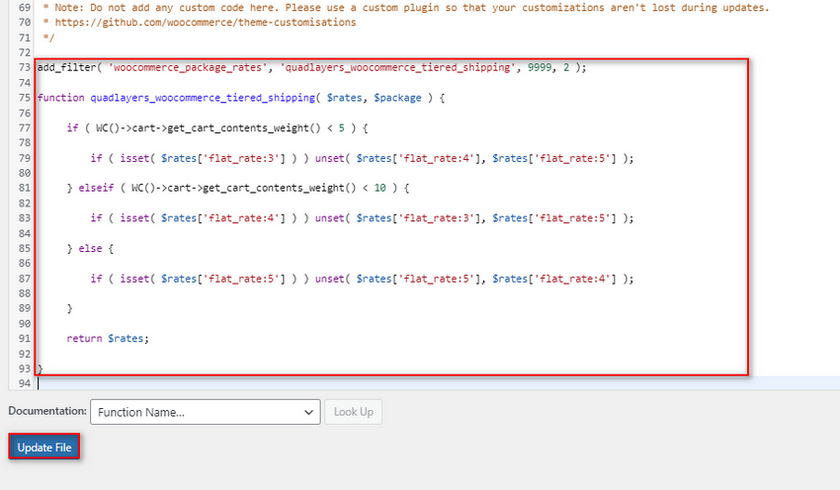
Next, we’ll add the following PHP code snippet to our theme’s functions.php file based on the flat_rate ids.
add_filter( 'woocommerce_package_rates', 'quadlayers_woocommerce_tiered_shipping', 9999, 2 );
function quadlayers_woocommerce_tiered_shipping( $rates, $package ) {
if ( WC()->cart->get_cart_contents_weight() < 5 ) {
if ( isset( $rates['flat_rate:3'] ) ) unset( $rates['flat_rate:4'], $rates['flat_rate:5'] );
} elseif ( WC()->cart->get_cart_contents_weight() < 10 ) {
if ( isset( $rates['flat_rate:4'] ) ) unset( $rates['flat_rate:3'], $rates['flat_rate:5'] );
} else {
if ( isset( $rates['flat_rate:5'] ) ) unset( $rates['flat_rate:5'], $rates['flat_rate:4'] );
}
return $rates;
}
This code simply works by checking the total weight of your cart using WC()->cart->cart_contents_weight hook. Do remember the conditional in this code works by checking the weight and then setting a certain flat rate and then hiding the rest. So, in the first conditional :
if ( WC()->cart->get_cart_contents_weight() < 5 ) {
if ( isset( $rates['flat_rate:3'] ) ) unset( $rates['flat_rate:4'], $rates['flat_rate:5'] );
The conditional checks if the weight is less than 5KG and then sets flat_rate:3 and unsets the rest of the flat rates based on the ID. Please make sure each of these flat rates is set based on your flat rate ids so the code works for your website.
You can also change the if statements in the above code from 5 or 10 to change the conditional check. So for example, we can modify the code like this so it checks if the weight of the cart is below 50 kg, above 50 kg, and below 100 kg or above kg.
2.2. Add the Code to your functions.php file:
Go ahead and add this to your theme’s functions.php file.
To access your functions.php file, open your WordPress Admin Dashboard and click on Appearance > Theme file editor. Then using the right Theme files sidebar, click on functions.php.
Go ahead and add your code snippet to this code editor and click on the Update File to save your changes.
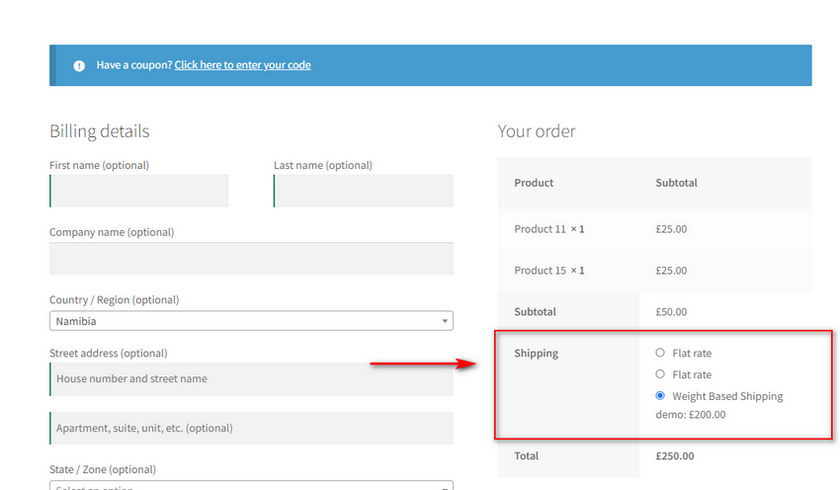
Now, your shipping rates should change according to your cart weight like so:
Bonus: Force shipping details in WooCommerce:
Now, if you’re adding more elements to your Shipping process, it’s a good idea to ensure that your Shipping form is a bit more customized for your customer’s demands. You can also choose to force the Shipping address since by default WooCommerce only lets you fill in the Shipping form optionally.
Of course, when you’re shipping a large volume of products that adds more difficulty to logistics so you’d like to add or remove a few more fields in your Shipping form. This is why you can also consider using a dedicated plugin to customize your Shipping form as well as force the shipping address along with the billing address on your Checkout page.
We highly recommend using WooCommerce Checkout Manager if you require such measures. You can also customize and change your billing and filling form fields and even hide them or set them to optional so the checkout experience for your website is much more smooth.
So, to start go ahead and install the plugin by clicking on Plugins > Add New on your WordPress Admin page. Use the search bar on the right to search for WooCommerce Checkout Manager and then click on Install Now on the plugin’s tab. Click on Activate once the button changes and this should activate the plugin.
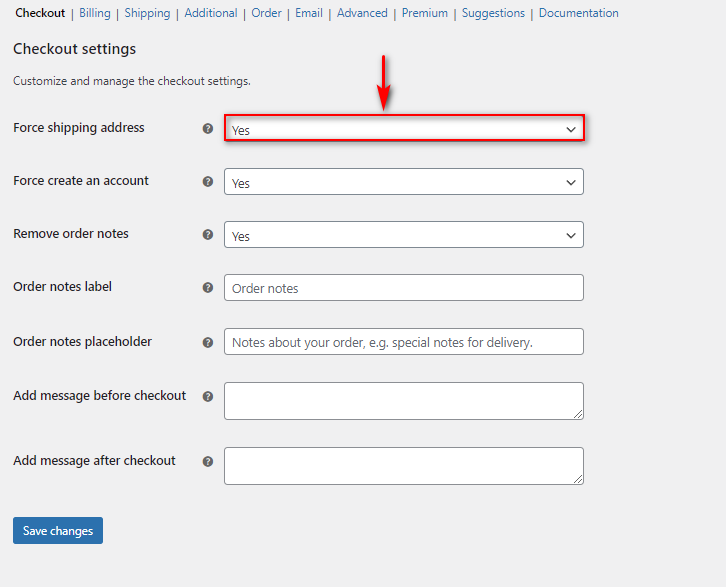
Next, go ahead and open your WooCommerce Checkout Manager settings by clicking on WooCommerce > Checkout.
After this, you can switch the Force Shipping Address options to Yes and now your customers will be required to fill in the shipping details.
You can also choose to customize your Shipping fields using the plugin in different ways. For that, please go through this article to learn more about this process. But if you want a better understanding to enable shipping addresses in WooCommerce, we have the perfect guide for you too.
Concluding:
And that ends our guide on How to Add Weight Based Shipping in WooCommerce. Customizing different parts of your WooCommerce checkout charges is a key part of running a profitable business. Setting different charges based on the weight of your cart can go a long way in helping you manage your business and logistics costs.
Our blog today covered multiple points when it comes to customizing your shipping charges and shipping fields. This includes:
- Using a plugin to add weight based shipping in WooCommerce.
- Adding custom flat rates for different weight based shipping and applying them programmatically.
- Forcing Shipping Address and customizing your Shipping checkout form.
Now, there are multiple ways and plugins to apply these measures to your website but the rough idea should be similar. However, if you have any issues please let us know in the comments and we’ll get right on top of it.
Furthermore, if you want to learn more about customizing your WooCommerce Store and the overall experience of using it why not check out some of our other articles:
