How to Add WooCommerce Product Reviews
Do you want your customers to leave reviews of the products after they have purchased them? If so then we’ve got great news for you. Today in this guide, we’ll show you how to add WooCommerce product reviews.
Why add Product Reviews to WooCommerce?
In order to sell the products, first of all, you must gain the trust of your customers. Reviews are something that is valued by almost everyone. When someone purchases a product and leaves their opinion about it, those are reviews. Such feedback gives credibility to your products and they are social proof that your products are trustworthy.
Not only another customer decides to buy after reading reviews but you can also improve your products and services by collecting those feedback. Reviews and ratings also help you drive traffic because customers spend more time interacting with your website. This signals the search engine and hence it boosts the SEO positioning and visibility of your WooCommerce website.
So to make sure that your WooCommerce site has the functionality to post reviews. Now you that have understood the importance of reviews, let’s look at how you can add product reviews to WooCommerce.
How to add WooCommerce product reviews?
You can add WooCommerce product reviews using 2 major ways:
- WooCommerce Dashboard
- Using a Plugin
1. Add WooCommerce product reviews from WooCommerce Dashboard
By default, there is an option for reviews and ratings in WooCommerce with basic functionalities. Therefore, if you want a very simple review tab on your product page, then it can be done from the WooCommerce dashboard.
Before following these steps, make sure to set up WooCommerce properly by using one of the compatible WooCommerce themes so you won’t have any issues while setting up customer reviews in WooCommerce.
1.1. Enable ratings and reviews from WooCommerce Settings
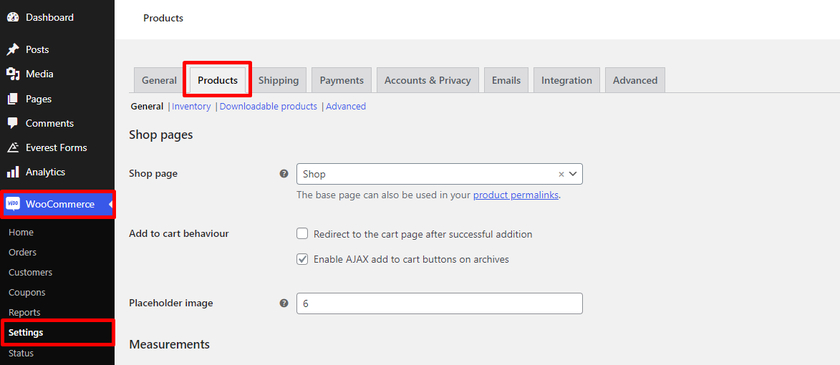
To add product reviews to your WooCommerce site, first of all, you need to enable ratings and reviews from WooCommerce settings. For that, go to WooCommerce > Settings from your WordPress dashboard. Here, you can find several tabs displayed on the top. All we need to do is click on the ‘Products’ tab.
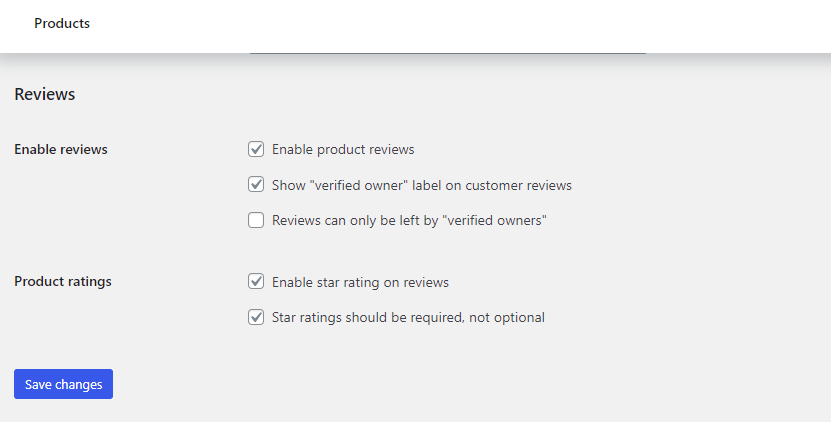
Now if we scroll further we’ll see a section for ‘Reviews‘. By default, adding ratings and reviews are enabled in WooCommerce. However, you can disable the other settings which are included in the reviews section.
As you can see there 5 different options to manage ratings and reviews in WooCommerce.
1.1.1. Enable reviews
The first option is to enable the product reviews. By checking the box next to it, you can activate the reviews option in WooCommerce.
Just below that, we can see another option that lets us enable or disable customer reviews by verified owners. Verified owners are the registered customer who has made a purchase from your online store. By checking the box, we can display the “verified owner” label in customer reviews.
You can also choose to allow reviews from just the registered users by checking the box “Reviews can only be left by verified owners”. As a result, only the registered customers who have purchased the product will be able to leave reviews. While on the other hand, guest users cannot leave any reviews and ratings for the purchased products.
These options are very useful since we can be sure that the reviews and ratings are left by real customers. This will prevent the chances of fictitious ratings and reviews from any user or bots, sometimes with bad intentions.
1.1.2. Product ratings
Next, we have options to manage ratings in your WooCommerce store as well. Similar to reviews, you need to check the box next to the Enable star rating on reviews if you want to activate the ratings. You also get to decide if the star ratings should be required, or not. If you tick the checkbox, it’ll be mandatory for the customers to leave the stars ratings along with the review of the product.
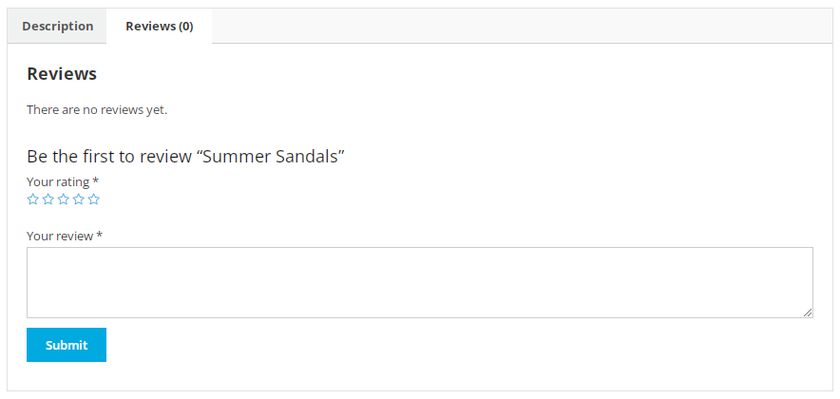
After you have enabled the reviews and rating option you can preview the changes on the product page of your website.
So, these are the easy steps you can follow to enable or disable the ratings and reviews on all the products in your online store.
However, you might want to enable ratings and reviews for certain products only instead of all the WooCommerce products on your store. In that case, you can disable them for an individual product.
1.2 Enable ratings and reviews in Individual Product
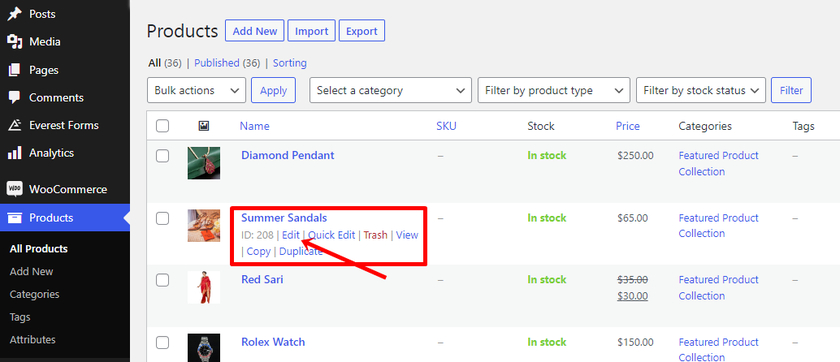
To disable ratings and reviews for an individual product, go to Products > All Products from your WordPress dashboard. Now, select the product where you want to disable ratings and reviews and click on Edit. Upon selecting a product you’ll be redirected to the product edit page.
You can also access product data settings from the page same. Now, click on the ‘Advanced‘ tab from the ‘Product data’ section. Simply just check the ‘Enable reviews‘ to activate reviews for that individual product only.
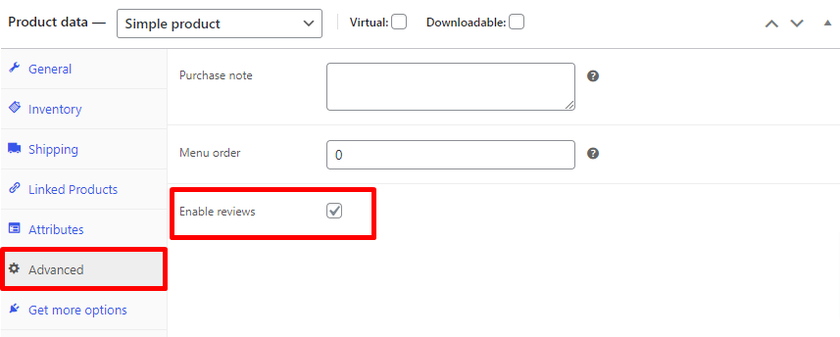
After that, make sure to click on the ‘Update’ button to update the changes in the product.
2. Add WooCommerce product reviews using a plugin
As we saw, we can easily enable the reviews and rating options from the WooCommerce dashboard. This method is perfect for those who prefer just basic functionality for getting reviews on your product page.
On the other hand, if you want to offer your customers more desirable review options with extra features such as image uploads, Q&A area, voting, etc, you can opt for a plugin.
For our demo, we’ll be using the Customer Reviews for WooCommerce plugin. It is a very easy-to-use plugin that sends each customer an automated email reminder after a transaction.

2.1. Install and activate the plugin
Like any other plugin, first of all, let’s install and activate the plugin. Go to the Plugins > Add New from your dashboard.
Then, in the top right corner, type ‘Customer Reviews for WooCommerce‘ into the search field. On the plugin’s tab, click Install Now, then Activate when the button changes.
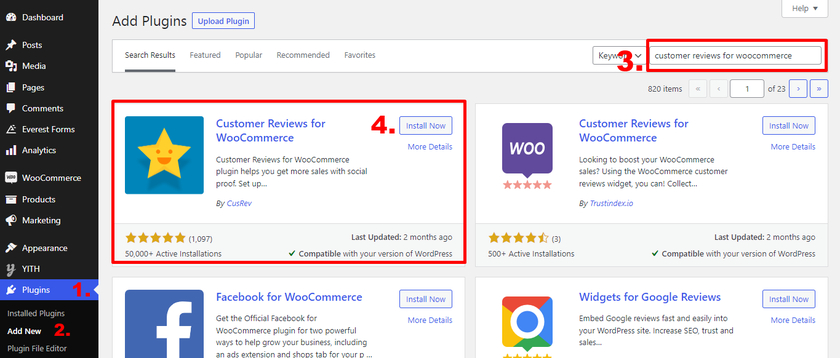
If you wish to unlock more features, you can upgrade to the premium version of the plugin. However, you must manually upload and install the plugin in order to activate it. For more details, see our tutorial on how to manually install a WordPress plugin.
2.2 Configure Customer Reviews for WooCommerce Plugin’s Settings
After installing it you can configure the settings for the plugin in Reviews>Settings from the WordPress dashboard.
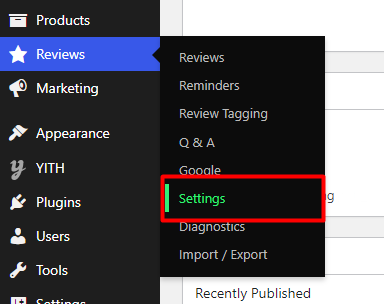
2.2.1. Review Reminder
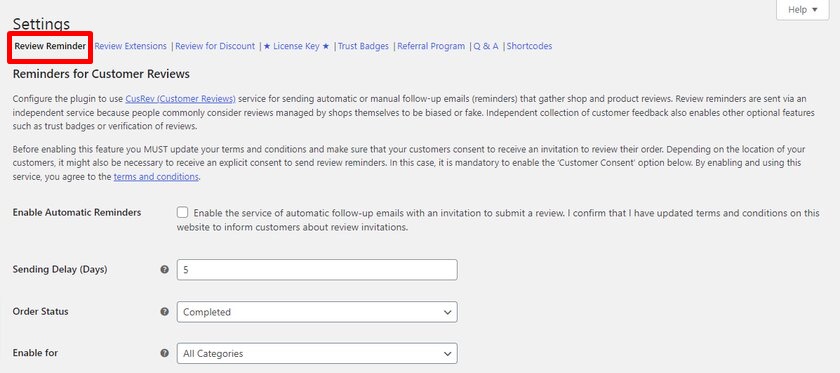
Even though the plugin contains lots of options, we’re going to show you the most important ones in this tutorial. Let’s start with the Review Reminder tab. You can set parameters such as when the email should be sent, the number of days for the email to be sent after the purchase, and so on.
If you don’t want automated emails, then you can enable manual reminders and control the emails all by yourself. You’ll be able to send the mail from the order page if you enable the manual reminders.
Another intriguing option is to choose whether to send the reminder to all clients or just the registered ones.
2.2.2. Review Extensions
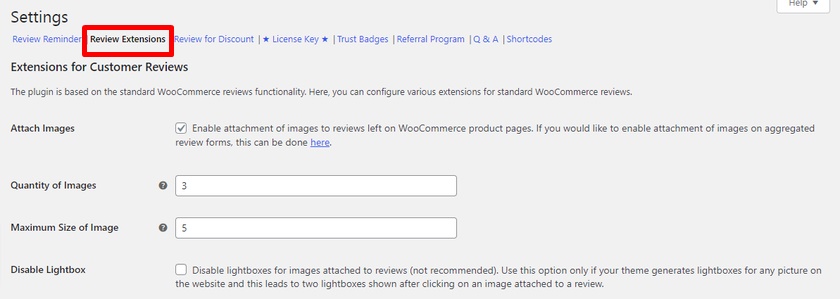
Next, you can find Review Extensions options where you can find advanced review features. You can enable the opportunity for users to attach images along with the reviews. This plugin also allows you to display reviews with a Show more button in the Lazy Load Reviews section instead of regular WordPress pagination.
2.2.3. Review for Discount
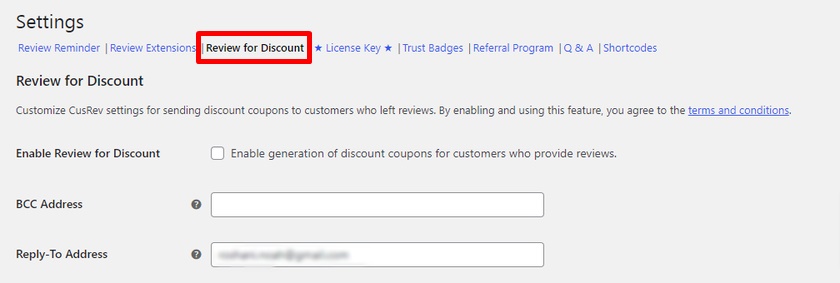
After that, you can activate a promo code under the Review for Discount option to encourage other individuals to post a review in exchange for a discount. You can even edit the BCC address and reply-to address from this section.
2.2.4. Trust Badges
Then, we have the ‘Trust Badges’ option on the settings page where we can enable it and display the trust badges icon in a review which indicates a verified review. These help your customers to let them know whether the reviews added to the products are verified or not.

2.2.5. Shortcodes
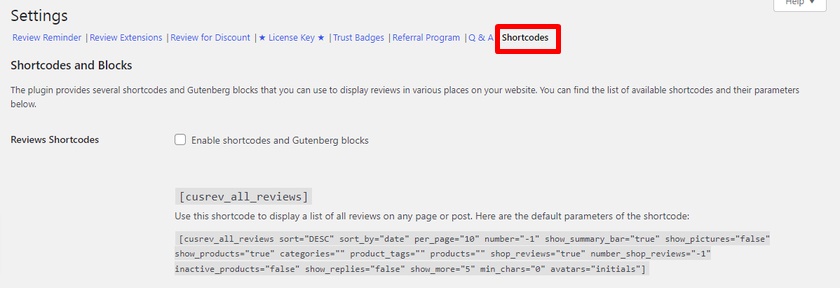
Finally, the plugin also includes Shortcodes that allow you to place your review section anywhere on your website. You can check out a very long list of available shortcodes and their parameters. Even the Gutenberg blocks can be enabled from here if required.
Don’t forget to click on Save changes after you have made all the necessary changes to all of these settings.
Once you have configured the settings of the plugin according to your preference, it is automatically added to all of the products. You can preview the ‘Reviews‘ tab with added features from the product page.
Bonus: Add custom product tabs to WooCommerce
We have already presented you with one of the easiest ways to add product reviews to WooCommerce. By default, you can find the ‘Reviews’ tab on any WooCommerce site. But if you want extra tabs to provide additional information about the product to your customer there is no such functionality to create one in WooCommerce.
That’s why as a bonus we’ll provide this guide to adding custom product tabs in WooCommerce.
Even though there are various methods to do so but using a snippet code is the quickest and easiest one. But let us ensure that, you do not need any coding skills.
However, because we’ll be modifying the theme’s core, we strongly advise you to make a thorough backup of your website and use a child theme. You can either code your own child theme or use any of the many child theme plugins available.
Now it’s time to open our functions.php file. Go to Appearance > Theme Editor > functions.php to do so.
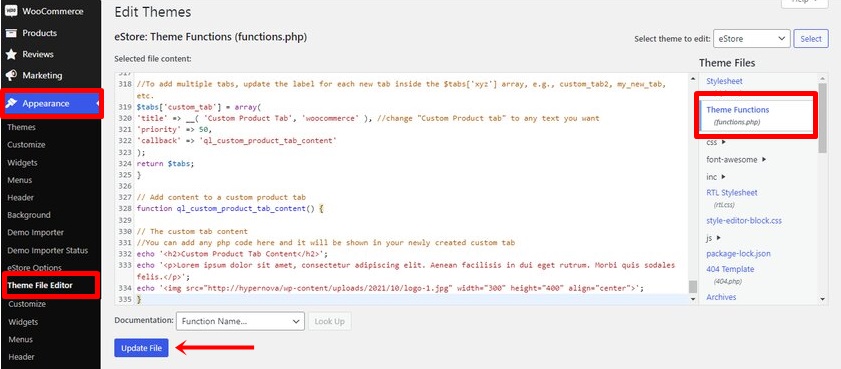
Just copy the following code and paste it at the end of the functions.php file. Also, make sure to click on the ‘Update’ button.
//Add a new custom product tab
add_filter( 'woocommerce_product_tabs', 'ql_new_custom_product_tab' );

function ql_new_custom_product_tab( $tabs ) {

//To add multiple tabs, update the label for each new tab inside the $tabs['xyz'] array, e.g., custom_tab2, my_new_tab, etc.
$tabs['custom_tab'] = array(
'title' => __( 'Custom Product Tab', 'woocommerce' ), //change "Custom Product tab" to any text you want
'priority' => 50,
'callback' => 'ql_custom_product_tab_content'
);
return $tabs;
}

// Add content to a custom product tab
function ql_custom_product_tab_content() {

// The custom tab content
//You can add any php code here and it will be shown in your newly created custom tab
echo '<h2>Custom Product Tab Content</h2>';
echo '<p>Lorem ipsum dolor sit amet, consectetur adipiscing elit. Aenean facilisis in dui eget rutrum. Morbi quis sodales felis.</p>';
echo '<img src="http://hypernova/wp-content/uploads/2021/10/logo-1.jpg" width="300" height="400" align="center">';
}
Then, you can preview the product page after you’ve updated the file. You can see that the ‘Custom Product Tab’ has been added.
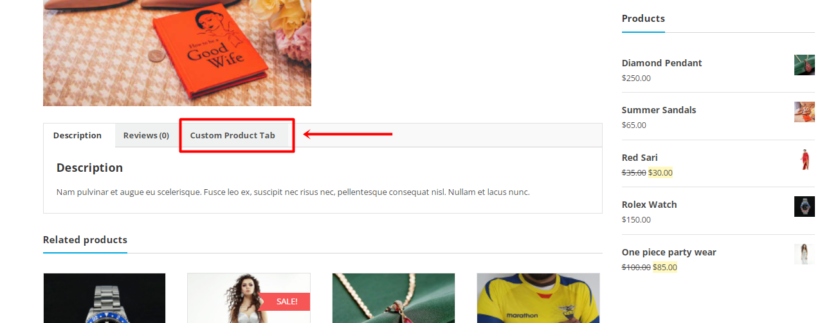
But this snippet adds a custom product tab to all of your WooCommerce products. However, if you want to add unique product tabs to a specific product then take a look at this article. You’ll also find a variety of other ways to add custom product tabs. Along with that, you can learn how to rename, reorder and remove custom product tabs.
Conclusion
So this brings us to the end of our guide on how to add WooCommerce product reviews. They are very essential to increase the conversion rates of your store by attracting your customers to the products. To summarize, you can add WooCommerce product reviews in 2 major ways:
- WooCommerce Dashboard
- Using a plugin
The default WooCommerce options include very simple and basic functionality which lets us enable or disable the reviews and rating sections in WooCommerce by default. But if you want to allow your customer to add reviews along with extra features like adding images, Q&A, and a voting system then you can even use a plugin.
We have also included a short guide to adding custom product tabs with this tutorial. This can be very useful to provide extra information about your product in a very organized manner.
So was out guide helpful for you? How do you add WooCommerce product reviews for your online business? Let us know in the comments below.
While you are here, check out some of our other blog posts for tips and instructions on how to improve the customer experience on the WooCommerce site and many more.

