How To Add a WooCommerce Subscription Product
Are you looking for a quick and easy way to add a WooCommerce subscription product to your website?
Subscription and recurring payments can be a great way to retain customers over a larger period. Subscription and software service models seem to be the future for online businesses for the foreseeable future and you’d be missing out if you don’t capture the opportunity to add them to your business. This is why we’ve brought you our guide on how to add a WooCommerce subscription product.
But first, let’s take a deeper dive into WooCommerce subscription products and how you can make use of them.
What is a WooCommerce subscription product?
Using subscription products has been a go-to model for many companies providing virtual goods and services for years now. The idea is to create a product and provide it to customers and charge them for it on a timely basis which can be weeks, months, or more. As long as your customers are subscribed to your product, they will be routinely charged for the product.
Through the means of recurring payments, you can continually profit from your products while you improve them over time and add more features and benefits to them. Thus, subscription products function on the basis of scheduled recurring payments. Depending on your interval or subscription period (monthly, weekly, annually) your customer will be charged automatically for your service.
But you might ask, why should you consider using a WooCommerce Subscription Product?
Why use a WooCommerce Subscription product?
Since payments are scheduled and are done automatically, consistent and well-scheduled billing is a crucial aspect of using subscription products. That means that your products provide you with a well scheduled, consistent cash flow. This removes the need to manually invoice your customers so that there is less billing required for your business.
Furthermore, this also means fewer payment errors as well as fewer payment delays so you don’t have to wait on your customers to pay before shipping out your products. With a WooCommerce subscription product, you can also define how long each subscription lasts as well as the interval for renewal. So you can set a subscription for a year where your customers are charged only once a year or even every 6 months or so.
Additionally, with specific subscription products, you can even bundle in advanced features like specific access to certain pages or content. You can also choose to use subscription-based services like Butcher’s Box or Dollar Shave Club or Monthly magazines that ship products every month as long as they’re on a subscription.
Similarly, different types of subscription plans or models can also be considered for the subscription products. You can also consider adding different types of subscription plans or models. And of course, as long as your users are subscribed you can also provide them the option to upgrade or cancel their plans whenever they want.
The opportunities to expand your business as you go along also increase with the help of subscription products. Many WooCommerce plugins and themes for WordPress quite frequently use this payment model nowadays. But that’s not all, these days you can see companies providing physical goods and services using subscriptions as well.
How to add a WooCommerce subscription product?
So, if you’re looking for a smart way to provide tangible products to your customers in exchange for consistent profits and growth then we highly suggest following our guide to create and add WooCommerce subscription products.
The easiest way to enable a WooCommerce Subscription product is by using dedicated Subscription Plugins. Using these plugins you can easily integrate a WooCommerce-based subscription model for your website. These plugins come with amazing features such as multiple payment gateway support, features for free trials and bonuses, customizable billing plans, and much more.
So let’s take a look at some of these plugins and how you would go on to use them for your WooCommerce website.
WooCommerce Subscription Product Plugins:
1) Woo Subscriptions
Woo Subscriptions is one of the most popular premium plugins available to add WooCommerce subscription products. You can easily create an online catalog of amazing subscription services in no time whatsoever with full integration to WooCommerce and all its functions. The plugin offers over 25 payment gateways, support for multiple billing schedules, manual renewing, and more.
It also allows you to enable smart features to ensure that your subscriptions are renewed without any failures. You can use automatic rebilling on failed renewing and smart renewal notification features provided by the plugin.
Moreover, you can also keep track of all your subscriptions and obtain compiled reports of your subscriptions with the help of this plugin. This includes the number of active subscribers, number of users that unsubscribed, recurring revenue, and more. With this data, you can make improvements to your subscription services or even add more lucrative offers for your customers.
Key features:
- Provide different subscription plans and billing schedules with support for over 25 multiple payment gateways.
- Supports manual renewing, automatic rebelling on failed payments, and built-in renewal notifications and emails for customers.
- Enable synchronized payments and variable subscriptions
- Set up a Subscription account page for your customer with options to suspend or cancel subscriptions.
Pricing:
Woo Subscriptions is a premium plugin that starts at 199 USD per year with 1 year of support and updates and a 30-day money-back guarantee.
2) Subscriptions for WooCommerce:
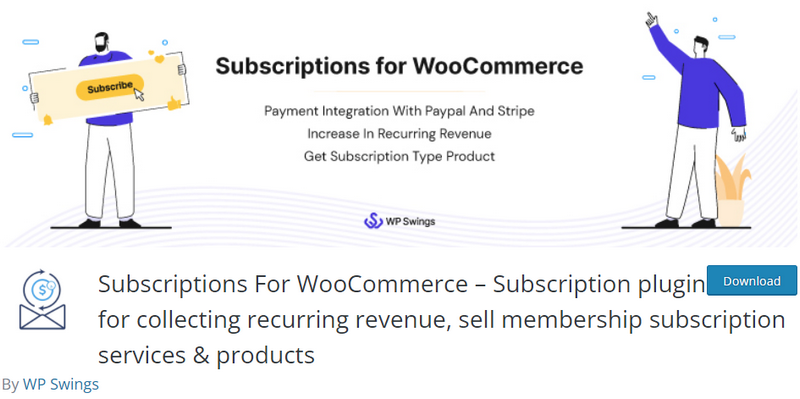
Subscriptions for WooCommerce is a free (or premium) option to enable subscription products for your website. Try out this freemium plugin that you can use to enable recurring payments and subscription products for your website. Create as many subscription products as you like and enable different billing schedules, prices, and subscription periods for them. This means that you can define how long each subscription lasts and what periods to charge your customers for recurring payments.
You can also add initial sign-up fees or even trial periods for your subscription products if you’d like. The plugin also uses popular payment gateways like Stripe and Paypal so your customers can pay for your services with full security. You can also enjoy detailed reports of all your subscriptions and view your logs for better research.
Pricing:
- Easily configurable options to enable recurring payments and subscriptions over a defined interval and frequency of payments.
- The plugin also comes with nifty options to let your customers unsubscribe at any time.
- You can also add initial signup fees, and free trials on subscriptions and monitor all your subscriptions from the plugin’s interface.
Pricing:
Subscriptions for WooCommerece is a freemium plugin that you can either use for free or use a premium version for a one-time purchase of 99 USD.
3) WooCommerce Membership

If you’d like to add a membership program instead of adding a subscription product to your website then we have you covered as well. WooCommerce Membership is a great alternative to subscription and recurring payment plugins where you can create certain membership plans for different accounts on your website. You can then grant or deny access to certain pages or content to your customers based on their membership.
This works great if you’re using services like tutorial services, health and gym memberships, access to various learning or entertainment content, and much more. The plugin also covers all its required bases when it comes to membership features.
You can easily define multiple memberships and membership categories with this plugin too. Similarly, you can also attach specific products to certain membership plans so it also functions as a subscription product service. Reward your customers with discounts if they’re subscribed to you for a longer period and give them other tangible rewards too if you’d like.
Key features:
- Enable Membership Plans with access to certain pages or content.
- Attach products to specific membership plans for additional benefits.
- Options to provide customers and members with discounts and other rewards.
Pricing:
WooCommerce Membership is a premium plugin that starts at a price of 199 USD per year. This includes 1 year of support and extension updates and a 30-day money-back guarantee.
How to use a plugin to add a WooCommerce Subscription Product:
Now if you’re looking for a free option to test out a subscription product for your website we recommend going for Subscriptions for WooCommerce as a starter. This way you can figure out how to add a WooCommerce subscription product and manage it with the rest of your product catalog. Then you can choose to either continue using it or consider a pro option(either for the same plugin or a different one.)
If you’re looking for other options when it comes to WooCommerce Subscription plugins you can check out the article here. So, let’s start with how you would install, activate and start using the plugin.
Note: Please confirm that you have completely set up WooCommerce without missing any of the major steps. This will help you avoid any possible issues related to plugin compatibilities or conflicts.
1. Install the Subscriptions for WooCommerce plugin
To Install the plugin open up your WordPress Admin Dashboard. Then, click on Plugins > Add New on your Dashboard sidebar. After this, use the search bar on the top right to search for ‘Subscriptions for WooCommerce.’
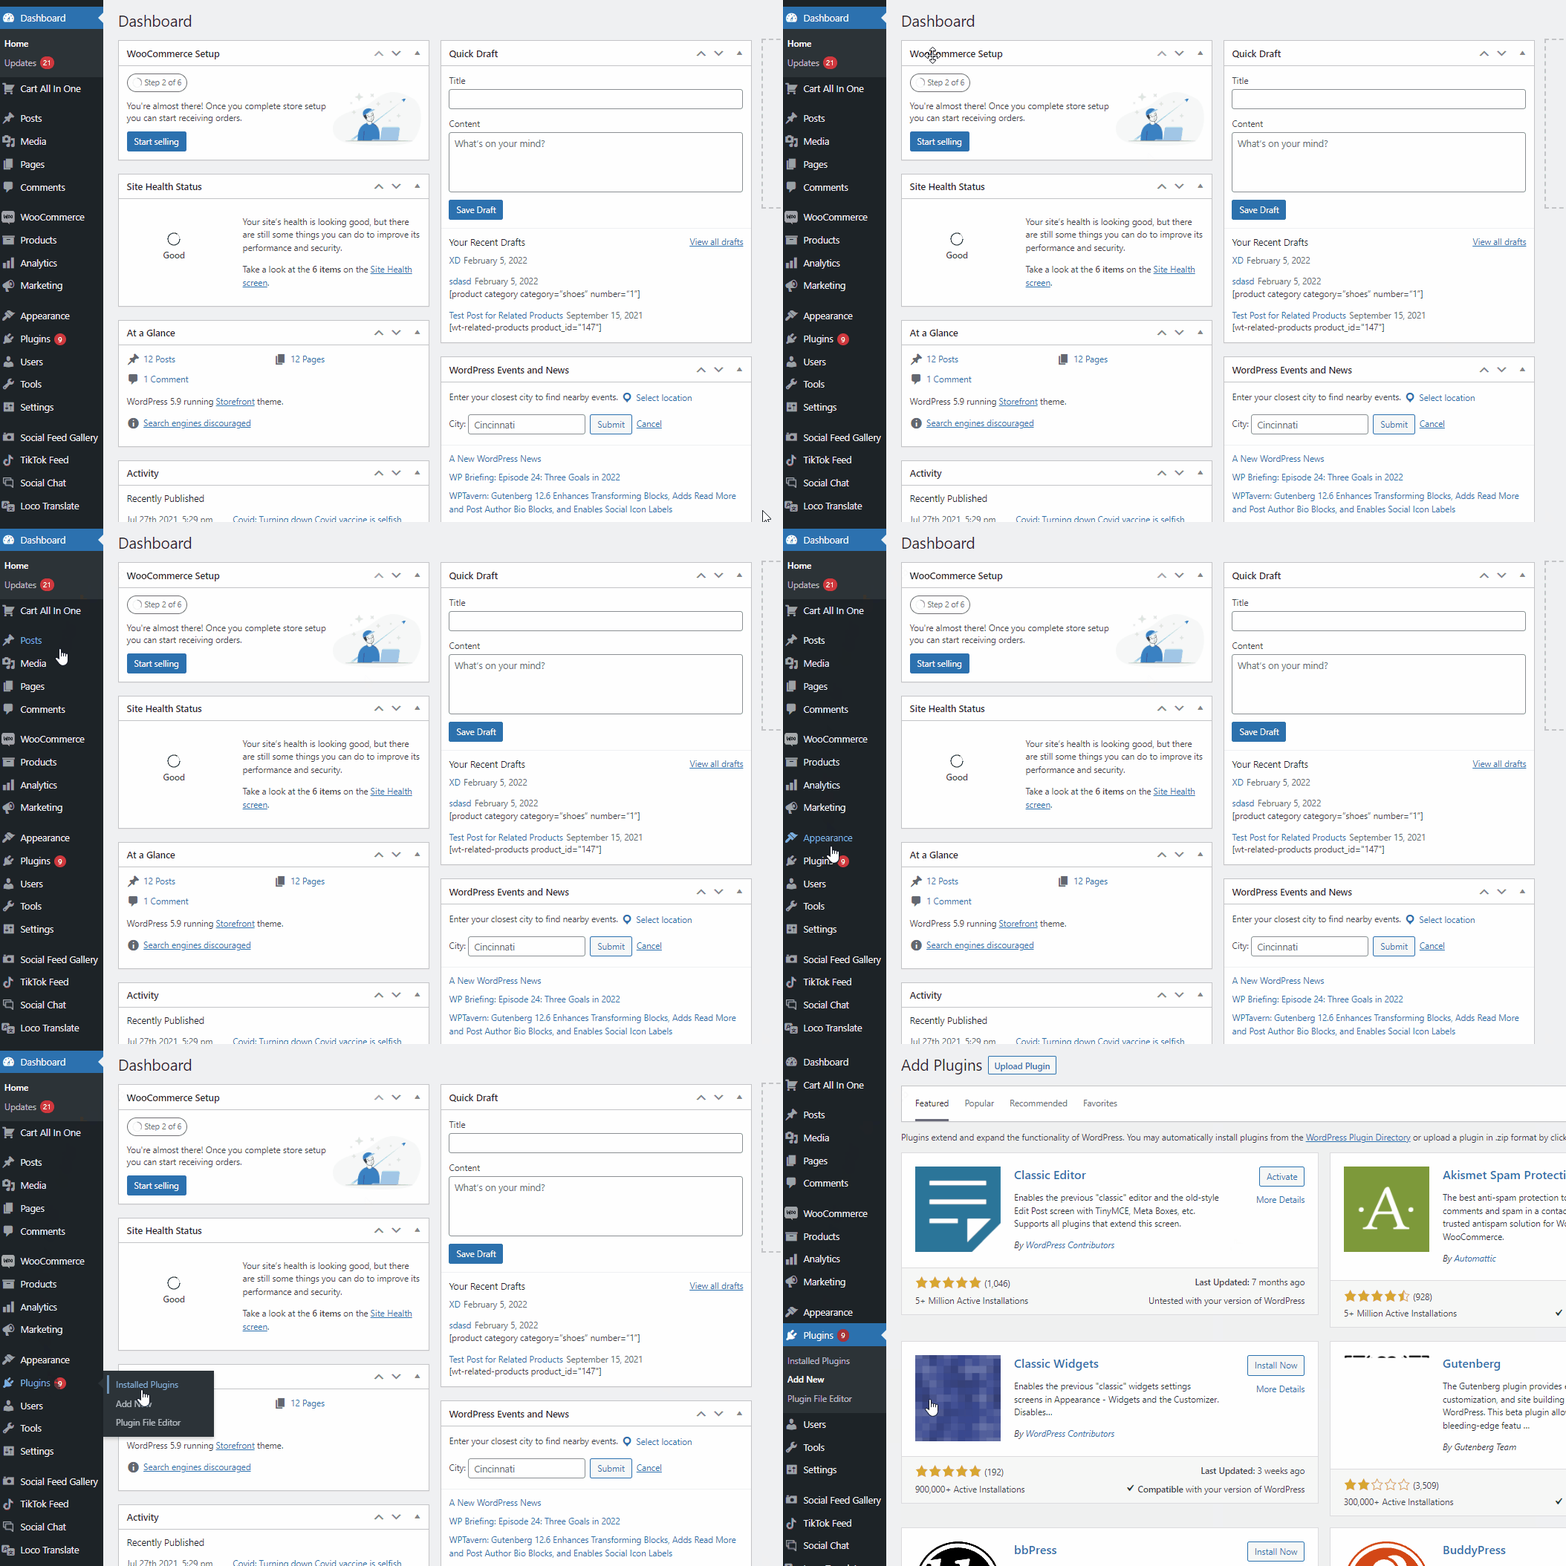
This should give you the plugin on the search results. Click on the Install Now button on the plugin’s tab and click on Activate to finish the installation/activation process.

If you want to use the premium version of the plugin, you have to manually upload it on your website to start using it. It’s the same case if you want to use a plugin that is not included in the official WordPress plugin repository. Have a look at our guide on how to install a WordPress plugin manually for more information on it.
2. Configure the Plugin Settings
Activating the plugin will take directly to the setup process of the plugin. Here, you’ll be asked to tweak a few general settings and set up your subscription product and its payment gateway. The process is divided into 4 different steps. Let us go through everything involved in each step:
2.1. General Settings
The first step towards enabling WooCommerce subscriptions on your website is setting up your general settings. To start, make sure you have the ‘Check this box to enable the Subscription for Woo’ enabled, and then customize your Add to Cart button label and Place Order label using the two fields below it. Do remember that these two label options are only for WooCommerce subscription products.
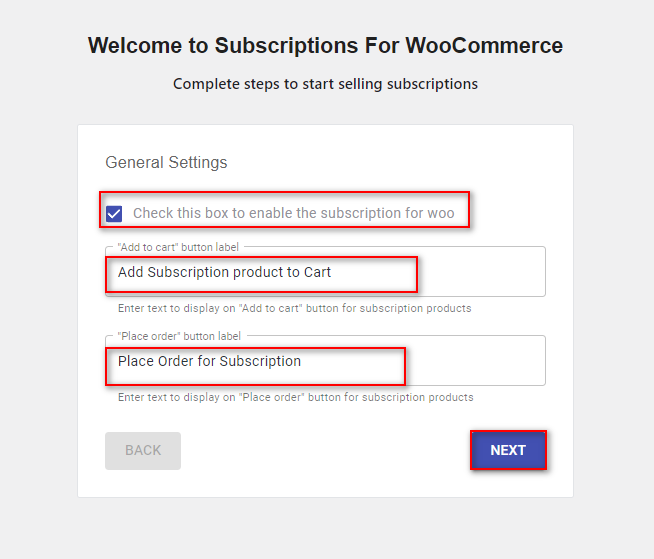
Click on Next to move to the next step.
2.2. Create a WooCommerce Subscription Product
Now, you will have to Create your WooCommerce Subscription product. For this, you’ll have to define your Product’s name, short and long description, price as well as subscription interval and frequency. The interval and frequency define the time in which the subscription is charged. So if you set the interval to 6 and frequency to monthly, the payment will be charged every 6 months. After you are done filling in the details, click on Next.
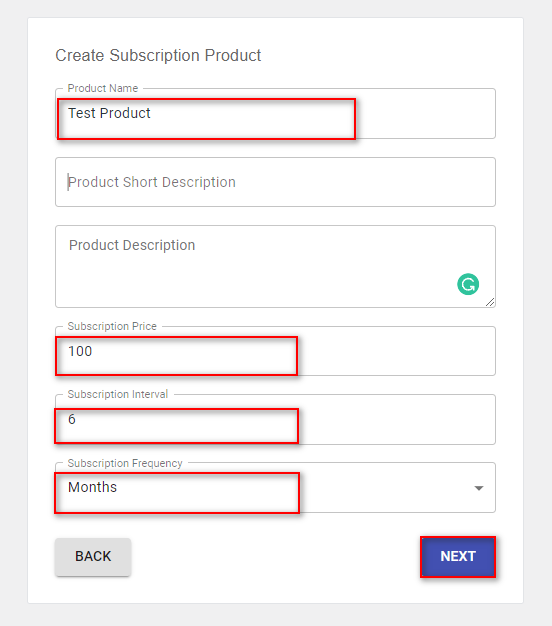
2.3. Setting up your Payment Gateway
The next step involves setting up your Payment Gateway. The plugin will check for the available supported payment gateways for you. It will even provide you the option of installing and activating it for you if you don’t have it installed. Just click on the Install icon next to the payment gateway to quickly install and activate it.
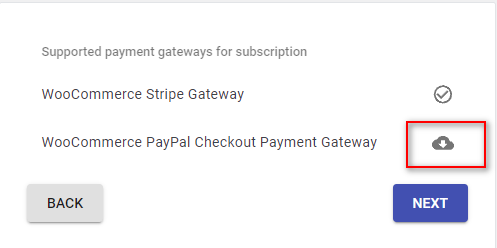
Once you’re done click on Next and you can move to the final step.
Alternatively, you can also add a payment gateway to your store by yourself if you don’t want to rely on the plugin. We even have guides to integrate some of the most popular gateways like Stripe and PayPal into your WordPress website.
2.4. Finalizing setup:
For the final step, you’ll be asked if you’d like to share some information regarding your use of the plugin. It is all up to you whether you choose to comply or not. Click on either Yes or no and finally, click on Finish.
You should now see your newly created Subscription product on your Products page on your backend. The products page will also show you the subscription period on the pricing column for your convenience.
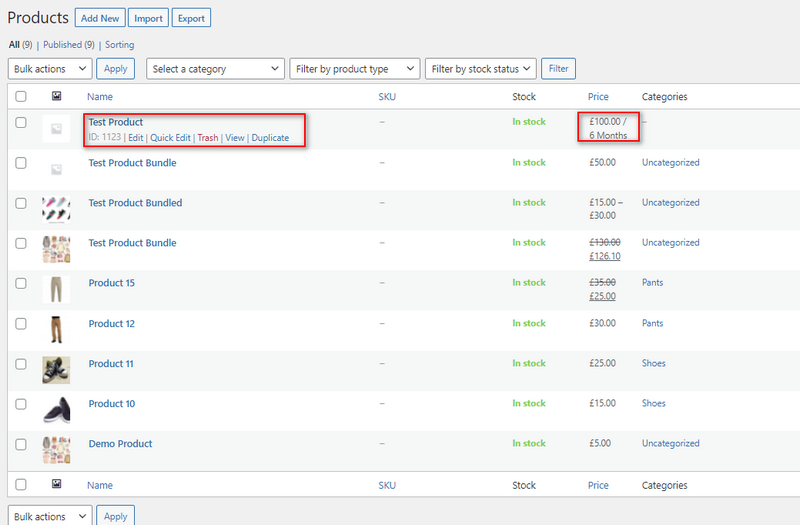
Click on View under the new subscription product to see how it looks on your front end of the product page. You can also edit the product itself so it looks more attractive to your customers but that is all up to you and how you choose to do it.
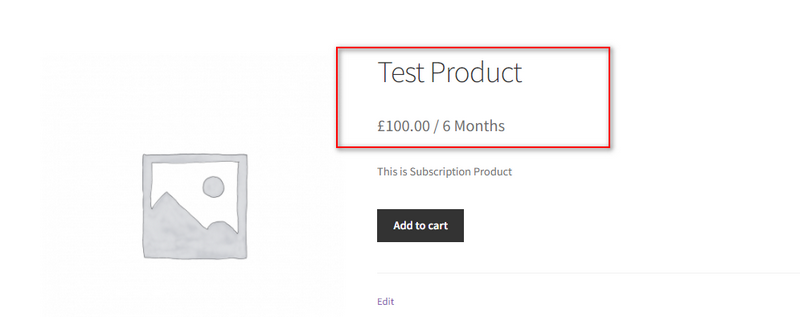
3. Creating a New WooCommerce Subscription Product and Customizing it:
You can also create a new subscription product at any time by clicking on Products > Add New and then enabling the Subscription option on the Product Data Tab. Click on Subscription Settings to configure your Subscription product.
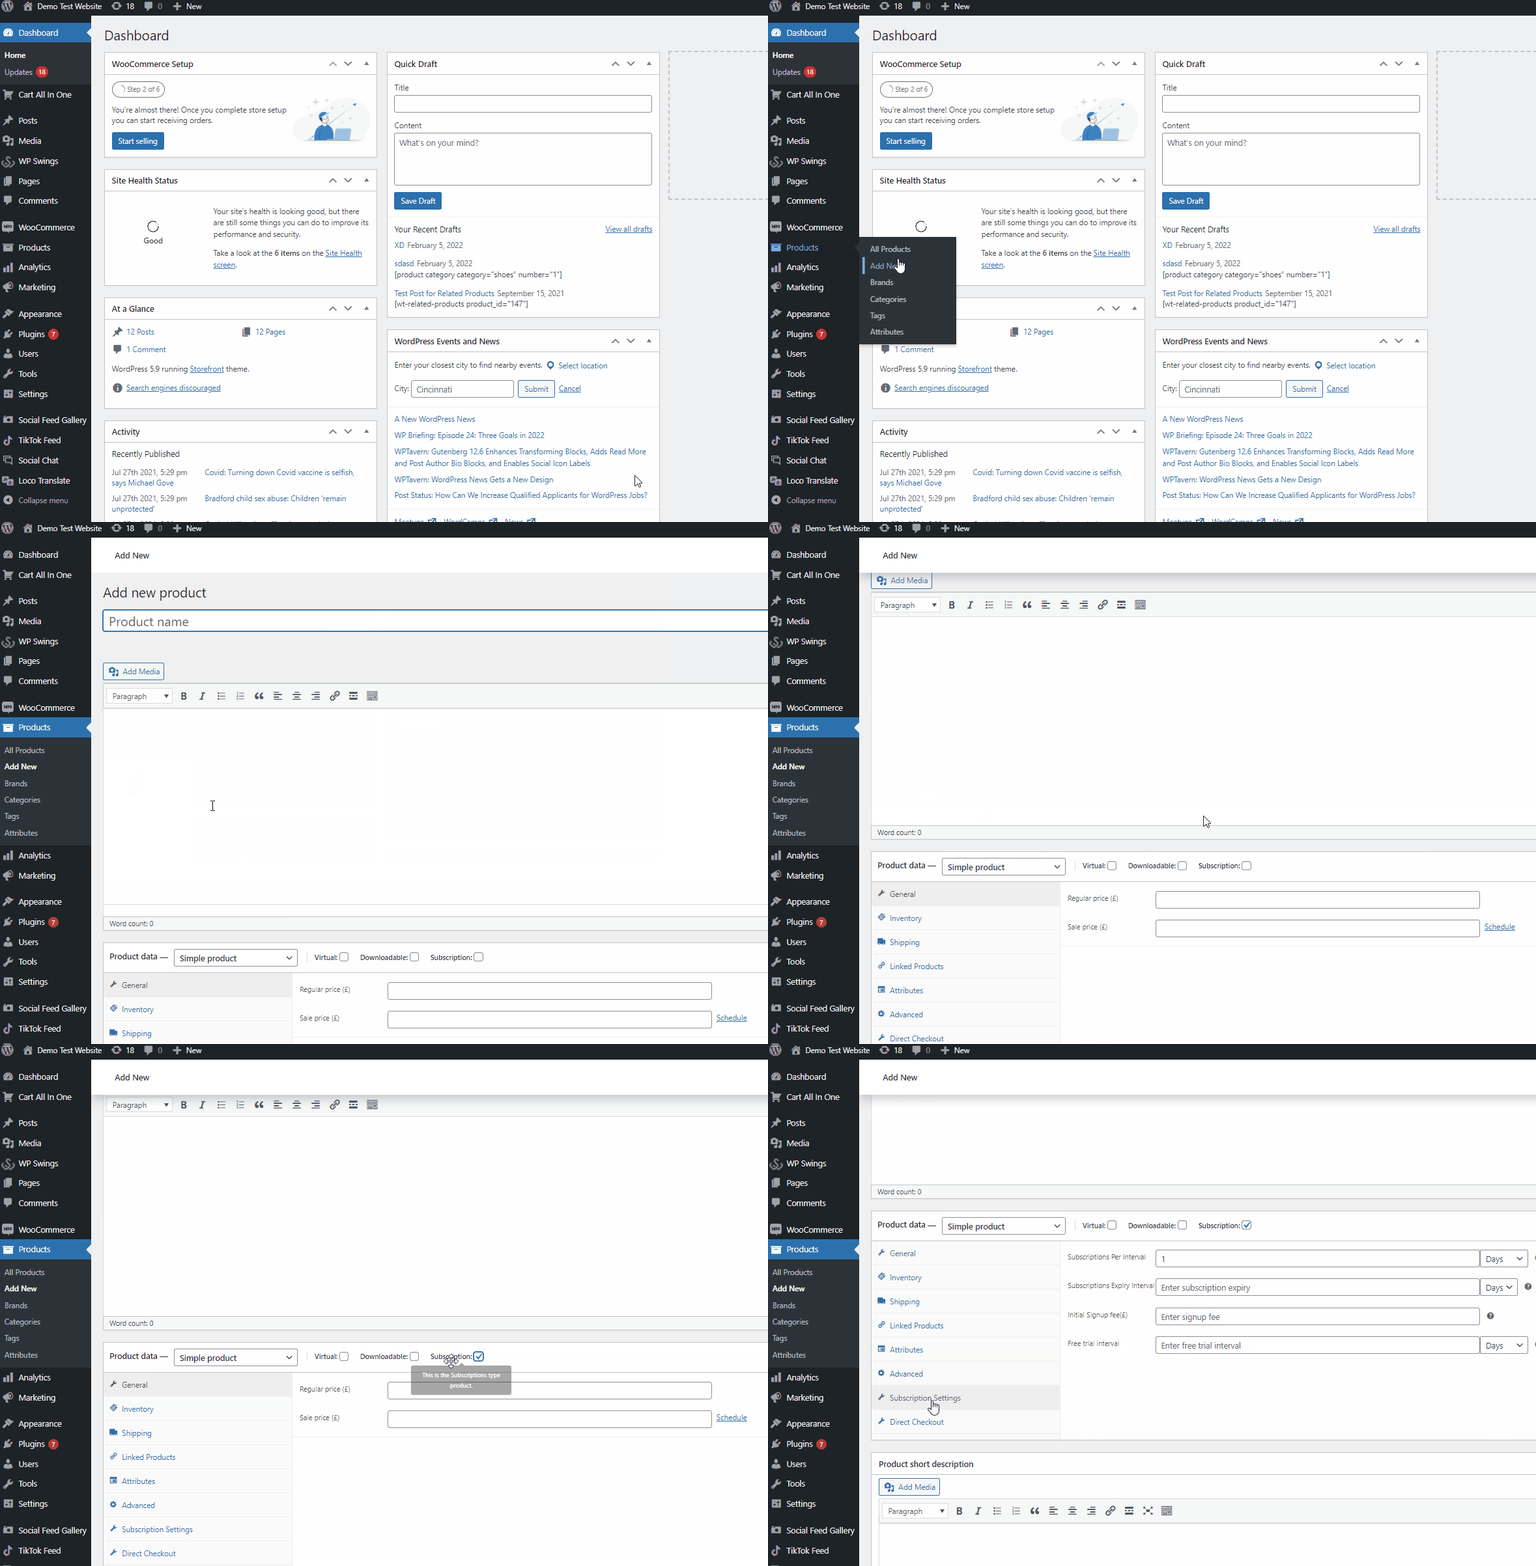
You can configure 4 different options:
- Subscription Per Interval: This field determines The interval at which the customer will be charged for the subscription product. So if you set it to 1 week, the customer will be charged every week.
- Subscription Expiry: You can set this field to define the expiry interval for your subscription. Meaning once this interval ends, your customer’s subscription will end and they won’t be charged for their subscription after this period. You can also set this field to empty to enable unlimited subscription intervals for your customer where they will be charged for this subscription as long as they’d like.
- Initial Signup Fee: You can also add an initial sign-up fee for the initial subscription to your product if you’d like to use this field. Leave this field empty if you don’t want to add a signup fee.
- Free Trial Interval: Using the Free Trial interval you can provide your customers with a free trial interval.

Remember to also set the name, description, and price for the product as you would any other WooCommerce product. Then Publish the product to create it.
4. Additional Options for Subscriptions for WooCommerce:
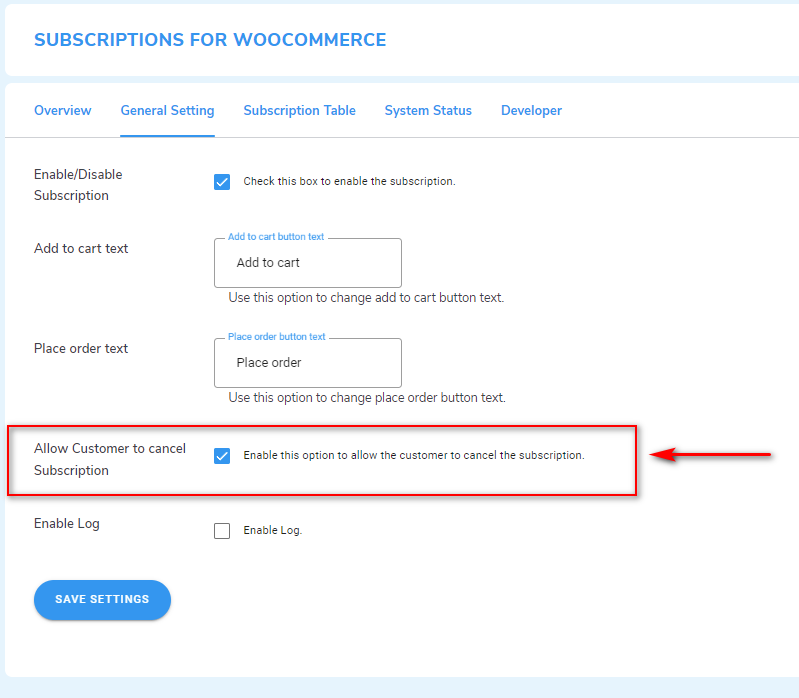
If you want your customers to be able to cancel their subscription at any time you can enable the Allow Customers to Cancel Subscription option under the General Settings tab of the plugin.
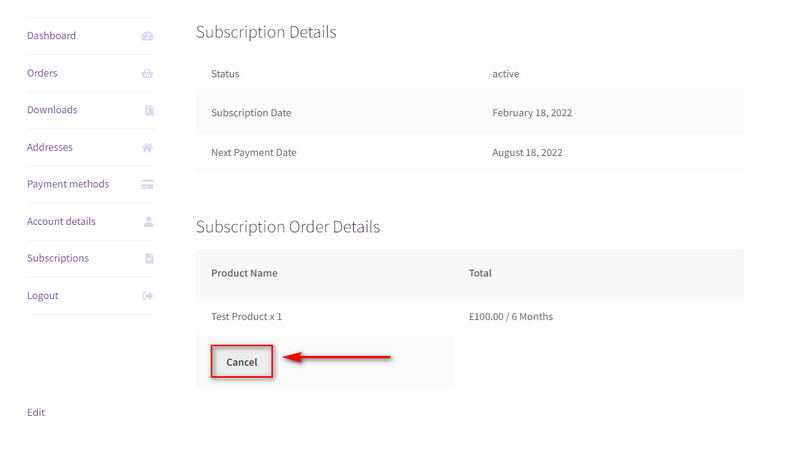
Once you enable this option, they will see the option to cancel any of their active subscriptions on their My Account page under the Subscriptions tab.
We highly recommend enabling this option. This way you can provide your customers the option to cancel their subscriptions or change them at any time. Additionally, you can also ensure that you are more compliant with laws regarding consumer rights and subscriptions.
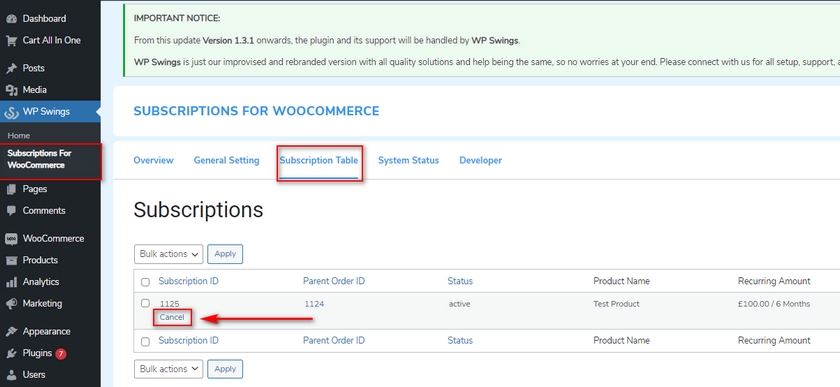
Moreover, if you want to check all your currently active subscriptions you can do so by clicking on Subscriptions for WooCommerce > Subscription Table. You can also use this page to cancel any of your currently active subscriptions for your customers if you’d like.
Bonus: How to autocomplete WooCommerce orders
As an additional measure, if you’re selling virtual products or services(with or without subscriptions) you can also choose to autocomplete your WooCommerce orders. What this means is that any paid order will be completed on your backend without manual intervention. This is a quick way to provide virtual products, files, and downloads to your customers without having to approve every order. This can work great to help you quickly respond to your customer orders and improve their experience in using your virtual products.
With autocomplete enabled for your WooCommerce orders, your customers don’t have to wait on you to use their virtual products. For example, if you were to run a virtual subscription product, you can ensure that as soon as your customer pays for their plan they can instantly access all their virtual products. There is no need for that extra downtime when you’re providing them with a virtual product or a membership subscription. This is a great way to boost your order processing and thus improve your sales and conversions.
To quickly enable autocompleting WooCommerce Orders on all your virtual products, you can use the following script. Simply paste in the script in the functions.php of your theme(or child theme.) We highly recommend using a child theme to add in custom functions since any change you make can be easily reverted. Moreover, your custom functions are saved to your child themes and will remain even when you update your main theme. You can learn more about Child Themes and how to use them here.
Enabling Autocomplete WooCommerce Orders Programmatically:
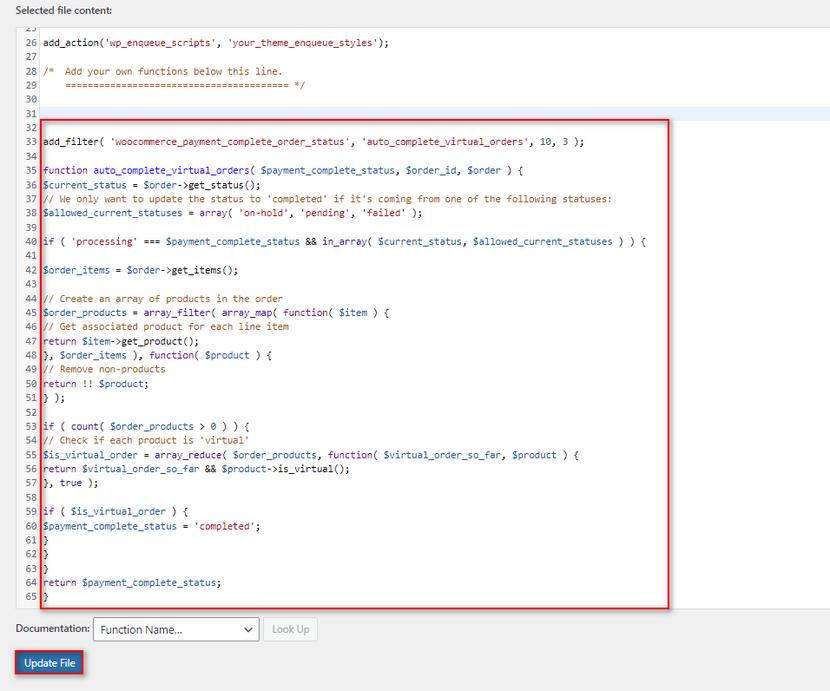
Once you switch to your Child theme, click on Appearance > Theme File Editor. Then, click on functions.php on your theme files sidebar on the right. Now, you can paste the following script to your editor and autocomplete orders for your virtual products.
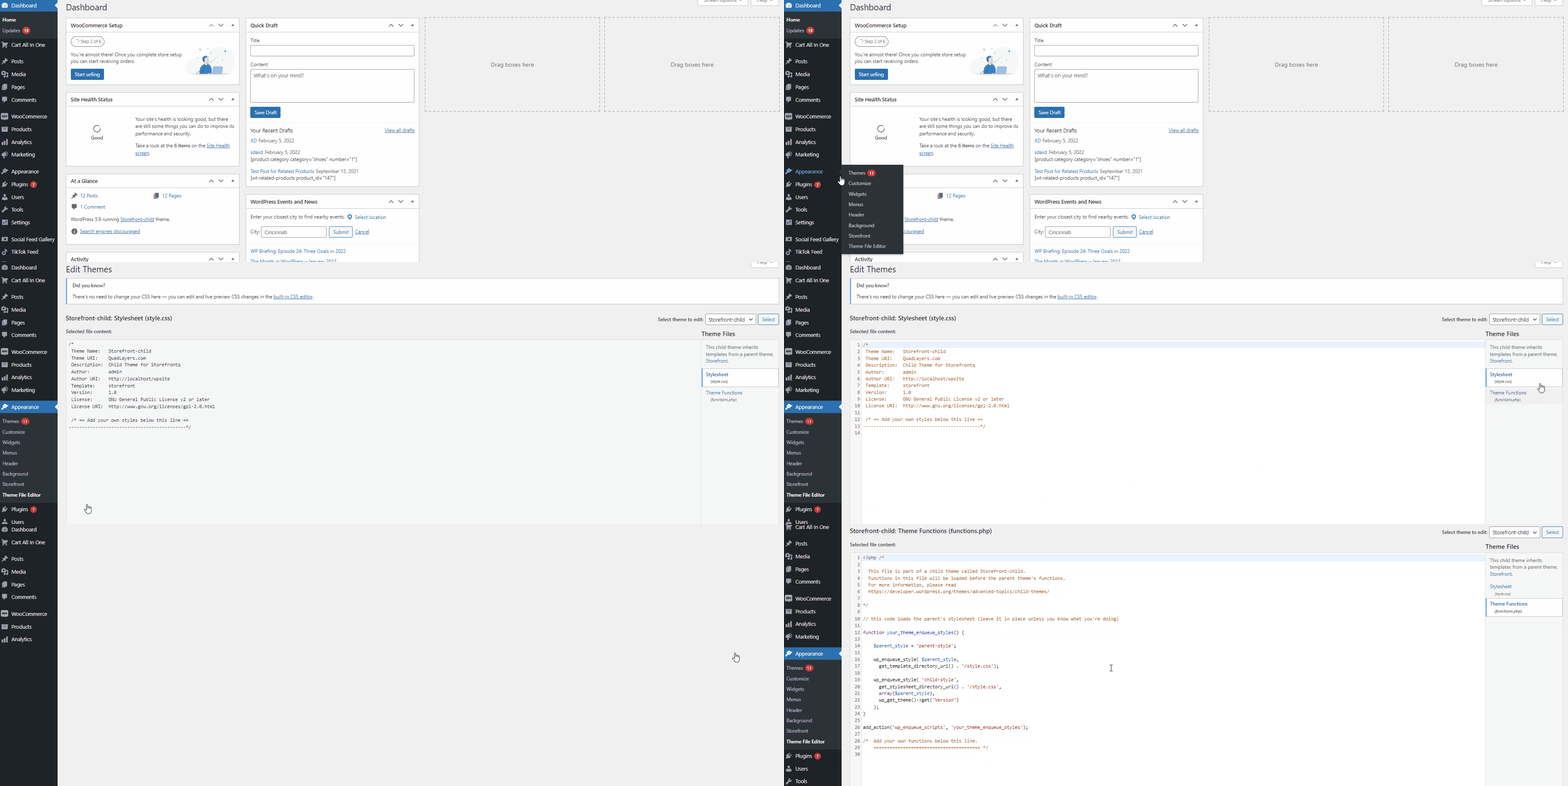
add_filter( 'woocommerce_payment_complete_order_status', 'auto_complete_virtual_orders', 10, 3 );

function auto_complete_virtual_orders( $payment_complete_status, $order_id, $order ) {
$current_status = $order->get_status();
// We only want to update the status to 'completed' if it's coming from one of the following statuses:
$allowed_current_statuses = array( 'on-hold', 'pending', 'failed' );

if ( 'processing' === $payment_complete_status && in_array( $current_status, $allowed_current_statuses ) ) {

$order_items = $order->get_items();

// Create an array of products in the order
$order_products = array_filter( array_map( function( $item ) {
// Get associated product for each line item
return $item->get_product();
}, $order_items ), function( $product ) {
// Remove non-products
return !! $product;
} );

if ( count( $order_products > 0 ) ) {
// Check if each product is 'virtual'
$is_virtual_order = array_reduce( $order_products, function( $virtual_order_so_far, $product ) {
return $virtual_order_so_far && $product->is_virtual();
}, true );

if ( $is_virtual_order ) {
$payment_complete_status = 'completed';
}
}
}
return $payment_complete_status;
}
The function simply checks if any of your orders made are Virtual products. If the payment is completed, the order will be autocompleted. After you add the scrip to the editor, update the file as well.
While this function works fine to an extent, we recommend using a plugin instead to enable autocomplete orders. This ensures that you have more control over what products and orders are autocompleted and you can revert any of the completed orders if there’s an issue. If you’d like to learn how to do so using a plugin, we recommend you check out the article here.
Conclusion:
And that ends our guide on How to Add a WooCommerce Subscription product. Subscription-based service is a great way of securing consistent revenue for your business. However, setting up a WooCommerce subscription can be quite difficult, even with a plugin and there are some tips we recommend when setting up your WooCommerce subscription products:
- Ensure that the fine lines regarding your subscription products, their payment intervals, and subscription periods are clear to your customers.
- Consider making sure your refund policies cover your subscription products based on your subscription renewals for better customer relationships.
- Virtual products, downloadable files, and membership-based services can make great advantage of subscription products and we highly recommend you experiment with them based on your business model.
- Consider adding free trials for new subscribers as well as discounts and offers for long-term ones.
- Make sure your customers are fully aware of their subscription schedule when it is renewed for their current plans as well as the option to cancel it whenever they want.
These tips should be a great starting point for you to capture the massively increasing subscription-based industry. We highly recommend you experiment with various subscription plans and billing schedules to figure out what works better for you.
If you want further advice on managing your subscription products or even help with setting them up please let us know in the comment section and we will do our best to help you.
Furthermore, if you want to experiment more with using various kinds of product designs and business models why not check out some of our other articles:

