
How to Add WordPress Site to Google Search Console
With so much competition on the Internet, it’s no secret that SEO plays a big part in the success of any online business. However, SEO can be challenging for most beginners. If you want to boost your rankings on search engines, this guide will interest you. In this article, we will show you how to add your WordPress site to Google Search Console and improve your SEO.
What’s Google Search Console (GSC)?
Search Console (previously known as Webmaster Tools) is a free service offered by Google. It is a pack of SEO tools and reports to help webmasters analyze their website’s performance on Google search results. GSC is a powerful tool and is considered one of the finest SEO tools available in the market to optimize your content and rank better for the keywords you’re interested in.
Some of the main features of Google Search Console are:
- Fetch as Google
- Sitemap submission
- Hreflang flag optimization
- Keyword tracking
- CTR tracking
- Position tracking
- Deindexing pages
- And many more!
Why Add Your WordPress Site to Google Search Console?
Adding your WordPress site to Google Search Console provides you with SEO benefits and gives you advanced tracking features. GSC can help you take your SEO game to the next level by helping you monitor:
- Keywords that are working best
- Posts that are getting more views and clicks
- Searches that users are doing before clicking on your posts
- Ranking and CTR (click-through rate) of each post for different searches
- And more
So if you want to make sure that your content is optimized to bring as much traffic as possible to your site, adding your site to Google Search Console is a must. It comes with plenty of useful features that will help you create new content targeting the right keywords and also update old content for better rankings.
How to Add WordPress Site to Google Search Console
Adding your site to the GSC platform is quite simple. You simply have to start the process, complete the verification, and monitor your website traffic by following our guide. Below, we will show you how to correctly add a WordPress site to Google Search Console. There are three steps to complete the process:
- Create a property
- Verify it
- Submit the sitemaps
Let’s have a deeper look into each section so you set everything up without getting any errors.
1) Create a Property
The very first thing you need to do is create a property by clicking this link. You will see a page like this:
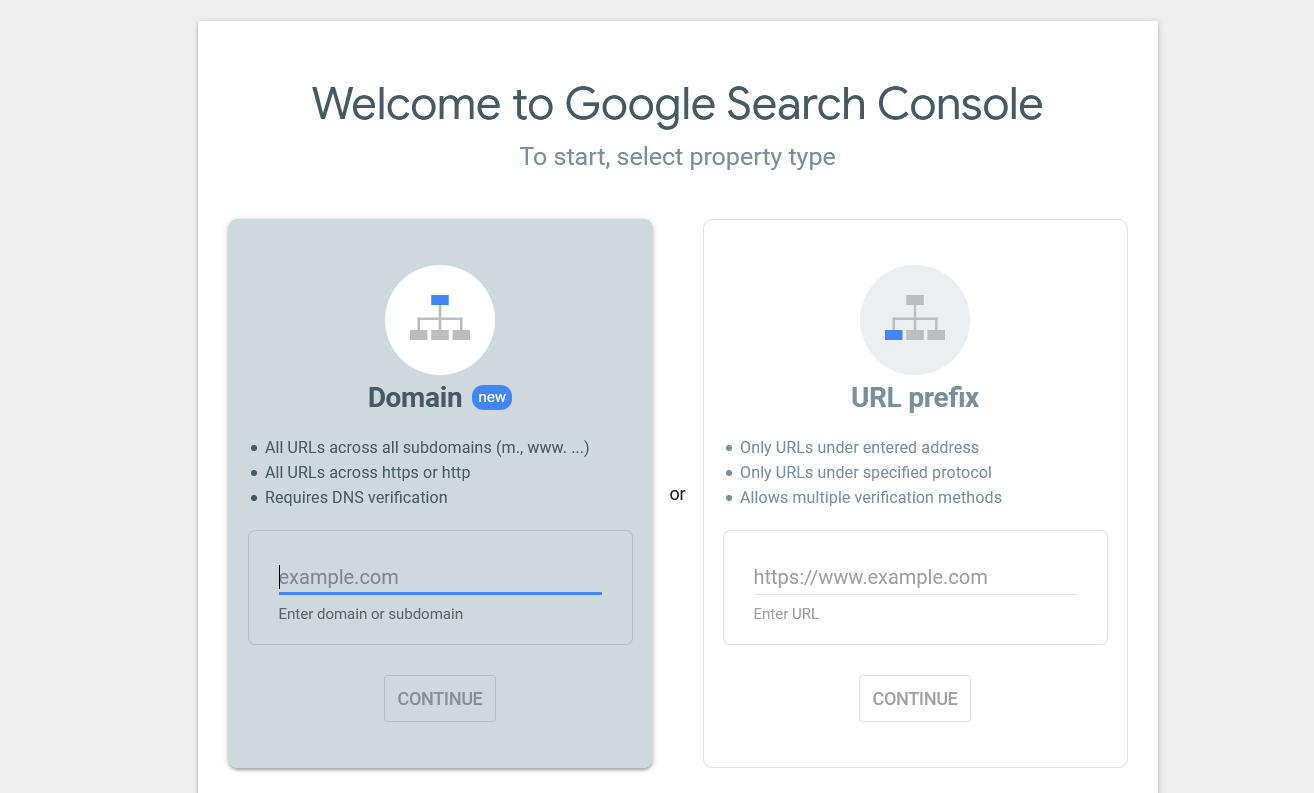
From here, you can create a new property. There are two types of properties that you can create:
- Domain
- URL Prefix
Let’s see what each of them involves so you can choose the right one for you.
Domain Based Property
Creating a domain-based property is the right choice when you have multiple subdomains and need to index them all. This means that GSC will fetch and index all the URLs available on your website, regardless of whether it’s based on the HTTP or HTTPS protocol. When it comes to the verification method, it requires DNS.
URL Prefix Based Property
URL prefix property is the popular property used by bloggers and website admins. It will help you index content from a specific domain name under HTTP or HTTPS protocol. Google Search Console will index only URLs based on the entered protocol. This means that if you need to index both HTTP and HTTPS versions of your website, you must create two properties.
To verify the property, you have multiple options, so you can choose a verification method according to your preference. For this demo, we will select the URL prefix-based property, so we enter our domain name there and click Continue.

On the next page, you will see some options to verify the ownership of the domain name.
2) Verify Your Site in Google Search Console
Verifying your site in Google Search Console is mandatory. Google has to know that you are an authorized person before it provides you with multiple features to control the overall website. Currently, there are five options to verify your site in Google Search Console.
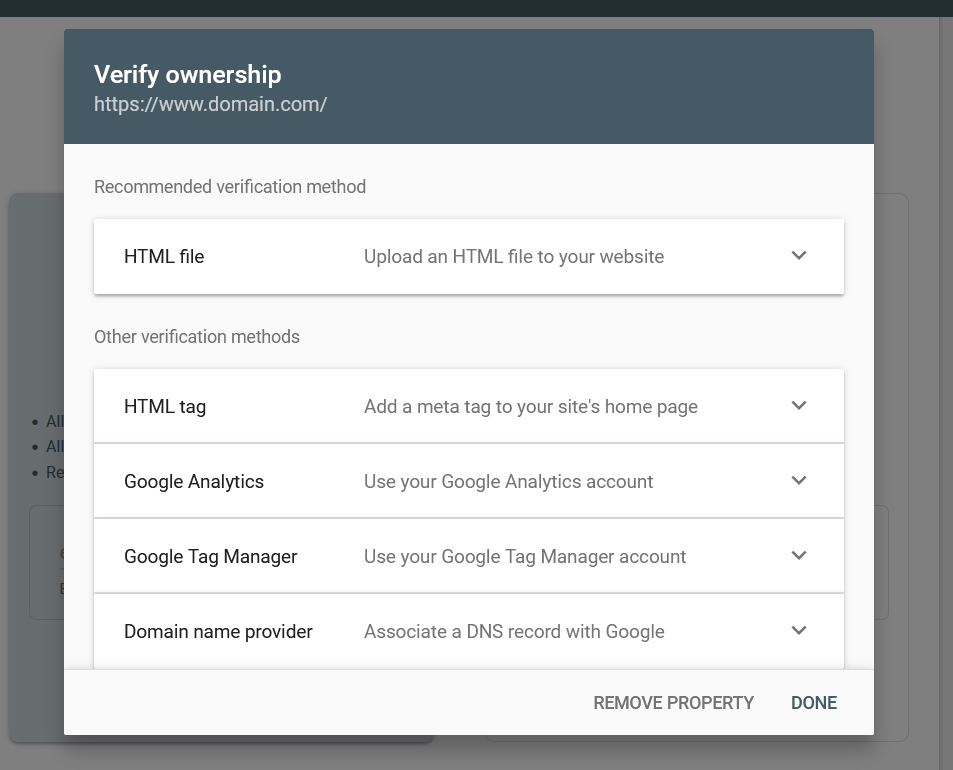
- HTML file
- HTML tag
- Google analytics
- Google tag manager
- Domain name provider
As you can see, there are several options to choose from, so simply select the most appropriate for you. In this section, we will show you how you can verify your property through various methods and complete the process.
2.1) HTML file
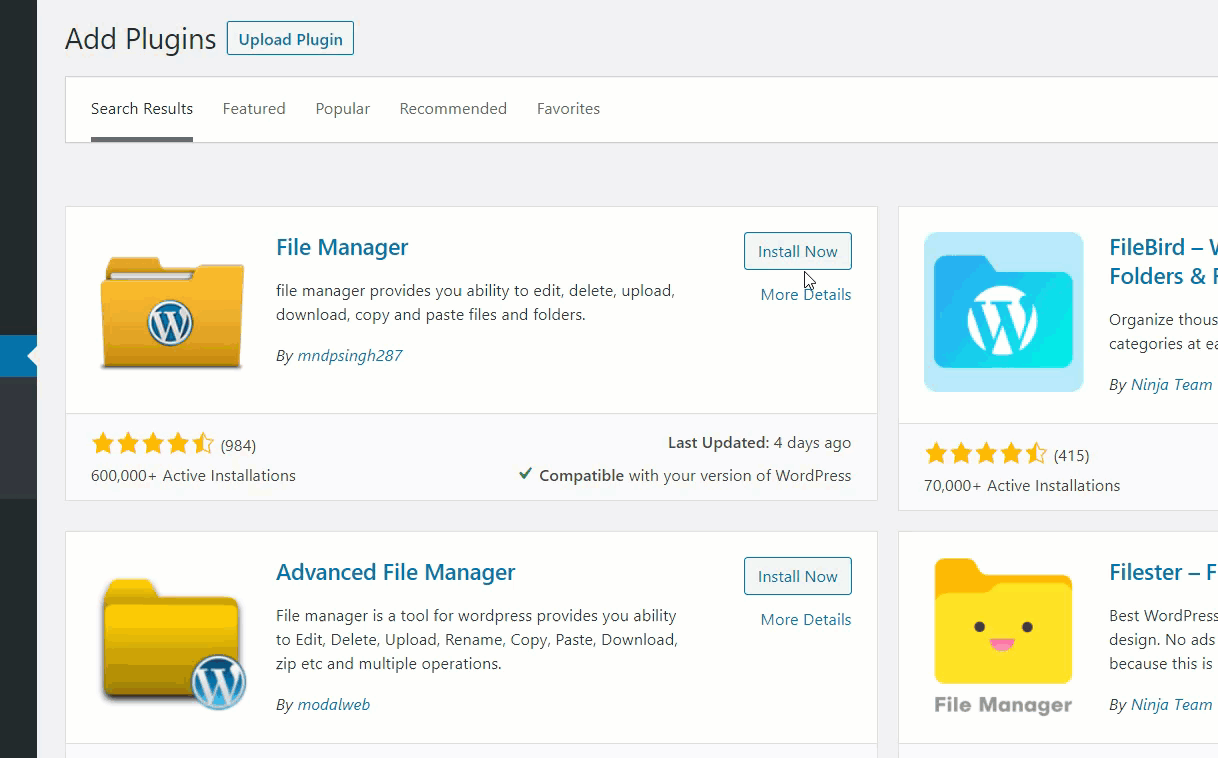
The HTML file is the simplest GSC verification method available and it doesn’t require any technical knowledge or editing any DNS records. You simply have to download the verification file from the screen and upload it to your public_html folder.

To do that, use an FTP client like FileZilla or a file manager plugin like this one.
If you aren’t comfortable using an FTP client, use the plugin as it’s more straightforward. First, you have to install and activate the File Manager plugin on your site by going to Plugins > Add New.
Once the plugin is active, navigate to the public_html folder and upload the HTML file you have just downloaded from your GSC property.

After that, get back to the GSC page and press Verify.
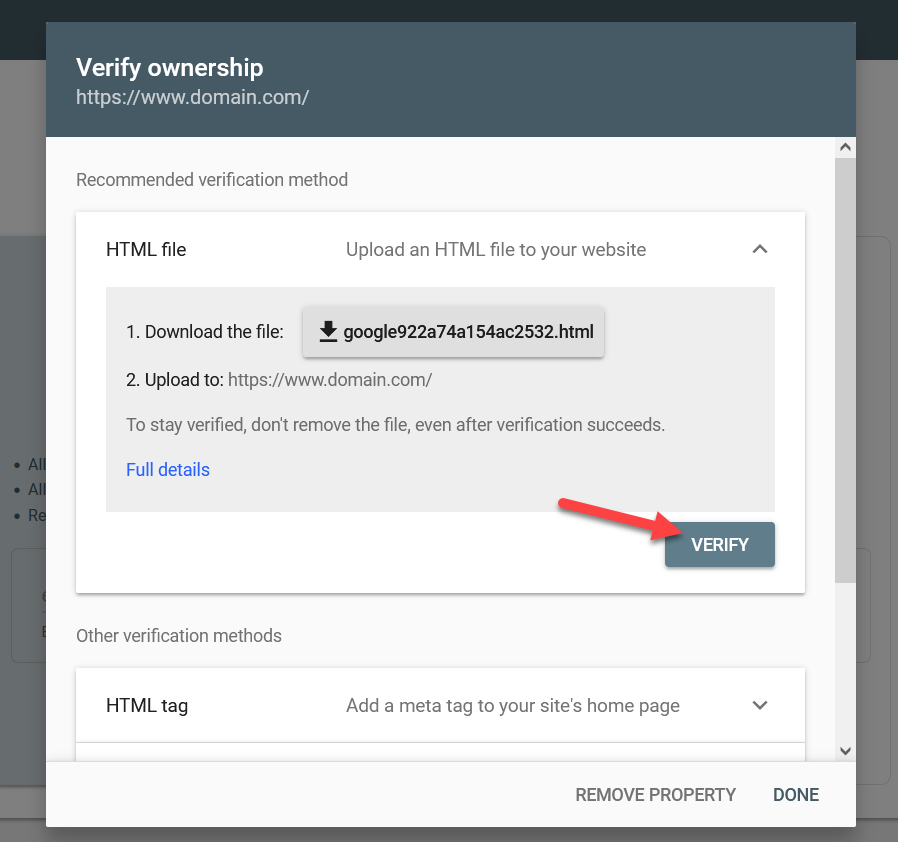
GSC will look for the file in the public_html directory, so if you have done it correctly, the verification will be completed and you will be redirected to the GSC dashboard. Keep in mind that you shouldn’t remove the file after the verification, otherwise the property will show up as unverified.
2.2) HTML tag
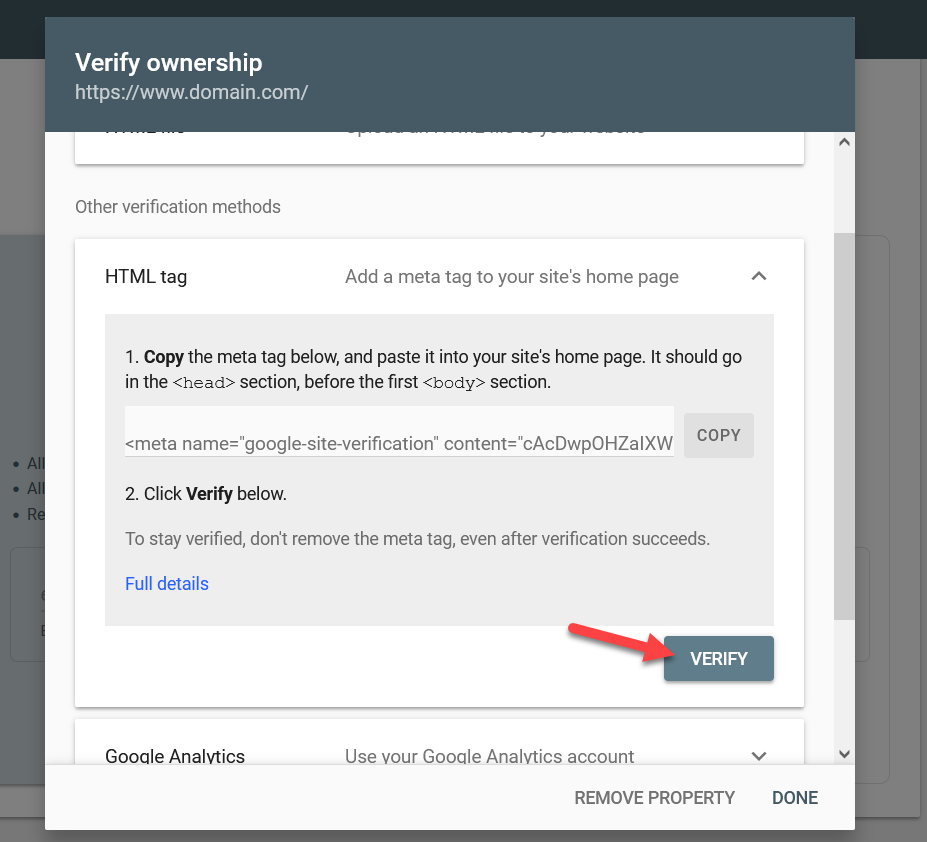
The next method to verify your domain is by pasting an HTML tag inside your website’s header. To do this, first, copy the HTML tag give to you in GSC.
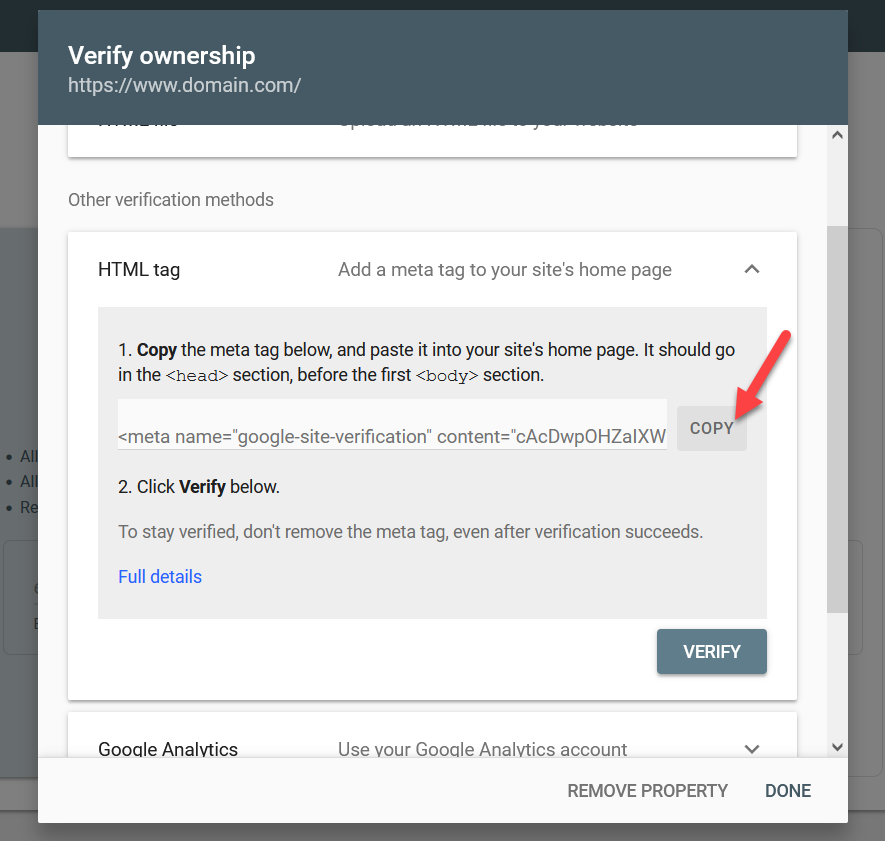
You will paste this code just before the </head> tag on your site. To do this, you can use a plugin like Insert Headers or Footers or paste the code directly to the header.php file of your theme using the Customizer. For this demonstration, we will use the plugin.
In your WordPress dashboard, go to Plugins > Add New, look for the Insert Headers and Footers plugin and install it.

Once the plugin is active, go to the Settings and paste the meta tag inside the header. Then, press Save.

You can also see the meta tag in the front end of your website when you view the page source.
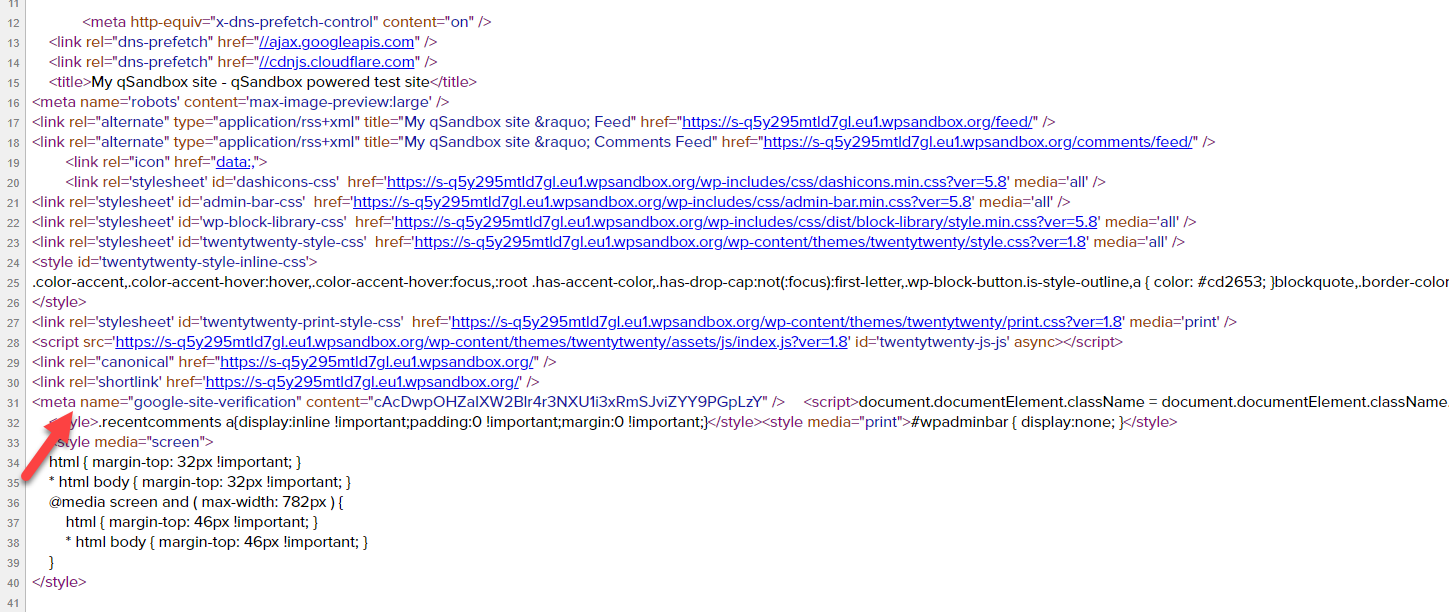
This way you can double-check that the code is there. If you can spot the meta tag before your </head> tag, you’re good to go. Now go back to GSC and complete the verification by pressing Verify.
That’s it! After that, you will be redirected to the GSC dashboard.
NOTE: Editing the theme’s header.php file isn’t a good idea because the theme updates will override the changes. You should either create a child theme or use a plugin for the verification.
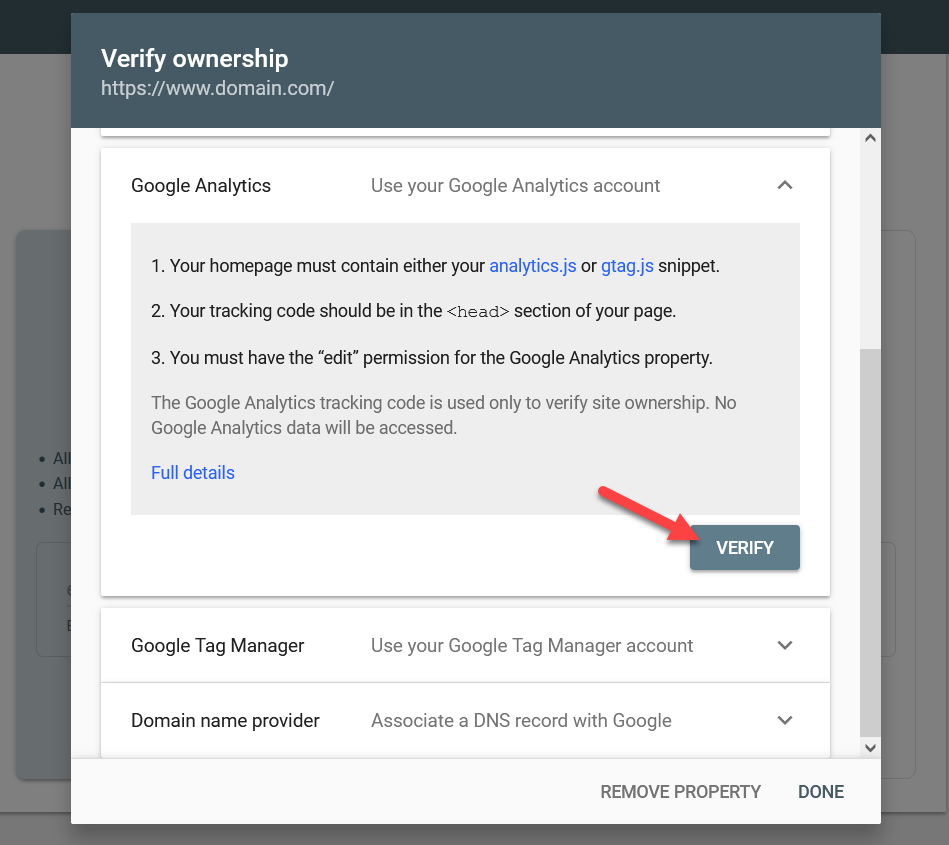
2.3) Google Analytics
When you have integrated your website with Google Analytics, this is the best way to verify the site ownership. You can verify the ownership of the domain without adding any code or files to your existing directory.
To do this, you need to have a Google Analytics property linked with your domain name and make sure that you are using the same Google account for both Analytics and Search Console. You can complete the integration manually or by using a dedicated Google Analytics plugin such as MonsterInsights or ExactMetrics.
Usually, you simply will add the tracking code between the <head> and </head> tags and if GSC finds a gtag.js or analytics.js snippet on your homepage, you are good to go.
So click the Verify button, and you will be redirected to the dashboard.
For more information on how to add Google Analytics to your WordPress installation, check out this guide.
2.4) Google tag manager
When you have a Tag Manager account active on your site, you can use this method to complete the verification process. Once again, make sure that you use the same Google account for your Tag Manager and Search Console account for the verification process.
Simply press the Verify button once you are ready. The process may take some time, but once the verification is complete, you will be able to access the Google Search Console tools.

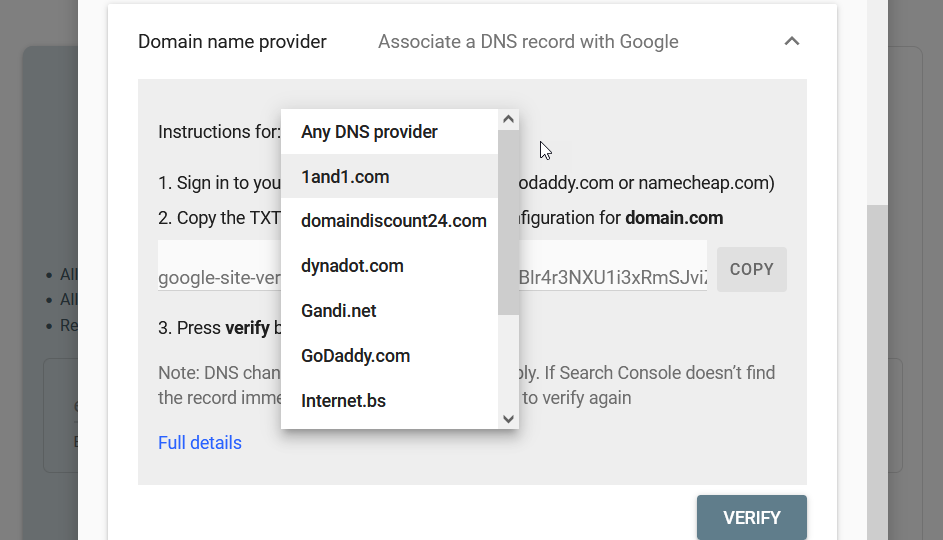
2.5) Domain name provider
This is the most advanced method compared to the previous ones. For this verification, you need to edit your DNS records. If you check the available domain providers, you will see the most popular ones such as Name.com, NameSilo.com, GoDaddy.com, Dynadot.com, 1and1.com, and others.
If you can spot your domain registrar, select it and click Start verification.
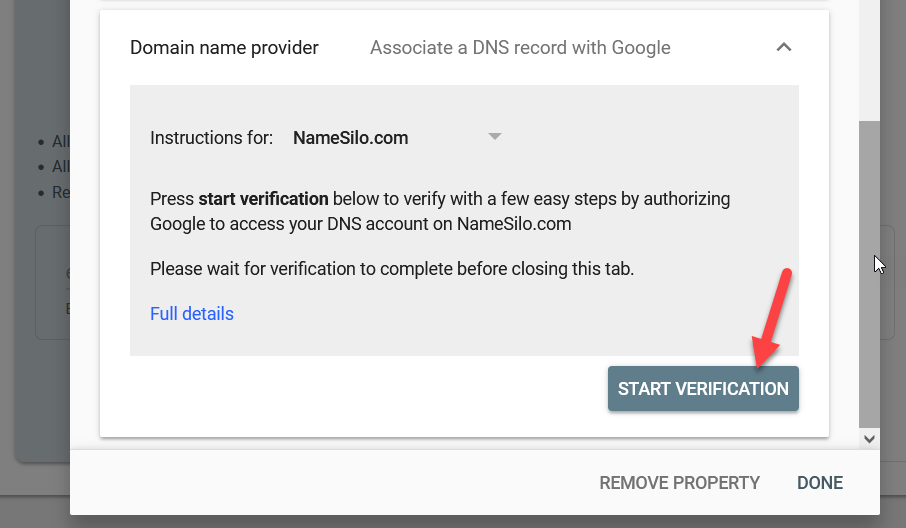
Your domain registrar’s official website will automatically open in a new tab and you will be able to complete the verification in no time.
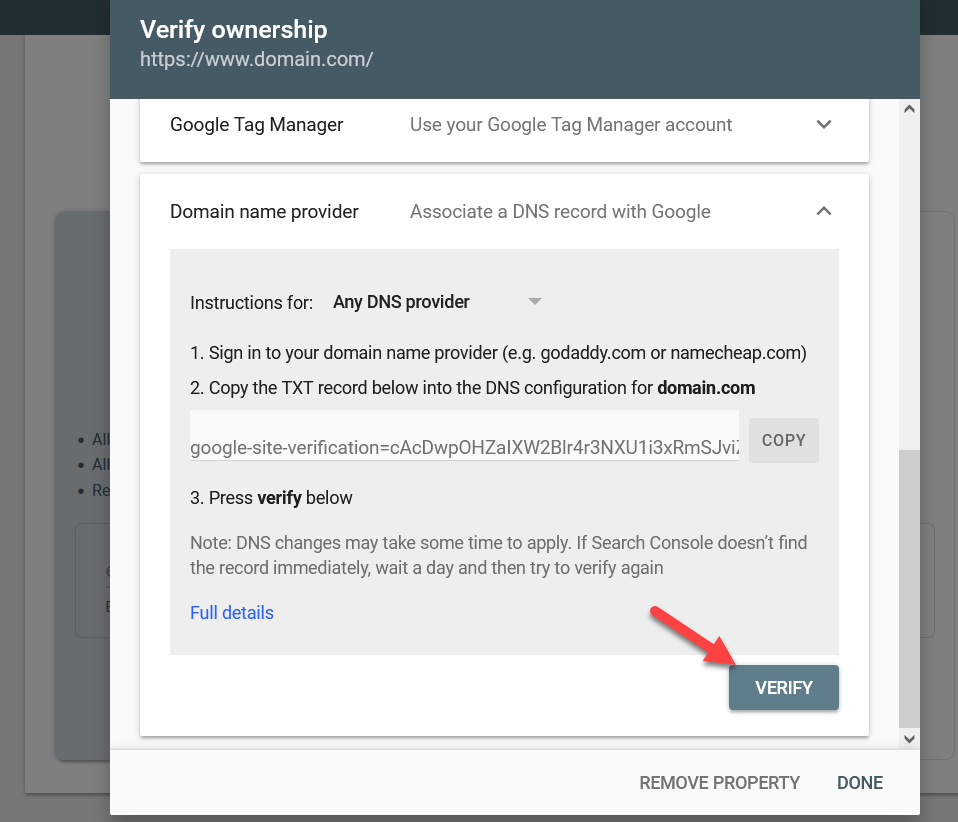
If you can’t see your domain name registrar in the dropdown, choose the Any DNS Provider option and copy the TXT record.
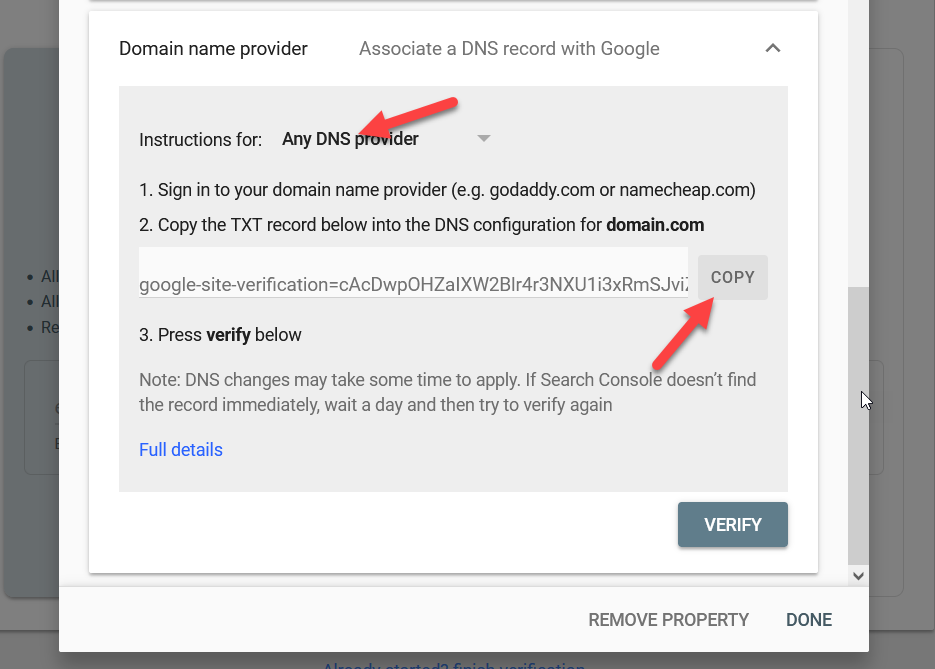
Then, log in to your domain name registrar and select the domain name you need to verify. On the domain settings, look for a feature called DNS records, that’s where you can edit the domain name records.
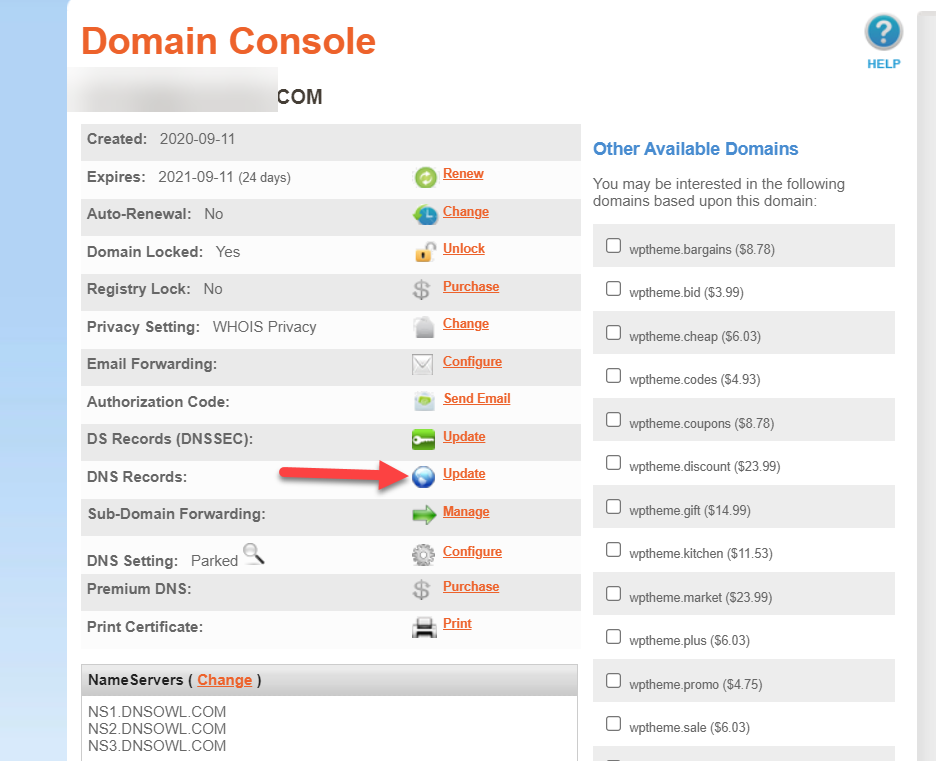
As you will add a TXT record, go to the TXT tab.
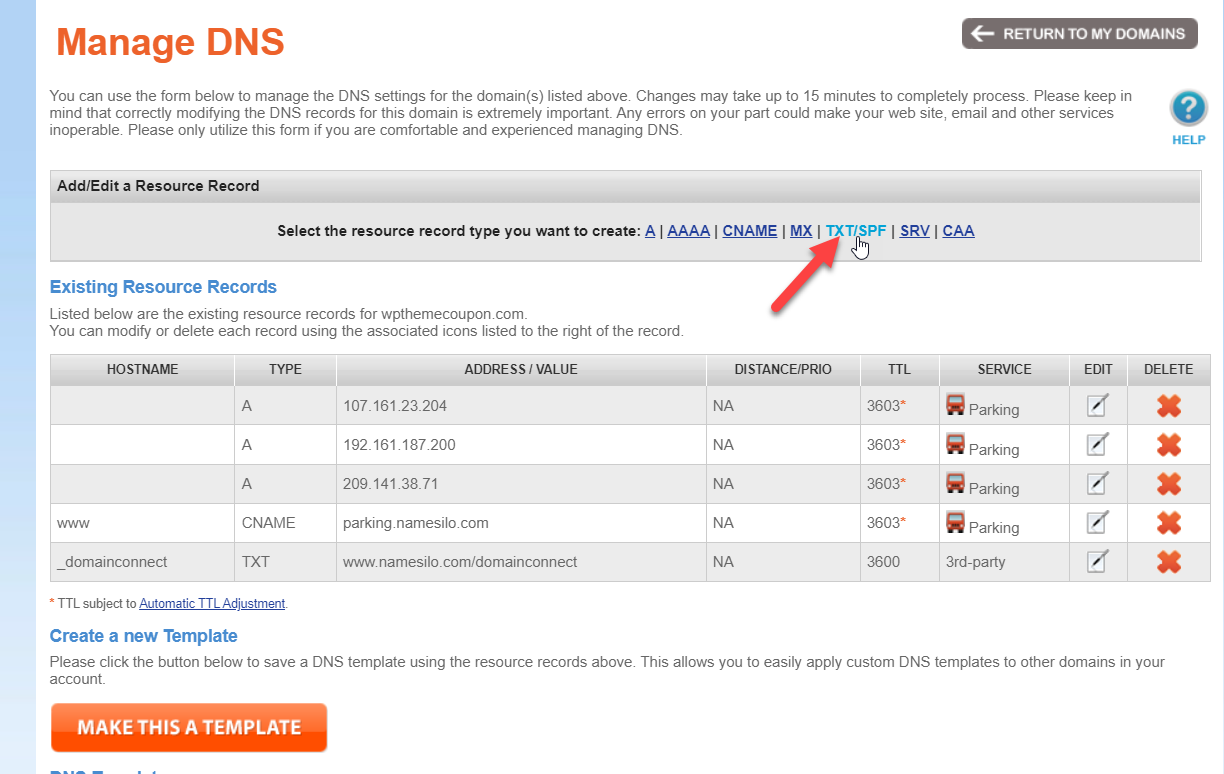
Set up a hostname, paste the TXT record, and submit the changes.

It normally takes a few minutes to reflect the DNS changes, so be patient. Once you see the changes, go to GSC and press Verify.
Most domain providers offer live chat support or support via tickets, so if you are having issues while adding the TXT file, you can contact them.
That’s it! This is how you can verify your Google Search Console property. All the methods serve the same purpose but in different ways, so choose the one that it’s easier for you.
Once the verification is approved, you’ll see your Google Search Console dashboard:

NOTE: When you verify the property for the first time, you won’t see any stats. This is because Google Search Console takes one day to update the stats, so you will see today’s performance tomorrow, tomorrow’s performance the day after, and so on.
3) Add an XML Sitemap to Google Search Console
Once you have verified your property, you need to tell search engine crawlers to go through your website and index your pages. You can do so manually or by submitting an XML sitemap. Doing it manually means that you have to fetch every single URL on your site which isn’t practical if you have a lot of pages on your website. That’s why the best way to submit pages is via an XML sitemap. This way, when you publish (or update) a post, the sitemap will be updated automatically, and the GSC crawlers will crawl the new URL according to the queue.
Now let’s see how you can add an XML sitemap to Google Search Console.
The easiest way to generate XML sitemaps is using SEO plugins. Rank Math, Yoast, All In One SEO Pack, and almost every SEO plugin comes with this feature. If you don’t have an SEO plugin installed, we highly recommend you use one. However, if you need a dedicated tool, check out our list of the best sitemap plugins for WordPress. For this demonstration, we will use Yoast SEO.
Enabling the XML Sitemaps Feature
Under the Yoast general settings, go to the Features tab.
Scroll to the bottom section and enable the XML sitemaps feature.
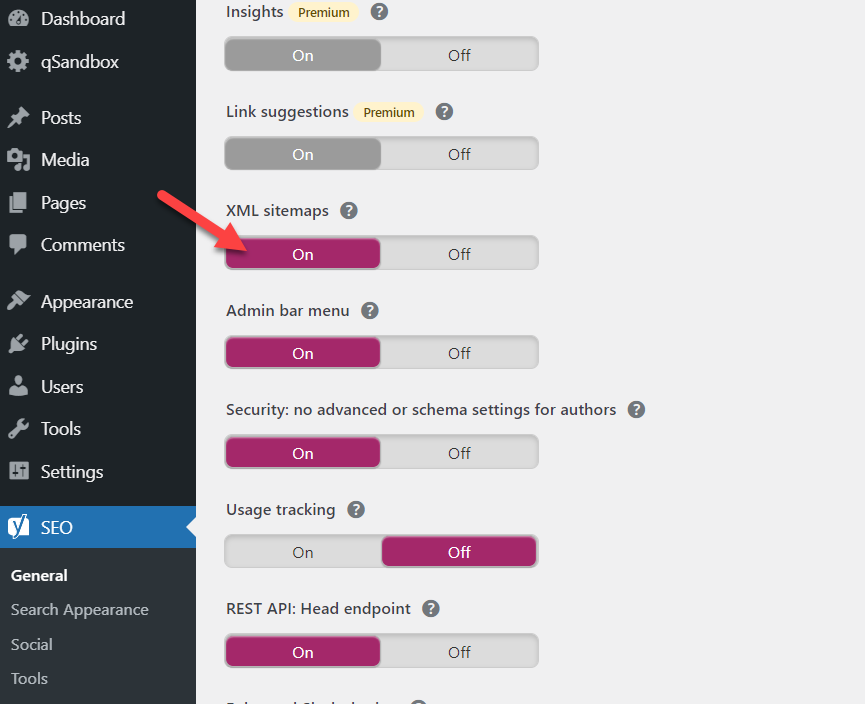
After that, save the plugin’s settings and you will see a path to your XML sitemap.
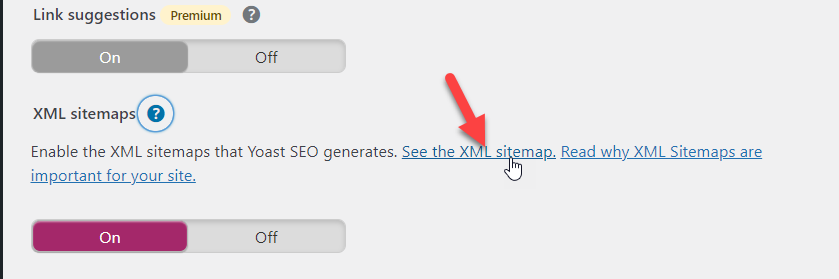
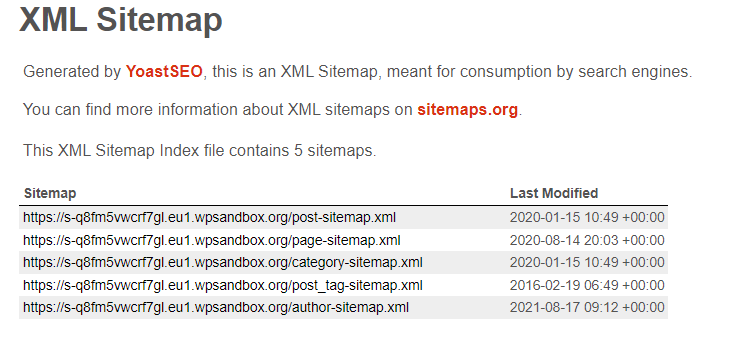
Open the link on a new tab and you will see all the generated sitemaps.
You can submit each sitemap to the Google Search Console tool. Now if you take a closer look at the GSC dashboard, you will see some tools on the left-hand side. Select the Sitemaps option from there.
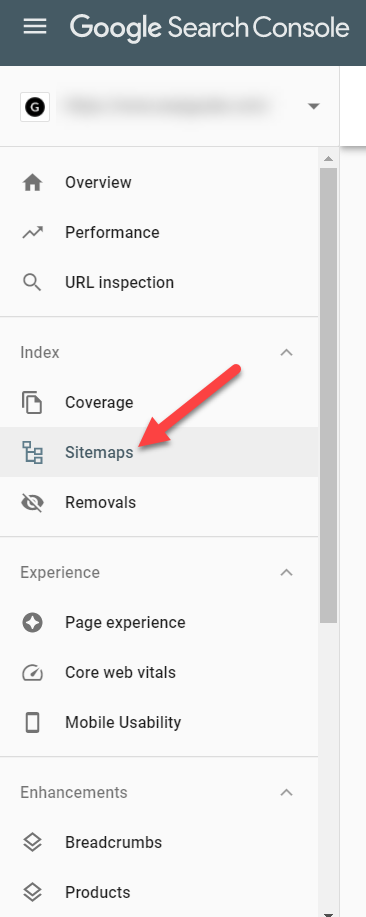
Now let’s see how you can add a new sitemap.
Submitting XML Sitemaps
To add an XML sitemap, you don’t need to mention the domain name again. For example, if the sitemap URL is https://www.example.com/post-sitemap.xml, you only need to mention post-sitemap.xml in the tool as shown below.

Once you’ve added the sitemap permalink, click Submit and that’s it! This way you can submit every sitemap you have on your website.
The SEO plugin will generate individual sitemaps for your posts, pages, custom post types, categories, tags, and so on. Simply submit the sitemaps through the tool and the search crawlers will take care of indexing them.
That’s it. This is how you can add a WordPress site to Google Search Console and verify it. Before we finish, let’s have a look at one more thing.
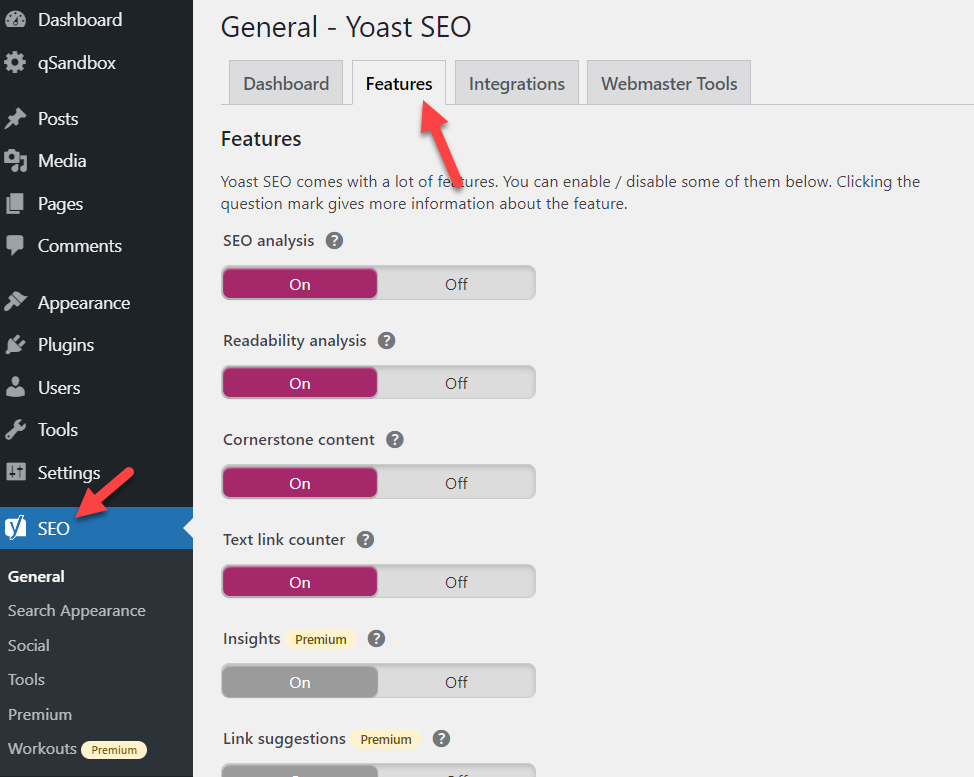
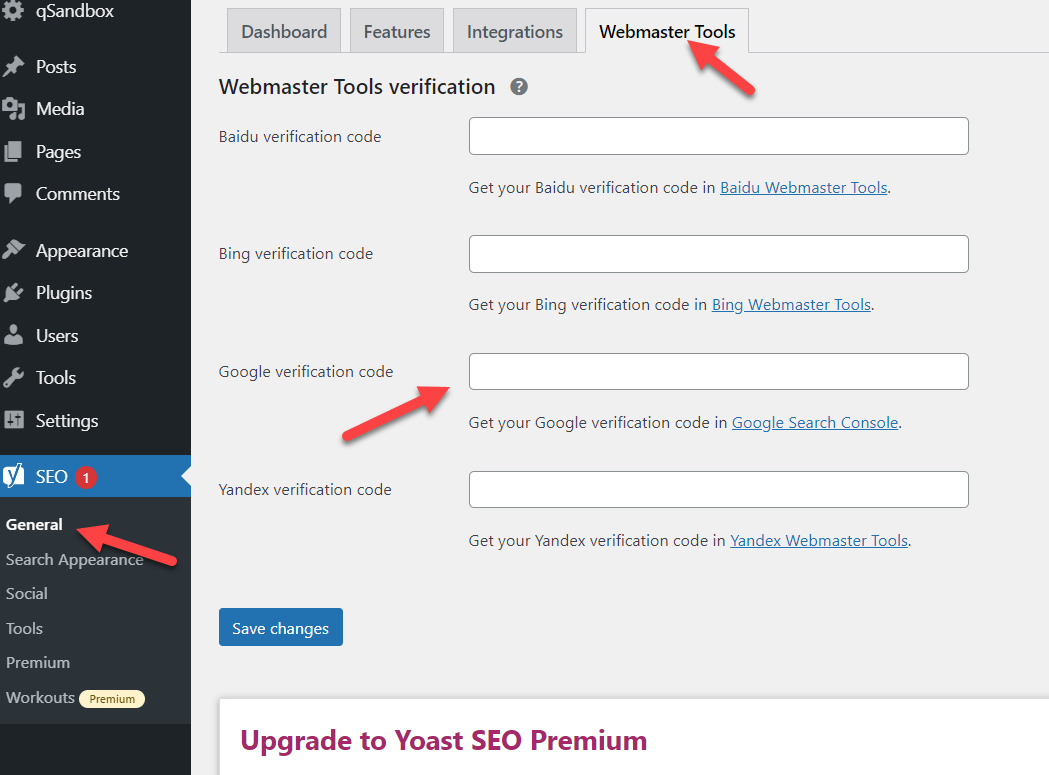
Bonus: How to Use Yoast to verify your Property
If you have the Yoast SEO plugin installed on your WordPress installation, you can verify the GSC property without using any additional plugins. To do this, go to the Yoast General settings and head to the Webmaster Tools tab. There, you will see an option called Google verification code.
In Google Search Console, start the verification process and select the HTML tag method. You will get a unique code that will look like this:
<meta name="google-site-verification" content="cAcDwpOHZaIXW2Blr4r3NXU1i3xRmSJviZYY9PGpLzY" />
To complete the verification using Yoast, all you need is the verification code, so you can remove the other parts. In this case, the verification code is:
cAcDwpOHZaIXW2Blr4r3NXU1i3xRmSJviZYY9PGpLzY
Now paste the verification code in the Yoast SEO settings and save the changes.
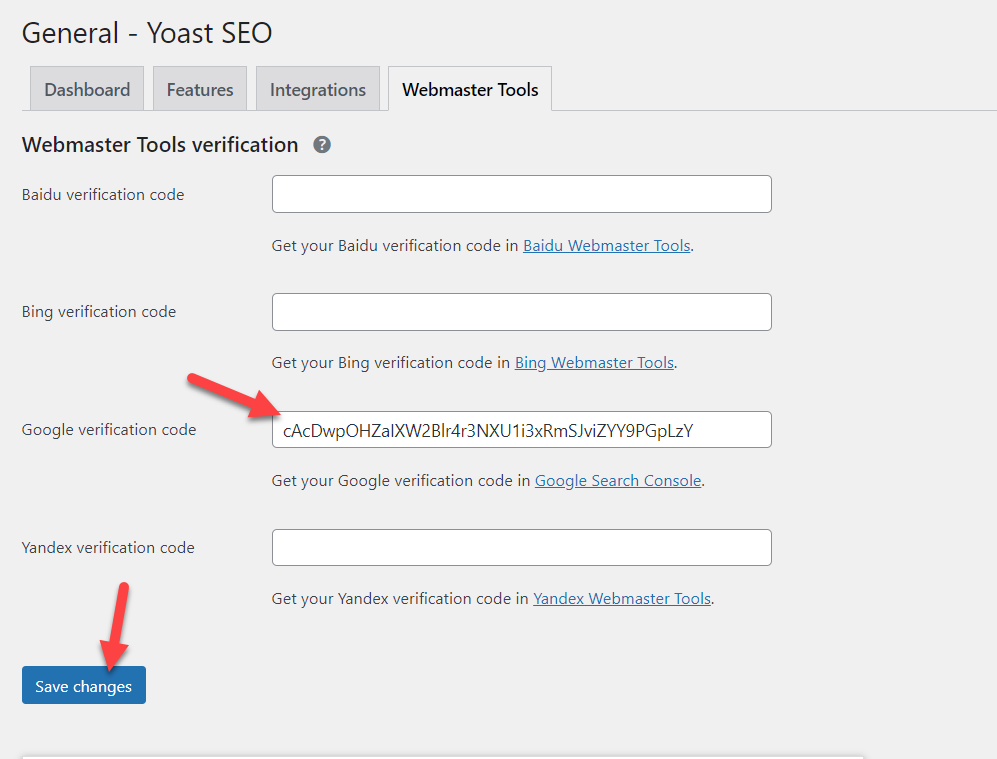
Once you have hit the save button, the code will be added to your header. Finally, go back to the GSC and press Verify to complete the verification process.
This is another simple way to verify the Google Search Console property and it takes less than a minute!
Conclusion
All in all, having a site that’s SEO-optimized is a must for any online business. If you want to get more traffic, revenue and sales, you need to optimize your site for search engines. GSC is a powerful tool that can help you improve your rankings and monitor your keywords’ performance.
In this guide, we’ve seen several ways to add a WordPress site to Google Search Console. The HTML file upload and HTML tag methods are the best ways for beginners because they’re easy to implement. On the other hand, if you are using Google Analytics or Google Tag Manager services on your site, you can choose those methods and verify your website with a simple click.
For more advanced users, the DNS record editing method can be a good option. Make sure that you have submitted the XML sitemaps after verifying the property. Finally, if you’re using Yoast SEO, you can also verify your property from the plugin’s settings.
Once you finish the verification, remember that Search Console takes one day to display data, so you’ll need to wait one day to see some information on your dashboard.
Have you added your site to GSC? Which method did you use? Let us know in the comments below!
If you have found this article helpful and enjoyed the read, share this article with your friends on social media to help them improve their rankings in the search results too.
For more information on how to take your SEO to the next level, check out these guides:

you are amazing and thanks for the Google search console content …
No problem, thank you