
How to change Place Order button in WooCommerce
Looking to edit the Place Order button in your store? We’ve got you covered. In this guide, we’ll show you different ways to change the Place Order button in WooCommerce.
This can help you improve the shopping experience on your site and let customers know about what lies ahead during the checkout process. Before we go through the steps to customize the Place Order, let’s see why you might need to change it.
Why Change the Place Order Button?
There are many reasons why you might need to edit the Place Order button in WooCommerce. When a customer goes through the checkout, they have multiple options for payment. After they select the desired payment method, the default button “Place Order” might not be the most appropriate for your customers.
If a customer selects to pay via bank transfer or cash, for example, the button will say Place Order but it isn’t clear whether the purchase will be confirmed in the next step or if they have to enter any further details.
However, if they select the PayPal option for the payment, the button will be labeled as “Proceed with PayPal”. This is more contextual and makes it clear to your customers that they’ll enceveryPal interface on the next step.
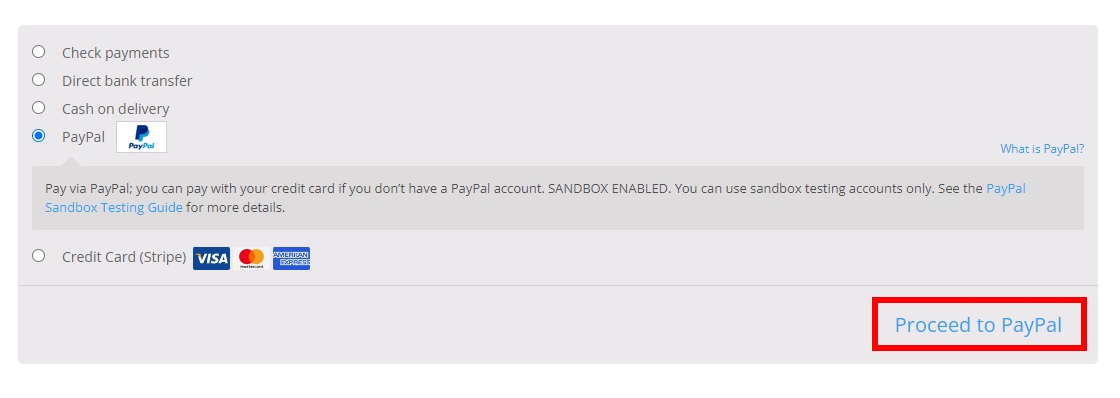
Providing proper information and context to your customers on every part of your website is important to improve the shopping experience and increase conversions. That’s why learning how to change the Place Order button in your WooCommerce store can help you stand out from your competitors.
Alternatively, if you accept donations or sell downloadable virtual products on your website, you could add a “Donate Now” or “Download Now” button instead of using the default Place Order button on your checkout page.
How to Change Place Order Button in WooCommerce
By default, WooCommerce doesn’t allow you to change the Place Order button. However, you can easily customize it with a bit of coding.
Before we begin, we recommend you create a child theme or use a dedicated child theme plugin for WordPress. This will allow you to keep the customizations on your website even after you update the theme. As we’ll edit some core files of your website, we also recommend you backup your website to avoid any issues in case something goes wrong.
Now that we’ve covered some basic reminders, let’s go through the process of customizing the Place Order button in WooCommerce.
The first thing you have to do is access the functions.php file.
The functions.php File
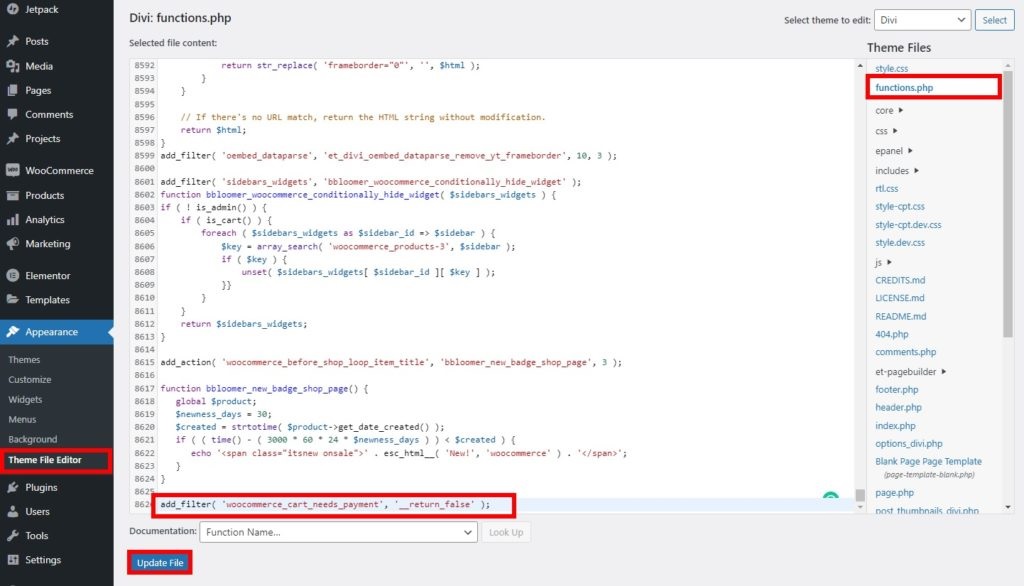
To change the Place Order button in WooCommerce you will need access to the theme functions file of your website. To access it, just go to Appearance > Theme File Editor in your WordPress dashboard.
Then, click the functions.php file under the theme files on the right side of your screen. This is where you’ll add the custom code from this tutorial.
You may need to make a few more changes to them depending on the needs of your website. Always remember to update the file after you make all the changes. Otherwise, they won’t be applied.
If you aren’t comfortable using the Theme File editor, you can use a code editor plugin like Code Snippets.
1. Replace Button Text with some Static Text
The first option to edit the WooCommerce Place Order button is to replace the text of the button with some static text. To do that, add the following code to your functions.php file.
// Replace Place Order Button with Static Text in WooCommerce
add_filter( 'woocommerce_order_button_text', 'ql_replace_place_order_button_text' );
function ql_replace_place_order_button_text() {
   return 'Continue';
}
This snippet will replace the button text with the term “Continue”. Go to your checkout page and you will see that the button text is changed to “Continue”.
Simply customize the code to add any text that makes sense for your store.
2. Change Button Text Based on the Product ID
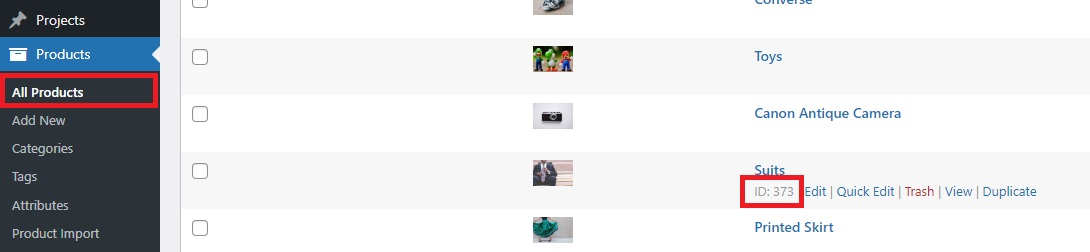
Another interesting option is to customize the Place Order button based on specific products. For this, you’ll need the product IDs of your products first.
To do that, go to Products > All Products and find the product for which you want to customize the button. Then, hover your mouse cursor over the product and you will see the respective Product iD as shown below.
You can also use the Inspect tool from your browser to find the product ID from the front end. Just open the single product page of the product, right-click on the product section of the page, and press Inspect. You should see the product ID on the Elements tab.
What you see here may vary depending on the theme you use. For example, this is how it looks when using the Divi theme.

Once you have the product ID of your WooCommerce product (373 in our case), add the following code to your functions.php file to change the Place Order button.
add_filter( 'woocommerce_order_button_text', 'ql_custom_button_text_for_product_id' );

function ql_custom_button_text_for_product_id( $button_text ) {

$product_id = 373; // a specific product ID you would like to change

if( WC()->cart->find_product_in_cart( WC()->cart->generate_cart_id( $product_id ) ) ) {
$button_text = 'Next';
}

return $button_text;

}
As you can see, we’ve changed the text of the button to “Next”. This only applies to the product ID = 373. Simply edit the code to add more products or change the text in the button.

3. Change Button Text Based on Categories
Similarly, you can also change the Place Order button text according to the category of the product in the cart. For this, you have to find the category slug of the product.
To find the category slug, go to Products > Categories on your dashboard and you will see all the products you offer in your store. Now, search for the categories of the products for which you want to change the button text.
Under the Slug column, you’ll see the slug for the particular category.
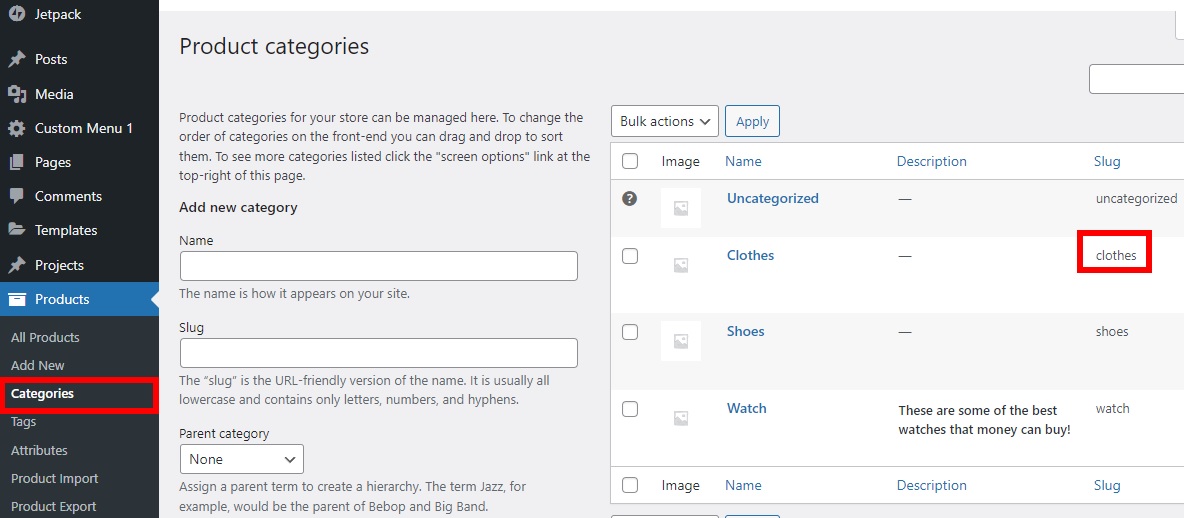
So to customize the Place Order button for the clothes category, simply add the following snippet to the functions.php file of your theme editor.
add_filter( 'woocommerce_order_button_text', 'ql_custom_place_order_button_text_cat' );

function ql_custom_place_order_button_text_cat( $button_text ) {

$cat_check = false;

foreach ( WC()->cart->get_cart() as $cart_item_key => $cart_item ) {

    $product = $cart_item['data'];
    // check if clothes is the category of the product in the cart
    if ( has_term( 'clothes', 'product_cat', $product->id ) ) {
        $cat_check = true;
        break;
    }
}

if ( $cat_check ) {
     return 'Submit Order';
}

}
In this case, we’ve customized the Place Order button so that it says “Submit Order” when the product that’s in the cart belongs to the clothes category. To check it, go to your WooCommerce checkout page on the front end and check.
4. Change Button Text Based on Payment Gateway
There’s one more thing you can do to edit the Place Order button to increase your conversions. You can change the text of the Place Order button based on the payment gateway or the payment method that the customer selects.
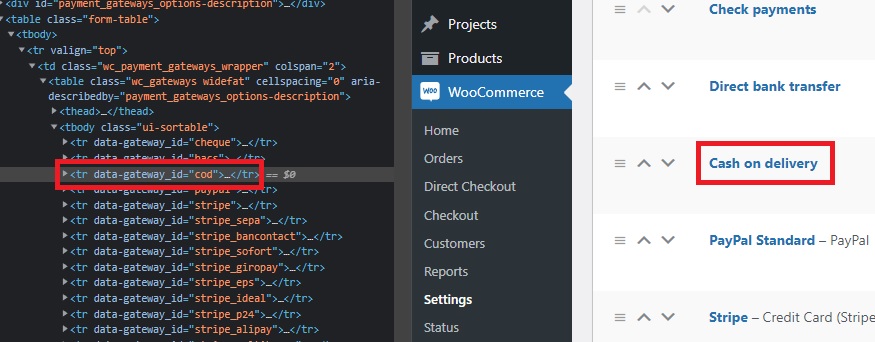
The first step is to identify the payment gateway ID. You can do this by using the Inspect tool. In your dashboard, go to WooCommerce > Settings and open the Payments tab. All of the payment gateways you’ve added will appear here.
Then, right-click on the payment gateway or the payment method you want to customize the Place Order button, and press Inspect. You will see the payment gateway ID on the adjacent screen as shown below.
Once you’ve got the payment gateway ID, add the following code to your theme functions.php file.
add_filter( 'woocommerce_available_payment_gateways', 'ql_rename_place_order_button_payment_gateway' );

function ql_rename_place_order_button_payment_gateway( $gateways ) {
    if ( $gateways['cod'] ) {
        $gateways['cod']->order_button_text = 'Confirm Cash on Delivery';
    }
    return $gateways;
}
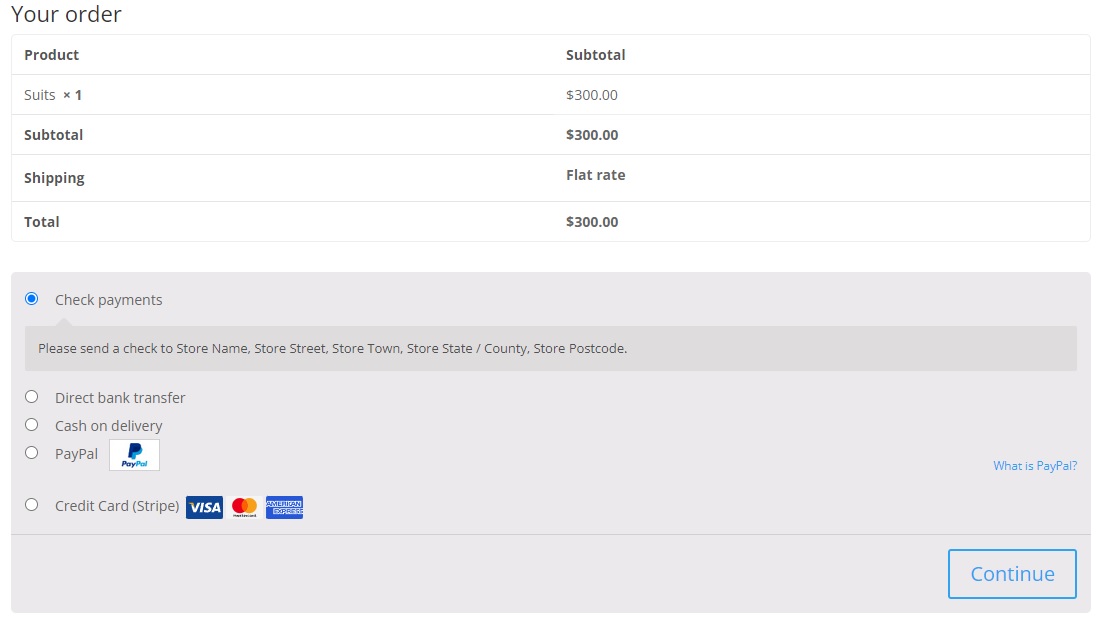
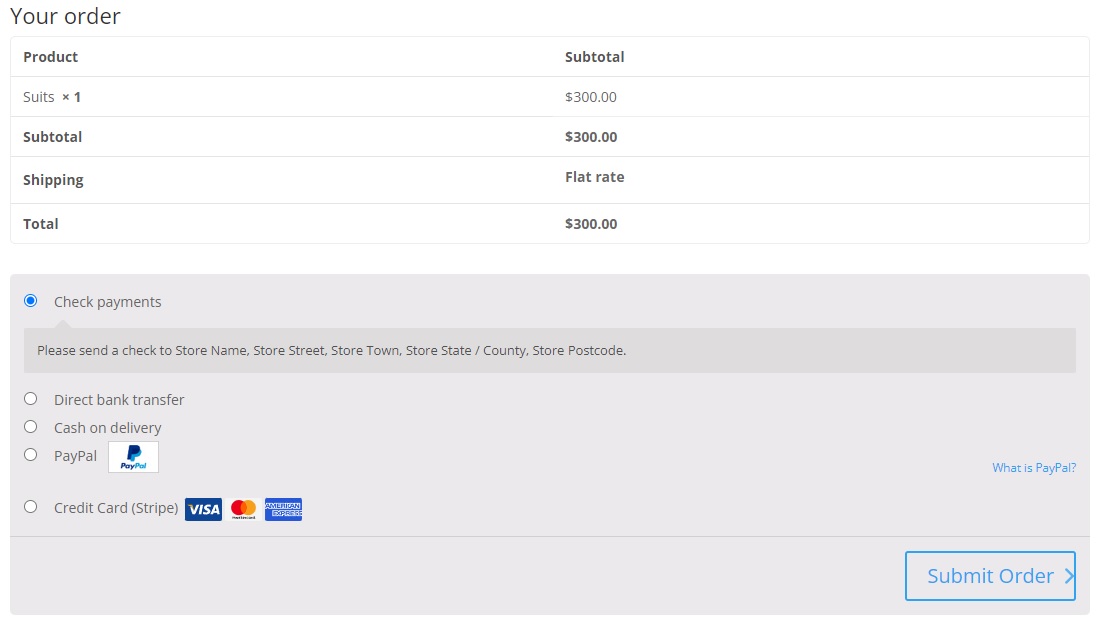
With the above snippet the Place Order button to “Confirm Cash on Delivery” when the customer selects cash on delivery as the payment method. Now if you check the front end, you should see something like this:

That’s it! These are the various ways you have to change the Place Order button text in WooCommerce. Don’t forget to update the theme functions file after you finish adding your code.
Bonus: How to Reorder WooCommerce Checkout Fields
Since you’re customizing the WooCommerce checkout page when you change the place order button, you can also have a look at reordering the checkout fields. Using the correct fields with the correct order is always a great convenience for your customers during the checkout process. So as a bonus, we’ll show you how to do so as well.
You can easily reorder the checkout fields using a plugin. So let’s start by installing and activating one.
For this demonstration, we will be using the plugin Checkout Manager for WooComerce. It is a free and easy-to-use plugin that allows you to completely customize your checkout page.

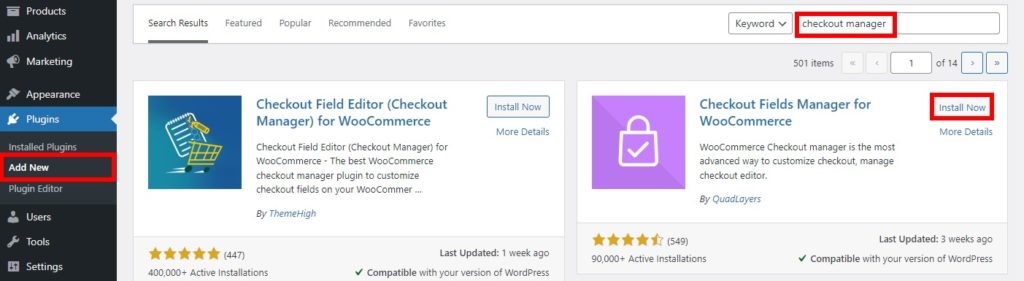
1. Install and Activate the Plugin
First, go to Plugins > Add New from your WordPress dashboard and search for the keywords of the plugin. After you find the plugin in the search results, click on Install Now to install the plugin.
The installation will take a few moments. As soon as the installation is complete, Activate the plugin.
You can also upload and install the plugin manually if you want. Please have a look at our detailed guide on how to install a plugin manually for more information on it.
2. Reorder Checkout Fields from Plugin Options
As soon as the plugin is activated, go to WooCommerce > Settings from your WordPress dashboard and open the Checkout tab.
Now, click on the Billing option and you will be presented with all the billing fields of your checkout page. You can use the upward and downward arrows to reorder them. Additionally, you can even use the horizontal lines to drag the checkout fields and reorder them.
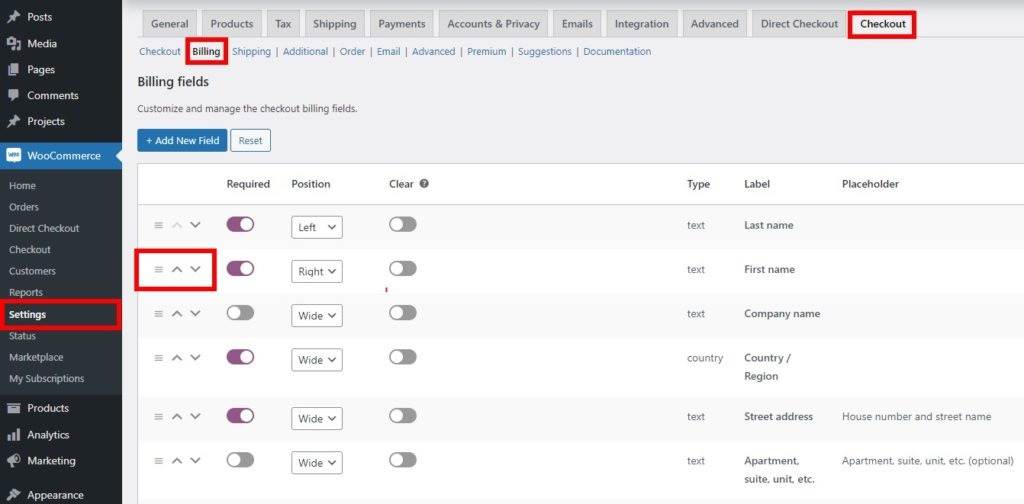
Furthermore, you can also align these fields in different positions on the checkout page by placing them either on the left or right side of the screen. However, the fields can also have a wide area and cover both sides.
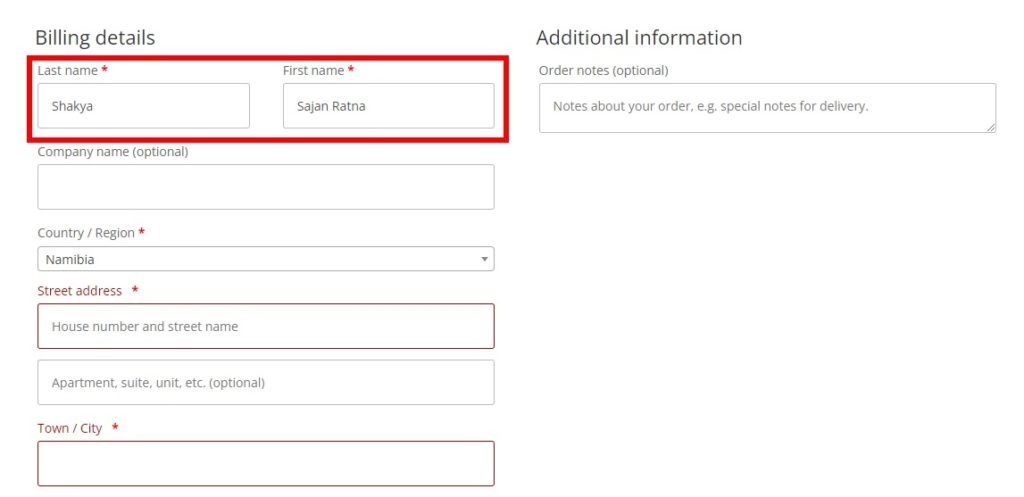
After you make all the necessary changes to your checkout fields order, click on Save Changes. When you preview your checkout page, you’ll be able to see that all the fields have been reordered accordingly.
You can also reorder the checkout fields by adding codes to your theme functions file similar to changing the place order button in WooCommerce. If you need any help with it, feel free to go through our guide on how to reorder checkout fields.
Conclusion
All in all, editing the place order button is a very effective way to make the buttons more contextual and provide a better shopping experience on your site.
In this guide, we’ve shown you different ways to change the place order button in WooCommerce. By adding some snippets to your functions.php file, you can customize the button text with static text and add conditionals based on product ID, category, and payment gateway.
We’ve also added a bonus section that will help you easily reorder checkout fields in WooCommerce to help you organize the billing and shipping fields on your checkout page.
Have you edited the Place Order button in your WooCommerce store? What changes have you applied? Let us know in the comments below.
If you want to boost your conversions, have a look at these guides:
