
How to Change WooCommerce Add to Cart Message
Looking for ways to change the messages when your shoppers add products to their carts on your online store? We’ve got you covered. In this guide, we’ll show you different ways to change the WooCommerce add to cart message.
One of the reasons why WooCommerce is one of the most popular eCommerce platforms is its immense customization options. Not only can you customize the shop page, the checkout, and the product pages, but also the smallest of details like the add-to-cart messages. Most store owners overlook these messages but the truth is that they can help you optimize your store and boost your conversion rates.
Before we go through how to edit the Add-to-Cart messages, let’s have a look at the default messages.
What’s the Added to Cart Message?
The add-to-cart messages in WooCommerce are the messages shown to the customers as soon as they add a product to the cart. It is provided to the users to confirm that the product has been added to their cart. This is also an indication that the shoppers can proceed to checkout through the cart page if they want to complete the purchase.
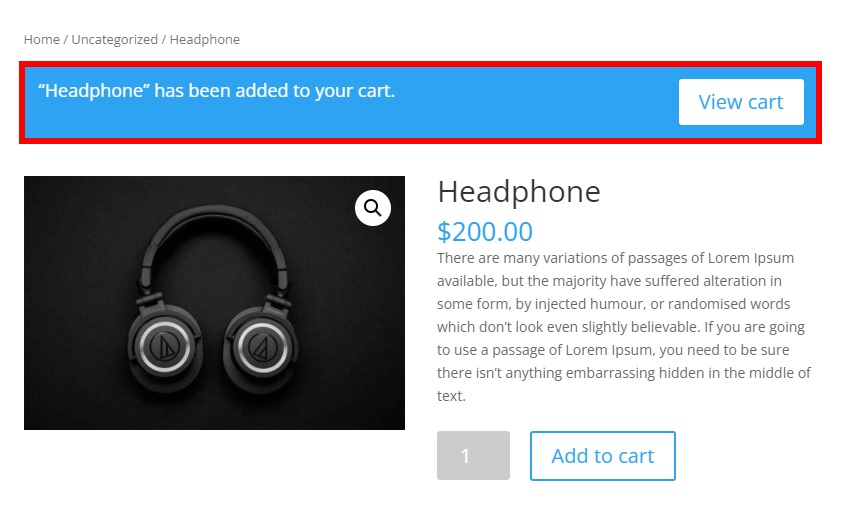
By default, the added to cart message is “(product_name) has been added to your cart”. Here, the product_name is the name of the item that the user has added to the cart. For example, if the is “Headphone”, the add to cart message will be “Headphone has been added to your cart”.
Now that we have a basic idea of what they are, let’s better understand the benefits of editing the add-to-cart messages.
Why edit the Add to Cart Message?
Most admins focus their efforts on customizing their stores but leave the default messages. This means that you can easily stand out by simply doing something different. On top of that, the add-to-cart message is one of the most distinctive messages that you provide to your customers before they confirm their purchase. That’s why you should make sure that the message is appropriate and help you grow your business.
For example, you can use add-to-cart messages to thank customers for shopping in your store, offer discounts, or encourage them to shop more on your website.
By default, there aren’t any options to change the WooCommerce add-to-cart message. But in this tutorial, we will show you different ways to edit the add-to-cart messages.
How to Change WooCommerce the Add to Cart Message
You can easily change the WooCommerce add-to-cart messages programmatically using just a few code snippets. Before we start, make sure you have properly set up WooCommerce on your website, otherwise, you may not be able to make the most of this tutorial.
Moreover, keep in mind that some WooCommerce pages such as shop, cart, and checkout vary depending on the theme you use. We will use the Divi theme for this tutorial, so some of the pages might look different from your site. However, you should be able to follow all the steps without any issues. If you’re looking for themes for your site, check out our post about the best WooCommerce themes.
NOTE: As we’ll edit some core files, we recommend you backup your website and create a child theme before starting. If you need help with this, you can use one of the best child theme plugins.
Now without further ado, let’s see how to edit the add-to-cart message in WooCommcerce.
Where to add the code snippets?
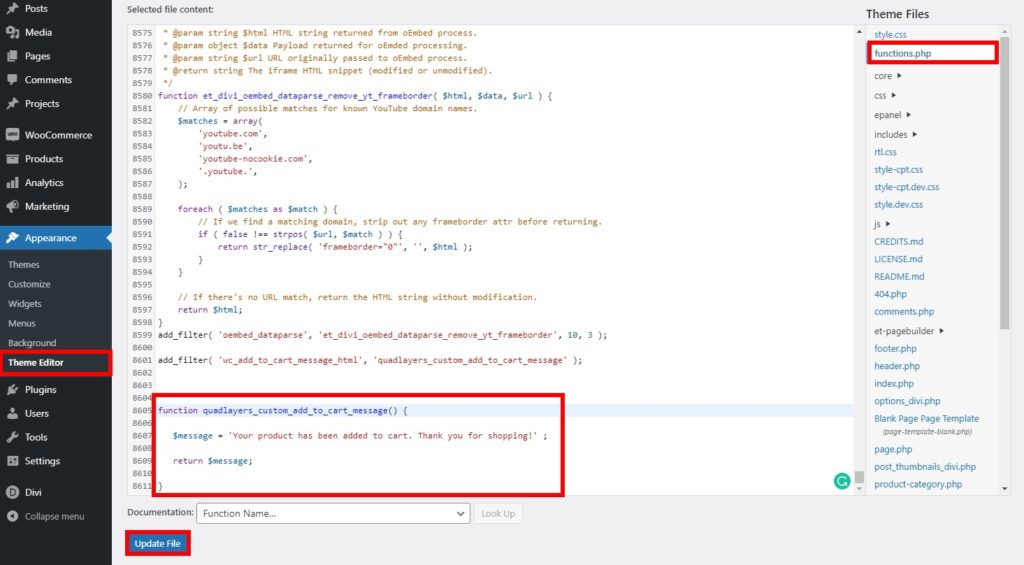
In the following section, we’ll have a look at different code snippets that we’ll add to the functions.php file of the child theme. We will add them using the Theme editor, so in your WordPress dashboard, you’ll have to go to Appearance > Theme Editor and open the functions.php tab.
Here you can add the code snippets that suit your needs at the end of the editor. Don’t forget to Update the file to apply the changes.
NOTE: Since we will make all the changes using code, it’s recommended that you have basic knowledge of programming. If not, then you might need help from someone familiar with programming and code.
1. Change Custom WooCommerce Add to Cart Message
If you simply want to add a different added-to-cart message for your WooCommerce store, you can use the following snippet.
It will just add a message to notify that the product has been added to the cart and any necessary details. Alternatively, you can use it to add a simple message to your customers when they add an item to the cart.
1.1. Simple Message
Use the following snippet to change your WooCommerce add to cart message with simple text. In this case, we inform the shoppers that they’ve added a product to the cart and thank them for shopping with us.
add_filter( 'wc_add_to_cart_message_html', 'quadlayers_custom_add_to_cart_message' );
function quadlayers_custom_add_to_cart_message() {
   $message = 'Your product has been added to cart. Thank you for shopping with us!' ;
   return $message;
}
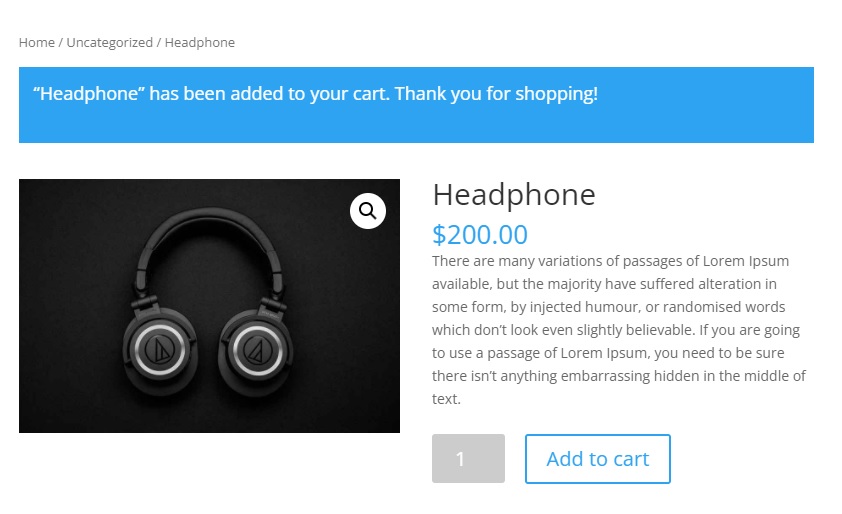
1.2. Simple Product Message:
If you want to specify the name of the product as well, you can use the following snippet.
add_filter( 'wc_add_to_cart_message', 'quadlayers_custom_wc_add_to_cart_message', 10, 2 );

function quadlayers_custom_wc_add_to_cart_message( $message, $product_id ) {
    $message = sprintf(esc_html__('%s has been added to your cart. Thank you for shopping!','tm-organik'), get_the_title( $product_id ) );
    return $message;
}
As soon as the customer adds a product to the cart, they will see the following message with the name of the product:
2. Custom Add to Cart Product Message with Cart Link
In the above snippets, we only added text to the message. But what if we want to add something? For example, you may want to display a “View cart” button when so that shoppers can review what they’re buying.
In this case, you’ll need to change the WooCommerce add to cart message with a custom message and add a cart link.
/**
 * Change WooCommerce Add to cart message with cart link.
 */
function quadlayers_add_to_cart_message_html( $message, $products ) {

$count = 0;
$titles = array();
foreach ( $products as $product_id => $qty ) {
$titles[] = ( $qty > 1 ? absint( $qty ) . ' × ' : '' ) . sprintf( _x( '“%s”', 'Item name in quotes', 'woocommerce' ), strip_tags( get_the_title( $product_id ) ) );
$count += $qty;
}

$titles     = array_filter( $titles );
$added_text = sprintf( _n(
'%s has been added to your cart. Thank you for shopping!', // Singular
'%s have been added to your cart. Thank you for shopping!', // Plural
$count, // Number of products added
'woocommerce' // Textdomain
), wc_format_list_of_items( $titles ) );
$message    = sprintf( '<a href="%s" class="button wc-forward">%s</a> %s', esc_url( wc_get_page_permalink( 'cart' ) ), esc_html__( 'View cart', 'woocommerce' ), esc_html( $added_text ) );

return $message;
}
add_filter( 'wc_add_to_cart_message_html', 'quadlayers_add_to_cart_message_html', 10, 2 );
Now when you check your site from the front end, you will see the custom message you’ve just customized.
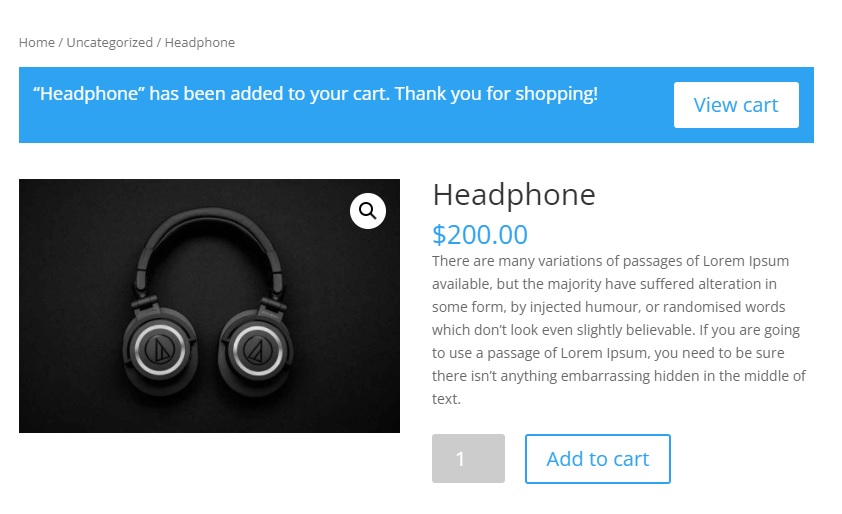
The snippet also considers multiple items and grouped products when they are added to the cart and adjusts the message accordingly.
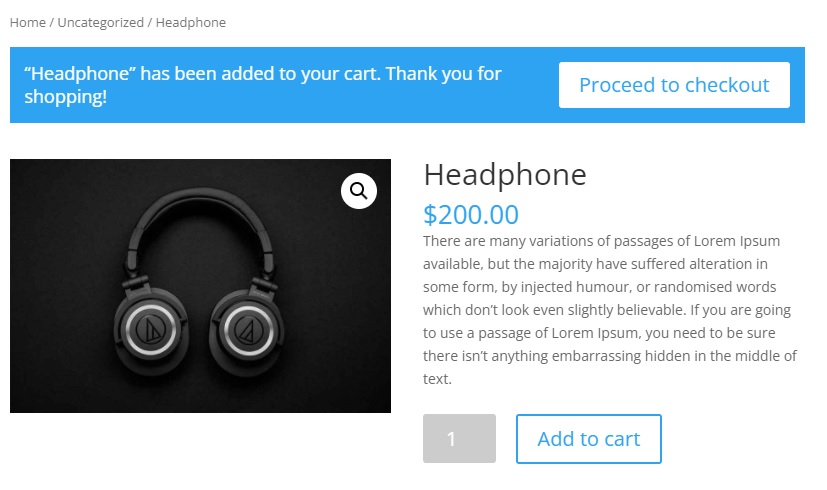
3. Custom Add to Cart Product Message with Checkout Link
Now let’s take it a step further. We know that most customers prefer shorter checkouts. So what if you could change the WooCommerce add-to-cart message and add a checkout link instead of a cart link? That way, you would cut out one step and shorten the checkout process.
In this case, we’ll add a link to the checkout that says “Proceed to checkout”.
/**
 * Change WooCommerce Add to cart message with a checkout link.
 */
function quadlayers_add_to_cart_message_html( $message, $products ) {

$count = 0;
$titles = array();
foreach ( $products as $product_id => $qty ) {
$titles[] = ( $qty > 1 ? absint( $qty ) . ' × ' : '' ) . sprintf( _x( '“%s”', 'Item name in quotes', 'woocommerce' ), strip_tags( get_the_title( $product_id ) ) );
$count += $qty;
}

$titles     = array_filter( $titles );
$added_text = sprintf( _n(
'%s has been added to your cart. Thank you for shopping!', // Singular
'%s have been added to your cart. Thank you for shopping!', // Plural
$count, // Number of products added
'woocommerce' // Textdomain
), wc_format_list_of_items( $titles ) );
$message    = sprintf( '<a href="%s" class="button wc-forward">%s</a> %s', esc_url( wc_get_checkout_url() ), esc_html__( 'Proceed to checkout', 'woocommerce' ), esc_html( $added_text ) );
return $message;
}
add_filter( 'wc_add_to_cart_message_html', 'quadlayers_add_to_cart_message_html', 10, 2 );
If you check the front end, as soon as customers add a product to the cart, they will see an option to Proceed to checkout instead of the View cart button. If the customer clicks on it, they will be redirected to the checkout page skipping the cart page.
For more information about this, check out our tutorial to skip the cart page in WooCommerce.
4. Remove the Add to Cart Message
Alternatively, you can entirely remove the add-to-cart message. All you need to do is use the following code snippet:
add_filter( 'wc_add_to_cart_message_html', '__return_null' );
Bonus: Customize the Add to Cart Button in WooCommerce
We’ve just seen various ways to change the WooCommerce add-to-cart messages. If you want to take your store to the next level, there’s something else you can do. Customizing the add to cart button can also be helpful to boost conversion rates. Personalizing the button that customers press to start the purchase process can have a great impact on your sales and make your store stand out for not using the dull add-to-cart buttons that the rest of the sites use.
In this section, we’ll show you how to easily customize the add-to-cart buttons in WooCommerce using code snippets. All you have to do is just copy and paste them on the functions.php file. For other options to personalize the add-to-cart button, check out this full guide.
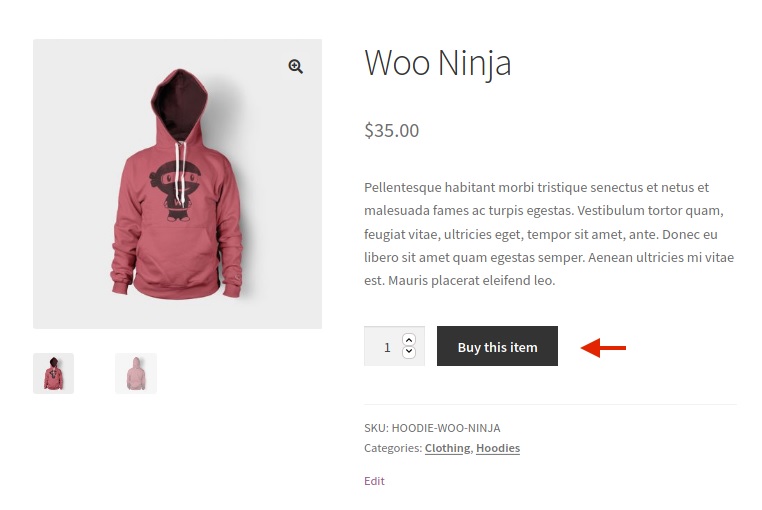
1. Change the Add to Cart Button Text
Similar to the add to cart message, you can change the text in the add to cart button. Simply go to Appearance > Theme Editor, open the functions.php file and add the following code snippet.
add_filter('woocommerce_product_single_add_to_cart_text','QL_customize_add_to_cart_button_woocommerce');
function QL_customize_add_to_cart_button_woocommerce(){
return __('Buy this item', 'woocommerce');
}
You will be able to see that the text on the add to cart button is changed once you preview it on your website.
In this case, we’re changing the text of the add-to-cart button to “Buy this item” but you can customize the code and add any text you want. Don’t forget to update the file after you finish your changes.
2. Redirect to Cart Page from Add to Cart Button
Another alternative is to redirect your customers to the cart page as soon as they add a product to their cart and display the add to cart messages.
All you need to do is go to WooCommerce > Settings and open the Products tab. Then, check the option to Redirect to the cart page after successful addition in the Add to cart behavior section. Don’t forget to save the changes.

Now, log in to your website as a customer or in an incognito window and add a product to the cart. You will see that you are redirected to the cart page as soon as you add the item to your cart.
These are just a few examples to customize the Add to cart button, but there’s a lot more you can do. For more information about this, have a look at our detailed guide to customizing the add to cart button in WooCommerce.
Conclusion
All in all, editing the add-to-cart messages can be very useful to provide your customers with additional information and encourage them to purchase more products from your store. Most stores leave the default messages, so you’ll stand out from your competitors.
In this article, we have learned different methods to change the add-to-cart message in WooCommerce using code snippets. This will hopefully help you boost your sales and increase conversion rates.
The code snippets we’ve used are straightforward. Feel free to take them as a base and customize them to apply them to your site. You can simply change the text of the messages, add links to different parts of your site, or even remove the add-to-cart messages completely. On top of that, we’ve seen a few examples to customize the Add-to-cart button on your site.
We hope that this tutorial was helpful. If you’ve enjoyed the read, share this post with your friends and help them improve their online stores!
Here are some more articles that you might find interesting:
- How to hide and remove Add to cart button in WooCommerce
- How to customize the WooCommerce Cart Page
- WooCommerce Add to Cart Button Not Working? How to fix it!
- How to Add the Add to Cart Button in Divi Shop Pages
Have you customized the add-to-cart messages on your stores? What did you do? Let us know in the comments below!
