Even though most hosts don’t limit storage space, cleaning your website is still a good idea. If you don’t, you might end up with many media files you don’t use, which can ultimately slow things down. As your WordPress site expands, you might end up with hundreds or thousands of images, and that is one reason you should remove unused images and clean up your WordPress media library.
It’s easy to upload and delete media files in WordPress, which is a good thing. That means you have no reason not to remove unused images every so often. Once you do that, your site should run better, and your workflows should get better.
This article shows you how to clean up the WordPress media library manually and with a plugin. Moreover, you will also learn tips to optimize your media library. So, let’s get started.
What is the WordPress Media Library?
The WordPress media library is a collection of all the images, audio and video files, and documents you have uploaded to your website. You can access the media library from your WordPress Dashboard.
To access the media library.
- First, log in to your WordPress Admin Dashboard.
- Click Media and select Library.
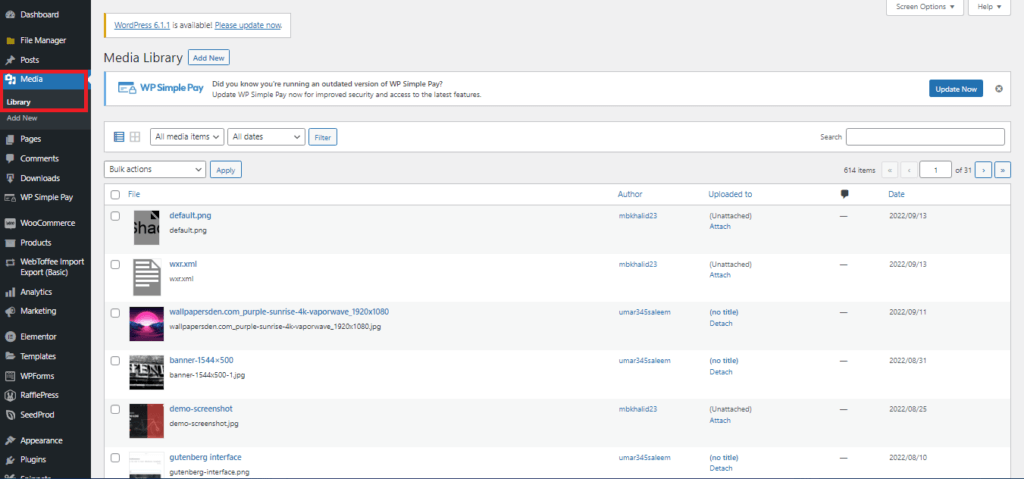
Here, you will find all your media files and documents, which you can manage from a single place. Now let’s get to the next big question; why should you clean up your media library? Let’s find that out.
Why Should You Clean Up the Media Library in WordPress?
There may be many good reasons to keep files you don’t use daily in your work. For example, you might need to keep necessary receipts or official documents. But it will be difficult to justify many unused media files on your WordPress site.
Now, if you talk about the website, media files are the ones that take up a significant portion of your quota. You may no longer need old media files when adding new products or updating landing pages or blog posts. But if you keep them in the library, they will stay there, taking up space and making it harder to find the correct files.
Besides, you would also want to avoid having to look through dozens of pages of files to find the one photo you need right away. Like a clean office, a well-organized media library is worth the work because it could save you time and stress daily.
Moreover, all extra dispensable files can make your site run slower and cost you more each month, depending on your web hosting plan. So, if you want to cut the cost of your host fee, try to clean up your WordPress media library.
Another problem that you will face with having a cluttered size media library is large backups. Because if you have selected automatic backup, you will have large backup files, which will be hard to handle.
Those are some of the reasons why you should remove unnecessary media files from your WordPress library. Now, let’s have a look at some of the best media cleaner plugins for WordPress.
Best Plugins to Clean Up WordPress Media Library
Before we go into the best media cleaner plugins, first, let’s see why we need media cleaner plugins and what benefits they offer.
Why Use Media Cleaner Plugins for WordPress?
As your site grows, the WordPress database will start collecting useless files you don’t need anymore. This includes spam comments, media files you no longer use, old versions of your posts, trashed items, and entries that don’t work. As we said earlier, if your database accumulates these useless files, it will overburden your server and slow down your website. This is where WordPress plugins come into play.
Once you install the plugin, it will help you find and delete all the junk files on your database. This will remove unused images and other files and free up storage space. Hence, it will keep your servers from having an unnecessary load.
Now, the reason you should use the plugins is that they use unique algorithms to show you all the junk files that are being stored on your website. You also get access to detailed control that lets you pick and choose which files you want to keep on your system.
Now, let’s begin with listing media cleaner plugins for WordPress.
1) Media Cleaner

If you want to clean up the WordPress media library or just remove unused images in WordPress, Media Cleaner is the best option. Using Media Cleaner, all the files described as “not used” will be shown in a dashboard where you can delete them. All files you delete are moved to internal trash so you can recheck them before deleting them permanently.
Here are some of the top features of Media Cleaner.
Features
- Clean up WordPress media library and broken files.
- Delete identified unused files from a dedicated dashboard.
- Allows you to recheck before deleting permanently.
- WP-CLI support in the premium version.
- Accurately guesses your media files by analyzing your website’s online version. (Premium)
- Compares your media collection to your physical/upload directory. (Premium)
Pricing
Media Cleaner has both free and paid versions. The paid version starts from $29/year. Besides, the developer also offers a full refund within the first two weeks.
2) WP-Optimize

WP-Optimize is another popular and widely used plugin that can help to clean up your WordPress media library, compress your images, and cache your whole website to make it run faster.
The plugin will help you free up your WordPress media library by removing all unnecessary files, defragmenting your database tables, optimizing your database without using any MySQL queries, and so on. You can set this plugin to remove unused images or images set to a specific size. You can also set up an optimization schedule that works best for your website.
Here are some features of WP-Optimized.
Features
- Clean up the media library, optimize images and cache your website.
- Can detect and remove unnecessary data like unapproved comments, trashed files, and pingbacks.
- Cleans your database every week automatically.
- Displays information about the database, such as how much space is saved.
Pricing
WP-Optimize come in both free and paid versions. The paid version starts from $49/year.
3) WP-Sweep

In the last, we have WP-Sweep, another one of the popular WordPress cleaner plugins. It is one of the most popular plugins to help you remove unused images from WordPress, including auto drafts, revisions, deleted comments, and so on. This plugin has built-in WordPress delete functions instead of MySQL delete queries. You can “sweep” through your files one category at a time or choose “sweep all” to delete everything.
Here are some key features of WP-Sweep.
Features
- Uses the default WordPress delete functions instead of MySQL delete queries.
- Cleans up auto drafts, duplicate files, unused items, deleted comments, and so on.
- Works with WP-CLI commands.
- Help you optimize database tables.
Pricing
WP-Sweep is a free plugin, and you can download it from the WordPress plugin directory.
How to Cleanup WordPress media library
There are different ways to clean up the WordPress media library. You can do it manually or using a plugin. First, we will look into the manual procedure.
Manually Clean Up WordPress Media Library
You can proceed directly from the Admin Dashboard to manually remove unused images in your WordPress media library.
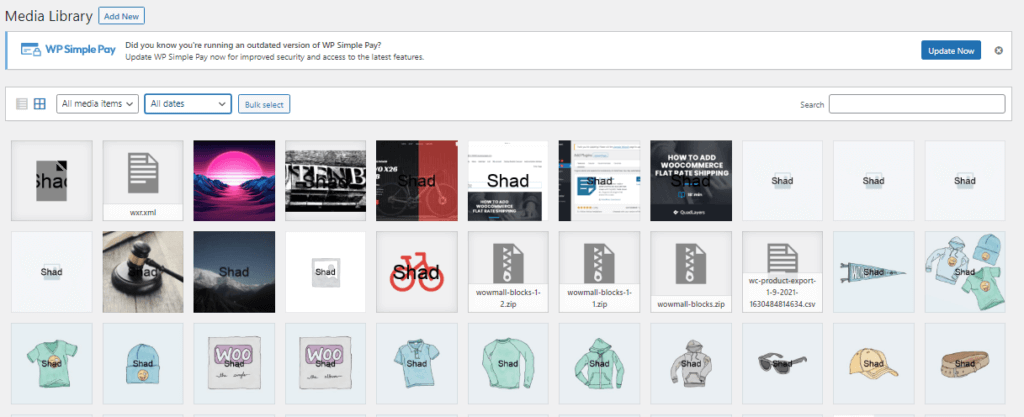
- Go to Media >Library.
All the images you have uploaded to WordPress will appear here.
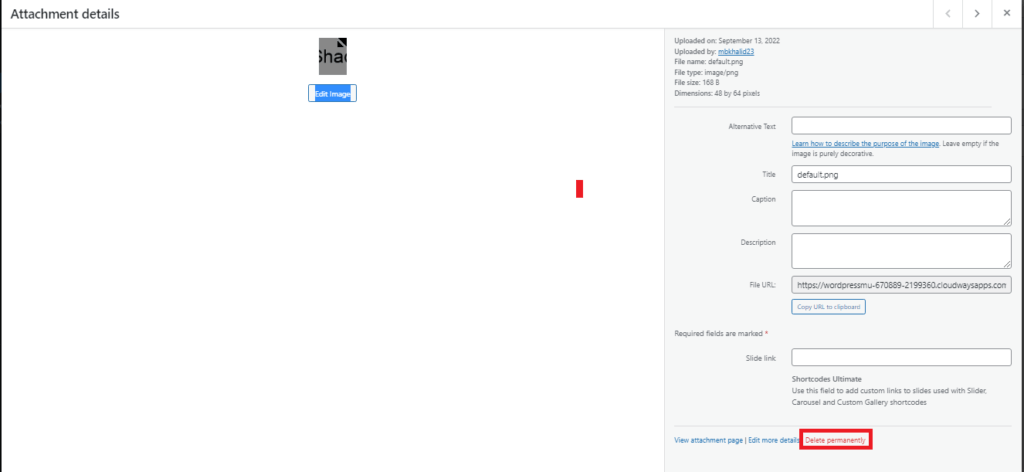
From here, you can quickly delete a single image from the media library. Click on the video or photo you want to delete, and a window will open. The window will show the media file, relevant information, and the image’s metadata.
In the bottom right corner of the window, you will see an option to Delete Permanently. Click on it and confirm.
You can also click Bulk Select to delete multiple media files.
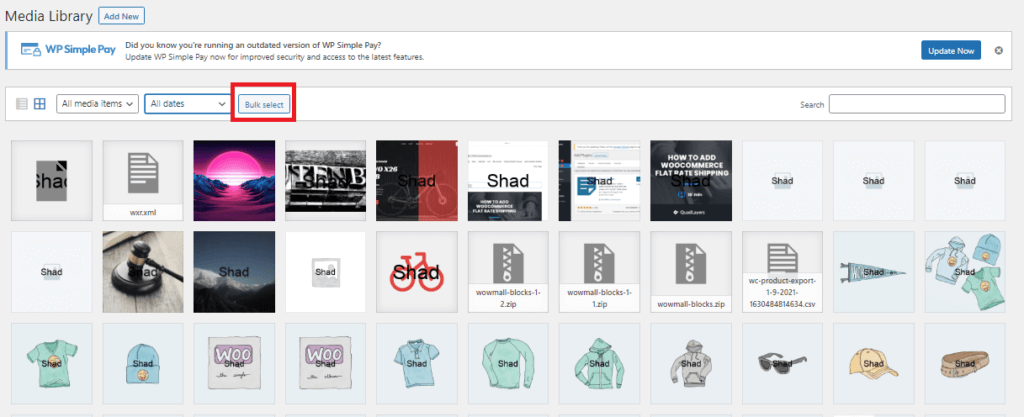
That’s all you can do with the manual approach. As you can see, it’s quite a tedious task to find all the unnecessary images manually and delete them. This is where using a plugin can really help you to do the task more quickly and efficiently. Let’s see how!
Clean Up WordPress Media Library Using a Plugin
For demonstration, we will use the Media Cleaner plugin to clean up the WordPress media library. Let’s go through the steps one by one.
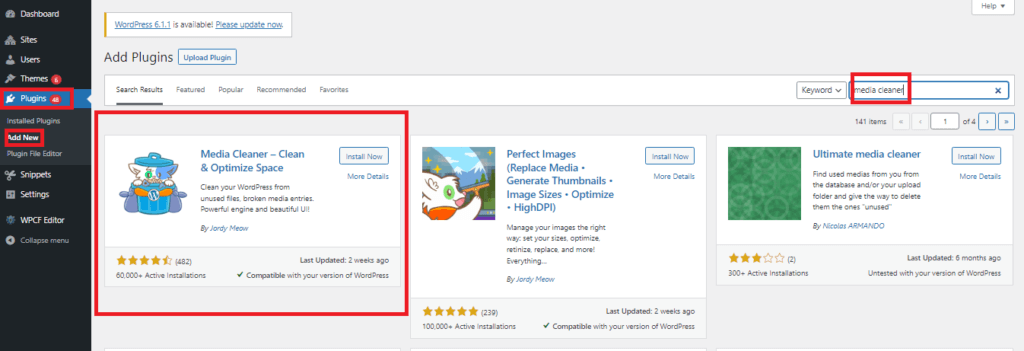
Install the plugin.
- Log in to WordPress Admin Dashboard.
- Go to Plugins > Add New
- Write Media Cleaner in the search bar.
- Click on Install Now.
- After installation, click on the Activate button to activate the plugin.
We strongly recommend you take a full backup of your website and databases. When using a plugin like Media Cleaner, it is crucial to back up since the plugin deletes files from your server that you cannot undo.
Setup the Media Cleaner Plugin
From the WordPress Admin Dashboard menu, navigate to Meow Apps > Media cleaner.

The free version of the plugin can scan the Media Library by default, so you can leave most settings as they are. This makes this plugin an excellent choice because it is easy to use.
Check the box to log the plugin’s activity. You may be able to recover deleted files from backups using log information. So, in the log section, click on Enable.

Clean the Media Library
Go to Media and click on Cleaner.
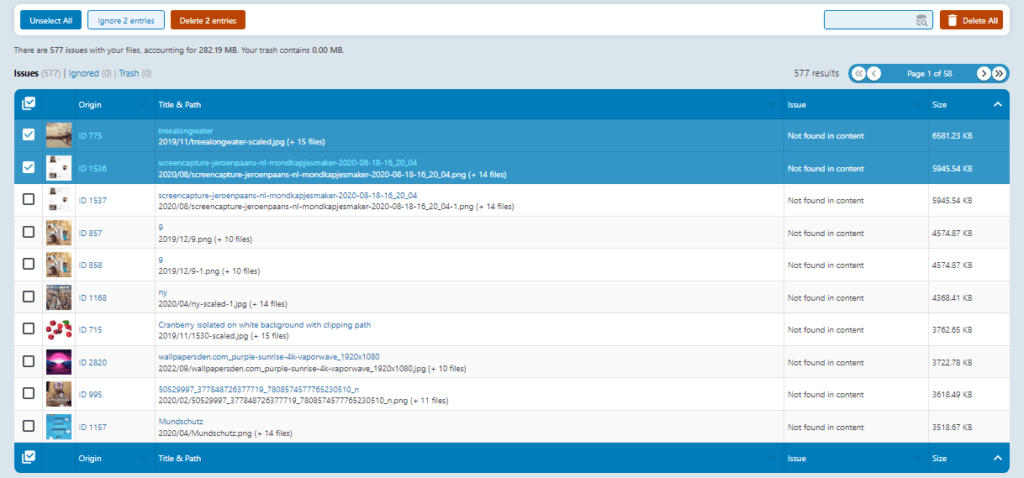
Click the Scan button to start scanning. If the plugin finds images that don’t belong to a page or post, it will show you a message that says issue(s) found.
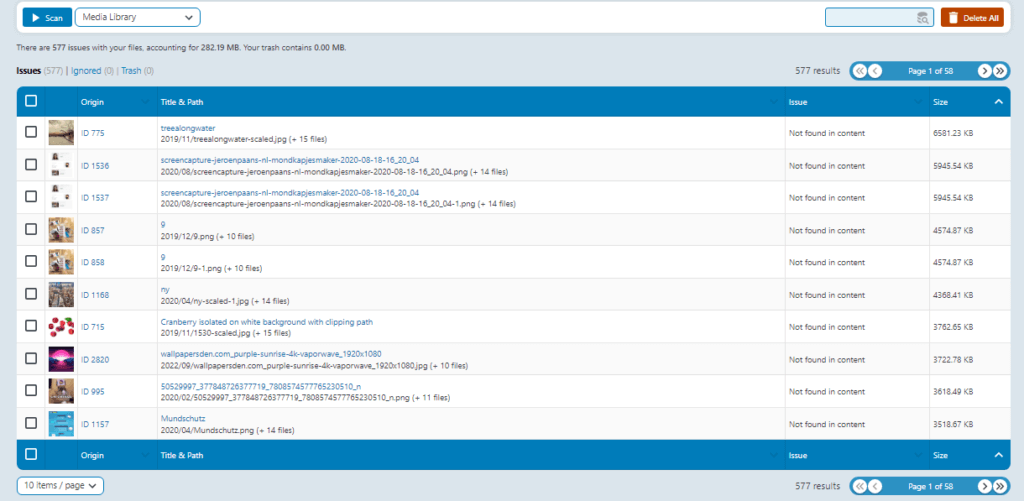
If you want to delete found images, check them and click delete.

Or else click Delete All to remove all unused images in your WordPress media library.
This plugin reminds us that once the images are deleted, you can’t undo that. By default, WordPress doesn’t put media files in the trash but deletes them for good. If you want to be safe, adding this code at the end of the wp-config.php file will turn on the trash function:
define( 'MEDIA_TRASH', true );
When you do this, the page loads again. At this point, if we delete the scan result files, they will go to the recycle bin instead of being permanently deleted.
This lets us check the site to ensure that no essential images have been removed. After making sure there are no mistakes, we can click on Trash and then click on the Empty Trash button to delete the files in the trash.
Tips to Optimize Your Media Library
It’s always good to keep your files handy all the time. But it can get messy when your media library becomes too stuffed. In order to prevent your media library from getting too big, you can take the following precautions.
Compress Images Before Uploading
When it comes to optimizing images or files, image compression is an essential factor. You can use Adobe Photoshop or other online tools to compress your images before uploading them to the WordPress Media library.
Upload Smaller Images
Image scaling is another essential factor when it comes to image optimization. When you directly upload images/photos from smartphones/cameras. They are usually high quality and in huge file sizes.
These huge images are usually compressed with HTML or CSS, yet the visitor’s browser downloads the full-size image. These kinds of images are not optimized for the web.
To reduce the space of the media library, we recommend you upload small images to match the pixel dimensions you use on your website.
Optimize Your Images
Optimizing your images is to find a good balance between the file’s size and the image’s quality. Optimizing your images has many benefits, such as making your website load faster, using less disk space, faster website backups, and improving your SEO rankings.
Regular Checkups
It is best to check and clean up the WordPress media library often to stay manageable. It would help if you did this at least once a month, but the more often you do it, the better.
Use JPG Format Rather than PNG.
JPG and PNG are the most common formats for saving image files. JPG files are better for photos, and PNG files are better for graphs, images with text, and images that need a transparent background, like logos.
Most of the time, PNG files have better quality, making them more prominent. We suggest you use JPG files for images on your website because pictures with a large file size will make your website load more slowly, which will be bad for your visitors.
Conclusion
Website hosts always curtail the size of your media library by only allowing a certain among of online storage. Wasting this space on unused images, audio and video files, and documents is never a wise decision.
So, in this article, we showed you how to clean up your WordPress media library. We also discussed three of the best plugins to remove unused images in WordPress. Next came the step-by-step guide to clean up your media library both manually and using a plugin to automate tasks and save time.
No matter which method you choose, always back up your site before deleting anything. And make sure to recheck before deleting permanently.
We hope this article helps you to clean up your WordPress media library. Have you ever considered cleaning up your Media Library in WordPress? How was your experience? Share your thoughts in the comments below.
Meanwhile, if you liked the post, here are a few similar posts you might also be interested in.
