Previously, we wrote a guide about the best Elementor mega menu plugins, where we analyzed the top mega menus out there. There were some stand out selections in the list, and Clever Mega Menu was one of them. This simple yet intuitive tool is one of the best Elementor extensions to redesign the UI of your website. So today, we’ll dig deep into Clever Mega Menu for Elementor and all it has to offer.
Introduction to Mega Menus
User Experience (UX) design is an essential element to improve your website’s navigation. This determines how easy or difficult it is for the user to consume the content on your site. This is defined by multiple factors, from how your content is arranged and categorized, how your user interface (UI) is designed, and how comfortable viewers are while browsing through your website.
With the increasing need for good UX improvement tools, menu builders have become very popular. How well your menu is designed can have a huge impact on your site’s conversions as it’s one of the main methods of navigation. You should make it attractive and include links to your main pages and content.
However, using the default WordPress options to setup well-optimized menus can be a hassle. Especially if you have many products or a lot of content that you want to display directly in your navigational menus. If that’s your case, enabling mega menus and mega menu builder plugins can be an excellent choice.
When to use Elementor Mega Menus?
Mega Menus allow you to create a compact and organized menu with links to many different pages without occupying too much space. This way, you help users browse through your website. So mega menus are especially useful when you have an online store with many products or when you have a site with a lot of content.
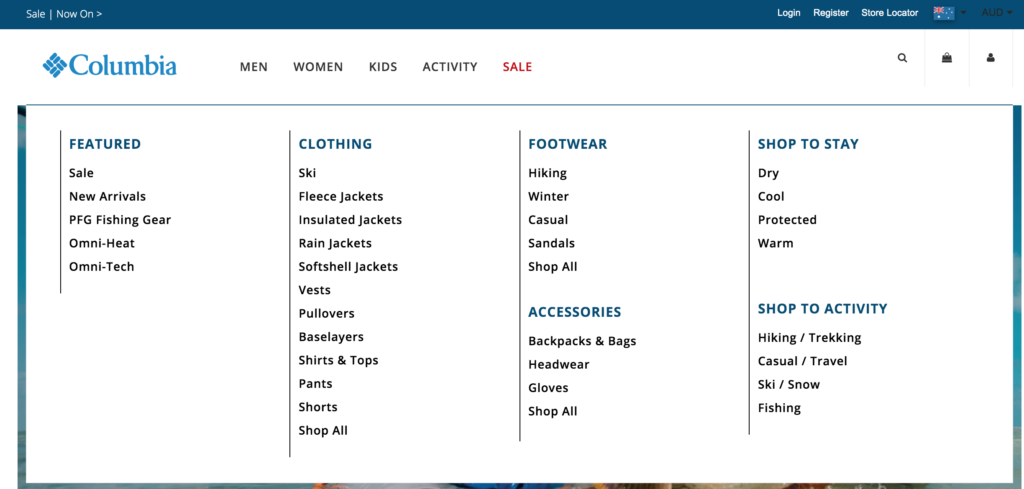
Additionally, a strong reason for its success is that Elementor can be integrated with a huge range of mega menu add-ons. So Elementor mega menus allow you to create excellent UI designs from top to bottom in a matter of minutes. Now, let’s have a look at Clever Mega Menu, one of the best Elementor mega menu plugins.
Clever Mega Menu – Main features
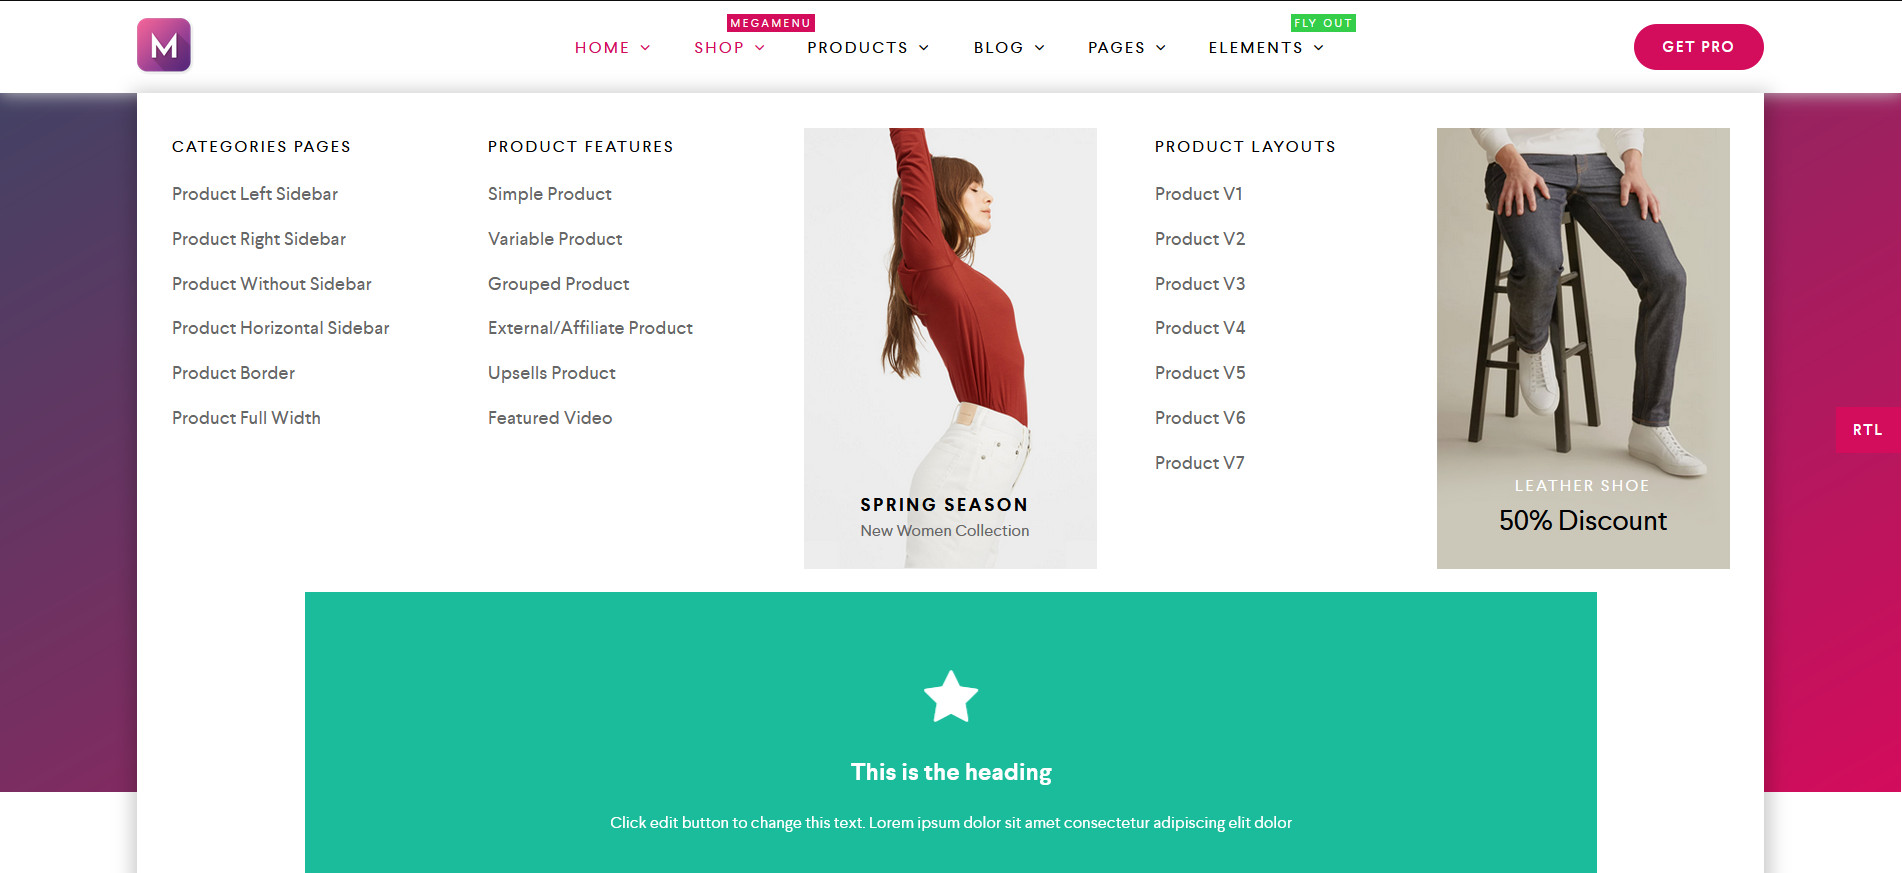 One of the things that make Clever Mega Menu one of the best plugins out there is the smart little features it comes with. This plugin is intuitive. It is designed to supplement all your design choices when it comes to building your mega menus. Whether it’s the huge range of skins, layouts, and icons or the easy-to-use Drag and Drop builder, every aspect of Clever Mega Menu is carefully thought out to make the design process much simpler.
While the variety of options is simply amazing, this tool also focuses on a lot of usability functionalities. For example, it is completely Touch and Retina ready as well as RTL design ready. Clever Mega Menu also fits perfectly with most WordPress themes and includes conditional menu options for more flexibility, Flyout menus and widgets, and more. All these little details and features come together to provide you with one of the best Elementor mega menu building experiences in the market.
To summarize, Clever Mega Menu’s main features are:
- Fully responsive and mobile-ready design that fits any theme
- Huge range of customizable widgets, conditional menu, and menu animations
- Easy to set up with dedicated presets to choose from
- Completely beginner-friendly drag and drop menu builder
- Detailed documentation
Additionally, you can also enjoy a Pro version that comes with great additional features such as:
- Dedicated menu presets
- Advanced menu widgets
- Specified roles and restrictions for mega menu items
- Export/Import features with dummy data available
Pricing
Clever Mega Menu for Elementor has a free version and three pro plans:
- Free version
- Single Site – 29 USD/year (1 site)
- Unlimited – 79 USD/year (unlimited sites)
- Theme Seller – 149 USD/year (1 theme)
If you want to know what using this mega menu feels like, you can check out Clever Mega Menu’s Demo to see all the amazing features it offers. And the best part is that this add-on includes a 14-day money-back guarantee so if you’re not happy with the tool, you can get a full refund. Now, let’s have a look at how to install and set up the Clever Mega Menu Elementor plugin.
How to Install Clever Mega Menu for Elementor
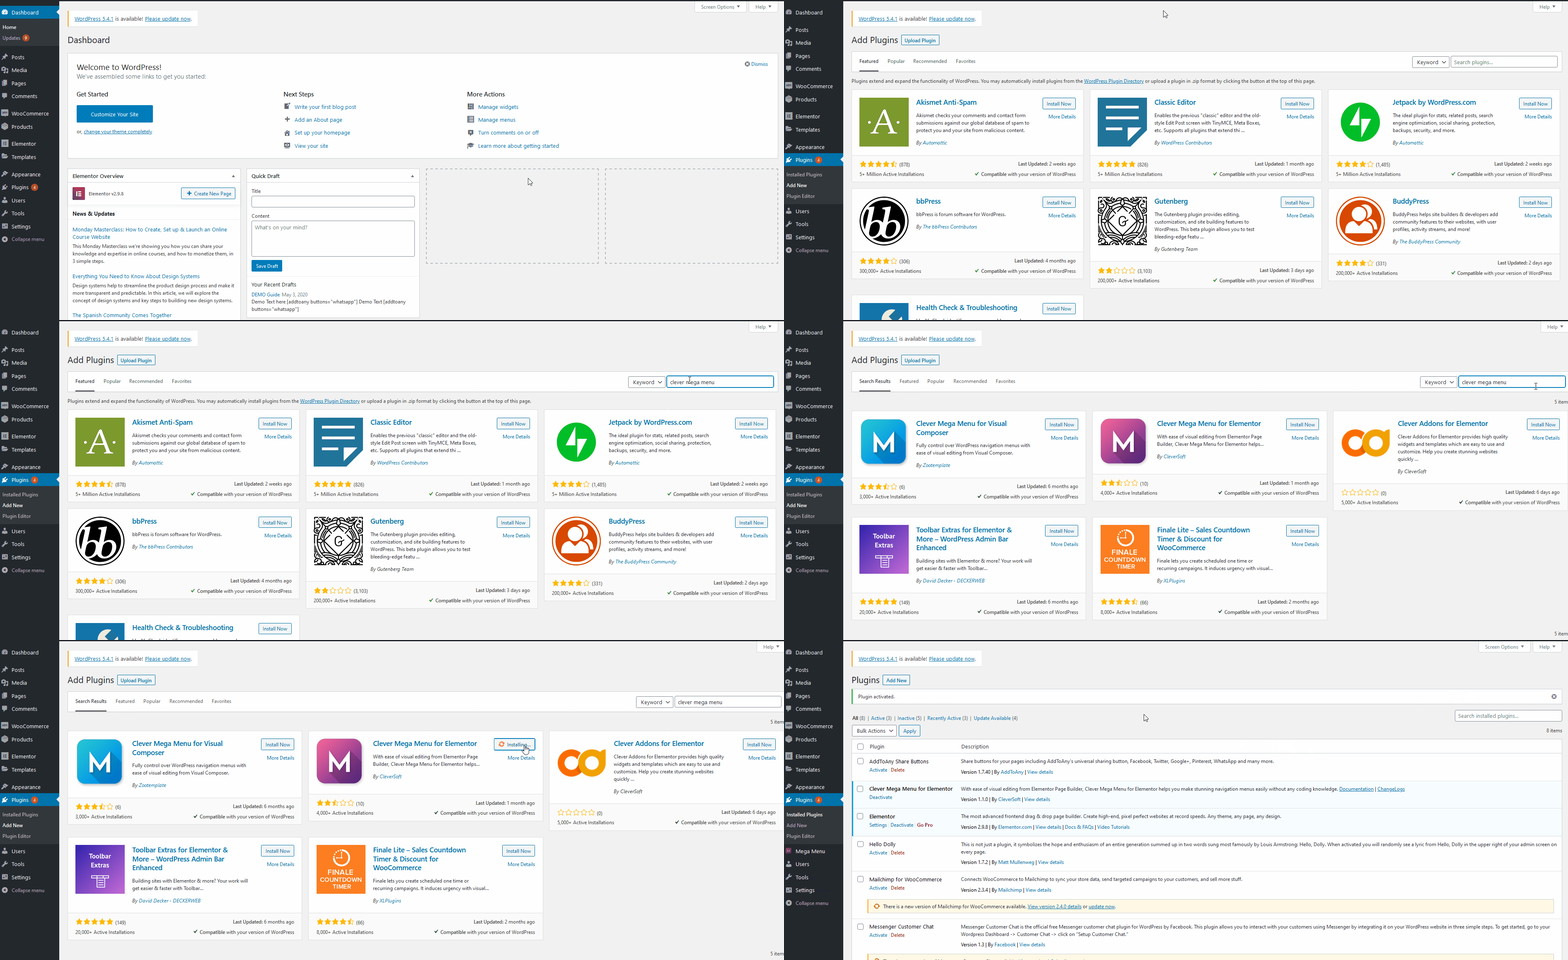
First, go to your WordPress Admin Dashboard. To install the plugin, you need to go to Plugins > Add New. Then, use the search bar on the top right and search for Clever Mega Menu for Elementor. Click Install Now next to the Clever Mega Menu plugin. Once the installation process finishes, click Activate, and the add-on should be ready to go.
Setting up your Nav Menus
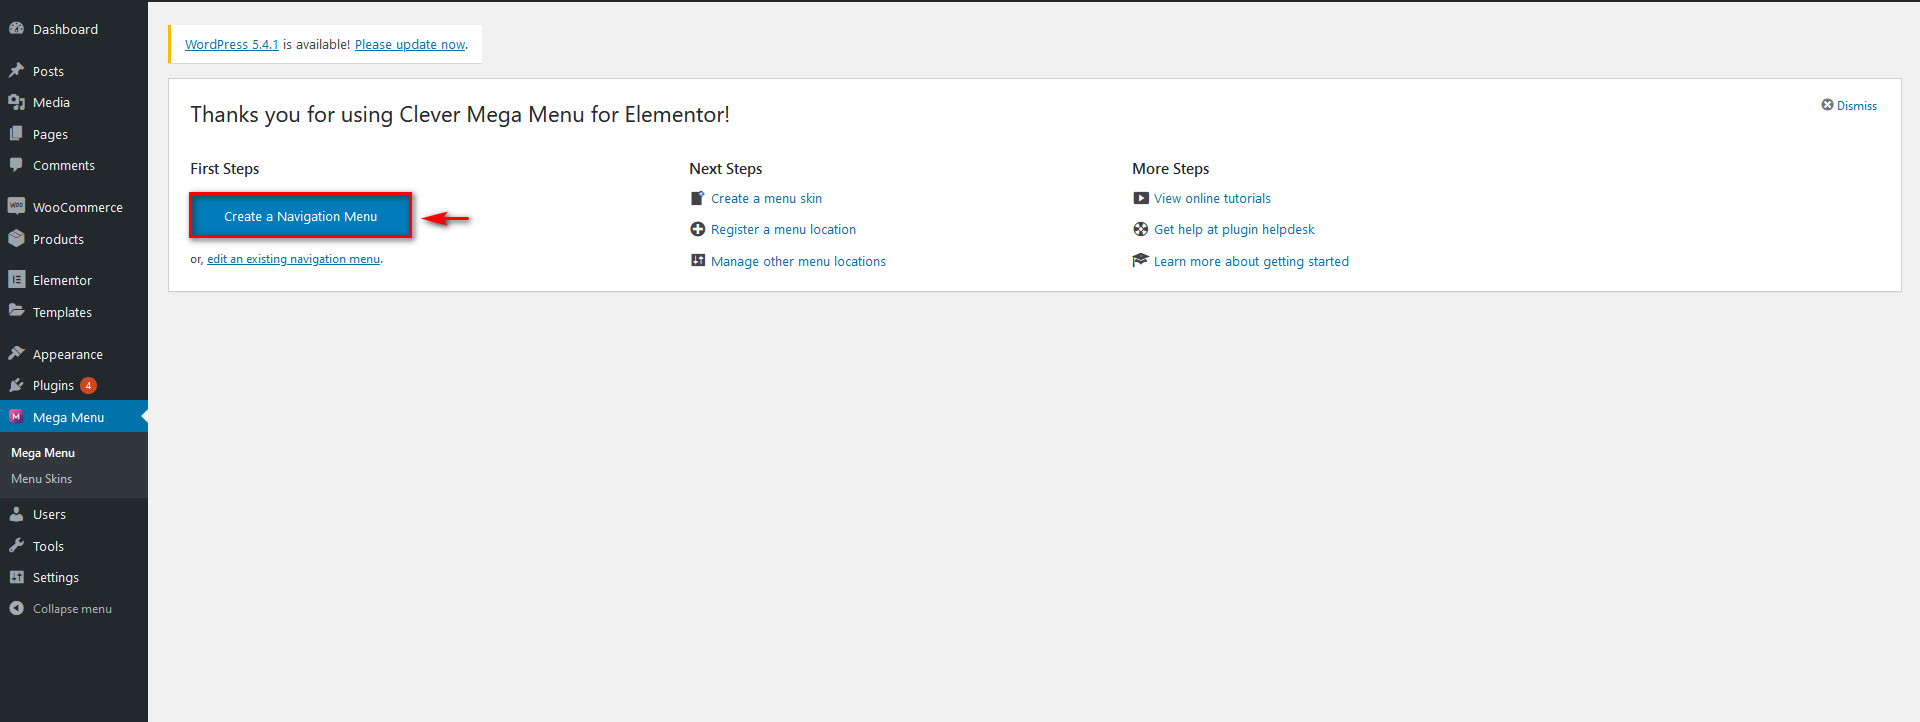
Next, you need to build a mega menu for your website. So first, let’s get acquainted with the Clever Mega Menu interface. Click the Clever Mega Menu selection on your WordPress Dashboard sidebar to open the plugin’s interface page. Then, you can go ahead and start building your navigation mega menu. Simply click, Create a Navigation Menu.
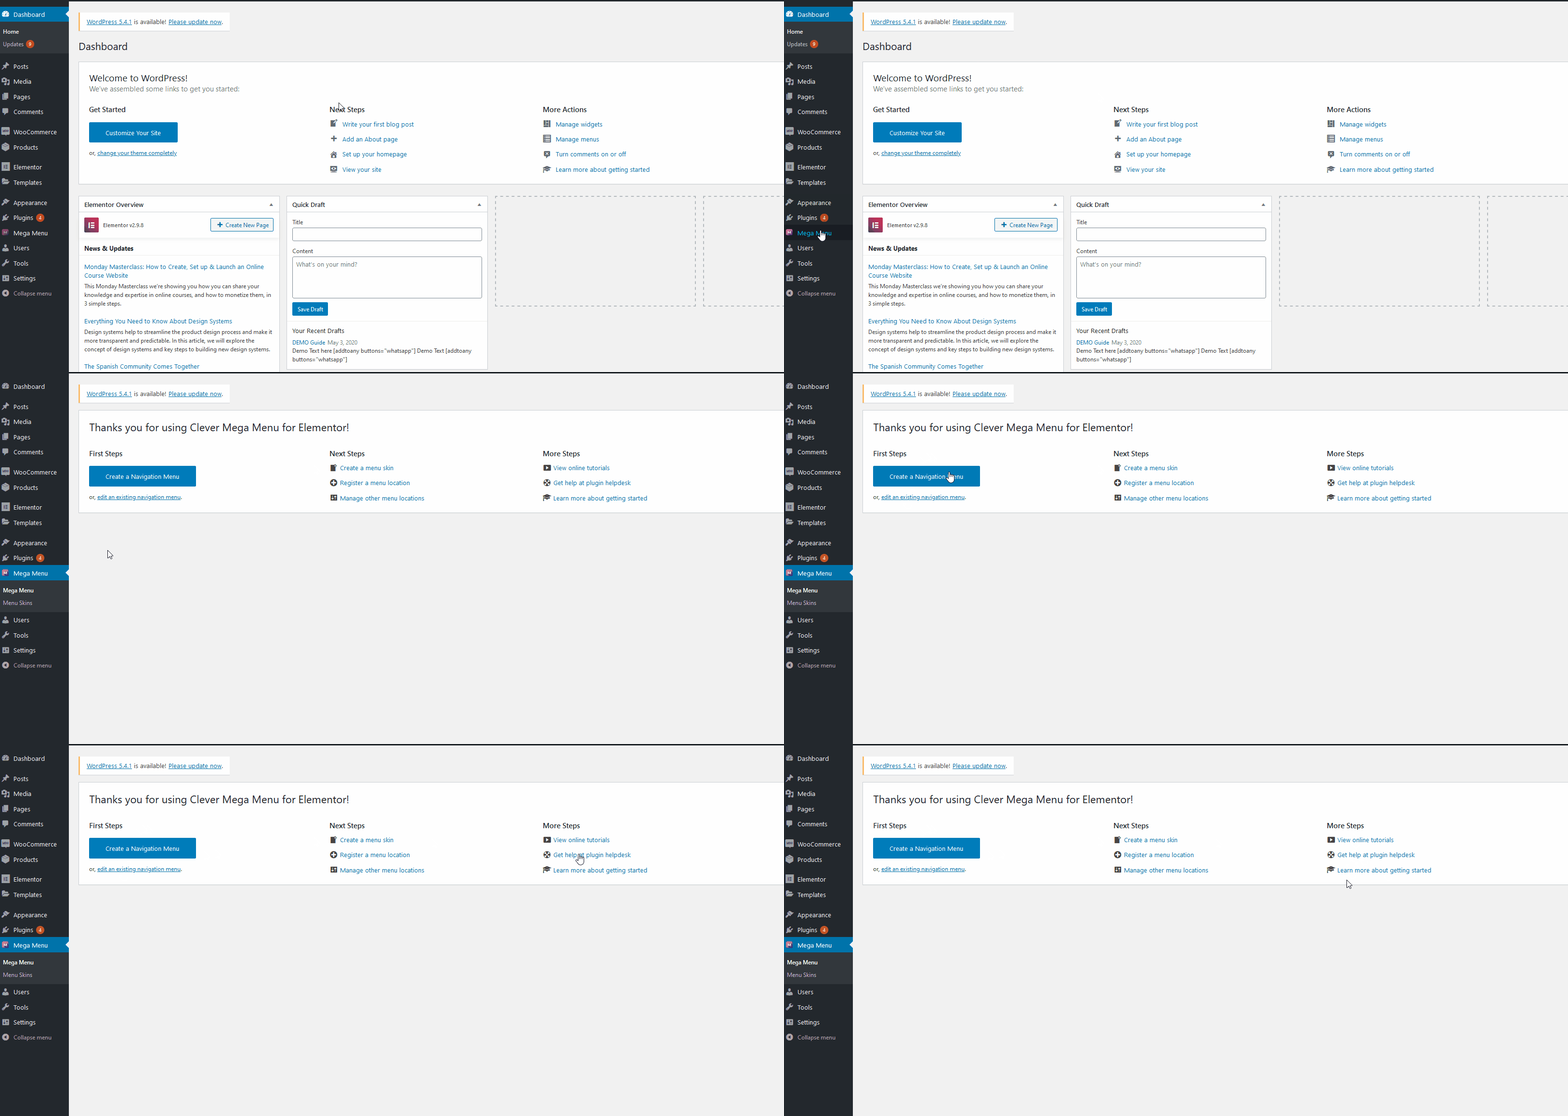 Additionally, you also have access to great documentation and help guides using the links under More Steps along with direct links to the Clever Mega Menu helpdesk. Let’s start by clicking on the Create a Navigation menu to work on first. You can also open the Menu tab under Appearance on the sidebar.
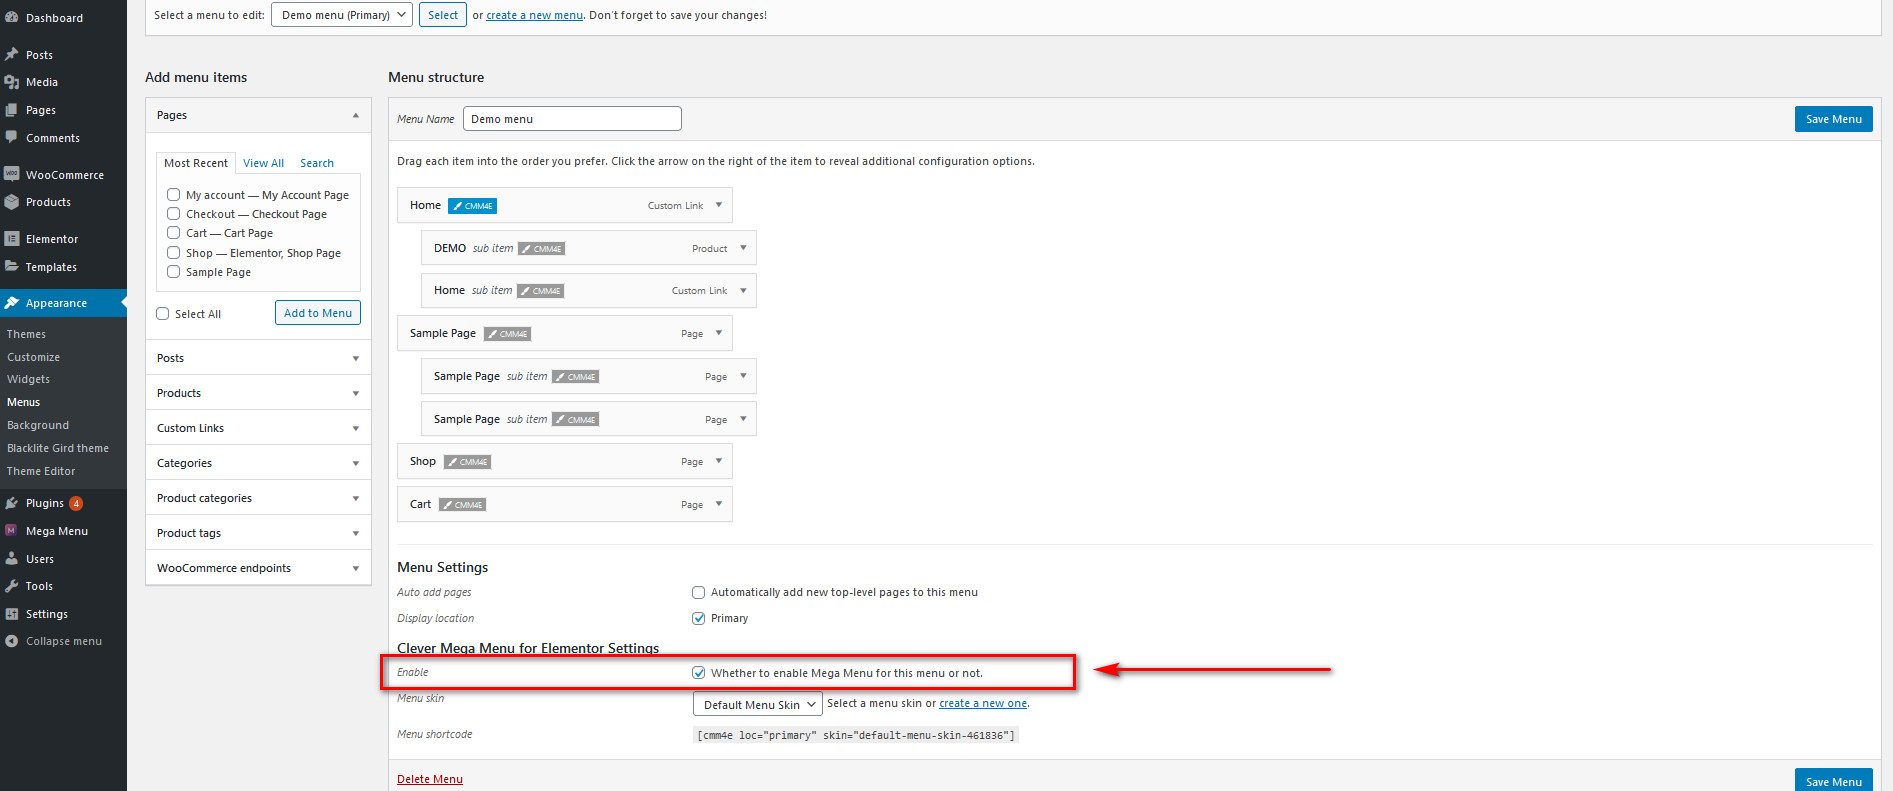
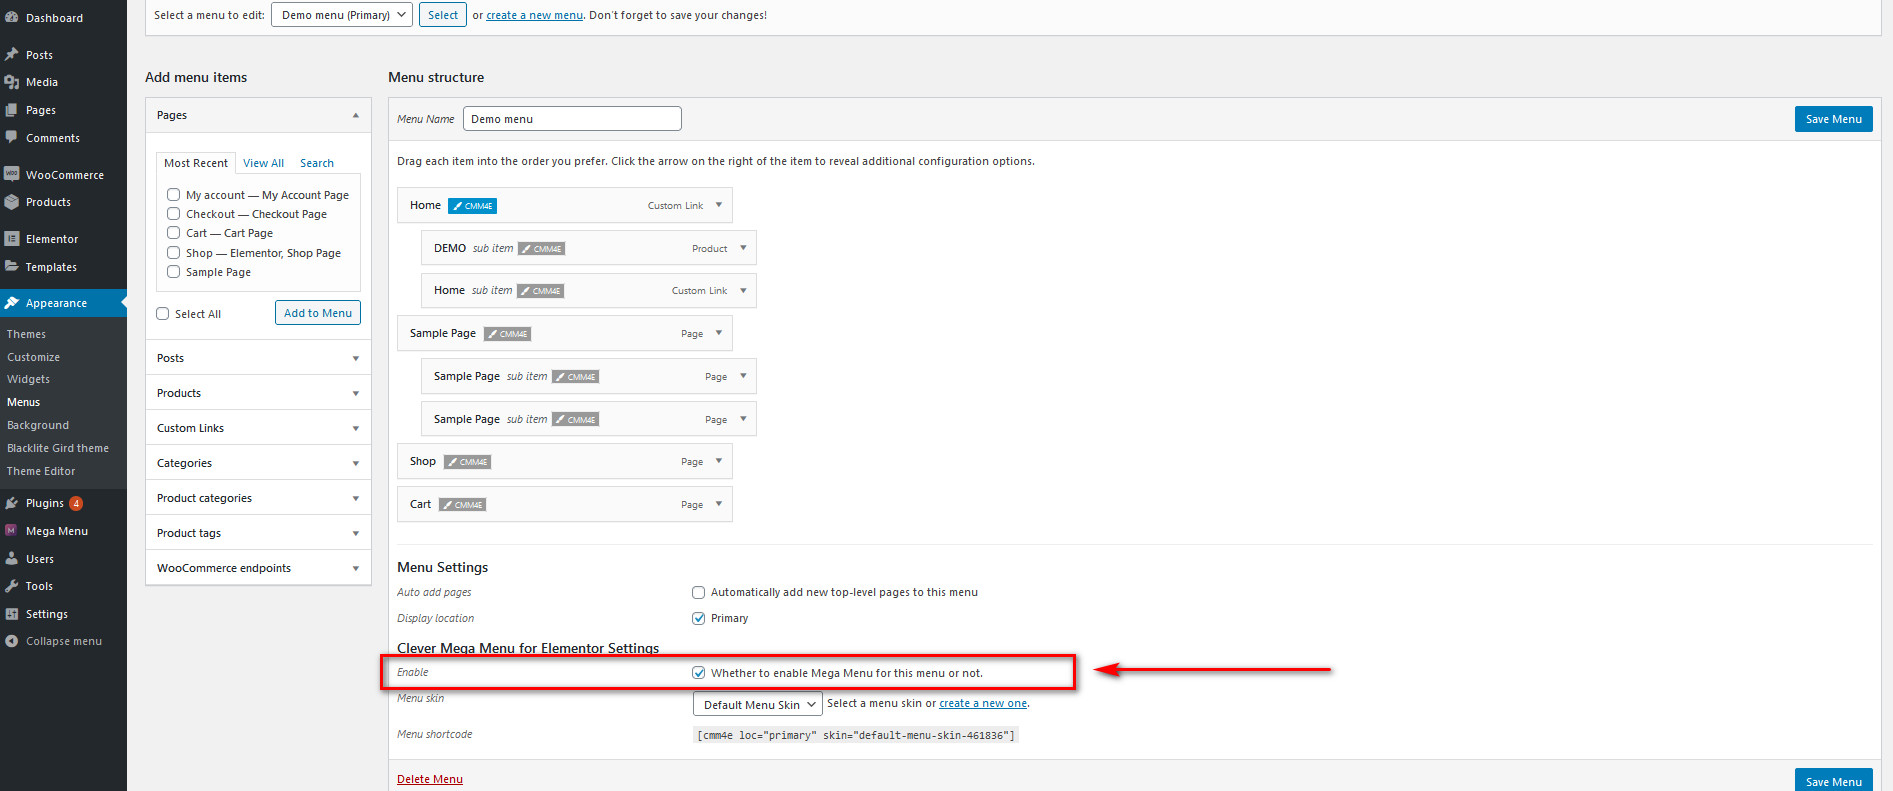
  Here there are plenty of options. You can add pages, posts, menus, and even WooCommerce products directly to your mega menu. And you can also customize each element. Simply set up your Menu’s name and customize your menu items by clicking on them or dragging them. Please note that if you want to create a mega menu, you need to select the option enable Clever Mega Menu for Elementor at the bottom of the menu options.
Managing your Menu items
Adding an item to the menu is super easy. Simply find the required page, post, or product from the left Add menu items bar, and click on Add to Menu. 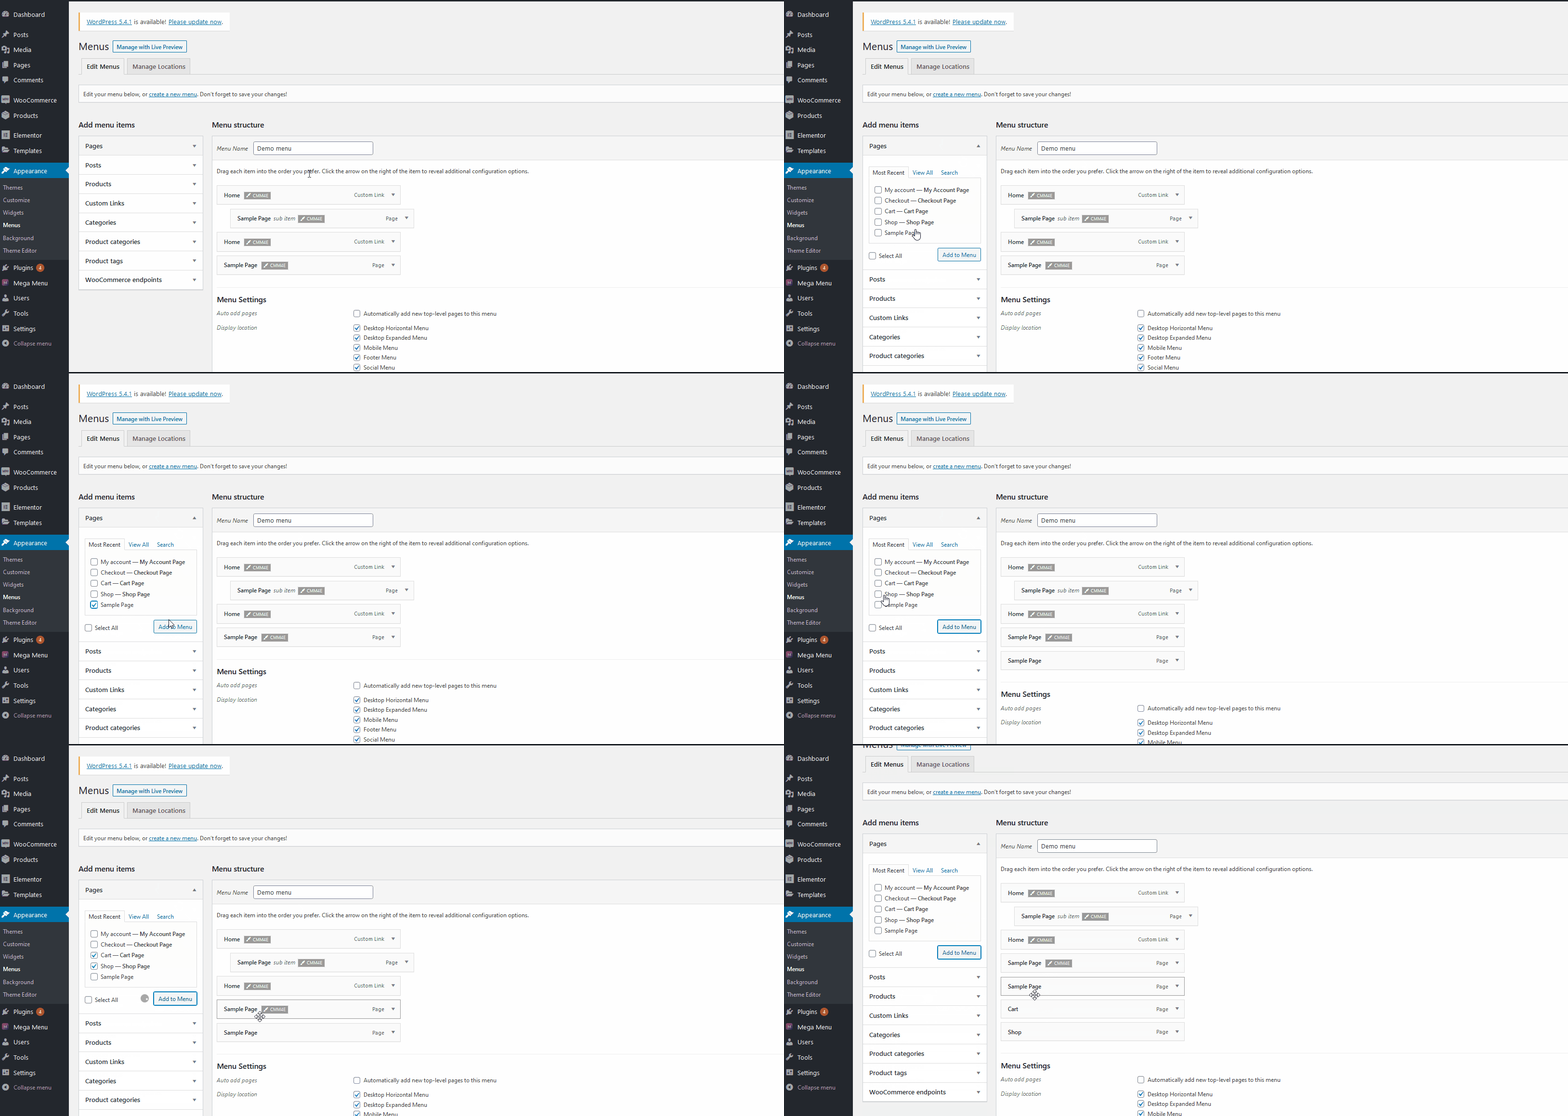 Then, manage your Menu items by clicking or dragging them appropriately. Clicking on the menu items opens customization options for each item where you can change the labels and menu order. You can also modify the order by dragging and dropping the items or set each item as a sub-item. To create a sub-menu item, simply drag the item to the right of the item you want the sub-menu to be displayed under.
 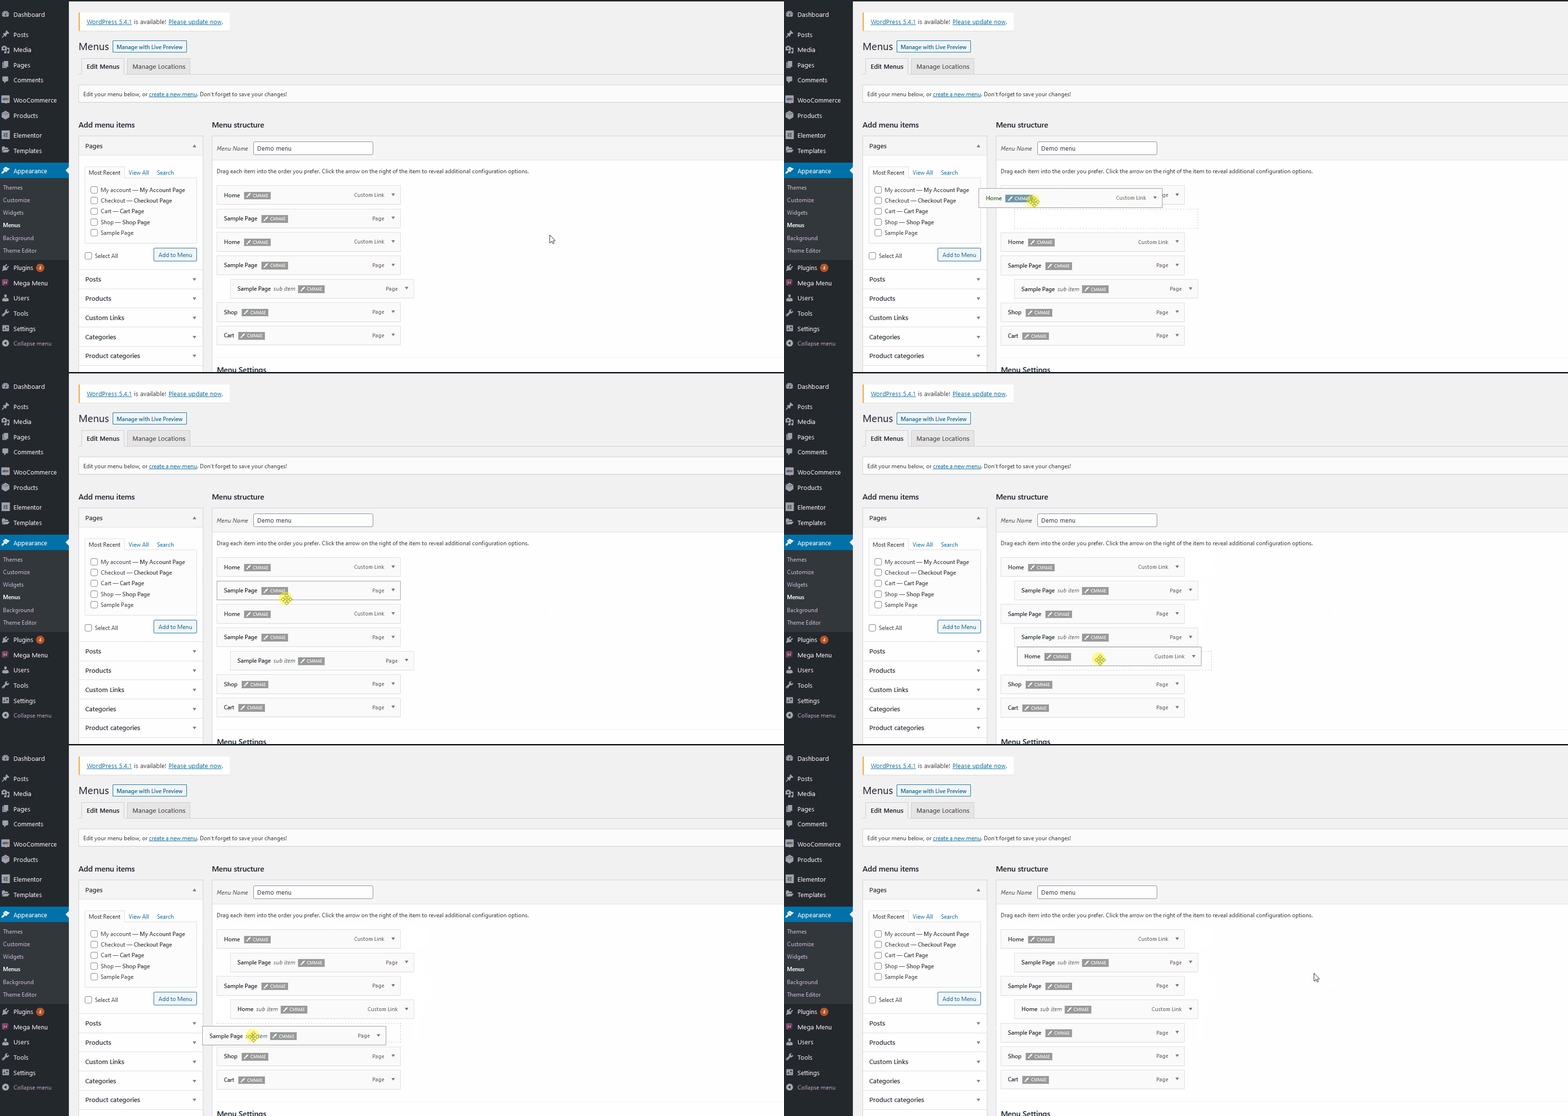 So, once you build your menu with the items and submenus you want, click the Save Menu button on the top right. After that, you need to designate the menu to show on various site locations. To do that, you can either click Manage Locations on the top left of the Menus customization screen or go back to the plugin’s main page and click Manage other menu locations.
  Here, you can choose what menu should be displayed on different site locations. By default, you’re provided with five different menu locations. To enable a menu under a location, simply click the Dropdown option next to the menu location and then click whichever plugin you want to use.
 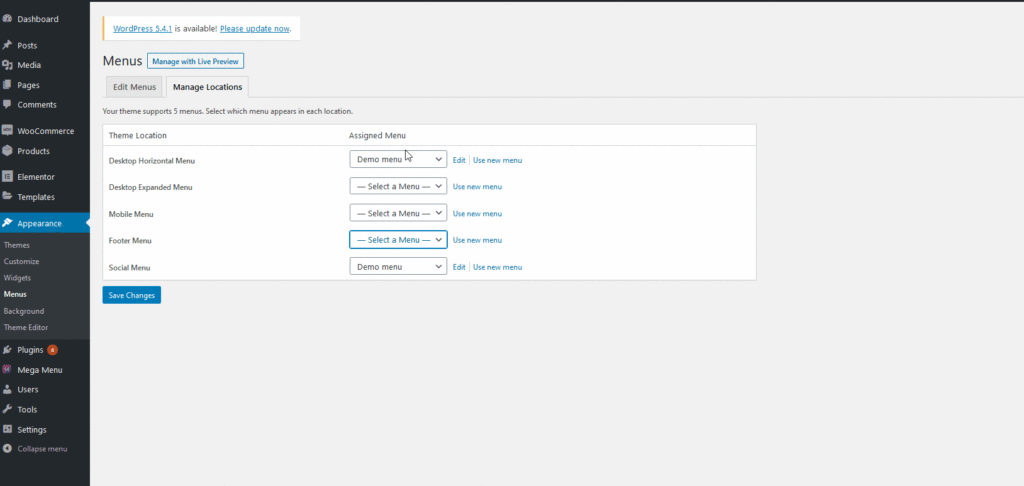 After that, save your changes, and your navigation menu should be displayed on your WordPress website.
Using Clever Mega Menu with Elementor
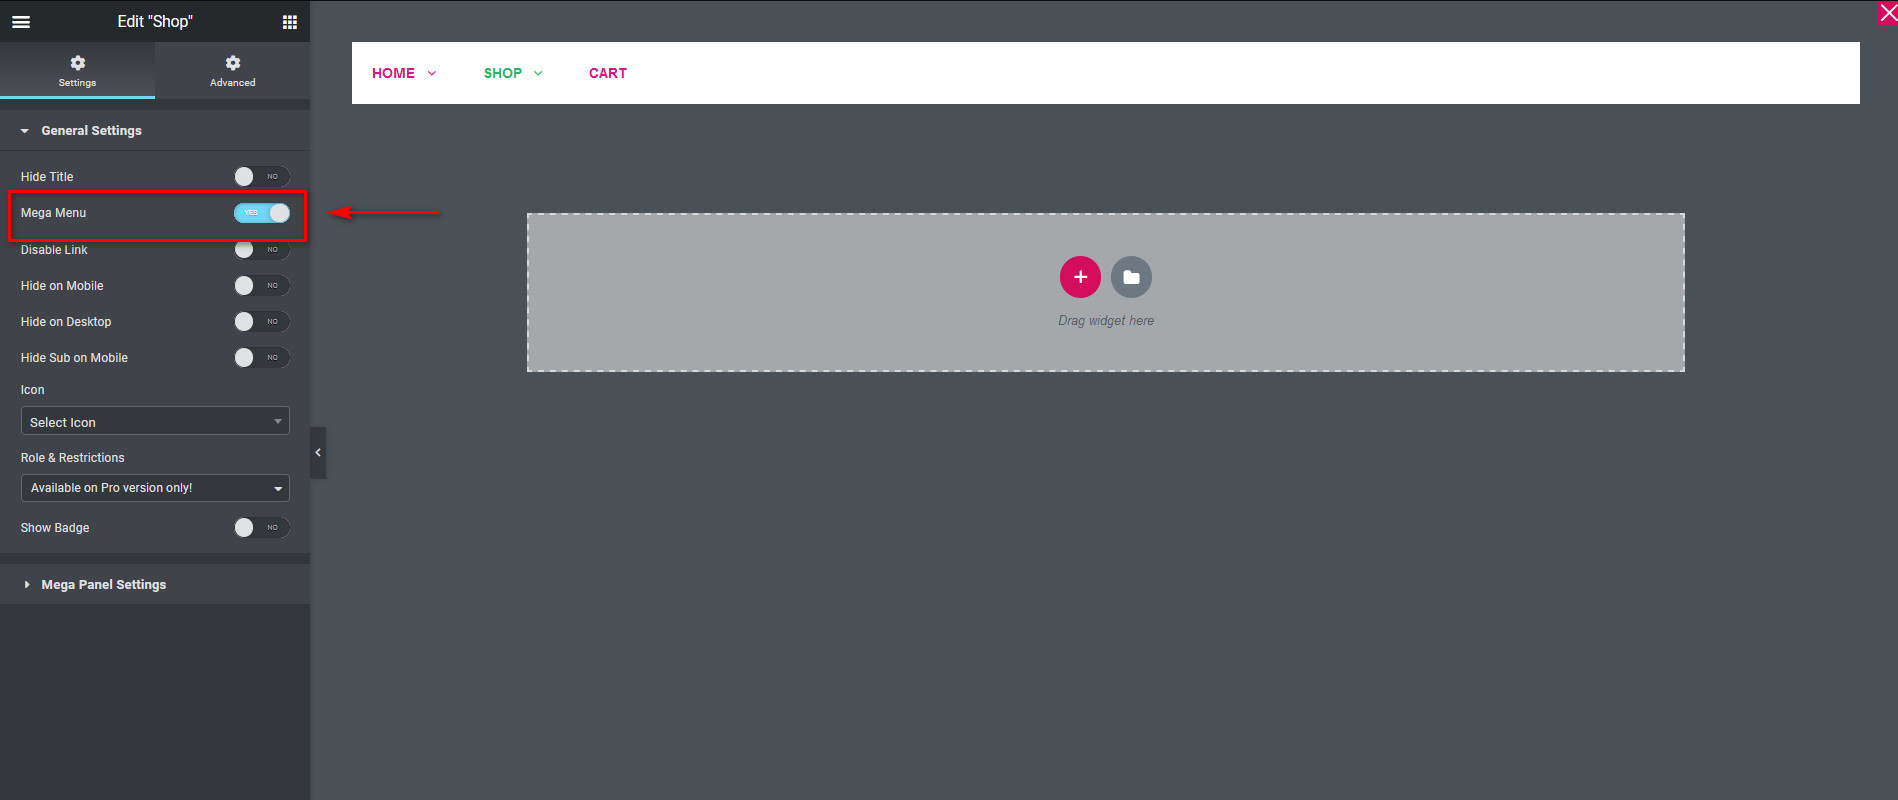
But that’s not all; there’s a lot more you can do with Clever Mega Menu such as building your Menu skin, designing your layout, adding multiple mega menus on your website, or integrating your WooCommerce content directly with your navigational menu. The opportunities are simply endless and we encourage you to play around and experiment with the Clever Mega Menu. To use all the features that Clever Mega Menu offers, you need to set up your menu using Elementor. To do this, click Change next to any of the menu items that you want to enable a Mega menu on. 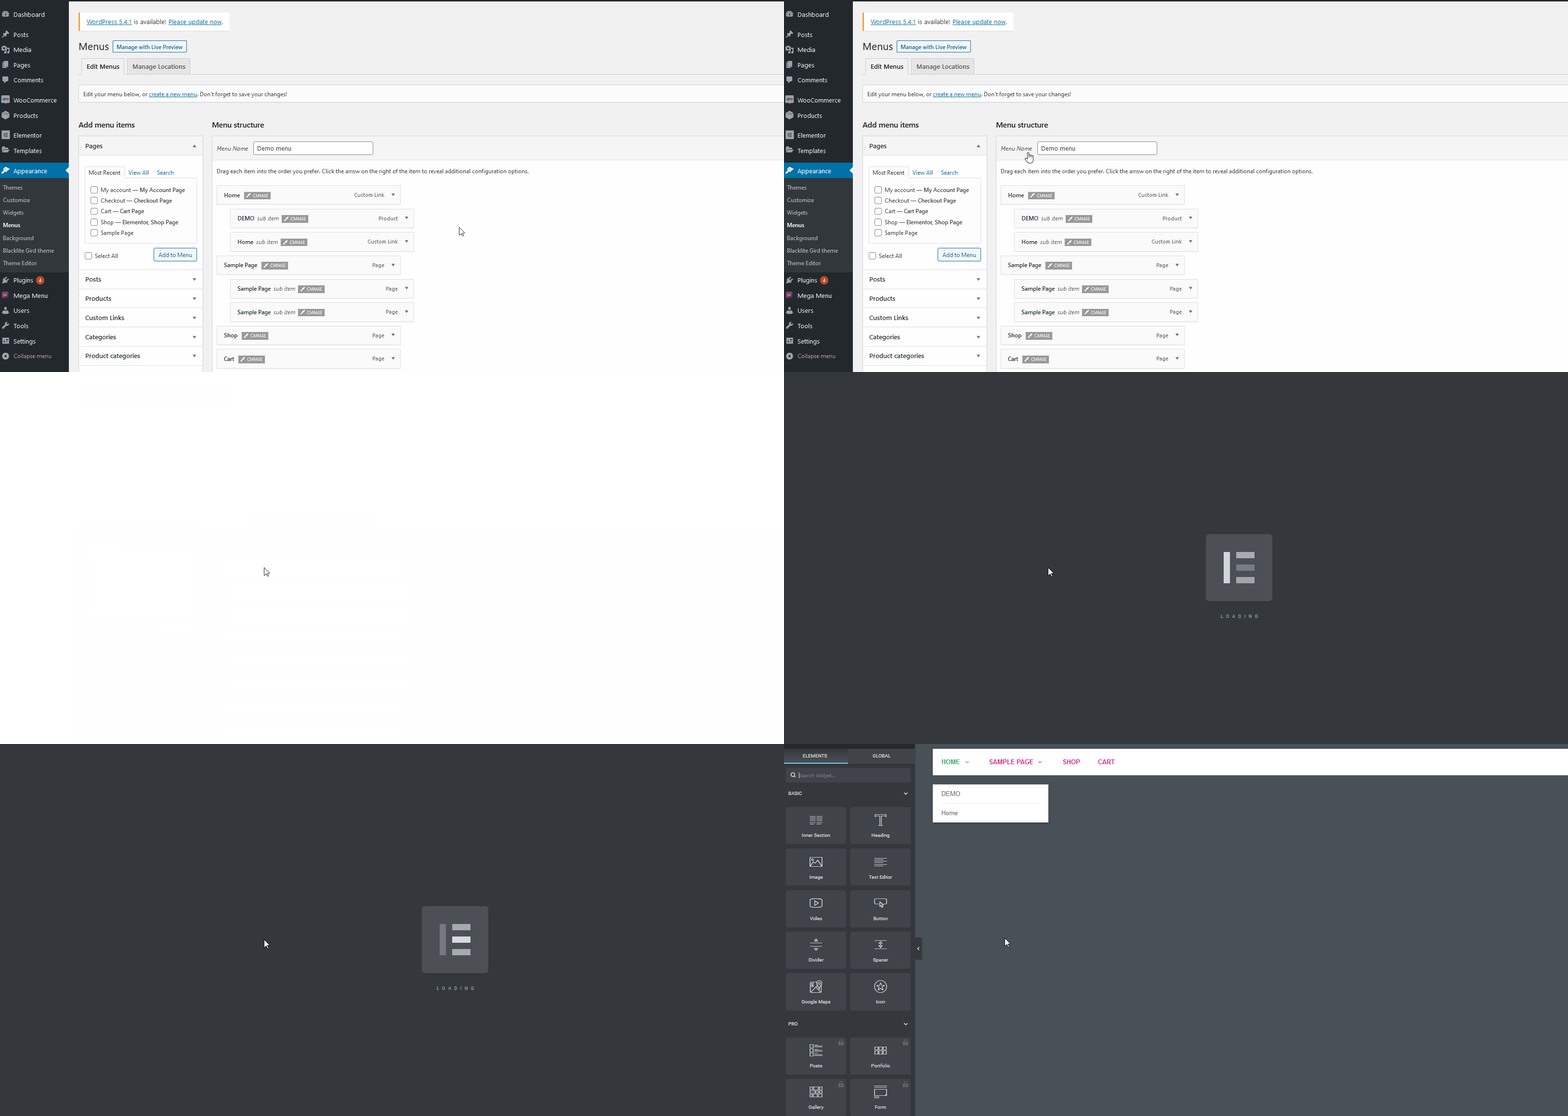 After that, click the Settings icon on the bottom of the Elementor sidebar and turn on the option labeled as Mega Menu. Now, your mega menu is enabled on top of Elementor’s page builder. Additionally, you can also customize the width of the mega menu.
  Now it’s time to use the Elementor magic and add all the widgets and content on the mega menu as you wish. You can add widgets directly from Elementor’s sidebar, media, videos, and more.
How to create a Mega Menu using Clever Mega Menu?
Now that you know the basics, let’s go ahead and create a mega menu with Clever Mega Menu for Elementor. Let’s start modifying the Shop mega menu first. In your WordPress dashboard, go to Appearance > Menus and open the Shop menu using the Change button. 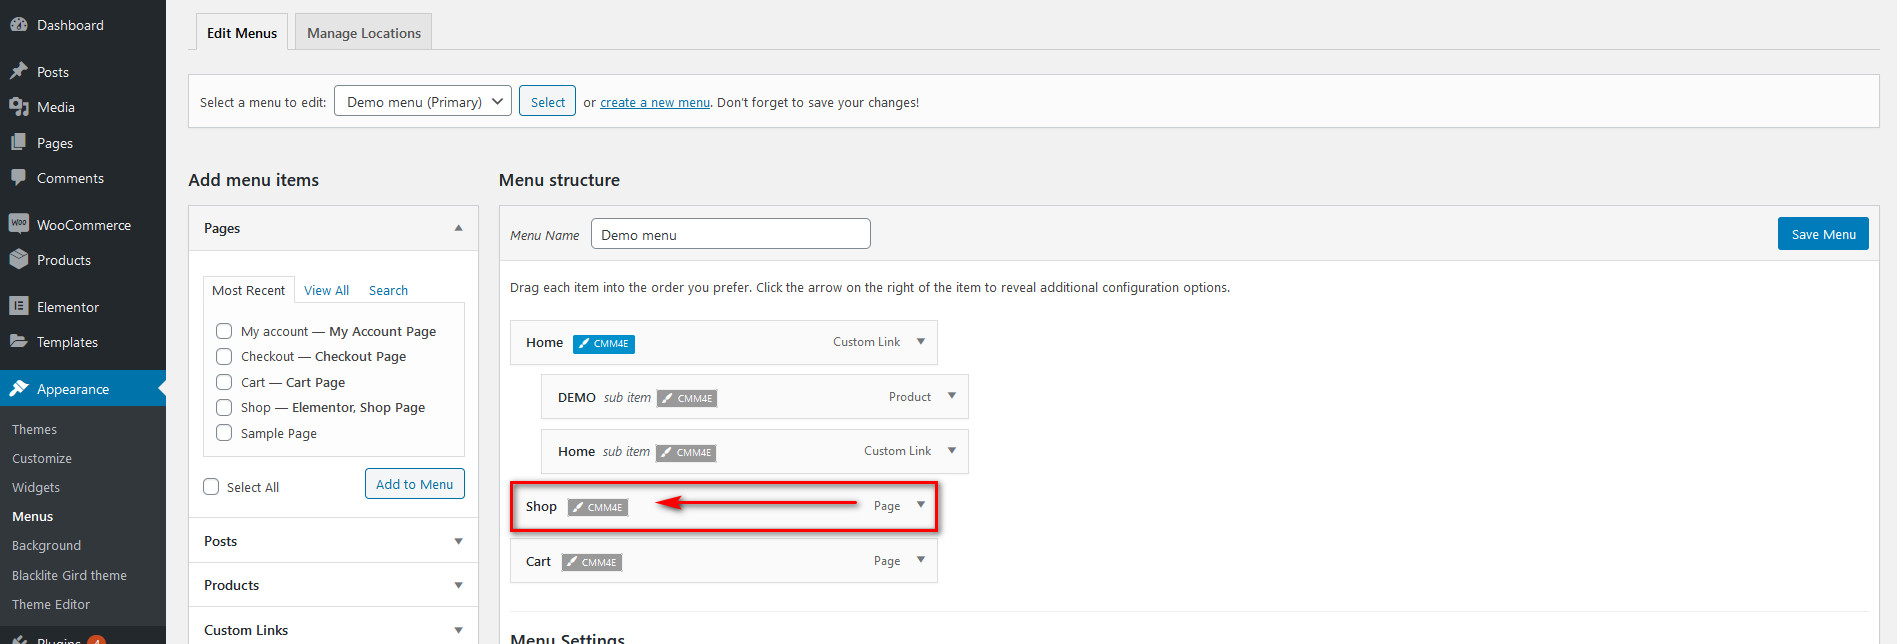 The documentation provides clear tips on how to create various kinds of menu designs, but the core idea is to use the same instructions we’ve described before. Then, enable the Mega Menu option under General Settings to designate Shop as a mega menu.
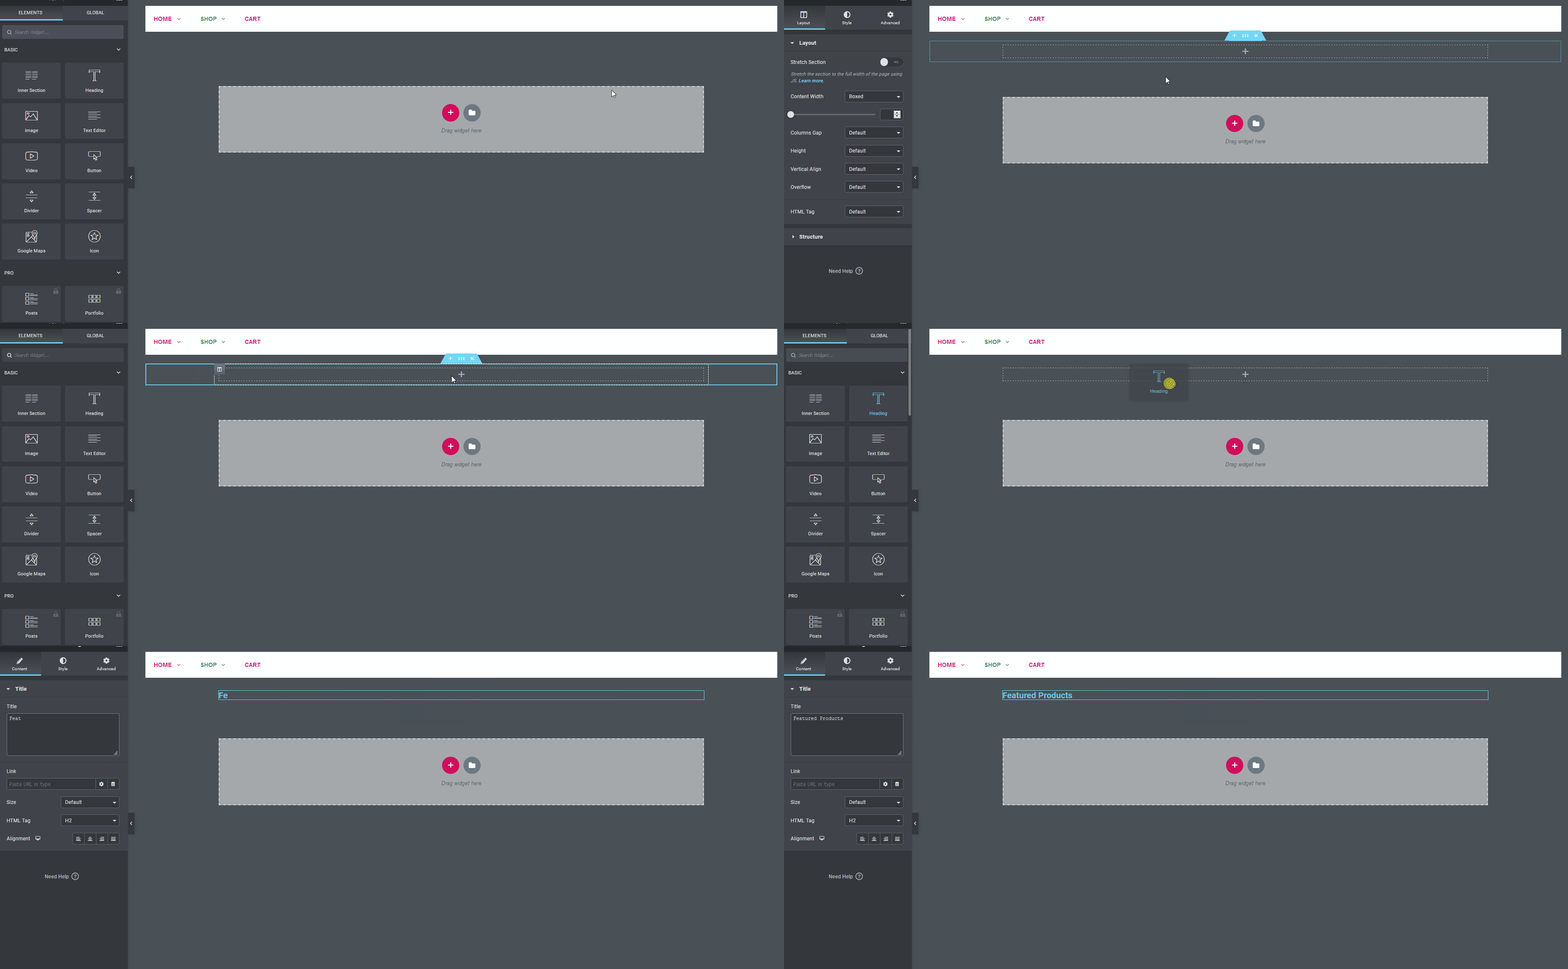
  After that, click the + button on the Elementor widget space and choose a structure for your mega menu. For this guide, we’ll select a single cell structure and add a heading widget labeled Featured Products.
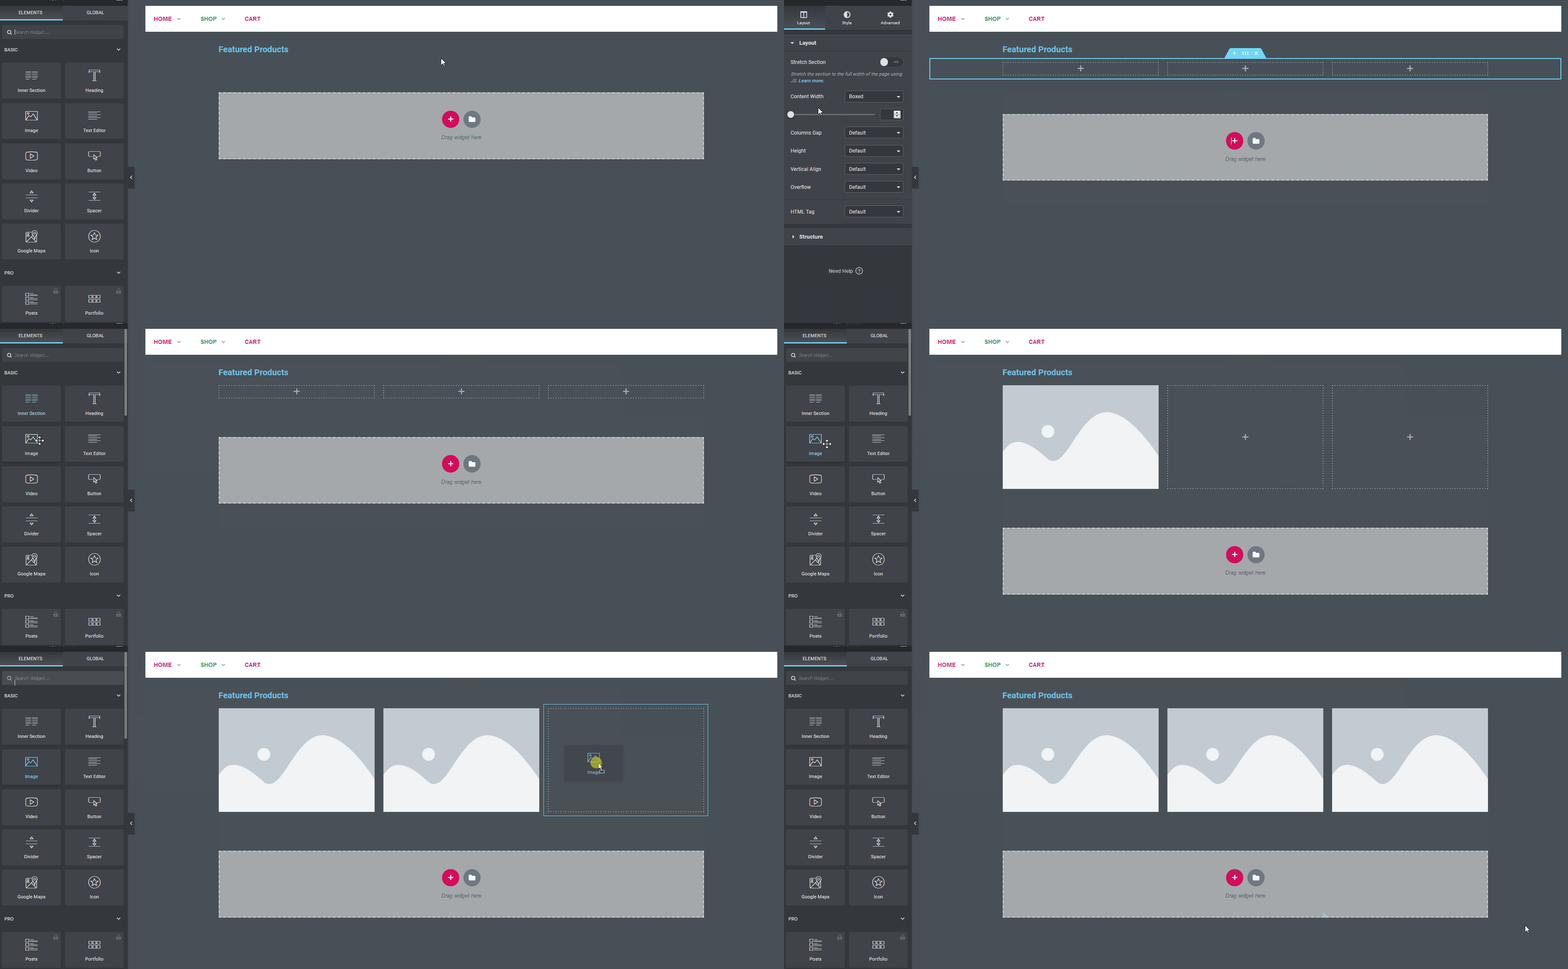
  Then, let’s add another three-cell structure to feature some shop items. Let’s add three images using the image widget.
  You can even add a direct link to the product URL on the images as well.
 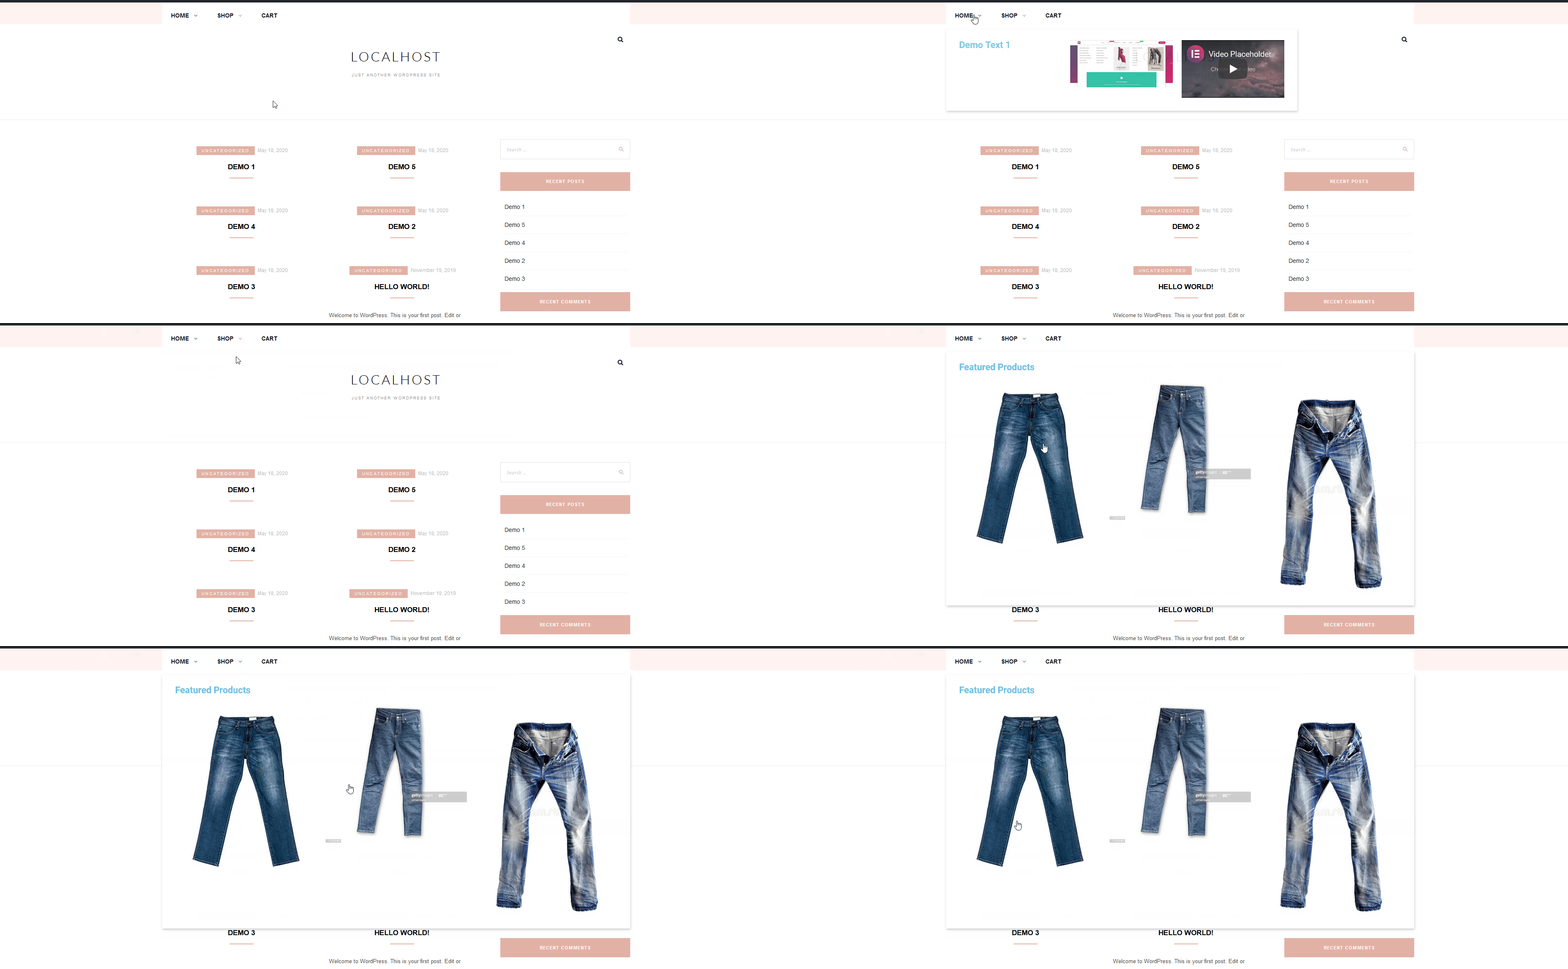 And that’s it, you’ve set up your basic Featured Products section in your Shop Mega Menu. Of course, there’s a lot more you can do using Clever Mega Menu for Elementor. You can set up another menu on the top of this menu, create Horizontal Menus or Vertical menus, add in WooCommerce products, and a lot more. You’re only limited by imagination!
Pros & Cons
Now, let’s have a look at the main pros and cons of the Clever Mega Menu addon:
Pros
- Extremely easy to use and beginner-friendly
- No coding skills required to set up menus and mega menus
- Wide range of features, even in the free version
- Highly customizable with tons of menu designs
- Responsive menus and mobile-friendly options
Cons
- It can be difficult to customize and setup menu skins
- Lacking in terms of documentation
- Not a huge number of Pro widgets to work with
Conclusion
And that concludes our guide on how to use and set up Clever Mega Menu for Elementor. Improving your website’s navigation is crucial for your business’ success and mega menus are certainly an excellent choice. Clever Mega Menu’s integration with Elementor is something to be praised as everything worked smoothly during our experience with the plugin.
We also need to highlight that this is one of the easiest Mega Menu add-ons to use due to its beginner-friendly design. Unlike other mega menus, with Clever Mega Menu, you can customize the items and skins without any CSS coding skills. But how does Clever Mega Menu hold up in comparison to other top add-ons such as Max Mega Menu or QuadMenu? The free version is somewhat limited but all the pro versions are excellent and reasonably priced considering all the features they include. Overall, this plugin is very user friendly and makes the mega menu building experience quite simple.
In terms of drawbacks, we would mention the lack of some additional features such as developer-friendly options, and Google Fonts integration. In the end, the best way to know if Clever Mega Menu for Elementor is the right mega menu plugin for you is to try it. So give it a go and let us know what you think about it.
Moreover, if you have a hard time setting up your mega menus, let us know in the comments and we’ll do our best to help you out. If you want more information about mega menus, you can check out our guide on how to add a WordPress mega menu using QuadMenu.

I like to read well-written articles. It looks like you spent a lot of time and effort on your blog. I learned a lot from your article and I have already bookmarked and am waiting to read a new article. keep up the good work!
Thanks a lot, David! Your comment encourages us to keep on working hard 🙂