Do you want to configure WordPress SMTP settings on your website? They are crucial if you want to ensure that your emails reach their intended destination and don’t end up in spam folders.
This article will walk you through the process of configuring WordPress SMTP settings.
We’ll also review everything from what SMTP is and why you need to configure SMTP on WordPress. So let’s go ahead and understand SMTP a bit in detail first.
What is SMTP?
SMTP, or Simple Mail Transfer Protocol, is an internet protocol for sending and receiving emails from one server to another. It is a common protocol that email clients use to send emails to a mail server. Then, they are finally forwarded to the intended recipients.
SMTP links the sender’s email client and the recipient’s email server. After you click the send button in your email client, the message is sent to the SMTP server, which forwards it to the recipient’s email server. Once the recipient’s email server receives the email, it delivers it to the recipient’s email client.
How Does SMPT Work?
SMTP works according to a set of protocol-defined rules. These rules specify how email messages should be formatted and sent from one server to another.
Firstly, your email client uses SMTP to communicate with your email provider’s SMTP server as soon as you send an email. Then, the SMTP server examines the domain of the recipient to decide which email server it needs to send the email to. Finally, the SMTP server forwards the email message to the recipient’s email server after the email server is found.
However, SMTP also includes a set of error codes to reflect the status of the email message. So if the recipient email server is down or cannot be found, it will send an error code stating that the email could not be delivered. Then, the email message is bounced back to the sender’s email client along with the error code to the user to notify that the email couldn’t be sent.
Why is Configuring SMTP in WordPress a Good Idea?
You may use WordPress for personal blogging, eCommerce, or corporate websites. Configuring SMTP in WordPress will benefit you and your users no matter what type of website you have.
- Improve email deliverability: By default, WordPress uses the PHP mail function to send emails. However, it is known to be a bit unreliable and can result in email delivery issues such as emails getting lost, not reaching the recipient, or being flagged as spam.
But if you configure the WordPress SMTP settings on your website, it will provide a more robust and dependable method for delivering emails. Thus, the likelihood of emails being delivered successfully to recipients will also be improved. This can further prevent emails from being marked as spam and provides a more secure way of sending emails. - Track email delivery: SMTP allows you to track email delivery based on whether an email was delivered successfully, opened, or bounced. This data can help you to identify any problems with your email campaigns and make changes to improve their performance.
- Customization options: Setting up SMTP in WordPress allows you to change your email settings, like editing the email sender name and address. This may help your recipients have a more professional and personalized email experience.
These are some of the major benefits you can have in your website when you configure SMTP in your WordPress website. So let’s move on to the actual process of configuring it.
Best WordPress SMTP Plugins
The best way to configure WordPress SMTP settings is by using an SMTP plugin. Plugins help in increasing the functionality of your website and help you add additional features that are not included in your default WordPress theme.
Modifying the default SMTP settings may also be one of the missing features. So here are some of the best plugins that you can use to adjust the SMTP settings on your website:
1) WP Mail SMTP
WP Mail SMTP is the most popular plugin for configuring SMTP settings in WordPress. It is a fantastic tool that ensures that emails are delivered to your recipient’s inbox efficiently and reliably. The plugin reconfigures WordPress to use a suitable SMTP provider for sending emails to resolve email deliverability issues.
Furthermore, it also provides you with a quick and user-friendly setup wizard. So you can start adjusting your WordPress SMTP settings in no time.
Features
- Reconfigures WordPress to use proper SMTP providers for emails
- Multiple SMTP mailer options
- One-click migration of SMTP settings
- Multisite email logs management
- Email alerts and smart routing
Pricing
WP Mail SMTP is a freemium plugin. You can download the free version from the official WordPress plugin repository. The premium version starts at 99 USD per year for one site license, with one year of updates and support, including a 14-day money-back guarantee.
2) Easy WP SMTP
Easy WP SMTP is a WordPress plugin that allows you to set up and send outgoing emails through 6 mailers or an SMTP server. This ensures that your emails don’t get marked as spam and increase the likelihood of successful delivery.
The plugin even provides you with email reports to help you track the progress of your emails. So you can check the number of emails that were resent, opened, clicked, and so on.
Features
- Easy to use setup wizard to configure SMTP settings
- Email logs options to keep track of emails
- Email reports which show the number of emails sent, opened, and clicked
- In-build dashboard widget for a quick overview of delivered and failed emails
- Debug events feature to log the error caused for failed emails
Pricing
Easy WP SMTP is a freemium plugin. You can download the free version from the official WordPress plugin repository. The premium version starts at 99 USD per year for a single domain license.
These are some of the best plugins to adjust SMTP settings on your WordPress website. If you want to use a different plugin, you can also look at our complete list of the best SMPT plugins for WordPress.
How to Configure WordPress SMTP Settings
As mentioned, the best way to configure SMTP settings in WordPress is by using a plugin. So we will be using WP Mail SMTP for this demonstration as it has a straightforward user interface and is very easy to use. But first, you must install and activate the plugin to start using it.
1) Install and Activate the Plugin
To install the plugin, go to Plugins > Install Now from your WordPress dashboard. Then, enter the keywords for the plugin on the search bar. After the plugin appears on the search results, click on Install Now.
The installation will take just a few seconds. Now, click on Activate immediately after the plugin is installed. This will activate the plugin.
If you want to use any other plugin not included in the official WordPress plugin repository, you must upload and install it manually. Please look at our guide on installing a WordPress plugin manually if you need more information.
2) Setup and Configure WordPress SMTP Settings
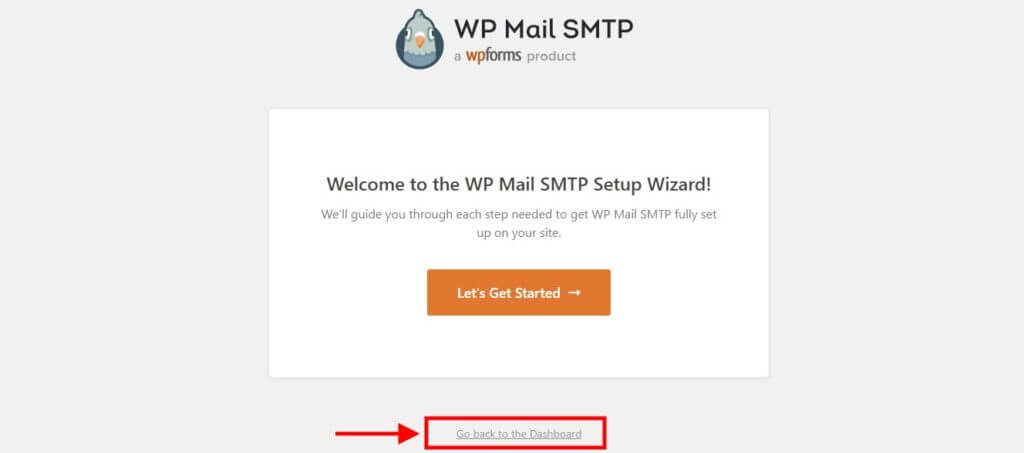
As soon as the plugin is activated, it will redirect you to the setup wizard of the plugin. But since we will manually configure the WordPress SMTP settings, we will skip the setup wizard for now. So just click on Go back to the Dashboard.
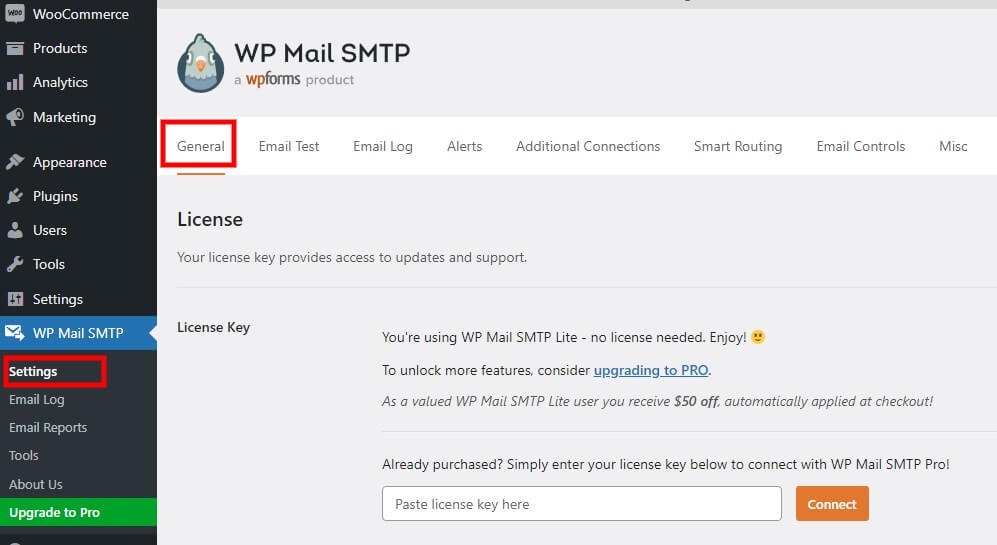
Now go to WP Mail SMTP > Settings from your WordPress dashboard to access the SMTP settings. Here, you can see all the general settings for your SMTP, like the plugin license key, primary connection, SMTP mailer, and backup connection options.
2.1) License Option
The license section is pretty straightforward. You can enter the license key of the plugin here if you have purchased the premium version. Then, click on Connect to activate the premium version of the plugin.
But if you are using the free version, you can skip this step and move forward to the primary connection options.
2.2) Primary Connection Options
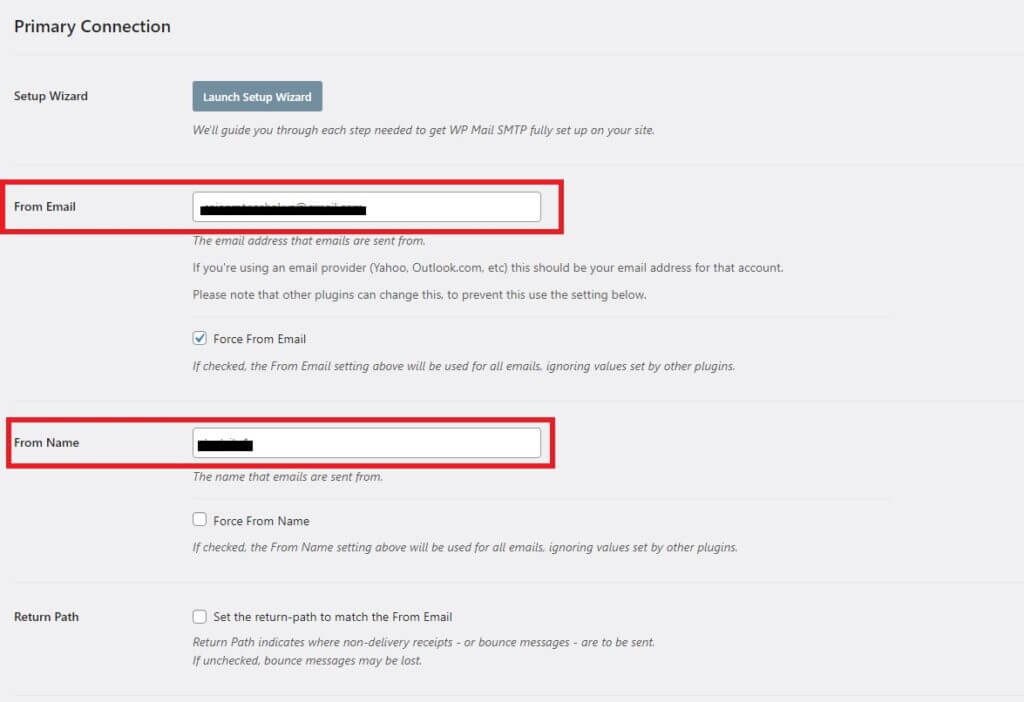
The primary connection options include the setup wizard, sender email address, sender name, return path, and mailer options. You can enter the sender’s email and name in the From Email and From Name options.
There are also options to force both the sender’s email address and name when you send an email. If you check this option, the entered email address and name will be used for all emails, regardless of values set by other plugins.
You can also enable the return path in this section to specify the destination for bounce messages or non-delivery receipts.
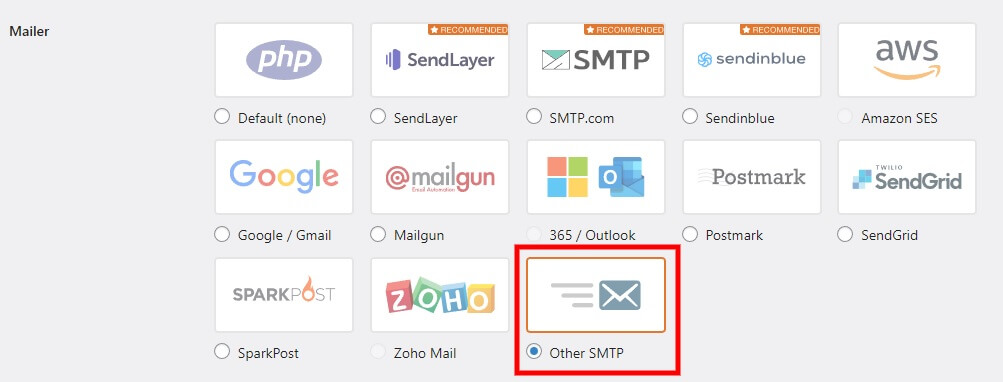
Finally, you can now select the mailer for your SMTP. Each mailer further has its options.
If you want to use any third-party SMTP mailers, several are listed here. They include SendLayer, SMTP.com, Sendinblue, AWS, Google, Mailgun, Outlook, and many more. But if you want to use your hosting, click Other SMTP.
2.3) SMTP Mailer Options
After you select your desired mailer, you will be presented with the SMTP options accordingly.
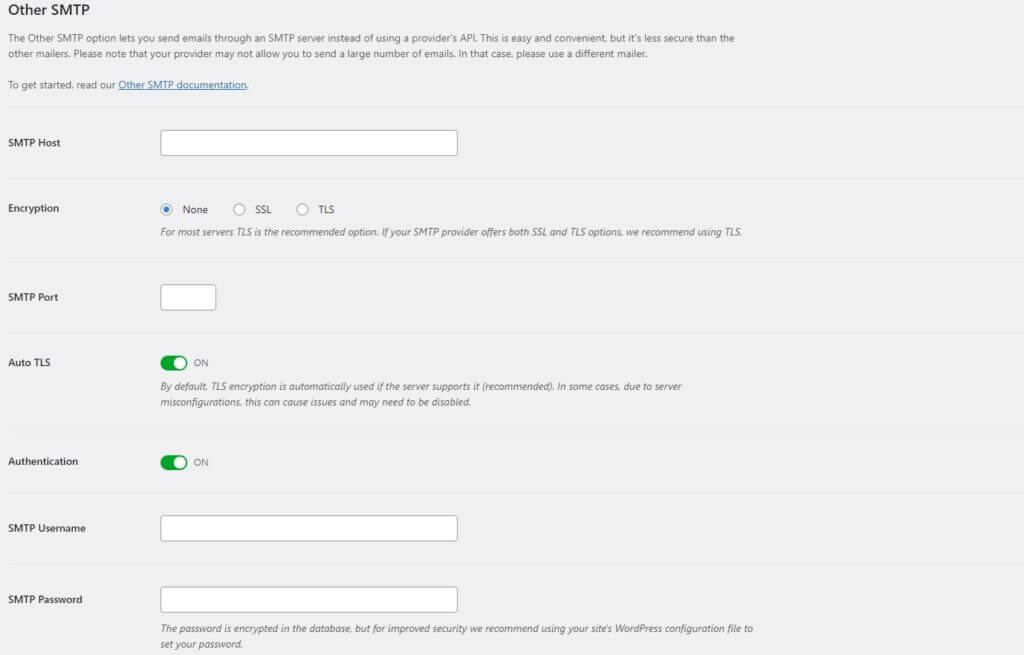
Now, all you have to do is adjust the WordPress SMTP mailer settings on your website. We have selected our hosting by choosing the Other SMTP option in the previous step.
Once you click on it, you must configure the SMTP options based on your hosting company. They include the following options:
- SMTP Host: refers to the SMTP hostname or IP provided by your hosting server.
- Encryption: You can select between SSL and TLS encryption depending on your hosting provider.
- SMTP Port: The network port for the SMTP to send emails.
- Auto TLS: Enabling this option will use TLS encryption automatically if the server supports it.
- Authentication: Check if the SMTP server requires authentication.
- SMTP Username: The email address that you use to send the emails.
- SMTP Password: The password for the email address you entered in the SMTP Username field.
Alternatively, if you have selected any other third-party mailers, you will have to enter fewer details. They mainly require information like API Keys, sender name, sender domain, client ID, and other similar information. However, SMTP mailers like AWS, Outlook, and Zoho mail are available only in the premium version.
2.4) Backup Connection Option
The plugin also provides you with backup options. But you can use it only if you have purchased the plugin’s premium version.
After you make all the necessary changes on this page, don’t forget to click on Save Settings.
3) Test Email with SMTP Settings
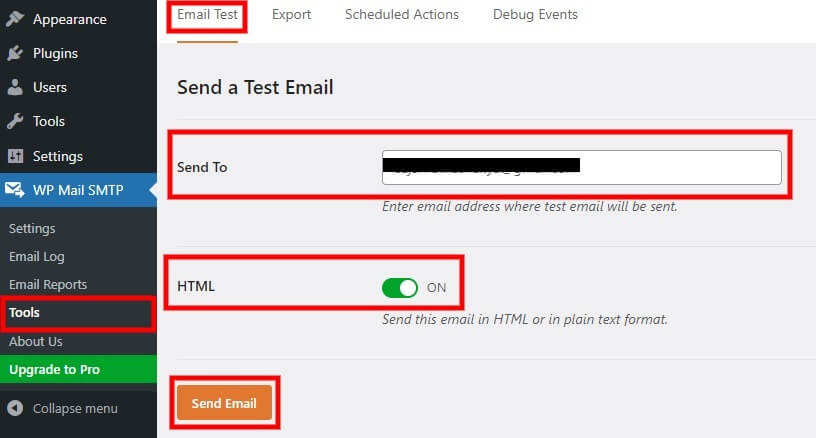
You also need to test if the email will be delivered to the recipient after you configure the WordPress SMTP settings. The plugin provides you with email testing tools for this. To access it, go to WP Mail SMTP > Tools from your WordPress dashboard again and click on the Email Test tab.
You can see that you need to enter the recipient email id for the test email here. You can also enable or disable the test email to be sent in HTML or plain text format.
Just enable the toggle as ON if you want to send the email in HTML format.
Then, click on Send Email.
You’ll be able to see the following image if your test email is successful. You can further verify the result by checking the email address’s inbox.
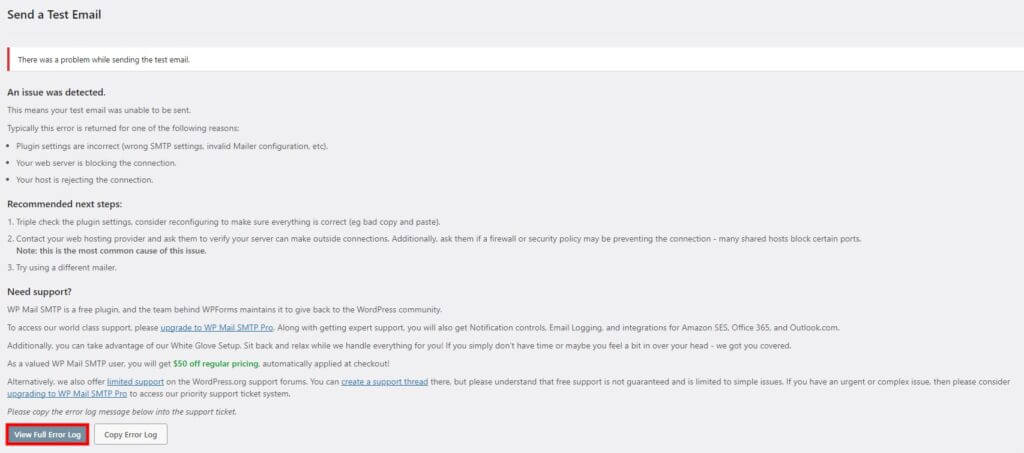
However, if the test email isn’t successful, it may show a similar error along with recommended tips to overcome it. You can even view the error log by clicking View Full Error Log to see what went wrong.
But if you have an online store and use WooCommerce, we also have an article on a few fixes that you can try out on your eCommerce website.
Conclusion
This is how you can configure WordPress SMTP settings to ensure that there are no delivery issues when you send an email from your website to the intended recipients. The article has also explained what SMTP is and why configuring them on your WordPress website is necessary.
In conclusion, we’ve learned that the best way to adjust them is by using SMTP plugins. You can use several plugins, and the steps for using them are similar and relatively straightforward. They mostly include:
- Plugin installation and activation
- Setup and configuration of SMTP settings
- Test email with new SMTP settings
We hope you can easily configure the SMTP settings on your WordPress website now and ensure that your emails are delivered reliably. Let us know if you have ever tried doing so and your thoughts on it in the comments below.
Meanwhile, here are some more articles that you can use to customize and improve your WordPress website if you found this post interesting:

