
How to Create Custom Header Widget in WordPress
Are you looking for ways to create a header widget on your site? You’ve come to the right place. We’ll show you how you can easily create a custom header widget in WordPress.
Having an attractive header is key to making an impression on your visitors. Additionally, it can be the perfect spot to display limited-time offers or special opportunities. If your theme doesn’t support this widget area, you can create one manually. In this guide, we will show you how to create a custom header widget in WordPress.
Before we see how to do it, let’s better understand the benefits of custom header widgets.
Why Create a Custom Header Widget in WordPress?
The header is the first thing visitors see when they land on your website. It’s one of the things that users pay more attention to, so most sites display their most important content such as special offers and menus on the headers.

If that’s the place that users pay attention to, it’s tempting to add a lot of content there. However, you should avoid having too many links on your primary menu (header). Having too much content in the header menu isn’t a recommended practice because it may confuse users and make your site look bad. That’s where a header widget can be helpful. You can add a custom header widget below the primary navigation bar and add extra widgets to this space without cramping the main menu.
Creating a custom header widget allows you to display anything be it an ad, newsletter widget, banner, text content, WooCommerce offers, and custom widgets without any issues. This way, you can add content to your header while keeping it organized.
Now that we better understand the importance of a custom header widget, let’s learn how to create one with minimal effort.
How to Create Custom Header Widget In WordPress
We’ve previously seen different methods to customize the WordPress header. In this section, however, we’ll learn how to edit the header by creating a custom header widget. For that, we will use PHP and CSS snippets.
NOTE: Before moving forward, as we’ll edit some core files, we recommend you generate a complete backup of your website and install a child theme. To create a child theme, you can follow this tutorial or use any of these dedicated plugins.
Once you’ve done that, move on to the next section.
1) Creating a Custom Widget
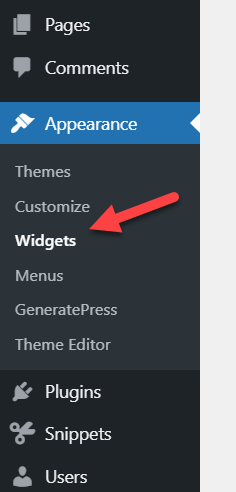
First, you need to create a new widget area. For that, on your WordPress dashboard, go to Appearance > Widgets.
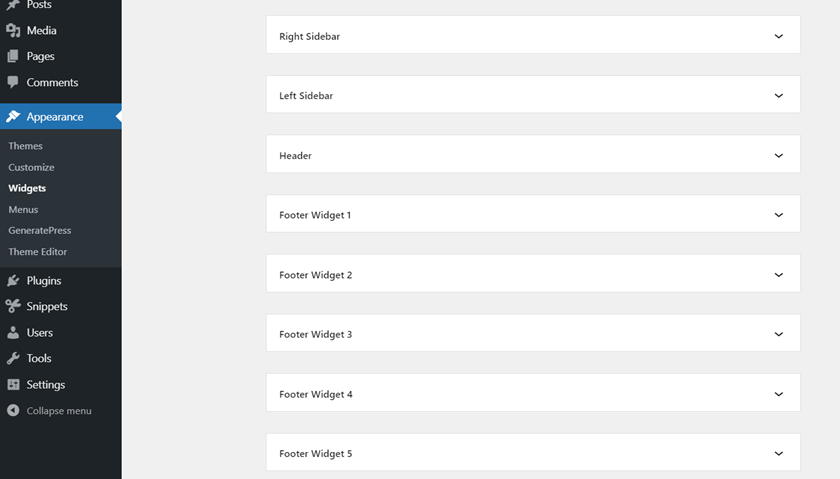
Once there, you will see all the widgets areas available in your active theme. This may change depending on your theme, but in most cases, you’ll see several areas here. For this demo, we are using GeneratePress, and it comes with a lot of widget areas that are already registered and styled.
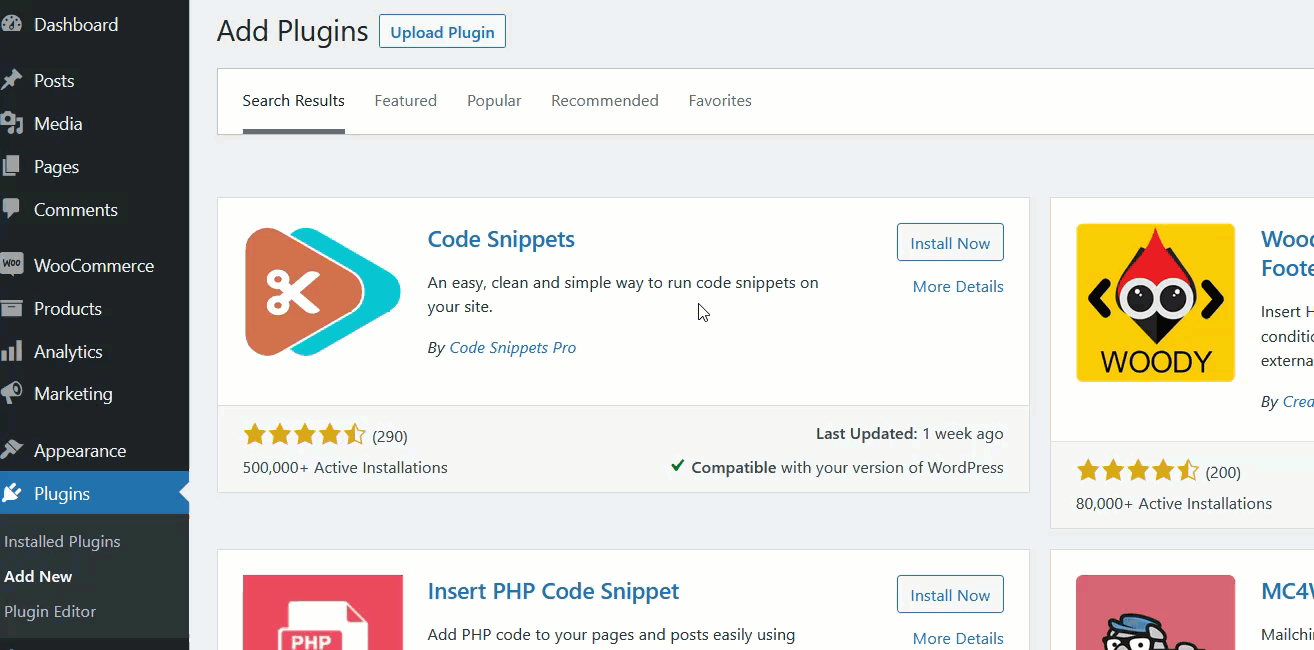
You need to create a new widget area where we’ll add our custom header widget. To do this, you need to tweak your child theme’s functions.php file. For that, you can either the file directly or use a plugin like Code Snippets.
For this demonstration, we will use Code Snippets, so we go to Plugins > Add New and search for the Code Snippets plugin. Then, we install it and activate it as shown below.
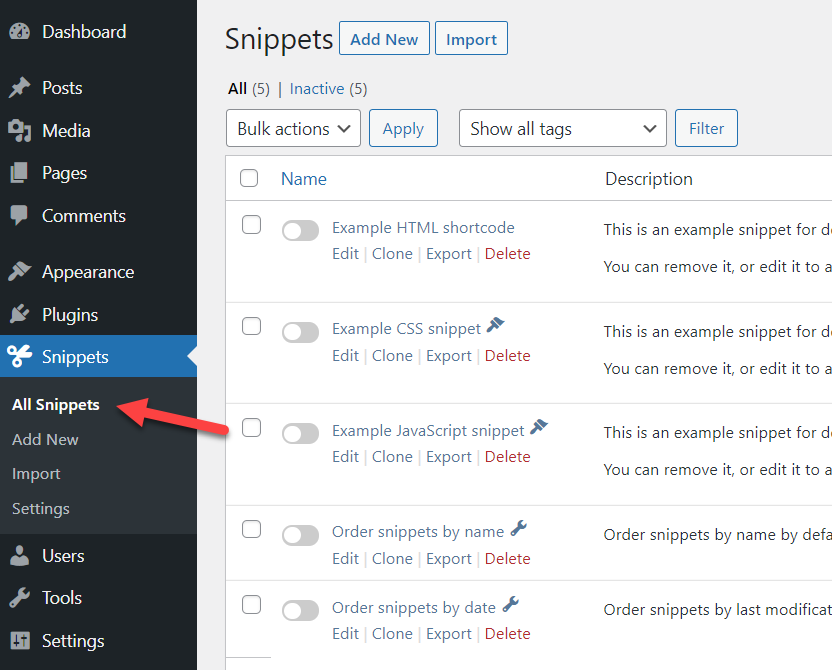
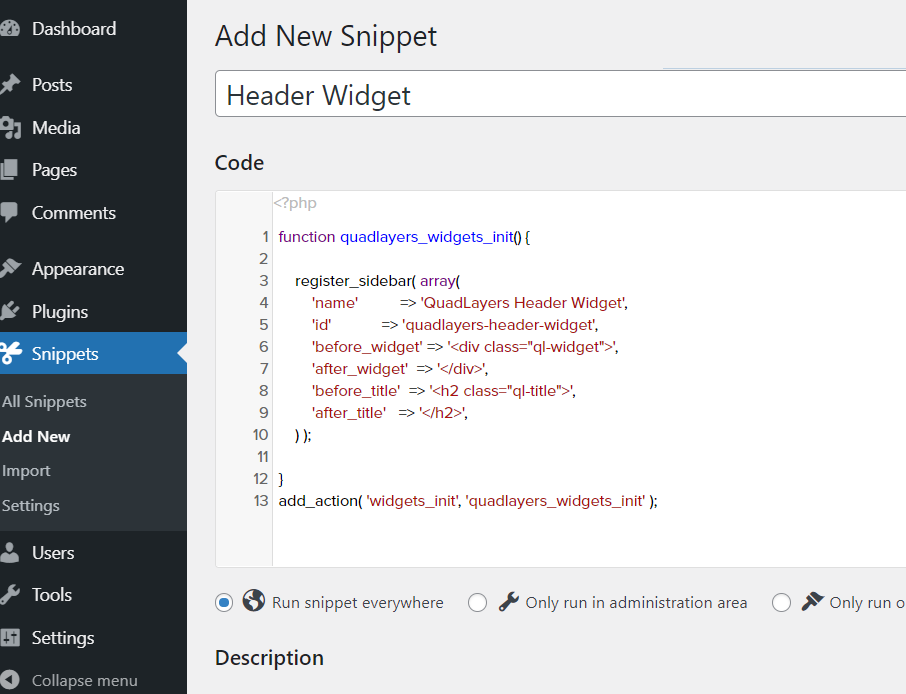
After activation, you will see the plugin’s settings on the left-hand side. Go to All Snippets and press Add New to create a new snippet.
Give the snippet a name and then paste the following snippet in the Code section:
function quadlayers_widgets_init() {
register_sidebar( array(
'name' => 'QuadLayers Header Widget',
'id' => 'quadlayers-header-widget',
'before_widget' => '<div class="ql-widget">',
'after_widget' => '</div>',
'before_title' => '<h2 class="ql-title">',
'after_title' => '</h2>',
) );
}
add_action( 'widgets_init', 'quadlayers_widgets_init' );
This snippet creates a new widget in your WordPress site called Quadlayers Header Widget.
Then save the changes and after activation, you will see a brand new widget area under the WordPress widgets section.
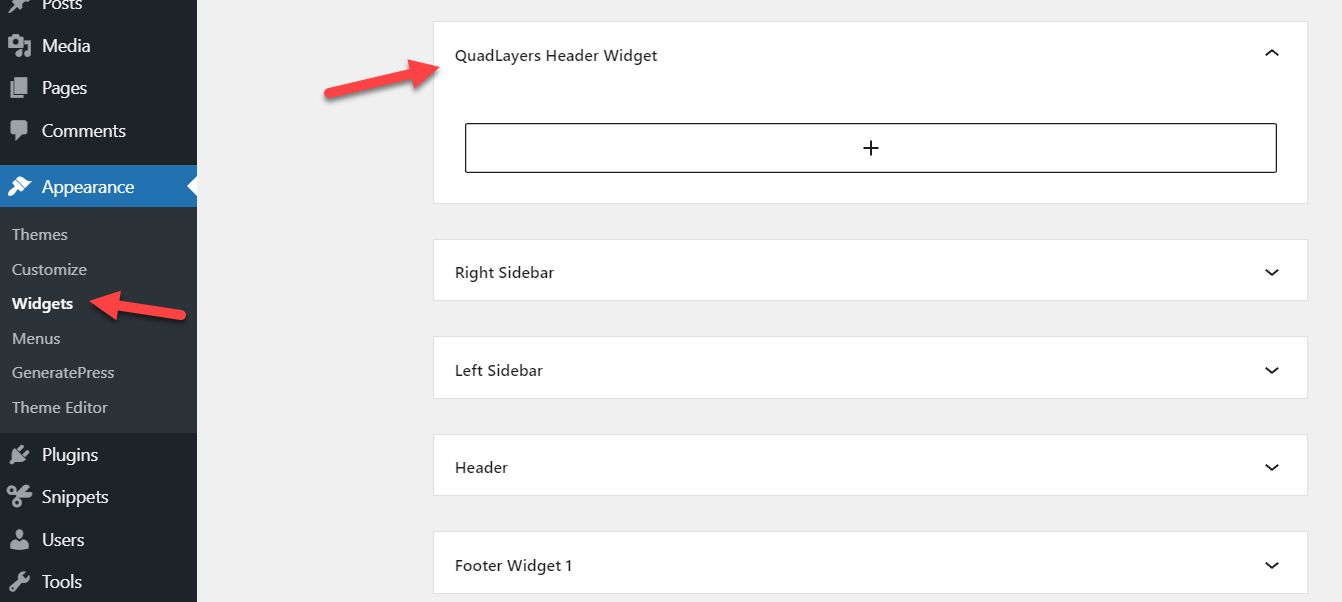
This way, you can register a new widget. After this, you have to add the widget to your website’s header. Let’s see how to do that.
2) Adding the Widget to the Header
You have successfully created a new widget on your website, but you haven’t specified the location. In this section, we will show you how to add this new custom widget to the WordPress header.
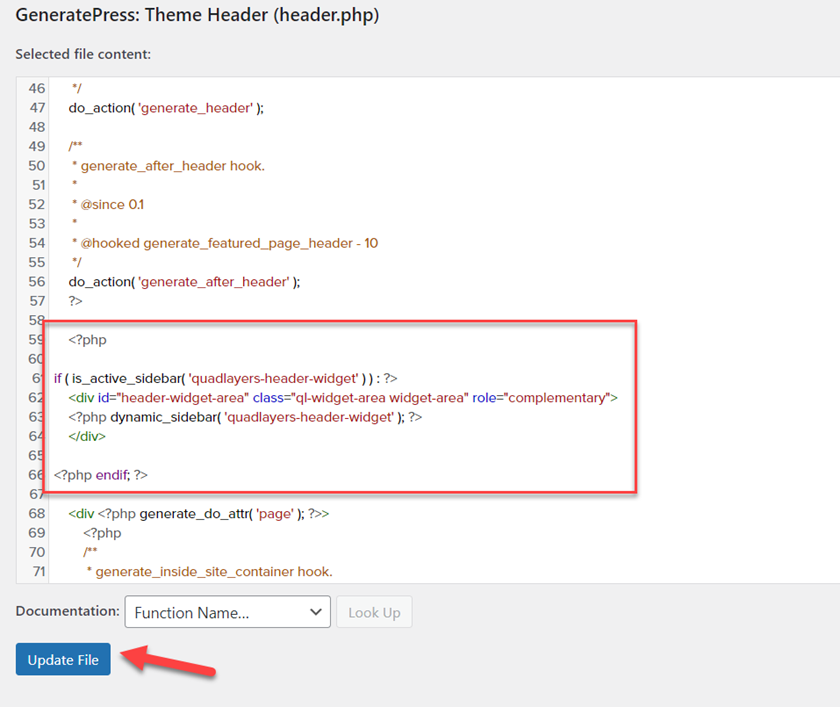
To do this, you need to edit the header.php file. You can find this file in the theme directory by going to Appearance > Theme Editor > Theme header (header.php). Before editing the file, make sure you are using a child theme. If your child theme doesn’t have a header.php file, open the parent theme’s folder, download the header.php file from there and then upload it to the child theme folder.
After that, paste the following code into the header.php file:
<?php

if ( is_active_sidebar( 'quadlayers-header-widget' ) ) : ?>
<div id="header-widget-area" class="ql-widget-area widget-area" role="complementary">
<?php dynamic_sidebar( 'quadlayers-header-widget' ); ?>
</div>

<?php endif; ?>
Once you have pasted the code, update the file.
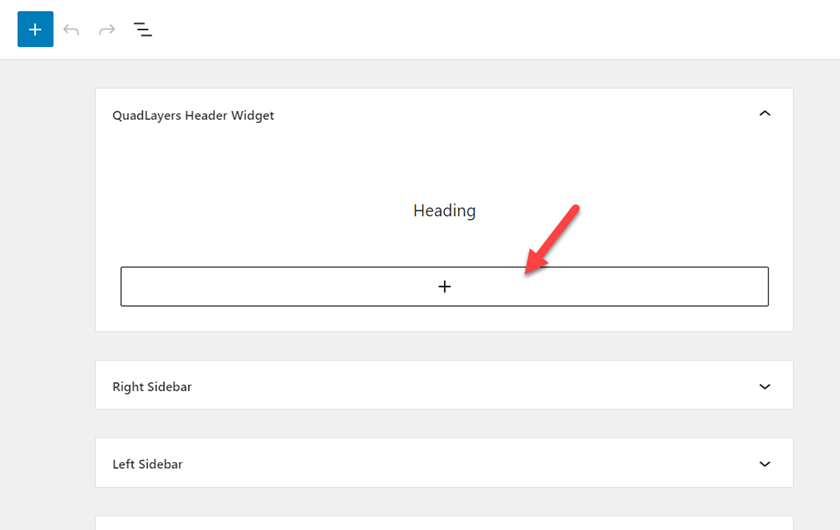
If you are not sure where to add the code, you can test different locations or contact your theme’s support team and ask them for the best location depending on your needs. After adding the code, test the widget area by adding a widget to it. In this example, we have added a paragraph block with some dummy content.
In the website’s front end, you’ll see the header as shown below.
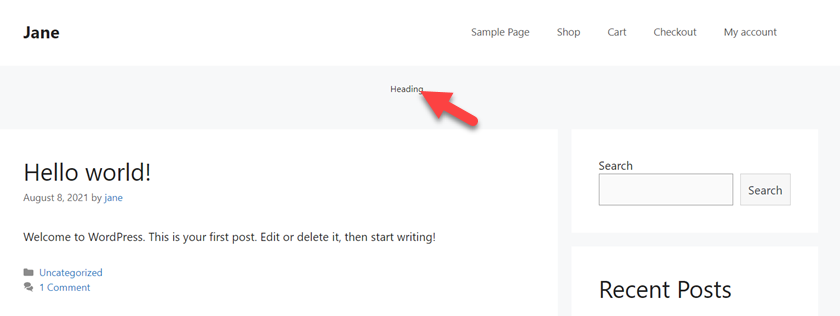
This means the widget and code are working. Great!
This is how you can add a custom header widget in WordPress. You can use that area to display a banner, ads, a limited-time offer, or anything you want.
But that’s not all. The widget is functional but you can still improve it. Let’s see how we can style the widget with a bit of CSS to match your site’s look and feel.
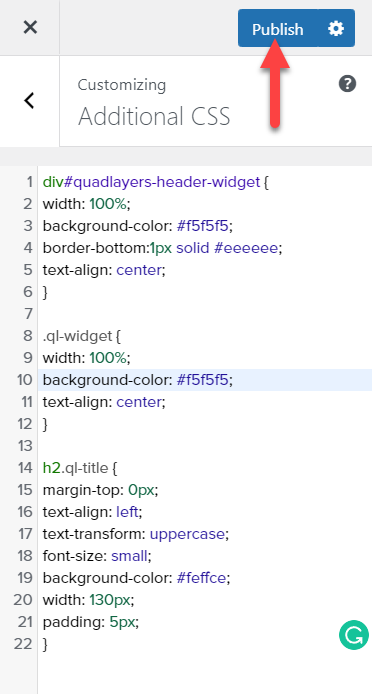
3) Customizing the widget with CSS
After adding the widget to the header file, it’s time to make it look better with a bit of CSS. You can enter your CSS code into the theme’s style.css file or use the WordPress Customizer. Both methods work well, but we recommend you add the CSS code using the Additional CSS section on the admin dashboard. This way, you will instantly see the changes in the live preview wizard. However,
Now let’s have a look at an example script so you can customize the custom header widget you’ve created in the previous section. Copy the following code, go to Appearance > Theme Editor > Additional CSS, and paste it.
div#quadlayers-header-widget {
width: 100%;
background-color: #f5f5f5;
border-bottom:1px solid #eeeeee;
text-align: center;
}

.ql-widget {
width: 100%;
background-color: #f5f5f5;
text-align: center;
}

h2.ql-title {
margin-top: 0px;
text-align: left;
text-transform: uppercase;
font-size: small;
background-color: #feffce;
width: 130px;
padding: 5px;
}
Once you have updated the CSS, it will look like this:

This is just a sample code. You can take it as a base and customize it to adapt it to your website’s styling and requirements.
That’s it! This is how you can create a custom header widget in WordPress with a bit of code. It wasn’t that hard, was it?
Conclusion
In summary, the header is one of the most prominent sections of any website and where you should have important content that you want visitors to see. That’s why adding a header widget is an excellent option to grab the user’s attention and display a limited-time deal, the most important sections of your site, and so on.
In this post, we’ve shown you how to create a custom header widget and customize it with a bit of code. Even if you don’t have programming skills, you can follow the tutorial and add the widget to your site. However, to change its style, you may need some basic knowledge of CSS. Editing the header.php file can be tricky depending on your theme, so if you are facing any issues with it, you can contact your theme author.
Have you created a header widget? How was your experience? Let us know in the comments section below.
For more ways to customize your header, have a look at the following guides:
