How to Create a Custom WordPress Plugin
Looking for ways to create a custom WordPress plugin? In this tutorial, we will show you how to build a WP plugin from scratch that will allow you to remove some elements from the WooCommerce product pages.
Before we go through the process, let’s look at why you might need to create a custom WordPress plugin first.
Why Create a Custom Plugin in WordPress?
We all know that there is a huge number of free and paid plugins available in WordPress. All of them are developed with various features to increase the functionality of your website. However, some of the features of the plugin might be unnecessary to your website and may act as an additional weight to your framework.
Sometimes, all you need is a tool with a very specific feature. But some plugins are so overloaded with additional features that you won’t get to use them to their full potential. In these cases, you can just create a custom WordPress plugin of your own.
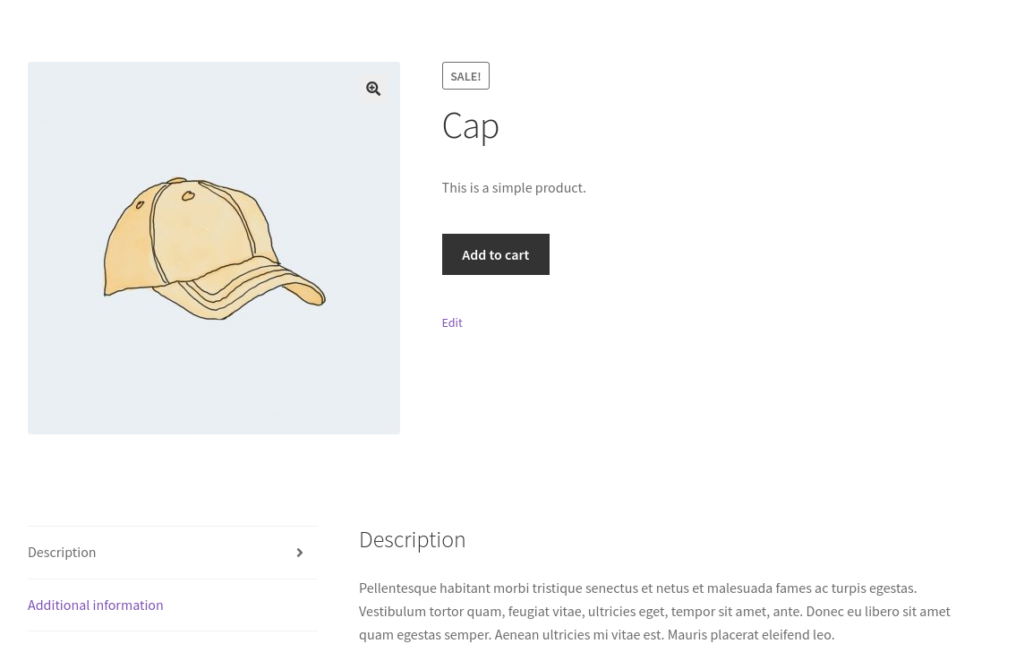
For example, let’s say you want to remove elements on your product page or any other WooCommerce pages using a dedicated plugin. Most plugins will provide you with some more additional features other than removing the elements. This will increase the plugin size as well as the website storage which can hamper your website performance as well.
Of course, you can also use CSS script or WooCommerce hooks to remove the elements as well. But they might bring some issues to your website if you update your WordPress theme without proper executions. But if you create a custom plugin, the modifications are less likely to hamper your website under any circumstances.
How to Create a Custom WordPress Plugin?
The whole process to create a custom WordPress plugin is quite easier than you think. But let’s start with a few things that we should keep in mind before we create a custom plugin.
1. Getting ready to start
There are a number of requirements that should be met by you to create a custom WordPress plugin. They are:
- WordPress installation on a localhost server
While you can develop a plugin on a live server, it’s a very bad practice to do so while the website is online. If you make any unnecessary changes to the website, it may go through some severe issues. So to prevent them, you will need to set up a localhost testing environment to create a custom WordPress plugin if you don’t have one yet.
- Use a code editor
WordPress comes with a built-in plugin editor to add and modify codes for your plugins. You can work with it to create a custom WordPress too. But we suggest using a code editor (IDE) like Sublime Text, Visual Studio Code, or any similar editors.
They have multiple tools and features required to build a custom plugin. Therefore, it is much more comfortable working with an IDE since they will be much better than using the WP code editor.
- Some basic WP development knowledge.
To create a custom WordPress plugin, we will be using WP hooks, PHP functions, and we’ll define our own functions. So we recommend that you continue with this tutorial only if you have basic knowledge of WordPress development. Otherwise, it might be very difficult for you to develop a custom plugin on your own.
These are some of the basic requirements and resources that you need to create a custom plugin. Make sure that all of these requirements are met before we move on with the tutorial.
2. Create the Main File for the Custom WordPress Plugin
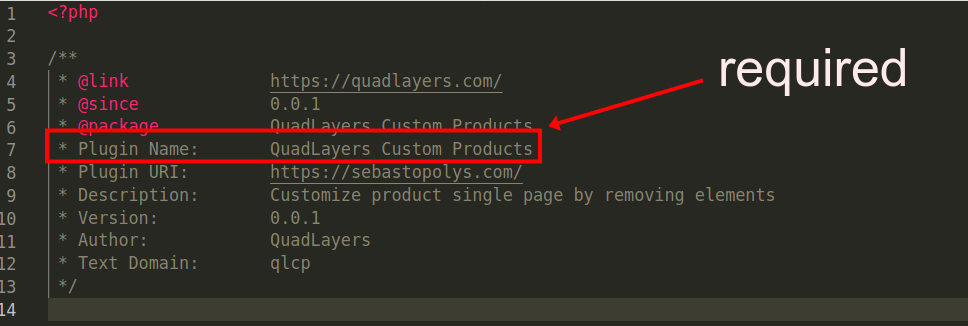
The first step to creating a custom WordPress plugin is to create a main file of the plugin. In fact, only a single main file is required to create a plugin. It must have a commented block with the plugin name.
This is the only value required by WP so it can recognize that this is a plugin. However, in order to follow good practices and avoid issues, we need to enter some other information here.
So let’s start working on it and create this file.
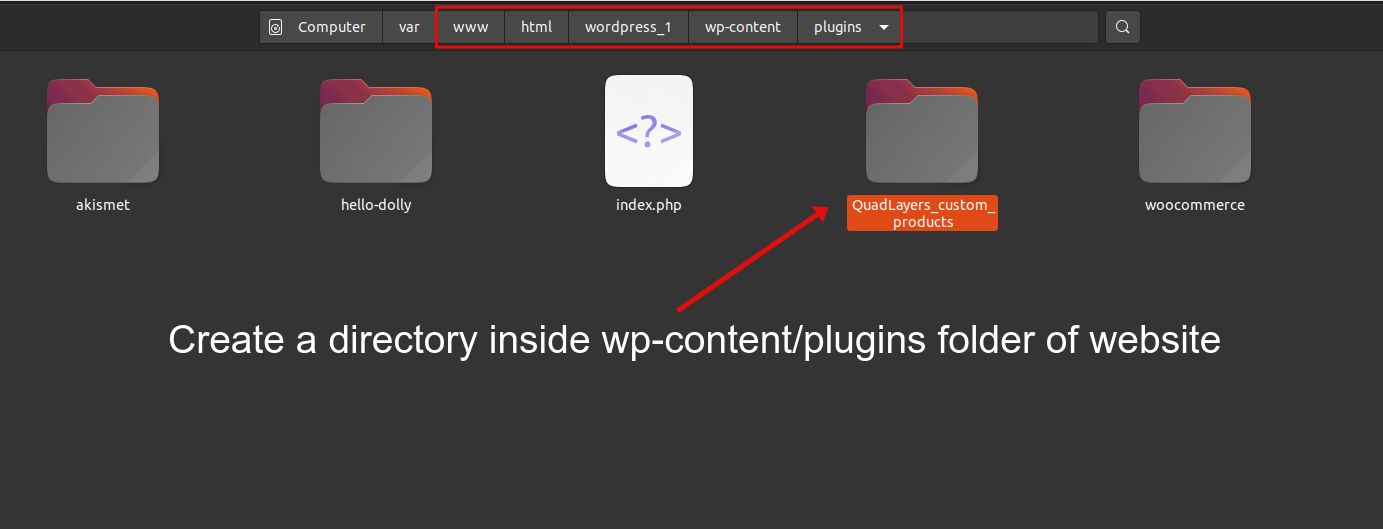
Open your localhost public folder and head to the WP installation you are going to work on. Then, navigate to the “wp-content/plugins” folder and you will see all installed plugins there
We are simply going to add our new custom plugin file here.
Create a new folder under the wp-content/plugins folder of your WP installation. For easy understanding, we have named the plugin QuadLayers_custom_products in this tutorial.
Inside this folder, all your plugin files will be located. So, let’s create our main file right into the folder we’ve just created. It should be in a .php file format
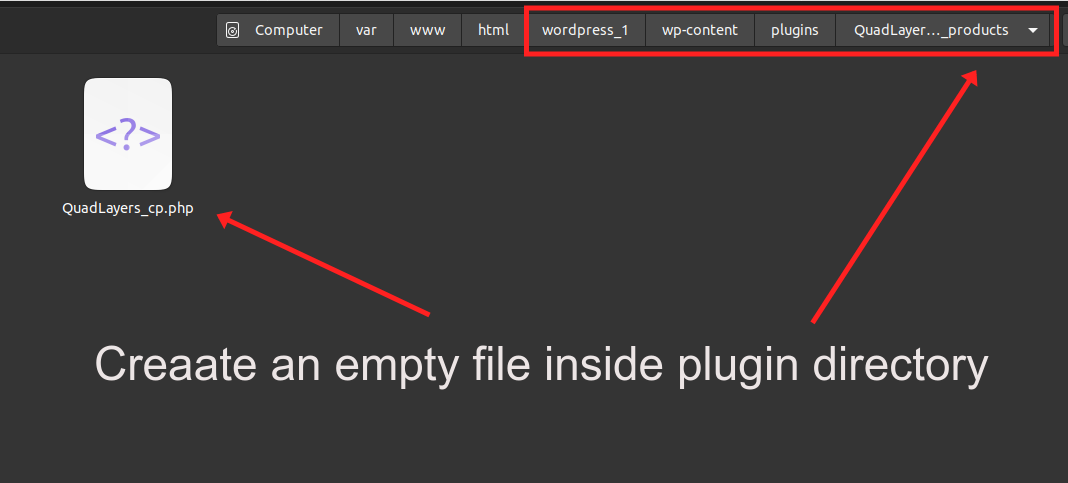
This main file, which we named QuadLayers_cp.php, where it all starts. It is the doorway of the plugin. You can use the code editor to create the file, but just be sure that it has the PHP extension and that it’s properly formatted as a PHP file.
Copy and paste this code on the file:
<?php

/**
 * @link              https://quadlayers.com/
 * @since             0.0.1
 * @package           QuadLayers Custom Products
 * Plugin Name:       QuadLayers Custom Products
 * Plugin URI:        https://quadlayers.com/
 * Description:       Customize product single page by removing elements
 * Version:           0.0.1
 * Author:            QuadLayers
 * Text Domain:       qlcp
 */

if(!defined('ABSPATH')){die('-1');}

function start(){
        if(is_admin()==true){
        require plugin_dir_path( __FILE__ ).'includes/Backend/QuadLayers-backend-init.php';
        }
        require plugin_dir_path( __FILE__ ).'includes/Frontend/QuadLayers-frontend-init.php';
 }
function runit(){
    add_action('init','start');
}
runit();
As you can see, we are simply calling two more files from here: QuadLayers-frontend-init.php and QuadLayers-backend-init.php. Obviously, one will work on the frontend, and the other on the backend respectively. You can clearly deduce it with their file names.
Out of them, we can ensure that the backend file will work only on the backend because we are using a conditional with the is_admin() function. This means that it will be triggered only when the admin is on the WP admin dashboard.
Right now, you will have some errors on your website because both frontend and backend files don’t exist yet. So let’s go ahead and create them.
Create a new folder within the plugin directory named includes. Then, add two more folders inside it: backend and frontend.
For getting rid of the wrong path errors, create two empty files, each one inside each of these folders: QuadLayers-backend-init.php inside the backend folder, and QuadLayers-frontend-init.php in the frontend folder.
So, this would be our final plugin file structure:
QuadLayers_custom_products
    __QuadLayers_cp.php
    __includes
       __Backend
          __QuadLayers-backend-init.php
       __Frontent
          __QuadLayers-frontend-init.php
3. Backend Options
After you have added the main file, we can start adding the backend options of the plugin. Here, we are going to create a plugin menu tab on the WP admin dashboard. This will allow the users to choose some options to hide or display the elements on the front end.
We’ll be using the settings API provided by WP for this demonstration. Don’t worry if you don’t understand this yet because it’s not so difficult to learn and there is plenty of documentation about it.
If you want to learn more about this, here is a complete guide to WP Settings API
For now, just copy and paste the following code on the QuadLayers-backend-init.php file
<?php
add_action('admin_init', 'QuadLayers_display_options');
add_action('admin_menu', 'QuadLAyers_cp_AdminMenu');
function QuadLAyers_cp_AdminMenu(){
    add_menu_page( __('QuadLayers Custom Products', 'qlcp'), __('QuadLayers Custom Products', 'qlcp'), 'manage_options', 'qlcp', 'QuadLayersOptionsPage' );
}
function QuadLayersOptionsPage() {
    ?> <form action="options.php" method="post"> <?php
    settings_fields('plugin_QL_Page');
    do_settings_sections('plugin_QL_Page');
    submit_button();
    </form><?php
}

function QuadLayers_display_options(){

    register_setting('plugin_QL_Page', 'qlcp_options',  'callbackValidation');

    add_settings_section(
        'QuadLayers_pluginPage_section',
        __('QuadLayers Backend Options', 'qlcp'),
        'QuadLayersSettingsSectionCallback',
        'plugin_QL_Page'
    );
    add_settings_field(
        'QuadLayers_checkbox_field_1',
        esc_attr__('Title', 'qlcp'),
       'QuadLayersCheckboxRender_1',
        'plugin_QL_Page',
        'QuadLayers_pluginPage_section'
    );
    add_settings_field(
        'QuadLayers_checkbox_field_2',
        esc_attr__('Quantity', 'qlcp'),
       'QuadLayersCheckboxRender_2',
        'plugin_QL_Page',
        'QuadLayers_pluginPage_section'
    );
    add_settings_field(
        'QuadLayers_checkbox_field_3',
        esc_attr__('SKU', 'qlcp'),
       'QuadLayersCheckboxRender_3',
        'plugin_QL_Page',
        'QuadLayers_pluginPage_section'
    );
    add_settings_field(
        'QuadLayers_checkbox_field_4',
        esc_attr__('Meta', 'qlcp'),
       'QuadLayersCheckboxRender_4',
        'plugin_QL_Page',
        'QuadLayers_pluginPage_section'
    );
    add_settings_field(
        'QuadLayers_checkbox_field_5',
        esc_attr__('Description Tab', 'qlcp'),
       'QuadLayersCheckboxRender_5',
        'plugin_QL_Page',
        'QuadLayers_pluginPage_section'
    );
    add_settings_field(
        'QuadLayers_checkbox_field_6',
        esc_attr__('Price', 'qlcp'),
       'QuadLayersCheckboxRender_6',
        'plugin_QL_Page',
        'QuadLayers_pluginPage_section'
    );
}

function QuadLayersSettingsSectionCallback(){
    echo wp_kses_post('A settings page for the QuadLAyers custom plugin');
}

function QuadLayersCheckboxRender_1(){
    $options = get_option('qlcp_options');
    ?>
    <input name="qlcp_options[QuadLayers_checkbox_field_1]" type="checkbox" />
    checked  <?php } ?>value = "1">
}

function QuadLayersCheckboxRender_2(){
    $options = get_option('qlcp_options');
    ?>
    <input name="qlcp_options[QuadLayers_checkbox_field_2]" type="checkbox" />
    checked  <?php } ?>value = "1">
}

function QuadLayersCheckboxRender_3(){
    $options = get_option('qlcp_options');
    ?>
    <input name="qlcp_options[QuadLayers_checkbox_field_3]" type="checkbox" />
    checked  <?php } ?>value = "1">
}

function QuadLayersCheckboxRender_4(){
    $options = get_option('qlcp_options');
    ?>
    <input name="qlcp_options[QuadLayers_checkbox_field_4]" type="checkbox" />
    checked  <?php } ?>value = "1">
}

function QuadLayersCheckboxRender_5(){
    $options = get_option('qlcp_options');
    ?>
    <input name="qlcp_options[QuadLayers_checkbox_field_5]" type="checkbox" />
    checked  <?php } ?>value = "1">
}

function QuadLayersCheckboxRender_6(){
    $options = get_option('qlcp_options');
    ?>
    <input name="qlcp_options[QuadLayers_checkbox_field_6]" type="checkbox" />
    checked  <?php } ?>value = "1">
}
Now, reload the backend screen or activate your plugin and you will see a new tab on the dashboard menu sidebar.
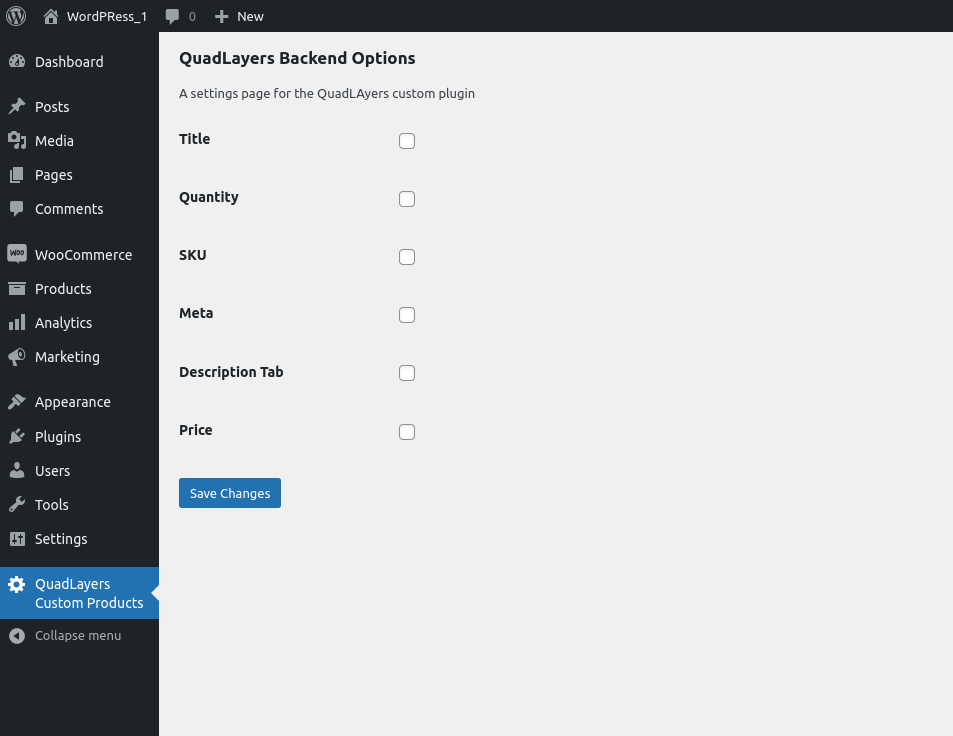
The WP settings API will store an array with all these options in the wp_options database table. You can check it by opening PHPMyAdmin on your localhost and searching it on the table.
Because this is newly created data, it should be found at the end of the table
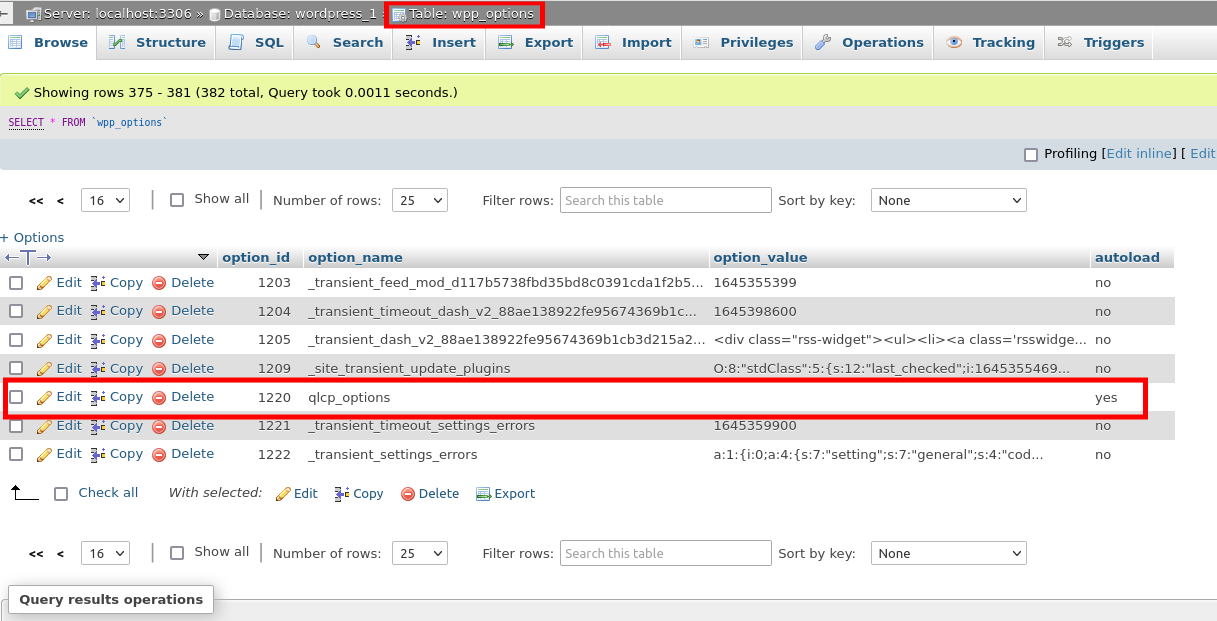
Of course, the qlcp_options array is empty on the database on the above screenshot. This is because all the checkboxes are unchecked at this moment. You can try checking some of them and come back to PHPMyAdmin to see how WP settings API stores the data.
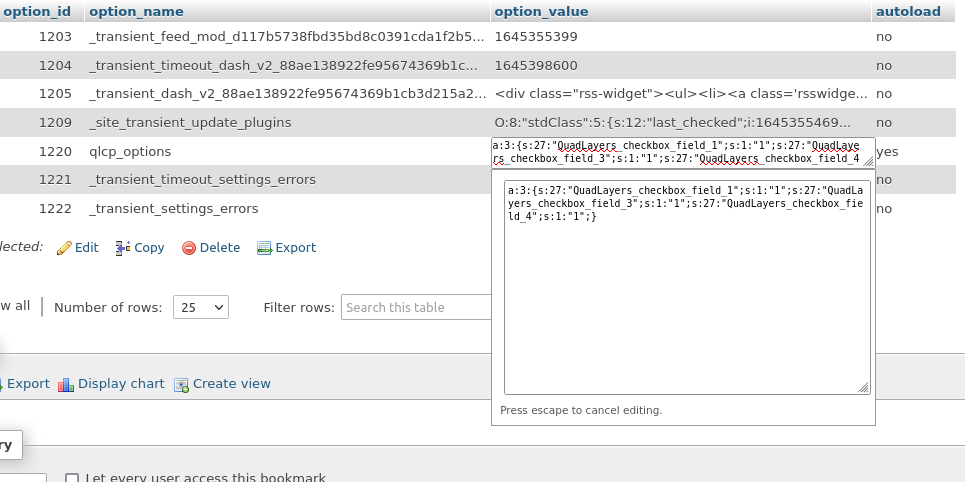
Now that we can store the options array on the database, we need to grab these options and use them in the frontend. These options will allow the users to hide or display various elements of your website.
4. Frontend Options
To add the frontend options, just copy and paste the following code on the QuadLayers-frontend-init.php file.
This will grab the data from the database, which was stored by the backend file there in an array.
After this, it will hide the specific elements of the product page, based on which options are true on the options array.
<?php

$options = get_option('qlcp_options');

if(!is_string($options)):
    // Title
    if(isset($options['QuadLayers_checkbox_field_1'])){
    remove_action( 'woocommerce_single_product_summary', 'woocommerce_template_single_title', 5 );
    }

    // Quantity
    if(isset($options['QuadLayers_checkbox_field_2'])){
        add_filter( 'woocommerce_is_sold_individually',
            function ( $return, $product ) {
                return true;
            }, 10, 2
        );
    }

    // SKU
    if(isset($options['QuadLayers_checkbox_field_3'])){
        add_filter( 'wc_product_sku_enabled',
            function ( $enabled ) {
                return $enabled;
            }
    );
    }

    // Meta
    if(isset($options['QuadLayers_checkbox_field_4'])){
        remove_action( 'woocommerce_single_product_summary', 'woocommerce_template_single_meta', 40 );
    }

    // Description Tab
    if(isset($options['QuadLayers_checkbox_field_5'])){
        add_filter( 'woocommerce_product_tabs',
        function ( $tabs ) {
            unset( $tabs['description'] );
            return $tabs;
            }, 11
        );
    }

    // Price
    if(isset($options['QuadLayers_checkbox_field_6'])){
        add_filter( 'woocommerce_get_price_html',
        function ($price){
            return ;
            }
        );
    }
endif;
We are enclosing all the code within a if(is_string($options)) conditional. Hence, we can check if there are no checked checkboxes, in which case the database value will be a string. Then, we don’t need to run this code at all.
Also, note that we are using anonymous functions. It works exactly the same as with named functions. But we just made a briefer code for this beginner-friendly guide.
So, if there are some values stored on database, each one of the functions of this code will remove a specific element depending on the specific index of the database array that is present.
It is important for you, as a beginner, to understand how we’ve interacted with the database. Our two files interact with it, but these files are not connected in anyway between them. You can even remove one file and the other one will still work because the database will still have the required values.
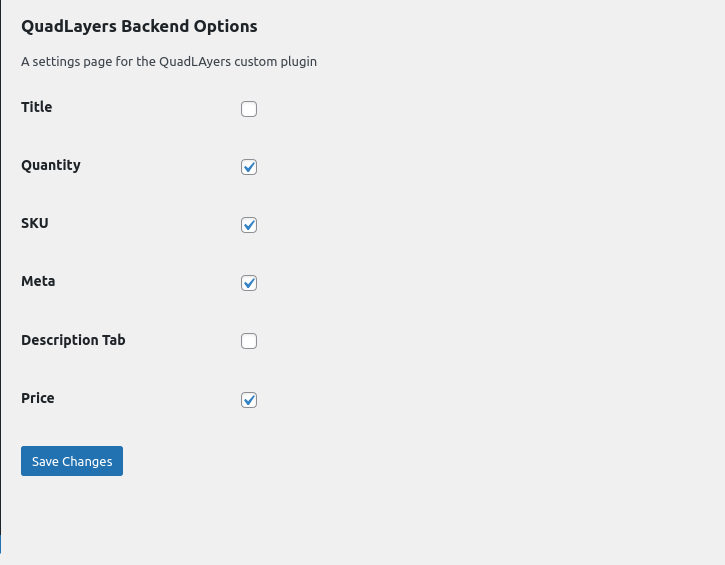
And that’s all. At this point, you should be able to create a custom WordPress plugin to select which elements to hide or display on the product page.
Backend
Frontend
Conclusion
This is our guide on how to create a custom WordPress plugin. The custom plugins are very helpful if you want to have very specific features for your website and don’t want to clutter your site with overwhelming features of dedicated WP plugins.
To summarize, these are the major steps to create a custom plugin:
- Create the Main Plugin File
- Add Backend Options
- Add Frontend Options
The main plugin file itself should contain the backend and frontend files for the custom plugin. Then, you can further add the backend options of the plugin followed by its frontend options. We have created a custom plugin to hide elements of the product page. But, you can further modify these files to create the plugin with the particular features that you need.
Nonetheless, if you still want to use a dedicated plugin, you can do so as well. But in the case of a paid plugin, you’ll have to install the plugin manually. You can even use plugins like WooCommerce Direct Checkout and WooCommerce Checkout Manager to hide elements in other pages like the checkout page.
Meanwhile, here are some more of our posts that you might be interested in:
- Best WooCommerce Checkout Plugins
- How to Create a WooCommerce Direct Checkout Link
- Best Plugins to Autocomplete WooCommerce Orders
We hope you can develop a custom plugin in WooCommerce without any issues now. Please share us your experience in the comments.

Just browsed through and love what I see. Most of the beginner WordPress plugin tutorials online are painfully basic “Hello World” guides. Glad to see something with actual functionality, would love to read more beginner plugin tutorials!
Thank you!