Sliders in WordPress installation are very functional. If you are running an online shop or need to grab the user’s attention, you should try adding one. In this article, we will show you how to create a slider in WordPress without writing a single line of code.
What Are Sliders?
Sliders are interactable media or links that redirect users to a custom page. They are one of the best ways to grab a user’s attention without additional effects. You can use sliders for showcasing multiple media and they are a great fit for most websites and stores.
Additionally, sliders provide you with a lot of control. You can modify their size, color, background color, and content. Sliders quickly show visitors what the store has to offer and allow store owners to promote multiple products through a single Gutenberg block.
Overall, sliders help you reduce the space required for promotions because they allow you to display content without having to add too many widgets or blocks to the page.
Why Add a Slider to WordPress?
If you need to draw your visitor’s attention to some engaging, responsive images, you should consider adding a slider to your site. There are multiple types of sliders available. For example, you can use them to display recent posts, videos, and even custom galleries. And the best part is they are customizable and easily manageable.
On top of that, eCommerce stores can also use sliders to display special discount offers and upcoming products. All in all, sliders are an excellent medium to boost visibility and engagement.
How to Create a Slider in WordPress
There are three main methods to create a slider in WordPress:
- By using a WordPress plugin
- With Divi builder
- Via theme options
In this section, we will show you all three methods, so you can pick the best one according to the requirements.
1) Create Slider in WordPress using a Plugin
This section will show you how to use a WordPress plugin to create a slider. If you check the internet for the best WordPress slider plugins, you will land on multiple free, freemium, and premium options. For this tutorial, we will be using Soliloquy. It is a freemium WordPress plugin with decent features and integrations.
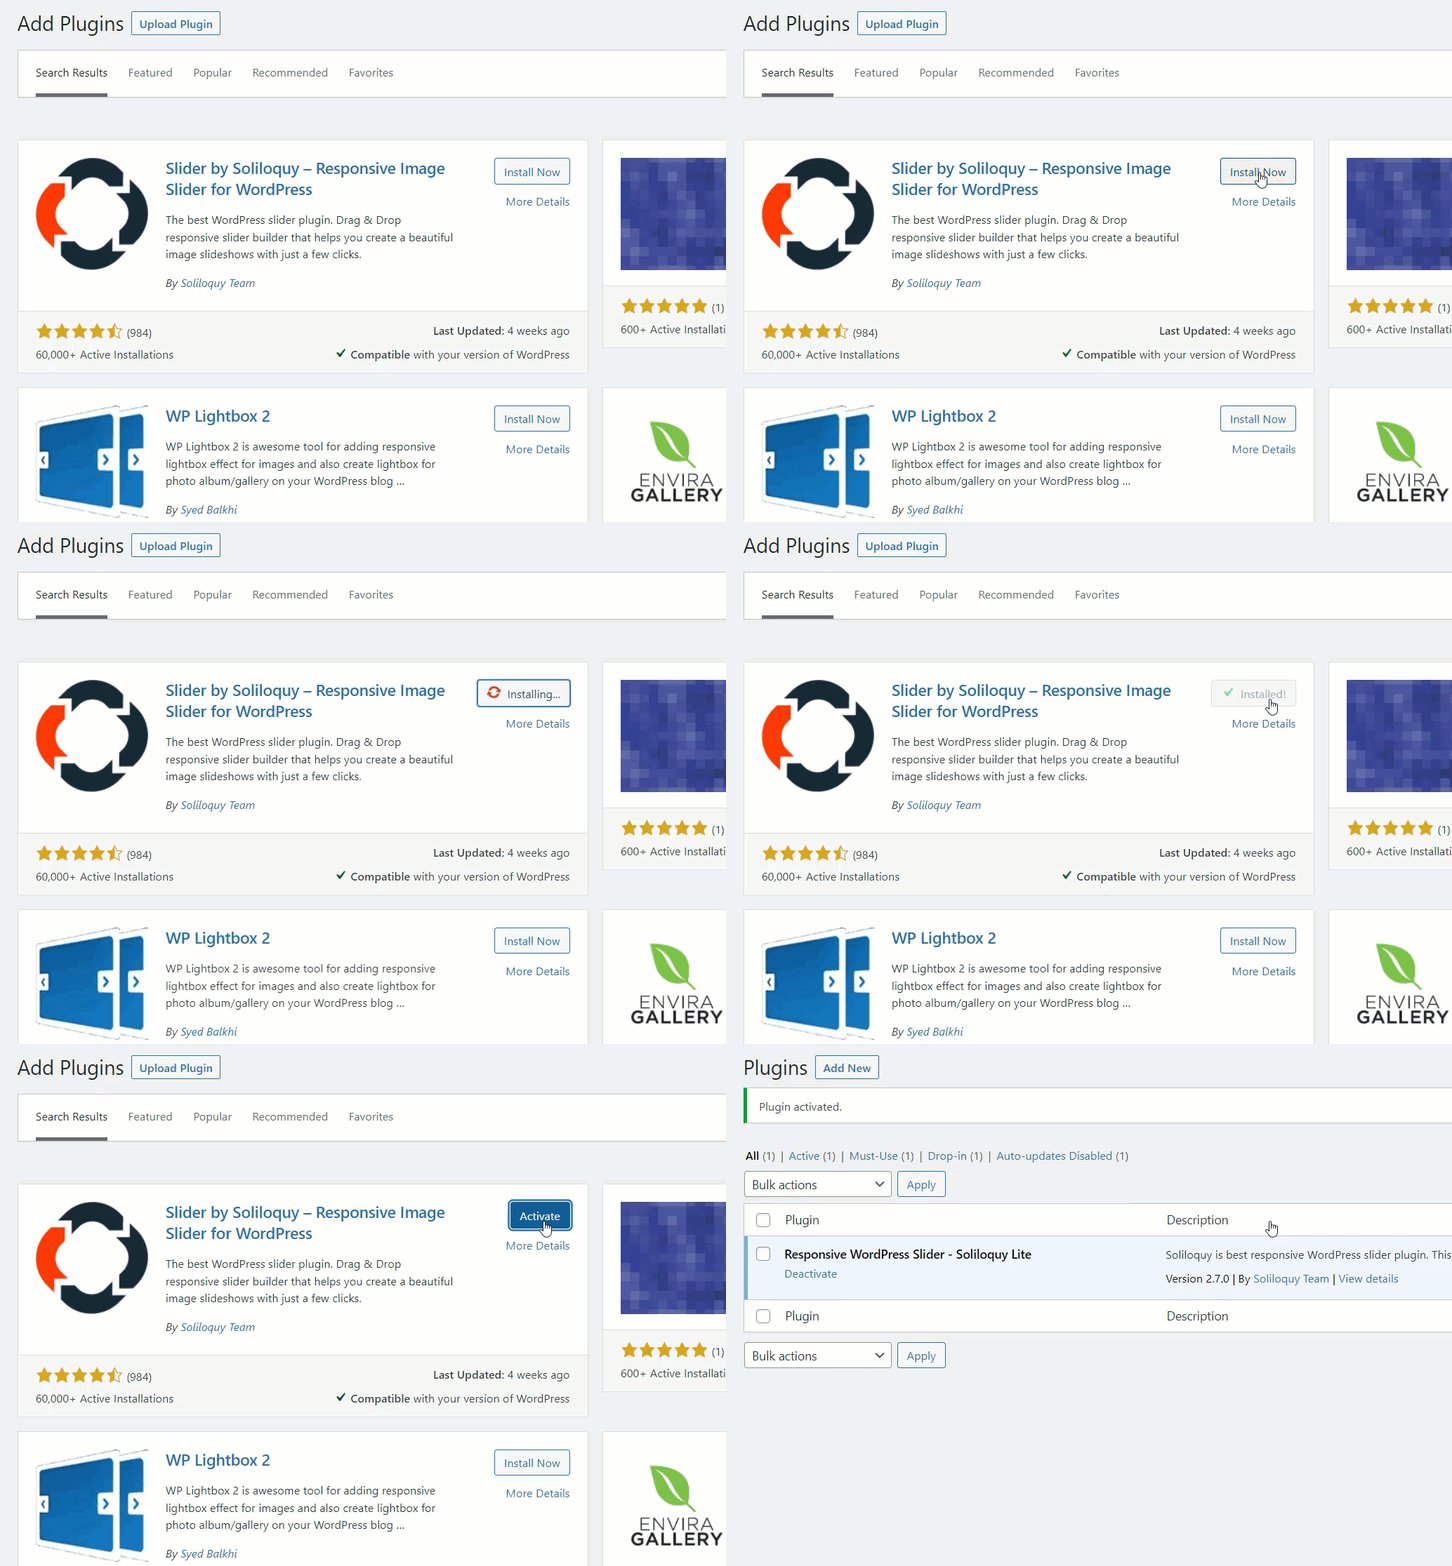
So the very first thing you need to do is, log in to your WordPress backend and go to the Add New plugins area. There, search for Soliloquy lite. Once you have found the plugin, install and activate it on your website.
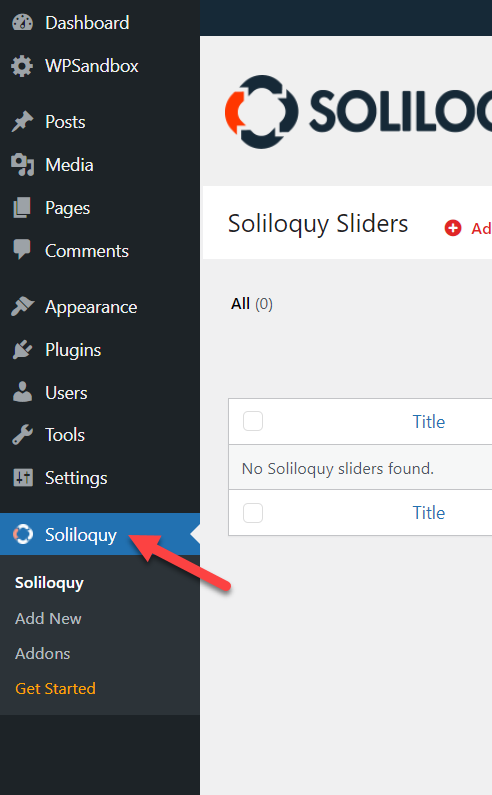
Since you use the lite version plugin, you do not need to do any authentication. After activating the plugin, you will see the plugin’s settings on the left-hand side of the admin panel.
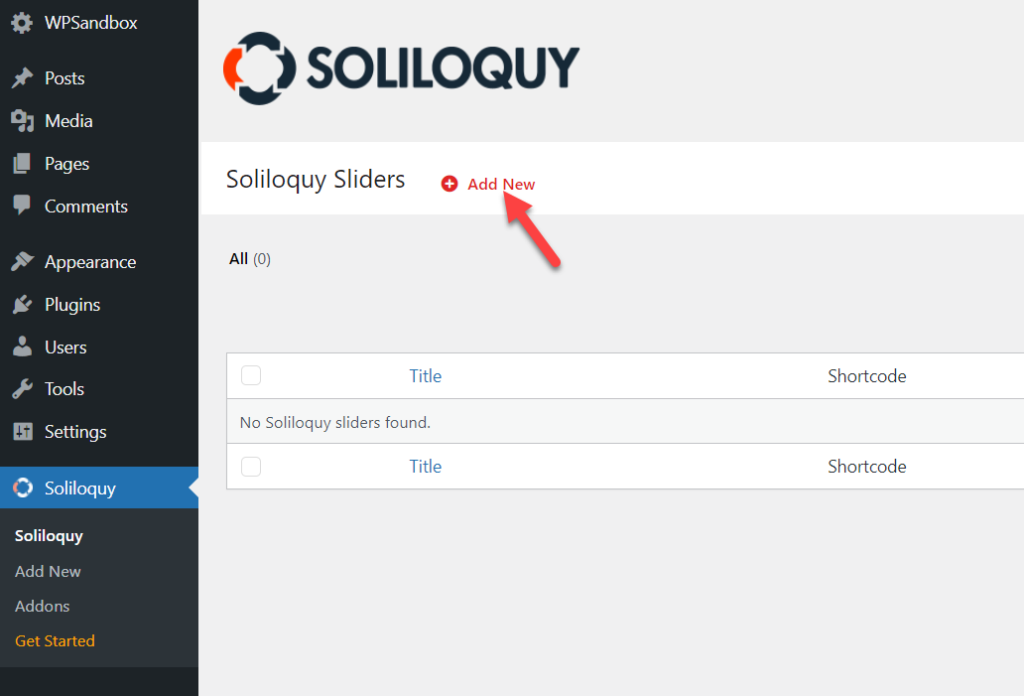
When you need to create a new slider, click on the Add New button.
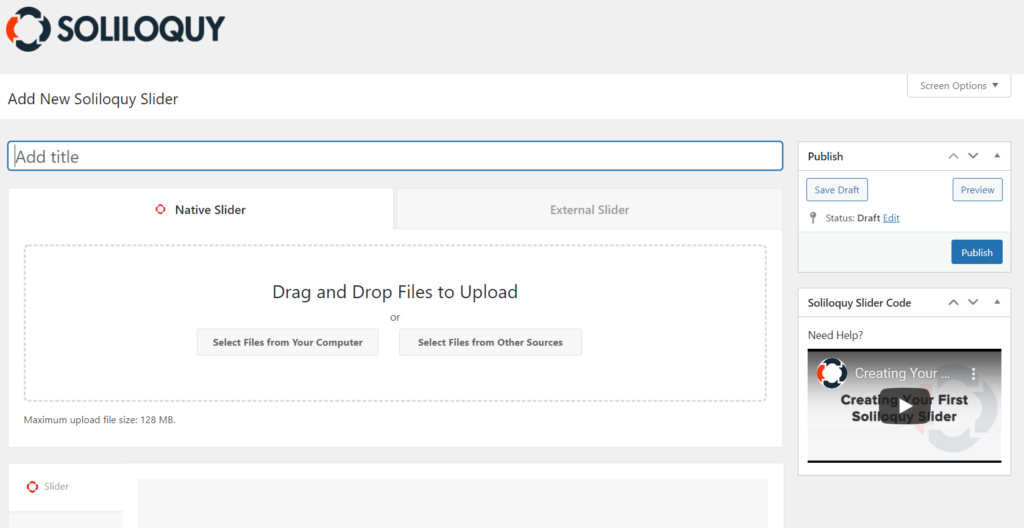
Soon, they will show you the slider-making wizard.
All you need to do is, name your slider and drop some images to the uploader.
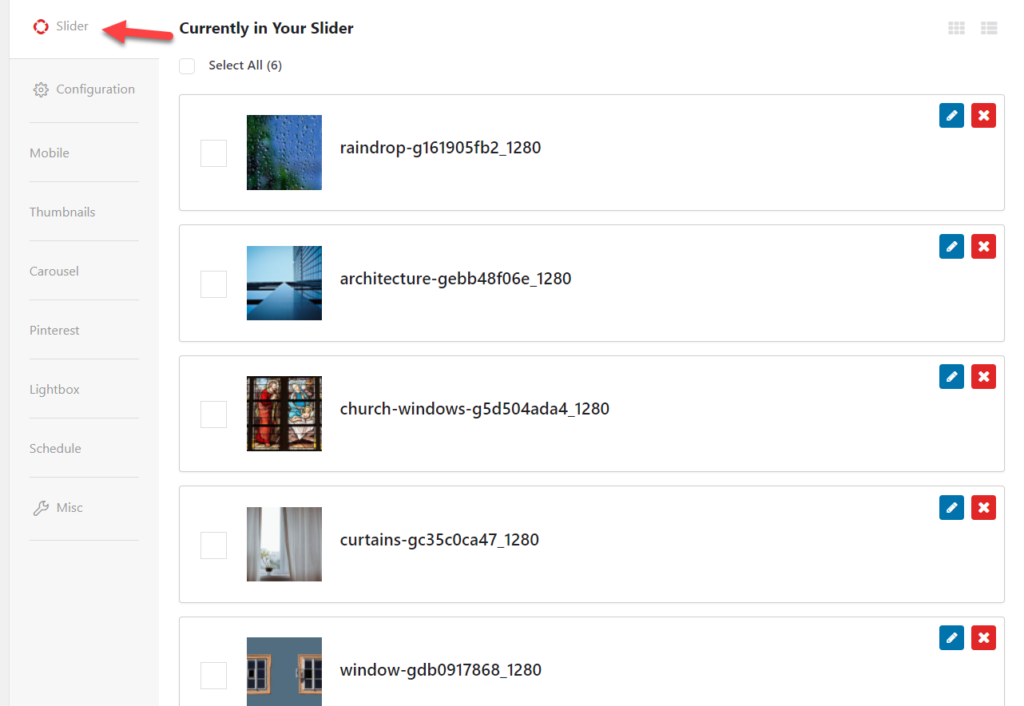
After uploading the images, you will see them under the Slider section.
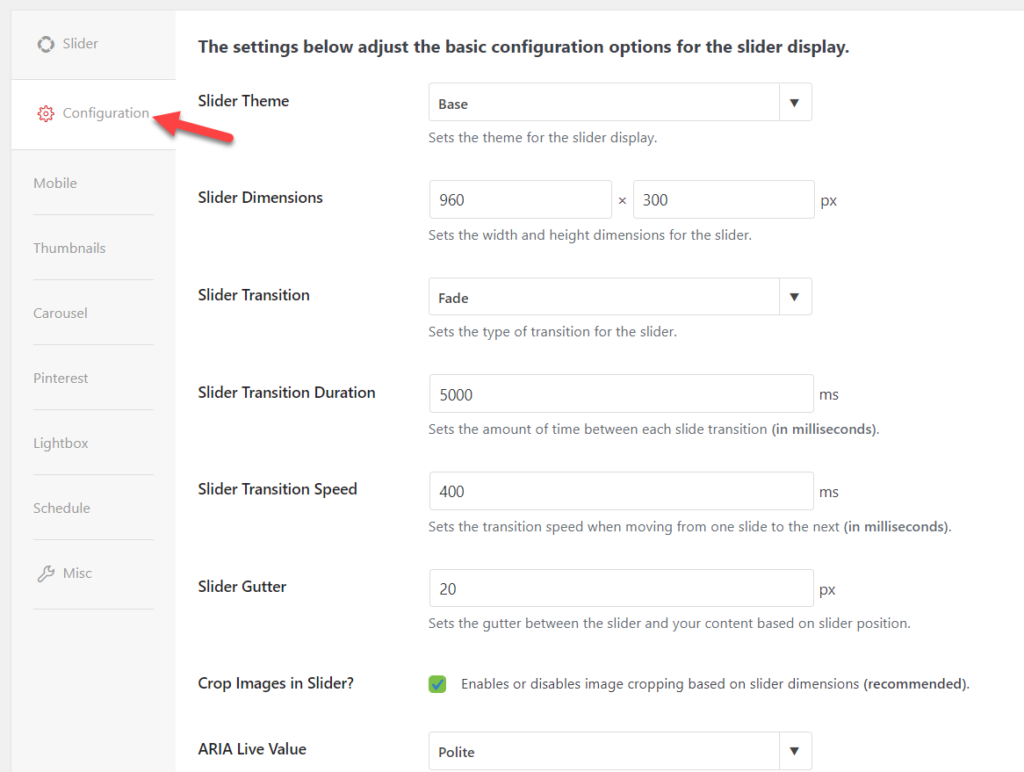
You can rearrange the images from there or delete them. Under the Configuration section, you can see the available customization options.
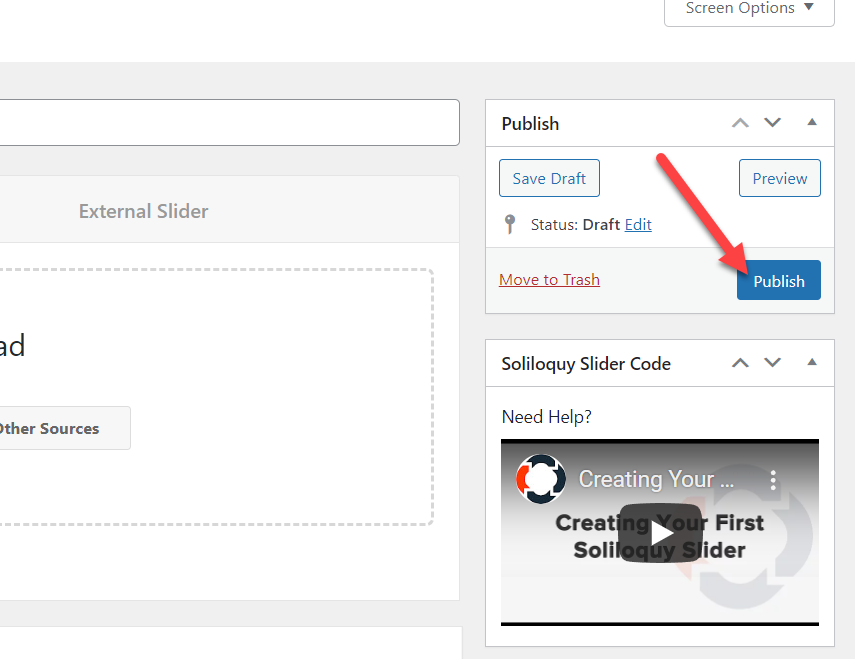
The plugin will automatically add some default configuration options and values to the slider. But you are totally in control and can edit the slider the way you like. Once you have modified the slider, you can publish it.
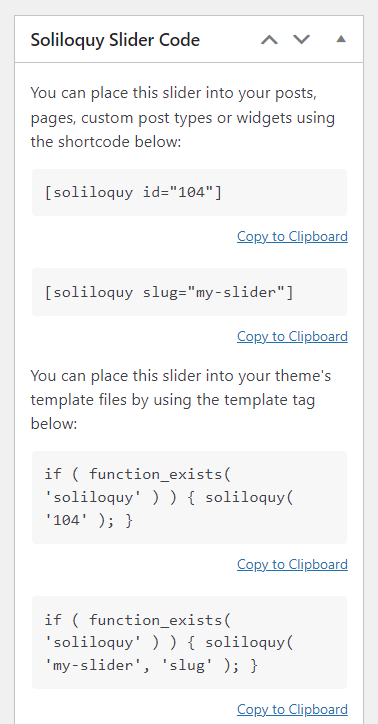
On the right-hand side of the slider settings, you will see the shortcode and WordPress function snippet you can use to display the slider.
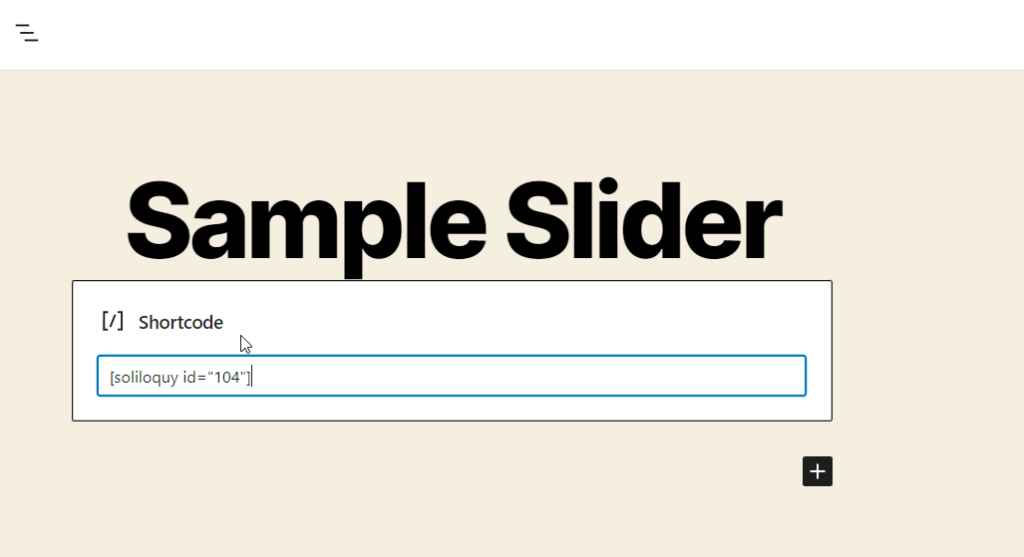
The shortcode is the best option when you need to display the slider on any page. All you need to do is copy the shortcode from there and paste it onto the page. On the other hand, use the snippet to show the slider on any of the templates. You can paste the snippet inside the theme’s PHP file.
In this case, we will paste the shortcode into a new page. Then, after pasting the shortcode, update the page.
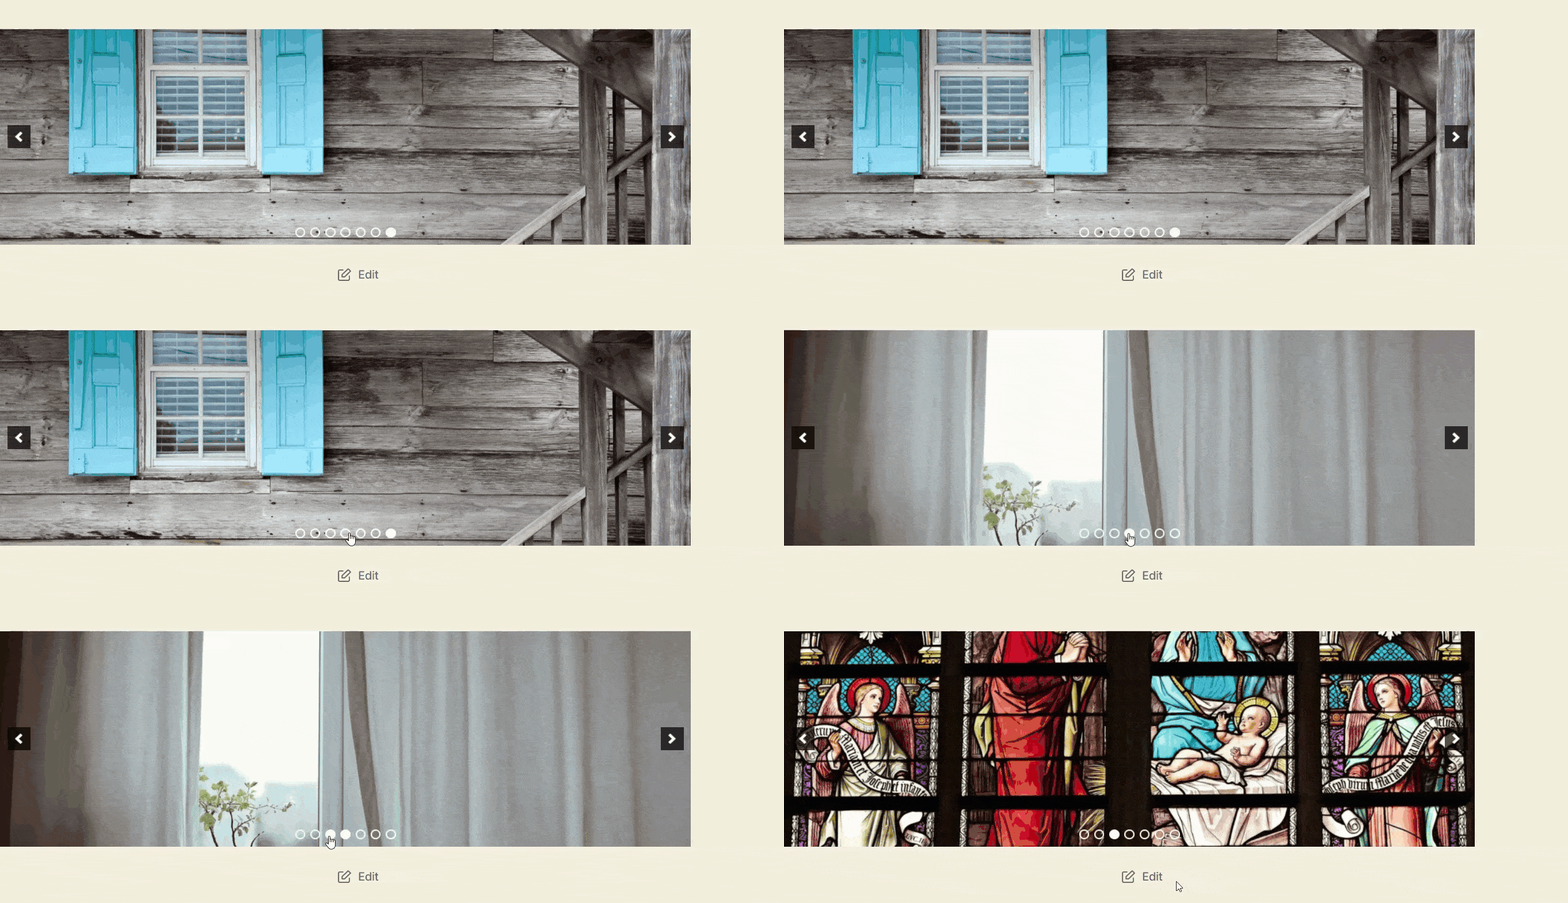
If you check the page from the front end, you will see the live-action.
The slider will display different media according to your configuration. Users can also manually switch images from the front end. When you need to edit the slider, go to the Soliloquy settings, open the slider you need to edit, and modify the configuration options or values.
The lite version comes with minimal features, so you should consider using their premium tool if you need to get more unique features and add-ons.
If you need to try another WordPress slider plugin, here’s a list of the best ones.
- Smart Slider
- LayerSlider
- SeedProd
- Slider Revolution
- Slide Anything
Check out this article to see more reliable slider plugins you can try.
This is how you can create a slider with Soliloquy. If you do not need to test it on a live website, you should host one WordPress install locally.
Create Slider in WordPress with Divi Builder
Divi builder is a power-packed WordPress page builder plugin. It can be used for creating sliders on WordPress websites. However, since it uses a drag and drop editor, creating custom pages and designs would be a cakewalk. Also, the plugin is compatible with most WordPress themes too. So no matter which theme you are using. Divi builder got you covered.
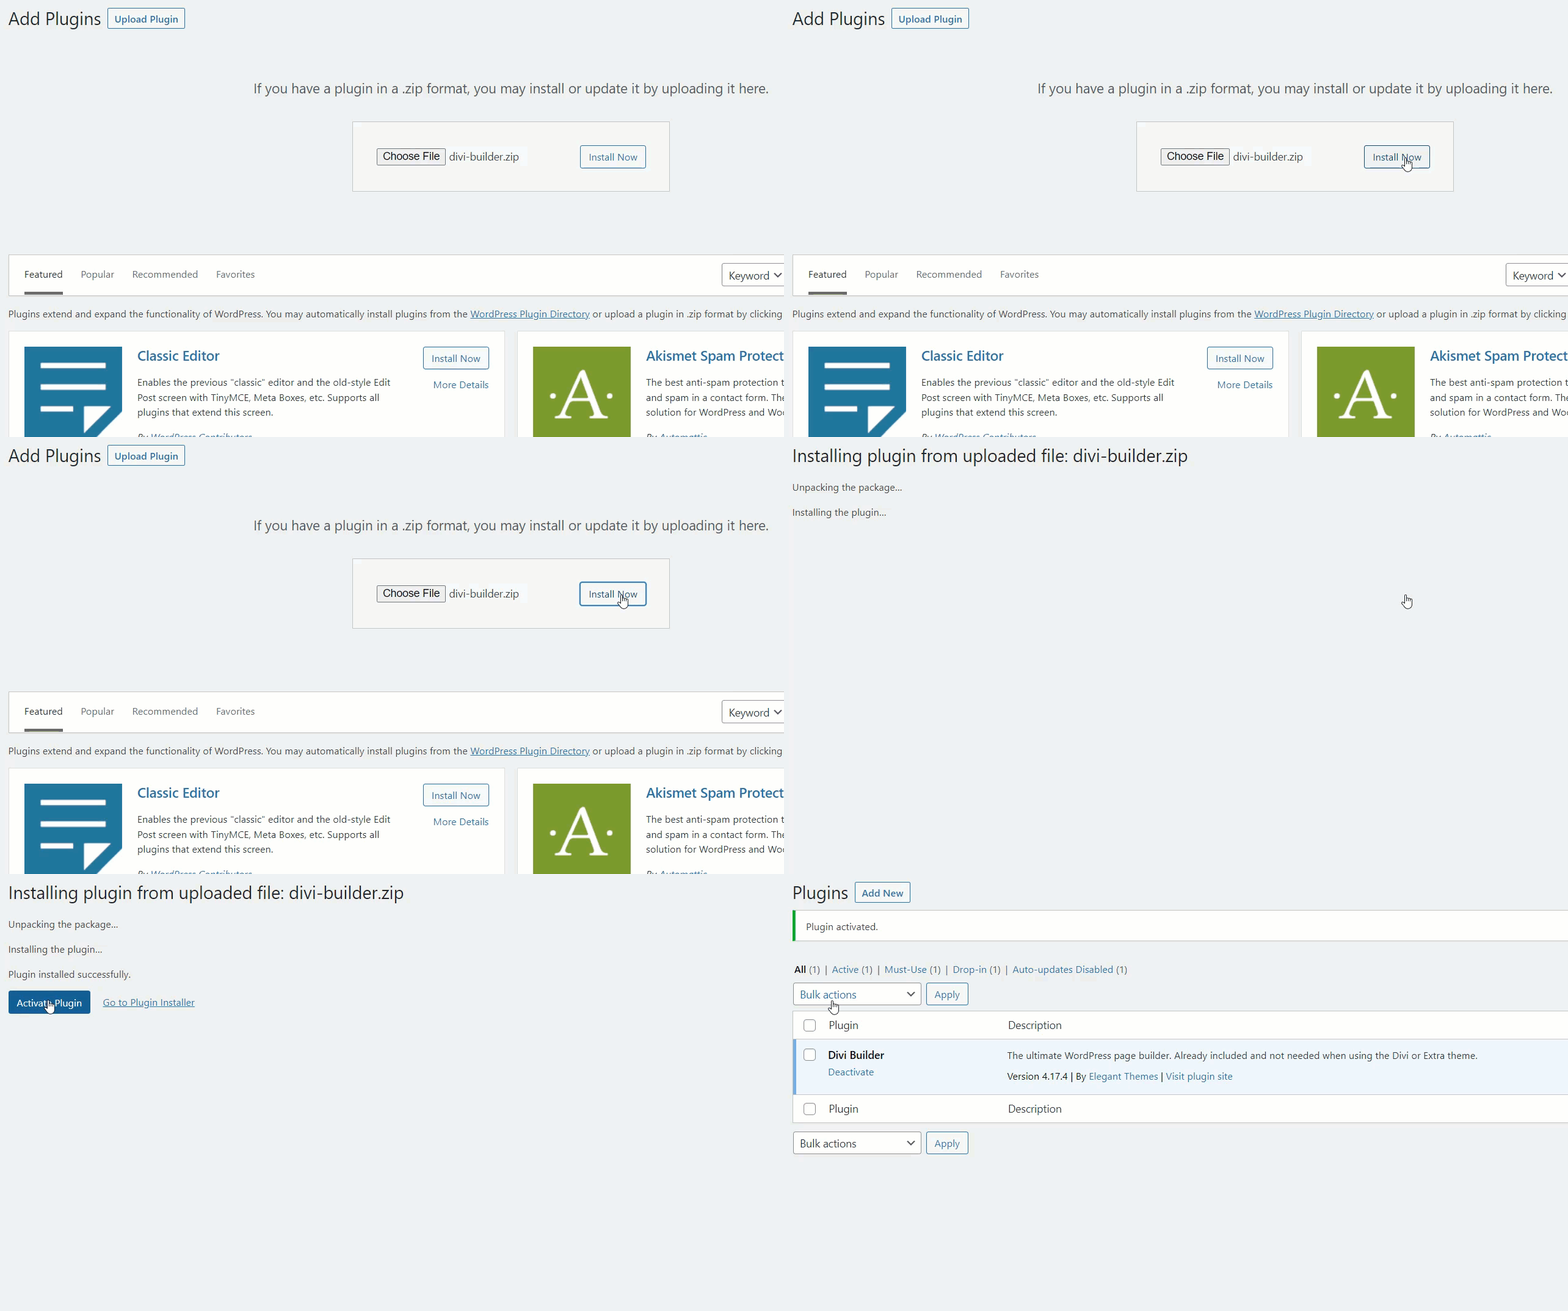
This section will show you how to create sliders with Divi builder. First, you have to go to Elegant Themes and purchase a Divi Builder subscription. Once you have done that, install and activate Divi builder on your WordPress website.
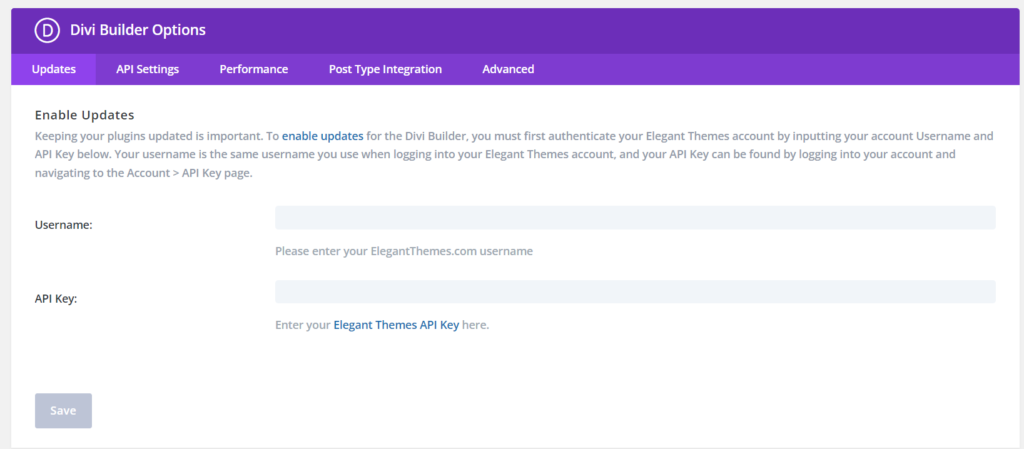
Then, go to the plugin’s settings and verify the license after activation.
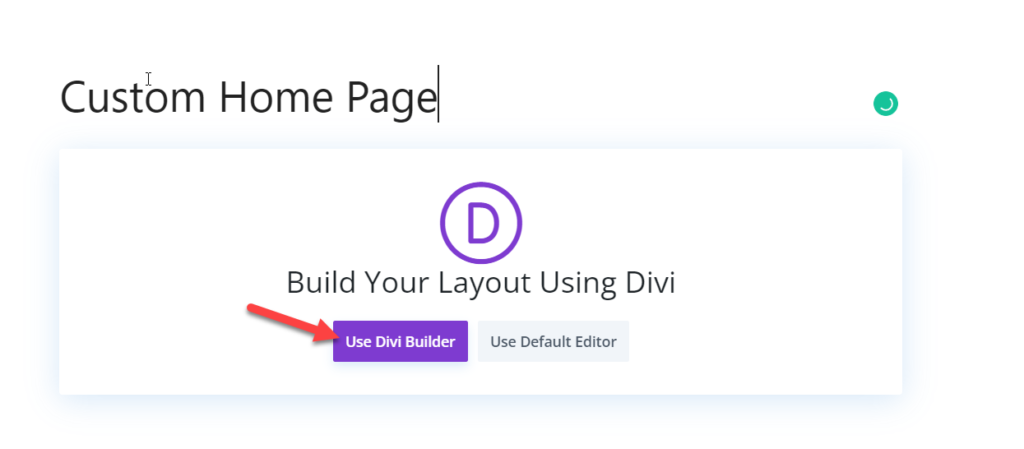
Now, go to a page (or create one) and use the Divi builder to edit it.
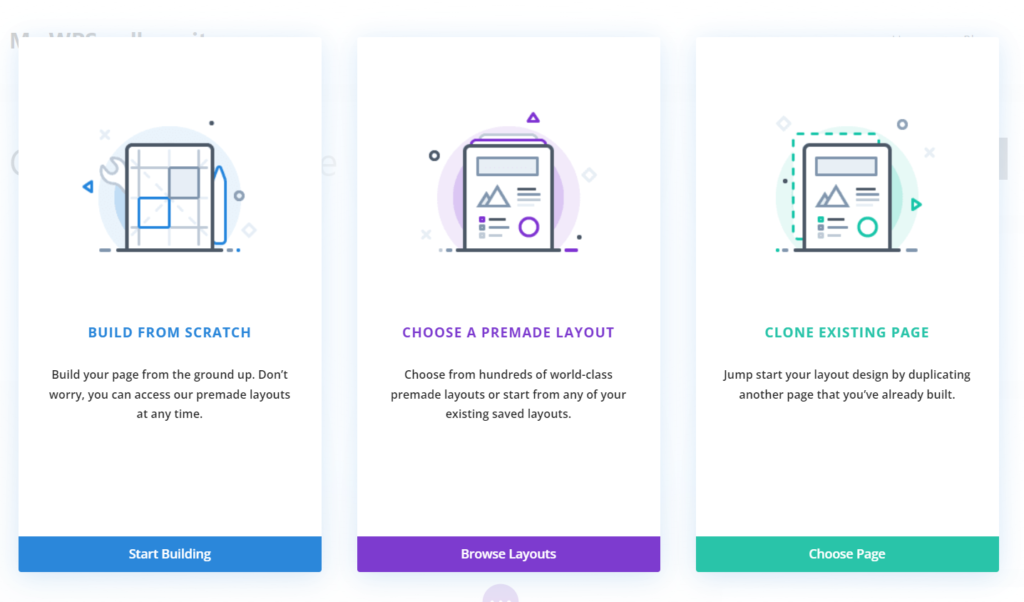
Soon, you will be redirected to the Divi visual editor.
From there, you can
- Build a template from scratch
- Choose a premade template
- Clone an existing page
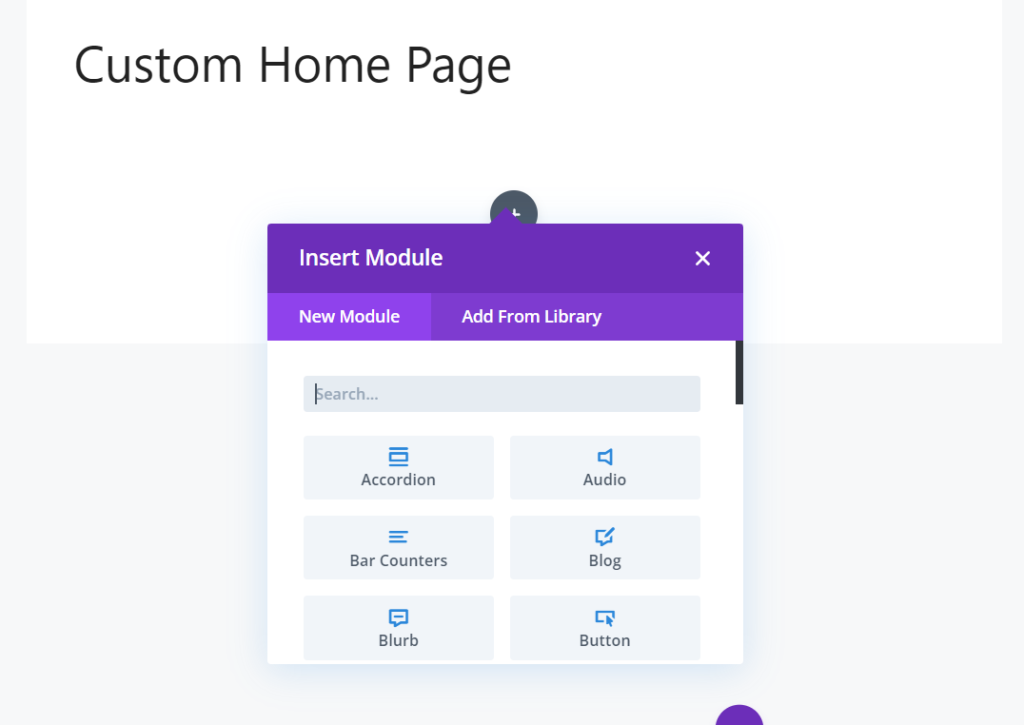
The option is totally up to you. In this case, we are going to start from scratch. After inserting a row, you will see an option to choose custom modules.
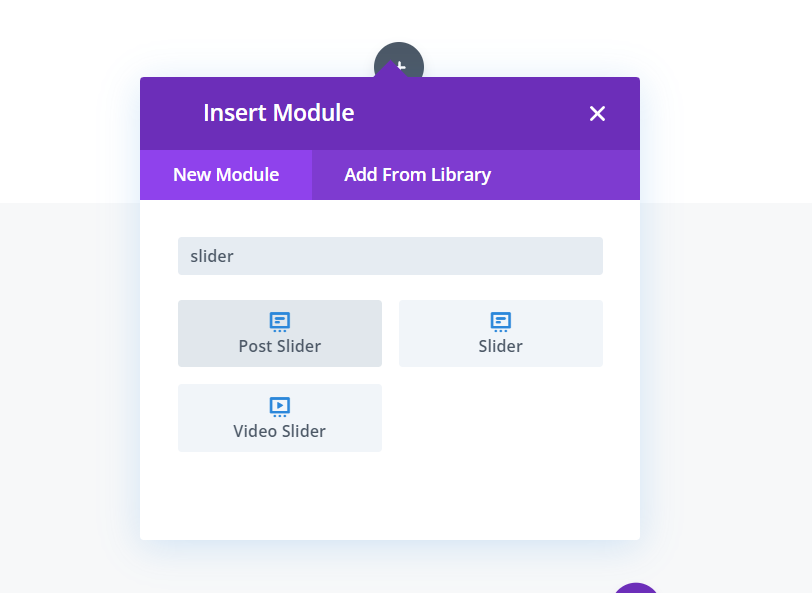
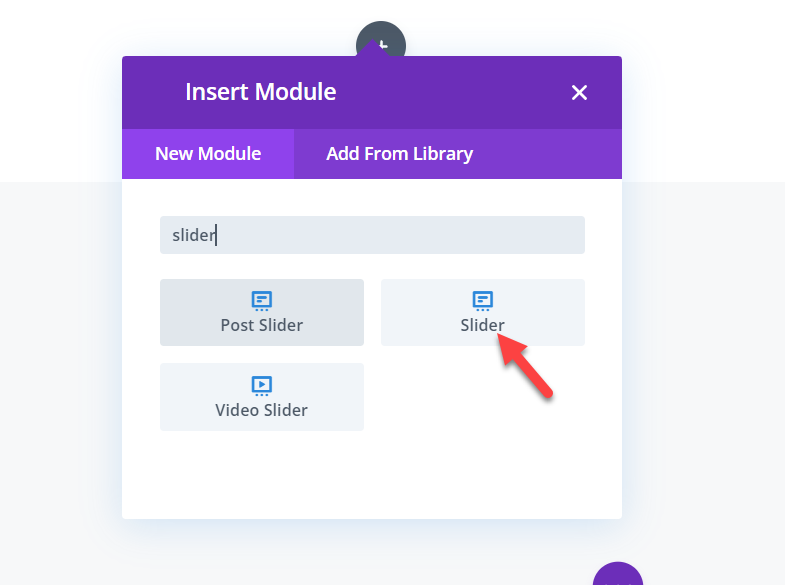
There, search for Slider.
You will see three slider options:
- Post Slider
- Slider
- Video Slider
Once you have chosen the required one, add it to the row. In this case, we will be using the default slider. If you need to display a group of images or custom text, the default slider module is the right one.
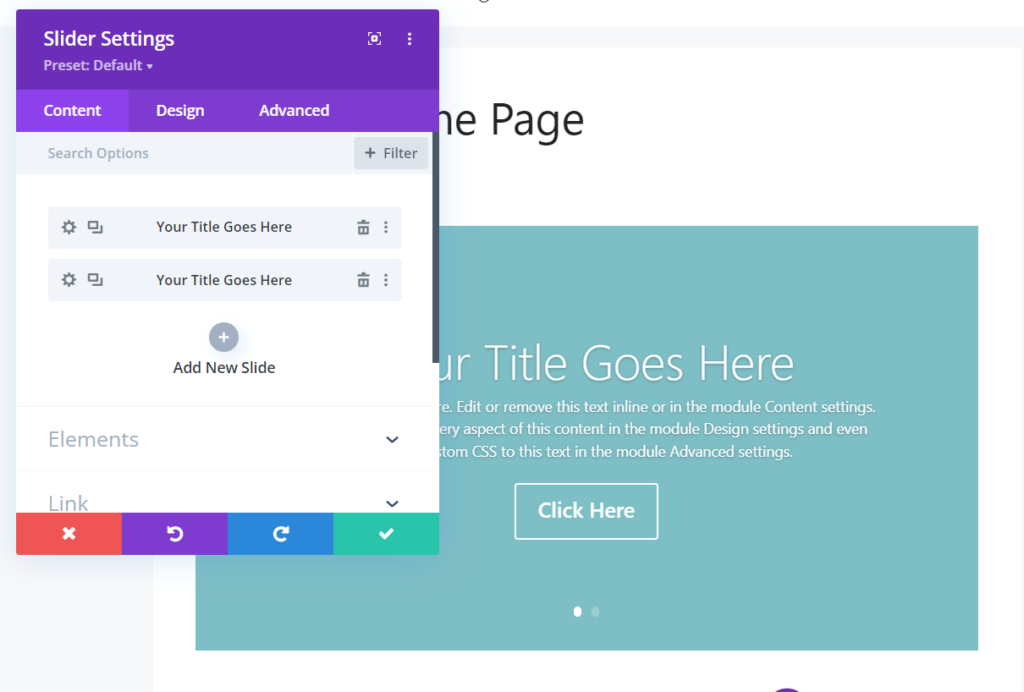
You can configure the slider through the module configuration block.
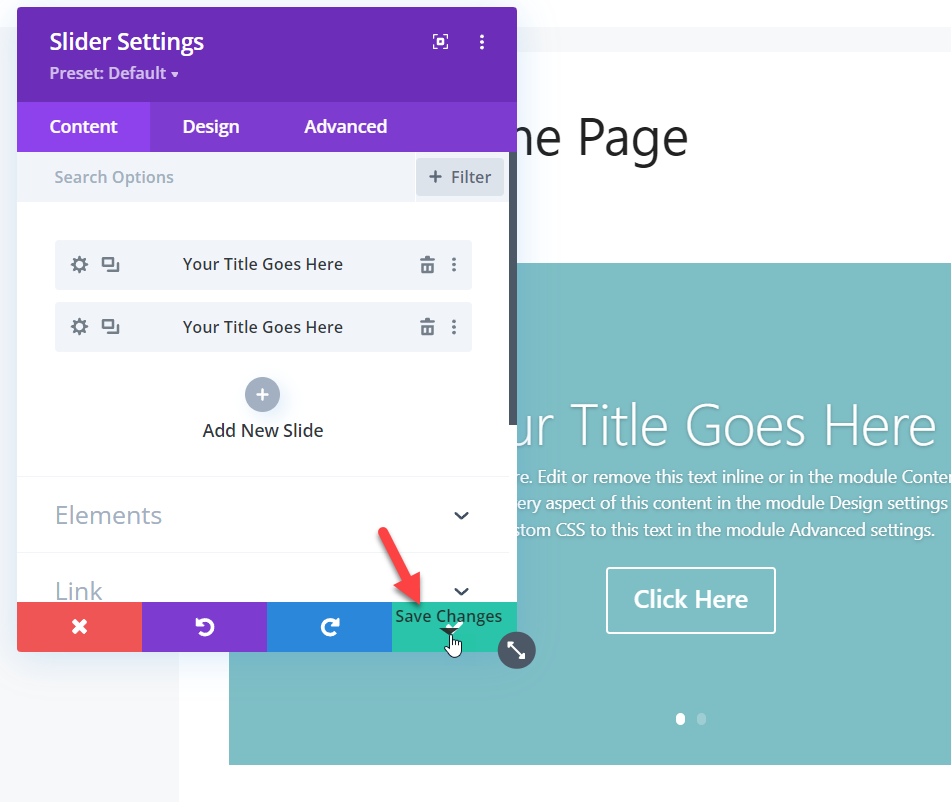
Here, you can add as many sliders as you want. It can be text, links, or images. Once you have modified the slider, save the module.
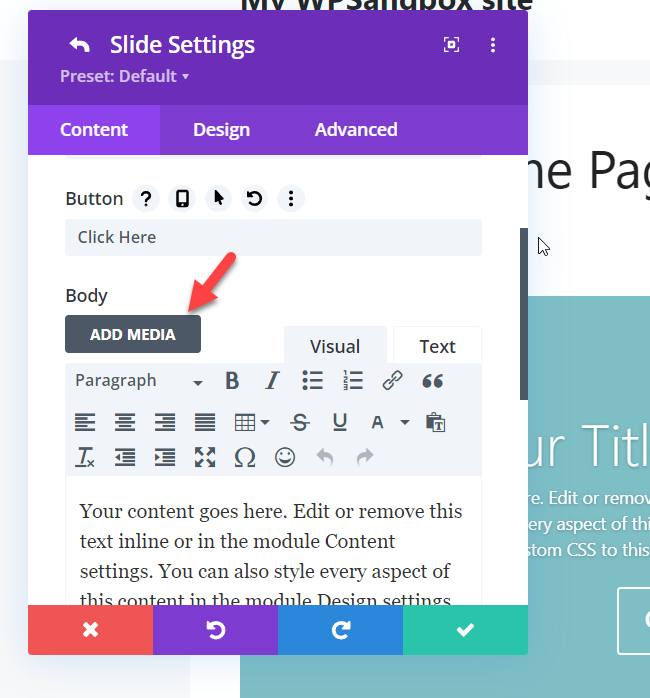
If you need to display an image slider, use the add media button and modify the existing sliders.
That’s it.
This way, you can create sliders with Divi builder. In addition, elegant Themes offer 24/7 human support if you are stuck somewhere, and you can quickly get your problems sorted.
Create Slider in WordPress using Theme Options
Some premium WordPress themes also come with in-built slider options. So if your theme has this feature, you do not need to use third-party slider plugins or custom codes. Instead, you can create sliders right from your WordPress dashboard through the theme panel.
If you have conflicts with this method, please contact your theme’s official support team. Or, you can also check their documentation section for more relevant guides.
Bonus: Add Instagram Slider to WordPress
Instagram is an excellent medium to display your beautiful moments. If you are highly active on Instagram and sharing images, you could easily import them to your WordPress installation with a dedicated plugin. Thankfully, we have created a cutting-edge tool with advanced features, and it is called Instagram Feed Gallery.
Here, we will show you how to add Instagram sliders to WordPress.
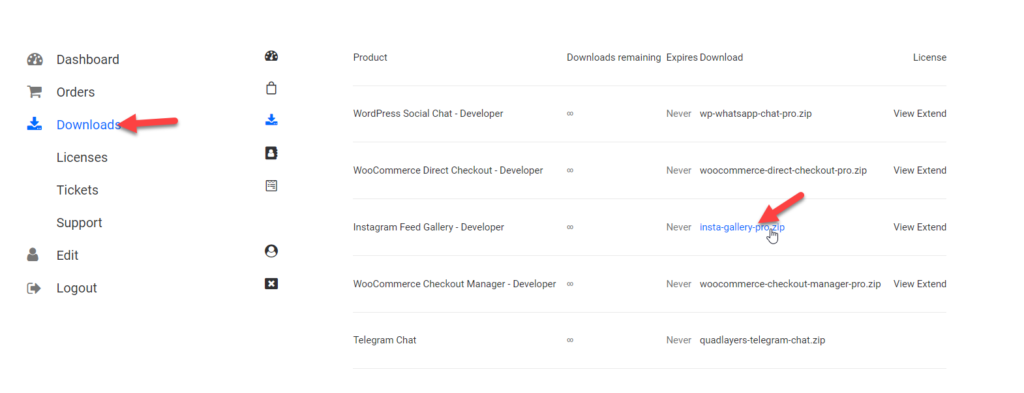
First, you need to get our Instagram Feed Gallery WordPress plugin. Once you have completed the purchase, you will be able to log in to your QuadLayers account and download the premium plugin files.
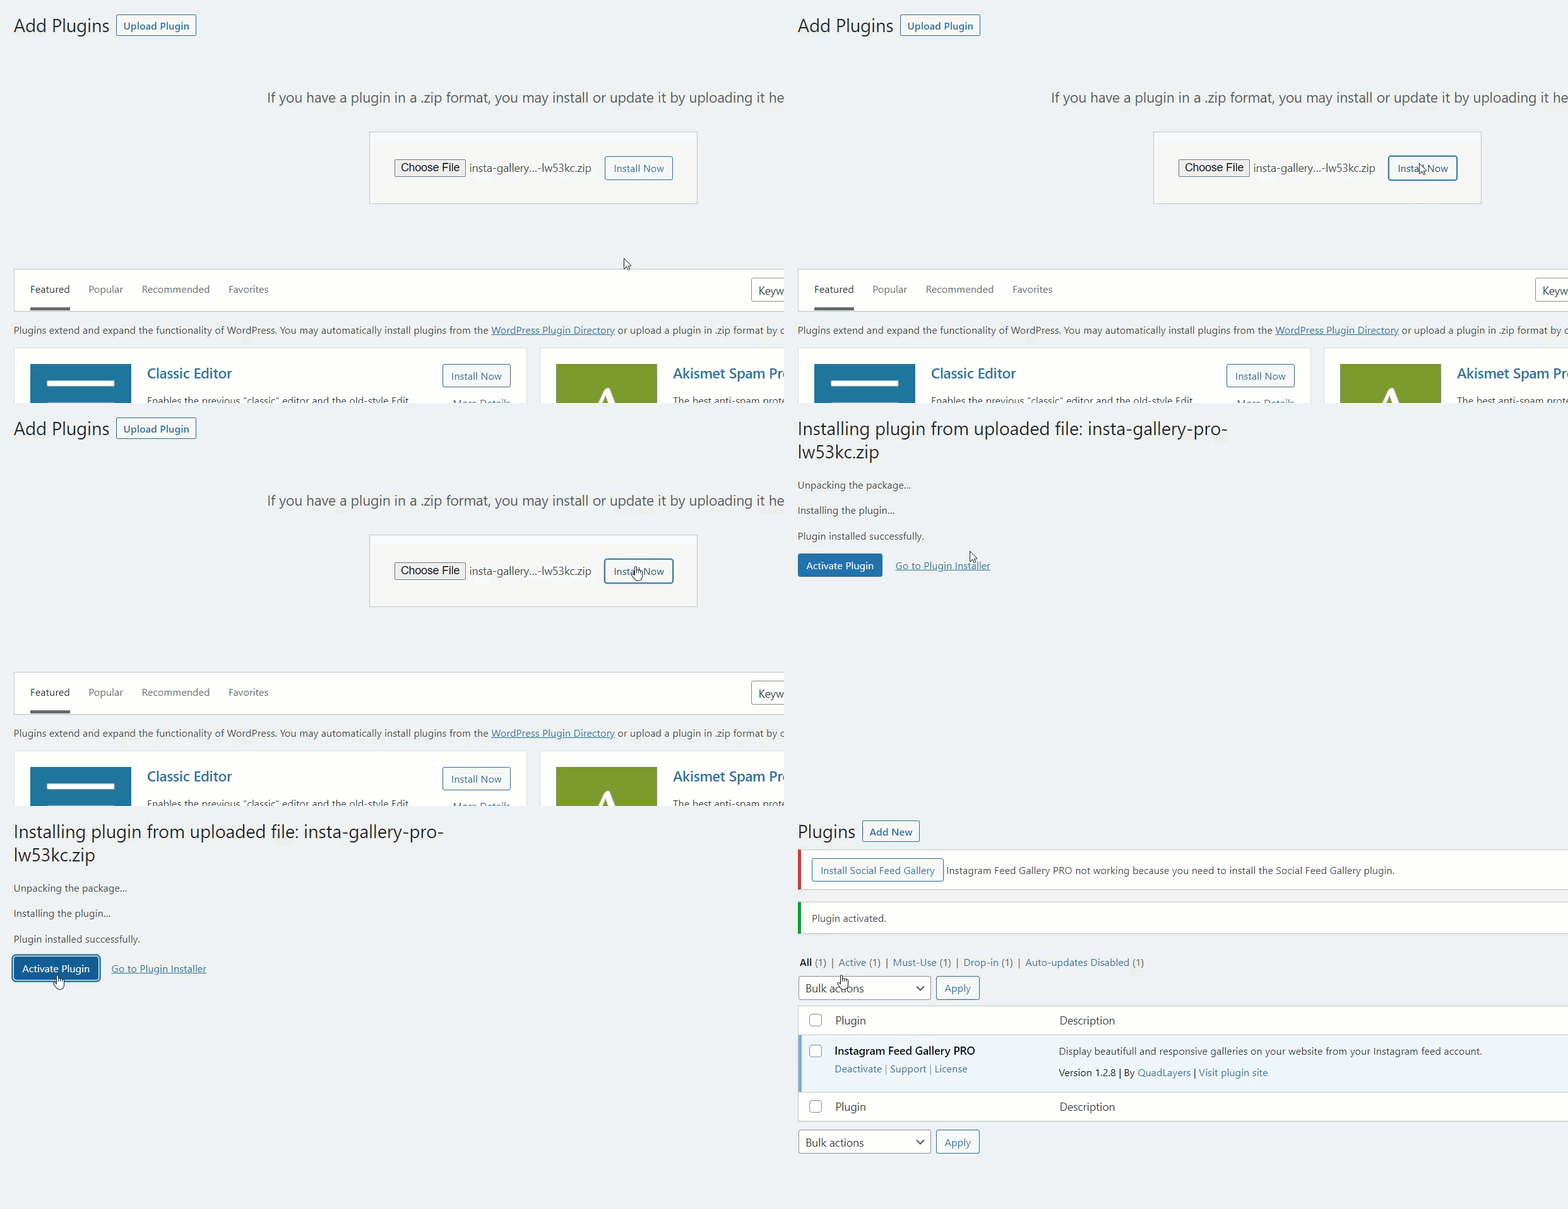
Install the plugin on your WordPress website.
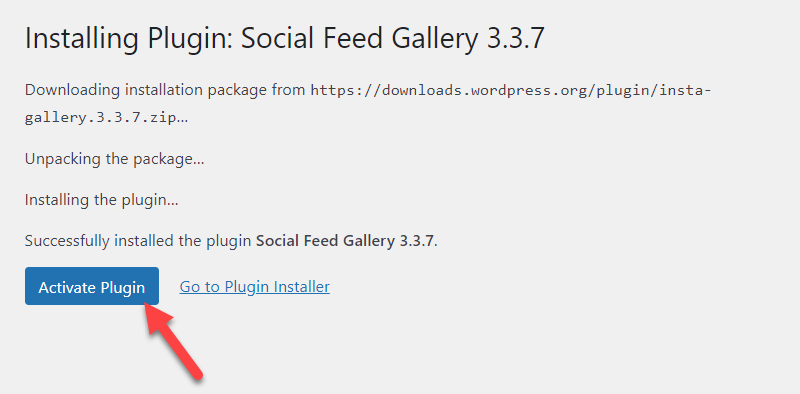
Once you have activated the plugin, you need to install and activate Social Feed Gallery. By clicking on the button, you can install & activate it.
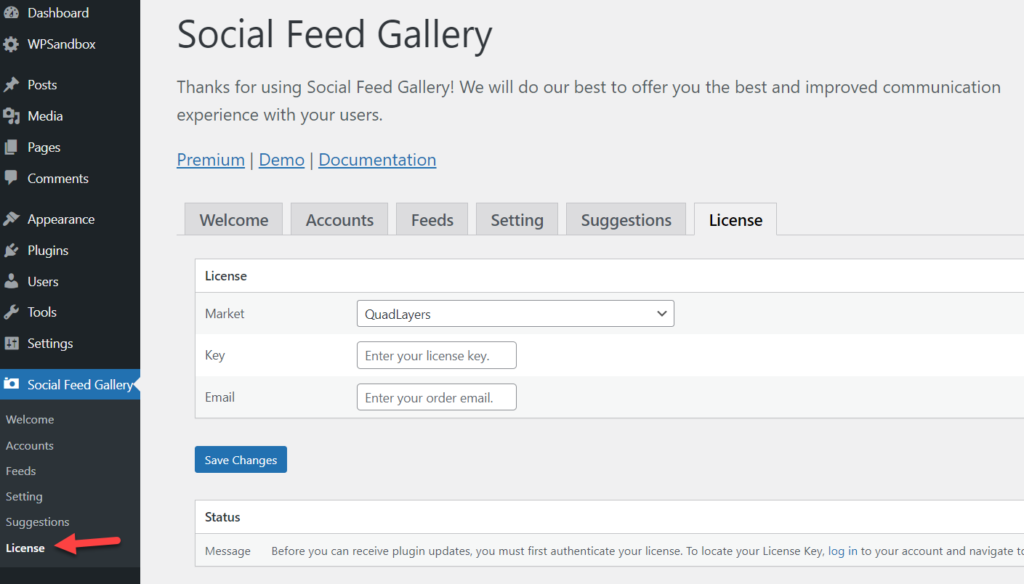
The very next thing you need to do is verify the license key. Under the Social Feed Gallery settings, you will see the license verification option.
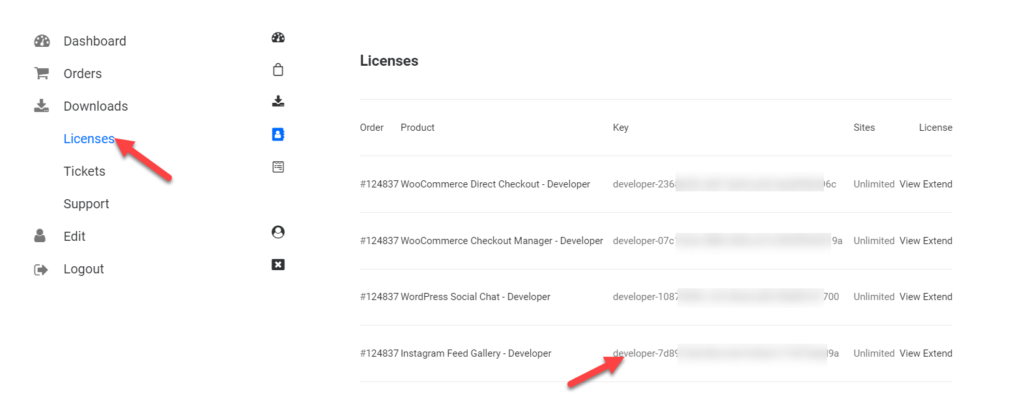
Log in to your QuadLayers account to grab your license key and go to the licenses section. There, you will see all the license keys available. Copy the key from there.
Now, paste it into your license option with your registered email address and click on Save Changes.
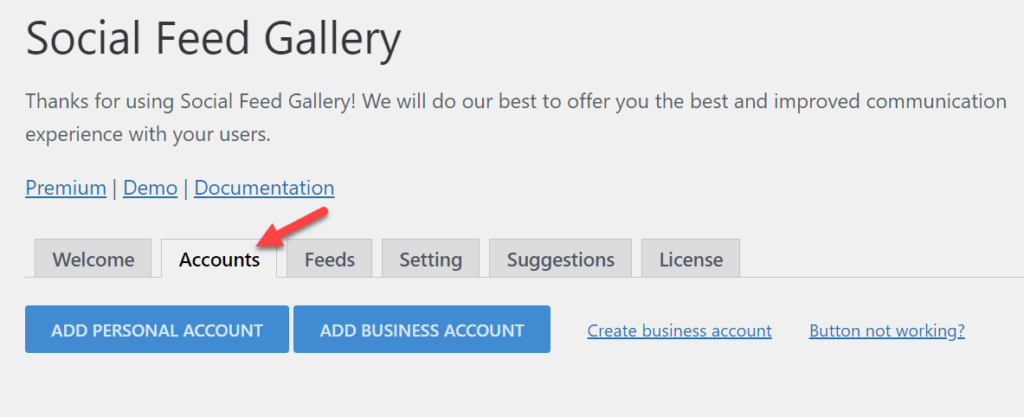
Now, you have unlocked the full potential of the plugin. From now on, you can start creating custom sliders and display them. But, first, open the account settings and link an account from there.
You can link your account or business account through the settings.
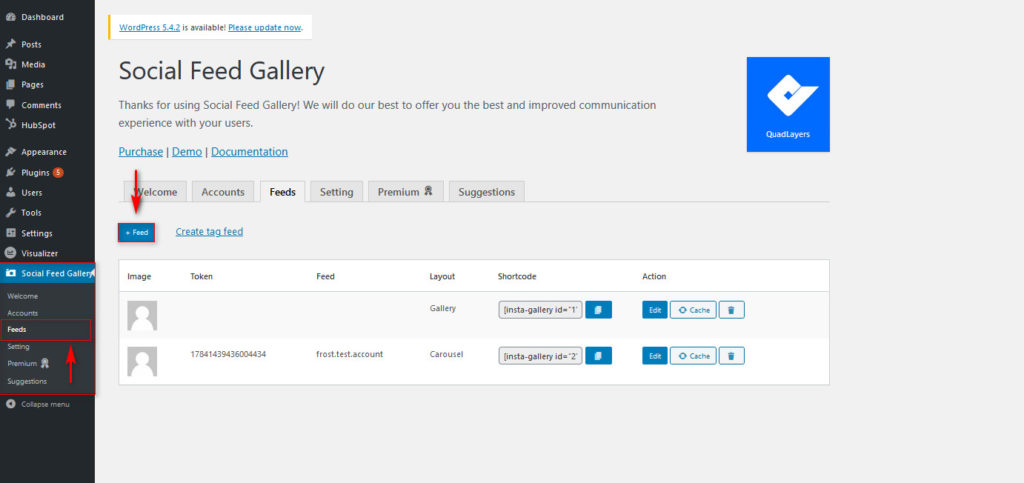
After completing the authorization, you can start creating new feeds.
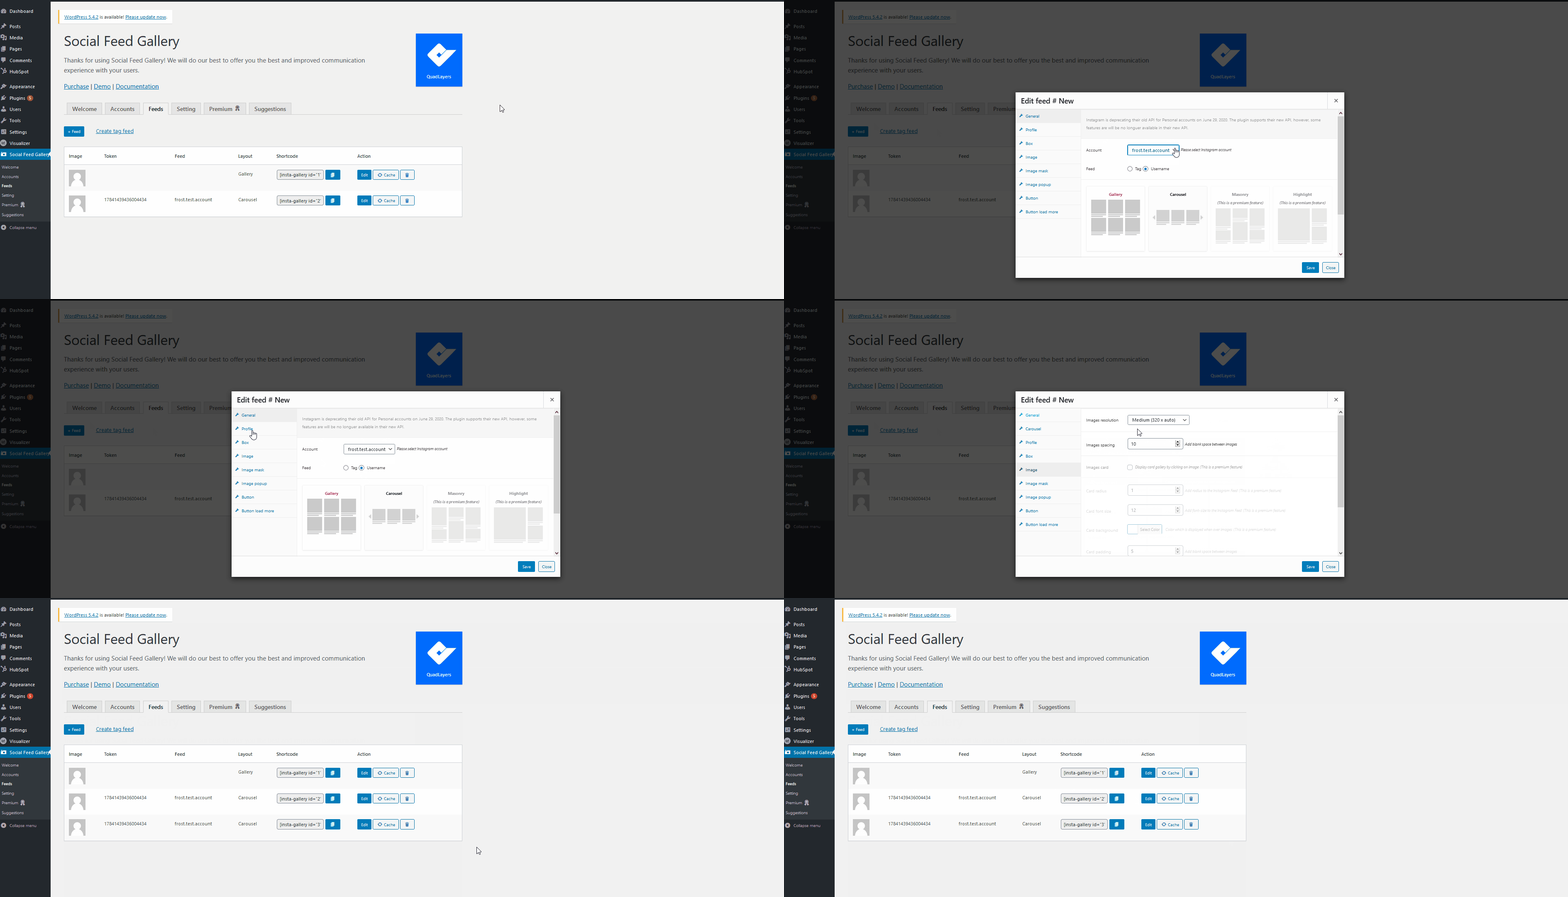
From the next step, you can customize your feed. Again, there are multiple options, so feel free to modify the feed the way you like.
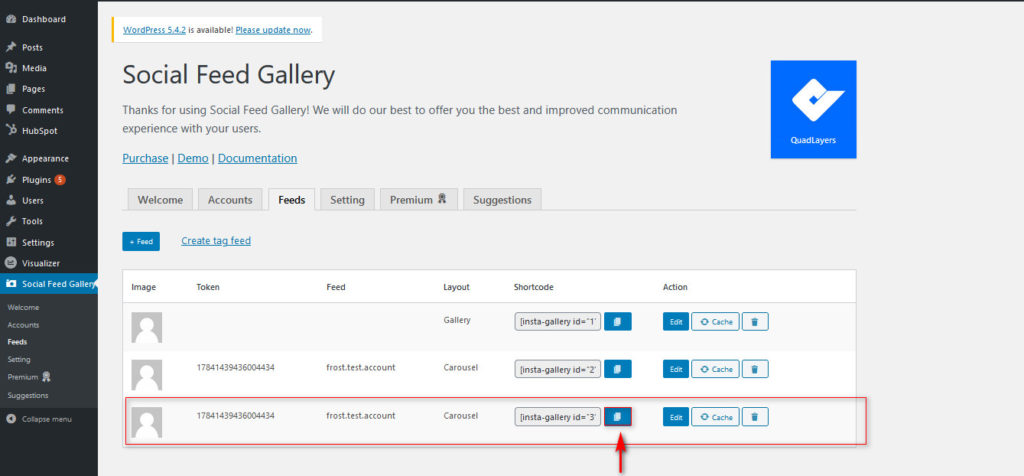
After creating a feed, the plugin will give you a unique shortcode.
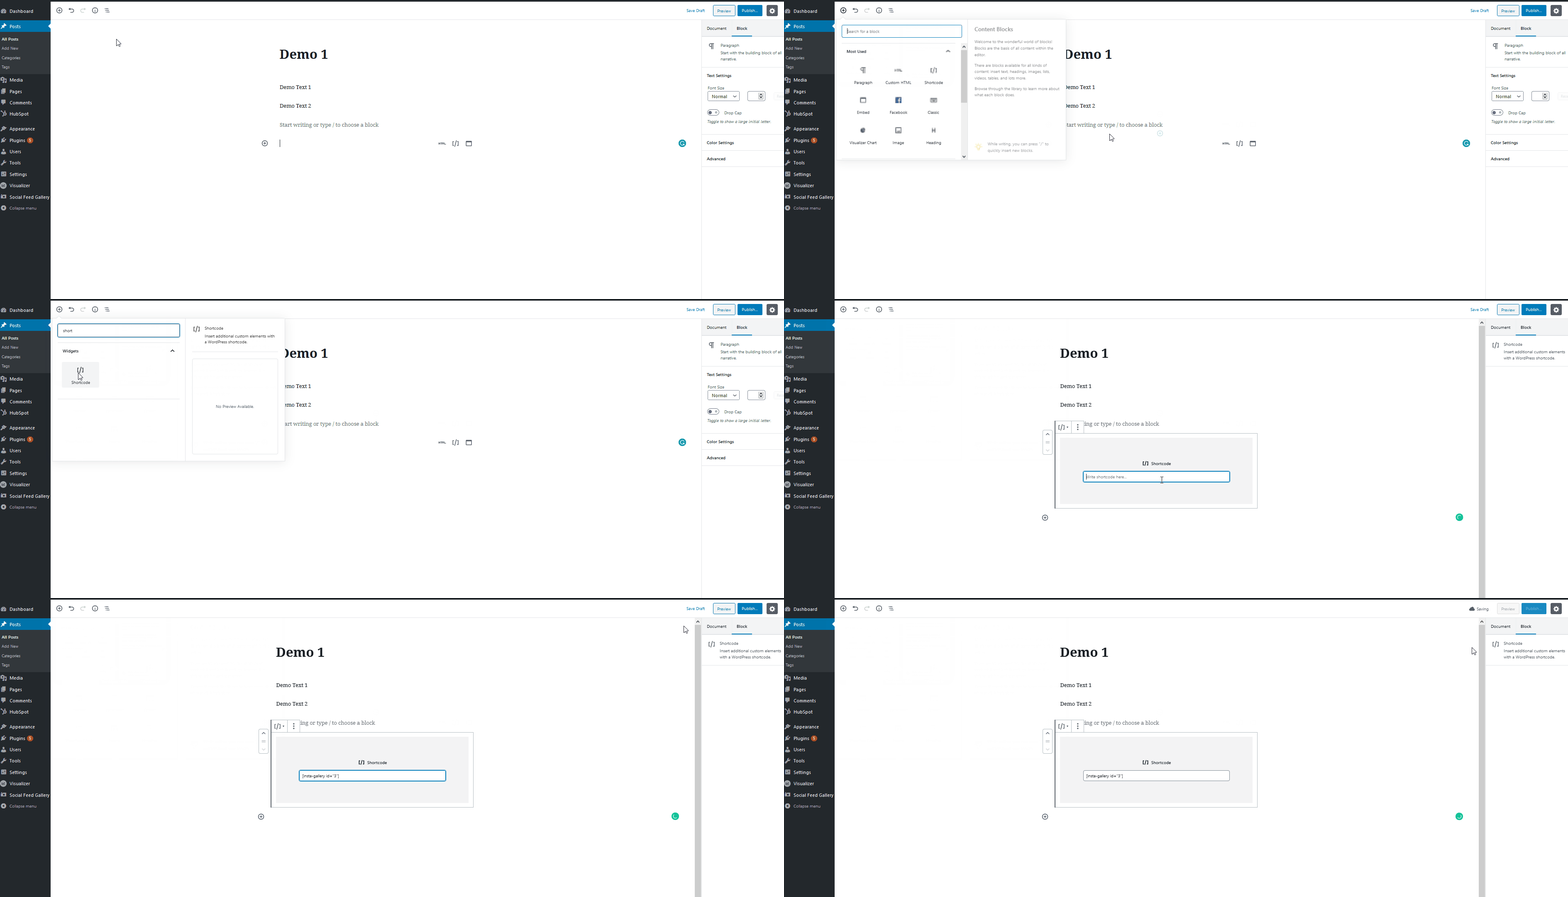
Then, go to the Classic Editor or the Gutenberg editor and paste the shortcode.
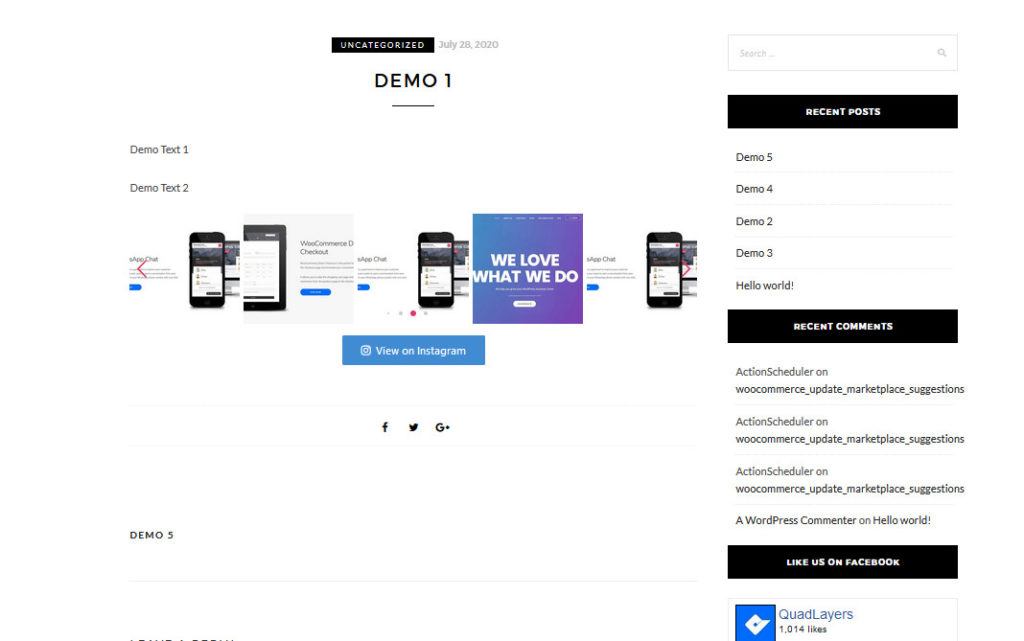
After publishing the page or updating it, you need to check it from the front end. You will see the slider there.
You can display your Instagram images on your WordPress website as sliders or a gallery.
How to Enable Lazy Loading in WordPress
When you add too many images to your WordPress installation, visitors will notice a slight delay in page loading time—having slow pages is not recommended when running an eCommerce store or something similar. Using a WordPress caching plugin can fix most speed and optimization issues. But if you need to optimize your image serving, you have to enable lazy loading.
Usually, when a user lands on any of your pages, the web server will load entire images and contents and display them. If you have too many pictures on the page, it will take a while. On the other hand, when you have enabled lazy loading in the installation, WordPress will load images only after the user starts to scroll.
You can get the page loaded within seconds and reduce the HTTP requests. It is a good feature and is used by millions of bloggers and websites around the globe.
But, we’ll show you how to enable lazy loading in WordPress by using BJ Lazy Load in this section.
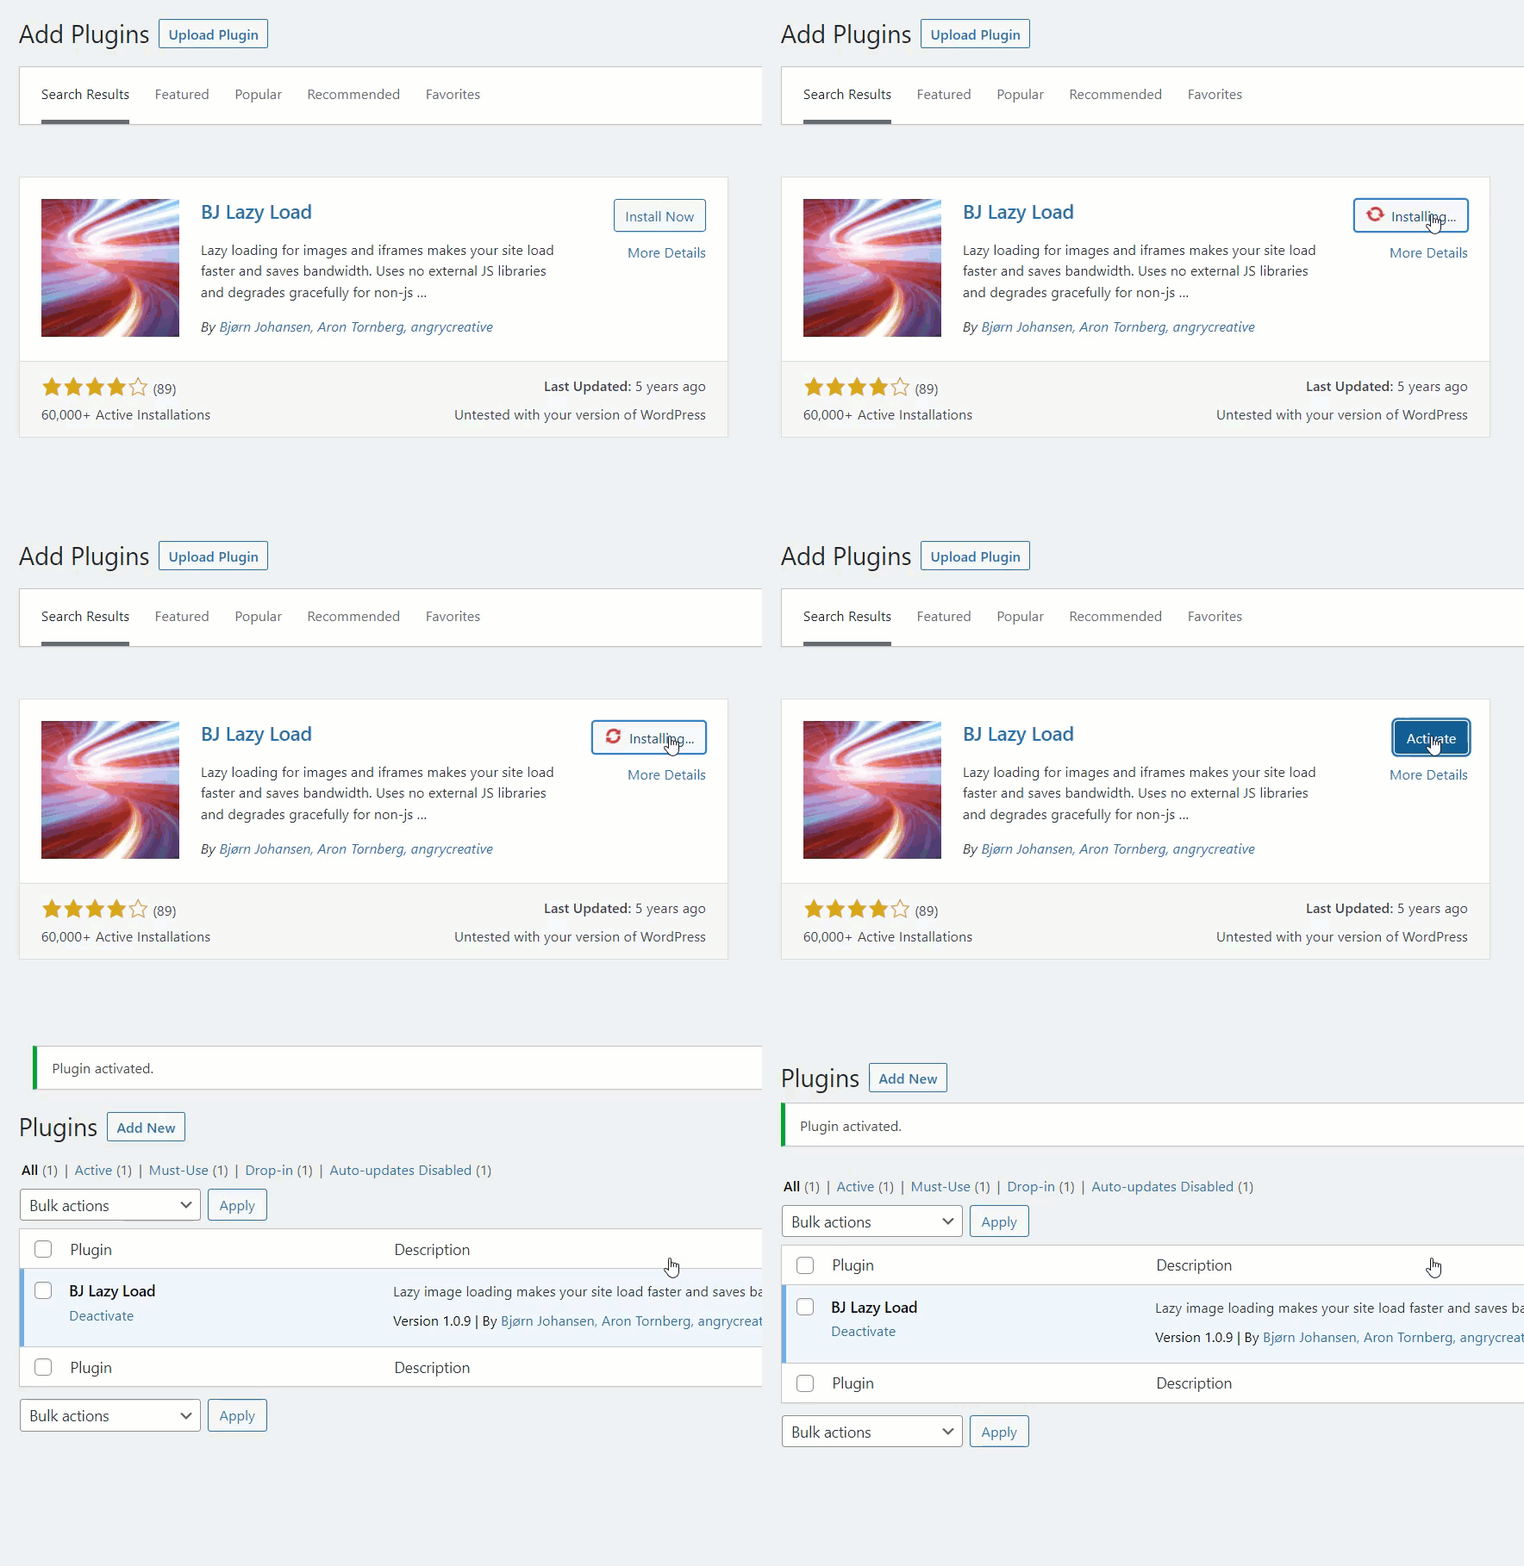
The first thing you need to do is install and activate BJ Lazy Load on your WordPress installation.
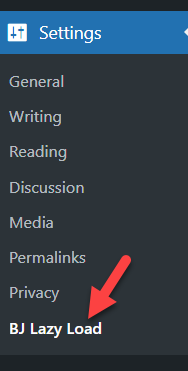
After installation, you will see the plugin’s settings under WordPress settings.
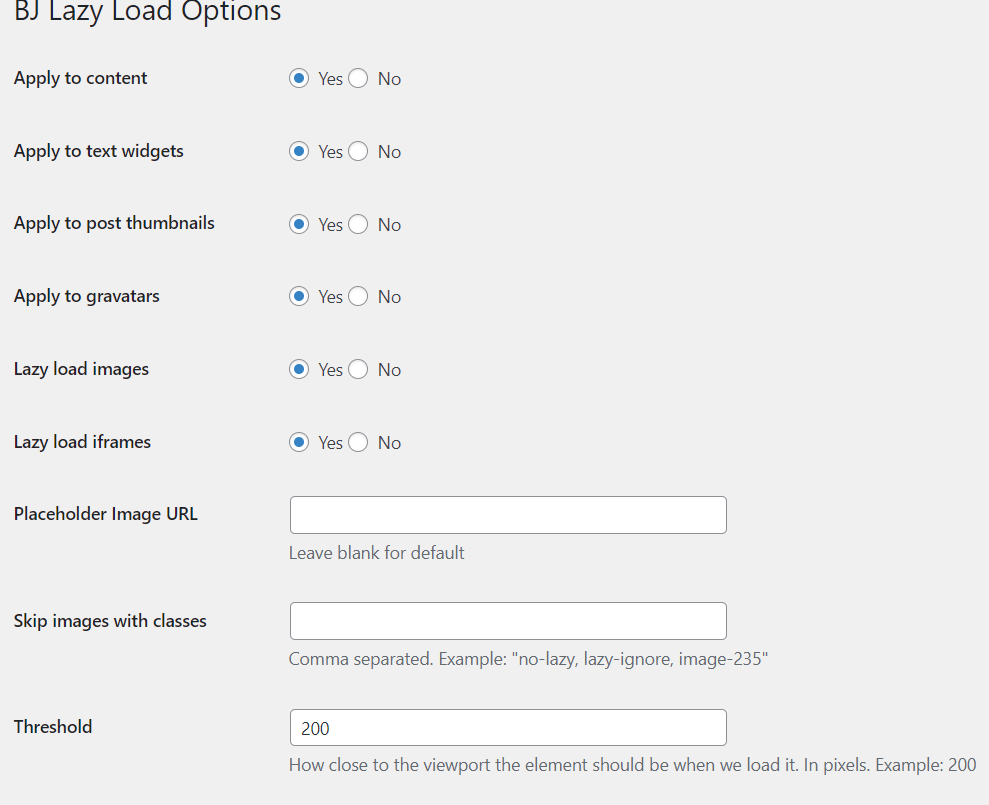
The default settings are pretty good for a standard WordPress installation.
If you want, you can modify the options. Finally, make sure that you have saved the settings after reconfiguring. This way, you can configure Lazy Loading on your WordPress website.
NOTE: Some WordPress caching plugins come with Lazy Loading features in-built. So if your caching plugin supports this feature, you do not need to rely on additional tools or services.
Conclusion
All in all, we’ve seen three methods to create a slider in WordPress:
- Using a dedicated slider plugin
- With Divi builder
- Via the theme options
If you are looking for an easy solution, the Soliloquy or Divi builder plugins are recommended. They come with unique features and integrations. On the other hand, if your theme support sliders in-built, you can use the theme editor. This way, you can reduce the number of plugins installed on your WordPress website.
After creating sliders, make sure that you have configured the caching plugin in the right way to optimize the website for better speed and performance.
You can check out our blog for more articles. However, here are some of our hand-picked articles that might be interesting for you.

