
How to Create Custom WooCommerce Product Type Programmatically
When you’re building a complex WooCommerce store, you might need to create your own solutions to particular problems. One of these problems is the lack of specific WooCommerce product types. This is why we at QuadLayers have brought you our guide on How to Create a Custom WooCommerce Product type for your website.
We’ll be looking at how you can define your product types, enable specific options and prices for them, and much more. But first, let’s look at WooCommerce product types and what custom product types can do.
Why Add a Custom Product Type in WooCommerce?
By default, WooCommerce has four unique product types. These are:
- Simple product
- Variable product
- External/Affiliate
- Downloadable Product
Of course, with external WooCommerce plugins, you can add more product types like Subscription products, Bookable products, Memberships, and more.
But what if you wanted to create a product type other than these specific types? If you have particular requirements that the default WooCommerce product types cannot fulfill, Or if you want to create a custom product type such as membership or auction products without using a third-party plugin, then you can create a custom product type using a bit of coding.
Using a custom product type means adding different, unique settings to the product type. For example, if you want a specific variable product type and add different visibility or pricing settings for it, then you can do so using a custom product type. Moreover, you can also define a specific product type for a single kind of product that is unique and only change the product type settings if you’d like.
Regardless of your needs, having your custom product type gives you more flexibility when customizing and defining the products you sell on your website.
How to Create a Custom WooCommerce Product Type?
The process of creating a WooCommerce product type is quite simple but does require some level of coding. We recommend our customers learn a bit more about creating custom WordPress plugins and adding codes to them if you want to continue with this article.
Once you understand the basics of creating your WordPress plugins in your website’s directory, go ahead and open your WP installation directory, open wp-content/plugins and create the folder ‘QuadLayers_custom-product-type‘. For our demo, we’ll be using our localhost directory.
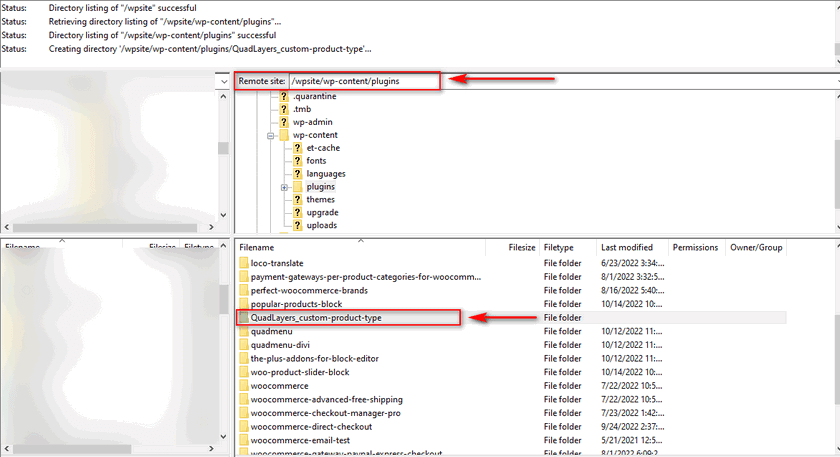
After that, create a file named ‘Quadlayers_custom-product-type.php.’ This is your main file which works as a doorway for the rest of your plugin’s features.
Open this file and paste the following lines of code into the file:
<?php

/**
* Plugin Name: Quadlayers Custom Product Type
* Description: Code for Quadlayers’ guide on creating custom WooCommerce product type
*/

if ( ! defined( 'ABSPATH' ) ) {
return;
}
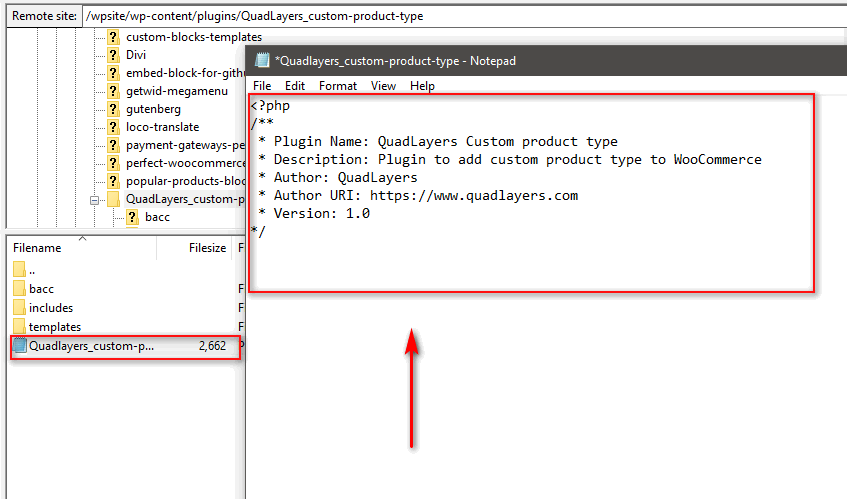
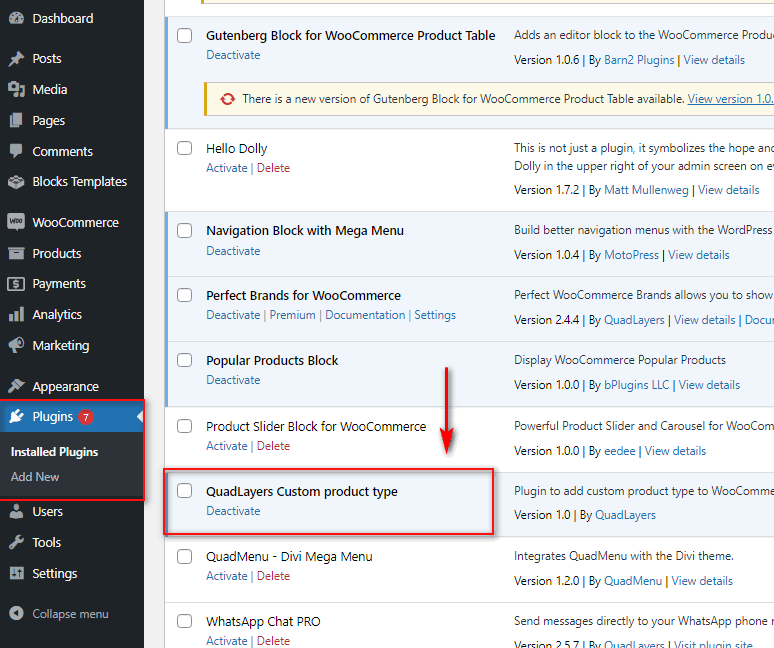
This set of code defines your plugin by adding a plugin name and description. For now, this is enough, as we need to add more codes to this file for it to function. Now, you need to activate your newly created plugin. We’ll keep the plugin activated for the tutorial and add more codes as we go along.
So go ahead and open your WP Admin Dashboard and click on Plugins. Here, you should see a new plugin named Quadlayers Custom Product Type. Go ahead and activate it and move to the next step of the tutorial.
Register Custom WooCommerce Product Type
Next, we’ll create a function to define our custom product type and register it as a WooCommerce product type. For this, add this code to your plugin’s main file:
add_action( 'init', 'register_demo_product_type' );
function register_demo_product_type() {
class WC_Product_Demo extends WC_Product {

public function __construct( $product ) {
$this->product_type = 'demo';
parent::__construct( $product );
}
}
}
This will register a custom product type named demo. If you want to change the name of the product type, simply change the text in $this->product_type = 'demo';
Add Custom WooCommerce Product option.
After this, we need to add the custom product type to the Product type Drop Down list. This makes your product type selectable when you create or edit a product on your WP Admin Dashboard. Add this code to your plugin’s main file, and you should see a new option on your Product Type list.
add_filter( 'product_type_selector', 'add_demo_product_type' );
function add_demo_product_type( $types ){
$types[ 'demo' ] = __( 'Demo product', 'dm_product' );
return $types;
}
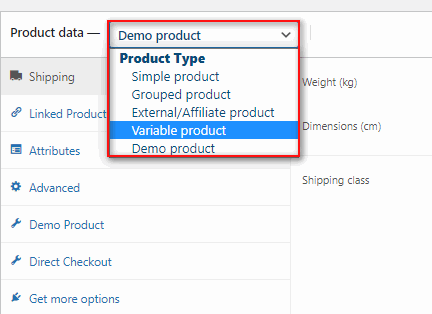
This code will add your custom product type to the Product data dropdown list using the $types['demo'] = __('Custom Product Type') line. You can change the text from Custom Product Type to anything such as Demo Product, Custom order, Gift card, etc.
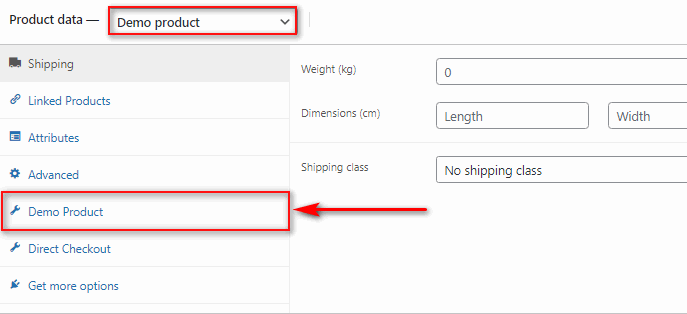
Now, open your WP Admin Dashboard and create a new product. Under the Product Type dropdown menu, you should see a new option named ‘Demo Product.’
Adding a Custom Product Type Tab
The following function will build a new settings tab for your custom product type. This way, you can add specific details to your Product type that isn’t shared with other product types.
Paste in this function to build a tab Custom Product Details:
add_filter( 'woocommerce_product_data_tabs', 'demo_product_tab' );
function demo_product_tab( $tabs) {

$tabs['demo'] = array(
'label' => __( 'Demo Product', 'dm_product' ),
'target' => 'demo_product_options',
'class' => 'show_if_demo_product',
);
return $tabs;
}
}
Remember to use your product_type ID instead of ‘demo’ in $tabs['demo'] = array if you’ve defined your own product_type above.
The three parameters in the array that we’ve used are:
label: This defines the name of your custom product tab.
target: This sets an identifier we’ll use to add settings to the tab.
class: This lets you check when to show the custom product tab.
Here, in the class parameter, we’ve used show_if_Demo_product, which means this tab will only be shown when your custom product type is selected.
Add Custom Product Type Tab Fields
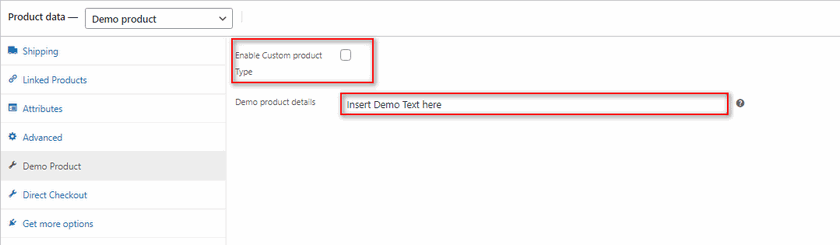
Next, let’s add some settings and fields to our tab so you can set prices and various options for your custom product type. For this, add this code to your plugin’s main file:
add_action( 'woocommerce_product_data_panels', 'QL_custom_product_options_product_tab_content' );
function QL_custom_product_options_product_tab_content() {
// Dont forget to change the id in the div with your target of your product tab
?><div id='demo_product_options' class='panel woocommerce_options_panel'><?php
?><div class='options_group'><?php
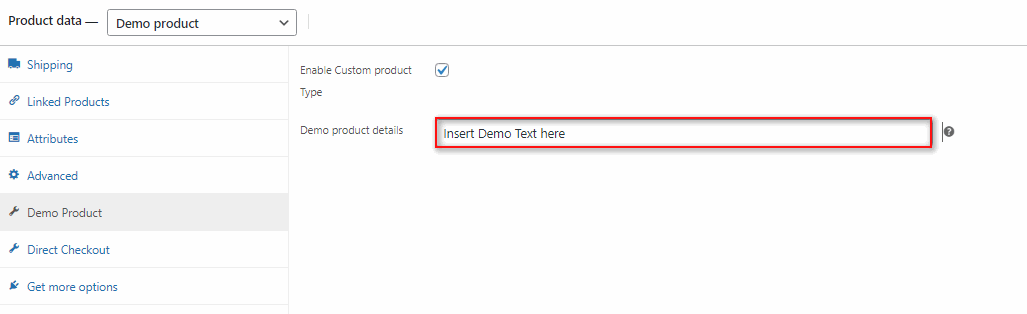
woocommerce_wp_checkbox( array(
'id' => '_enable_custom_product',
'label' => __( 'Enable Custom product Type'),
) );
woocommerce_wp_text_input(
array(
'id' => 'demo_product_info',
'label' => __( 'Custom Product details', 'dm_product' ),
'placeholder' => '',
'desc_tip' => 'true',
'description' => __( 'Enter Demo product details.', 'dm_product' ),
'type' => 'text'
)
);
?></div>
</div><?php
}
This will add a checkbox option to enable the custom product type and a custom text field for the product. Of course, you can add more settings using other WooCommerce functions, such as woocommerce_wp_select() for a drop-down list, woocommerce_wp_textarea_input() for a text area, and much more.
But for our demo, we’ll only display simple text information regarding the custom product admins can customize from the backend.
You can learn more about these functions and how to use them here.
Saving Custom WooCommerce Product Type Tab Fields
Now that we’ve created our product type settings, we must save them to our database. This is done using the woocommerce_process_product_meta hook. For this, we’ll use these lines of code:
add_action( 'woocommerce_process_product_meta', 'save_demo_product_settings' );

function save_demo_product_settings( $post_id ){

$demo_product_info = $_POST['demo_product_info'];

if( !empty( $demo_product_info ) ) {
update_post_meta( $post_id, 'demo_product_info', esc_attr( $demo_product_info ) );
}
}
Once you add this code to your plugin’s main file, you’ll be able to save your custom product type settings when you update or publish a product.
However, these codes are only for the backend and will now show on the front end of your product until we define a template for WooCommerce to use. For this, we’ll use the next step of our tutorial to display the content for our custom product type.
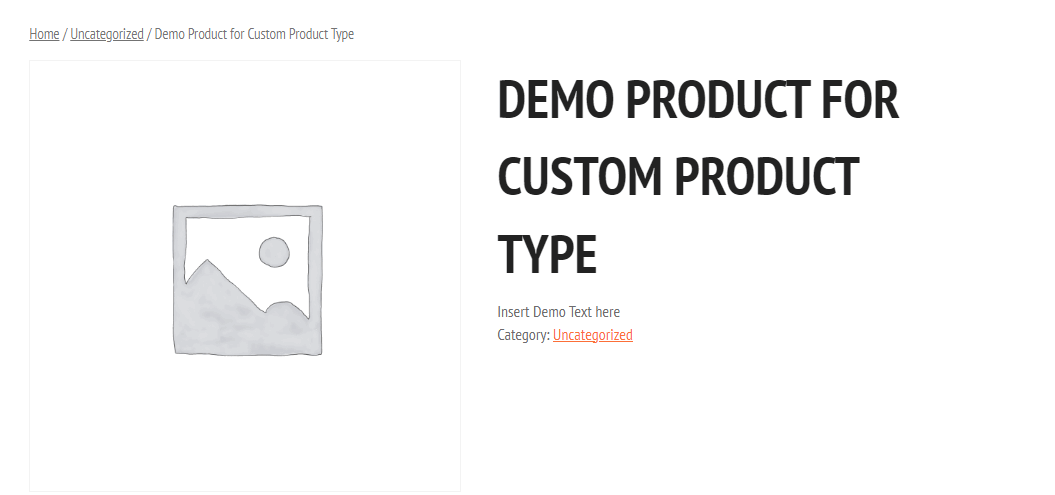
Add Content for the Custom Product Type
You’ve just created the custom product type for your website, but you also need to specify to WooCommerce what kind of content you want the product type to have. For this, we’ll use the woocommerce_single_product_summary hook to add the product info that we added to the Custom Product Details tab.
add_action( 'woocommerce_single_product_summary', 'demo_product_front' );

function demo_product_front () {
global $product;
if ( 'demo' == $product->get_type() ) {
echo( get_post_meta( $product->get_id(), 'demo_product_info' )[0] );
}
}
Make sure your product type ID matches the code if ('demo' == $product->get_type(), as we mentioned above. Once you save this code, you’ll see your custom product details on the front.
Complete Code Snippet
For your convenience, we have combined the different codes into a single set, so you can simply paste it into your plugin’s main file and edit it as necessary.
<?php
/**
* Plugin Name: QuadLayers Custom product type
* Description: Plugin to add custom product type to WooCommerce
* Author: QuadLayers
* Author URI: https://www.quadlayers.com
* Version: 1.0
*/


defined( 'ABSPATH' ) or exit;

add_action( 'init', 'register_demo_product_type' );
function register_demo_product_type() {
class WC_Product_Demo extends WC_Product {

public function __construct( $product ) {
$this->product_type = 'demo';
parent::__construct( $product );
}
}
}


add_filter( 'product_type_selector', 'add_demo_product_type' );
function add_demo_product_type( $types ){
$types[ 'demo' ] = __( 'Demo product', 'dm_product' );
return $types;
}


add_filter( 'woocommerce_product_data_tabs', 'demo_product_tab' );
function demo_product_tab( $tabs) {

$tabs['demo'] = array(
'label' => __( 'Demo Product', 'dm_product' ),
'target' => 'demo_product_options',
'class' => 'show_if_demo_product',
);
return $tabs;
}


add_action( 'woocommerce_product_data_panels', 'demo_product_tab_product_tab_content' );
function demo_product_tab_product_tab_content() {
?><div id='demo_product_options' class='panel woocommerce_options_panel'><?php
?><div class='options_group'><?php


woocommerce_wp_checkbox( array(
'id' => '_enable_custom_product',
'label' => __( 'Enable Custom product Type'),
) );


woocommerce_wp_text_input(
array(
'id' => 'demo_product_info',
'label' => __( 'Demo product details', 'dm_product' ),
'placeholder' => 'Insert text to be shown on the front end here',
'desc_tip' => 'true',
'description' => __( 'Enter Demo product Info.', 'dm_product' ),
'type' => 'text'
)
);
?></div>
</div><?php
}

add_action( 'woocommerce_process_product_meta', 'save_demo_product_settings' );

function save_demo_product_settings( $post_id ){

$enable_custom_product = isset( $_POST['_enable_custom_product'] ) ? 'yes' : 'no';
update_post_meta( $post_id, '_enable_custom_product', $enable_custom_product );
$demo_product_info = $_POST['demo_product_info'];

if( !empty( $demo_product_info ) ) {
update_post_meta( $post_id, 'demo_product_info', esc_attr( $demo_product_info ) );
}
}


add_action( 'woocommerce_single_product_summary', 'demo_product_front' );

function demo_product_front () {
global $product;
if ( 'demo' == $product->get_type() ) {
echo( get_post_meta( $product->get_id(), 'demo_product_info' )[0] );
}
}
Of course, all the steps we’ve shown in this tutorial are pretty simple, and you can and should try adding more fields, settings, and content to your custom product type. Also, as you can see, this tutorial is a bit programming-heavy. So, if you’re new to WordPress or coding, you can always ask for our help in the comments section. Besides, you can also do things quite differently and use your theme’s functions.php file to add all these codes to your website.
This would skip the step in creating a WordPress plugin but do note that your changes would disappear if you change or update your theme(unless you use a child theme.) We highly recommend using a plugin for this method, but if you’d prefer to use the functions.php file, you can do so.
Always remember to take a full backup of your WordPress site before making changes to the functions.php file. That way, in case anything goes wrong, you can always revert back to the working version.
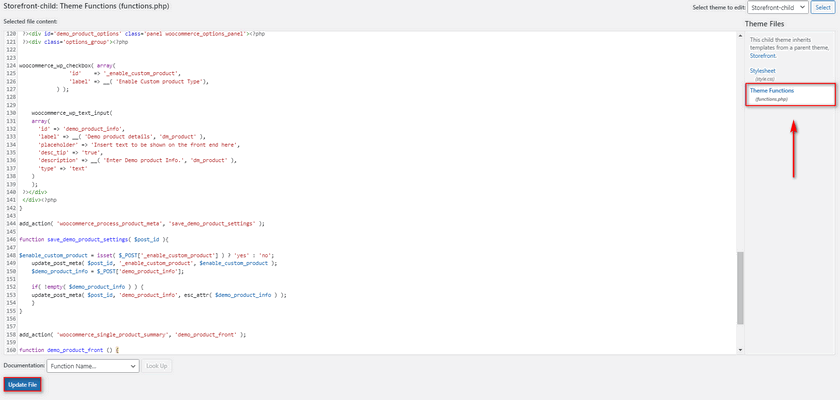
Just click on Appearance > Theme File Editor and click on Theme functions or functions.php on the right Theme files sidebar.
Then, you can just paste the above codes into the editor and click on Update File to finish.
Conclusion
And that ends all the steps required to create a custom WooCommerce product type programmatically. Let’s quickly summarize all the steps needed to create your custom product type:
- Create and activate the plugin for your Custom WooCommerce Product Type.
- Register your new product type.
- Add a tab for your custom product type for the single products page.
- Add fields and settings to your product tab.
- Save the fields and settings on your product tab.
- Display your product tab content on the front end.
Lastly, for your convenience, we combined all the different pieces of code to provide you with the complete code. So, you can just copy the entire code o your main file and make the changes as necessary.
We hope you find this article helpful. If you want to learn more about setting up various WooCommerce settings and products options, why not check out some of our other articles:
