How to customize Add to Cart button in WooCommerce
Looking for ways to create a custom Add to Cart button for your store? In this guide, we’ll show you different ways to customize the Add to cart button in WooCommerce.
The Add to Cart button is one of the most important buttons for any online business. It’s the button that shoppers press to show their interest to buy a product and optimizing it can have a great impact on your store. Before we have a look at ways to change it, let’s better understand the benefits of doing so.
Why customize the Add to Cart button in WooCommerce?
WooCommerce is the most popular eCommerce plugin for WordPress. Although it works well with its default settings, you can take your store to the next level by customizing it. One of the most efficient ways to get more customers is by improving the purchase process, making it more user-friendly and simple.
We’ve already seen different options to customize the checkout page and optimize it to maximize conversion rates and avoid drop-offs. However, the previous step in the sales funnel is also very important. The “Add to Cart” button is useful for stores where customers usually buy more than one product, or when users are expected to navigate through products, adding and removing them from the cart before going to the checkout page.
Many other eCommerce stores, on the other hand, have simpler purchase processes and prefer to skip the “Add to Cart” step and direct the customers directly to the checkout. This works especially well in one-product stores, or when the customer is expected to purchase a single product. Even though shorter purchase processes tend to work better, it depends on the type of product you sell. There’s no one size fits all approach.
That’s why in this guide, we’ll show you how to create a custom Add to Cart button in WooCommerce so you can optimize your store and boost your sales.
How to customize the Add to Cart button in WooCommerce
There are many ways in which you can customize the Cart Page. In this tutorial, we’ll focus on how to edit the Add to Cart button. We’ll show you different options so you can choose the one that best suits your needs. We’ll use some plugins and a bit of coding but all the options are beginner-friendly.
In this guide, we’ll show you how to:
- Change the Add to Cart button text
- Add text above or below Add to Cart button
- Change the color of the Add to Cart button
- Remove the Add to Cart button and add a Direct Purchase button on the Shop Page
- Customize the Add to Cart button and add a Direct Purchase button on the Product Page
Let’s have a look at how to do each of these things step-by-step.
Before you start
- As we’re going to edit some core files, before you start, we recommend you create a child theme. You can use plugins or generate a child theme following this guide
- Place the PHP code snippets at the end of your child theme functions.php file
- Paste the CSS snippets in your child theme style.css file
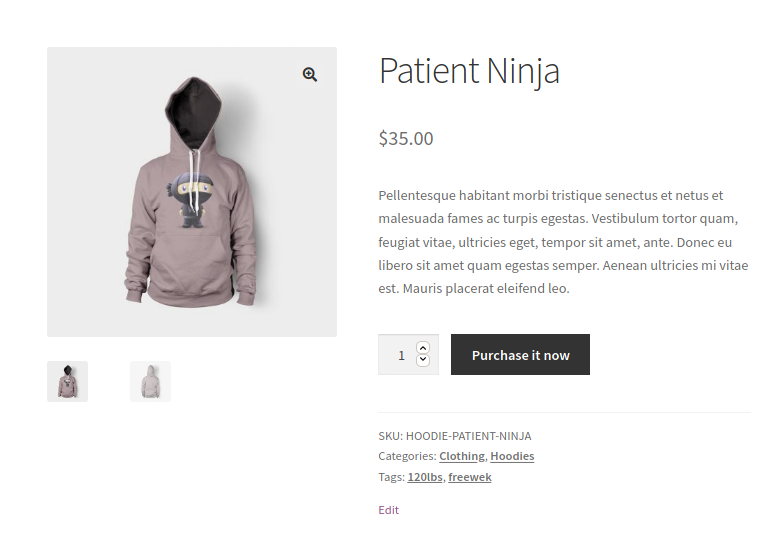
1) How to change the Add to Cart button text in WooCommerce
Let’s start with something simple and create a custom Add to Cart button by editing the text of the button. Let’s say that you change the Add to Cart text to “Buy this item”. To do this, simply copy and paste the following code:
add_filter('woocommerce_product_single_add_to_cart_text','QL_customize_add_to_cart_button_woocommerce');
function QL_customize_add_to_cart_button_woocommerce(){
return __('Buy this item', 'woocommerce');
}
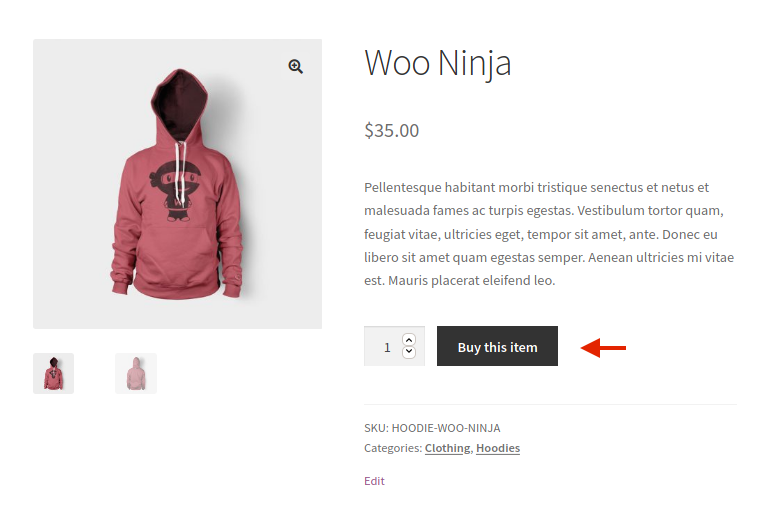 As you can see, this code is for single products and the button text takes the values we’ve specified in the customize_add_to_cart_button_woocommerce() function.
2) How to add text above/below the Add to Cart button
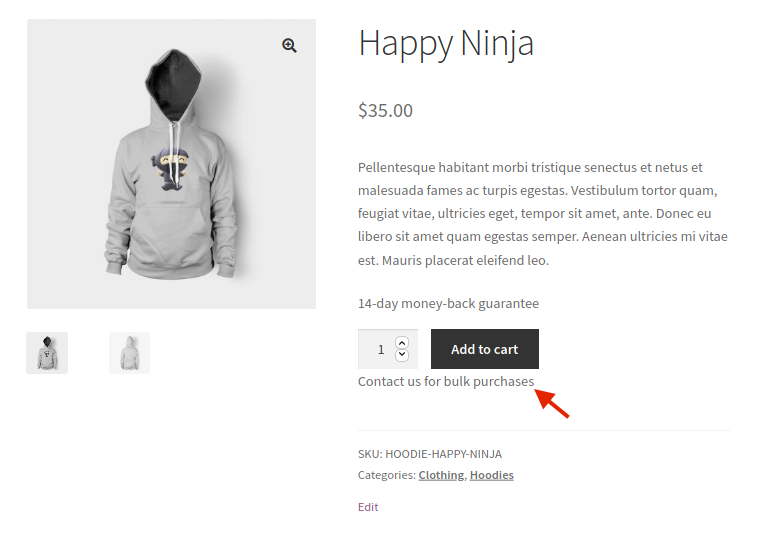
Another very interesting and simple change you can do to customize the Add to Cart button in WooCommerce is to add a text above the Add to Cart button. This is a great option to mention free shipping, a return policy, a guarantee, and so on.
Let’s say you want to add the following text “14-day money-back guarantee“. To do this, we use the echo statement and add the following snippet to the functions.php file of the child theme.
add_action( 'woocommerce_single_product_summary', 'QL_add_text_above_add_to_cart', 20 );
function 'QL_add_text_above_add_to_cart'() {
  echo '14-day money-back guarantee';
}
On the other hand, you can also add text below the Add to Cart button. This can be useful to notify shoppers that there might be discounts for bulk purchases for example. To add a text below the Add to Cart button, you can use this code snippet:
add_action( 'woocommerce_after_add_to_cart_button', 'QL_add_text_under_add_to_cart' );
function QL_add_text_under_add_to_cart() {
  echo 'Contact us for bulk purchases';
}
 As you can see, these are very easy changes that you can do to increase your conversion rates in no time.
3) Change the color of the Add to Cart button
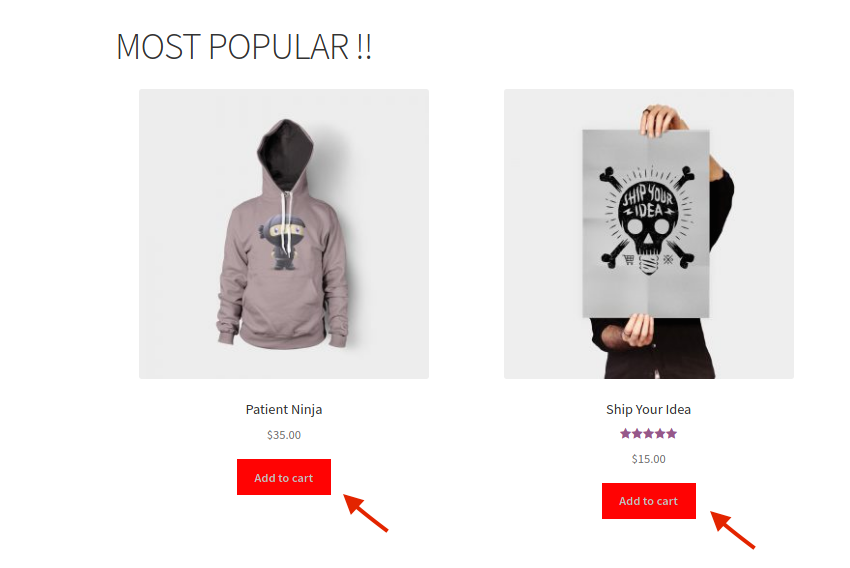
Now, let’s see how to edit the Add to Cart button by changing its color. Even though most WordPress and WooCommerce themes come with default colors for the buttons, you should make sure that they match your store’s style.
To customize the color of the Add to Cart button in WooCommerce, you will need to add a CSS code snippet to the style.css file. You can access it with an FTP client or from the WordPress dashboard by going to Appearance > Customize > Additional CSS. Here there are two options:
- Change the color of the Add to Cart button on Single Products
- Change the color of the Add to Cart button on Archive Pages
3.1) Change the color on Single Products
Paste this code in the style.css file and change the colors to the ones you want. In this case, we’ll have a red background and silver text.
.single-product .product .single_add_to_cart_button.button {
background-color: #FF0000;
color: #C0C0C0;
}
3.2) Change Add to Cart button color on Archive Page
To customize the Add to Cart button and change its color on the WooCommerce Archive Page, use this code and change the Hex Codes to the ones that make sense for your store.
.woocommerce .product .add_to_cart_button.button {
background-color: #FF0000;
color: #C0C0C0;
}
4) Remove the Add to Cart button and add a Direct Purchase button on the Shop Page
Now, let’s have a look at a more advanced option. Having a purchase process with several steps increases the chances of shoppers dropping off at each stage. That’s why shortening the funnel is a great way to optimize the checkout and improve conversion rates.
In this section, we’ll show you how to remove the Add to Cart button and replace it with a direct purchase one using Direct Checkout for WooCommerce. This plugin has both free and premium versions and comes with many features to help you simplify the checkout. Additionally, it allows you to skip the cart page and redirect users directly to the checkout page, making the purchase process shorter. So, let’s see how to completely remove the Add to Cart button and replace it with a direct buy button.
Change the function of the Add to Cart button
First, you need to install and activate Direct Checkout. You can download the free version from this link or have a look at one of the premium plans that start at 19 USD (one-time payment).
After activating the plugin, in your WordPress dashboard, go to WooCommerce > Direct checkout > General and fill out the options as follows:
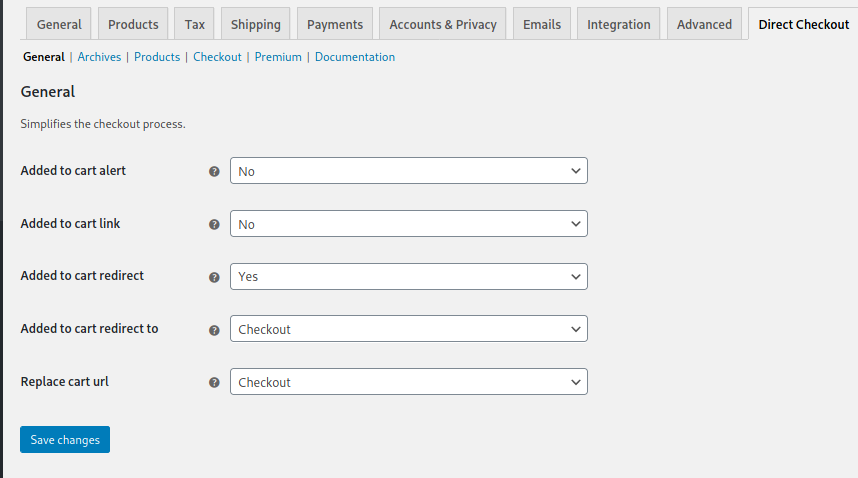
For more information on how to customize the WooCommerce shop page, have a look at this full guide.
Change the Add to Cart button text
After setting up the options in the General tab, the Add to Cart button will redirect users to the checkout page. However, you should also edit the text of the button as you’ve changed its function. The button doesn’t add products to the cart anymore, so it’s better to change it to something like Purchase now, for example. To do this, go to the Archives tab and fill out the options as follows: 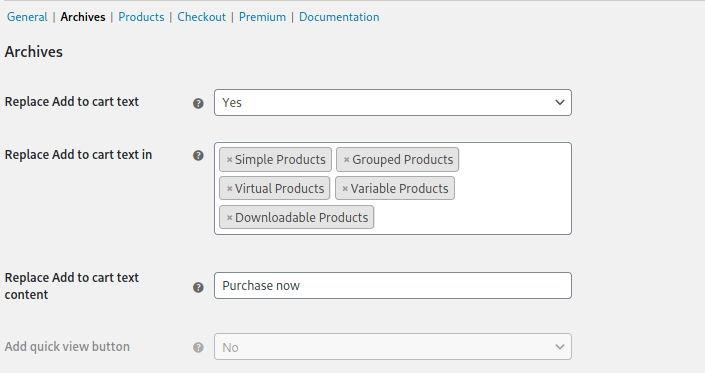 Here you can change the button text for specific product types. We’ll apply the changes to all types of products by selecting all of them in the corresponding field. After that, it’s time to check the front end.
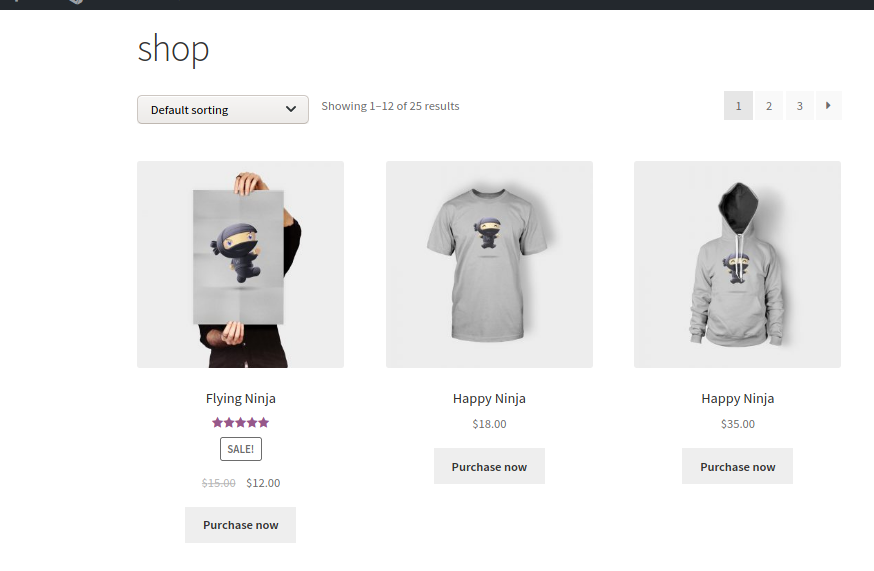
As you can see, we’ve customized the Add to Cart button in our WooCommerce store and replaced the Add to Cart button with a Purchase now button that will take customers from the shop page directly to the checkout page. On top of that, we’ve completely removed the cart functionality from our store.
For more information on how to remove the Add to Cart button, check out this step-by-step guide.
5) Customize the Add to Cart button and add a Direct Purchase button on the Product Page
Finally, we can do something similar and customize the Add to Cart button to redirect the users from the product page to the checkout.
This way, you can easily create a custom Add to Cart button in WooCommerce on both the Shop and Products page. And the best part is that you can have different buttons on each page.
How to customize the Added-to-cart message
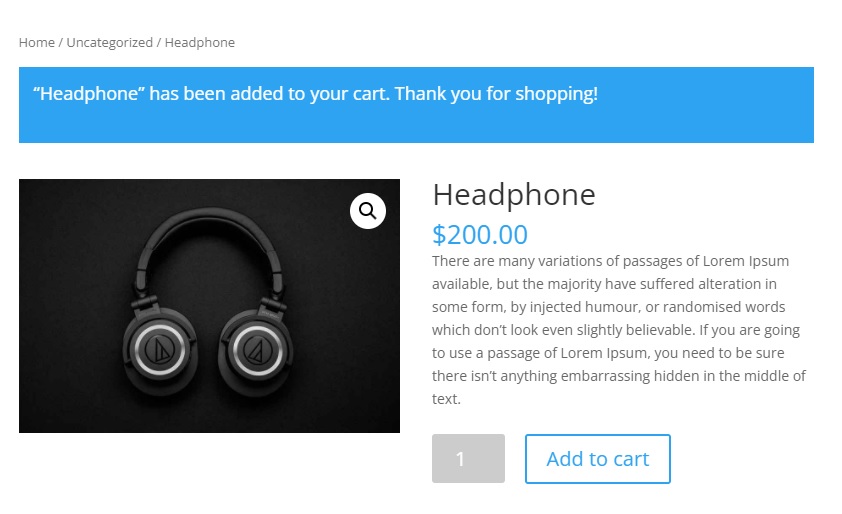
Apart from customizing the button, you can also edit the Added-to-Cart message. The easiest way to do that is to simply change the message by pasting the following script to the functions.php file.
add_filter( 'wc_add_to_cart_message_html', 'quadlayers_custom_add_to_cart_message' );
function quadlayers_custom_add_to_cart_message() {
   $message = 'Your product has been added to cart. Thank you for shopping with us!' ;
   return $message;
}
In this case, we’re changing the message to Your product has been added to your cart. Thank you for shopping with us!
To make it more personalized, you can display the name of the product the customer has just added to the cart as follows:
add_filter( 'wc_add_to_cart_message', 'quadlayers_custom_wc_add_to_cart_message', 10, 2 );

function quadlayers_custom_wc_add_to_cart_message( $message, $product_id ) {
    $message = sprintf(esc_html__('%s has been added to your cart. Thank you for shopping!','tm-organik'), get_the_title( $product_id ) );
    return $message;
}
These are just a few examples but there’s a lot more you can do and add links and buttons to the message. For more information about that, check out our guide on how to change the WooCommerce Add-to-Cart message.
Bonus: Change the Add to Cart button text for different categories
Now let’s say you have different product categories and you want to have custom Add to Cart buttons for each category. For example, you may want to have a button that says “Buy Now” for product category 1 but display the text “Download” for category 2.
To do this, you should use the same function we used in point 1. add_filter('woocommerce_product_single_add_to_cart_text','QL_customize_add_to_cart_button_woocommerce');
You need to get the categories of each product and then use a conditional to change the text depending on the taxonomy as follows:
if($category=='category 1'){

return __('Buy Now', 'woocommerce');

}elseif($category=='category 2'){

return __('Download', 'woocommerce');

}else{

return __('Default text', 'woocommerce');

}
My Add to Cart button doesn’t work. What can I do?
There may be several reasons why the Add to Cart button may not work. The most common ones are:
- Plugin/theme incompatibility
- Products with incomplete information
- Issues with cache
- Checkout endpoints
- Permalinks
- ModSecurity issues
- And more
To learn how to solve each of these issues, check out our guide on how to fix the Add to Cart button.
NOTES
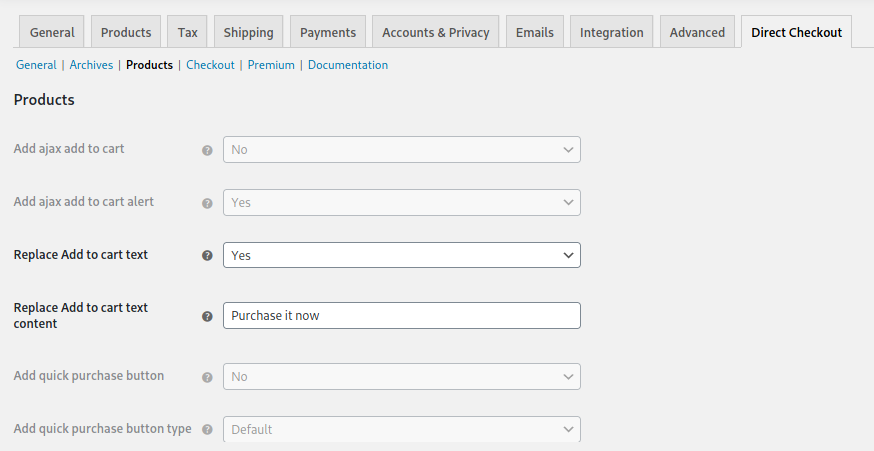
- The settings you save in the Archives section of the plugin options panel will apply to the base Shop and Product categories pages, while the settings in the Products section will apply only to the Product pages.
- For this demo, we’ve used the Storefront theme but you can use any theme compatible with WooCommerce.
- Even though most themes will integrate without any issues, some themes may alter the default WooCommerce features and can cause issues when using Direct Checkout.
- We’ve covered some basic features of Direct Checkout. For more advanced features, check out the Premium plans that will help you take your store to the next level.
Conclusion
All in all, customizing the Add to Cart button can have a great impact on your business. That’s why we recommend you adapt it to your store’s needs. In this guide, you’ve learned different ways to customize the Add to Cart button both programmatically and with plugins:
- Change the text of the Add to Cart button
- Add text above or below the Add to Cart button
- Change the color of the Add to Cart button
- Remove the Add to Cart button and add a Direct Purchase button on the Shop Page
- Customize the Add to Cart button and add a Direct Purchase button on the Product Page
Finally, for more guides to make the most of your WooCommerce store, check out the following guides:
- How to customize the WooCommerce Shop Page
- Remove checkout fields in WooCommerce
- How to create direct checkout links
Do you have any questions about how to customize the Add to Cart button? Let us know in the comments section below! We’ll do our best to help you out.

i have a theme “chapter one” for books publisher or sellers, and it is using wp bakery page builder product list, and it does not show a separate add to cart button.
Hello Mate !
Regarding how you are inserting the button, some themes might not be compatible. Test with default WC theme to check.
If adding the button programmatically, you may need to adjust your scripts.
Hi Sebastopolys,
Thanks for the info above.
Ive a question on the above, you maybe able to help.
In the following, lets say I want to apply a class to one word in the button, how would I do that?
For instance I wanted to add a class to the word Buy in the button so that it stands out from the words this item. I can then style that word in css
(‘woocommerce_product_single_add_to_cart_text’,’QL_customize_add_to_cart_button_woocommerce’);
function QL_customize_add_to_cart_button_woocommerce(){
return __(‘Buy this item’, ‘woocommerce’);
}
Thanks
Eoin
Hey there. Thanks for your comment.
You could simply add html markup replacing the return:
return __(‘Buy this item’, ‘woocommerce’);with this:
echo '<span class="myclass">Buy </span>this item ';This is not a recommended practice, however, it will do the job and I don't think it involves any risk.
Cheers !
Hello,
Is it possible to change the “add to cart” button with products or categories?
Cheerio
Hi Raymond.
I’m not sure what exactly what you’re after, but I’m sure you could achieve with enough developer skills.
Cheers !
Ok, thanx for the reply.
What I mean is the following:
– category “example” text button “Buy Product”
– category “other” test button “Download”
Thanx!
I see.
Yes, you can use the same function in point 1)
add_filter('woocommerce_product_single_add_to_cart_text','QL_customize_add_to_cart_button_woocommerce');Inside the function, get the categories of each product and use a conditional to change text depending on taxonomy.
something like this
if($category=='example'){return __('Buy product', 'woocommerce');
}elseif($category=='other'){
return __('Download', 'woocommerce');
}else{
return __('Default text', 'woocommerce');
}
Find out how to get taxonomy of product in this link -> https://stackoverflow.com/questions/15303031/woocommerce-get-category-for-product-page
Hey! How do I customize the add to cart button on the archives pages? Specifically I would like to add a link right after that add to cart button.
Hey there !
You can try some of these hooks that works on archive pages. -> https://www.businessbloomer.com/woocommerce-visual-hook-guide-archiveshopcat-page/
But it might be a better solution to edit the template file of WC. -> https://wordpress.stackexchange.com/questions/256088/how-to-override-woocommerce-template-files
You need to overwrite the archive-product.php file
How can I customize button text on the card page?
Hi Nik.
Depending on what kind of customization you are after, you could use a simple CSS script to achieve.
Another way would be using the cart hooks provided by WC.
Hi there!
I would like to ad another ”Buy Here” button to link my customer to another platform to buy if they prefere. So is it possible to put 2 buttons one says ”Add to chart” and the other says ”Buy on Ebay” for example.
Hello there
You could adapt the sample script 2) and add a button instead of content.
This will require coding skills .
Hello.
How to move Add to cart/buy now button below product price for both single product and with variations?
sample: https://imgur.com/5Q2LTmg
Hello Jey.
You will need to create your own custom CSS script to achieve
hello ,
How can i separate ‘Quantity’ box and ‘Add to Cart’ button.
thanks
Hello.
can I add to cart button add without plugin
Yes, you can. Check out these guides:
https://quadlayers.com/woocommerce-ajax-add-to-cart/
https://quadlayers.com/woocommerce-add-to-cart-function-programmatically/
Hello;
Is it possible to change the function of the “add to cart” button and give it a custom direct URL?
For example when the user clicks “add to cart” it goes to a custom URL outside our own website
Thank you
Yes, you can set custom URLs but it requires custom code.
Here you can find some information. Alternatively you can use this plugin or this other one.
Cheers!
Thanks man;
Where should I put my custom URL in the code you sent?
I’ve just updated the previous comment.
Thanks a lot
Hi,
I am using oceanwp theme and have copy past ur change add to card button function in my function.php file but its nothing showing on my card buttom
add_filter(‘woocommerce_product_single_add_to_cart_text’,’QL_customize_add_to_cart_button_woocommerce’);
function QL_customize_add_to_cart_button_woocommerce(){
return __(‘Buy this item’, ‘woocommerce’);
}
add_action( ‘woocommerce_single_product_summary’, ‘QL_add_text_above_add_to_cart’, 20 );
function QL_add_text_above_add_to_cart() {
echo ’14-day money-back guarantee’;
}
add_action( ‘woocommerce_after_add_to_cart_button’, ‘QL_add_text_under_add_to_cart’ );
function QL_add_text_under_add_to_cart() {
echo ‘Contact us for bulk purchases’;
}
Thankyou for sharing a solution of problem its helpful.
Changing button colour by following your guide does not work!
Hi there !
CSS scripts are very straight forward to use. If it doesn’t work, it might be because of several reasons:
1_ There are some inconsistencies when copy / pasting script
2_ Buttons html on your website are being modified, so the script doesn’t work.
3_ Pasting the script on the wrong place.
Hope this helps
great article thanks, love code tips like this that actually work.
question is, now i’ve changed my ‘add to cart’ to ‘add to basket’, how do i change the rest of the ‘cart’ stuff, like ‘view cart’ to ‘view basket’ and so on.
Hey by using your reference, I am going to customize the button. Do you think this will also affect in button click tracking?
Great share! Thanks for the information. Keep going!
Great share! Thanks for the information.
Could you please share code for how to replace add button with “Order on Whatsapp” and then info should go to Whatsapp about product details and quality and variants if any.