How to Customize the WooCommerce Cart Page with Elementor
Are you looking for various ways to customize your WooCommerce cart page? Elementor is one of the best tools when it comes to customizing WooCommerce. You can easily configure and create a custom design for your cart page for your Elementor in no time. This is why we’ve brought you our guide on How to customize the WooCommerce cart page with Elementor.
But first, let’s take a look at why you should consider using Elementor to customize your cart page.
Why customize the cart page with Elementor?
Customizing your WooCommerce cart page is a crucial part of improving your conversion rates. The cart page interface can hugely determine whether your customer will proceed to the checkout or not. This includes adding options to show cart details, increase/decrease amount, adding detailed thumbnails for your cart items, and so on.
And while there are a lot of ways to customize your cart page such as using cart plugins or programmatically, using a page builder can be one of the best ways to do so.
Elementor is one of the most popular WordPress Page builders available with complete integration with WooCommerce. You can easily customize any WooCommerce page with it in no time with tons of pretty designs, deeply customized widgets, modules, and much more.
Furthermore, you can use Elementor to easily configure your WooCommerce pages and use dedicated templates and modules to set them up in no time. Each module and element can be configured according to the needs of your website. They can be handcrafted for everything you want to add to your WooCommerce cart pages.
Before We Start:
Before we start with our tutorial, we’d like to note down that you will need both Elementor and Elementor Pro to follow our tutorial.
While it is possible to manage and set up WooCommerce pages using the free version of Elementor, the procedure is a lot more difficult with limited features. You can’t use the option to use dedicated templates and designs that are quite a boon when it comes to customizing your cart pages in the free version. So, we’d recommend you consider purchasing Elementor Pro considering all the WordPress customization that you can get from it.
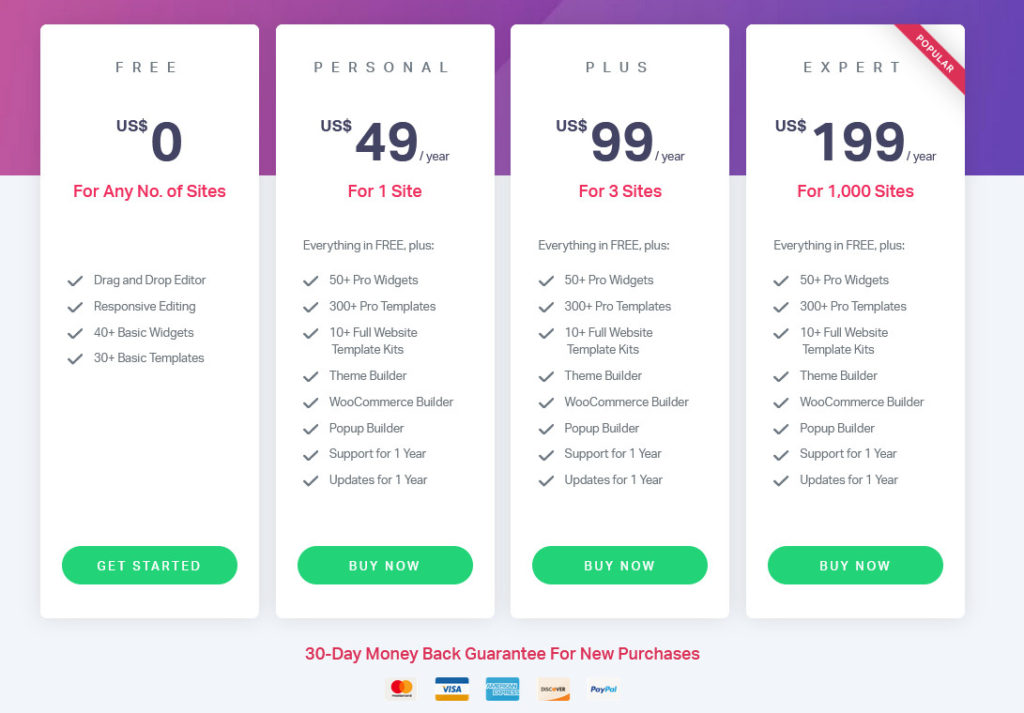
For 49 USD a year, you can enjoy features such as:
- Fully customization options, from scratch or using templates and from scratch.
- Full integration and options to create and customize all WooCommerce pages such as Shop page, product pages, shop archives, cart page, and more.
- 50+ Pro widgets with options for specific WooCommerce widgets.
- 10+ detailed website kits with 300+ templates that you can configure and set up on the go.
- Beginner-friendly drag and drop builder with amazing customization options for every element of your website.
- Incredible support for Addons and Extensions.
You can also choose from multiple plans depending on your needs. Each plan also comes with a 30 day money-back guarantee period that is perfect in case you are not satisfied with using the plugin.
Similarly, make sure that you have set up WooCommerce properly and have used one of the compatible WooCommerce themes as well. This will ensure that you won’t have any conflict issues while customizing the cart page.
Now that we’ve explained why you should consider using Element to customize your WooCommerce cart page, let’s go ahead and take a look at how you can do so.
How to customize the WooCommerce cart page with Elementor?
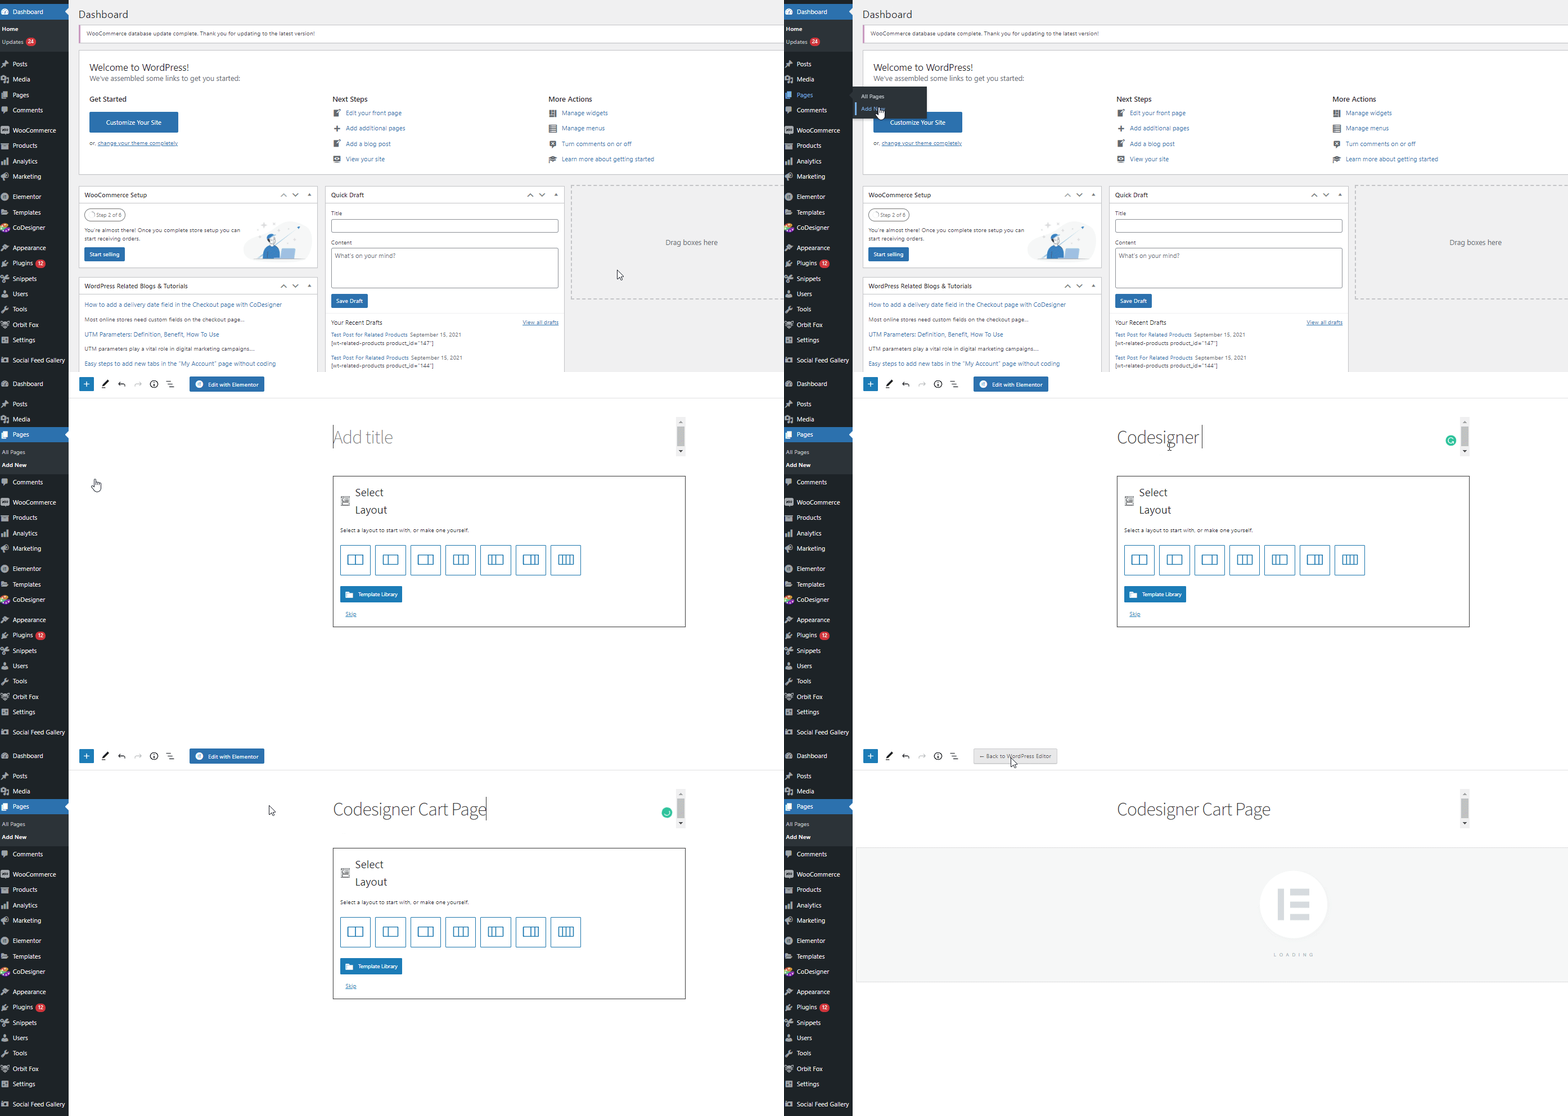
After you install and activate Elementor Pro on your website, create a new page in your WordPress Dashboard by clicking on Pages > Add New. Give your new custom page a name and click on the Edit with Elementor button.
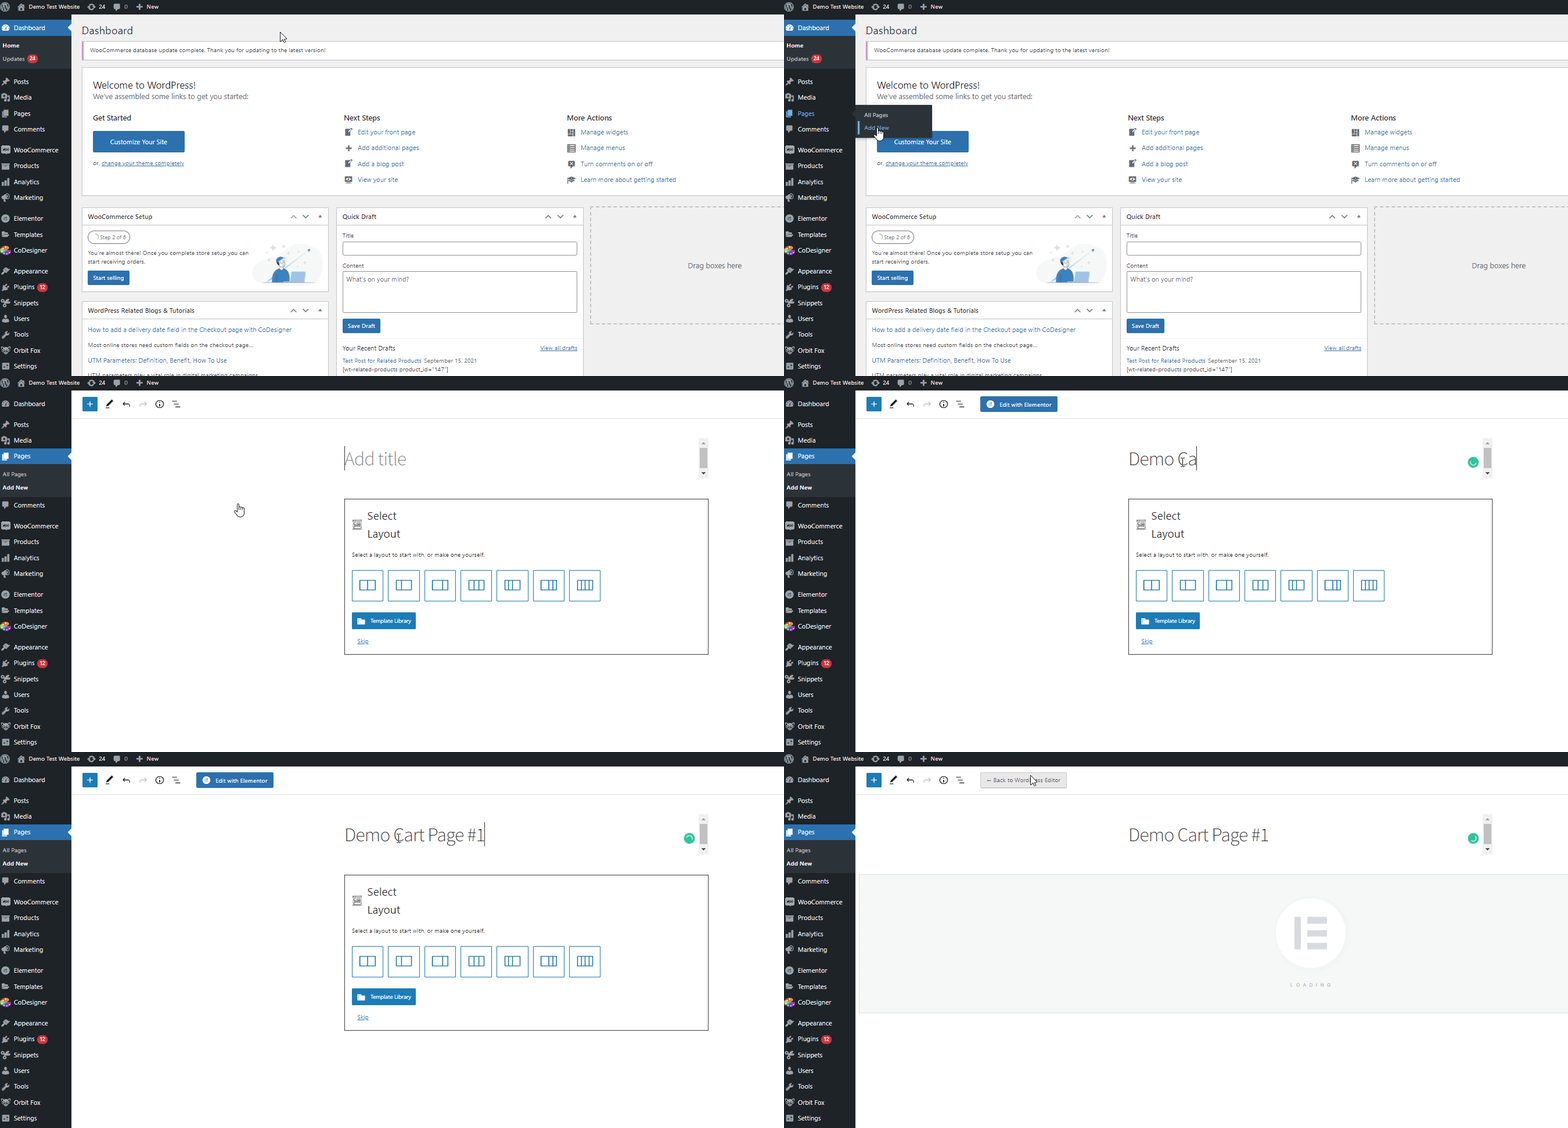
This will take you to the Elementor Page builder where you can now add content to your custom cart page. Let’s go ahead and add some basic WooCommerce elements to fill your cart.
Start by scrolling down in the widget menu on the left and clicking on the WooCommerce drop-down option. Click on the Cart widget and drag it to the Add Widget here section in the builder.
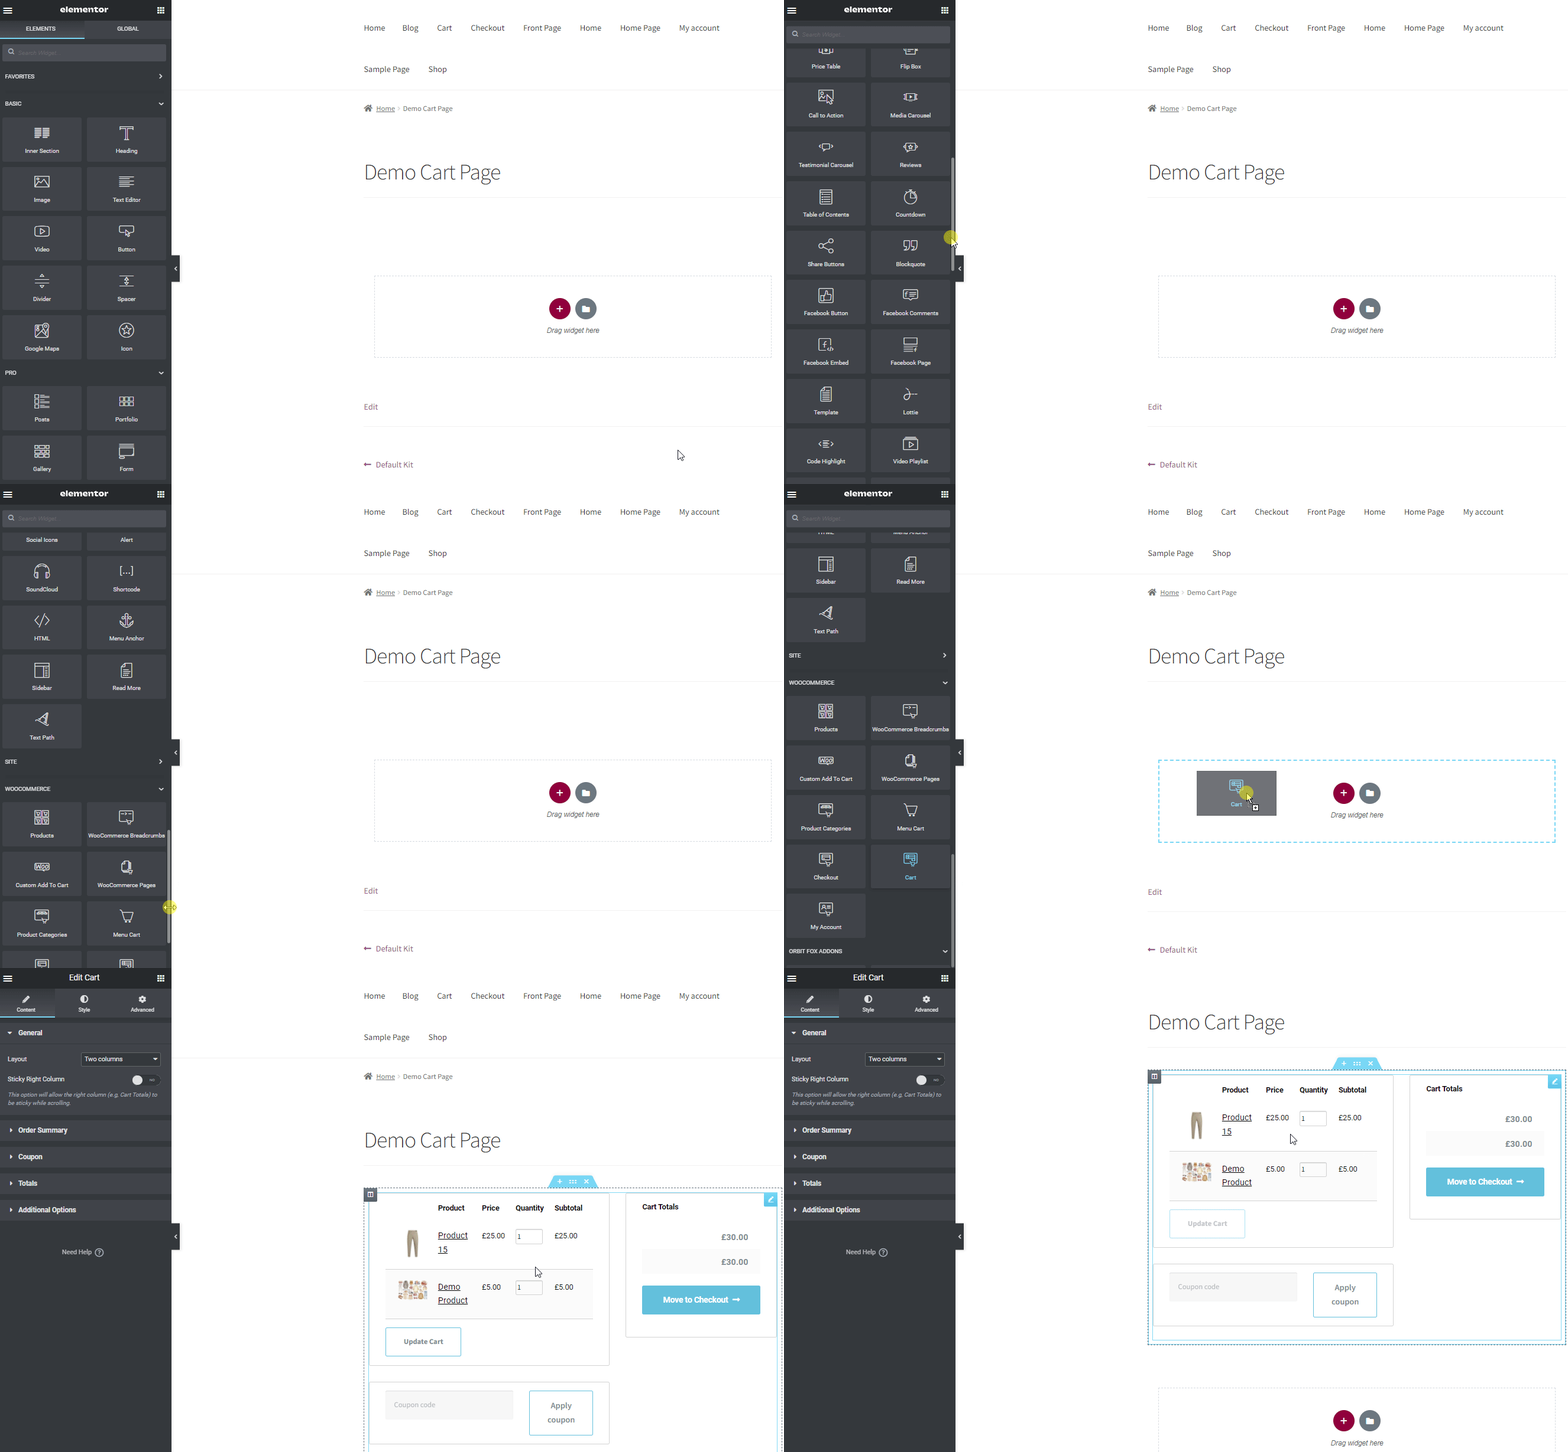
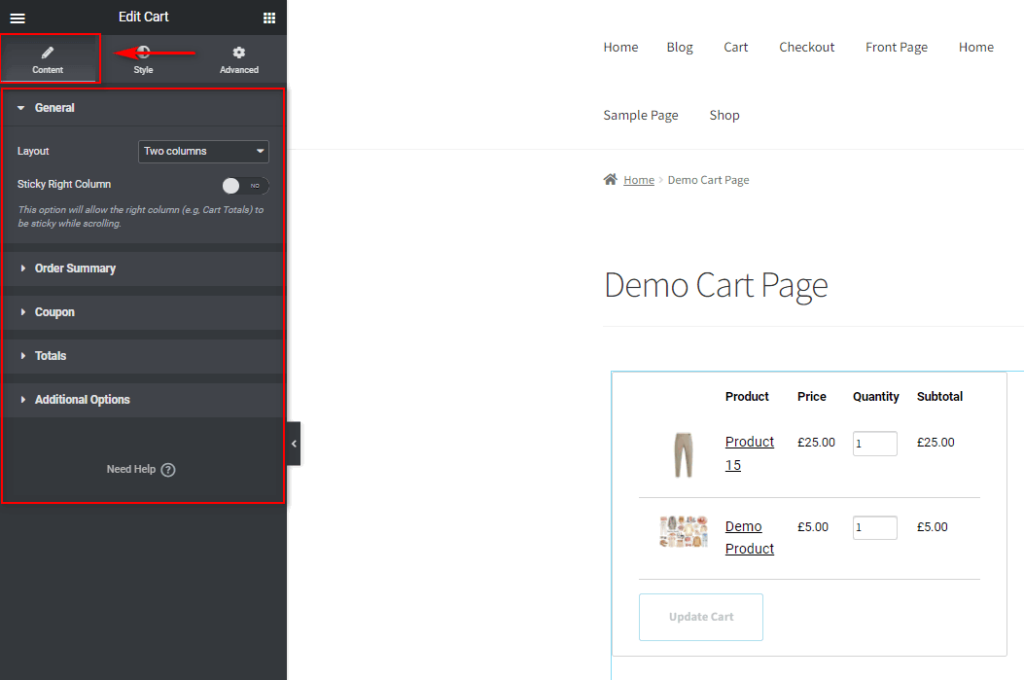
Next, configure your cart widget using the Edit Widget options on the left. You can use the Content tab to configure different elements such as:
- Column Layout ( One Column/Two Column Checkout.)
- Update Cart text.
- Apply Coupon text.
- Cart Total customization.
- Cart Auto-update options.
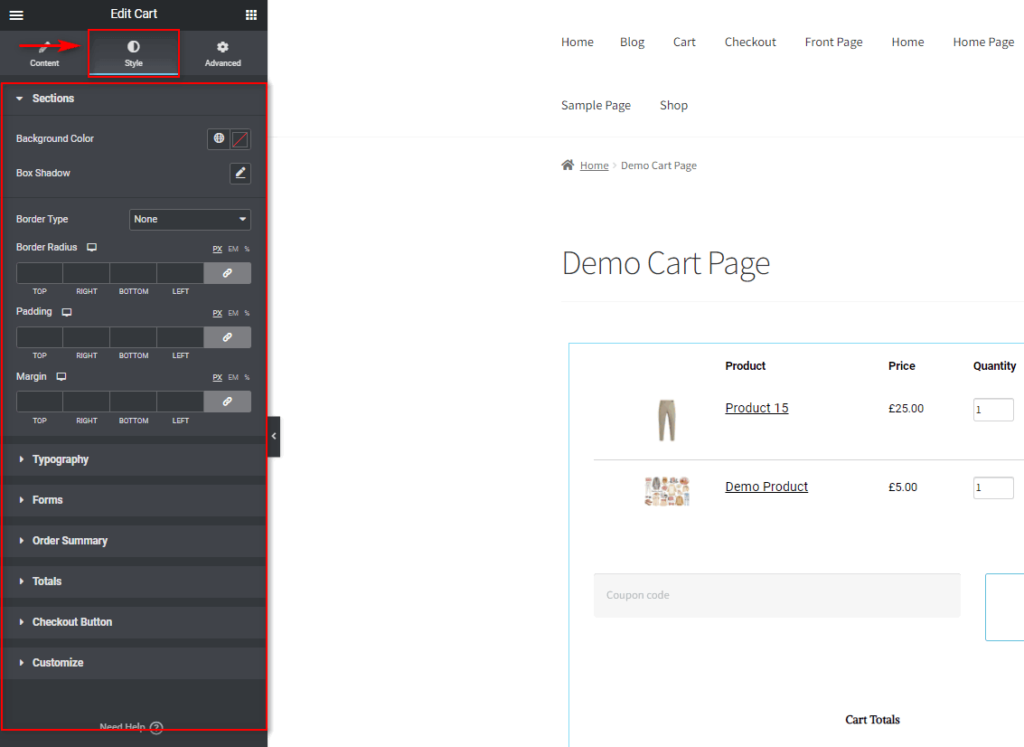
Of course, you can configure the styling, font, colors, and more for all these fields and elements using the Styling tab as well.
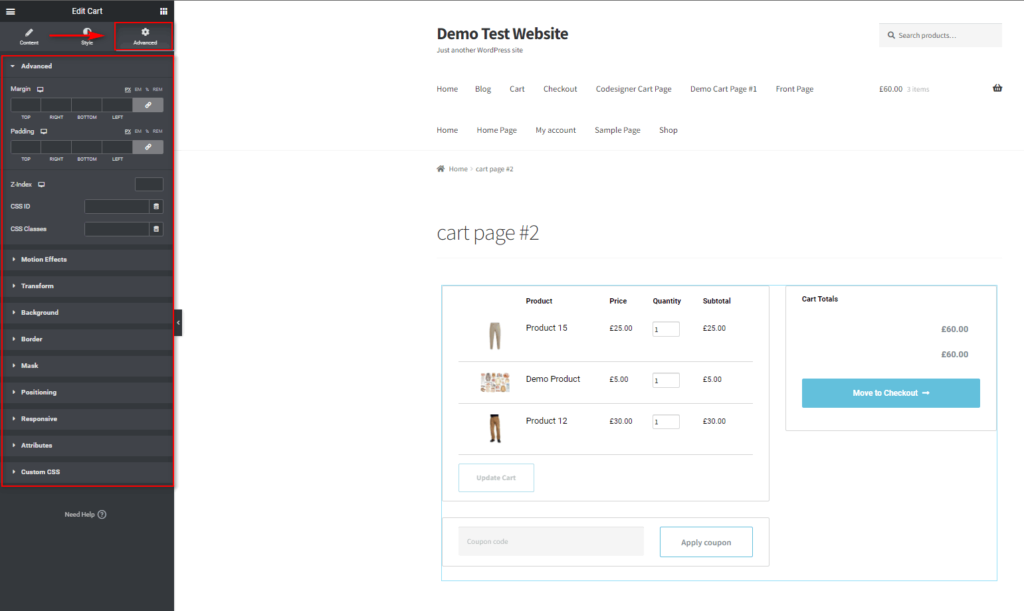
Similarly, the advanced tab lets you configure all the custom animations, backgrounds, motion effects, and more.
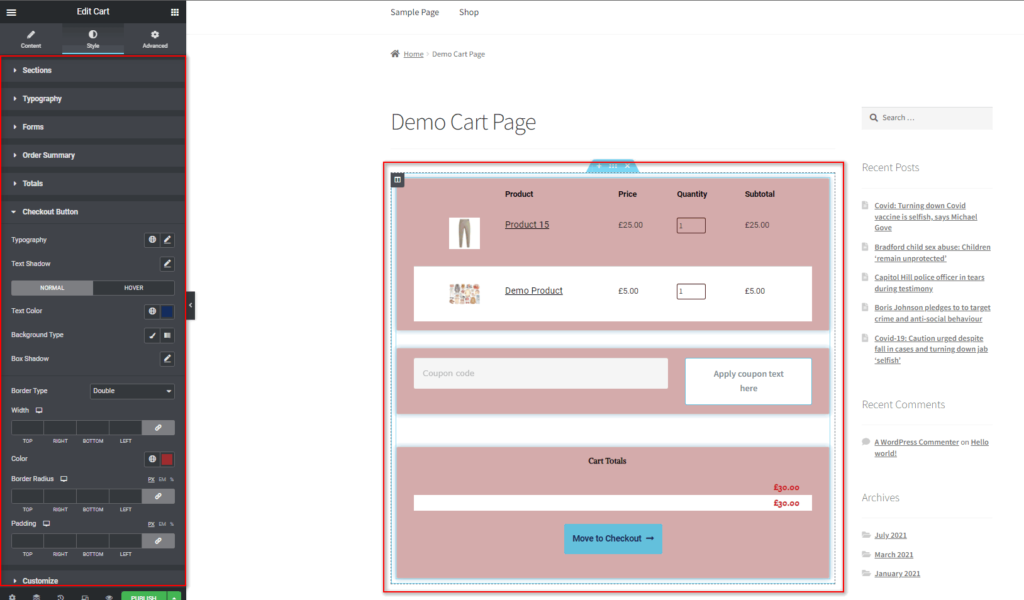
If you want to configure a few options on the styling, click on the Style tab. In this tutorial, we have given the sections box shadows. Click on Sections and then the edit button on Box Shadow. Then, click on the Color option to give your box-shadow a custom color.
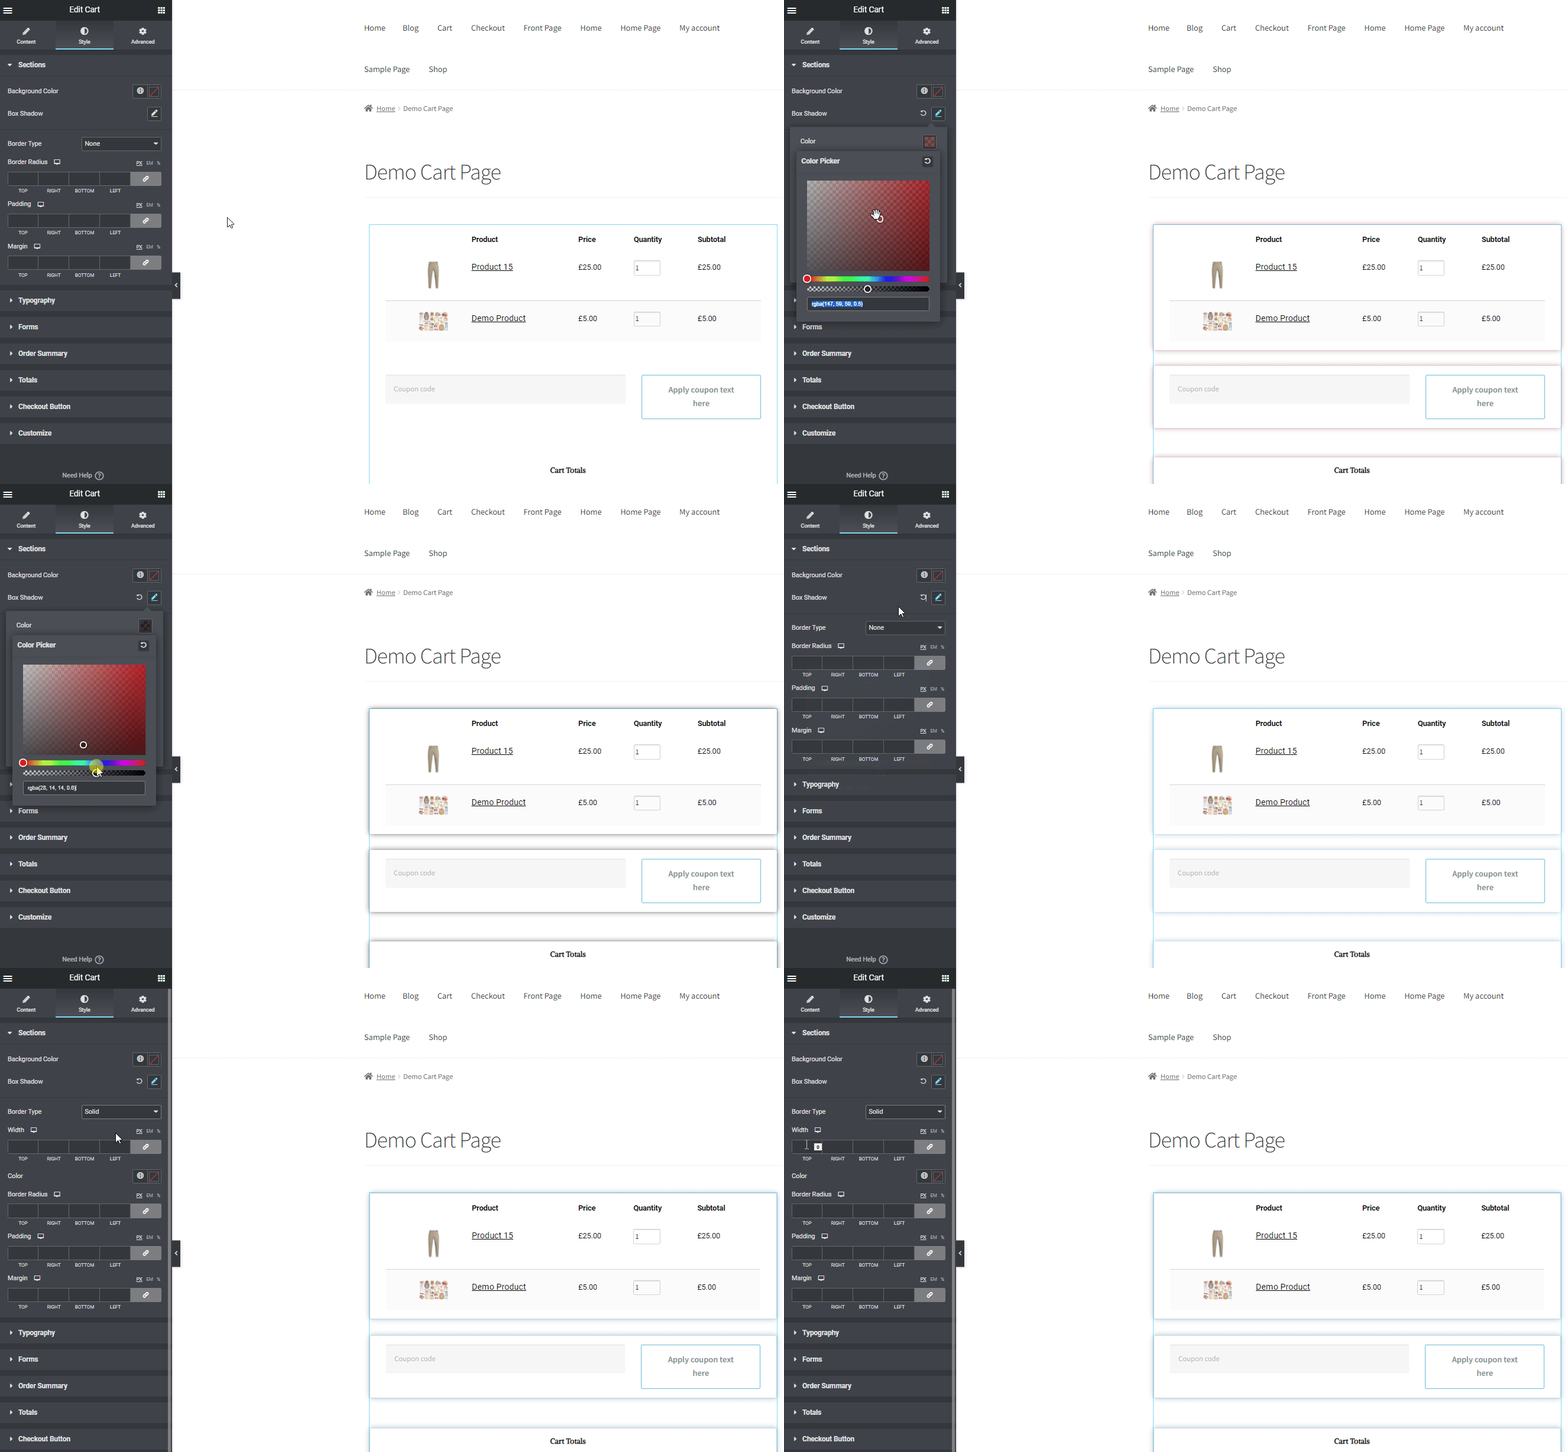
Now, give your cart a Border using the Border type option. For our demo, we’ve set this to Solid. Of course, you can customize both the border and the box-shadow using additional options.
Similarly, if you customize additional elements like Order Summary, Checkout button, and Totals, you should get a cart like this:
For now, we’ll keep this cart. But you can always go back and customize the cart page even more if needed.
Next, a few more elements can be added to the cart page. You can add them using the widget bar on the left using the same method as above.
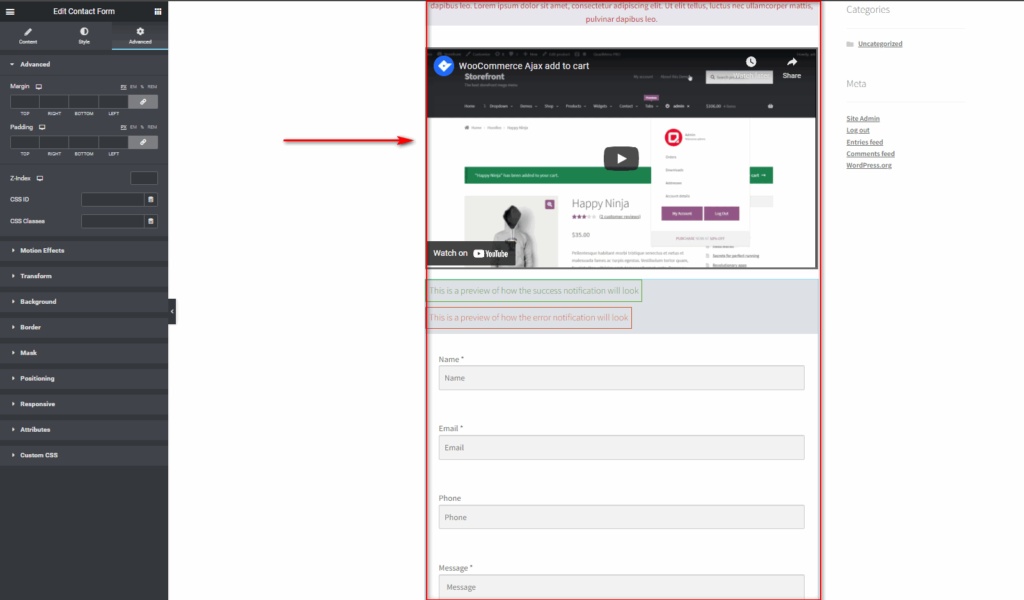
Let’s go ahead and add a disclaimer text, a video, and a contact form. These are all great elements to add to help your customers with inquiries and information regarding order notes, shipping, and more.
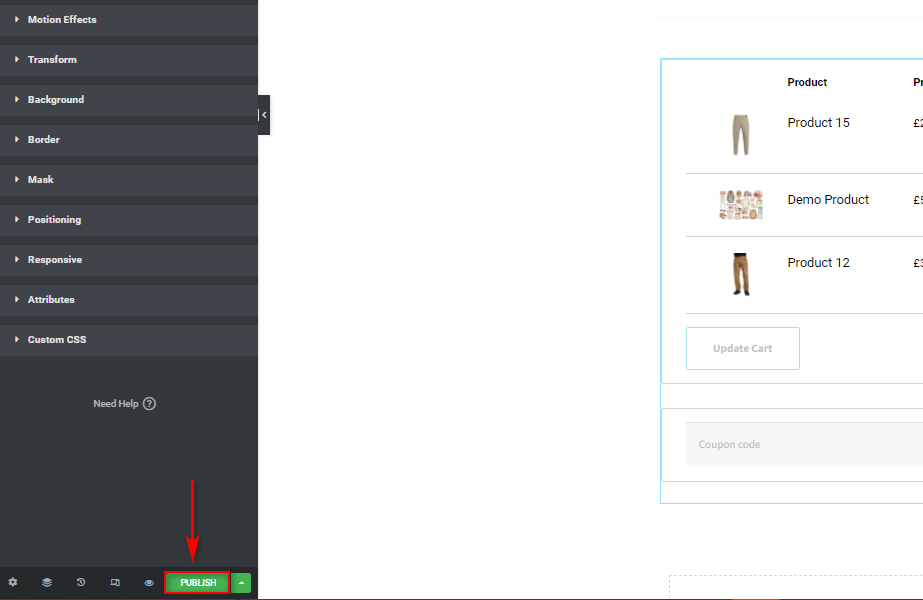
Once you’re done you can publish this custom page and finish editing. However, we suggest adding this as a custom template for future customization if you’d like. Just click on the arrow button next to the Publish button on the bottom and click on Save as Template. Then, give the name of your custom cart template and click on Save.
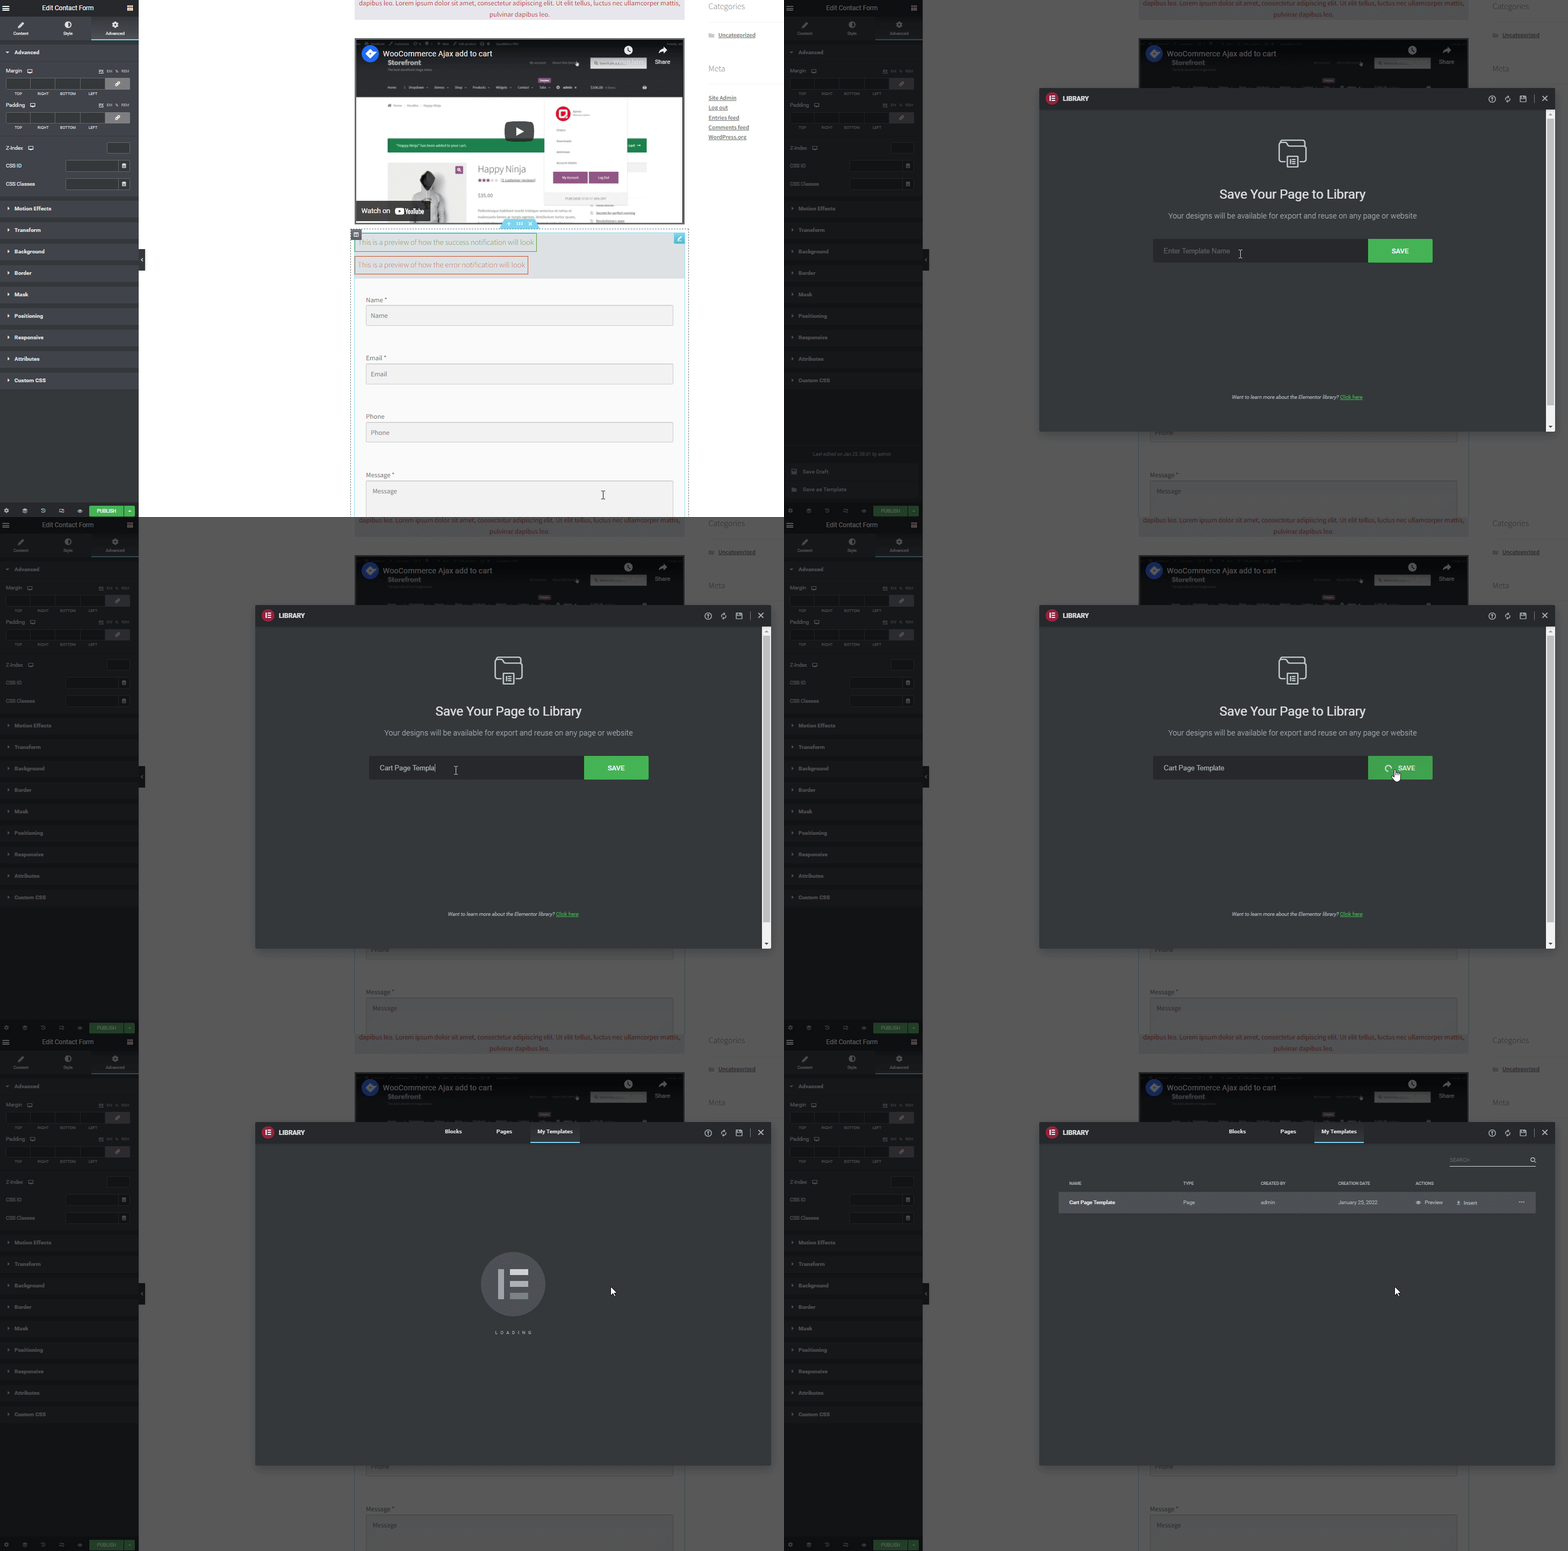
Finally, you can finish customizing your custom cart page by clicking on Publish.
Setting your customized Cart page as the WooCommerce Cart Page
The above process simply builds your customized WooCommerce cart page.
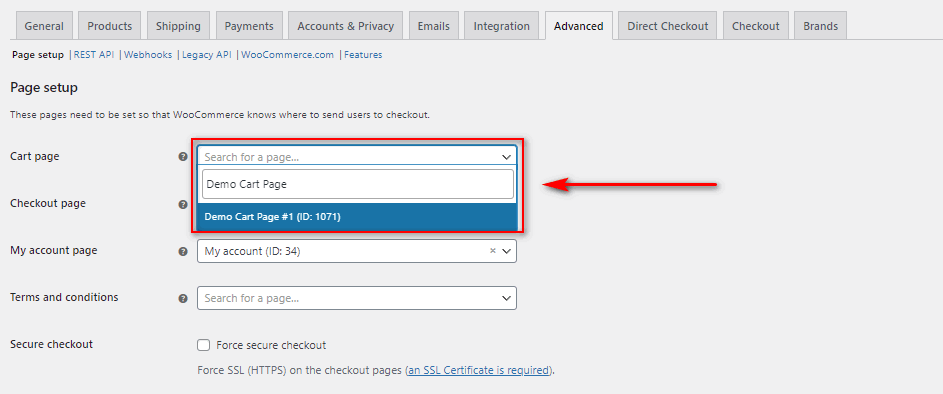
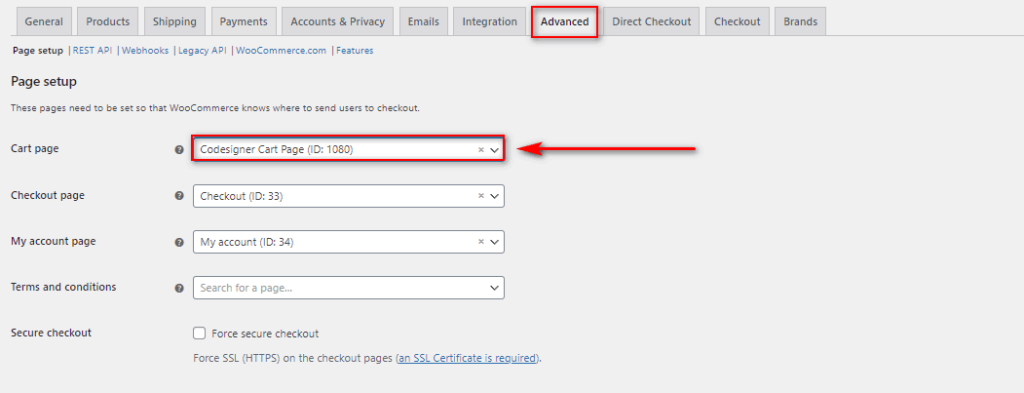
Once you create your customized WooCommerce cart page in Elementor, you need to define this new page as the cart page WooCommerce needs to use. You can do this by opening your WooCommerce settings by clicking on WooCommerce > Settings from your WordPress dashboard. Then, click on the Advanced tab to access your Page Setup options.
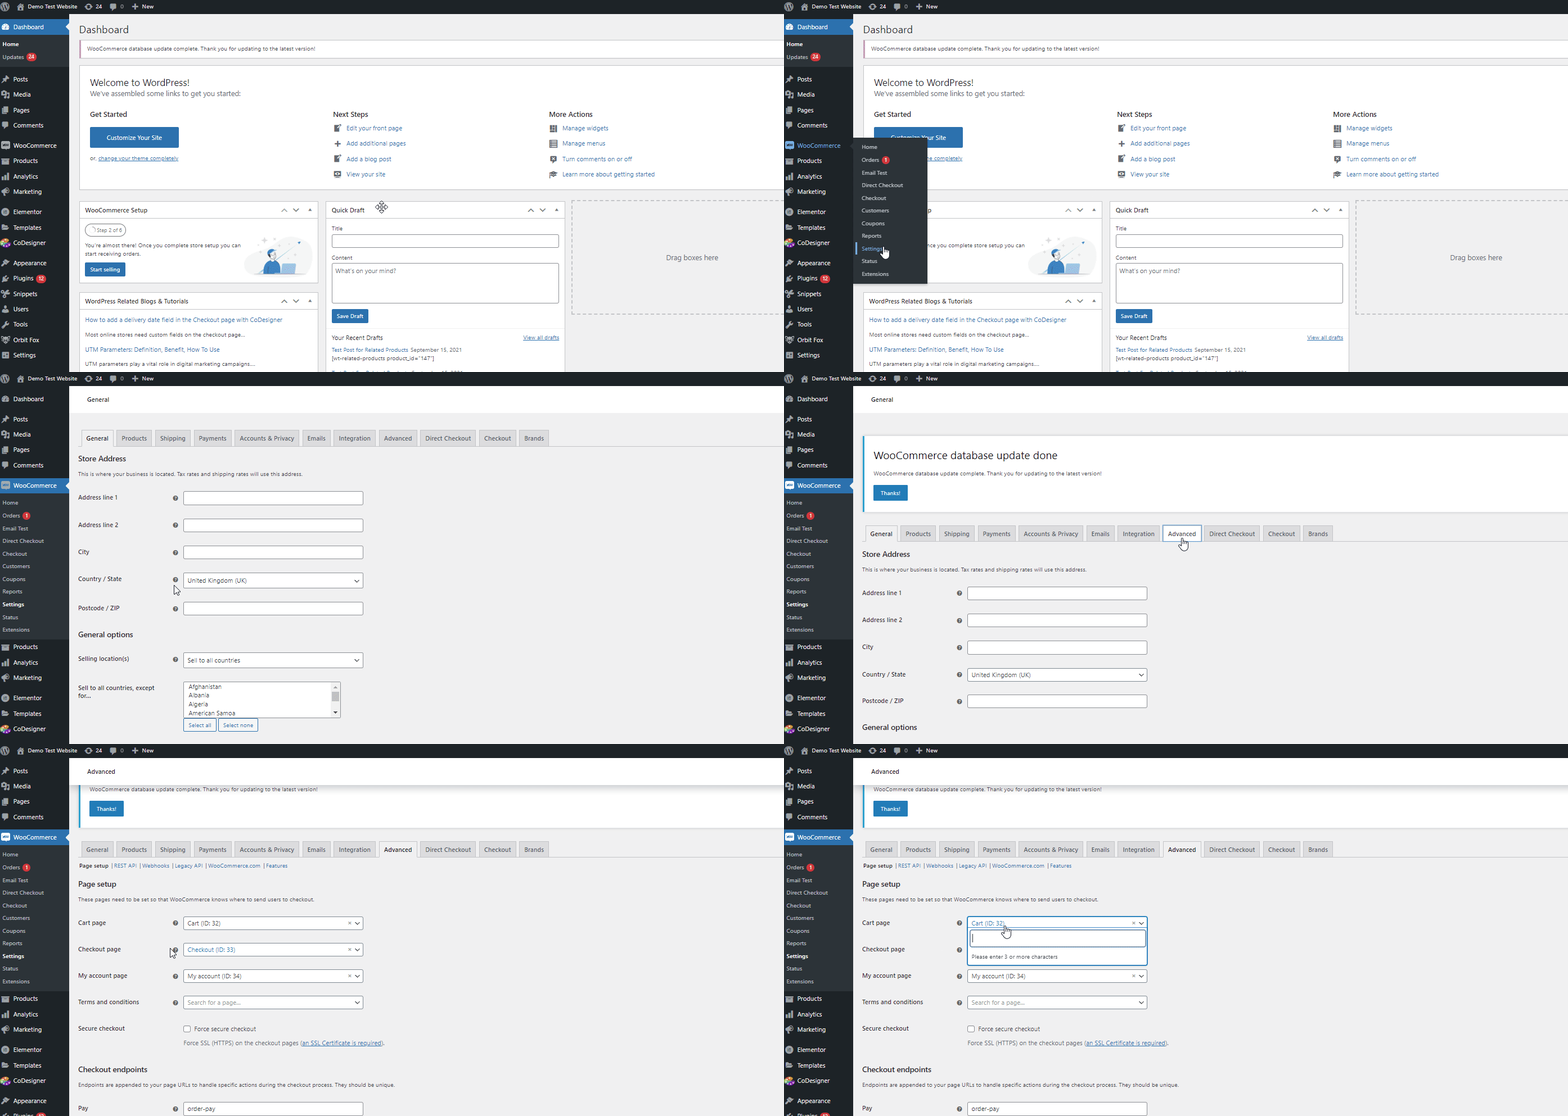
On your Cart page option, go ahead and search for the name of the page you just created. For us, it will be Demo Cart Page. Click on your customized cart page, scroll down and click on Save Changes.
This will save your newly customized page as your default WooCommerce Cart page.
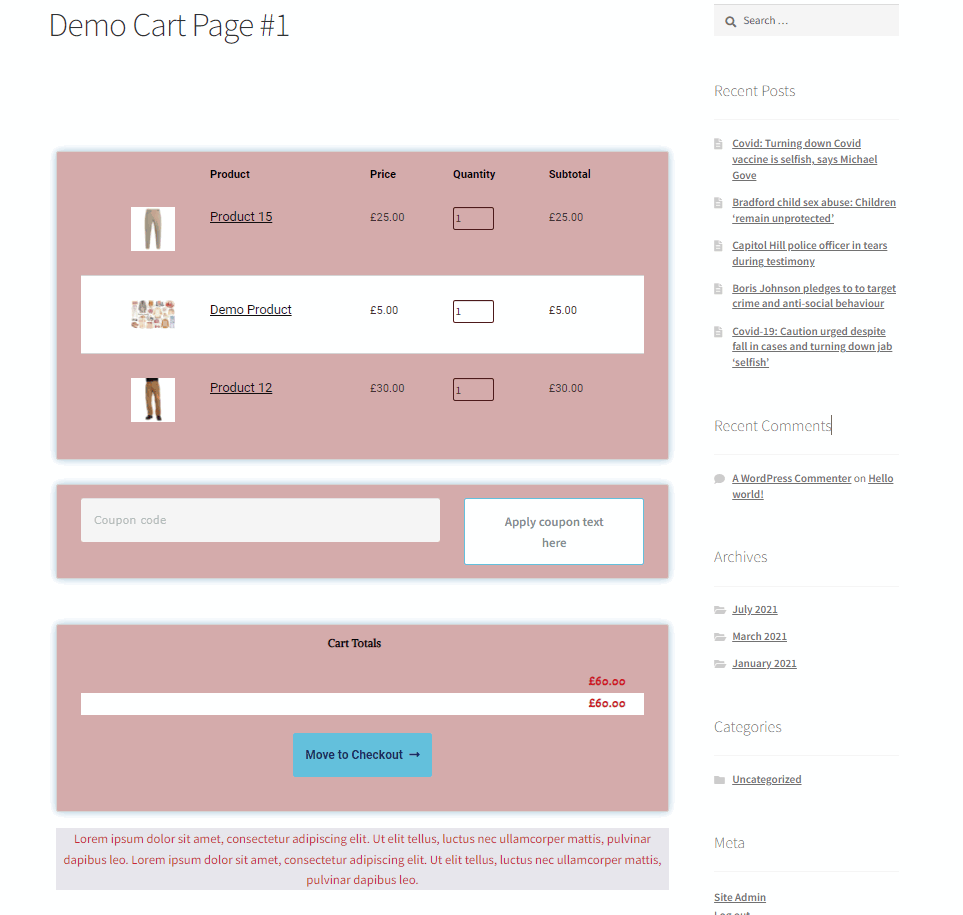
Using WooCommerce Templates to customize WooCommerce Cart page in Elementor:
You can clearly see that the above steps are only the basics for creating your custom WooCommerce cart page. Of course, there’s a lot of work involved when it comes to customizing your WooCommerce cart page with Elementor. But you are also completely free to use a simple cart page design with a bit more styling and customization but for the maximum benefits.
If this approach suits your needs more, we recommend using Elementor templates. These are made from tons of template options and template plugins available for Elementor.
To set up our WooCommerce cart page, we’ll also be using a free Elementor Addon that comes with dedicated Cart page templates for our demo. While there are tons of Elementor addon and template plugins available, we’ll be using CoDesigner for this demo. This is one of the easiest and hassle-free ways to get a perfectly crafted cart page ready for your website.
So let’s start by installing the plugin.
Install the CoDesigner Plugin:
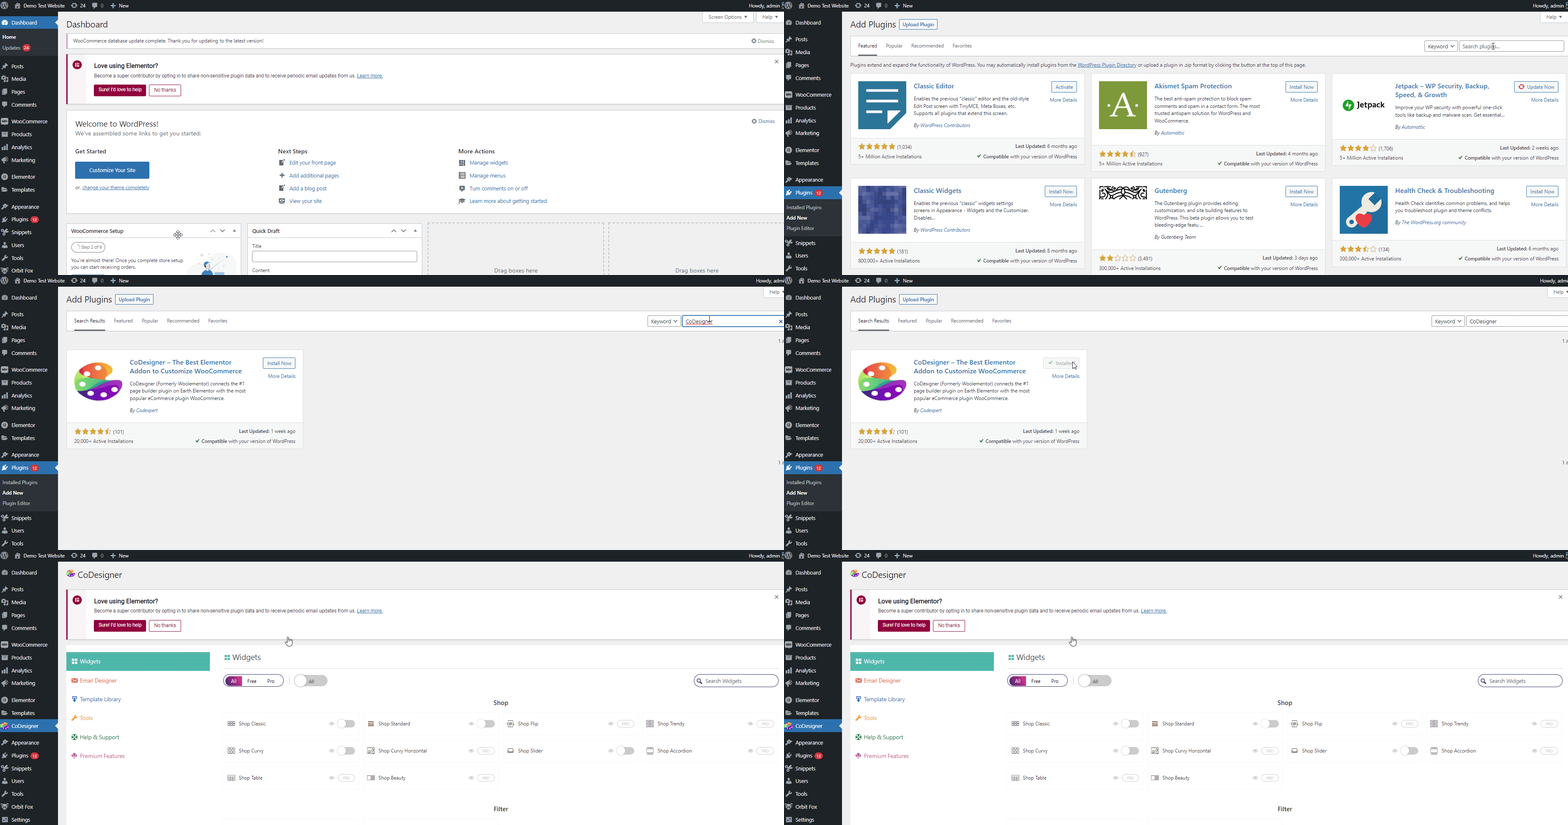
Open your WordPress Admin Dashboard and go to Plugins > Add New. Then, use the search bar on the top right to search for ‘CoDesigner’ and click on the Install Now button to install it.
Once the installation is complete, click on Activate to finish the installation and activation process.
Enabling the CoDesigner Cart Widgets:
Before you add your CoDesigner widget to your cart page, you need to enable the widget in the CoDesigner dashboard.
So open CoDesigner on your WP Admin Dashboard. It will open the CodDesigner dashboard. Then, click on Widgets.

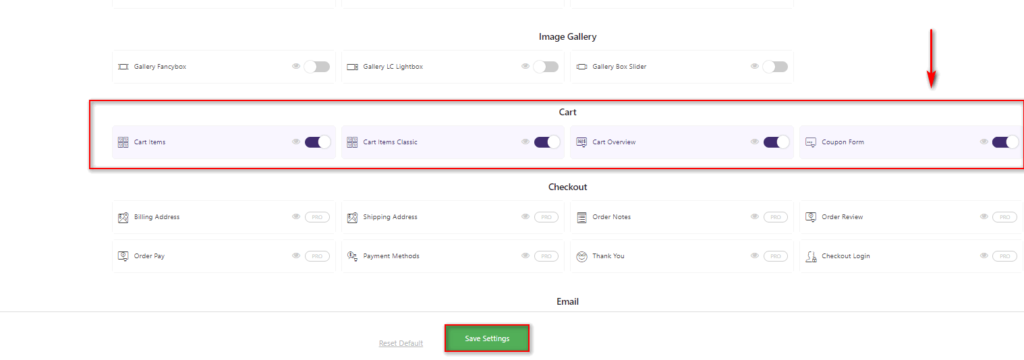
Next, scroll down the Cart sections and enable all the widgets under them. These will be added to your Elementor Widgets menu directly. Now, you can directly add your CoDesigner custom widget straight to your cart page.
Finally, click on Save Settings to enable the widgets.
Using CoDesigner Cart Widgets and Templates:
The process to create and customize the WooCommerce cart page in Elementor using Codesigner is identical to the above process using Elementor.
Simply create a new page by clicking on Pages > Add new and name it. After this, click on edit with Elementor as above.
Once you have your new page opened in the Elementor page builder you’re ready to add your CoDesigner templates. Simply click on the CoDesigner icon on the Drag Widgets here section.
Then, under the Blocks tab, use the category drop-down menu and select Cart. Use an appropriate design that is perfect for your website and click on Insert.
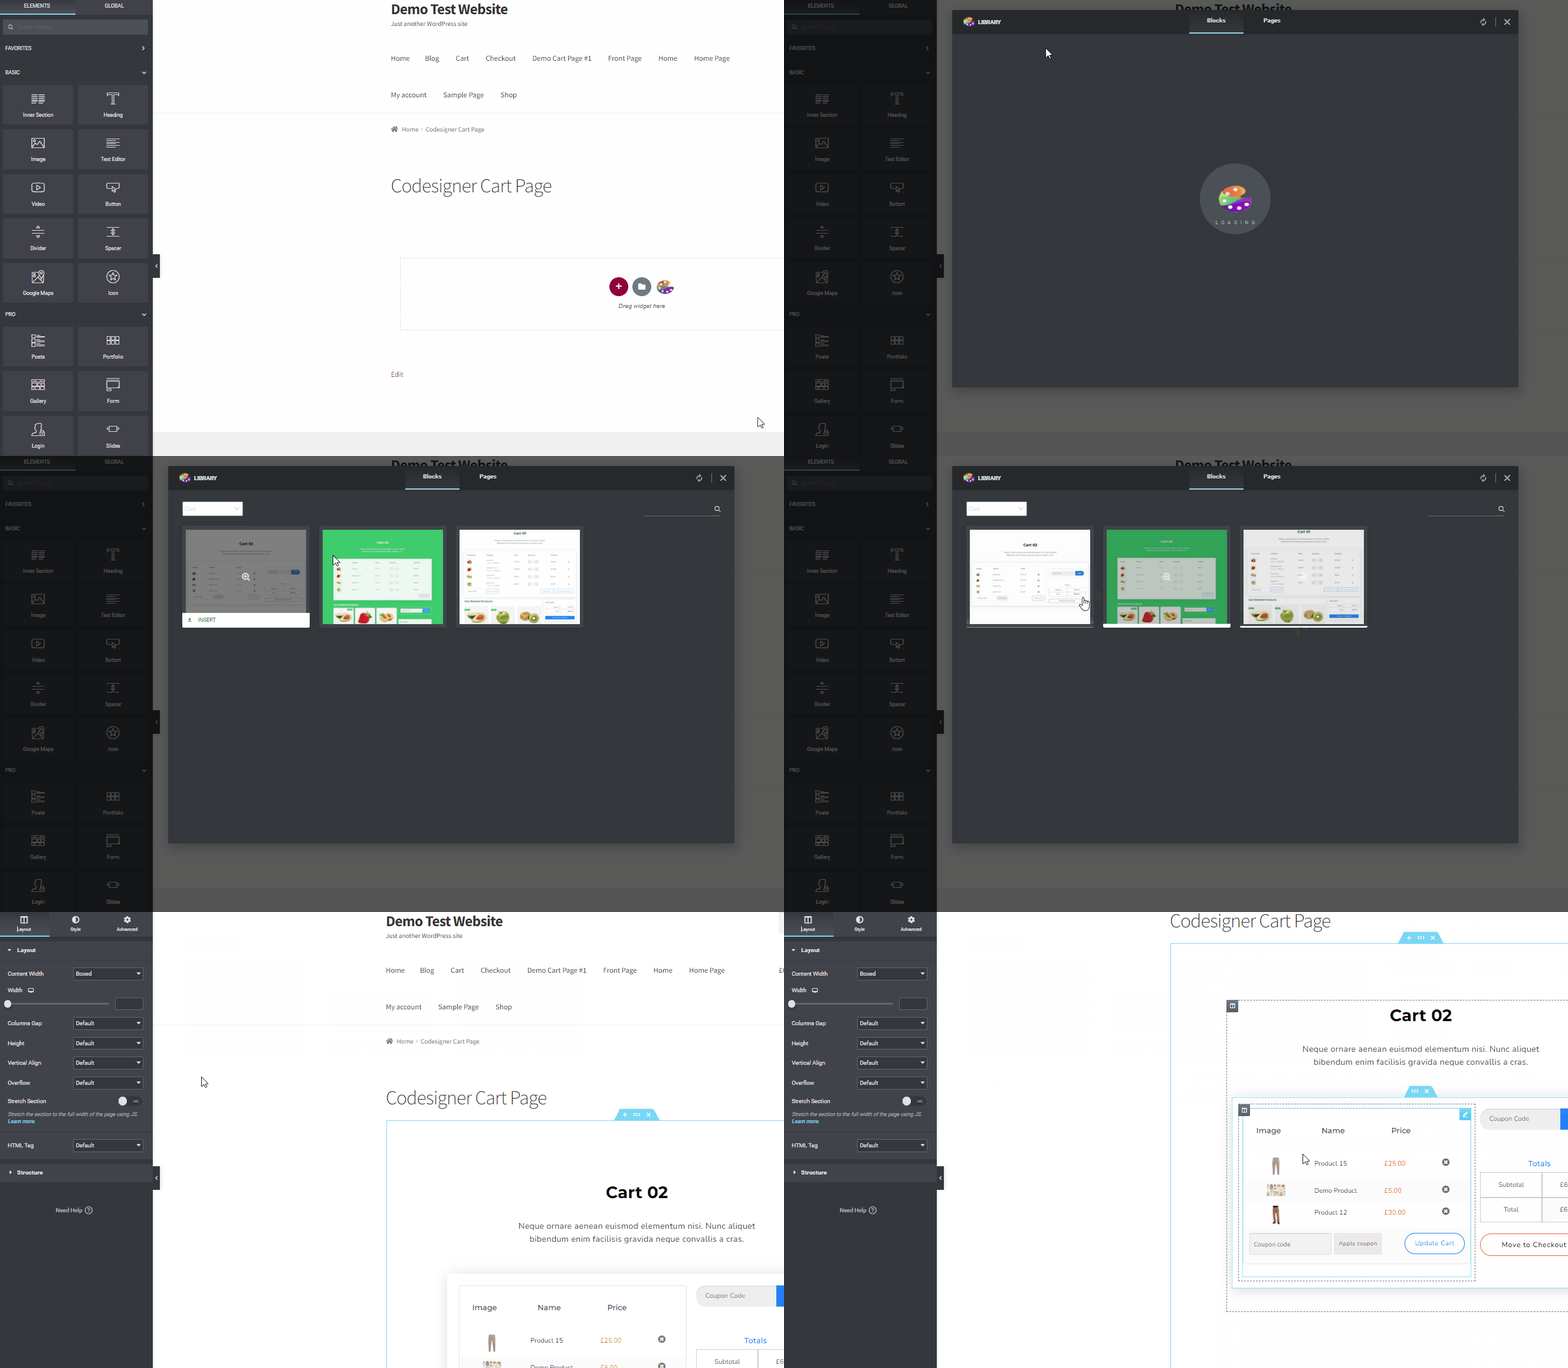
If your CoDesigner widgets were activated, your cart page template should show up perfectly. Of course, this is still just a template so you do need to customize the text and other elements manually.
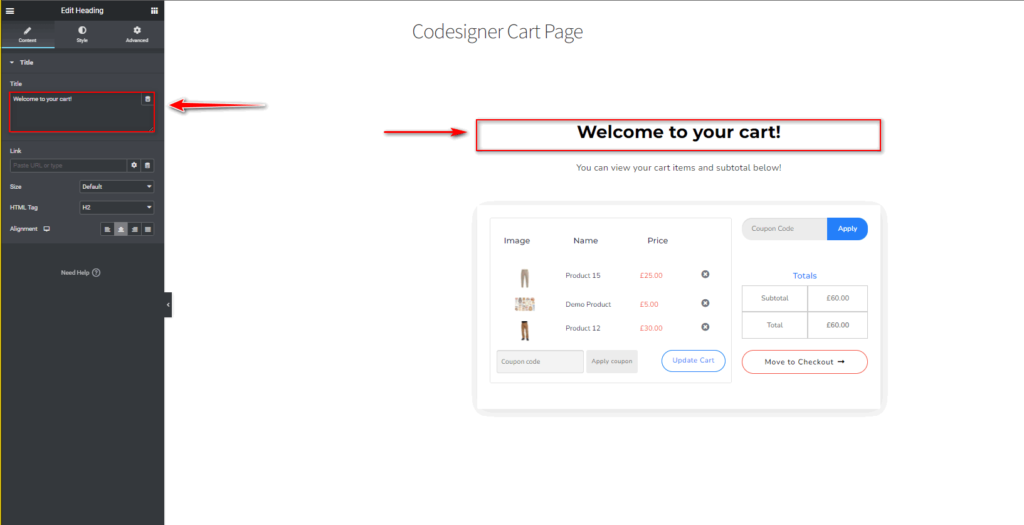
Let’s start by replacing the Heading text. Click on the Heading widget and use the customization menu on the left to add your own custom text.
Similarly, do the same for the text fields below it.
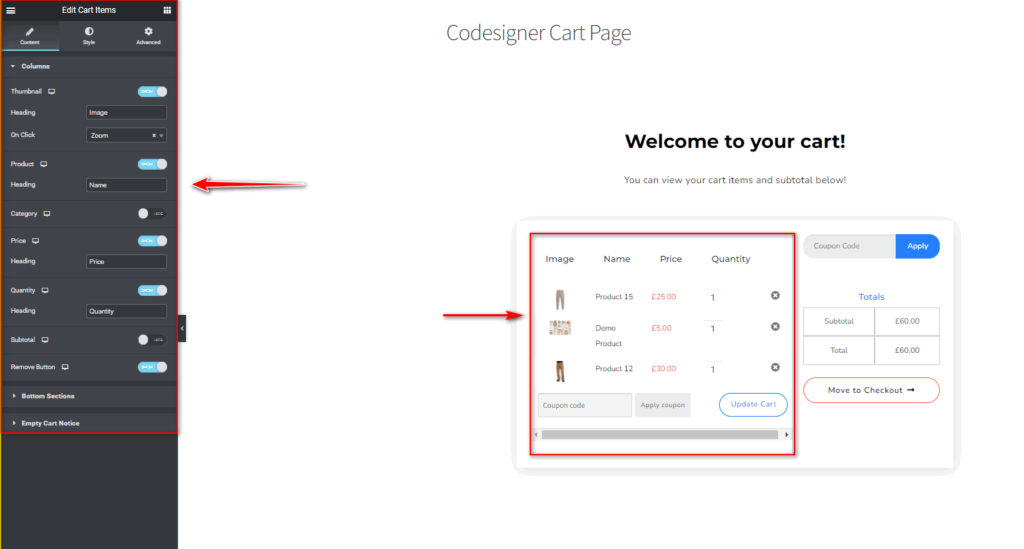
You can also click on each cart widget and customize additional options such as thumbnail, item subtotal options, and quantity fields.
Just like the steps mentioned previously, you can also style and edit all the fields and widgets and customize colors, typography, padding, and so on. Simply click on any widget and use the styling and advanced tab. It’s just that easy!
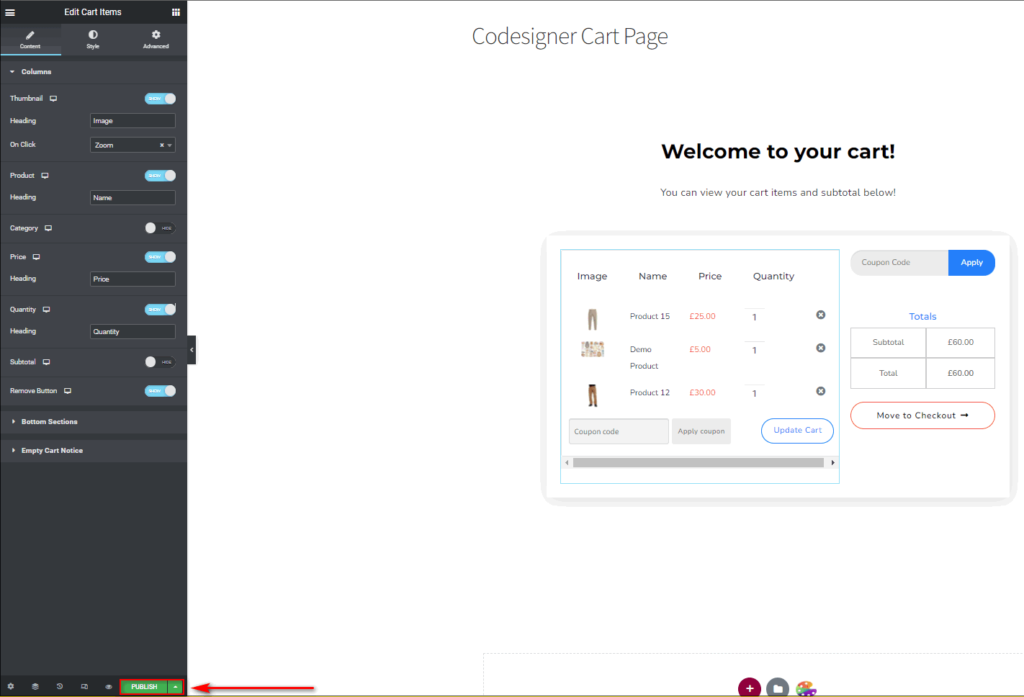
Once you’re done, click on the Publish button to save your custom cart page or save it as a template in the same way as mentioned earlier.
Once again, go to WooCommerce > Settings > Advanced and select your newly cart page under the Cart Page field. Then click on Save Changes to finish.
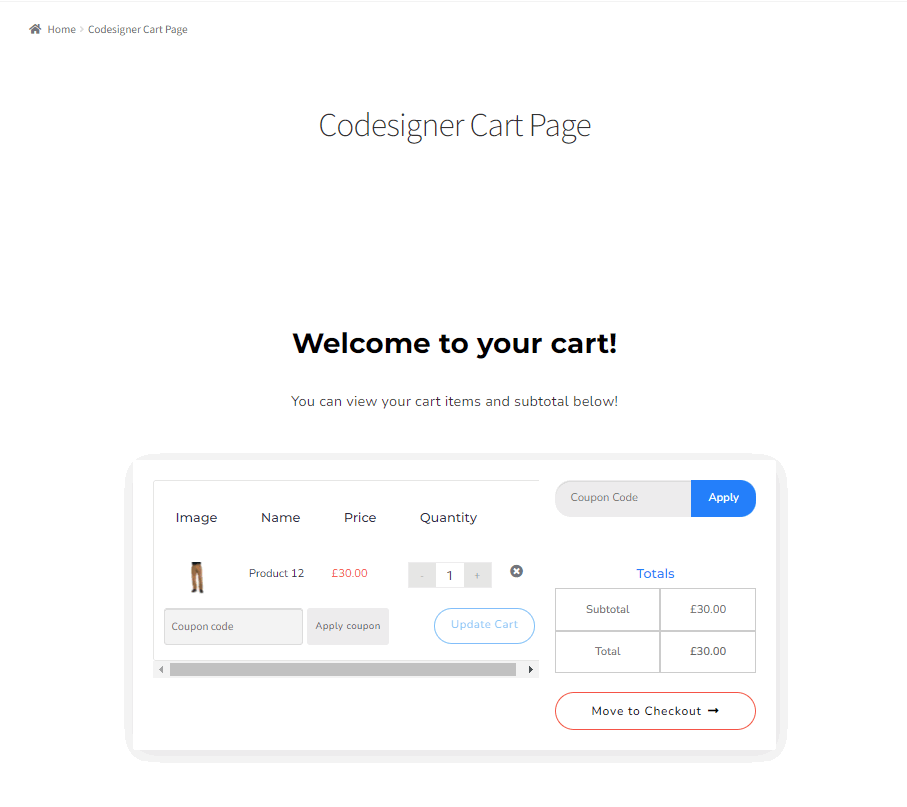
Now you should see your new cart page on your frontend
Conclusion:
And that ends our guide on How to Customize WooCommerce Cart Page with Elementor. Elementor is one of the most powerful website building available for customizing WooCommerce and WordPress sites. Whether you use addon widgets and templates, you have a myriad of tools available for you to customize every nook of your website.
Here are some great tips for you when you’re customizing WooCommerce Cart Page in Elementor:
- Make sure your customized cart page is completely usable on both mobile and desktop using the responsive option.
- Use Elementor’s color styling and typography options to make sure your cart page matches with the rest of your theme design.
- It’s a great idea to customize your cart page and your checkout page so they match each other.
- Consider additional elements like related products, featured products, trust badges, etc to your cart page.
Were you able to figure out how to customize your cart page? Have trouble with setting up your addons or templates? Let us know in the comments about how you were or weren’t able to customize your cart page. We love to help our readers with their issues and hear their opinions regarding WordPress and WooCommerce customizations.
If you’re looking for other guides customizing various other WooCommerce pages using Elementor why not check our some of our other articles here:


