How to Customize WooCommerce Cart Page
Do you want to edit your cart page to make it more user-friendly and get the best out of it? You have come to the right place. In this article, we will show you different methods to customize the WooCommerce cart page.
Before we see how to do that, let’s first have a look at the default cart page and understand why you should customize it in the first place. Let’s better understand what you can customize and how it will benefit your store.
Why Edit the Cart Page?
As a store owner, you should try to optimize every single aspect of your business. We have previously seen how to customize the Shop Page, the Product Pages, and the Checkout Page. In this post, we’ll focus on the Cart Page.
The cart page is key when it comes to customers’ purchase decisions. It is where the shopper reviews their order before finalizing the purchase. Thus, your cart page should offer added value to the customer to enhance their chances of conversion.
Cart abandonment is one of the online stores’ main pains as around 80% of users abandon their carts. That’s why you should pay special attention to your cart page. Even a small improvement in your cart abandonment can have a great impact on your sales.
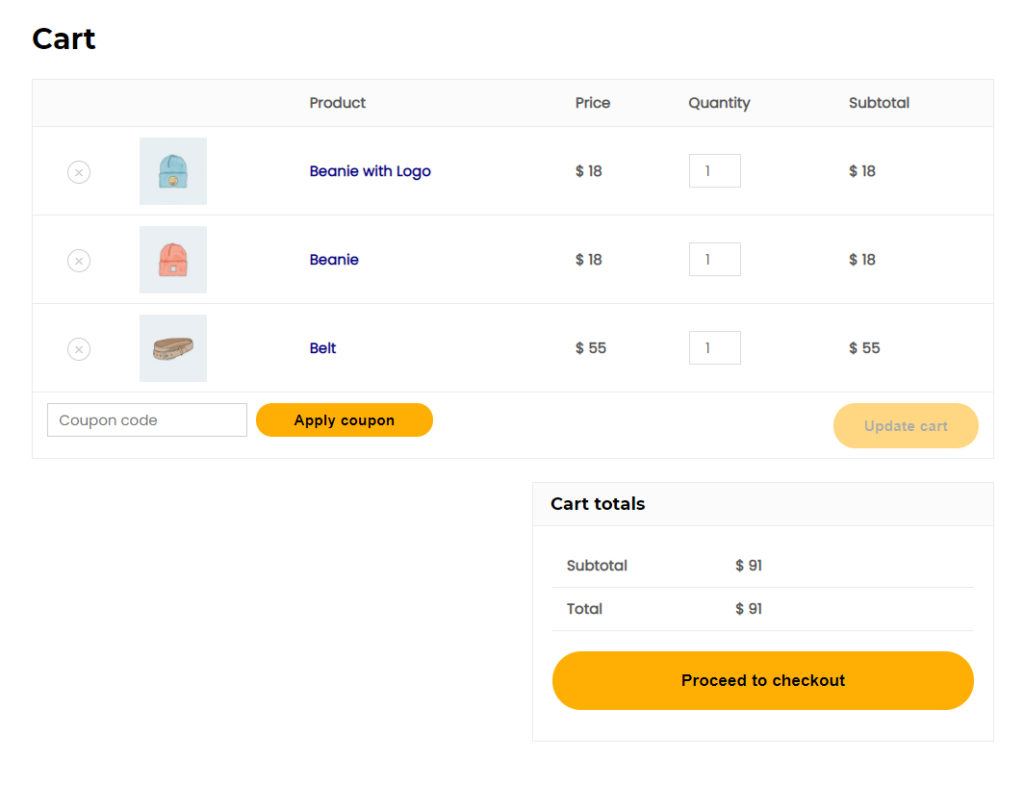
By default, the way the cart page looks and behaves depends on your active theme. For instance, here’s how the cart page looks with the Astra theme.
And here is how it looks with the default Twenty-Twenty One theme.
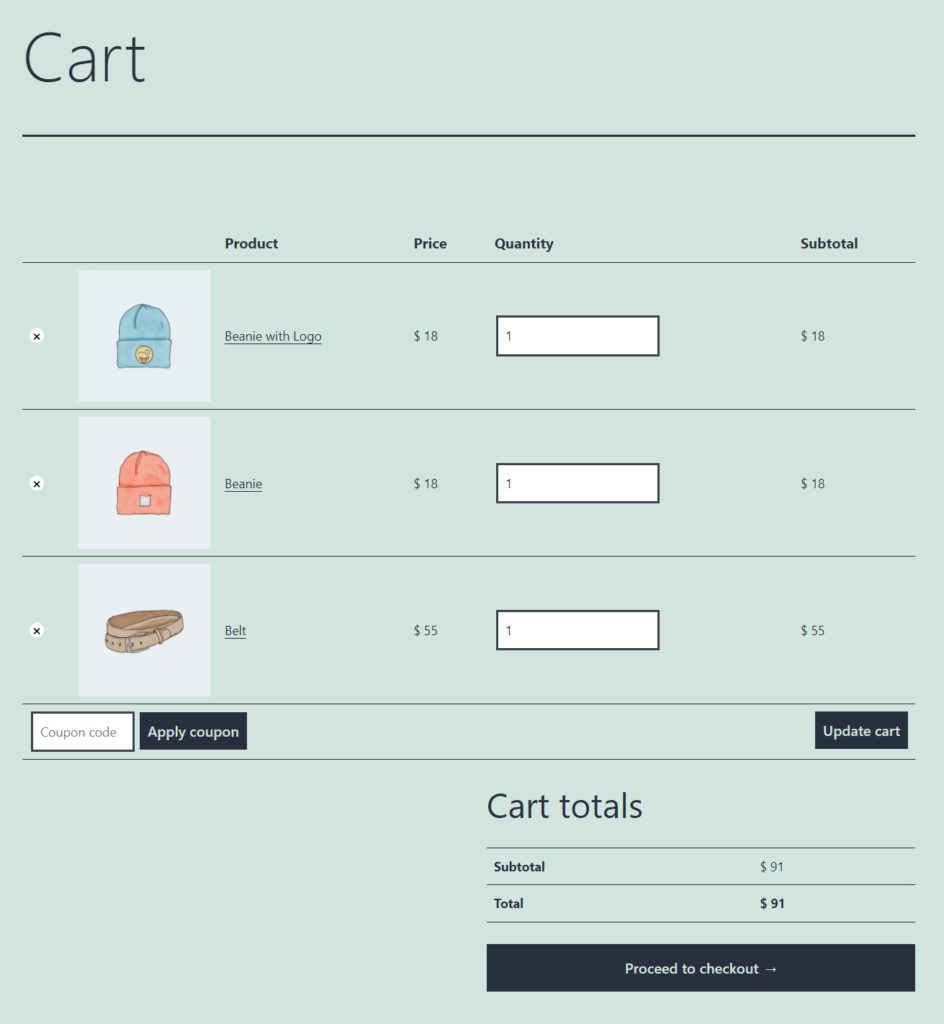
As you can see, the look and feel of the cart page vary drastically with each theme. Moreover, the default cart page is quite basic. Even though it gets the job done, it doesn’t offer any extra functionality, missing out on opportunities for cross-selling, making special offers, and so on.
By customizing the cart page, you can improve your customer’s user experience. You may add a custom message for an important update, show related products, add a back-to-cart button, change the Add to Cart message, and much more. These things contribute to improving the user experience, which results in satisfied customers.
To sum up, improving the cart page can be very beneficial for your online venture and is something worth the effort. Now let’s move a step forward and see different ways to customize the cart page in WooCommerce.
How to customize WooCommerce cart page
There are different ways to customize the cart page on your WooCommerce store:
- With the default WooCommerce Blocks
- Using plugins
- With Page Builders
- Programmatically
Let’s have a closer look at each method so you can choose the best one for you.
1. Default WooCommerce Blocks
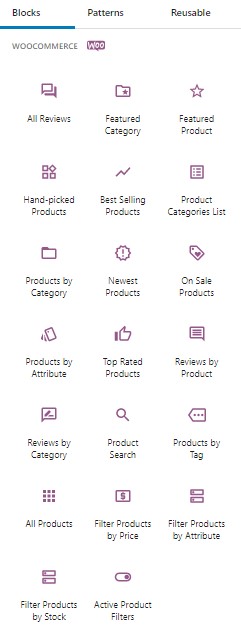
Gutenberg, the WordPress block editor, comes with a set of default blocks dedicated to WooCommerce. These include All Products, Featured Products, Filter Products, All Reviews, and many more. There is a total of 20 WooCommerce blocks that you can add to any page on your site, just like regular Gutenberg blocks.
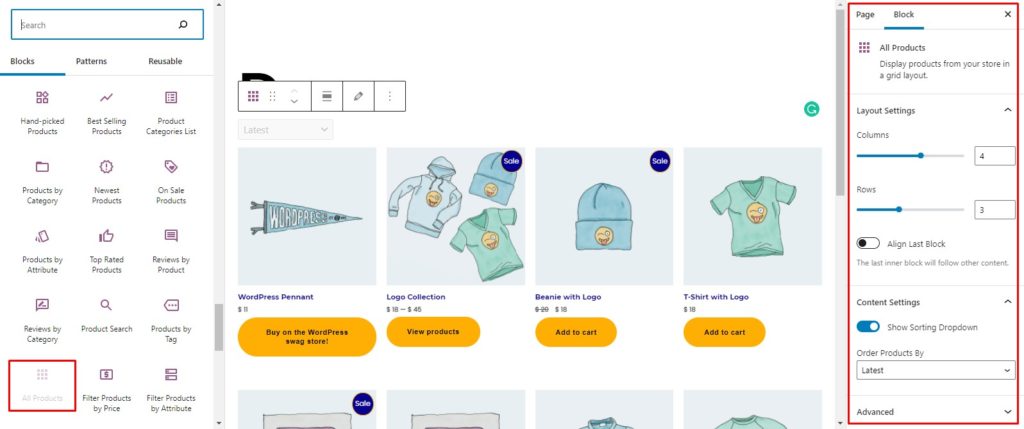
1.1) Add All Products Block
Navigate to your Cart page or create a new page in WordPress. Click on the + icon on the top left to unveil a complete set of blocks available for the Gutenberg editor. Then, scroll down to the WooCommerce Blocks section and find the All Products block. Click and drag it to the page area, and it will add the block to your page.
Once you have added the block to your page, all the products in your inventory will be displayed here. You can further tweak the settings of the products displayed from the settings menu in the right-most section and change the number of columns, rows, sorting, and more.
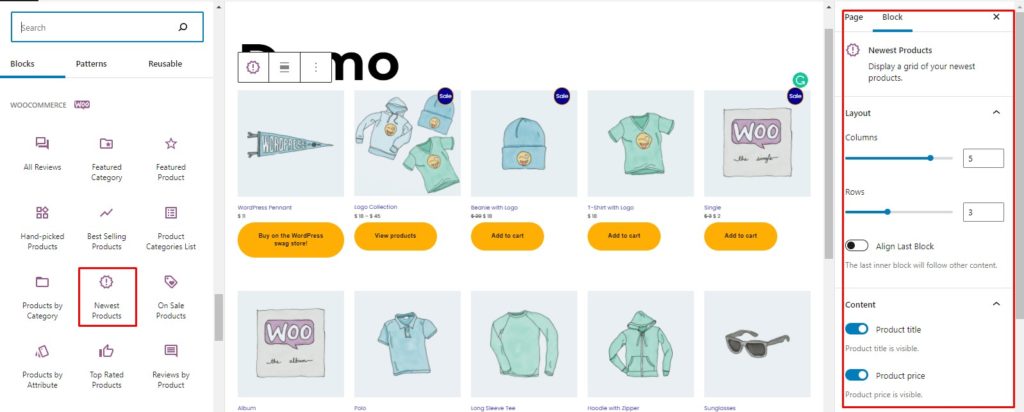
1.2) Add Newest Products Block
The Newest Products block will display all the new additions to your inventory. Simply click and drag the Newest Products block onto your page, and it will show your latest products. Additionally, you can customize the block’s settings from the settings menu.
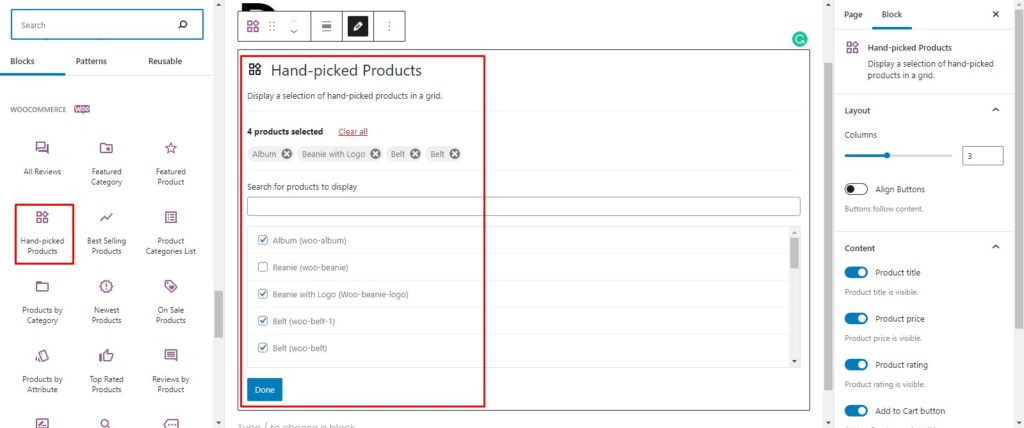
1.3) Add Hand-Picked Products
The Hand-Picked Products block allows you to manually select the products you want to display on a page. This can be a great tool to showcase some specific products on a page or highlight certain products on another page.
To add the block to your site, simply drag the Hand-Picked Products block onto the page. It will display a search bar where you can look for the products you want to highlight. Find your desired product and click on it to add it to the list. Similarly, you can repeat the process and add multiple products to the list.
Once you’ve added all the products you want to the list, hit the Done button, and voila! Your hand-picked products are now displayed on the page. Just as we saw before, you edit the settings from the settings menu.
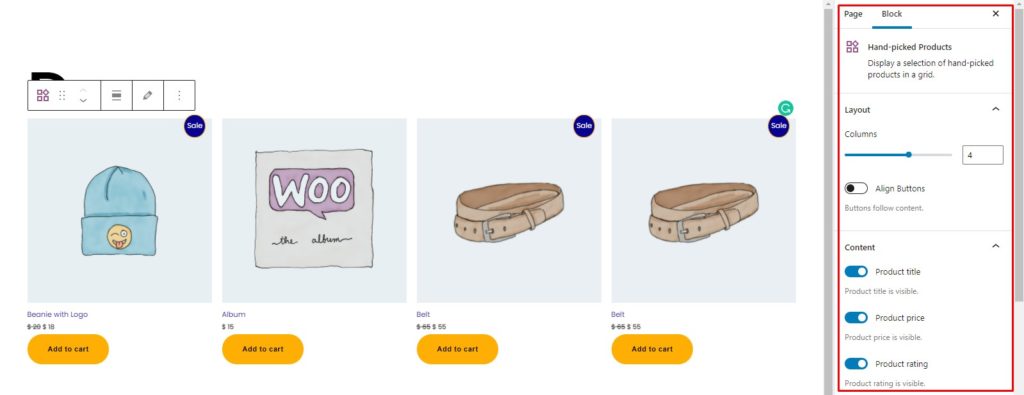
Similarly, you can add any other WooCommerce block that you wish. You can go for a single block on an entire page or multiple blocks on the same page. The possibilities are endless.
We have seen how the default WooCommerce blocks can help you customize the Car page. Now, let’s move on to the next section and see how we can customize the cart page using third-party plugins.
2. Plugins to customize Cart page
There are several plugins you can use to edit the Cart Page. In this section, we’ll have a look at some of the best ones.
2.1) WooCommerce Blocks
WooCommerce Blocks is an early access plugin to experimental WooCommerce blocks. It allows you to try out new WooCommerce blocks before they are released into the default block editor.
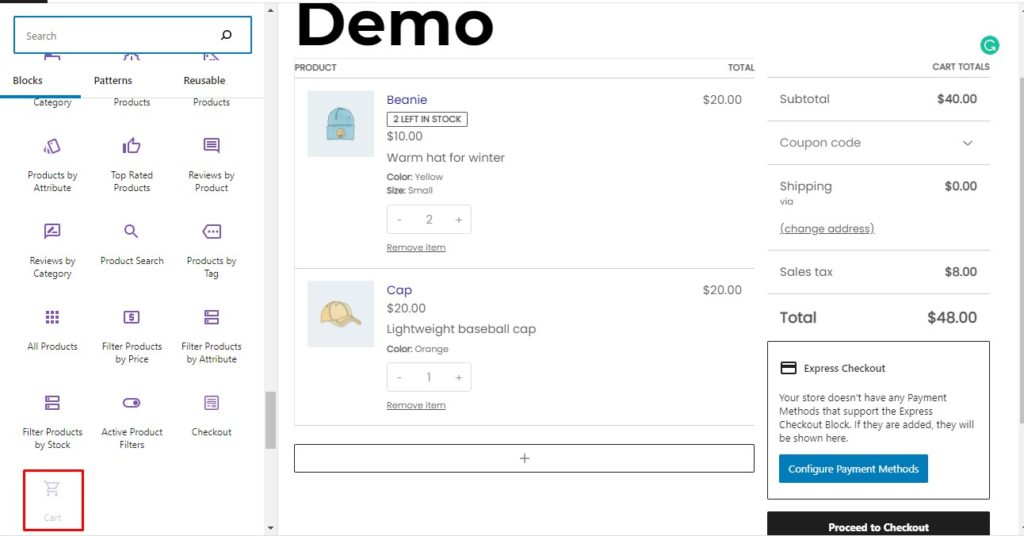
At the time of writing this post, the plugin adds two additional blocks: cart and checkout. When activating WooCommerce Blocks, the cart and checkout blocks are automatically added to the block editor, and you can use them in the same way as any other block.

To display the cart on a page, simply drag the cart block and your cart will show up. You can then customize each cart section individually and the cart block as a whole. Moreover, you can even edit it for both filled and empty carts.
Similarly, you can display the checkout form on a page and customize it to your liking. You can also personalize each block’s parameters in the settings as well as the entire checkout block.
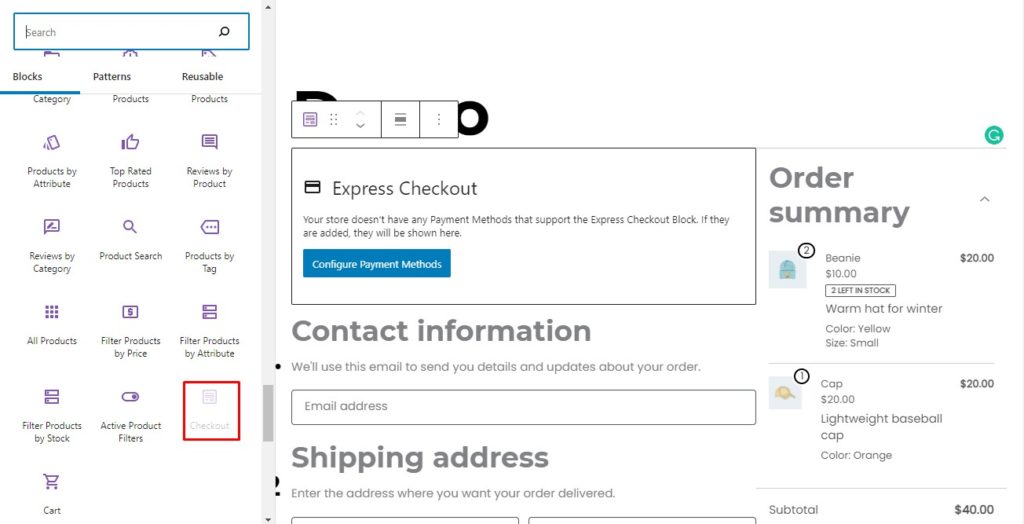
Furthermore, you can place numerous blocks on a single page alongside the cart or checkout page which wasn’t possible previously. This gives you a lot of flexibility and allows you to design the cart page exactly as you want it.
While adding these blocks, you may receive a compatibility warning indicating that the plugin may have compatibility issues with other plugins or extensions. This is because certain blocks are experimental and are under development. Therefore, they should only be used to try out new features and not in production. They will be rolled out as default WooCommerce blocks once they are stable.
Features
- Experimenting with new blocks for testing purposes
- Try cart and checkout blocks
- Report bugs and errors if any found
Pricing
This is a free plugin.
If you want to try more plugins to edit your Cart page, have a look at these other two:
2.2) StoreCustomizer
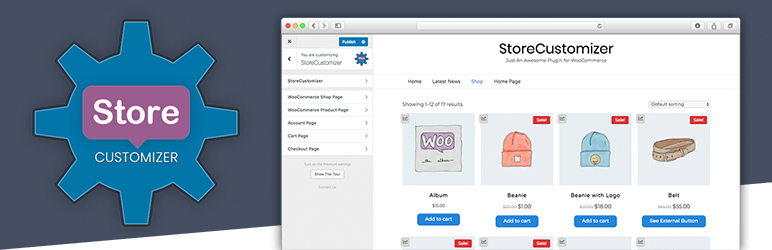
StoreCustomizer is an all-in-one package that allows you to fully customize your WooCommerce store. You may personalize anything from the product pages to the shop page, account page, cart page, and checkout page.
To begin with, you can customize global fonts and colors used throughout the store. You can also personalize each page individually, change its appearance, add new functionalities and features, and much more.
The plugin eliminates the need of writing custom snippets to customize parts of your WooCommerce store. It adds the required code itself, so there is no need to create any child theme or add custom code snippets because it’s all handled by the plugin.
Finally, all of the options are conveniently integrated into the theme customizer. As a result, it makes customizing the WooCommerce store seamless and painless.
Features
- All in one plugin to customize your WooCommerce Store
- Personalize products pages, shop page, account page, cart page, and checkout
- Change the design of the store to your liking
- Add extra features and functionality to your store without any coding
- Easy access via theme customizer, which makes customization effortless
- Extremely lightweight and only adds the necessary code itself
Pricing
This is a freemium plugin which means that it has both free and premium versions. While the free version provides decent customization options, the premium plans start at 49 USD per year for a single site and give you an advanced customization experience. They include one year of updates and support.
2.3) WooCommerce Fast Cart Plugin
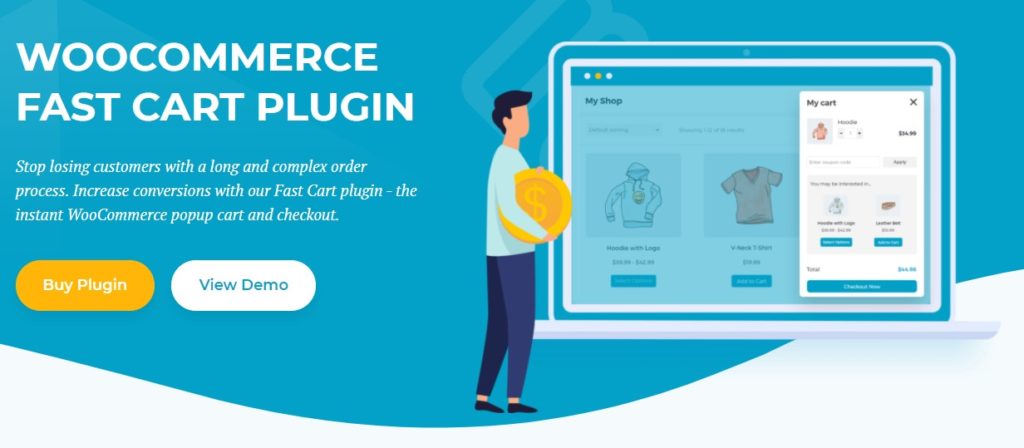
WooCommerce Fast Cart is designed to speed up the purchasing process for the consumer. Instead of having separate cart and checkout pages, you can use the plugin to create a pop-up cart and checkout pages. Moreover, you can just skip the cart page entirely and proceed directly to checkout.
Both the cart and checkout pop-up pages can be completely customized. You can modify the typography and colors to match the theme of your website. You can also adjust the position of the buttons and customize the cart layout.
Moreover, you can apply coupons from the cart page and use the pop-up cart to feature relevant products by enabling cross-sells. Finally, the plugin is extremely lightweight and well-optimized and supports all the widely used payment channels, such as PayPal, Stripe, and Amazon.
Features
- Add pop-up cart and checkout page for instantaneous conversions
- Set only cart or checkout or both pages in the pop-up
- Highly customizable
- Lightweight and optimized
- Works with all popular payment gateways like PayPal, stripe, amazon
Pricing
This is a premium plugin that costs 79 USD per year for a single site. You will also get a 30-day money-back guarantee.
In this section, we have seen some of the best plugins to customize the WooCommerce cart page. Let’s have a look at some of the customizations that we can accomplish. For demonstration, we will use the StoreCustomizer plugin. Let’s get started.
Customize the Cart Page using StoreCustomizer
StoreCustomizer is a feature-rich plugin that lets you customize nearly every aspect of your WooCommerce store. In the previous section, we had a look at the plugin’s features and functions. Now let’s see how you can use StoreCustomizer to customize the cart page.
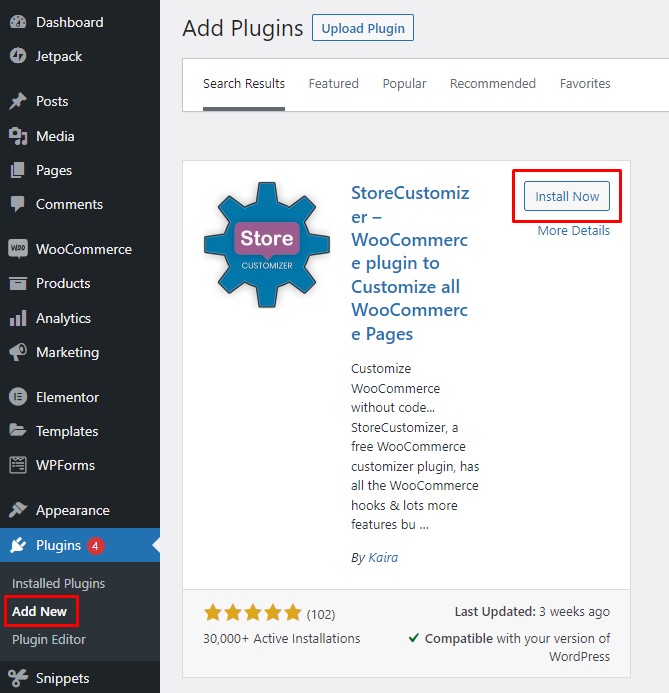
Install and Activate the Plugin
First, go to your WordPress Admin Dashboard and navigate to Plugins > Add new. Search for the StoreCustomizer plugin, click the Install Now button, and then activate it.
Customize the Cart Page
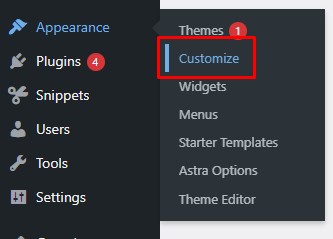
Once you have activated the plugin, go to Appearance > Customize to go to the theme customizer.
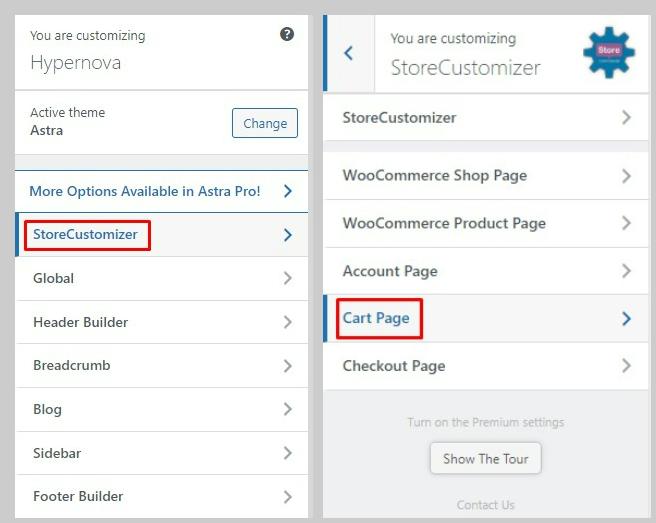
StoreCustomizer embeds its customization tools and features in the theme customizer. Simply navigate to StoreCustomizer > Cart Page from the theme customizer menu and you will find all the options to edit the cart page.
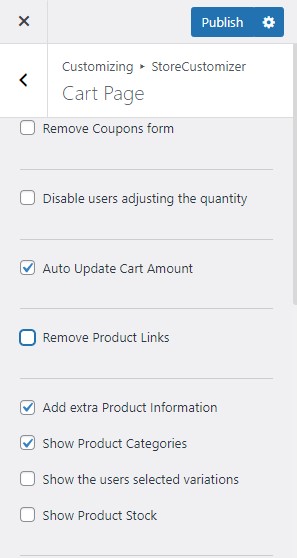
Basic Customizations
Starting with the basic customizations, you have a few possibilities. You can disable coupons from the cart page, prevent the user from changing the quantity in the cart, or have the cart auto-update when the user updates the item quantity. You can also delete links to the product page, display product metadata, list products in stock, and much more.
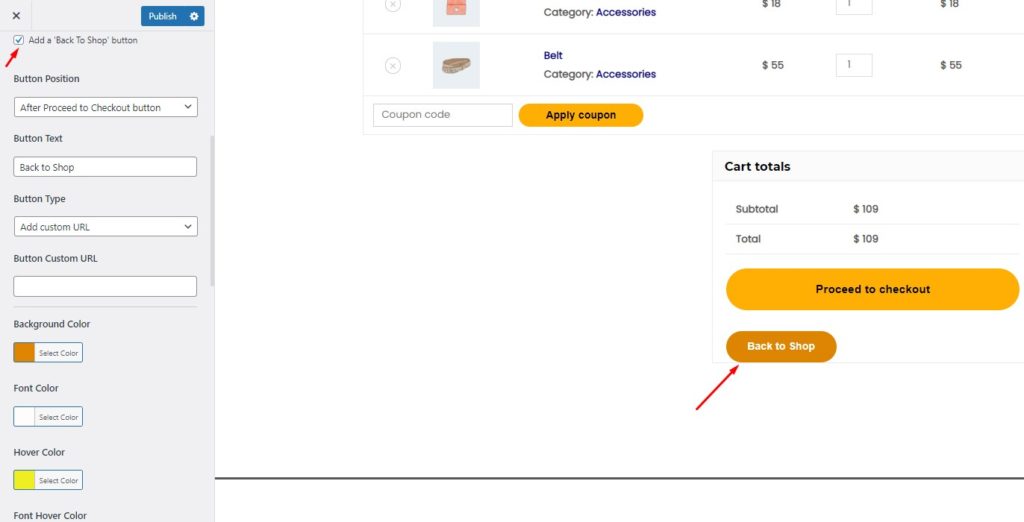
Add Back to Shop Button
A back-to-shop button allows the user to return to the store page if they need to add something to their cart. It’s a good idea to add that button as it provides customers with a better shopping experience.
StoreCutomizer allows you to add a back-to-shop button to your cart page and completely change the design and feel of it. Moreover, you can change the button text and link it to any page. Finally, you can also change the button’s position to suit your needs.
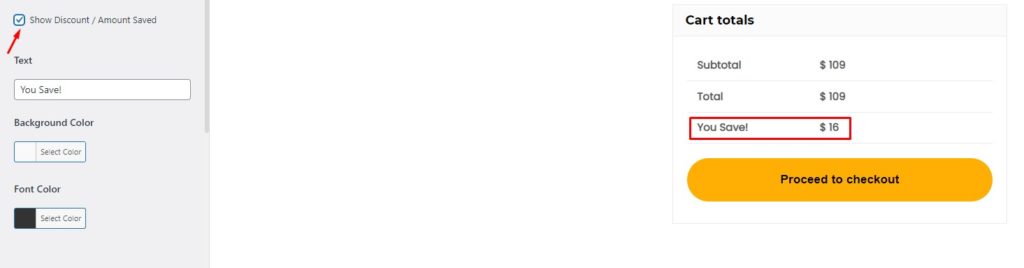
Show Discount/Amount Saved
Show discount/amount saved allows you to include a block in the Total Price section that displays the discount a user receives on a purchase when using a coupon or during a storewide sale. You can give it any name you like as well as change the background and font color.
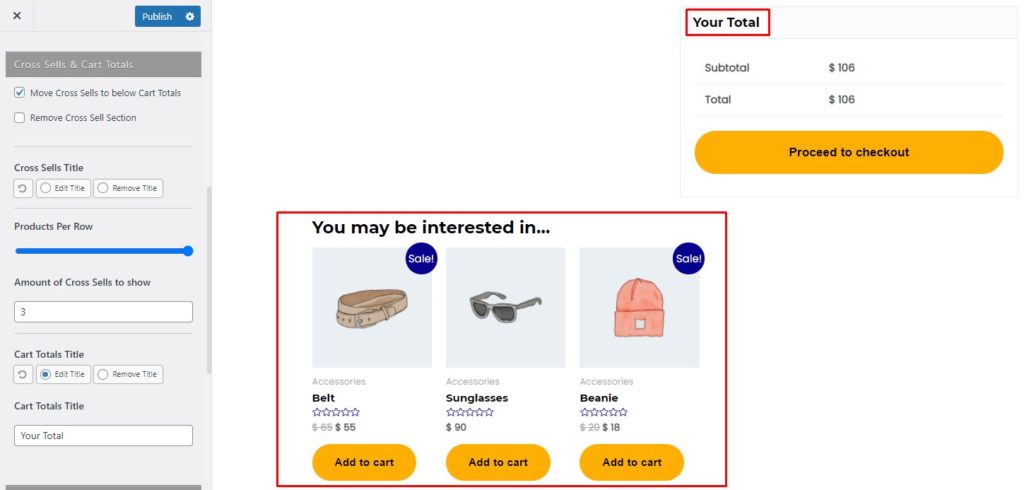
Cross-Sells and Cart Totals
You can also display related or featured products on the cart page. Typically, these items are closely linked with the products in the cart, so users are likely to add them to their carts, helping you boost your sales.
Using the StoreCustomizer plugin, you can choose the total number of cross-sells to display and the products to display per row. You have the option to move the cross-sells section below the cart totals or leave it as default. Finally, you can modify the title of the cross-sells or even eliminate the entire cross-sells section if you want.
Apart from cross-sells, you can change the heading of the Cart Totals section.
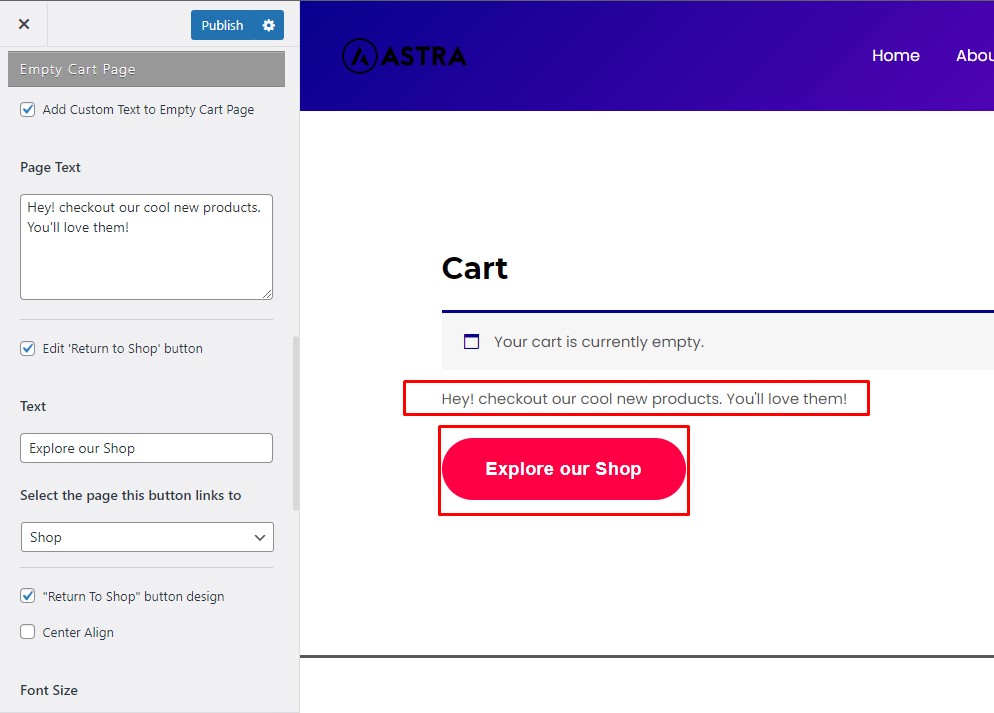
Edit Empty Cart Page
The default Empty Cart page displays a message informing the user that the cart is empty. StoreCustomizer, allows you to create your custom message to invite the user to explore the shop.
You can also include a Back to Shop button to redirect customers to the store. You can entirely customize the design and feel of the button, including the button’s color, font, and text.
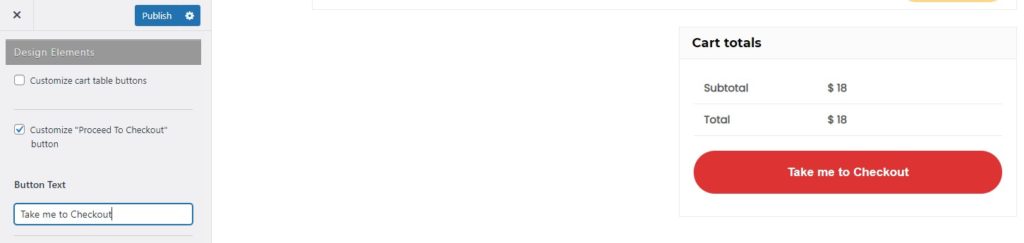
Customize Cart Table and Proceed to Checkout Buttons
Under the Design Components area of the StoreCustomizer cart page, you can customize the cart table as well as the Proceed to checkout button. You can adjust the button sizes, colors, font, and more.

As you can see, plugins can help you customize a lot of your WooCommerce cart page. However, there are other options too. In the next section, we’ll see how page builders allow you to edit the cart page.
3. With Page Builders
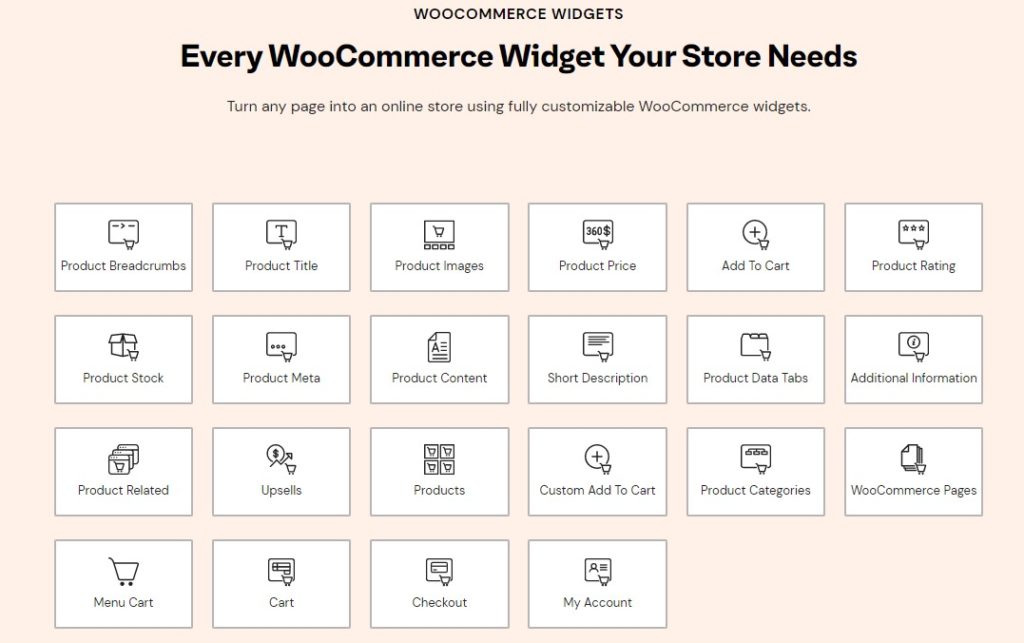
Page builders are a one-size-fits-all solution for all of your site’s modification needs. Most popular page builders have a dedicated WooCommerce section that allows you to fully customize your entire store.
You can use page builders to change the cart page and any other WooCommerce pages. Page builders are usually based on the concept of blocks or widgets. There are widgets for various functionalities and multiple features, and you may add them to any page you want and edit them.
When working with page builders, you have a lot of autonomy in terms of personalization. Furthermore, page builders come with a variety of pre-made templates that are fully preconfigured and designed creatively for you to use.
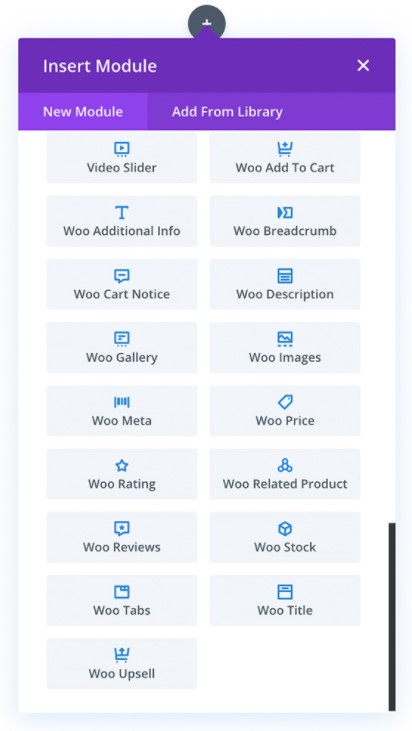
If you want to use a page builder, the two most popular and preferred options are Elementor and Divi. Both of these page builders have a set of WooCommerce-specific blocks.
For example, Elementor includes 22 distinct blocks for WooCommerce that you can use. However, it is worth mentioning that the WooCommerce blocks in Elementor are only available in the Pro version.
In the case of Divi, you have access to 17 WooCommerce blocks. Divi is a premium page builder, so you will have to pay to get access to these features.
Plugins and page builders aren’t the only ways to customize the WooCommerce cart page. You can also add your custom code snippets to personalize and enhance the functionality of your cart page. If you have some coding skills, the next section is for you. Let’s see how you can change the cart page programmatically.
4. Programmatically
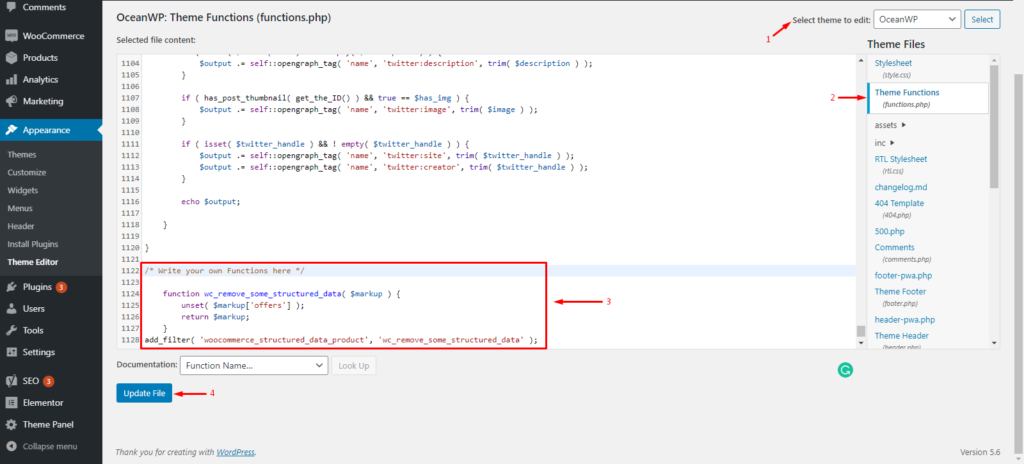
Before going any further, we recommended you create a full backup of your site and use a child theme to edit the functions.php file. If you don’t know how to do it, check out our guide on how to create a child theme or use any of these child theme plugins.
After you’ve configured your child theme, go to WP Admin Dashboard > Appearance > Theme Editor. Here, you can add custom code snippets at the end of the functions.php file of your child theme.
The Code Snippets plugin is another option for adding code snippets to your site. You can install the plugin from the WordPress repository to add snippets to your site. Even though with Code Snippets, you don’t need a child theme, we always recommend having one.
Now let’s see some of the code snippets you can use to customize your WooCommerce cart page.
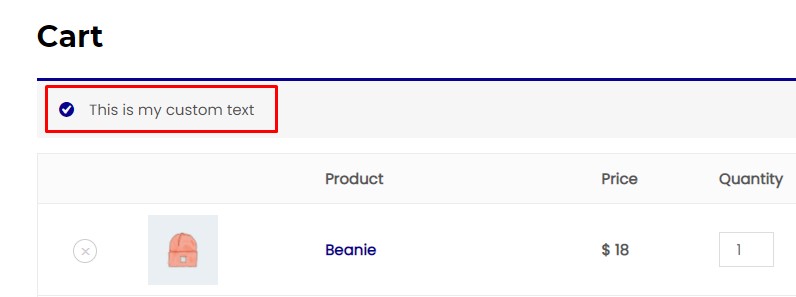
4.1) Custom message on the cart page
First, let’s learn how to customize the message on the cart page. This can be useful to provide essential information to your user. For example, you can give them notices such as “Shipments can take more time due to COVID”, let them know about a promotion, and so on. Simply replace “This is my custom text” in the snippet with your own and post it to your website.
// Add custom message to WooCommerce cart page
add_action( 'woocommerce_before_cart_table', 'shop_message', 20 );
function shop_message() {
echo '<p class="woocommerce-message">This is my custom text</p>'; // Change this text
}
Done! This will display a custom message on your cart page.
4.2) Custom content to empty cart page
Customizing your Empty Cart page is very important. The default Empty Cart page only displays a message saying that the cart is empty. However, using the following snippet, you can customize it to a more friendly and interactive message directing the user to explore your inventory, giving them info about your products, and so on.
Simply replace “You have not added any item to your cart. Check out our inventory and you will love our products” with the message you want to display.
// Adds custom content to Woocommerce empty cart page

add_action( 'woocommerce_cart_is_empty', 'empty_cart_custom_content' );
function empty_cart_custom_content() {
echo '<h4>You have not added any item to your cart. Checkout our inventory and you will love our products</h4>'; //Replace the message with your own mesasge
echo do_shortcode('');
}

4.3) Empty cart button on the cart page
Even though giving shoppers the option to empty their carts may seem counterproductive, the truth is that it provides a much better experience. For such circumstances, you can include an Empty Cart button that lets users remove all the items from their carts.
To add an Empty Cart button, simply use the following code snippet.
// "Empty cart" button on Woocommerce cart page

add_action( 'woocommerce_cart_coupon', 'woocommerce_empty_cart_button' );
function woocommerce_empty_cart_button() {
echo '<a href="' . esc_url( add_query_arg( 'empty_cart', 'yes' ) ) . '" class="button cart"
title="' . esc_attr( 'Empty cart', 'woocommerce' ) . '">' . esc_html( 'Empty cart', 'woocommerce' ) . '</a>';
}

add_action( 'wp_loaded', 'woocommerce_empty_cart_action', 20 );
function woocommerce_empty_cart_action() {
if ( isset( $_GET['empty_cart'] ) && 'yes' === esc_html( $_GET['empty_cart'] ) ) {
WC()->cart->empty_cart();
$referer = wp_get_referer() ? esc_url( remove_query_arg( 'empty_cart' ) ) : wc_get_cart_url();
wp_safe_redirect( $referer );
}
}
If the button is not separated from the other cart table buttons, you may need to add this to the Customizer > Additional CSS.
a.button.cart {
margin-left: 10px;
}

We have seen some code snippets to edit your cart page. Taking these snippets as a base and adapting them, you can completely personalize your cart page and boost your sales.
So far, we’ve seen different methods to customize the WooCommere cart page: with the default options, with plugins, page builders, and programmatically.
Now let’s go a step further and see how you can bypass the cart page to make the customer’s purchase experience faster. Let’s see how you can skip the cart page.
How to skip the cart page
Some stores prefer to skip the cart page and let customers review and pay for their order on the checkout page. This shortens the steps customers need to checkout, making the shopping experience faster.
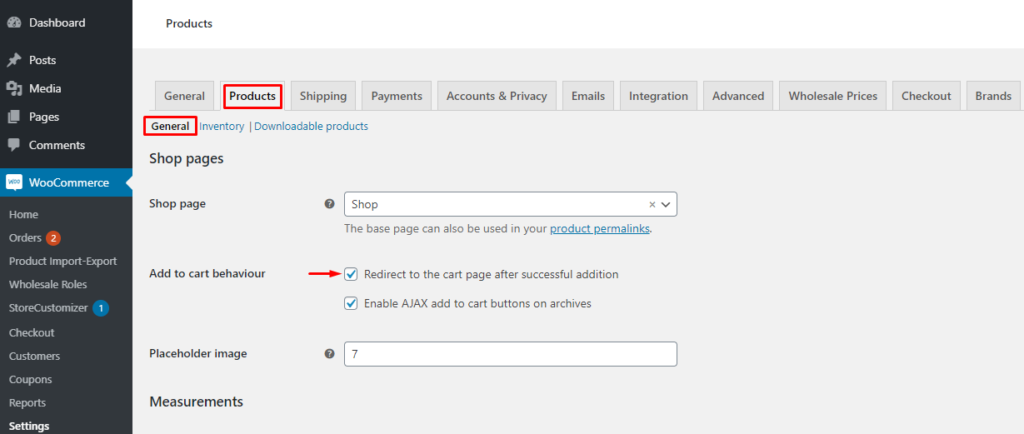
To skip the cart page, go to the WP Admin Dashboard and navigate to WooCommerce > Settings. Under the Products tab, select the General settings in the sub-menu and check the “Redirect to the cart page after successful addition” option. After that, remember to save the changes.
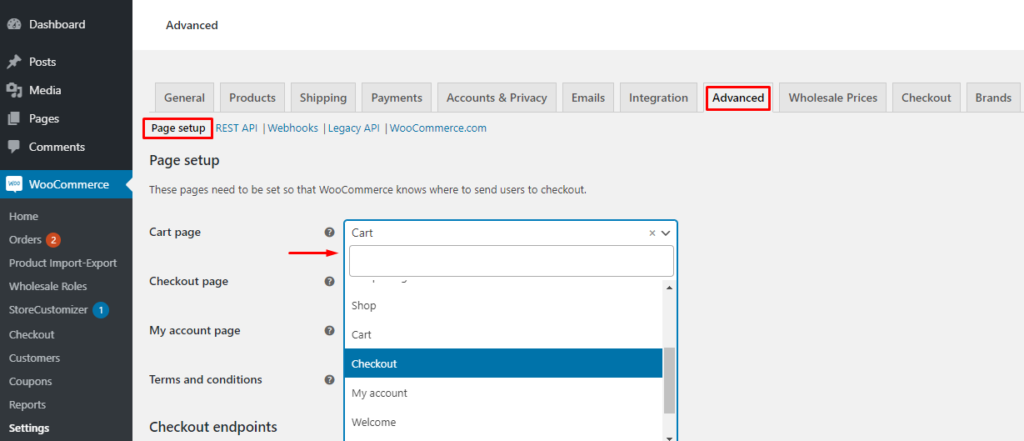
Then, go to the Advanced tab and select Page Setup. Change the default Cart page to Checkout and save the changes.
Done! You can now go to the front end of your website and check it yourself.
Interestingly, skipping the Cart page via WooCommerce default settings is not the only way. You can achieve the same using dedicated plugins or custom code snippets. For more information about this, check out our guide on how to skip the cart page in WooCommerce.
Bonus: How to change proceed to checkout text
Another good way to edit your cart page is to change the “Proceed to checkout” text. This is an interesting option so that text is more meaningful for your store. For example, if you sell digital products that are available in a subscription plan, “Subscribe Now” is a better option than “Proceed to Checkout”.
In this article, we have already explained how to edit the “Proceed to Checkout” button and text using the StoreCustomizer plugin. In this section, we’ll see another way to change the “Proceed to Checkout” text using a custom code snippet.
For example, let’s have a look at the following snippet to replace the Proceed to Checkout button with “Take me to checkout”. Simply change the “Take me to checkout” text with anything you want.
//Change the proceed to checkout text

remove_action( 'woocommerce_proceed_to_checkout', 'woocommerce_button_proceed_to_checkout',20);
add_action( 'woocommerce_proceed_to_checkout', 'custom_button_proceed_to_checkout',20);

function custom_button_proceed_to_checkout() {
echo '<a href="'.esc_url(wc_get_checkout_url()).'" class="checkout-button button alt wc-forward">' .
__("Take me to Checkout", "woocommerce") . '</a>'; //Replace “Take me to Checkout” with your text
That’s all! You can now change the “Proceed to Checkout” text on your cart page using the above code snippet. However, there is more to it. If you want more information about this, check out our post on how to change the “Proceed to Checkout” text.
Conclusion
All in all, your cart page is one of the most important pages in your online store, so you should it deserves your full attention. It is the page where your clients review their orders before completing their transactions, so it requires special consideration.
By default, the cart page is defined by the active theme and offers limited functionality. However, you can do a lot more with your cart page, such as adding a customized message or cross-sells to boost your sales. You may also customize the WooCommerce cart page to give your customers a better buying experience.
In this article, we have seen, in detail, how to customize the WooCommerce cart page. We started with the default WooCommerce blocks that come with the block editor. We then followed the WooCommerce Blocks plugin, introducing two additional experimental blocks. Then, we have seen some of the best plugins for customizing the cart page and saw a demonstration using the StoreCustomizer plugin. We also had a look at some of the page builders you can do to personalize the cart page. Finally, we had a look at some code snippets that provide you more control and flexibility over your customization preferences and let you make the most of the cart page.
Apart from customizing the cart page, we have seen how to skip the cart page and how to change the “Proceed to Checkout” message, both using the plugin and programmatically.
Have you ever thought of customizing your WooCommerce cart page? What customizations would you like to make? Let us know in the comments below.
