
How to customize WooCommerce checkout page
Looking for ways to edit the checkout page in your store? The checkout is one of the most important steps in the purchase process, so it’s key that you optimize it to increase conversion rates. In this guide, we’ll show you different methods to customize the WooCommerce checkout page both with plugins and programmatically.
Why should you edit the checkout page in WooCommerce?
If you have a WooCommerce store, the checkout is one of the most crucial pages. It’s where the customer pays and you close the sale. Considering how many shoppers abandon their carts and how much competition there is nowadays, you should optimize the checkout to close as many sales as possible.
Even though WooCommerce includes a good default configuration, you may need to edit the checkout page to increase conversion rates on your store. Some of the changes you can apply to edit your WooCommerce checkout page are:
- Create a one-page checkout
- Change the checkout style and design with CSS
- Add, remove, or rearrange checkout fields
- Include content
- Make a field required or optional
- Add conditional fields and create conditional logic
- Add extra fees for shipping, packaging, and so on
- And many others
We have previously seen how to customize the shop page and how to remove fields from the checkout, and today we’ll show you 2 different ways to edit the checkout page in WooCommerce.
WooCommerce checkout page customization: 2 Methods
In this guide you will learn how to customize the checkout page in WooCommerce in 2 different ways:
- With a plugin
- Programmatically (coding)
Let’s have a closer look at each option.
1) Customize the checkout page with a plugin
If you don’t have coding skills, you can edit the WooCommerce checkout page with a plugin. There are many options out there but for this tutorial, we’ll use WooCommerce Checkout Manager.
This plugin has been on the market for a couple of years and has more than 90,000 active downloads. It has a free version with basic but powerful functionalities that you can download from here and 3 premium plans with more advanced features that start at 19 USD (one-time payment). Let’s have a look at what this tool can do.
WooCommerce Checkout Manager
Checkout Manager is one of the best plugins to manage your checkout page. It allows you to add, edit, and delete fields on the checkout page to boost your sales. And the best part is that it’s very easy to use. For example, you can add shipping, billing, and additional fields to the checkout page by simply enabling the options from the menu.
The tool allows you to add or hide fields such as the first and last name, company name, country, city, zip code, address, phone number, email, and others. To do this, on your WordPress dashboard go to WooCommerce > Checkout and then the Billing, Shipping, or Additional tab. There, you will see a list of all the fields that you want to display or hide. 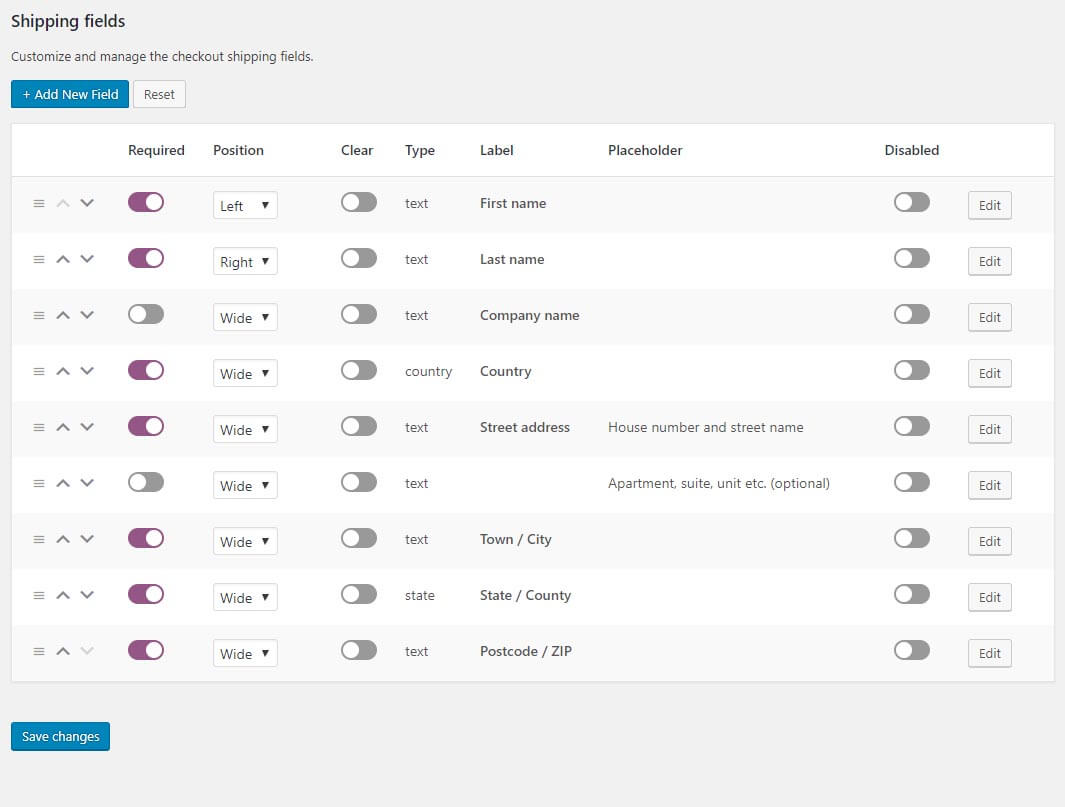
Create a custom upload file field
One of the most interesting features of the WooCommerce Checkout Manager plugin is the possibility to let shoppers upload any type of file during the purchase process. This is very useful when you book a hotel or rent a car online and have to upload your ID or driver’s license. You can also edit those files and let the users manage their files in case they need to provide additional documents.  Additionally, you can add fixed or percentage fees to any core or conditional fields.
Add fees to the checkout
Another interesting option to edit the WooCommerce checkout page is to add fees. This can be very useful if you want to include an additional charge for situations like:
- Express delivery
- Special handling
- Extra charge for shipping to certain countries or locations
- Fees related to credit cards or payment gateways
Even though WooCommerce offers some options to add these extra charges, Checkout Manager provides you with more control and flexibility. To add fees with Checkout Manager, and go to WooCommerce > Checkout > Billing.
You’ll see different billing fields that you can enable. For this demonstration, we’ll add a fee for Express Delivery and we’ll need to create a new field, so we press the Add New Field button. We’ll select radio as the button type and give a name to the new field.
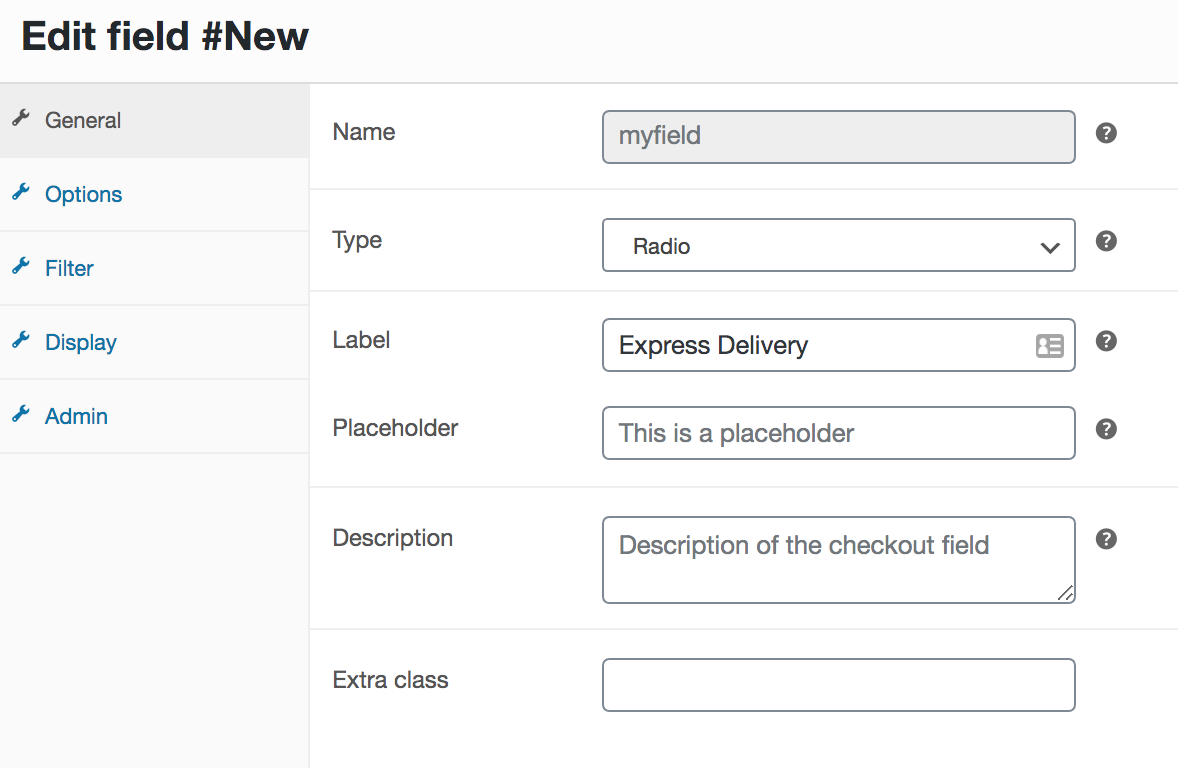
Then, go to the Options tab and we’ll add two labels: Yes and No. When the shopper selects Express Delivery, we’ll add an extra charge of $10.
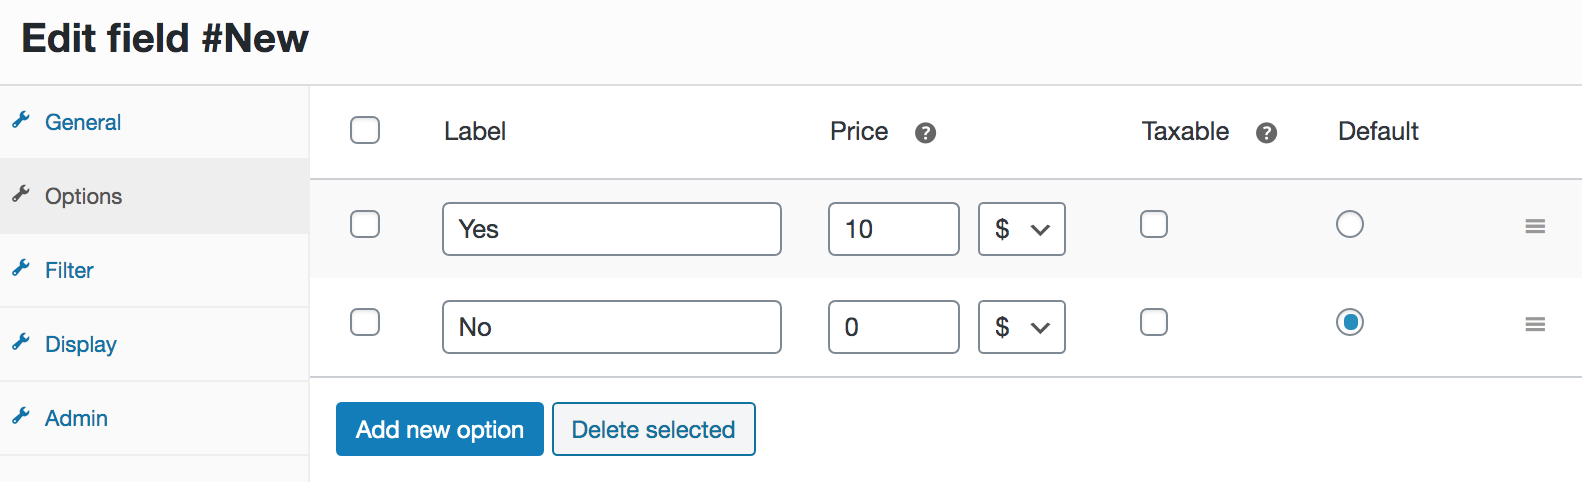 Save the changes and that’s it! Now when the user selects the Express Delivery option at checkout, an extra fee of $10 will be added to their cart.
Create conditional fields
Besides adding fields and fees, you can also customize the WooCommerce checkout page by creating conditional fields to improve the user experience. You simply need to select the conditional parent field and value. Let’s see the step-by-step process:
- In your WordPress dashboard, go to WooCommerce > Checkout > Billing and click Add New Field
- Select the type of field you want to create and fill in the label, placeholder/type, and description. This will depend on the type of conditional you’re creating
- After that, tick the conditional checkbox on the right. Select the parent field and the value the parent field has to take to display the conditional field
- Press Save and you’re done!
The good thing is that Checkout Manager allows you to create unlimited custom fields and apply as many conditions as you want to edit your checkout page and provide users with a unique experience.
For more information on how to create conditional fields in WooCommerce, have a look at this full guide that has several examples of what you can do to customize your checkout.
This is just a simple example but there’s much more you can do. For more information, check out our full guide on how to add fees to the WooCommerce checkout.
All in all, if you want to easily edit the checkout page, WooCommerce Checkout Manager is a great choice. The free version is a great start but if you want more advanced features, we recommend any of the premium plans.
2) Edit the checkout page programmatically (coding)
In this section, we’ll show you how to edit the WooCommerce checkout page via coding. So, by the end of it, you’ll know how to:
- Add custom fields to the WooCommerce checkout page
- Save custom fields to the database
- Make a required field optional
- Add content to the checkout page
- Use shortcodes in the WooCommerce checkout page
- Style the checkout page with custom CSS
To achieve all these customizations, you will use some WooCommerce checkout hooks. If you’re not familiar with hooks, we recommend you check out our starter guide on how to use WooCommerce hooks. As we’ll apply some changes to the functions.php file, we recommend you use a child theme. You can either use one of the many child theme plugins or create one following this guide.
2.1) Add custom fields to the WooCommerce checkout page
The first thing we’ll show you is how to add custom fields to the checkout page. To do this, paste the following script in the functions.php file of the child theme:
// checkbox field
add_action( 'woocommerce_after_order_notes', 'quadlayers_subscribe_checkout' );

function quadlayers_subscribe_checkout( $checkout ) {
woocommerce_form_field( 'subscriber', array(
'type' => 'checkbox',
//'required' => true,
'class' => array('custom-field form-row-wide'),
'label' => ' Subscribe to our newsletter.'
), $checkout->get_value( 'subscriber' ) );
}
This will add a custom checkbox field at the end of the checkout page to give users the option to subscribe to your newsletter. In the same way, you can add any field type. For example, let’s add a radio input field type with the following script:
// Radio input field
add_action('woocommerce_before_order_notes', 'quadlayers_radio_checkout');
function quadlayers_radio_checkout($checkout3){
woocommerce_form_field( 'feed', array(
'type' => 'radio',
//'required' => true,
'class' => array('custom-field form-row-wide'),
'label' => ' How did you find us?.',
'options' => array(
'Google' => 'Google',
'Friend' => 'Friend',
'Facebook' => 'Facebook',
'Youtube' => 'YoutTube',
'Other' => 'Other'
)
));
}
This will add a radio input type so you can ask your customers about where they heard about you. 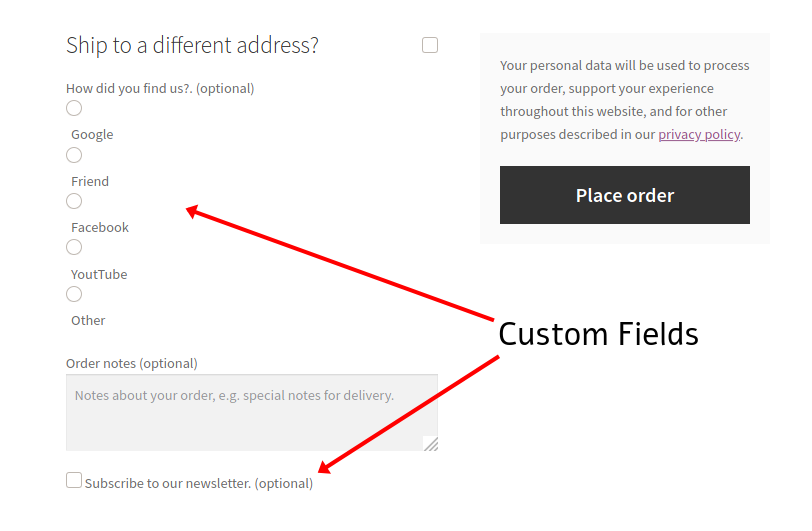 For more information about how to add custom fields to the WooCommerce checkout page, check out this complete guide with several examples.
2.2) Save custom fields values to the database
Now, let’s see how you can use these custom fields to edit the checkout and gather information about WooCommerce orders. To do this, you need to be able to retrieve the values of the custom fields whenever you need to. Additionally, you need to save the values of the custom fields in the database once the customers complete the form and hit the Place order button.
To achieve this, you have to use the 'woocommerce_checkout_update_order_meta'hook. To update the two custom fields you added in step 2.1, copy and paste the following code in the child theme funcitons.php file:
add_action( 'woocommerce_checkout_update_order_meta','quadlayers_save_function' );
function quadlayers_save_function( $order_id ){
if ( ! empty( $_POST['subscriber'] ) ) {
update_post_meta( $order_id, 'subscriber', sanitize_text_field( $_POST['subscriber'] ) );
}
if ( ! empty( $_POST['feed'] ) ) {
update_post_meta( $order_id, 'feed',sanitize_text_field( $_POST['feed'] ) );
}
}
This script checks if the custom field is empty or not with an if()conditional before saving it to the database. After adding this script, you can retrieve the saved data from the database using a global “$post” WP object. In the following script, we get the subscriber metadata of the current order. You can use this in the backend of the WooCommerce orders list.
global $post;
$order = wc_get_order( $post->ID );
$c_meta = $order->get_meta('subscriber');
It’s worth noting that this is a raw script, so you will have to adapt it to fit your specific needs.
2.3) Make a required field optional
Another simple yet effective way to edit the checkout page in WooCommerce is to make mandatory or required fields optional. This way, you let shoppers fill in only the fields that are necessary for the transaction and improve their buying experience.
For example, let’s say you sell downloadable or virtual products so you want to make the Address field in the Billing section optional. Simply add the following code to the functions.php file of your child theme.
add_filter( 'woocommerce_billing_fields', 'wc_address_field_optional');
function wc_address_field_optional( $fields ) {
$fields['billing']['billing_address_1']['required'] = false;
return $fields;
}
Using this snippet as a base, you can make more fields optional in no time.
Conditional fields
If you want to take your WooCommerce checkout page a step further, you can customize it by adding conditional fields. Conditional fields have conditional logic so that there are fields that appear or disappear based on the values of another field. For example, you can create conditional logic so that the credit card fields only appear if the user selects Credit Card as the payment option.
To know more about conditional fields and how to use them to edit your checkout page, have a look at this complete guide.
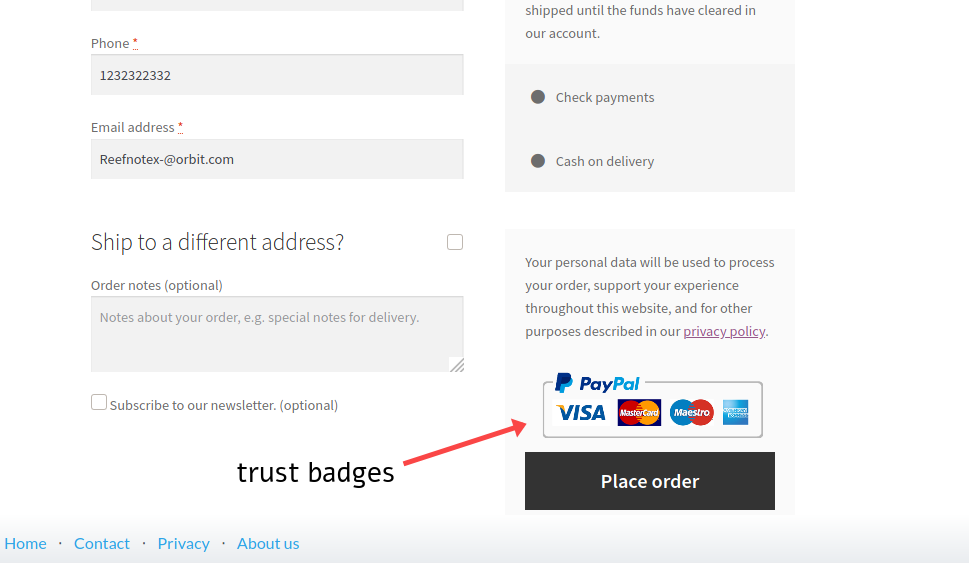
2.4) Add content to the checkout page
Another way to edit the WooCommerce checkout page is by adding some content. With a solid knowledge of WC checkout hooks, you can easily insert any kind of content such as images, titles, text, and so on wherever you want. For example, you can use this script to add a trust badge image before the Place order button on the checkout page:
add_action('woocommerce_review_order_before_submit','quadlayers_checkout_content');
function quadlayers_checkout_content(){
echo '<img src="https://www.heresylab.com/wp-content/uploads/2019/01/paypal-1.png" />;
}
 Apart from images, you can also add a simple header text at the top of the checkout:
add_action(woocommerce_checkout_before_customer_details
,'quadlayers_checkout_header');
function quadlayers_checkout_header(){
echo "<h2>This is a custom Header<h2>
";
}
Another interesting alternative is to add a message to your checkout page. Typically, stores mention things related to shipping, delivery, and so on. For example, let’s say you want to remind customers that they might need to wait 5 business days to receive their products. In the functions.php file of your file theme, add:
add_action( 'woocommerce_after_order_notes', 'wc_add_message' );
function wc_add_message () {
echo 'Please remember that delivery may take up to 5 business days.';
}
2.5) Add Fees to the checkout page
Let’s have a look at how to edit the WooCommerce checkout page and add extra fees. Most of the time, there are two types of additional fees:
- Fixed
- Percentage
In this section, we’ll show you how to add both to your checkout.
Add a fixed fee
A typical example of a fixed fee is express delivery. Let’s say you want to include a $10 fixed fee for express delivery.
Simply use the script below and edit the text for the field name. In this example, we’ll call the “Extra Charge” and it will add $10 to the order.
add_action('woocommerce_cart_calculate_fees', function() {
if (is_admin() && !defined('DOING_AJAX')) {
return;
}
WC()->cart->add_fee(__('Extra Charge', 'txtdomain'), 10);
});
Keep in mind that this code will automatically add a $10 fixed fee to the total of the customers’ order during checkout.
Add a percentage-based fee
Another alternative is to charge a percentage-based fee. This can be useful if there are extra taxes or you want to add an extra cost for certain payment gateways charges. Let’s say we want to add a 3% fee to the total price of the order (products + shipping).
add_action('woocommerce_cart_calculate_fees', function() {
if (is_admin() && !defined('DOING_AJAX')) {
return;
}
$percentage = 0.03;
$percentage_fee = (WC()->cart->get_cart_contents_total() + WC()->cart->get_shipping_total()) * $percentage;
 WC()->cart->add_fee(__('Tax', 'txtdomain'), $percentage_fee);
});
This script will add a 3% fee to the shopper’s total order during checkout.
For more information and examples to add fees to your store, check out our guide on how to add fees to the WooCommerce checkout.
2.6) Use shortcodes on the WooCommerce checkout page
WooCommerce shortcodes give you a lot of flexibility and allow you to add any type of content using checkout hooks. However, if you simply print the shortcode, it won’t work. Instead, you should include them as follows:
echo do_shortcode('[woocommerce_cart]');
So, using a hook the same way you did in previous examples, you can end up with something like this:
add_action('woocommerce_after_checkout_form','quadlayers_checkout_shortcode');
function quadlayers_checkout_shortcode(){
echo do_shortcode('[woocommerce_cart]'); }
This script will bring the
[woocommerce_cart]
shortcode into action, displaying the WooCommerce cart at the bottom of the checkout page.  Please note that you can use any WordPress, WooCommerce, or custom shortcode. However, some shortcodes might not be compatible or supported by WooCommerce so check that before using them. To know more about shortcodes, you can check out our complete WooCommerce shortcodes guide.
2.7) Edit the WooCommerce checkout page with custom CSS
Finally, you can also customize the checkout page of your WooCommerce store by editing the CSS style. This doesn’t mean that you need to spend hours rebuilding the whole checkout page. Even a couple of simple changes can help you optimize the checkout. For example, by editing the colors, fonts, margins, or borders, you can see some great improvements in conversion rates.
There’s no magic formula that works for every business here and you’ll need to test different styles but adjusting a few things can help you boost your sales. For example, you can use this simple script to apply a custom CSS style and edit the background color on the checkout page:
add_action('wp_head','quadlayers_checkout_style');

function quadlayers_checkout_style(){
         if(is_checkout()==true){

                 echo '<style> body{background:#dfdfff!important;}<style>';
         }
}
On top of that, you can take this script as a base and add your own CSS rules inside the HTML tag to give it the perfect look and feel for your site. This is a quick hack to apply CSS to the checkout page. It’s very handy to add small pieces of CSS. But if you want more extensive style scripts, you should enqueue the CSS style the WordPress way, using the wp_enqueue_style() native WP hook as follows:
add_action( 'wp_enqueue_scripts', 'quadlayers_enqueue_css' );

function quadlayers_enqueue_css(){
    wp_enqueue_style(  'checkout_style',
        get_stylesheet_directory_uri() . '/checkout-style.css'
    );
}
This way, you can have all your custom CSS in a separate file (checkout-style.css in this example) which will be stored in your child theme folder at the same level as the main style.css file.
These are just a few examples of how you can customize the checkout page in WooCommerce with some simple scripts. We recommend taking them as a base and playing around to add or edit any other aspects of your checkout. Additionally, if you want to edit the shop page via coding, we recommend you have a look at our guide on how to customize the WooCommerce shop page programmatically.
Bonus: Checkout Hooks
There are many checkout hooks that you can use to edit the checkout page in WooCommerce. These are some of the main ones:
- woocommerce_before_checkout_form
- woocommerce_checkout_before_customer_details
- woocommerce_checkout_billing
- woocommerce_before_checkout_billing_form
- woocommerce_checkout_shipping
- woocommerce_before_order_notes
- woocommerce_checkout_after_order_review
- woocommerce_checkout_after_customer_details
- woocommerce_review_order_before_cart_contents
- woocommerce_review_order_before_shipping
- woocommerce_review_order_after_order_total
- woocommerce_checkout_order_review
- woocommerce_review_order_before_submit
- woocommerce_review_order_before_payment
- woocommerce_review_order_after_submit
- woocommerce_after_checkout_form
For more information about hooks and how they work, check out the following guides:
Finally, for the full list of hooks that you can use, have a look at this documentation page.
How to increase Checkout Page conversion
One of the main goals of checkout page optimization is increasing conversions. This means, improving the number of users who purchase from your WooCommerce store without having to increase the number of visitors. This is key to making your checkout and your overall business more efficient.
Let’s have a look at some ways to do it:
1) Offer more payment options
One of the mistakes that can cost you a lot of money is not offering enough payment options. This is especially important if you have customers from different countries.
Nowadays, people expect to have different options to pay, so you should let your shoppers decide the most convenient method for them. Accepting credit and debit cards and PayPal payments is a great way to increase your conversions.
2) Clear Pricing details
Have you ever been shopping online and then seen an extra charge that you weren’t aware on the last step? Experiences like this are quite common and deliver a terrible shopping experience. To reduce checkout cart abandonment and boost your conversions, make sure that your pricing and all the extra fees are clear from the start. This means clearly stating shipping costs, taxes, additional charges, and anything extra that the customer will have to pay.
Nobody likes discovering hidden costs and charges when they’re ready to pay, so avoid being that store at all costs.
3) Avoid unnecessary fields
A complicated checkout is one of the main reasons for checkout cart abandonment. That’s why you should make the checkout as simple as possible and remove or hide unnecessary fields that may distract shoppers. For example, if you sell a digital product, do you really need the shopper’s address? Probably not. Simply remove all distractions and only leave the fields that are strictly necessary.
For more ideas on how to optimize your WooCommerce checkout page, have a look at this guide.
Conclusion
All in all, editing the checkout page can make a great difference and help you take your WooCommerce store to the next level. Even with a few changes, you can increase conversion rates and boost your sales. In this guide, we’ve shown you two ways to edit the checkout:
- With a plugin
- Programmatically (via coding)
If you don’t have coding skills but want an easy yet solid solution, WooCommerce Checkout Manager is your best choice. This freemium plugin has powerful functionalities to edit the checkout page, and it’s easy to use.
Also, you can try to tailor your entire payment page to match your brand with help of Fondy. From design, imagery, and color scheme to typefaces and logos. Custom checkout pages help to build customer trust and reduce cart abandonment. You can also change your payment fields and messaging to match promotions and seasonal sales.
On the other hand, if you want to create your own solution via some coding and you don’t want to install any plugins, you can edit the checkout page programmatically. We’ve shown you five different examples to edit different aspects of the checkout but the options are endless. Play around with the scripts and unleash your creativity to optimize your checkout.
If you want to shorten the checkout process to improve conversion rates, we recommend you use a quick buy plugin for WooCommerce or direct checkout links.
Finally, if you want to learn different options to edit the shop page on your store, we recommend you have a look at this step-by-step guide.
Do you have any questions or want to share with us the checkout customizations that you have applied to your site? Let us know in the comments section below! We’ll be happy to hear from you!

Hi there,
I have this situation and I would like to know if there is a possible way to play around in order to get this solve.
Here is the situation:
I have a web offering 3 services, say S1, S2, S3. I did it with divi, within a price frame box. I would like to be able to do this:
S1-> pres the button “Buy Now”-> go straight to the checkout process, where it will have customize fields (I need from the customer in order to provide the service) such as the price of S1.
S2-> the same as S1
S3-> the same as S1
So, to be clear, I don’t want to display S1 product page from woo-commerce, I just want to click in my page and straight away get the checkout for that service as I explained above.
How could achieve this? Any clue what code/function do I have to modify?
I will appreciate very much your answer.
Kind regards,
Neki
Hello Nekigm.
I believe you need two different solutions:
1_ Redirect to the checkout page when hitting WC button
2_ Use a custom set of fields in the checkout page, depending on the current product
I’d try this approach:
1_ Use Direct Checkout plugin to redirect to checkout (https://quadlayers.com/portfolio/woocommerce-direct-checkout/)
2_ Apply PHP function in checkout page were you display different fields for:
a Specific product ID (if single product)
b Product taxonomy (tag a product and retrieve tag from ddbb. This way you can group several products for S1, S2, S3)
Buongiorno,
il vostro plugin mi consente di inviare nella mail di conferma ordine il contenuto dei campi Additional presenti nel dettaglio ordine? Grazie
Ciao. Sì, Checkout Manager Pro ti consente di includere campi aggiuntivi nell’e-mail di conferma.
Thank you very much for your clear description of the checkout page customization! Great job! I was able to reshape the checkout page of the shop that I’m working on. I have 2 issues that I was not able to solve:
1. I added 2 radio buttons as selection mechanism. The text of options is under the radio button – no idea, how to align it with radio button
2. I set the radio button as “required” (‘required’ => true). When I check out an order, the required data is not asked.
Do you have any idea, how to solve these issues? Thank you very much in advance!
Hello Calin, I’m very happy you liked the post!
For 1_ you can easily achieve with a simple {display:inline;} CSS rule. Or try using <label> HTML tag
For making required, note that in the script, the required => ‘true’ is commented with “//”. Remove double slash
Hi Sebastopolys,
thank you! I will try your proposals for the first issue.
to the second issue: yes, I removed from beginning the comment. Despite this, the system doesn’t verify the required fields added with the method described in this article.
have a nice day!
Hi Sebastopolys,
ok, I found tha}t my radio button would be nice if I could pass him the {display: inherit;} rule.
have I to use this (is it correct?)
add_action(‘wp_body’, ‘quadlayers_checkout_style’);
function quadlayers_checkout_style(){
if(is_checkout()==true){
echo ‘ .form-row label {display: inherit;}’;
}
}
Yes, that’s fine. But you are forgetting that the CSS must be inside
<style>tag like this :echo "<style>.form-row label {display: inherit;}</style>";And also it’s a better idea to use the
wp_head()orwp_footer()hooks, instead ofwp_body().For the required issue, you will need to debug your WP installation since it should work.
Maybe this helps: https://rudrastyh.com/woocommerce/checkout-fields.html#optional_or_required
Hi,
Via the coding, any possibility to remove the link to product page ( i.e. link appears within the Download Table ) on the checkout page after order placed ? I found the following code from the internet but it only remove the link to product page within the Order Table.
add_filter( ‘woocommerce_order_item_permalink’, ‘__return_false’ );
Hey there.
What link are you referring to?
Maybe a faster and easier solution could be doing it with JS.
Hello I purchased your plugin, but need help.
I don’t get respons to my mails and I cannot access my account nor get a new password!
Please contact me
Hi there, the Support team will contact you shortly and help you access your account
Hi, how to achieve it: When the user clicks the checkout button on the checkout page, if the amount is not up to the standard, you can’t click the radio button of the payment method, such as the PayPal button
Hello Daniel.
Check payment tab of WC settings. Maybe some payment methods are not available.
Hi, do you know how to allow customer to select delivery or local pickup after cart?
so if customer select local pickup, then don’t need to enter billing/shipping address and skip to payment
if delivery then normal checkout process
You can use conditional logic. Check out this post for more info
Hello,
Thanks for the information you provided. I need help.
I want to separate the shipping options on the WC according to products, not countries. or by categories.
eg.
A Product – USA Area USPS – USA Area UPS but not EU Area
B Product – USA Area USPS – but not USA Area UPS – EU Area
C Product – Only EU Area
So the shipping country and shipping option should be separated by product. In the current WC, only the shipping option is set according to the country.
Thanks in advance.
Can this plugin help to design and customise woocommerce checkout pages using any page builder
We haven’t tried it with many page builders but if the page builder modifies the WC checkout, it probably won’t work
Thank you for your information. This is very helpful in making my website
We’re glad it was helpful, Rahul
How to create radio box with products , on choose change price?
Hi,
I seem to be having an issue when trying to get the updated placeholder values of the “billing_address_1” and “billing_address_2” checkout fields to display in the checkout page.
When I update with the new text, it initially shows in the checkout page form field, then quickly resets to the default.
Could you please help?
I need to rename these fields so they match up with how the google places API address validation tool likes to populate them.
Thank you,
Dushyan
Hi there
If you can see the placeholder for a moment, and after page is fully loaded it returns to default, that means that some other script is overwriting yours.
Maybe some plugin or theme is doing it. Try deactivating plugins and switch theme to test.