
How to Customize WooCommerce Product Page Template
Are you looking for ways to edit the templates of your product pages? We’ve got you covered. In this guide, you’ll learn different ways to customize the WooCommerce product page template.
WooCommerce includes a large number of customization options. One of the most interesting options is the possibility to edit the default templates of your eCommerce store. And the fact that you can customize them with more than one method is even more impressive.
Let’s have a look at some of the benefits you can expect from customizing your product page templates.
Benefits of Editing the Product Page Templates
Editing the product page templates improves the experience of both the website owner as well as the customers. The default WooCommerce product page template is good for most sites. It provides all the necessary information about your product that shoppers need. However, having a unique product page will give you a valuable advantage to stand out from your competitors.
Even though there is adequate product information in the default template, making a great first impression will help you boost your sales. For this, you might still want to add or remove some details. You might also need to change some elements of the product page depending on the type of product or services you sell, customers’ demands, or ongoing trends. For example, you can display and regularly update information about discounts, offers, and yearly sales to attract more visitors.
Additionally, there are color, layout, and typography changes you can apply to make your website unique and make an impression on shoppers.
These are some of the most common changes you can apply to product page templates, but there’s a lot more you can do. Let’s have a look at different methods to edit the product page templates in WooCommerce.
How to Customize the WooCommerce Product Page Template
There are different ways to edit WooCommerce product page template:
- Programmatically
- With page builders
- Using a plugin
Before we start, there are a few things that we would like you to keep in mind.
- Make sure that you have properly set up WooCommerce and don’t miss any steps to avoid any issues
- As we will modify some theme files that contain delicate information about your website, we recommend you backup your WordPress website and create a child theme or one of these child theme plugins before you continue
- For this demonstration, we’ll use the Divi theme. The theme files may be different on your website depending on your theme, but you should be able to follow all the steps without any issues
- >Make sure you use one of the compatible WooCommerce themes on your website
Now without further ado, let’s move on to the methods to edit product page templates.
1) Customize WooCommerce Product Page Template Programmatically
This method is highly recommended if you want to make simple tweaks to your product page templates. You can easily edit them with code but it’s better if you have some basic programming knowledge if you use this approach.
We will mostly use WooCommerce hooks here, so if you are not familiar with them you can have a look at our guide on how to use WooCommerce hooks. This is quite useful as hooks also allow you to customize any type of WooCommerce template.
Let’s have a look at a few examples of things you can do to edit product page templates.
1.1) Removing Elements from the Product Page
If you want to remove elements from the product page, you can use one of the snippets below that use hooks to delete or hide the elements you want. All you have to do is select the correct one and add the code to your website theme files.
You can find all the available hooks in the comments of the content-single-product.php file in the WooCommerce plugin template files. Alternatively, you can refer to this page.
These are a few examples of snippets you can use to remove an element from your product pages:
// remove title
remove_action( 'woocommerce_single_product_summary', 'woocommerce_template_single_title', 5 );
// remove rating stars
remove_action( 'woocommerce_single_product_summary', 'woocommerce_template_single_rating', 10 );
// remove product meta
remove_action( 'woocommerce_single_product_summary','woocommerce_template_single_meta',40 );
// remove description
remove_action( 'woocommerce_single_product_summary','woocommerce_template_single_excerpt',20 );
// remove images
remove_action( 'woocommerce_before_single_product_summary', 'woocommerce_show_product_images',20 );
// remove related products
remove_action( 'woocommerce_after_single_product_summary','woocommerce_output_related_products',20);
// remove additional information tabs
remove_action('woocommerce_after_single_product_summary','woocommerce_output_product_data_tabs',10);
After you have found the hook to delete the element you want, go to Appearance > Theme Editor on your WordPress dashboard and open the functions.php file. Then, add the code snippet you want with the remove_action function at the bottom of the file.
For example, to remove the product page title, we would paste the following snippet:
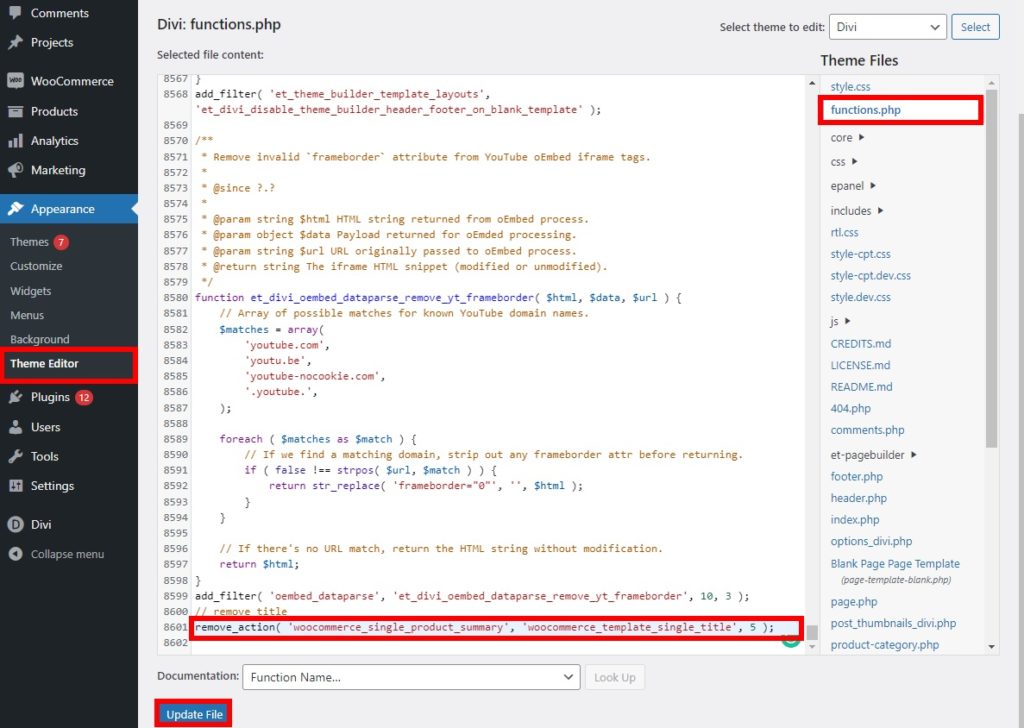
Then press Update File and check your site from the front end. You will see that the title has been removed from the product page.
1.2) Add New Elements
You can also use hooks to customize your WooCommerce page template and add new elements to it. To include an element, you need to use the add_action function with the required hook.
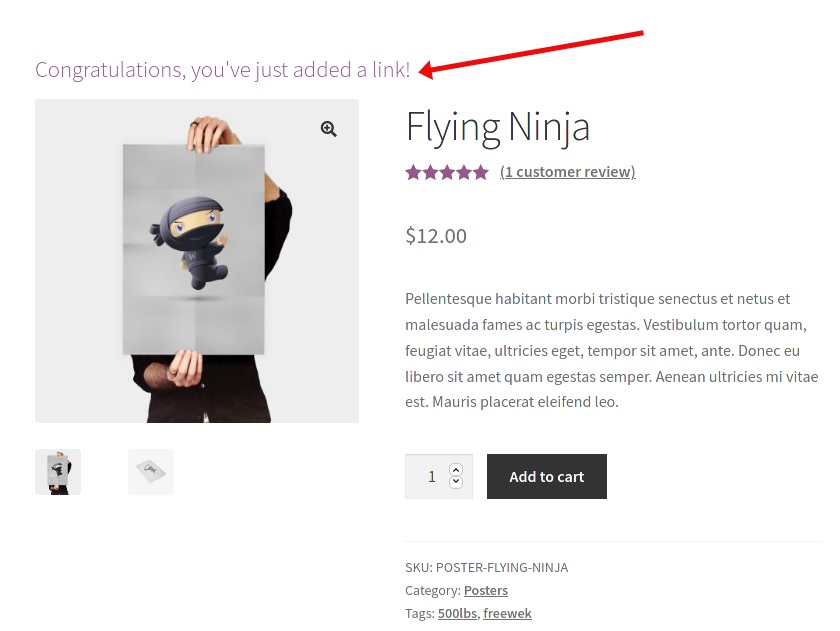
For example, to add some text to the product page, you can paste the following snippet to the functions.php of your child theme file.
add_action('woocommerce_before_single_product_summary',function(){
  printf('<h4><a href="?added-content">Congratulations, you\'ve just added a link!</a></h4>');
}
);
This will add new content to the product page. Simply adjust the code above to change the text and size to add any elements you want to your product pages.
1.3) Reorder Elements
Another option is to customize the WooCommerce product page template by reordering some elements. Similar to removing and adding elements, you need to add code snippets to the function.php file of the child theme.
To reorder elements, you need to remove the hook from the product page template first and then add the hook again in another position. It is a combination of the code snippets we’ve used in the previous steps.
In the example given below, the script will move the product description right below the title by changing the position order.
// change order of description
remove_action( 'woocommerce_single_product_summary', 'woocommerce_template_single_excerpt', 20 );
add_action( 'woocommerce_single_product_summary', 'woocommerce_template_single_excerpt', 6 );
Similarly, you can use any of the required hooks to reorder the elements of your product page templates. Just make sure that you enter the correct position orders.
If you want some more examples about this, have a look at our guide on how to edit the WooCommerce product page programmatically.
2) Edit WooCommerce Product Page Template with Page Builders
Page builders are great tools that make the process of creating and customizing websites easy. This is also the case with product page templates. If you don’t have programming skills, you can customize a WooCommerce product page template with page builders in a few clicks.
Additionally, page builders also let you save templates of the product pages with the changes that you have made. And since most page builders provide you with a drag and drop editor to edit the templates, you can save a lot of time.
There are many page builders in WordPress. For this tutorial, we will use the Divi Builder since it is one of the best page builders and works great with our theme, Divi.

To start using it, make sure that you get Divi and then install the Divi Builder on your website. After that, you’re ready to start editing the templates.
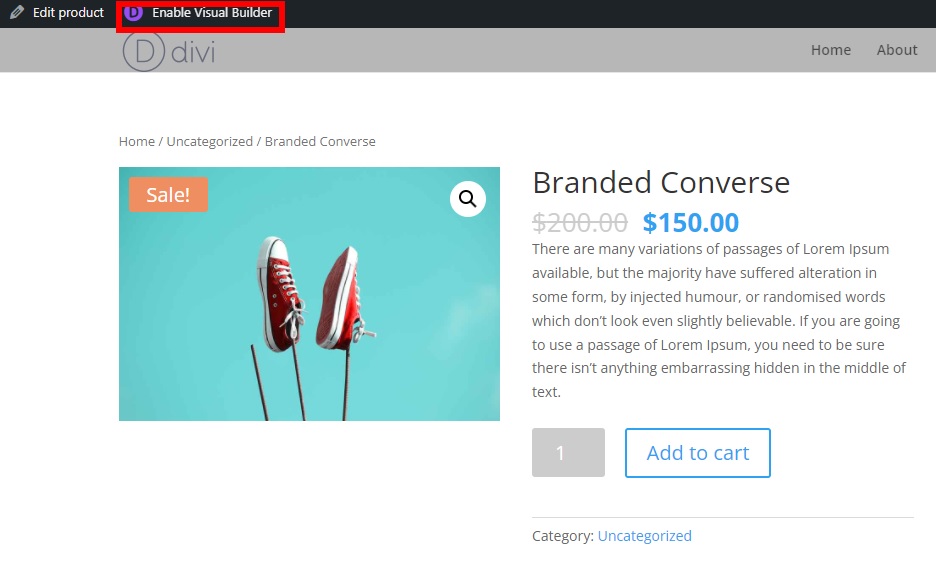
2.1) Open the Visual Editor
The first step to editing a product page template is to open one of your product pages and click on the “Enable Visual Builder” option on the admin bar. You will be redirected to the Divi Visual Editor where you can customize the product page template.
If you don’t see this option, make sure you are logged into your WordPress dashboard in the same browser window.
2.2) Customize the Template with Visual Editor
With the help of the visual editor, you can customize almost all the elements of your product page. All you have to do is just click on any of the existing elements that you want to edit.
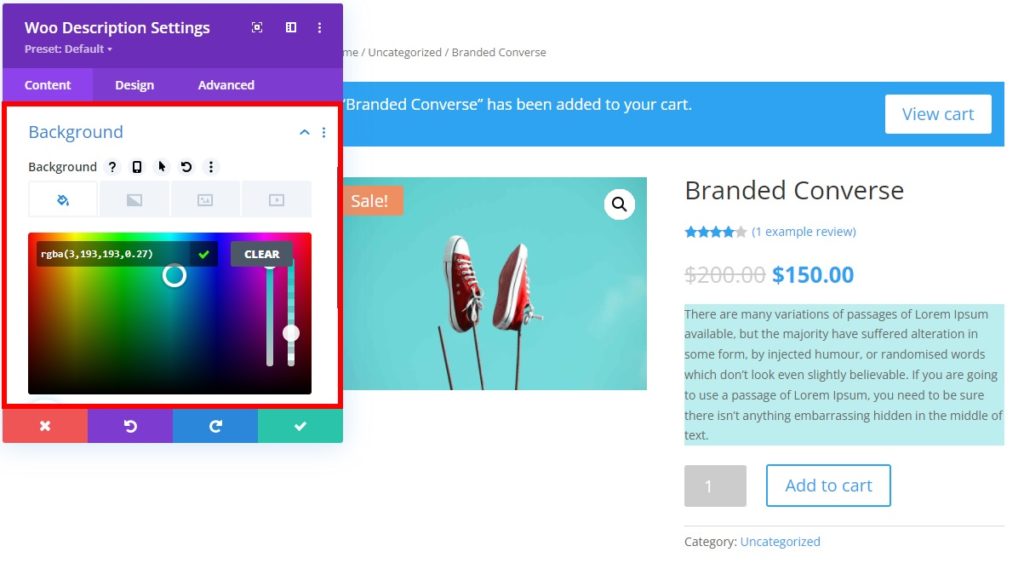
For example, let’s say you want to customize the product description background color. Press on the product description and open the description settings by clicking on the Settings icon.
![]()
Then, go to Background and select the color you want to set for your product description. You will see that the background color changes immediately in the live preview. Once you’re happy with the color, remember to save the changes.
Apart from changing the color, let’s say you want to add more modules to the product page template. Simply click on the “+” symbol on the area where you want to add a module, select the type of row, and select the module you want.
If you want to add something in particular, you can search for specific modules by typing in the search field. Then, all you have to do is configure the options in the module settings and save the changes.
For example, let’s say you want to add a countdown timer module to start a Christmas sale. Press the + symbol and search for the countdown timer keywords. 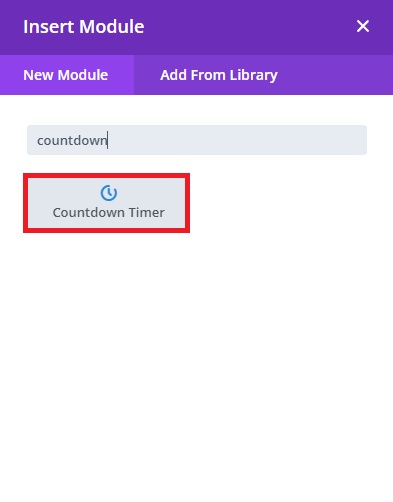
Then, add the necessary information to the countdown such as text, time, and date in the module settings.
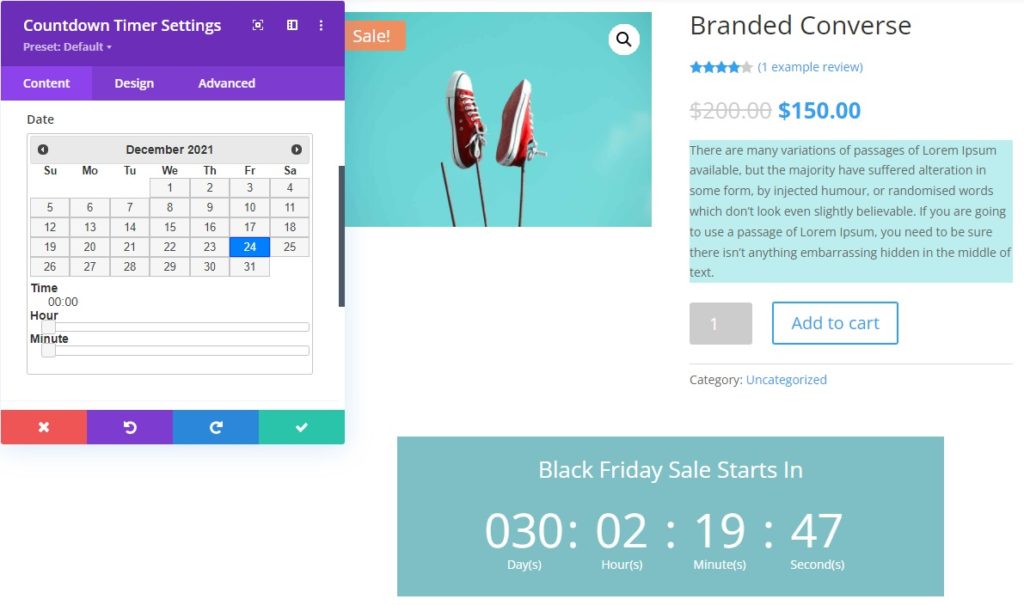
You will see the changes in real-time on the preview as you make them. Once you’re happy, save the product page template by expanding on the 3 horizontal dots at the bottom of your screen.
Quick Tip to Customize Product Page Template with Divi Builder
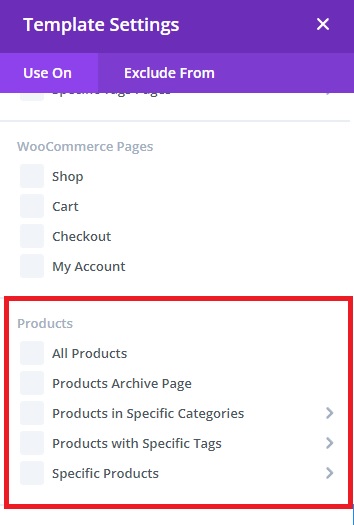
You can also have different product page templates depending on the type of product you sell in your online store. All you have to do is go to Divi > Divi Builder in your WordPress dashboard and click Add New Template.

If you scroll down to the Products section, you will see that you can create templates for specific product pages. This can depend on the categories, tags, or specific products. Simply select the option you want and press Create Template.
Then, you need to add a Custom Body to the product page template that you’ve just created. You can either build a new one from scratch or use one of the templates from the library. Regardless of what you select, you will have to use the Visual Editor once again to customize the WooCommerce product page template.
If you want to know more about how to use Divi Builder, have a look at our detailed guide on how to customize the WooCommerce product page in Divi.
Alternatively, you can use other page builders to edit the product page templates. If you use Elementor, you can check out our tutorial to customize the WooCommerce product page in Elementor for more information.
3) Customize WooCommerce Product Page Template using a plugin
If you want to make very specific changes to your WooCommerce product page templates, you can use a plugin. Some page builders like Elementor are also available as plugins, but there are other dedicated tools that you can use for very specific functionalities.
One of such plugins is Direct Checkout for WooCommerce. This tool is designed to help you simplify the checkout process in WooCommerce. With this plugin, you can redirect customers from the product page directly to the checkout page after adding a product to the cart. This way you shorten the purchase process and boost your conversion rates.
All in all, this is an excellent tool to edit the buttons of the product page templates on your store.
Let’s have a look at the steps to edit the product page template with Direct Checkout.
3.1) Install and Activate the Plugin
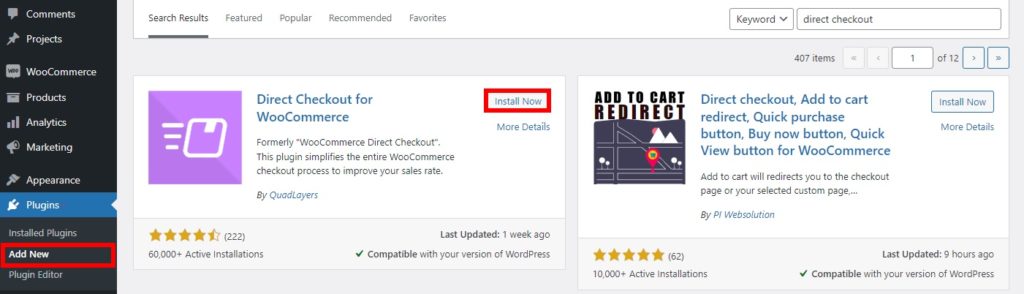
First, you have to install and activate the plugin. You can download the free version from here or get one of the premium plans that include more functionalities and start at 19 USD (one-time payment).
Alternatively, you can go to Plugins > Add New in your WordPress dashboard, search for the plugin and install it.
After installing and activating the plugin, you need to set it up.
3.2) Configure the Direct Checkout Options
Go to WooCommerce > Direct Checkout and open the General tab.
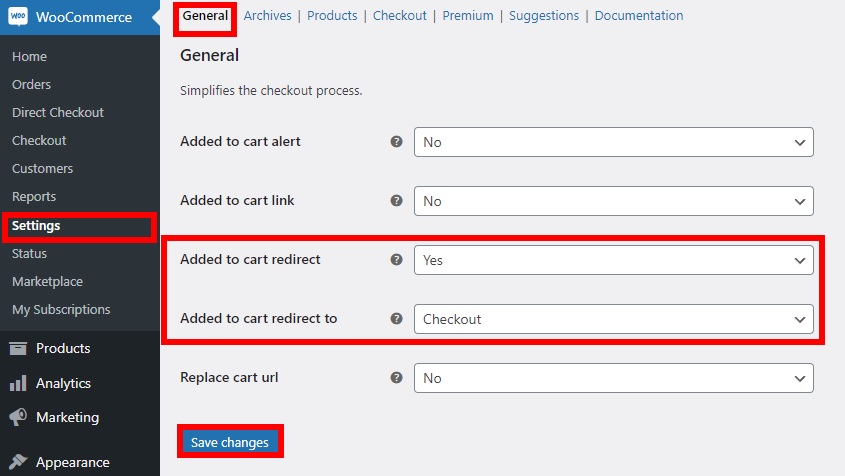
Then, set the following options:
- Added to cart redirect: Yes
- Added to cart redirect to: Checkout
Finally, save the changes and preview any of the product pages in your online store. Now as soon as you click the Purchase button on any product, you will be directly redirected to the checkout page.
For more information about how to add one-click buy buttons, check out our guide on how to add a quick buy button in WooCommerce.
In summary, customizing the product page templates is similar to editing the product page. You can have a look at our tutorial to customize WooCommerce product pages for more information and ideas to make the most of your product page templates.
Bonus: Edit WooCommerce Product Page Template with CSS
So far, we’ve seen how to customize the WooCommerce product page programmatically, with page builders, and using dedicated plugins. But there’s another thing you can do. You can also edit your template with a bit of CSS. This is the quickest method to make small design changes on your product page.
CSS scripts are very useful to change the display and design options, so you can easily add them to your site by going to Appearance > Customize > Additional CSS. Once there, you can add your CSS scripts to customize the product page templates.
Here are some examples of things you can do to improve your product pages using CSS.
Change the Title Font Size
The following CSS code will change the title font size on the product page to 16.
.woocommerce div.product .product_title {
        font-size: 16px;
}
You can choose any other font size by simply adjusting the font-size line in the snippet.
Change the Title Color
You can also customize the product page templates by changing the color of the title with CSS. Simply look for the hex codes of the color you want to add to your website with CSS and use the below code.
For example, in this snippet, we have used the color code #800000 that changes the title color to maroon.
.woocommerce div.product .product_title {
            color: #800000;
}
Once you have made all the changes, Publish it.
For more examples of CSS snippets, have a look at this post. It shows you how to customize the shop page but you can apply the same snippets to edit the product page templates.
For more specific examples to apply to Divi, you can check out this other article.
Conclusion
All in all, editing the templates of your product page can help you build unique product pages and stand out from your competitors. Depending on the type of products you sell and feedback from your customers, you can add, remove, or reorganize elements and make sure that you’re making the most of your product pages.
In this guide, we have seen various ways to customize the WooCommerce product page template on your website
- Programmatically
- With page builders
- Using a plugin
All these methods are effective in their way, so choose the most appropriate for your needs. If you have coding skills, the programmatic approach is very effective and gives you plenty of flexibility on what you can change. Otherwise, you can use a page builder to easily customize different sections of your templates. Finally, you can use plugins such as Direct Checkout that allow you to apply specific changes to your product pages.
Have you edited your templates? Which method did you use? Let us know in the comments below.
If you found this tutorial interesting, here are some more articles that you may also like:

I am trying to find similar instructions to edit our “content-product.php” page which is the template that controls the 4 wide thumbnail view of our products … I have managed to do some of it via CSS but need to remove some of the hooks which, at this time, seem to be hidden to me …
Thanks heaps,
Woody