
How to Customize WooCommerce Registration Form
Do you want to edit your registration forms and get more leads? In this guide, we’ll show you different ways to customize the WooCommerce registration form with and without plugins.
Online registrations are one of the most essential parts of your online store. It’s standard procedure to let your customers create a new account to purchase from your store. To avoid drop-offs, you should make sure that your registration forms are tailored to your store and only have the necessary fields.
Why Customize the Default WooCommerce Registration Form?
When a customer registers a new account in your online store, you receive some information about them such as email, name, billing address, and more. However, the default WooCommerce registration form only asks for the email address to register a new account. This may make the process faster for the customer but it’s also a wasted opportunity to get to know your shoppers better.

If customers need to provide any additional information, they need to add it during the checkout or from the “My Account” page. This can be a very repetitive and long procedure for your shoppers and might even make them lose interest in your online store.
The good news is that you can avoid this by adding all the necessary fields to the registration form with the information you want to get. This way, you’ll get the information directly and customers won’t have to update their details later making it more convenient for both you and your users.
Now let’s see the different methods to edit the WooCommerce registration form.
How to Customize the WooCommerce Registration Form
There are 3 main ways to customize your WooCommerce registration form:
- From the WooCommerce Dashboard
- With plugins
- Programmatically
Let’s have a look at each method. Before you start, make sure that you have properly set up WooCommerce on your store.
1. Customize WooCommerce Registration Form from the WooCommerce Dashboard
By default, you can edit your registration form from the WooCommerce dashboard. Go to WooCommerce > Settings and open the Accounts and Privacy tab. Here, you can change a few options when customers create a new account in your store.
For example, you can activate options to automatically generate usernames and passwords during account creation. These options are activated by default, but you can disable them.
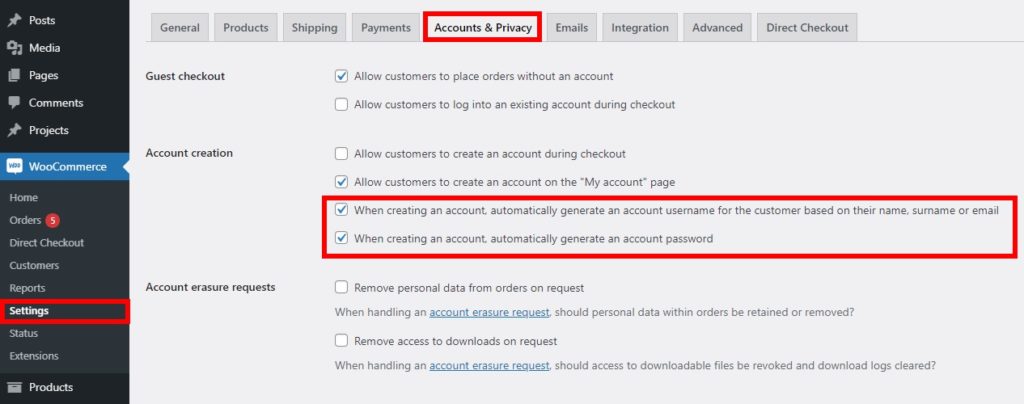
There are also some other options to let customers create an account on the checkout or the My Account page, allow shoppers to place orders without an account, and so on. Simply check the options you want to enable and then save the changes.
As you can see, these default options are quite limited to edit your WooCommerce registration forms. If you want to add more fields or make bigger changes, you will have to use other methods.
2. Customize WooCommerce Registration Form using Plugins
One of the best ways to easily customize your WooCommerce registration form is by using dedicated plugins. There are several tools out there. For this tutorial, we’ll demonstrate how to edit the registration forms using the User Registration plugin.
User Registration is a freemium plugin that allows you to create your own custom registration forms and is 100% responsive. You will need to get the WooCommerce add-on which is available in their premium plan.
2.1. Install and activate the Plugin and WooCommerce Add-on
To start using the plugin, you need to install and activate it, so you need to subscribe to any of their premium plans that are integrated with WooCommerce.
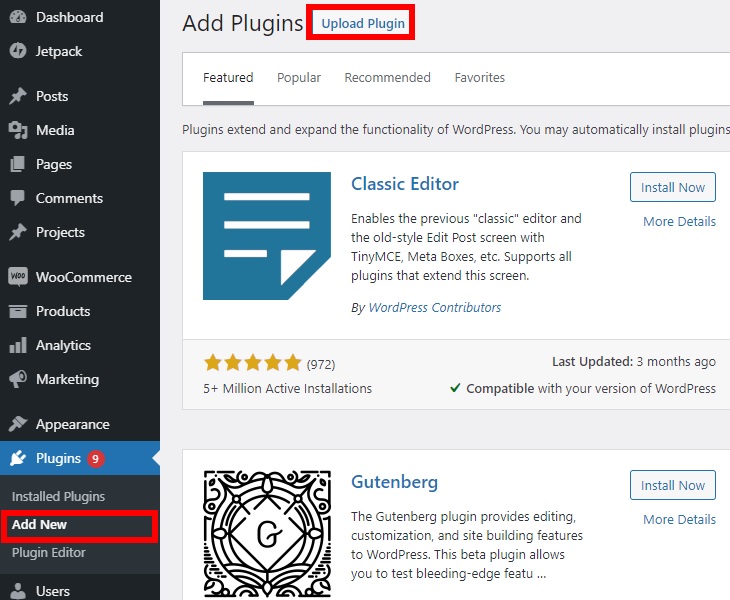
After that, in your WooCommerce dashboard, go to Plugins > Add New and click Upload Plugin.
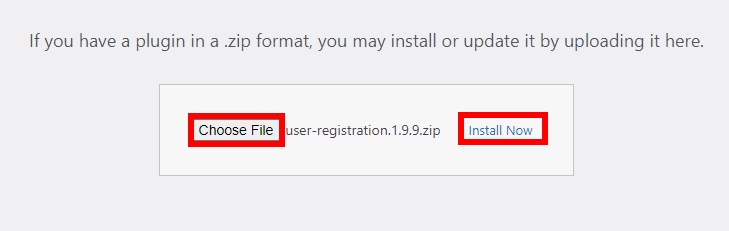
Press Choose File, select the plugin’s zip file that you’ve downloaded after the purchase, and click on Install Now to install the plugin.
After the installation, activate the plugin. Go to Plugins > Installed Plugins and click Activate next to the User Registration WooCommerce extension.

If you aren’t familiar with the process of installing this way, check out our guide on how to install plugins manually.
2.2. Create your WooCommerce Registration form
To start creating your custom WooCommerce registration form, go to User Registration > Add New.
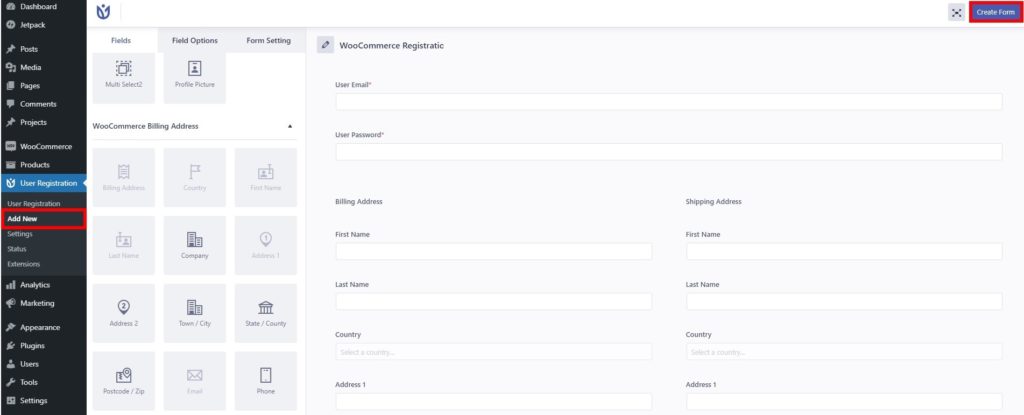
We’ll call our new registration form “WooCommerce Registration”, but you can give it any name you want.
By default, the form only asks for the user’s email and password, but you can add other fields such as billing and shipping address, country, zip code, phone number, and so on. Simply drag and drop them to your form and once you’re happy with your new WooCommerce registration form, click Create Form to save it.
2.3. Replace the Default WooCommerce Registration Page
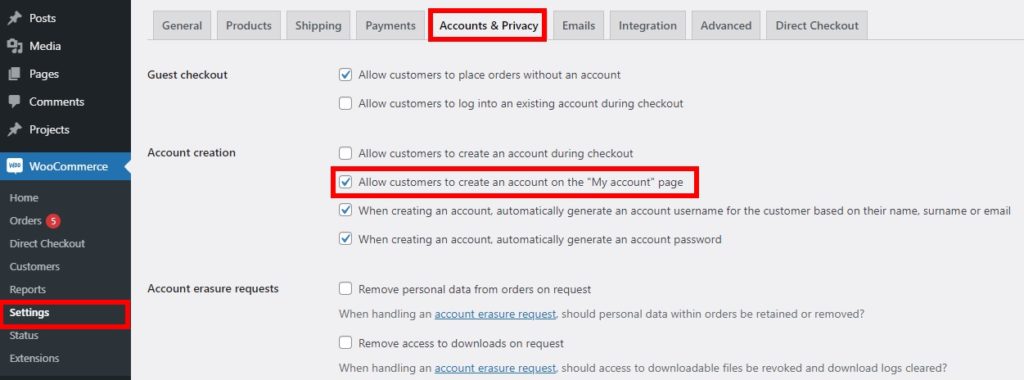
After you create your registration form, you need to replace the default registration form on the registration page. To do this, go to WooCommerce > Settings and open the Accounts and Privacy tab.
Select the option to allow customers to create an account on the “My Account” page.
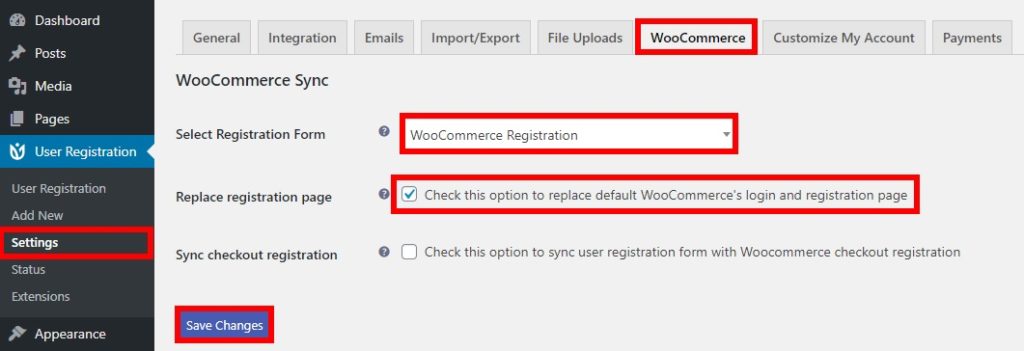
Then, go to User Registration > Settings, open the WooCommerce tab and select the registration form that you’ve just created in the Select Registration Form option.
After that, a few fields will appear and you need to tick the option to replace default WooCommerce’s login and registration page. To complete the process, save the changes.
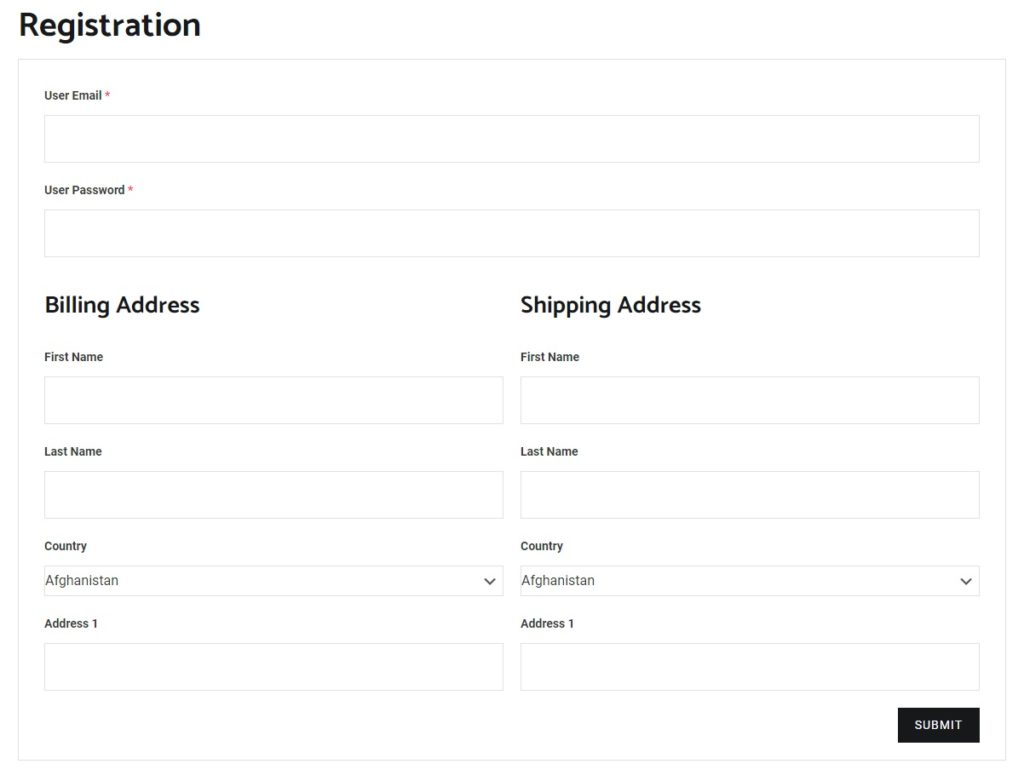
Now it’s time to see your new registration form in the front end. Go to the registration page and preview it to see your newly customized WooCommerce registration form.
3. Customize WooCommerce Registration Form Programmatically
If you don’t want to use a premium plugin and have programming skills, this method is for you. You can edit the WooCommerce registration form in almost any way using code snippets.
Before you move further, we would recommend you backup your WordPress website and create a child theme. You will change the theme files with these snippets and if anything goes wrong they can break your site, so it’s always better to be prepared.
After you’ve backed up your site and installed a child theme, you can start editing your registration forms. In this section, we’ll show you different examples of things you can do. You’ll need to place the snippets in the functions.php file of your child theme. To do that, in your WordPress dashboard, go to Appearance > Theme Editor and open the functions.php file.
Before you start, make sure that you have checked the option to allow customers to create an account on the “My Account” page. To do this, follow the instructions described in step 2.3 if you haven’t checked that option yet.
Now let’s have a look at a few examples to customize the WooCommerce registration form programmatically.
Display Billing Account Number in the Registration Form
If you want to add a billing account number as a required field to your WooCommerce registration form, you can use the following code snippet:
// Display a field in Registration / Edit account
add_action( 'woocommerce_register_form_start', 'ql_display_account_registration_field' );
add_action( 'woocommerce_edit_account_form_start', 'ql_display_account_registration_field' );
function ql_display_account_registration_field() {
$user = wp_get_current_user();
$value = isset($_POST['billing_account_number']) ? esc_attr($_POST['billing_account_number']) : $user->billing_account_number;
?>
<p class="woocommerce-form-row woocommerce-form-row--wide form-row form-row-wide">
<label for="reg_billing_account_number"><?php _e( 'Ship to/ Account number', 'woocommerce' ); ?> <span class="required">*</span></label>
 <input type="text" maxlength="6" class="input-text" name="billing_account_number" id="reg_billing_account_number" value="<?php echo $value ?>" />
 </p>
<div class="clear"></div>
<?php
}

// registration Field validation
add_filter( 'woocommerce_registration_errors', 'ql_account_registration_field_validation', 10, 3 );
function ql_account_registration_field_validation( $errors, $username, $email ) {
if ( isset( $_POST['billing_account_number'] ) && empty( $_POST['billing_account_number'] ) ) {
$errors->add( 'billing_account_number_error', __( '<strong>Error</strong>: account number is required!', 'woocommerce' ) ); }
return $errors;
}

// Save registration Field value
add_action( 'woocommerce_created_customer', 'ql_save_account_registration_field' );
function ql_save_account_registration_field( $customer_id ) {
if ( isset( $_POST['billing_account_number'] ) ) {
update_user_meta( $customer_id, 'billing_account_number', sanitize_text_field( $_POST['billing_account_number'] ) );
}
}

// Save Field value in Edit account
add_action( 'woocommerce_save_account_details', 'ql_save_my_account_billing_account_number', 10, 1 );
function ql_save_my_account_billing_account_number( $user_id ) {
if( isset( $_POST['billing_account_number'] ) ){
update_user_meta( $user_id, 'billing_account_number', sanitize_text_field( $_POST['billing_account_number'] ) );
}
}

// Display field in admin user billing fields section
add_filter( 'woocommerce_customer_meta_fields', 'ql_admin_user_custom_billing_field', 10, 1 );
function ql_admin_user_custom_billing_field(
$args ) { $args['billing']['fields']['billing_account_number'] = array(
'label' => __( 'Ship to/ Account number', 'woocommerce' ),
'description' => '',
'custom_attributes' => array('maxlength' => 6),
);
return $args;
}
This will show the billing account number in the edit account section of the My Account page as well as the Admin User edit page in the billing fields section.
You can take this snippet as a base and adjust it for your store. You can also add some other WooCommerce registration form fields to the billing section such as:
- billing_first_name
- billing_last_name
- billing_company
- billing_address_1
- billing_address_2
- billing_city
- billing_postcode
- billing_country
- billing_state
- billing_email
- billing_phone
Display Custom WooCommerce Registration Form during Checkout
You can also add the WooCommerce registration form to the checkout page. This can be very convenient for your customers as it allows them to easily browse your shop as guests and create an account only if they want to purchase something.
You can easily do so by using the User Registration plugin. You will need one of the premium plans, so have a look at step 2.1 if you haven’t done so already. On top of that, you need to create your WooCommerce registration form and replace it with the default form.
After that, go to WooCommerce > Settings and open the Accounts and Privacy tab. Then, tick the option to allow customers to create an account during checkout and save the changes.

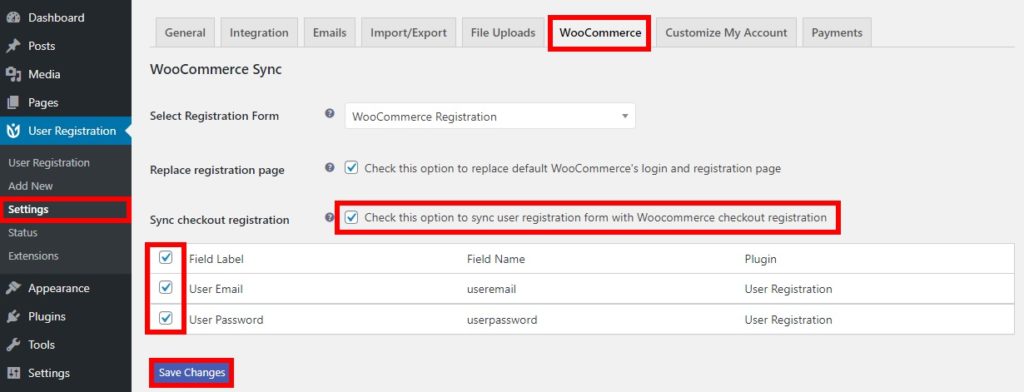
After that, go to User Registration > Settings and open the WooCommerce tab. Tick the option to sync checkout registrations and save the changes.
This will let your customers sync user registration with WooCommerce checkout registration. After that, check all the field labels in the table and save the changes.
That’s it! Now your customers will be able to register a new account during checkout on your website.
Bonus: Edit the WooCommerce Registration Email Address
Email addresses are fundamental for registration. As an eCommerce store, you want to have your customers’ email addresses to be able to contact them in the future with information about their orders, send them offers, exclusive deals, and so on.
That’s why learning how to edit the WooCommerce registration email is very useful. The best way to do this is by customizing the email template. And the best part is that you can do this from the WooCommerce dashboard.
Simply go to WooCommerce > Settings and open the Emails tab. Here, you can change the email templates with the help of email sender and email template options.
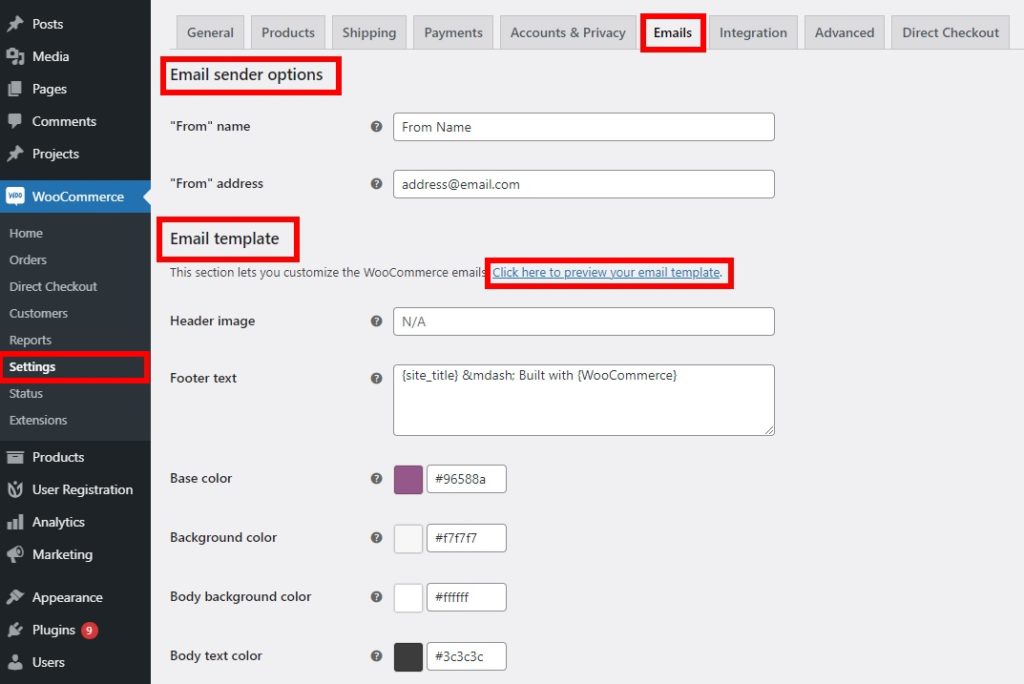
The email sender option allows you to edit the “From” name and address. This means that you can customize how the sender name and email address will appear in the WooCommerce email.
Similarly, you can edit the email templates’ header image, footer text, base color, background color, body background, and text color.
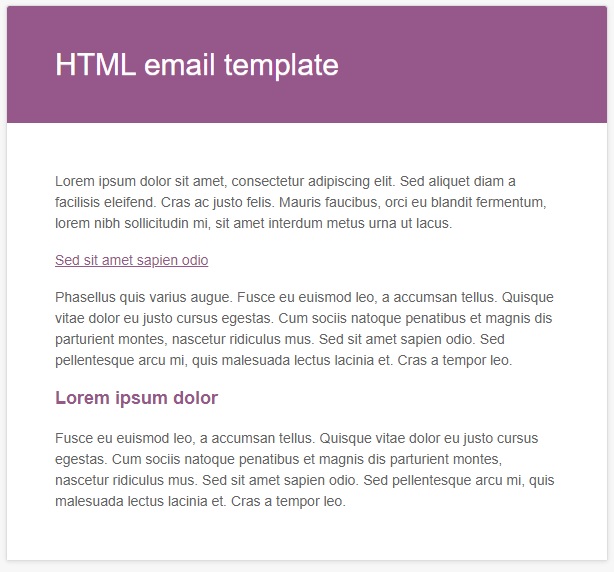
Make all the changes you want for your WooCommerce email and see the changes in real-time by clicking on the “Click here to preview your email template” link.
Once you’re happy with your new template, remember to save the changes.
There are other ways to edit the email templates that allow you to customize many other things. For more information, check out our guide on how to edit WooCommerce email templates.
Conclusion
All in all, the registration form is very important as it allows you to collect relevant information about your customers. The default registration form doesn’t always provide you with all the information you want, so customizing it can be a very effective method to gather all the details you need.
In this guide, we’ve explored 3 different methods to customize the WooCommerce registration form:
- From the WC dashboard
- Using a dedicated plugin
- Programmatically
If you want to make a few changes here and there, the default options from the WooCommerce dashboard can be useful. However, the options it offers are quite limited, so if you want to customize more things, we recommend you use a plugin. On the other hand, if you don’t want to install a third-party tool and have coding skills, you can edit the registration form programmatically using code snippets.
For more information on how to customize your store, have a look at the following guides:

Thank you for this article. It saved my time.
You’re welcome Suresh
Hello, Just to check if after creating this form, does it work with Sendinblue as i will want to capture my user after they have register
Need to improve the quality of solutions
Hi!
How can i edit/translate the default text below the field:
“A link to set a new password will be sent to your email address.”
Thanks!
Daniele
Thank you for the hooks. Be aware your code is unsafe. Escape user inputs with sanitize_text_field() method at least.
Thanks for the feedback!
We will look into this.