How to Customize WooCommerce Thank You Page: Plugins and Coding
Are you looking for ways to make the best of your after-purchase Thank you Pages for better lead generation? Then this article is perfect for you. In this guide, we’ll see different ways to customize the WooCommerce Thank You page both using plugins and programmatically.
What is the Thank You page in WooCommerce?
Usually, when your customers purchase your products, they’re taken to a Thank You Page. This page usually gives customers information about the order they’ve placed such as order number, the product they’ve purchased, payment method, and so on.
Even though the default Thank You page that comes with WooCommerce by default is ok, it’s not exactly the most optimal when it comes to improving your sales or catching your customers’ attention.
Why edit the Thank You page?
The Thank You Page is the first page your shoppers see after they buy from you. This means that it’s the only page that all your customers will see, so it’s an additional means to boost your sales. For example, you can redirect shoppers to related products, offer exclusive deals, promote new products, and so on.
Alternatively, you can display customized Thank You messages which will help you stand out from 99% of eCommerce sites. With a customized Thank you page, you open new avenues to not only increase your sales but also give your customers a better post-sale experience.
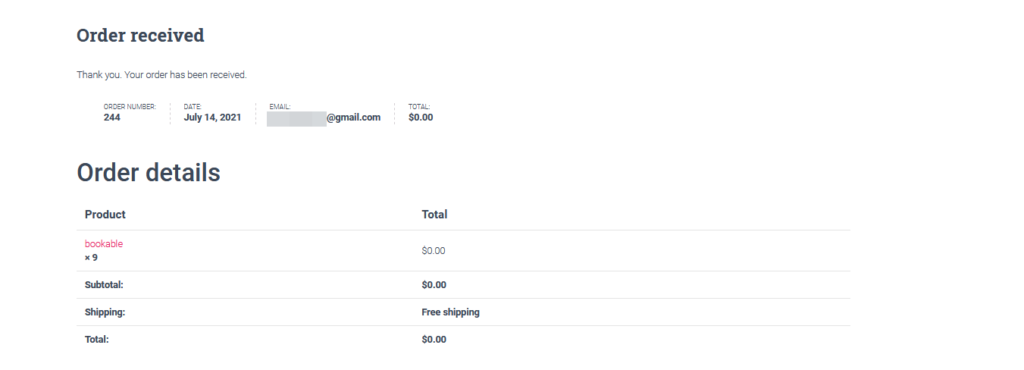
The problem is that, by default, WooCommerce doesn’t offer many customization options for your Thank You page. That’s why in this guide, we’ll show you different methods that you can use to edit your Thank You page.
How to customize the WooCommerce Thank you page
There are different ways to customize the Thank You page in WooCommerce:
- With plugins
- Programmatically
Let’s have a look at each method so you can choose the best one for you.
1) Edit the WooCommerce Thank You page with plugins
There are many tools to edit the Thank You page in WooCommerce. These are some of the best ones.
1.1) NextMove Thank You Page Customizer
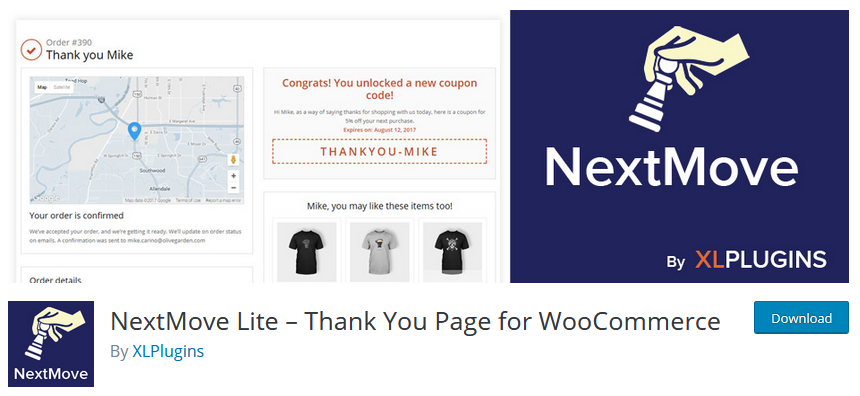
With NextMove Thank You page customizer, you can create new ways to keep customers interested in your store. It comes packed with interesting components that you can integrate with your Thank you pages in multiple ways. For example, you can add social share buttons, recommend products, HTML content, videos, and even dynamic coupons. On top of that, you can add a location map as well as details about the order and the customer to generate more loyalty and find ways to serve your customers even better.
Additionally, NextMove is compatible with most page builders, so you can simply add the customized thank you page using its convenient shortcodes. Moreover, the plugin also has a pro version with additional components that are designed for lead generation. This includes personalized and dynamic coupons, smart bribe options, related products, and more.
Key features
- Wide variety of components to add to your Thank You page
- Compatible with page builds and each component comes with its own dedicated shortcode
- Options to add HTML content to your Thank You page along with order details and customer details
Pricing
NextMove Thank You page customizer is a freemium plugin. It has a free version with basic features and a Pro plan that starts at 29 USD per year.
1.2) Thanks Redirect for WooCommerce
Thanks Redirect for WooCommerce is a simple and easy-to-use plugin that lets you set a redirect page for your products. It lets you define a Thank You page for your customers based on whether they successfully buy your products or not.
Create a custom Thank you page with a specific thank you message along with additional content such as order details as well as language translation compatibility. The plugin also lets you add either a global Thank You page or set per product redirect URLs for even more flexibility.
On top of that, the pro version comes with extended features such as multisite compatibility as well as compatibility with WooCommerce Subscriptions and Donations.
Key features
- Easy to use redirect plugin for WooCommerce Thank you pages
- Custom Thank You pages with specific messages, translations, and order details
- Create and set per product-based redirects if required
Pricing
Thanks Redirect for WooCommerce is a freemium tool. The free version has standard features while the Pro plan starts at 15 USD for a single website and includes more advanced functionalities.
1.3) WooCommerce Thank You Page Customizer
Improve your sales and customer responses with Thank You Page Customizer for WooCommerce. This excellent plugin provides an easy-to-use tool to edit your Thank You pages with ease. Enjoy a live customizer and a wide range of components to choose from. Add Thank You messages, coupons, order details, confirmation details, social media share buttons, and more. You can also easily change the position of the elements, colors, designs, and much more as well.
With Thank You Page customizer you can not only add social media icons but also include custom media and texts as well. Similarly, it lets you easily add a Google Map to your Thank you page to direct your customers to your shop.
Key features
- User friendly Thank You page customizer with live preview
- Options to design, customize and choose the positions of each Thank You page component
- Pro version adds more features for featured products, cross-sells, and up-sells as well as slideshows and rule-applicable coupons
Pricing
Thank You Page Customizer is a freemium plugin. The free version comes with basic features while the Pro plan starts at 26 USD for a single license.
How to Customize WooCommerce Thank You Page using NextMove Lite
For this demonstration, we’ll use the free version of NextMove WooCommerce Thank You Page. It’s a beginner-friendly tool and its shortcode-ready design makes it very easy to deploy your Thank You pages.
Install the NextMove Lite Plugin
First, install the plugin by opening your WP Admin Dashboard and going to Plugins > Add New. Then, use the search bar on the top right to search for Next Move WooCommerce Thank You Page and then hit Install on the plugin’s tab. Click Activate once the button updates.

After that, you’ll be prompted with a request for diagnostic tracking that you can easily decline or accept using Skip or Allow and continue respectively.
Next, you will be taken to the Thank You Pages screen where you can choose to customize an existing Thank You page or create a new one.
Let’s start by editing your existing page.
Edit and Customize Thank You Pages with NextMove Lite
Go to XLPlugins > NextMove Lite and under your Thank You page, click Components.
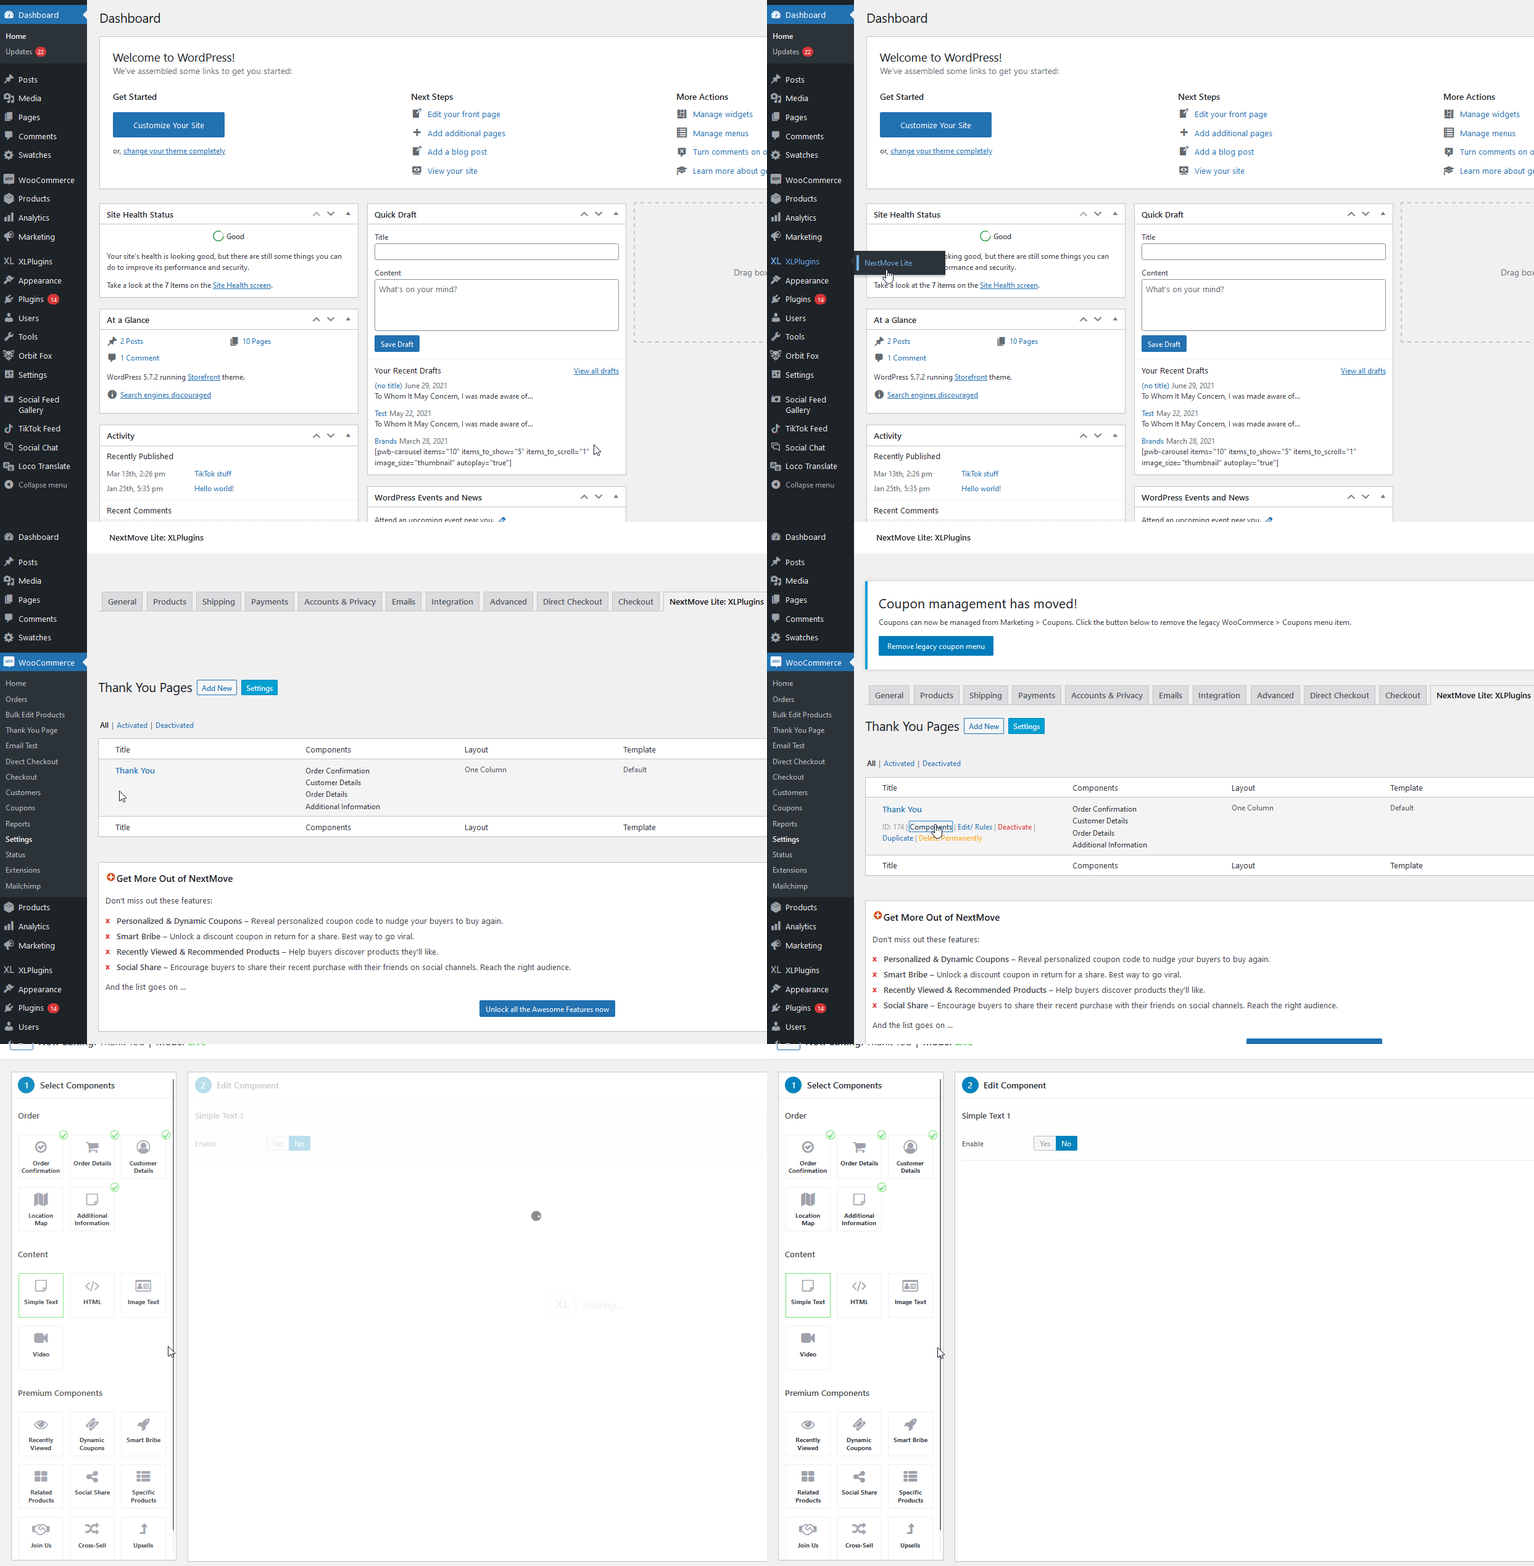
You will be now taken to the Thank You Page customizer screen where you can freely add or edit any of your components.
Let’s start by adding a simple text and video to your Thank You Page.
Simply click on any of the components from the left Select Components column and press Enable on the middle Edit Component screen.

Adding a Text Component to your Thank You Page
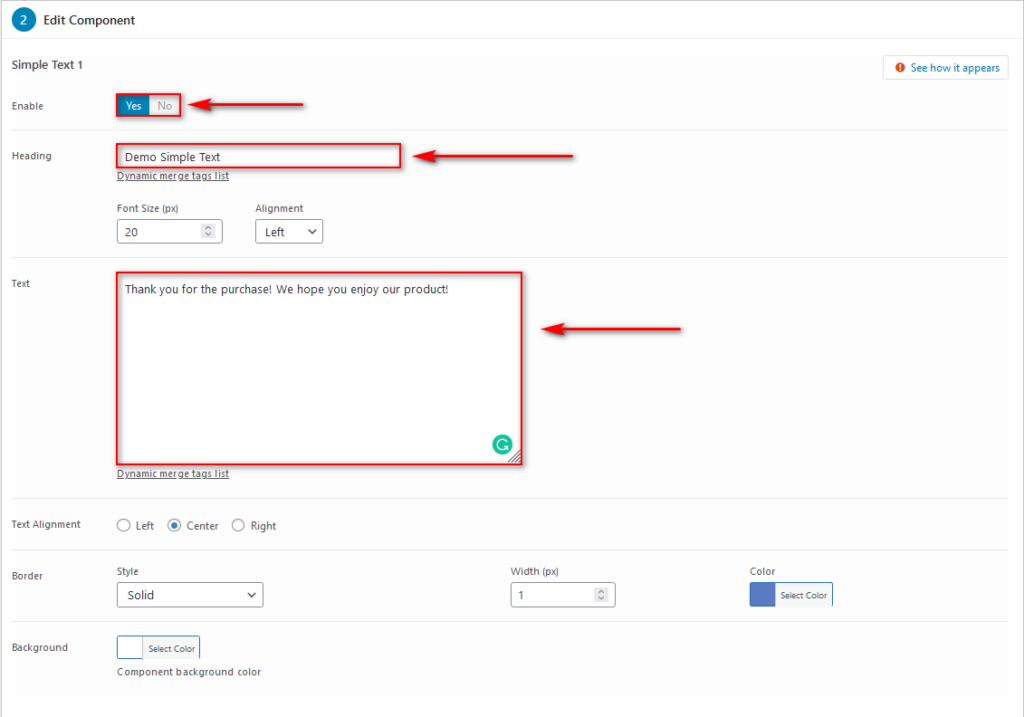
Now you can customize your text by adding a small heading section, text and then personalizing your text accordingly. Let’s go ahead and customize the text component by adding a heading, the required text, and adding a bit of font color to it.
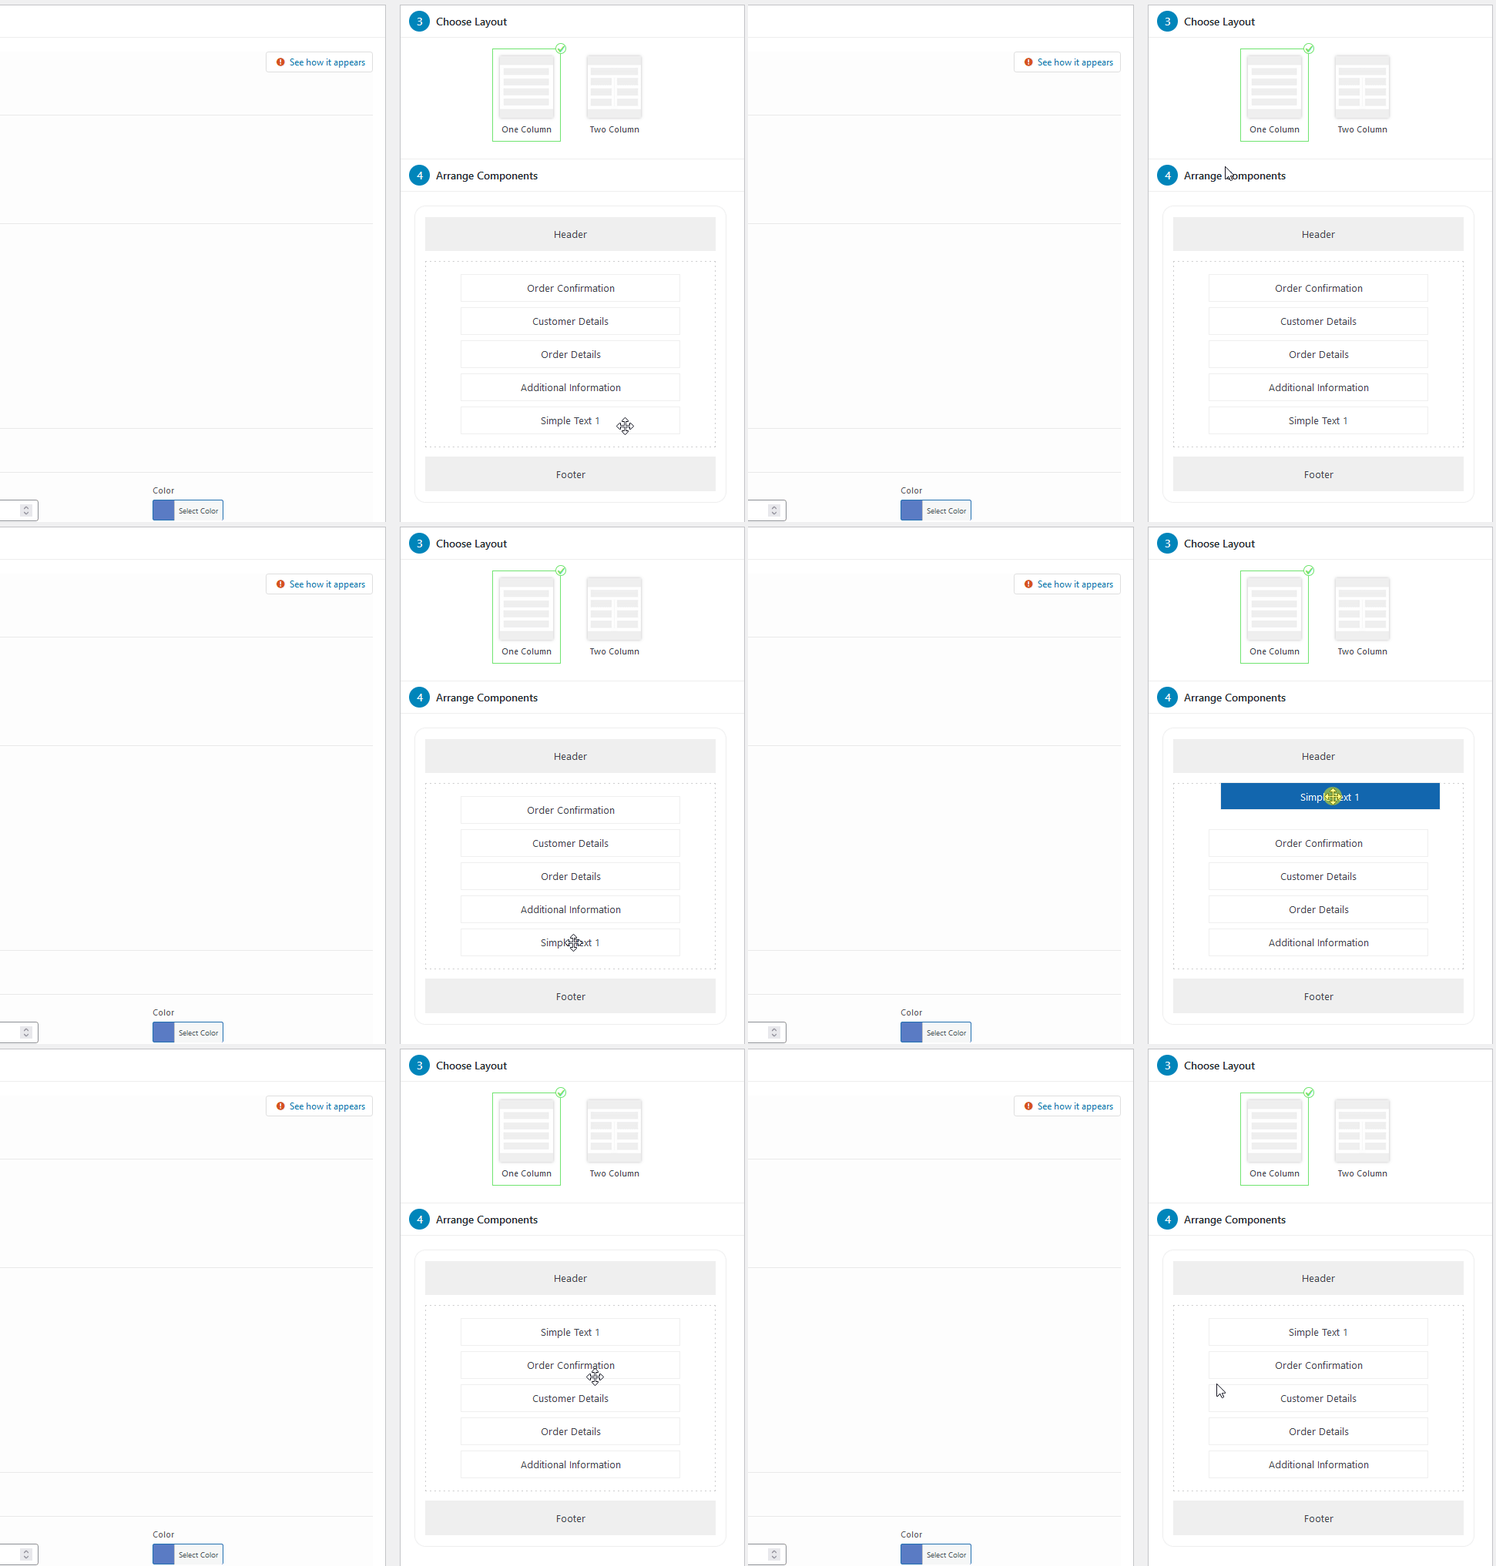
Then, you can use the right column to choose the layout of your Thank You page between a single column or a double column layout. After that, you can rearrange your components by dragging and dropping them from the list.
For our Thank You page, we want our simple text to be on the top, so let’s just drag our Simple Text component to the top as shown below.
Adding a Video Component to your Thank You Page
That’s just the first step. Let’s add a Video to make our Thank You page more attractive. Following the same process, select Video, and enable the component.
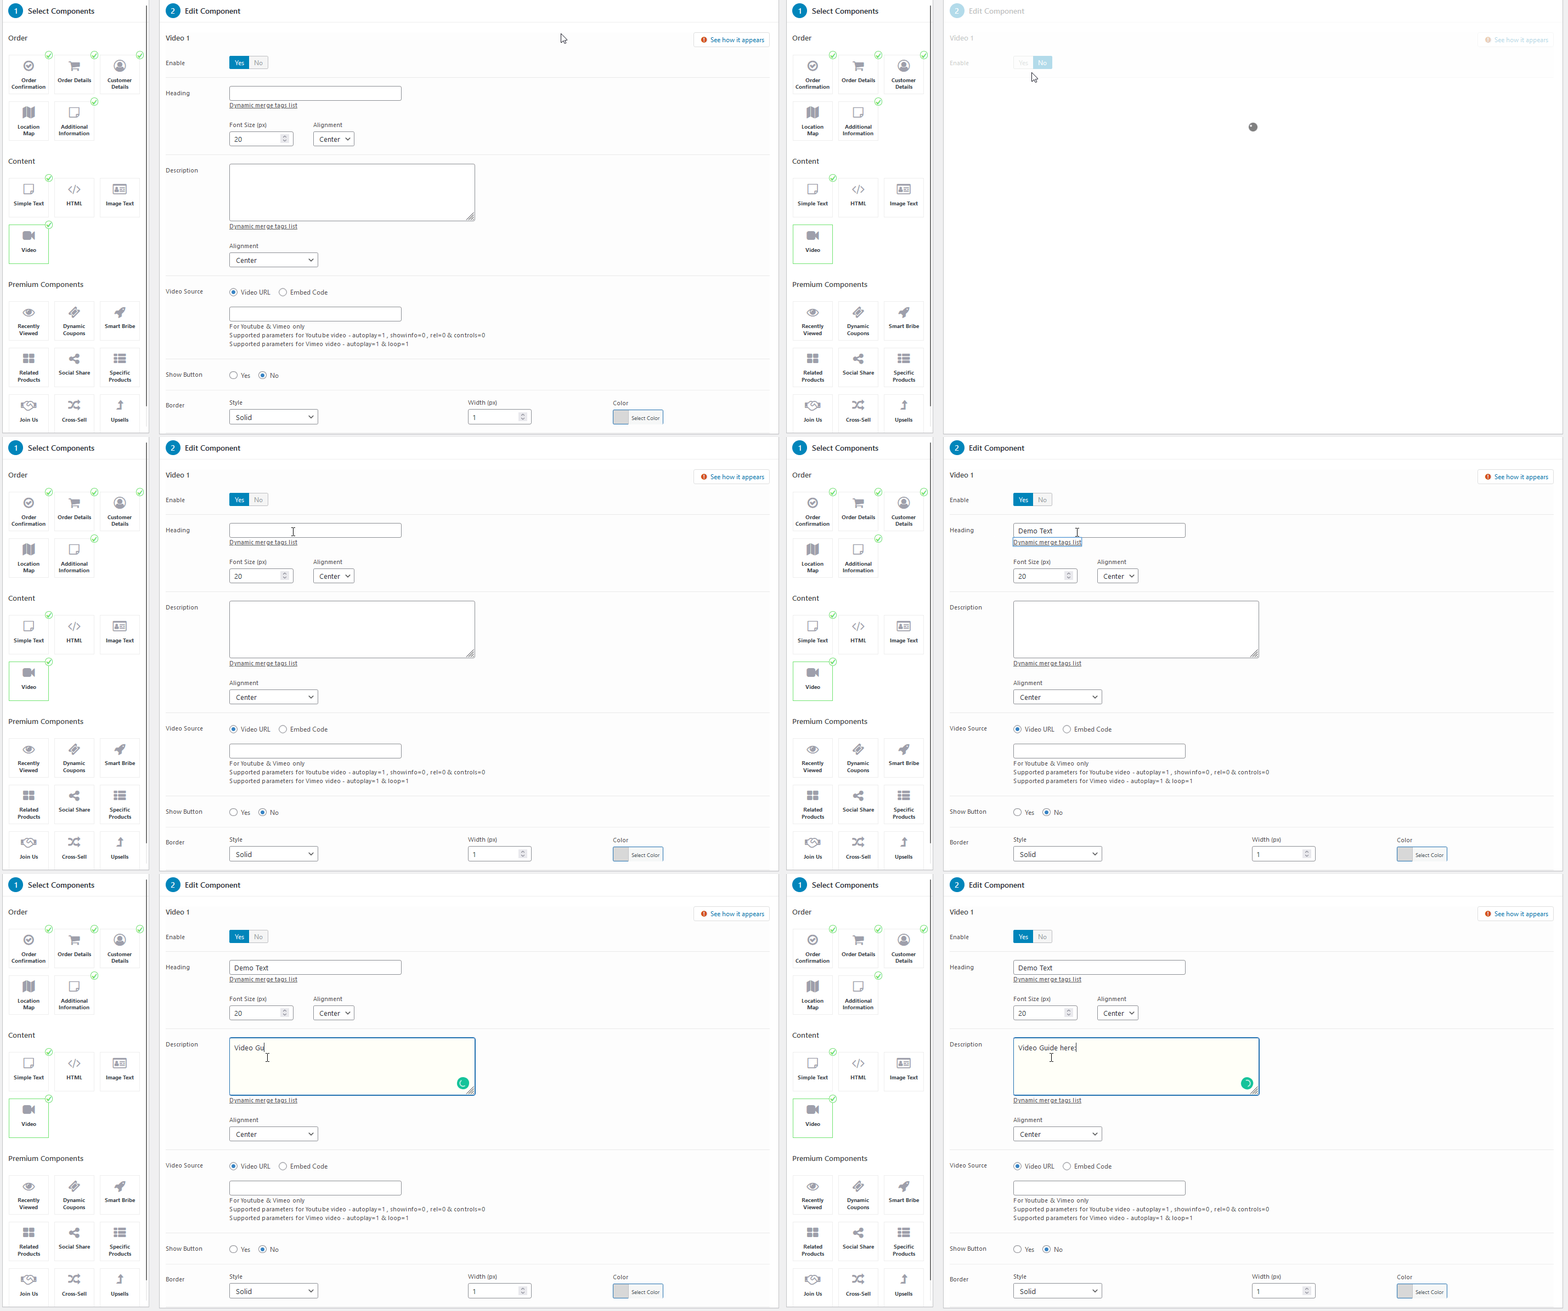
Then, you can add a heading and a description text as well as the video source through a URL or an Embed Code. For now, let’s add a simple YouTube video as the source to promote one of our products.
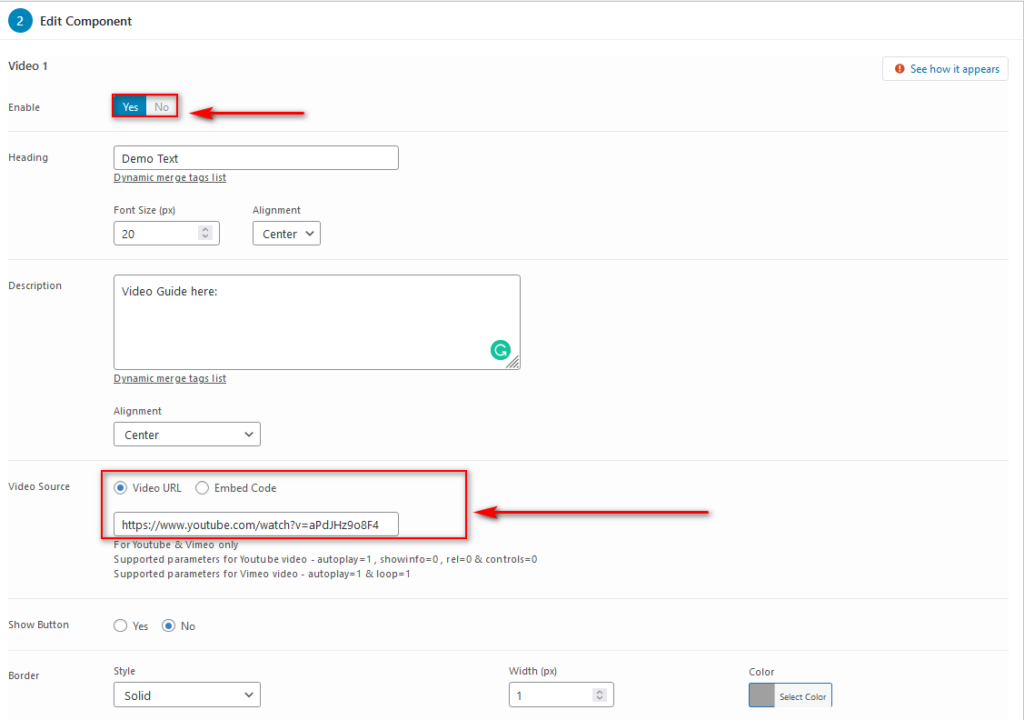
You can also enable extra options for the components as well as set a layout and rearrange your components as seen before.
Additionally, you can freely edit any of the existing components such as order information and order details by pressing Components on the left column and editing it accordingly.
Let’s have a look at an example.
Edit and customize components for Thank You pages
If we click Order Information, we’ll see the Edit Component screen for it where we can choose the icons, order headings, and subheadings. The plugin also lets you add specific dynamic tags that you can change based on your customer’s order details and information.
Let’s add an extra line on your Subheadings that says “The Additional Order details will be sent to {{customer_email}}”.
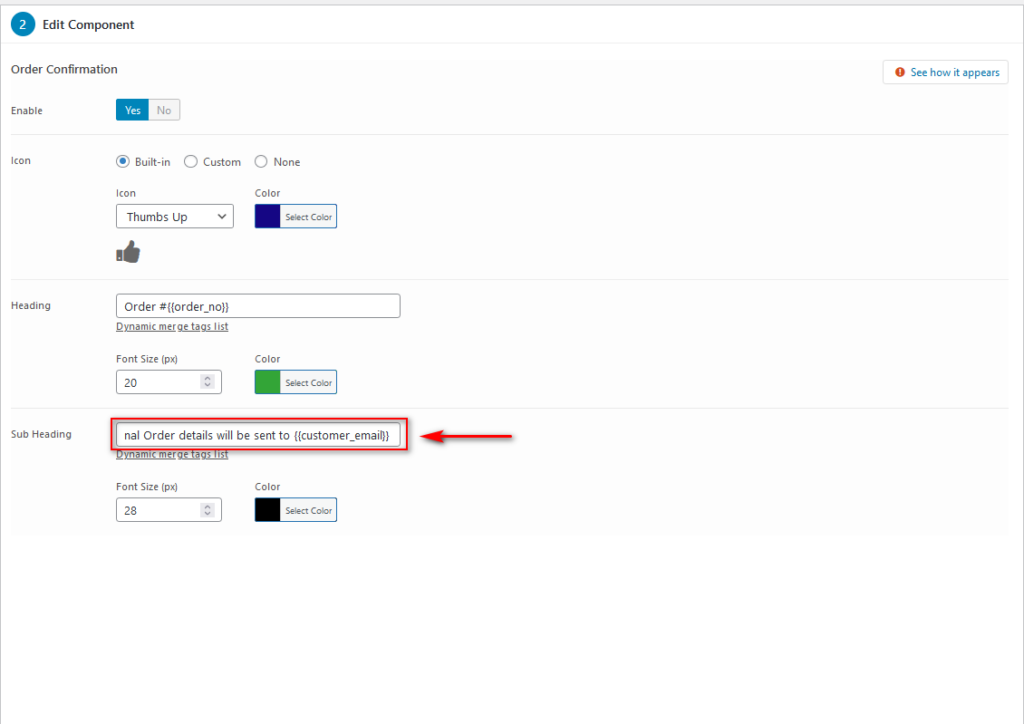
Once you’re done customizing your Thank You page, press the Save button on the top right to save your customized Thank you, Page. If you want to see how your Thank you Page looks on the front end, click Preview.
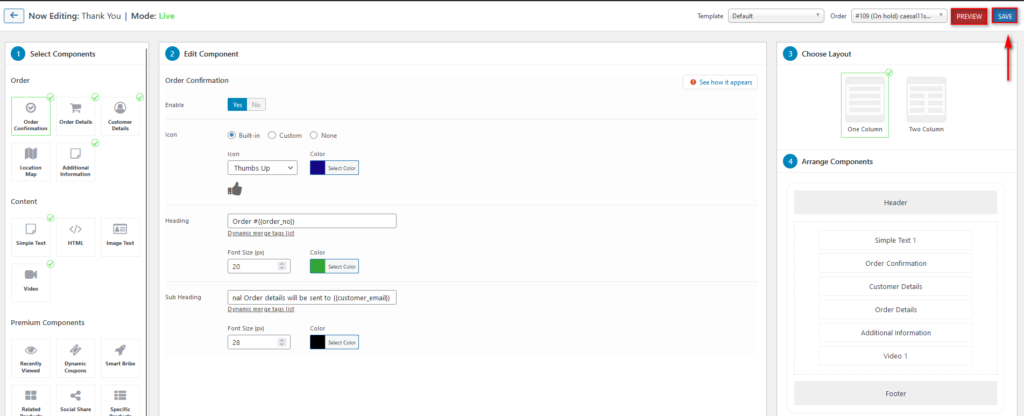
So after all those changes, this is our customized Thank You Page:
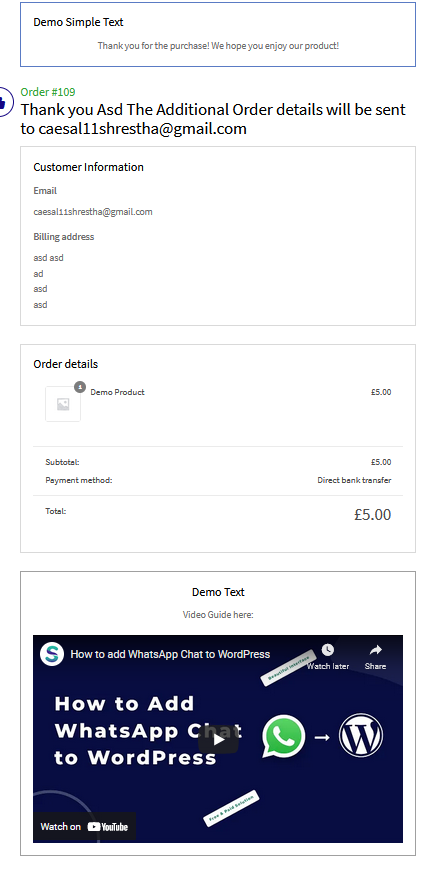
As you can see we’ve personalized the text and added a video promoting one of our products. You can use more features and customize it, even more, to improve it.
An important thing to consider is that the plugin lets you add multiple Thank You pages and set different rules for each page. This way, you can create and set different Thank You pages to show up for different products, categories, roles, and so on.
Let’s see how to do that.
Set up Rules for Multiple Thank You Pages
Let’s start by creating a new page by clicking Add New on the Plugin’s Interface. Give your Thank You page a title and then scroll down to the Rules section.
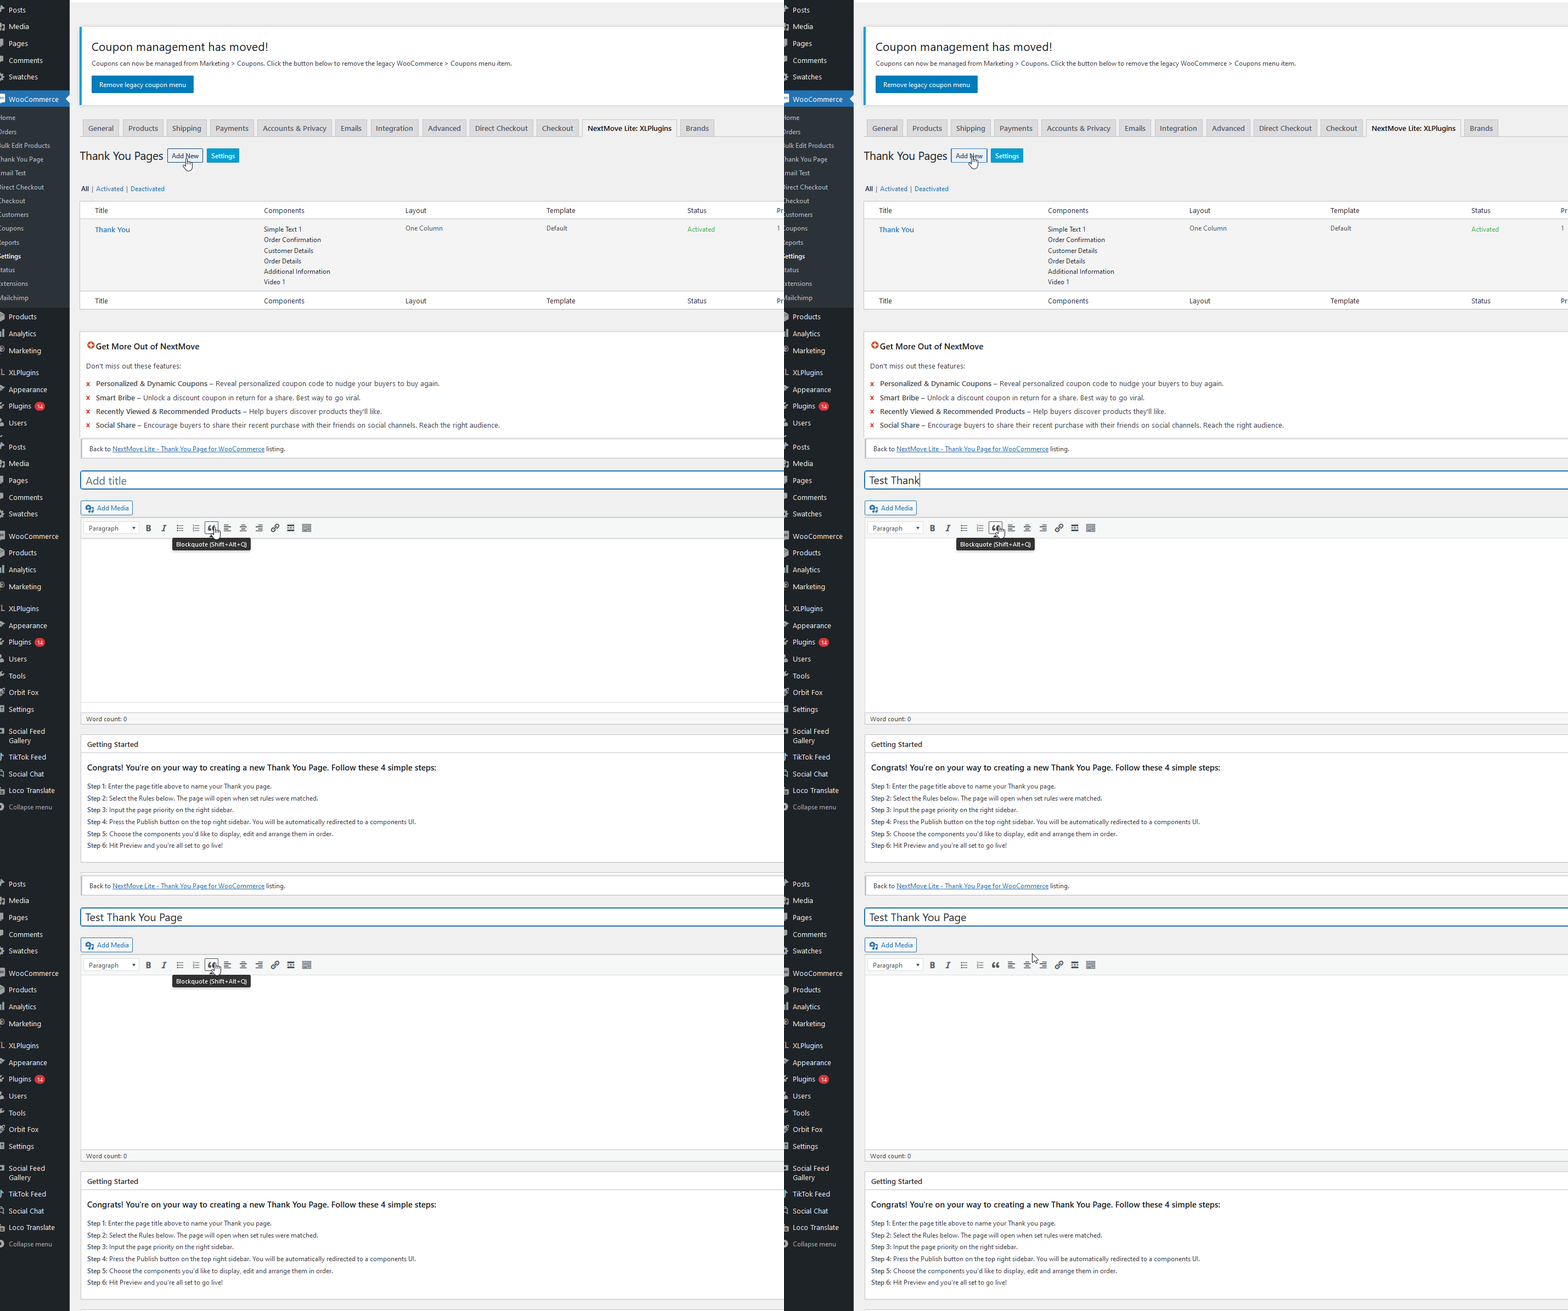
Here, you can define the rules of your products so that this specific Thank You page only appears to your customers if they purchase products based on your rules. For our demo, we’ll set the rule to Order Category, and on the right-field choose what Category to apply to the rule. For example, let’s display this Thank You Page only when customers buy something from the Bundled Products category.

You can also add more rules by clicking on the AND or OR buttons so that the rules are checked based on multiple conditions.
Adding Priority and Redirects to your Thank You page
On the right sidebar, you can choose what page the Thank You page will redirect users to. Let’s select the My Account page and then choose your Page Priority below it. This lets you define the priority of a page if you have multiple priorities. Since this current page should be applied to any bundled product first, let’s set the highest priority (1).
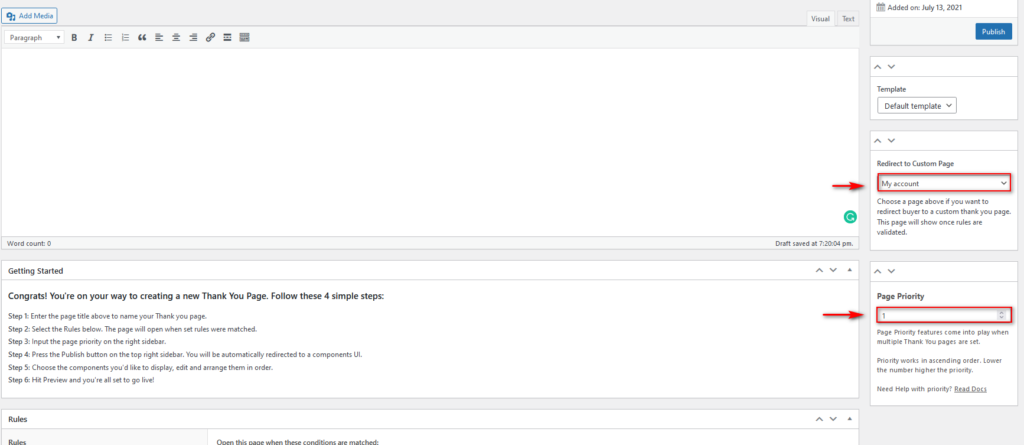
Then, click Publish, and your new Thank You page should be created.
You can now go back and edit this newly created Thank You page following the steps described above to personalize it.
Remember to preview and edit the Thank You Page accordingly and to use the provided tags to add dynamic elements to your Thank You page.
2) How to Customize the WooCommerce Thank You Page Programmatically
If you don’t want to install any plugins, you can customize your WooCommerce Thank You Page programmatically. This is a very interesting option for more experienced WordPress/WooCommerce users and requires a bit of coding knowledge.
NOTE: Before you start with this method, make sure to create a full backup of your site and install a child theme.
The simplest way of doing so is by adding a simple WooCommerce hook to the functions.php file of your child theme. This way you can send custom texts or messages to your shoppers when they reach your Thank You page.
For example, a simple code you can add to customize the text is:
add_action('woocommerce_before_thankyou','QuadLayers_before_thankyou');
function QuadLayers_before_thankyou(){
echo "Thank You for Purchasing From QuadLayers";
}
Simply place this code in the functions.php file of your child theme. To do so, open your Theme Editor by going to Appearance > Theme Editor. Then, use the right sidebar to find the functions.php file and paste the code as shown below.
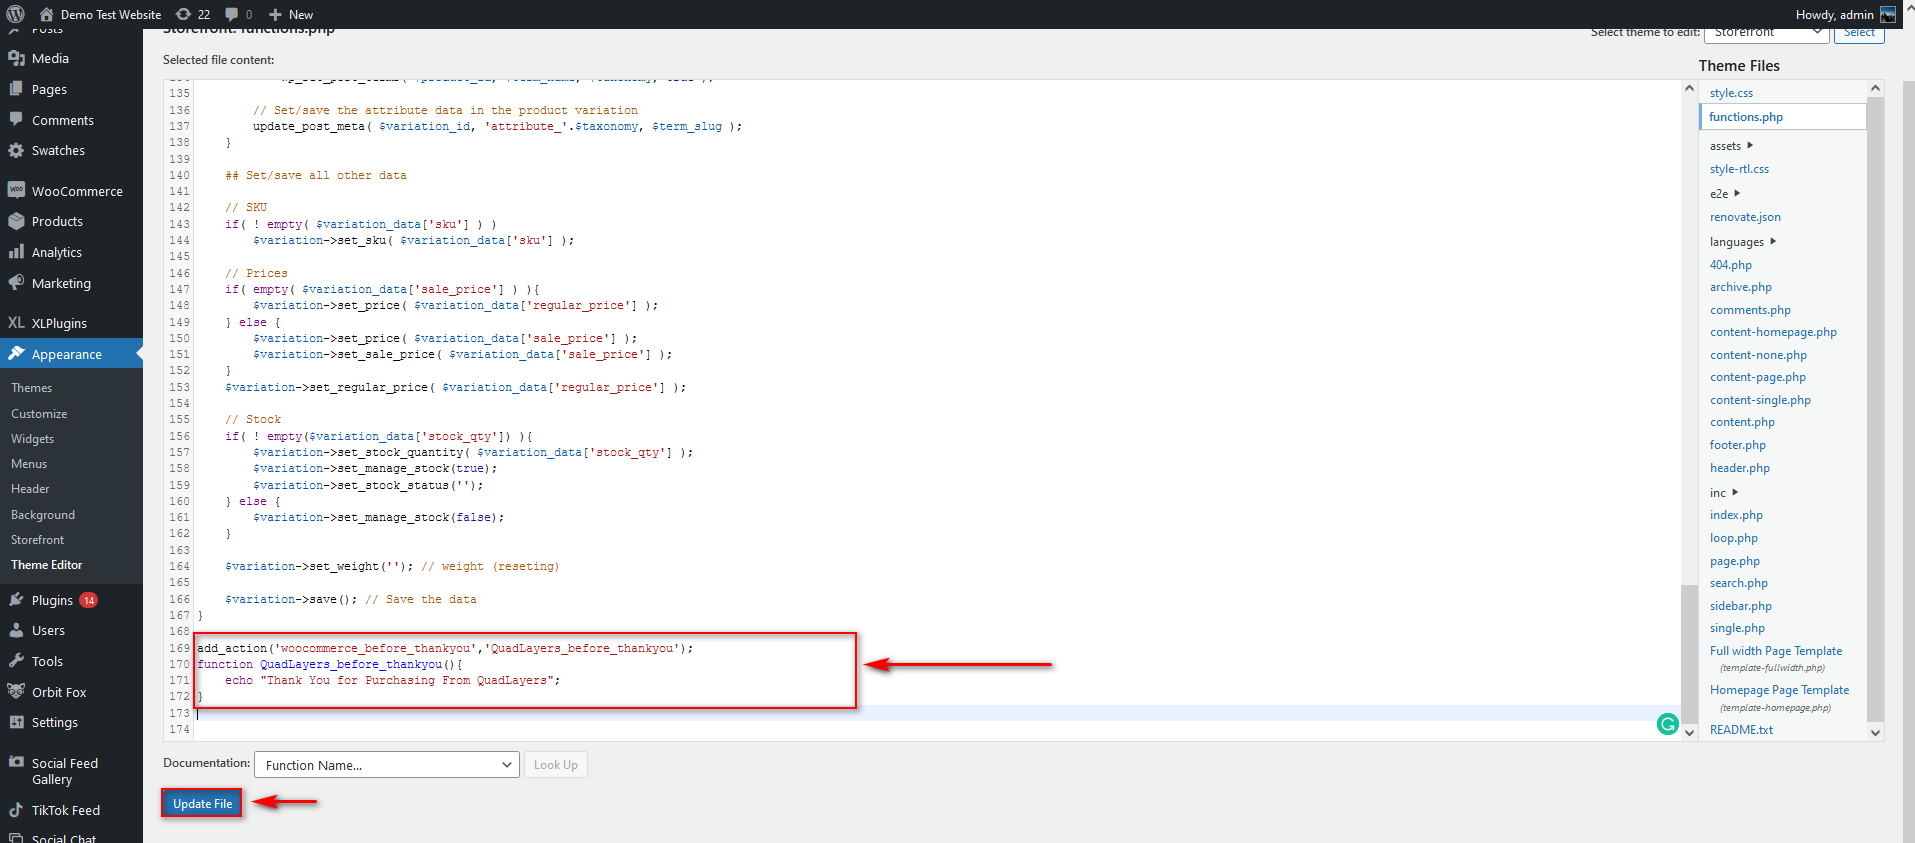
Click Update File and that’s it!
As you can imagine, there’s a lot more you can do. To properly edit the WooCommerce Thank You page programmatically, you’ll need to customize your template files. To learn more about this process and more examples of things you can do, have a look at our guide on how to customize the WooCommerce Thank You page programmatically.
Conclusion
All in all, the Thank You page is one of the few pages that all your customers will see. This page is often overlooked but can help you boost your sales if used smartly. For example, you can redirect shoppers to related products, offer exclusive deals, and more. By doing so, not only will you already be different from 99% of eCommerce sites that use the default Thank You page, but you can also create ways to provide your customers with a better post-sale experience.
In this guide, we’ve shown you different ways to customize the WooCommerce Thank You page. Which one should you choose? If you want something quick and easy, choose a plugin that you like and you’ll be able to edit your Thank You page in a few minutes. If you have coding skills, on the other hand, you can personalize your Thank You pages programmatically. This requires a bit more work but offers a lot of flexibility.
For more guides on how to make the most of your store, have a look at these tutorials:
- How to customize WooCommerce My Account page
- Edit the Product Page in WooCommerce
- How to customize the 404 Page in WordPress
Have you edited your WooCommerce Thank You Pages? Which method did you use? Let us know in the comments section below!
