5. How to get and use PayPal Token?
To work correctly, Autocomplete Orders requires the PayPal Identity Token.
Before we start, it’s important to note that to get the PayPal Token, you must have a Business Account. If you don’t have one yet, we recommend you have a look at this guide that explains how to create a business account.
5.1. Get the PayPal Identity Token
The PayPal Identity Token is used to verify payments without using PayPal’s Instant Payment Notification (IPN). This allows customers to track their payment process in a secure channel.
So, to get the Identity Token from PayPal follow these steps:
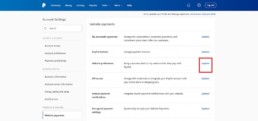
1. First, access your PayPal dashboard and go to Account Settings → Website payments. Then, tap the Update link next to the Website preferences option.
2. Then, enable the Auto return for website payments, and add your store’s thank you page link to the Return URL field.
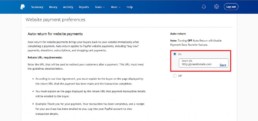
3. After that, go to the Payment data transfer section and turn it on. The identity token should appear at the bottom of the section.
5.2. Set up PayPal Token in WooCommerce
To integrate PayPal with your WooCommerce store and start using Autocomplete Orders, follow these steps:
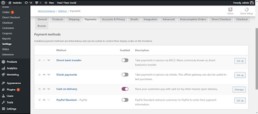
1. Go to your WordPress dashboard > WooCommerce → Settings.
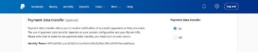
2. On the Payments tab, enable the PayPal option and click on the Set Up button.
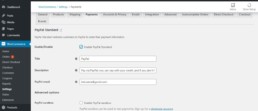
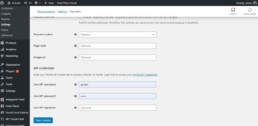
3. After that, set the Standard settings:
-
- Enable/disable — Check the box to enable PayPal as your payment gateway.
- Title — Fill it in with the checkout page heading.
- Description — Add a payment description or a message to your customers.
- PayPal email — Input the PayPal email you use to collect payments.
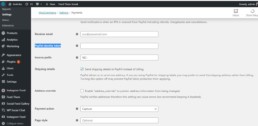
- Set up the Advanced options section as follows:
- PayPal sandbox — It allows you to test PayPal payments. However, you need to leave it unchecked as it requires a developer account.
- Debug log — Check the box if you want to log all PayPal events.
- IPN Email Notifications — Tick the box if you want to be notified of refunds, chargebacks, and cancellations.
- Receiver email — Add the email address that will receive the notifications.
- PayPal identity token — Input the identity token from PayPal.
- Invoice prefix — If you connect the PayPal account to multiple stores, you can add a combination of letters and numbers to help you differentiate your invoices.
- Shipping details — Check this box to let PayPal create shipping labels instead of billing the customers directly.
- Address override — Leave it unchecked to prevent customers from changing their address.
- Payment action — Choose Capture to process the payments immediately or Authorize to approve them manually.
- Page style — Input the name of the PayPal page style you want to use for the checkout page.
- Image URL — Allows you to display a 150x50px image in the upper left corner of the checkout page.
Finally, configure the API credentials section using the information you can get from PayPal if you need it.
Once done, click Save Changes.
5.6 After that, you have to paste the Identity Token from your PayPal Account:
5. Don’t forget to save the changes.