Do you want to downgrade your plugins and themes in WordPress? In this guide, you’ll learn 2 different methods to easily roll-back any plugin or theme you have installed on your site.
Even though it’s usually recommended to update WordPress as well as your plugins and themes, sometimes you may need to downgrade them. Compatibility issues like the one that WordPress 5.5 had, bugs, and performance are just some of the reasons that you may have to go back to an older version.
We have previously seen different ways to downgrade the WordPress core and you can also roll-back your themes and plugins. In this guide, we’ll show you different methods to downgrade plugins and themes in WordPress.
Why Roll Back Plugins and Themes to Older Versions?
Let’s start with an example. After the recent update to WordPress 5.5, thousands of sites had compatibility issues. Many themes and plugins weren’t compatible with the latest version of WordPress so it created problems for thousands of sites. There were several fixes for the different problems to get sites back and running and one of them was to downgrade WordPress.
In other cases, what causes the conflict is a problem between two plugins, or between a plugin and your theme. In this case, downgrading the WordPress core won’t solve the issue. Instead, you’ll have to roll-back the plugin or theme to momentarily fix the issue until there’s a more stable solution.
On the other hand, if your installed themes and plugins aren’t compatible with the PHP version you are using, you might want to downgrade it.
In most cases, downgrading either WordPress or plugins/themes is a temporary solution until there’s a new version that fixes the conflicts. If you’re experiencing some issues and you think they’re related to compatibility issues, then downgrading plugins and themes in WordPress may help you fix it.
How to Downgrade Plugins and Themes in WordPress?
In this guide, we’ll have a look at two different methods to downgrade plugins and themes.
- Manually
- With plugins
Both methods are equally effective so choose the one that best suits your skills and needs. Before you start, make sure you create a complete backup of your site.
1) Downgrade plugins and themes manually
The process to downgrade themes and plugins manually isn’t the most beginner-friendly one. You need to create an FTP account, use the FTP client to upload the files manually, and so on. However, if you’re an advanced user and you don’t want to install any plugins on your site, this is the option for you.
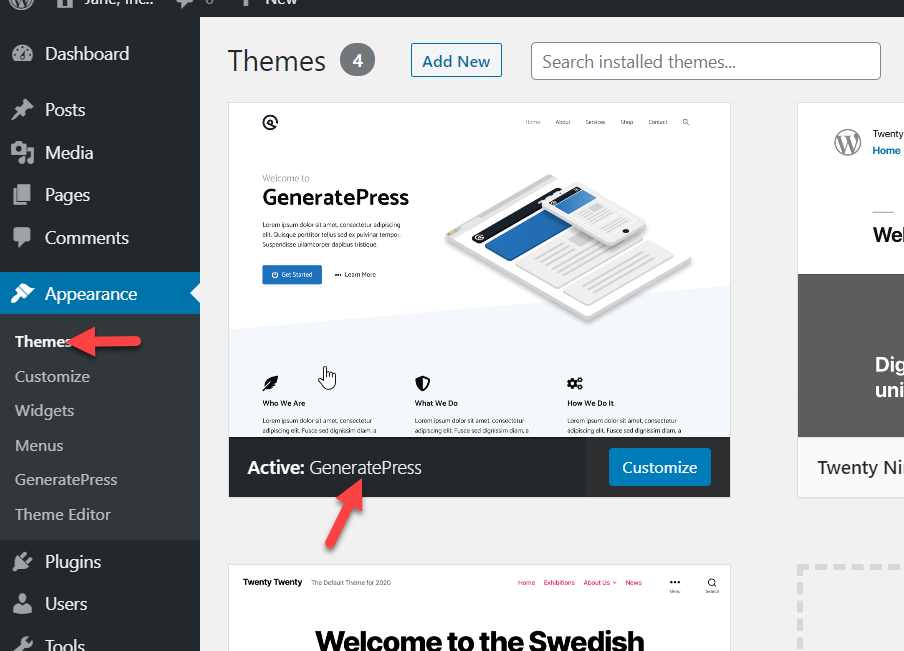
For this demo, we’ll use the popular GeneratePress WordPress theme.
As you can see in the image below, there aren’t any pending updates available. This means that all the plugins, themes, and core are running on the latest version available.
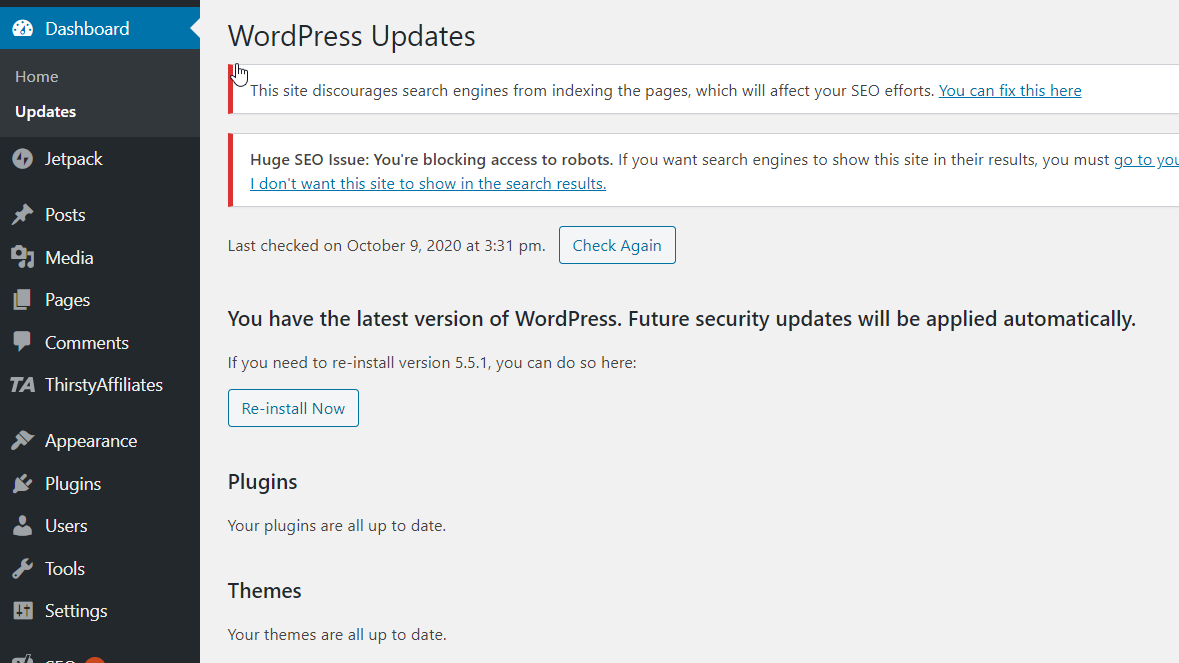
However, if you’re having compatibility issues, you can downgrade the plugins and themes. Let’s have a look at how to do it.
Downgrading WordPress Plugins
In this section, we will downgrade Yoast SEO to an older version. As you can see, we are running the latest version 15.0.

We are going to downgrade it to version 14.8. However, if you go to the WordPress repository and click on the Download button, the server will give you the latest version available.
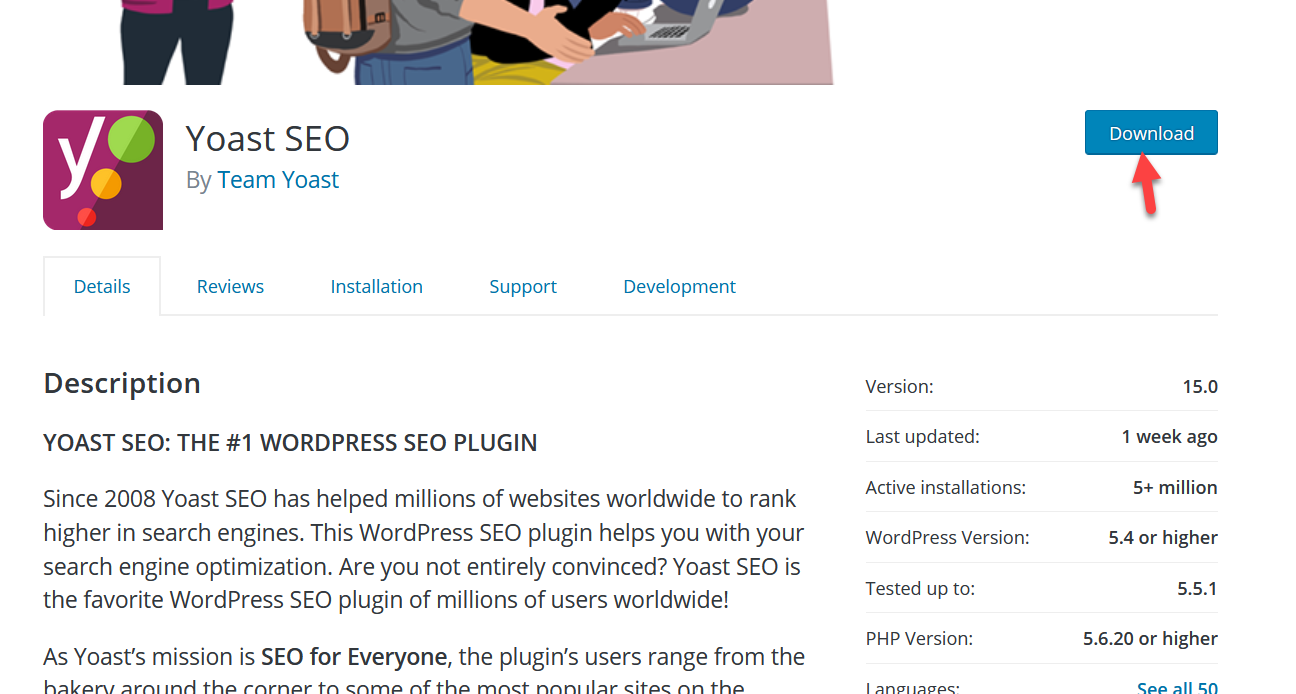
So, to get an older version, press Advanced View.
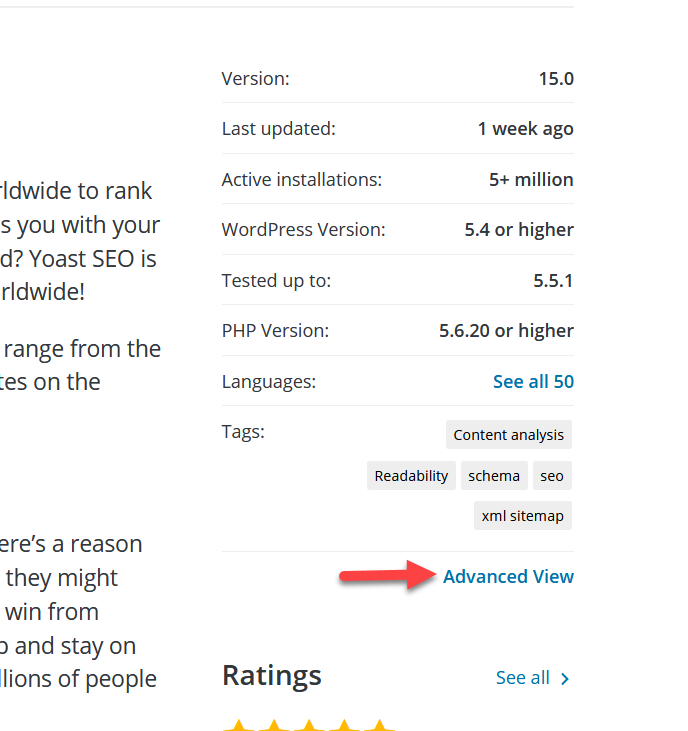
Scroll to the bottom and you will see a section to download previous versions of the plugin under Advanced Options.
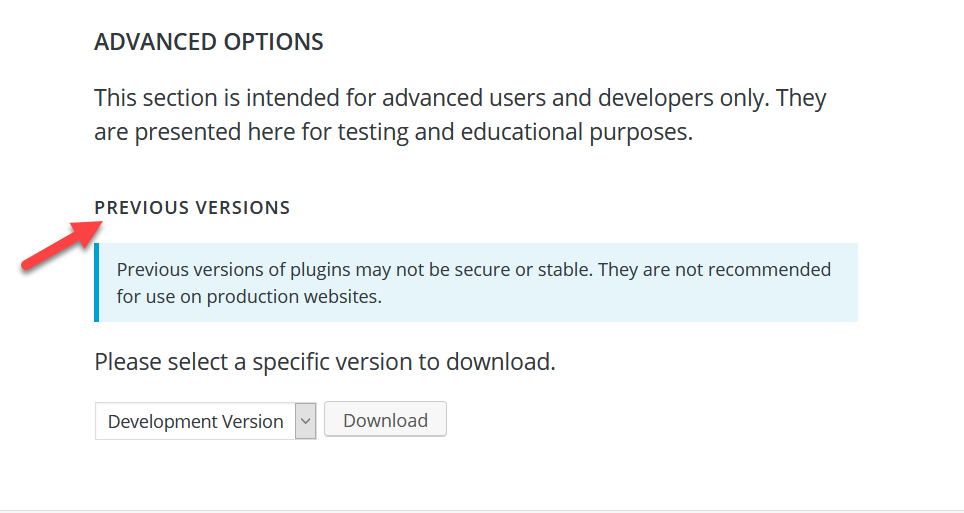
Simply choose the version from the dropdown and click Download to get the files.
FTP Client
Now, you will need to use those files to replace the ones on your server. To do that, you need to use an FTP client. For this demo, we’ll use FileZilla. FileZilla is a free FTP software that you can download from this link.
After that, create an FTP account through your cPanel. Go to FTP Accounts under the Files section. Then, connect FileZilla to your server using your FTP credentials.
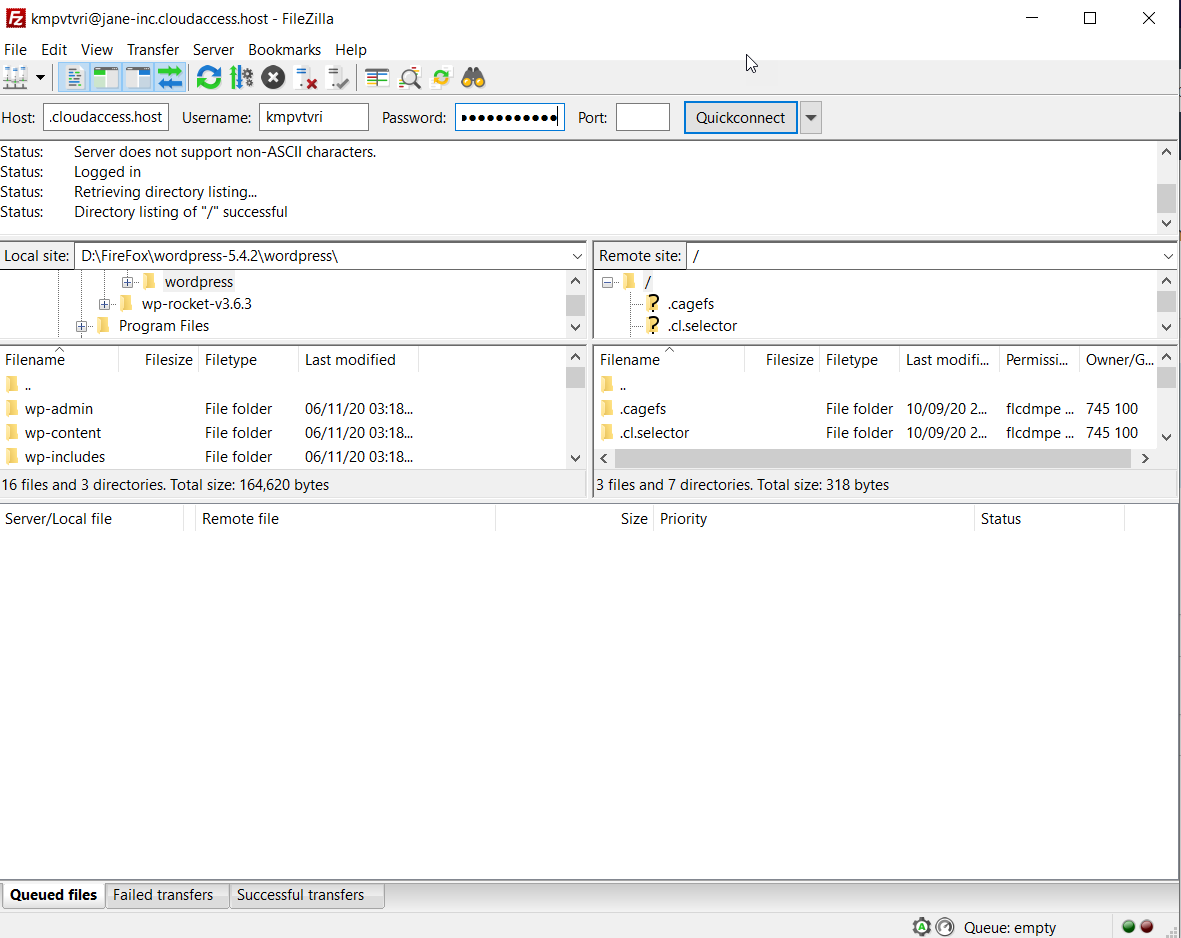
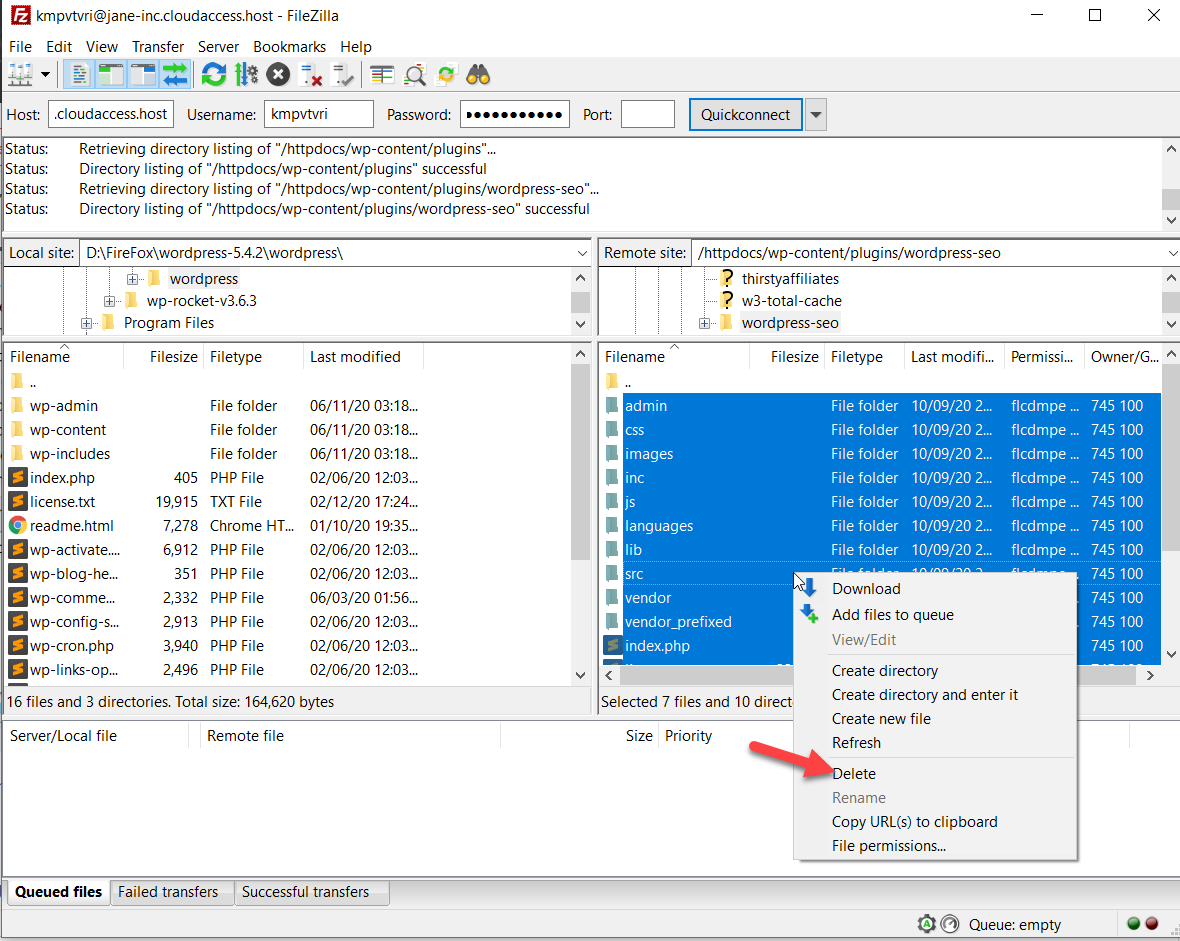
Now, go to the Yoast SEO’s folder, select all folders and files, and delete them.
After that, extract the zip file you downloaded in the previous step (Yoast SEO v14.8). You will see several PHP files and folders there.
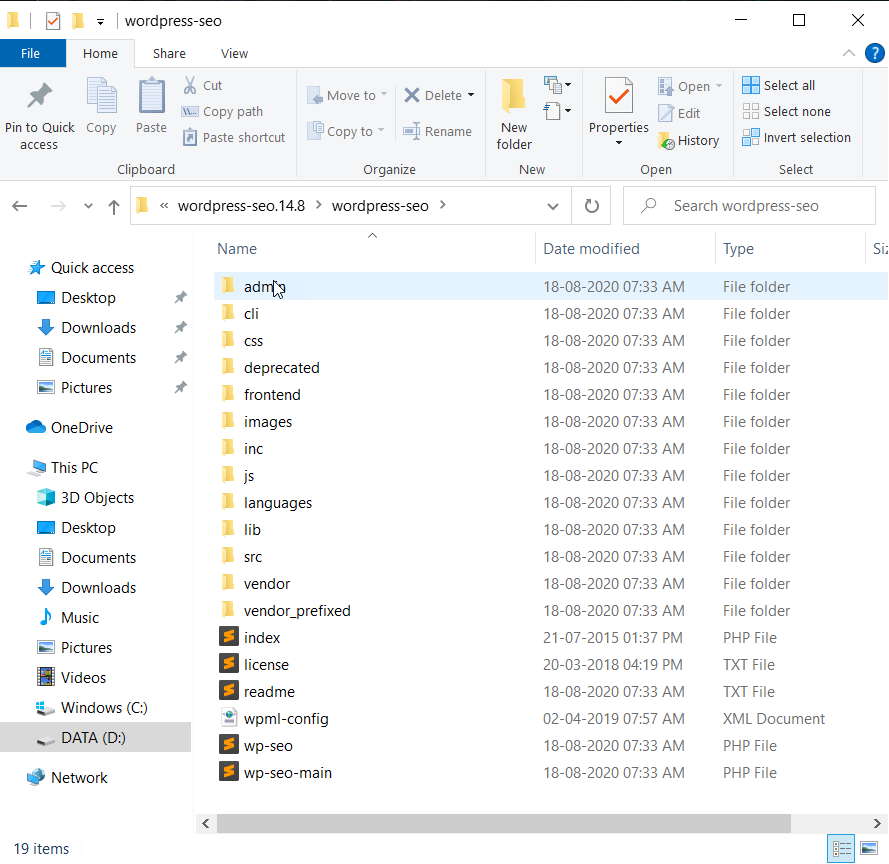
Select all the files and folders and upload them to the Yoast’s folder in the FTP client.
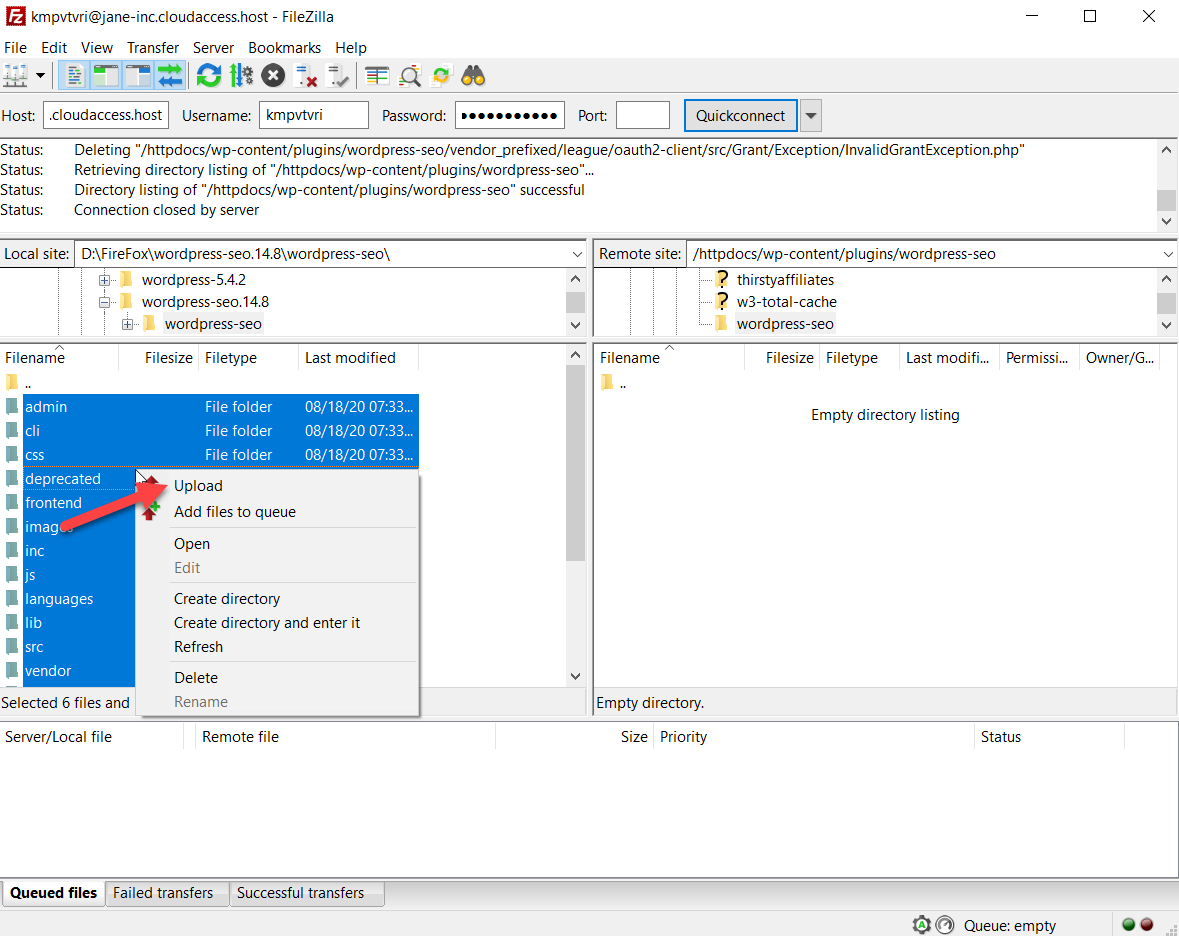
After that, we’ll see all the files in your destination folder.
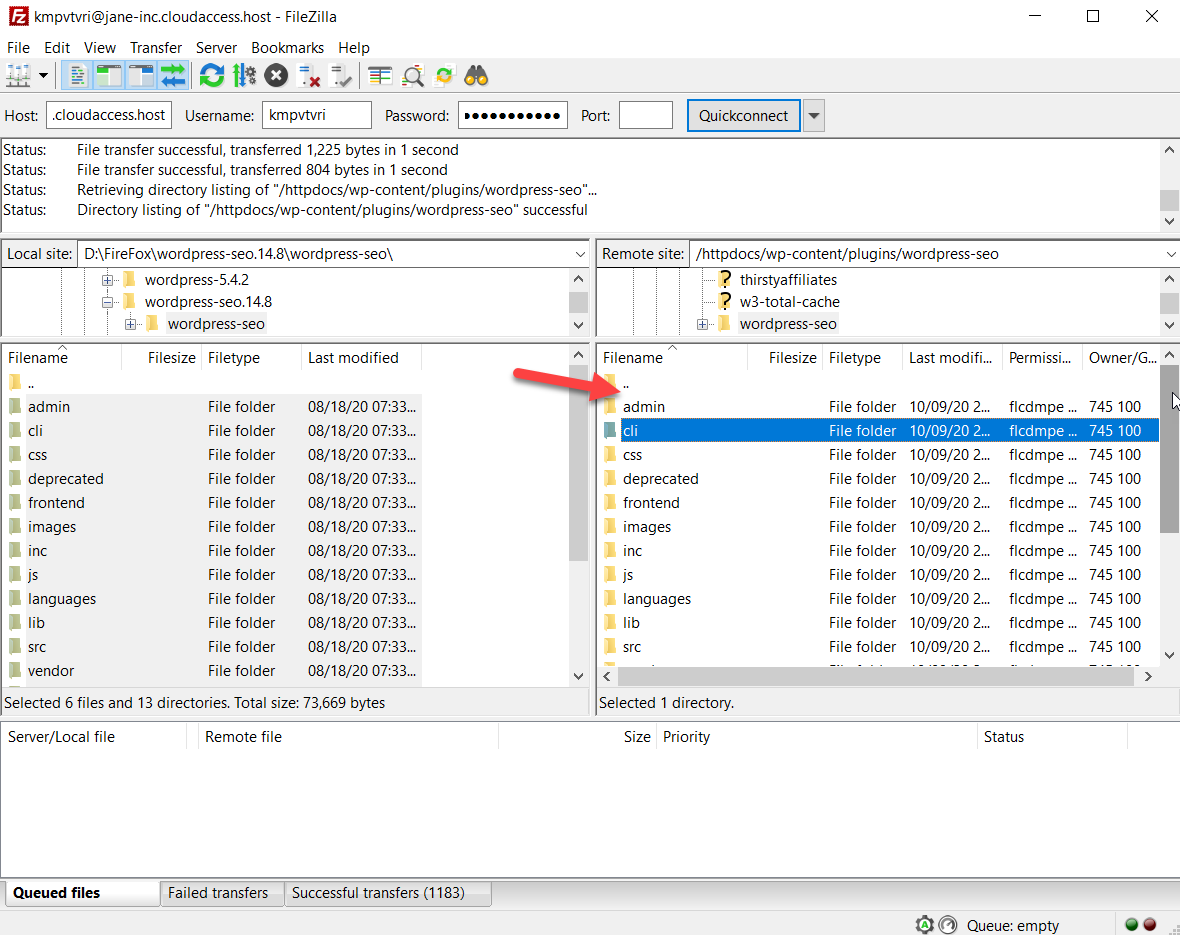
Now, log in to your WordPress site, go to the Plugins section and you will see the changes there.

Note that WordPress 5.5 comes with a feature called auto-updates. If you have enabled it for your plugin, it will automatically update when there’s a new version.
Downgrading WordPress Themes
Now, let’s see how to downgrade WordPress themes. Unlike the plugins, you won’t be able to download the themes’ old versions. To get the files of previous versions, contact the developers.
Once you have the files of your theme’s older version, connect to FileZilla FTP client and go to your active theme’s folder. In our case, it’s GeneratePress v3.0.1 and we’ll downgrade it to v2.4.1. Then, delete all the files and folders from the theme’s folder.
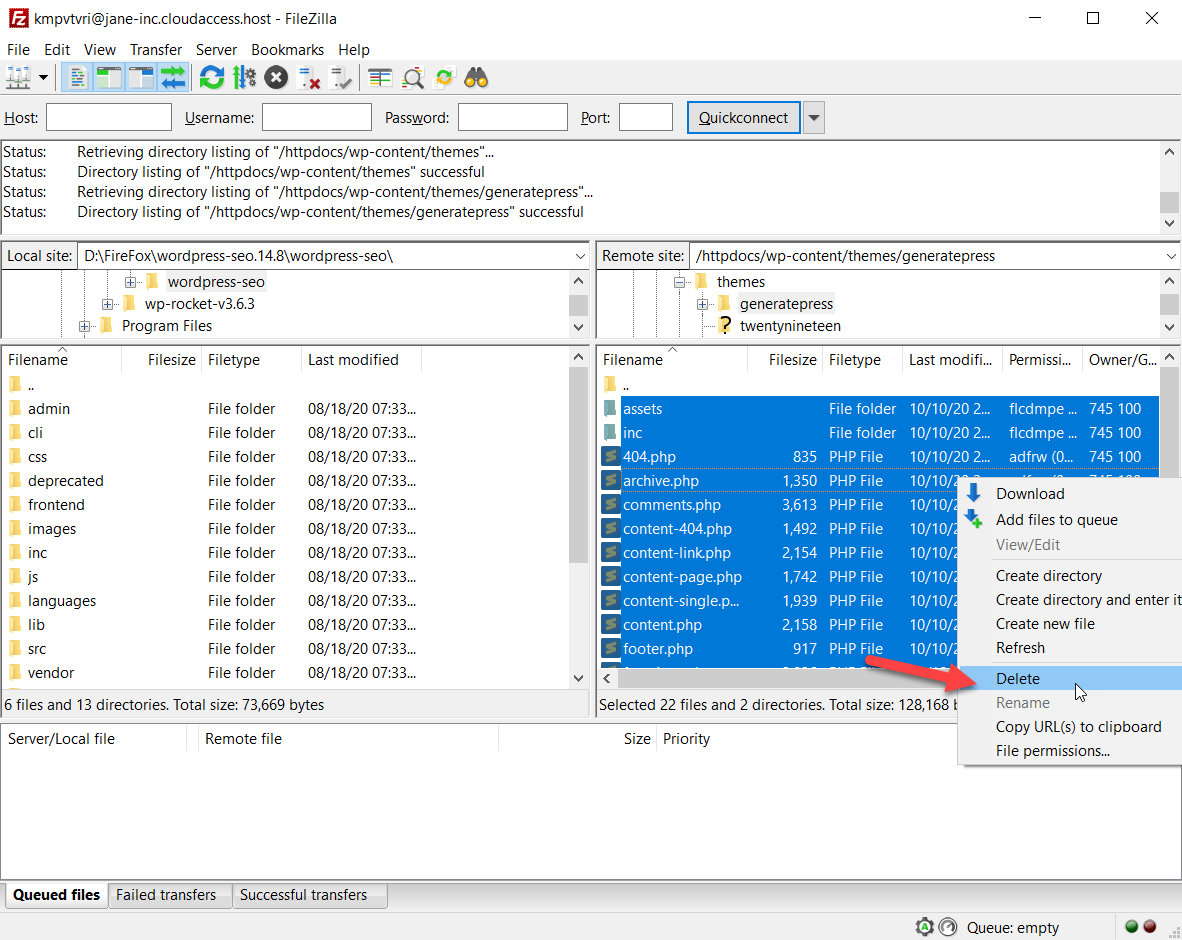
After that, upload the theme’s previous version files and folders there.
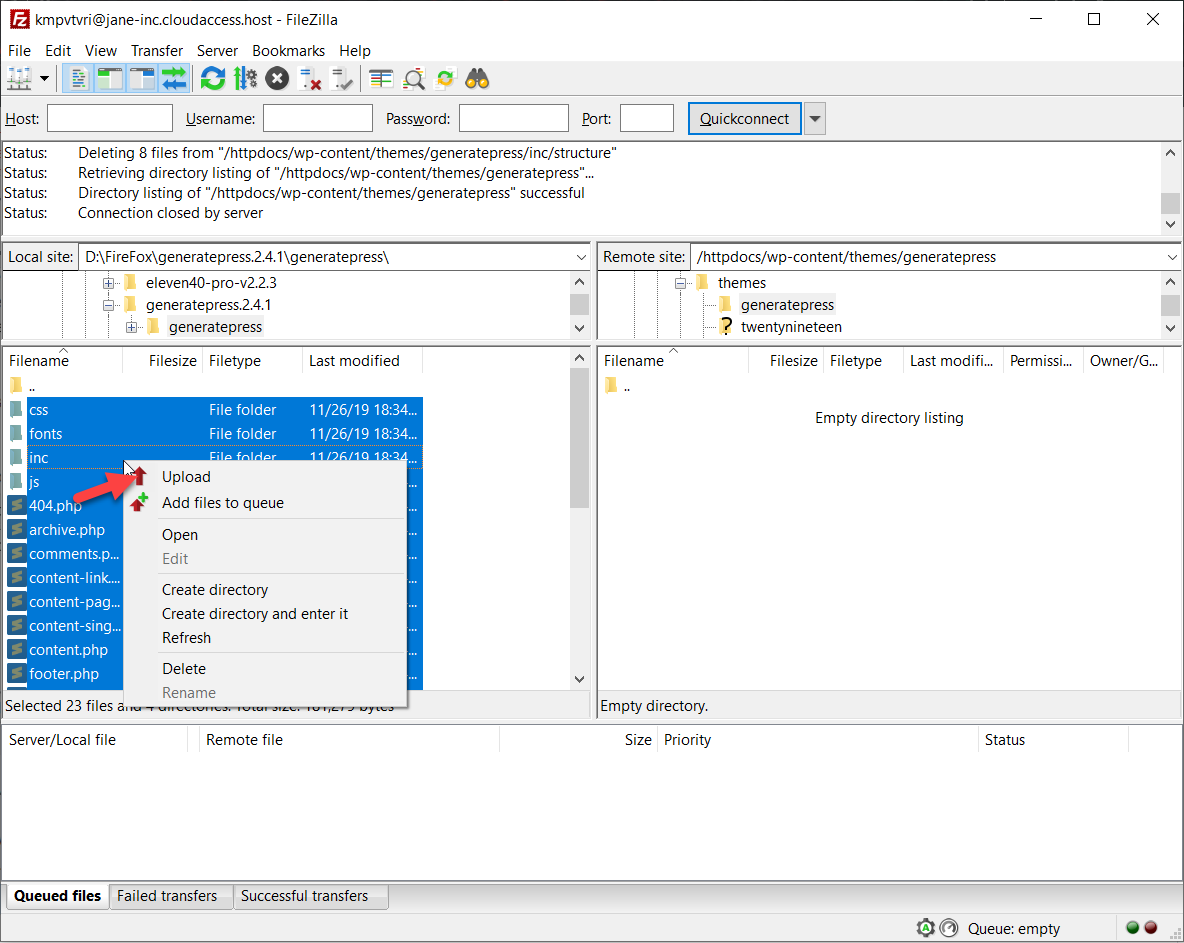
After the upload finishes, check the theme version from the backend.
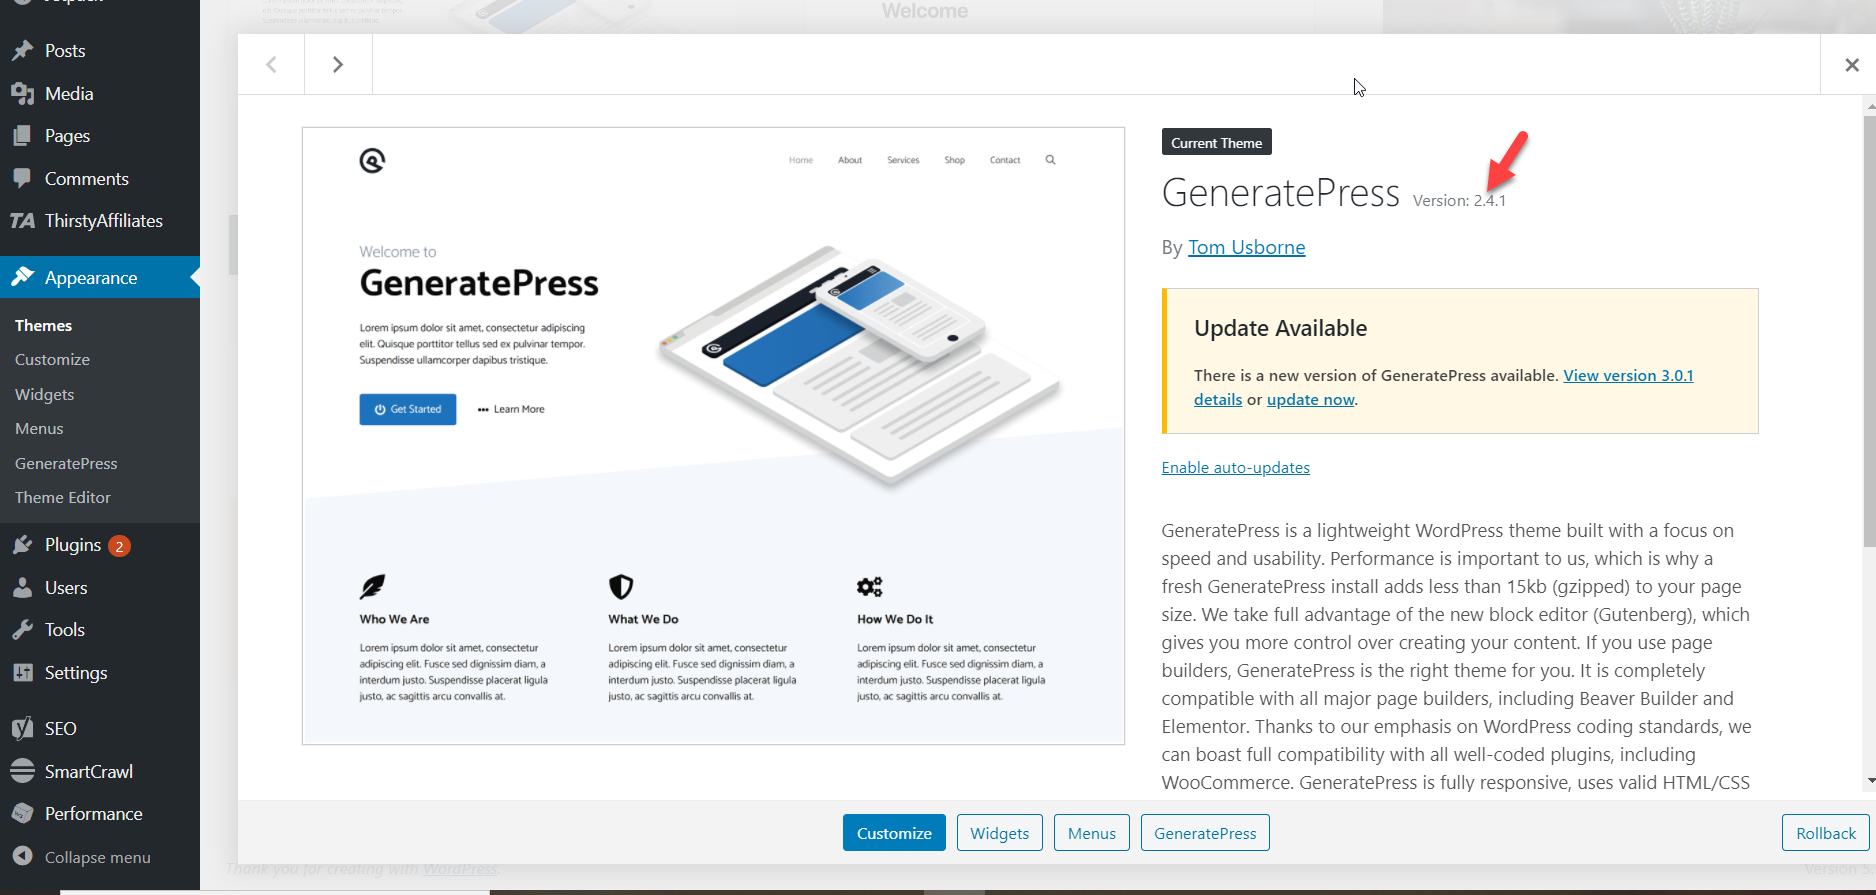
As you can see, now we’re running GeneratePress 2.4.1.
2) Downgrade WordPress using Plugins
If you don’t feel comfortable doing the roll-back manually, you can use a plugin. In this section, we’ll show you how to downgrade plugins and themes in WordPress using a plugin. This is the most simple way and takes only a few minutes. For this demo, we’ll use a free tool called WP Rollback.
To install it, go to your WordPress dashboard > Plugins > Add New and search for WP Rollback. Then, install it and activate it.
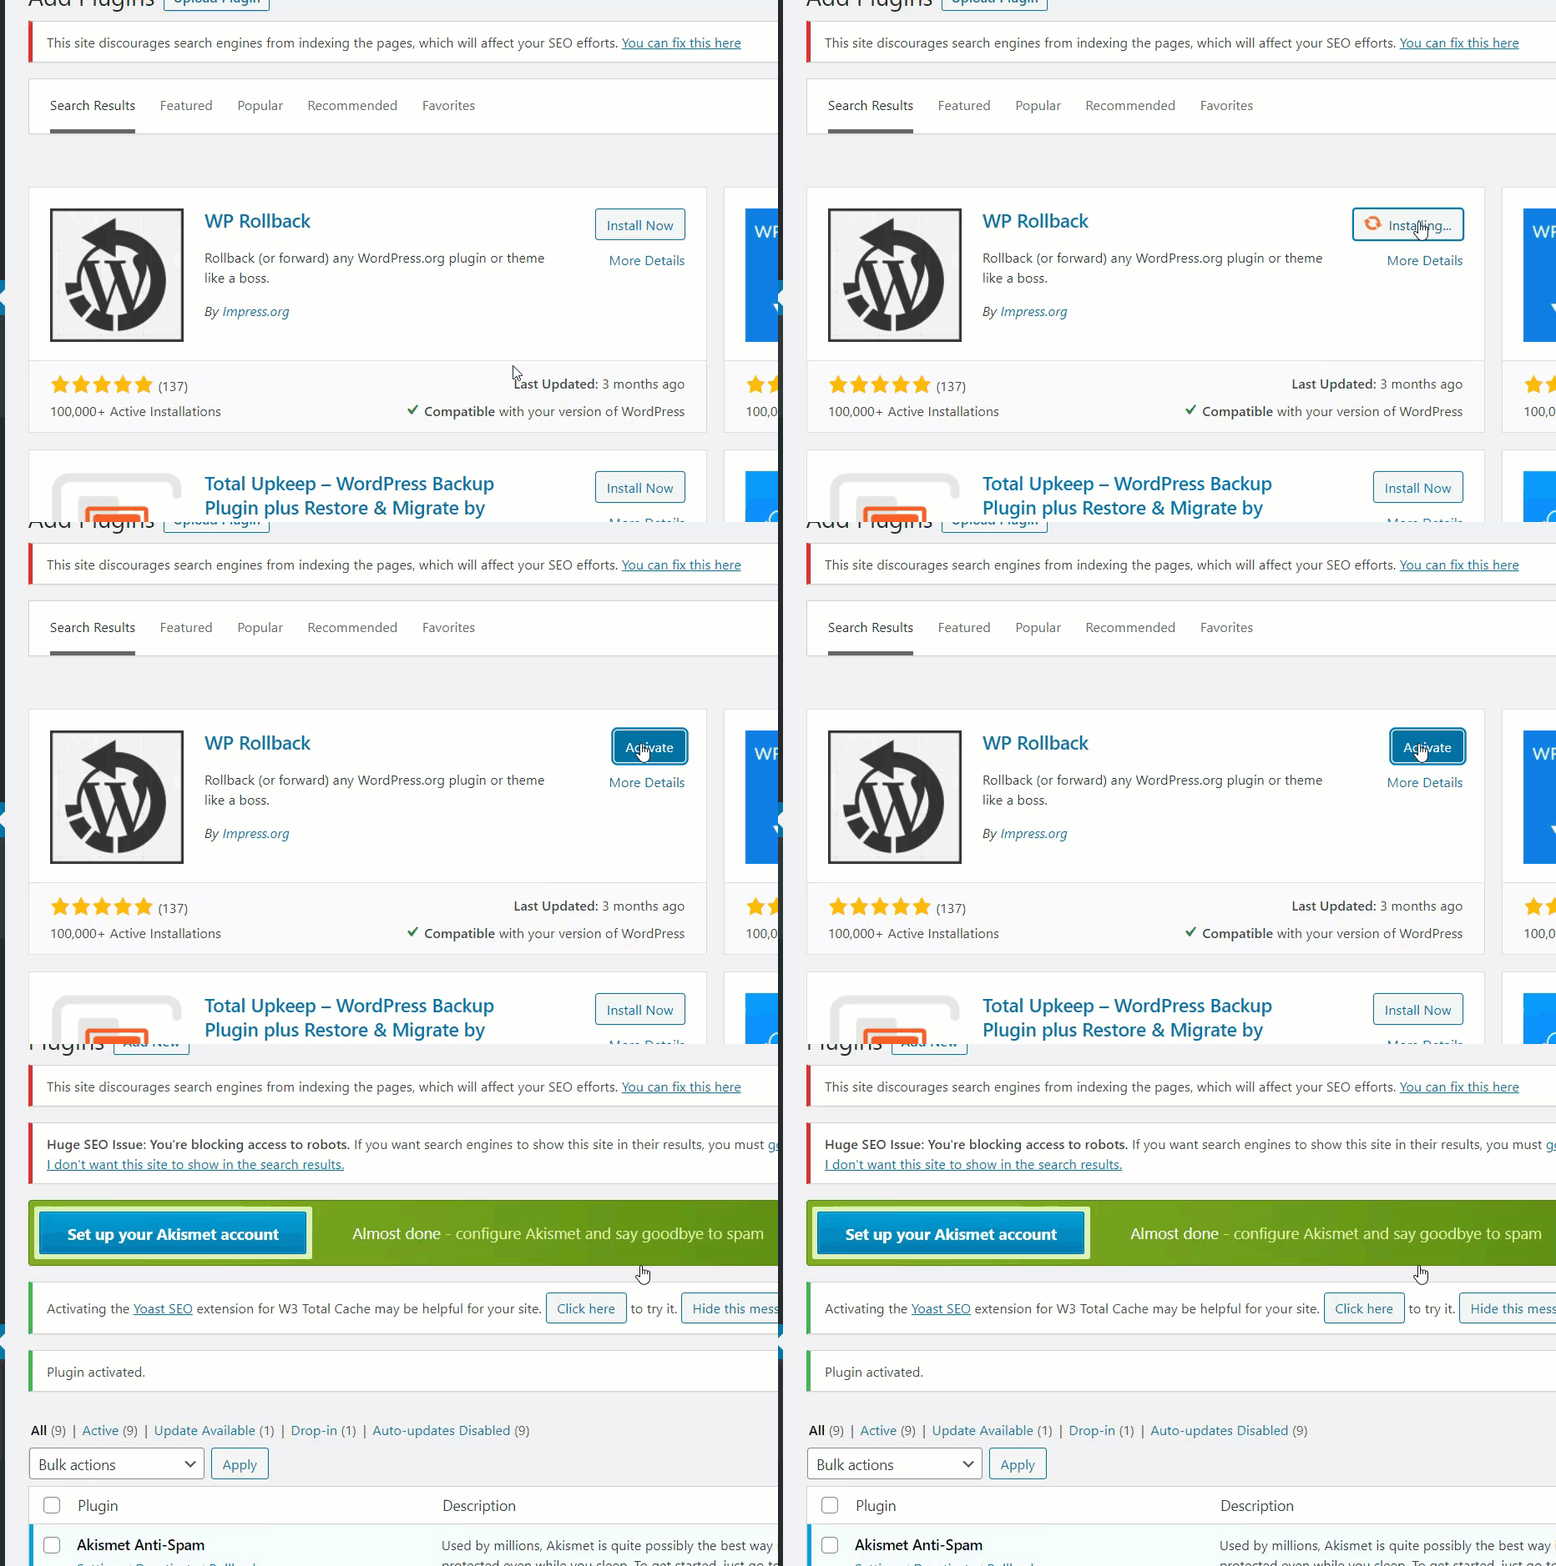
Roll-back a plugin with WP Rollback
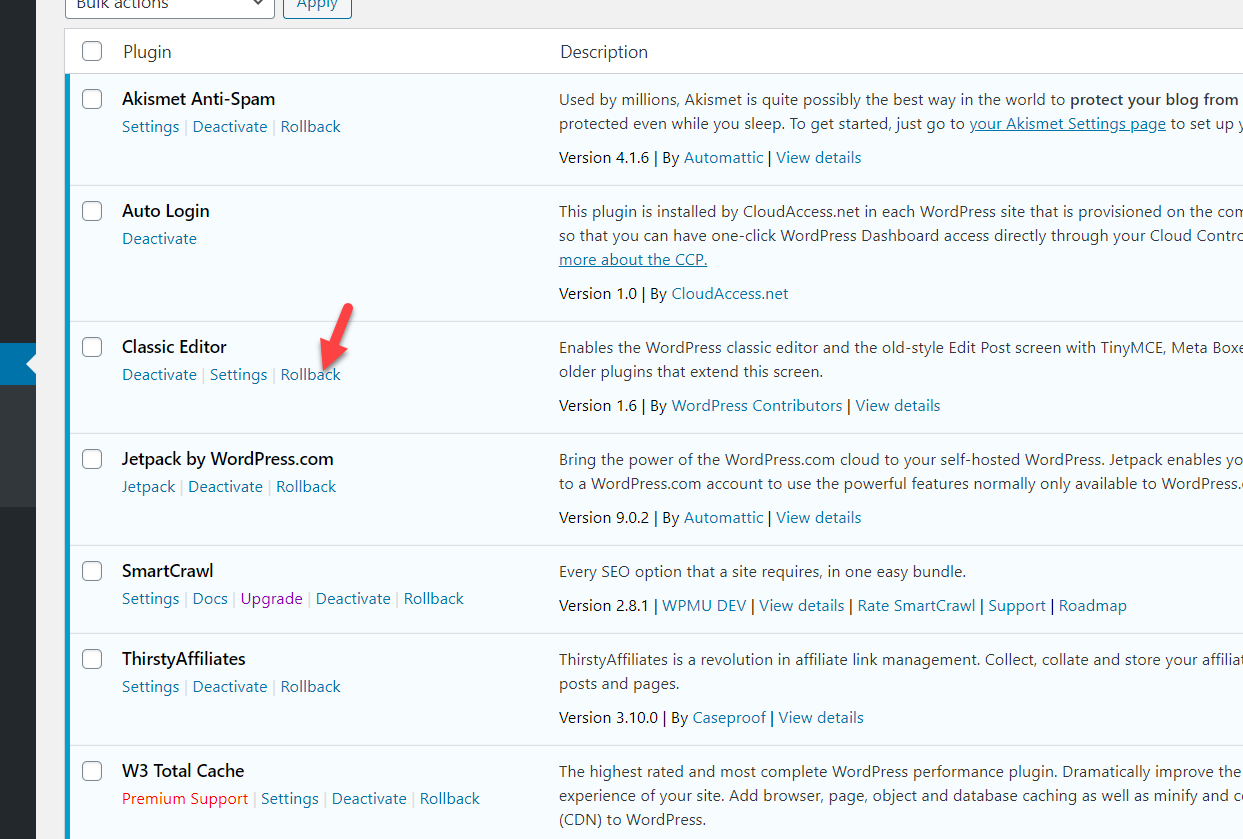
After activating WP Rollback, go to the Plugins section. Hover over any plugin and you will see a new link called Rollback. For this demo, we are going to downgrade the Classic Editor plugin to an older version.
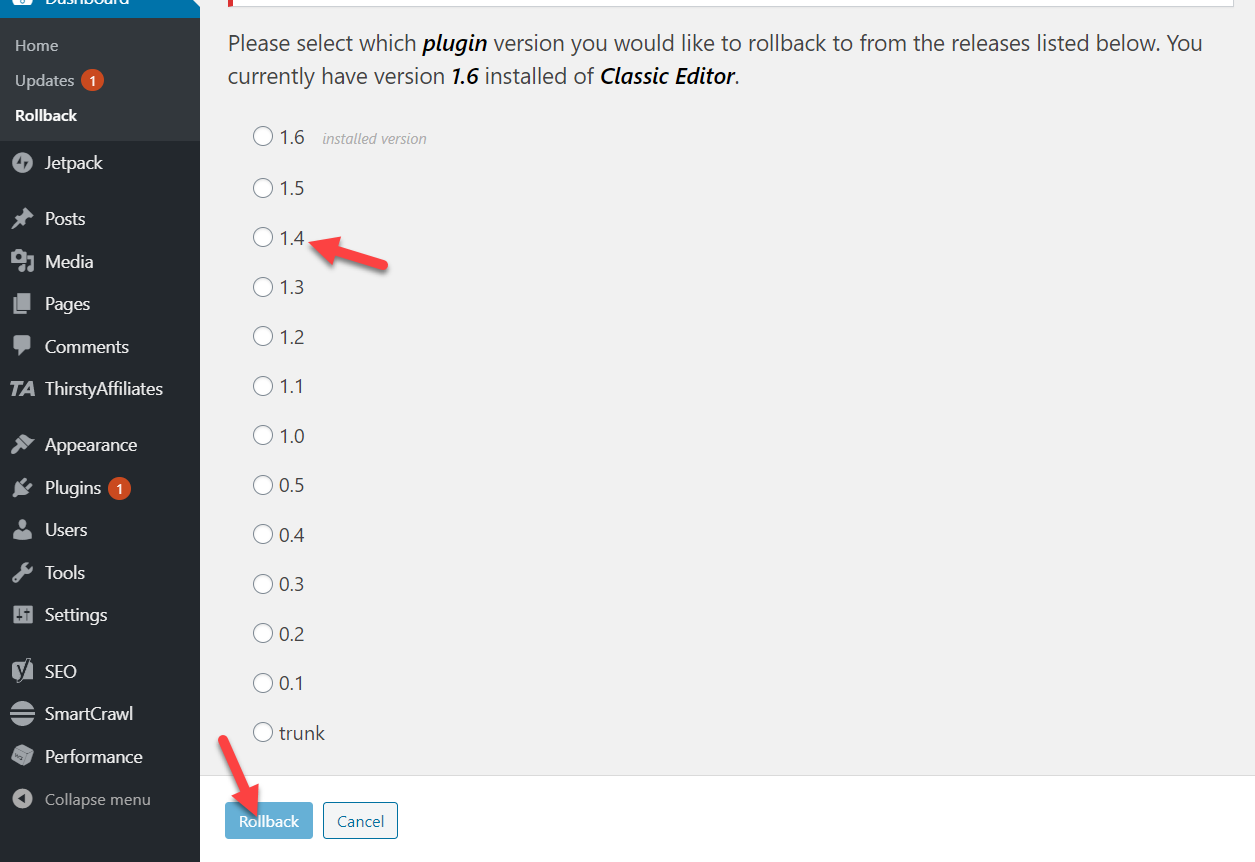
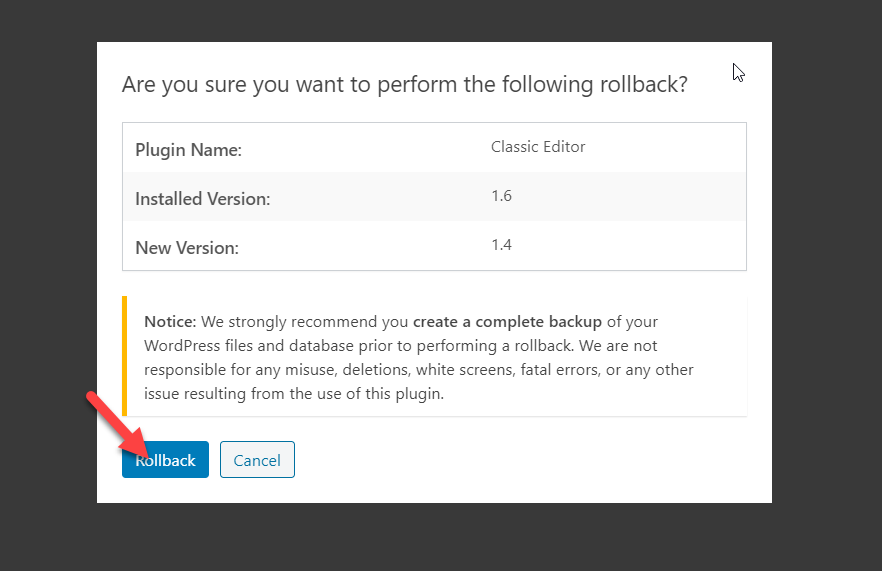
After you press Rollback, you will see a new screen with all the versions you can downgrade the plugin to. We have the latest version 1.6 installed on our site, so we are going to downgrade to v1.4. We simply select the version and press Rollback.
A dialogue box will pop-up and we need to confirm the action.
After that, we need to activate the plugin by clicking the Activate Plugin button.
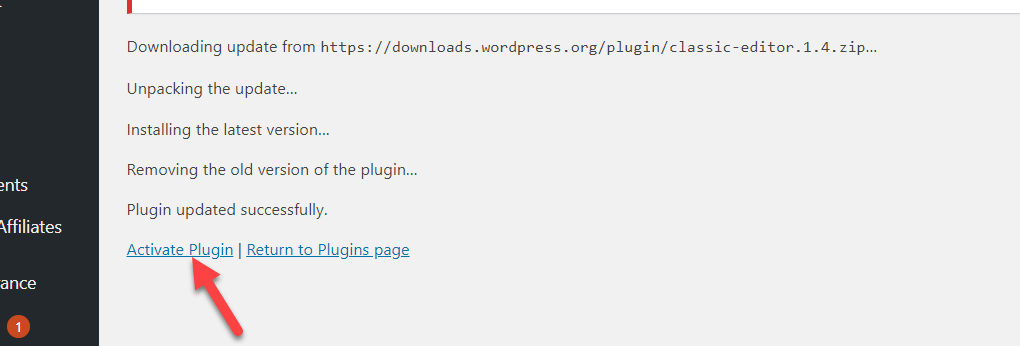
That’s it! We are now running on version 1.4.

That’s how you downgrade a plugin using WP Rollback. Now, let’s have a look at how to do the same with themes.
Roll-back a theme with WP Rollback
Now, let’s see how to downgrade a theme. The process is very similar to what we’ve seen with the plugins.
You can roll-back any of the installed or active themes on your site. In our case, we have 4 themes installed.
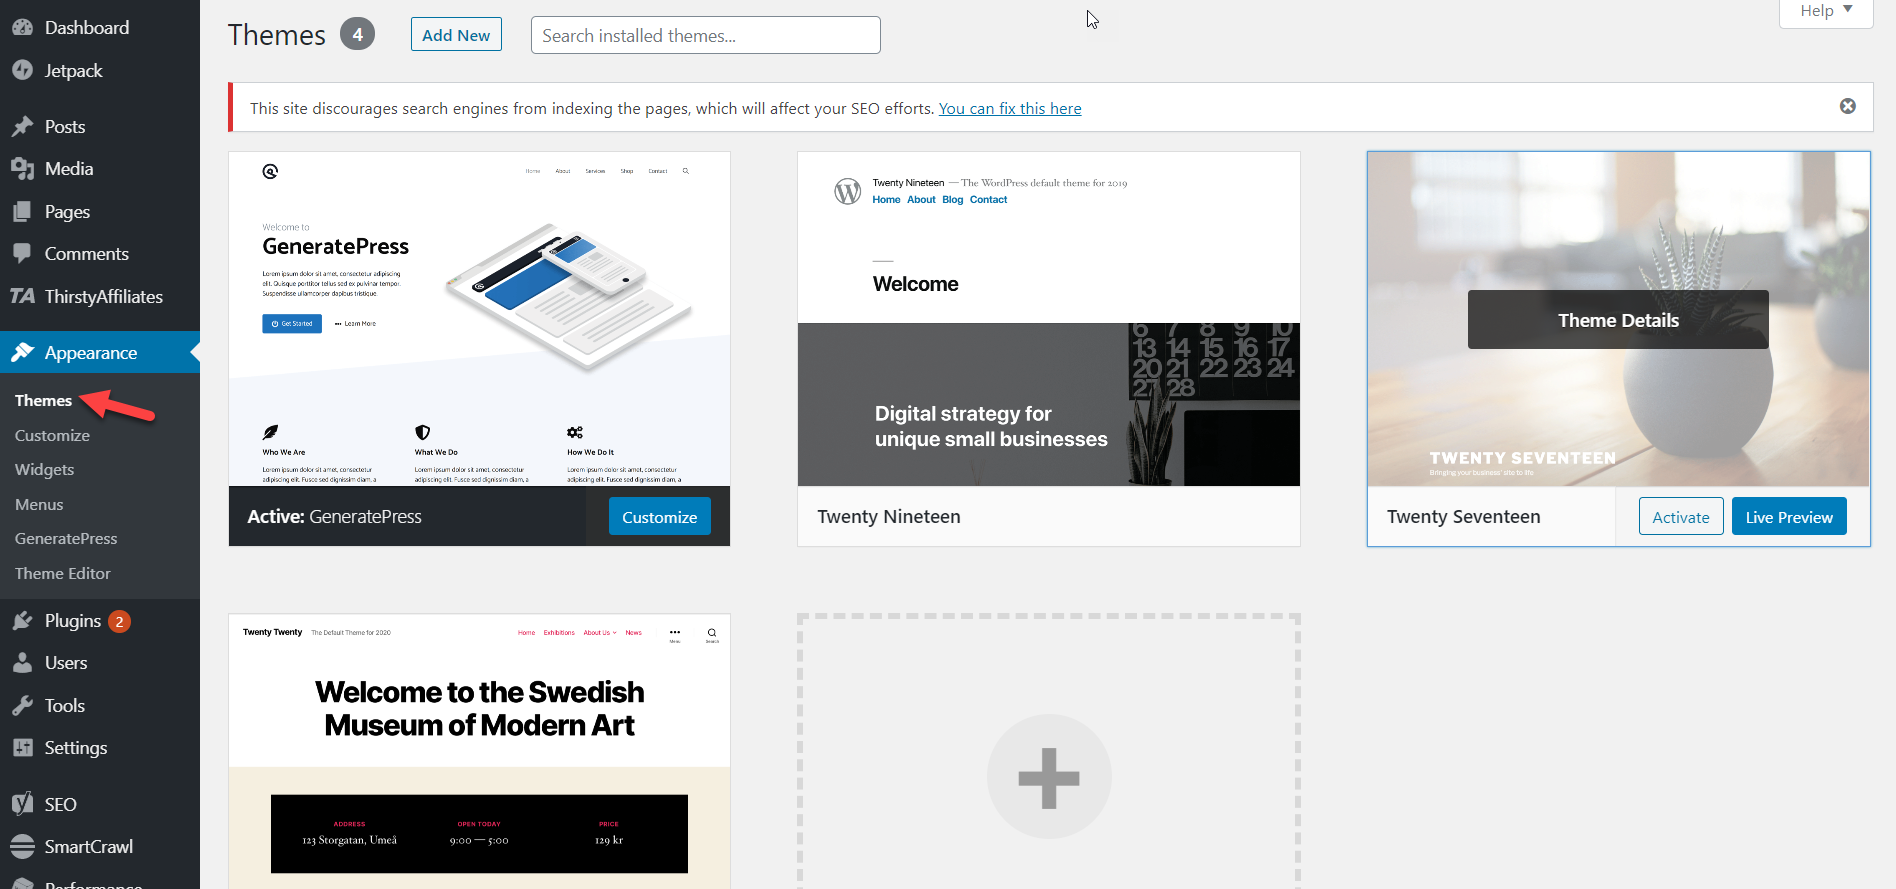
We are using the GeneratePress theme so we’ll downgrade it. To do that, simply select the theme and in the bottom right corner, you will see a Rollback button.
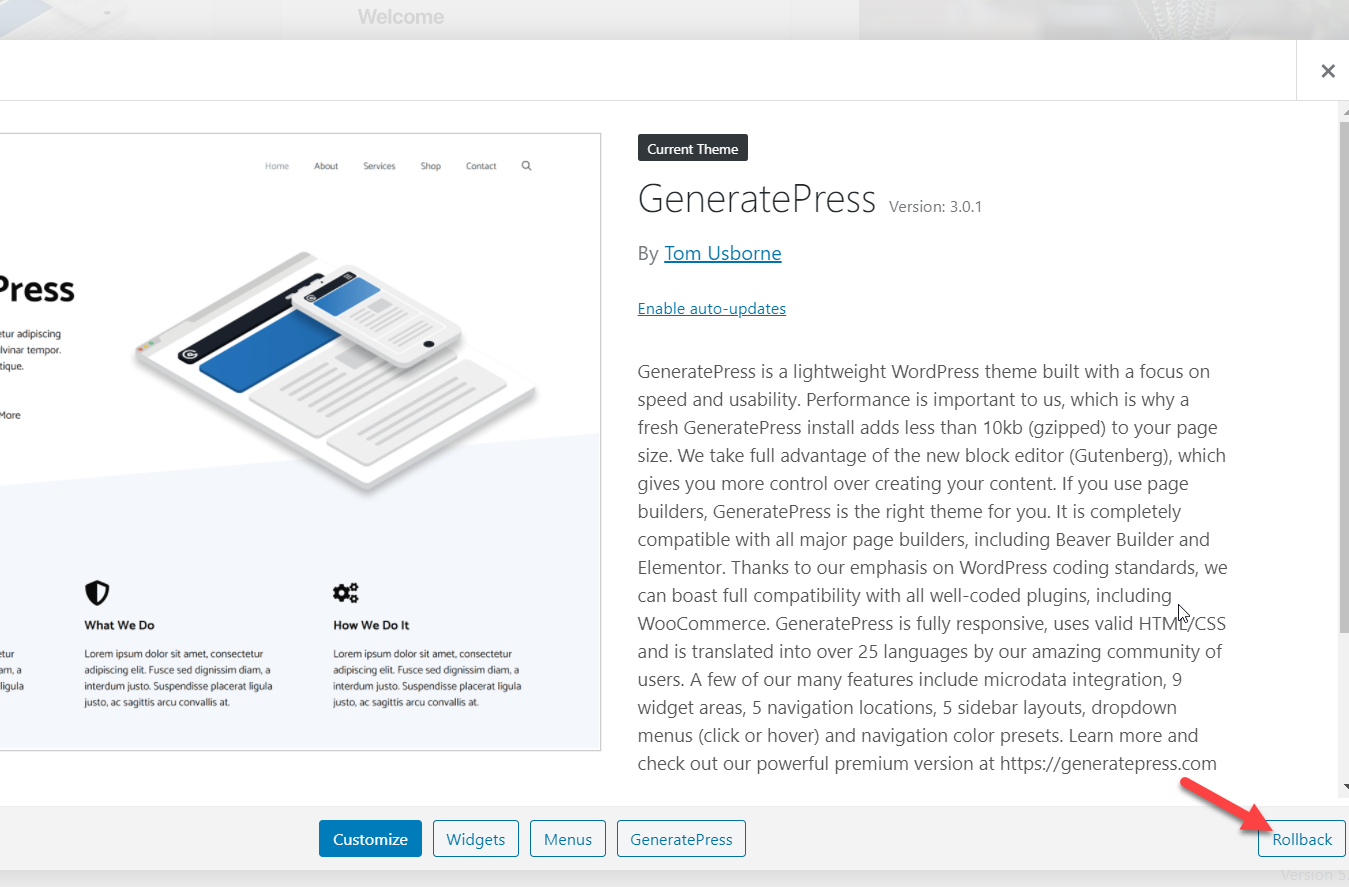
Then, select the version you want to downgrade to and press Rollback.
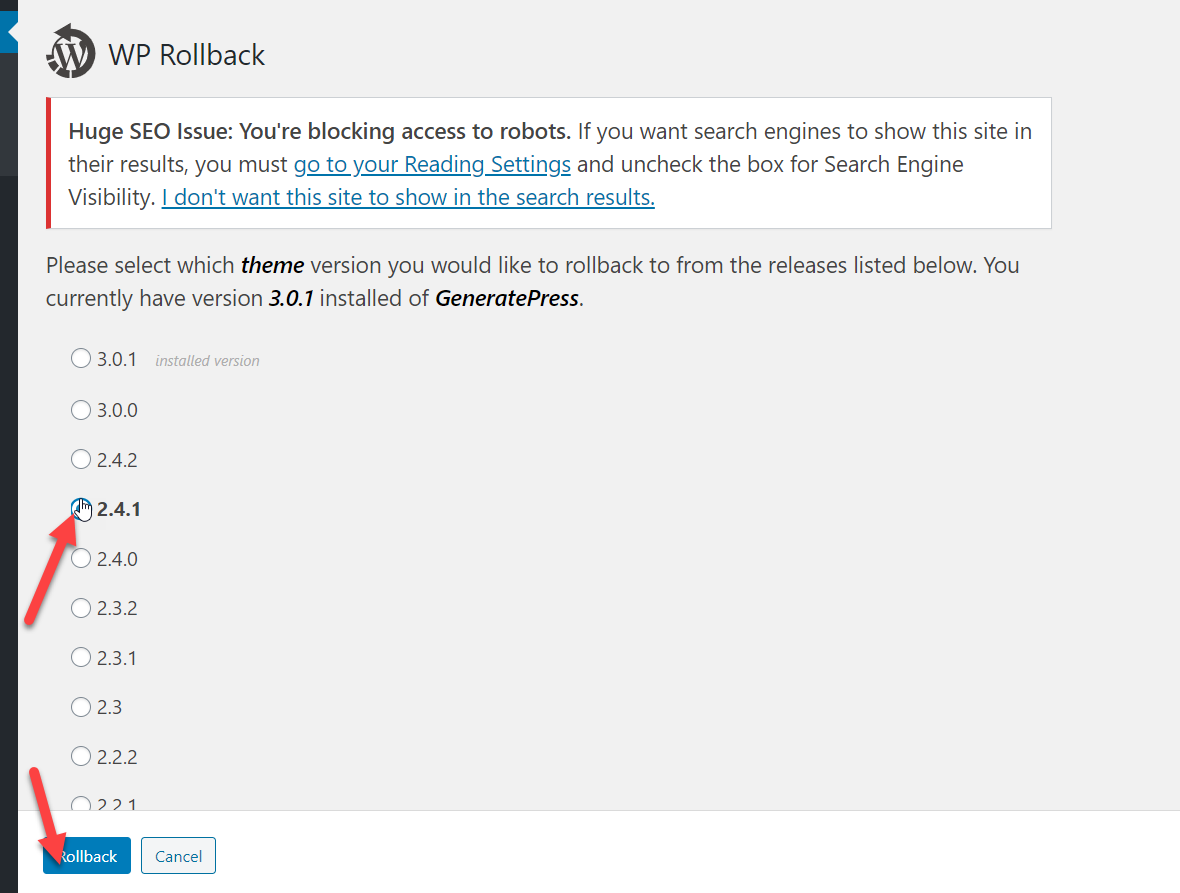
Then, confirm the roll-back.
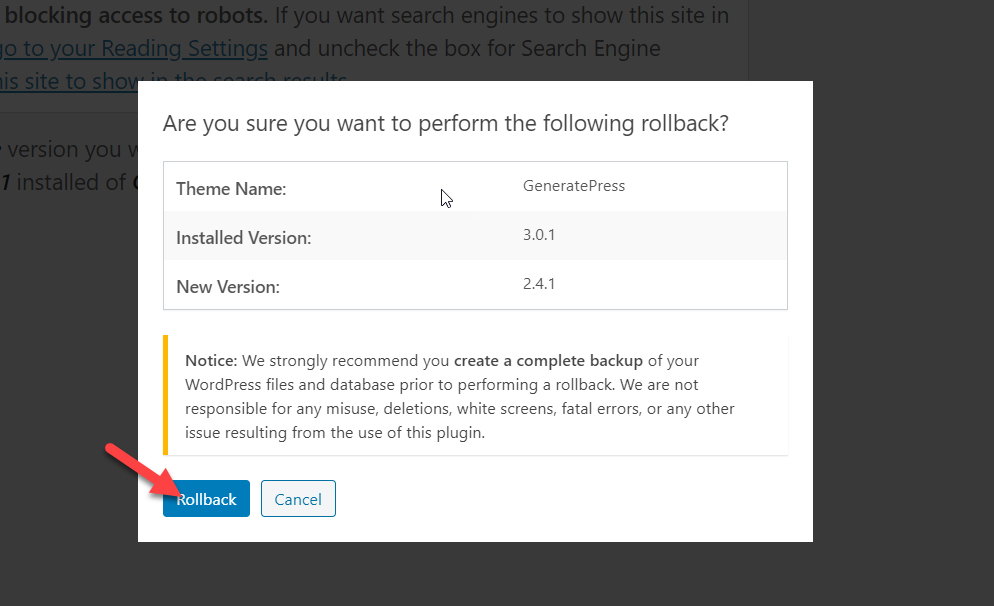
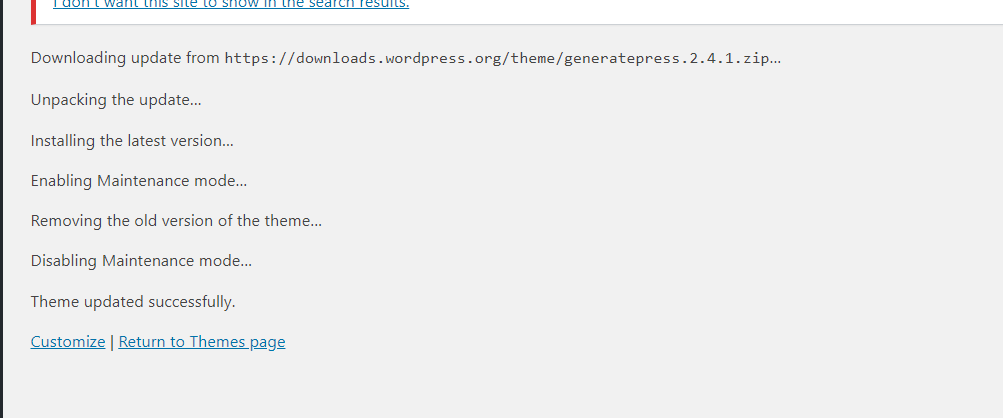
After a few seconds, you’ll see that the theme has been downgraded.
Now, we can check the appearance section and see that we are running version 2.4.1.
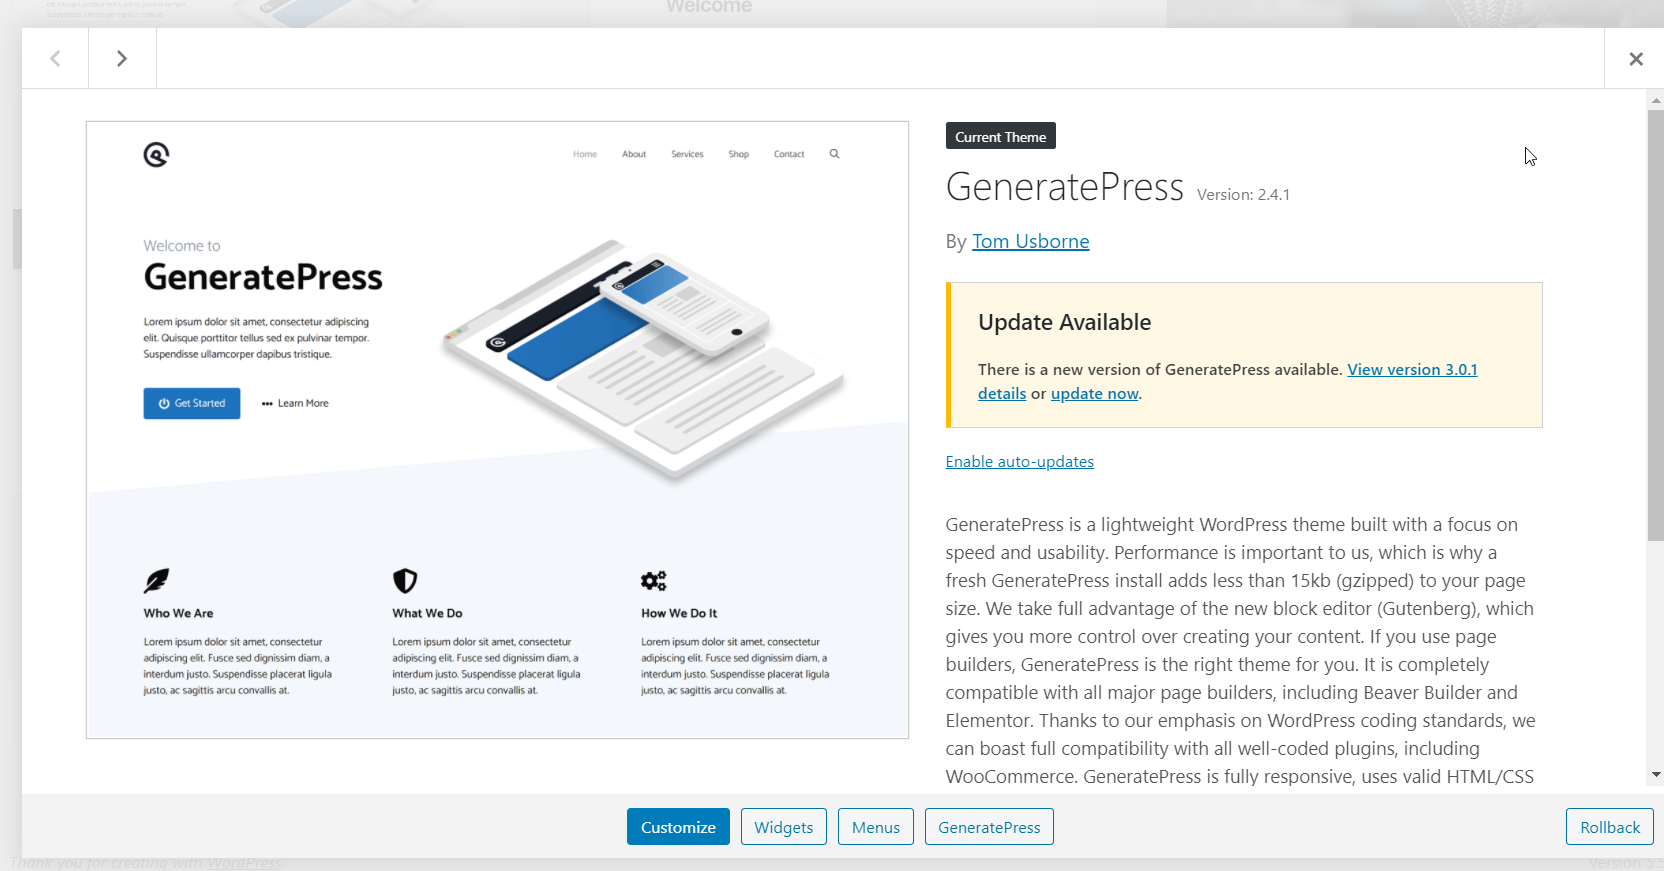
That’s it! That’s how you downgrade WordPress themes and plugins using the WP Rollback plugin.
Recommendations
Before downgrading themes, plugins, or even the WordPress core, we recommend you keep these things in mind.
Create a Complete Backup
Before you downgrade plugins and themes, we recommend you create a complete backup of your site. It’s good practice to generate backups regularly but it’s especially important before rolling-back any plugins or themes.
If you’re not sure how to do it, have a look at our guide on how to generate a WordPress backup.
Test Everything On a Staging Environment
Before updating your core, themes, or plugins, create a staging environment for testing purposes. Some managed WordPress hosting companies like WP Engine, Kinsta, or Cloudways allow you to create a staging environment of your site.
As we’ve seen, updates can create conflicts between plugins and themes so before applying any changes, test them in staging. If all works well, you can go ahead and apply the changes on your live site.
Downgrade temporarily
Plugins and themes receive regular updates to fix bugs, add new features, improve security, and so on. So, we recommend keeping your tools up-to-date. If there are compatibility issues, you can downgrade your themes/plugins as a temporary measure. However, we don’t recommend you keep an old version for a long time.
Conclusion
All in all, rolling-back WordPress plugins and themes can help you fix compatibility issues. However, this is a temporary solution and we don’t recommend keeping older versions for a long time.
In this guide, we’ve seen two different ways to downgrade plugins and themes to an older version.
- Manually
- With a plugin
Both methods are equally effective so you can choose the one that better fits your needs and skills. If you are looking for a beginner-friendly method, use WP Rollback to roll-back to a previous version in a few clicks. If you don’t want to use any plugins, on the other hand, you can go for the manual method. It’s a bit longer than using a plugin but it’s equally effective.
We hope you have enjoyed the read and found this article helpful. If you did, please consider sharing this article with your friends and fellow bloggers on social media. You can read more WordPress tutorials and product reviews on our blog.
