How to edit WooCommerce My Account page programmatically
Do you want to customize the My Account page on your store? You’ve come to the right place. In this guide, we’ll show you how to edit the WooCommerce My Account page programmatically to help you improve your customer experience.
What’s the My Account page?
By default, WooCommerce stores include a My Account page where users can have a look at their orders and where you store information about your customers’ personal information, billing, and shipping address. The default My Account page is a WordPress page that contains a WooCommerce shortcode.
[woocommerce_my_account]
Even though this out-of-the-box page has all the basic information your users need to manage their orders and settings, editing the My Account page can help you stand out from your competitors and provide a better user experience.
Why customize the My Account Page in WooCommerce?
It’s no secret that providing a great UX is key for the success of any eCommerce store. Users buy online because it’s fast and comfortable, so you should make sure that your store provides them with the tools they need to have an amazing experience.
Most store owners focus their attention on customizing the product page and checkout but forget about the My Account page. As this is a page designed for your registered users, customizing it can help you improve their experience on your site. Additionally, it can help you make them come back to your store and boost your sales. For example, you could create a special section where you show them personalized deals and promotions.
We’ve already analyzed the best plugins to customize the My Account page. However, if you don’t want to install any third-party tools and you have some coding skills, we’ve got something for you. In this guide, we’ll show you how to edit the WooCommerce My Account page programmatically.
How to edit the WooCommerce My Account page programmatically
There are two different techniques to edit the My Account page in WooCommerce:
- You can override the default WooCommerce template files
- Use some WooCommerce hooks
Which method is better? Each of these options is more appropriate for different cases. As a general rule, you should try to use hooks instead of overwriting the template files where possible. This is one of the best practices that WordPress recommends when customizing your site.
However, if you want to do more complex tasks that include functions or objects, you might need to edit the template files. In this guide, you’ll learn how to edit the WooCommerce My Account page programmatically using both methods. As you can imagine, editing template files has more risks than using hooks so keep this in mind before choosing your desired option.
1) Customize My Account Page overriding template files
NOTE: As this method involves overriding template files, we recommend you create a full backup of your site before you start. If you don’t know how to do it, check out this guide. For more in-depth information about how to customize WooCommerce templates, check out this post.
The process to override WooCommerce template files is similar to overriding any other file in your child theme. As you know, child themes allow you to edit your theme without losing the customizations when you update the theme. The same applies to WooCommerce plugins, so if you don’t have a child theme, you can create one or use any of these plugins.
First, in your WordPress admin dashboard, go to Plugins > Editor. Then, go to the plugins folder, open WooCommerce, and find the template files. For this, you can use the WordPress plugin file editor or any code editor of your choice. Under the WooCommerce directory, open the templates file and look for the myaccount folder.
plugins/woocommerce/templates/myaccount
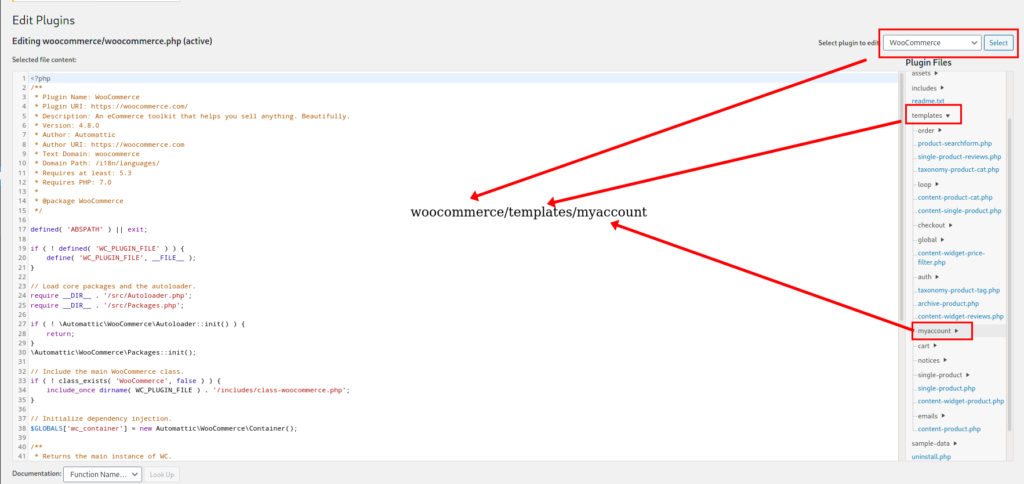
Open the /myaccount folder and you’ll find all the template files that the My Account page uses. 
These are the default files that are currently working on your website. To overwrite these files, you need to create a new file with the same name in your child theme. However, if you create an empty file, you disable all the functionalities of the original file. So to avoid creating issues on your site, you need to copy the default file and paste it into your theme folder.
For example, let’s say you want to copy the dashboard.php file from the WooCommerce installation. Before pasting it into your child theme, you need to create two nested subdirectories and call them /woocommerce and /myaccount. After that, paste the dashboard.php file into it: child_theme/woocommerce/myaccount/dashboard.php 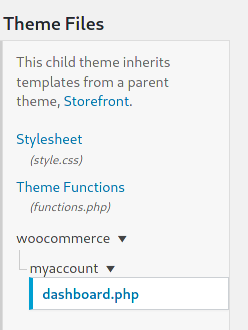
Now open the dashboard.php file and make some small changes to make sure it’s working properly. That’s it! You’ve just learned how to override a WooCommerce template file. That’s the first step. Now, let’s take it a step further and see how to customize the My Account page.
Customize the My Account page dashboard
Now that you know how to override template files, let’s see how to edit the WooCommerce My Account page programmatically. In this section, we’ll show you how to customize the main dashboard of the My Account page. By the end of this process, your My Account page will look like this:
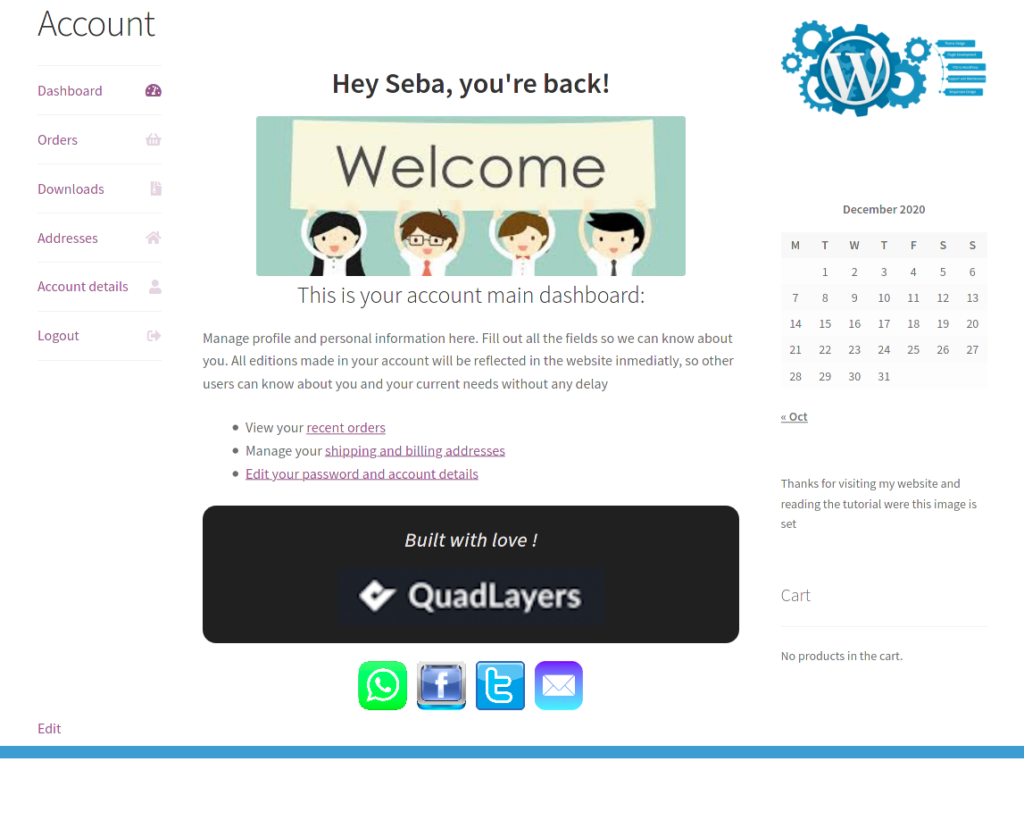 We’ve added a heading image and some text below it. Additionally, we’ve created a list with links to the sections that users visit more frequently, a footer, and some image links so that customers can easily contact you.
Full script
This is the final dashboard.php file that creates the above screenshot.
if ( ! defined( 'ABSPATH' ) ) {
exit; // Exit if accessed directly.
}
$allowed_html = array(
'a' => array('href' => array(),)
);
?>
<h2>
<?php
printf(
/* translators: 1: user display name 2: logout url */
wp_kses( __( 'Hey %1$s, you\'re back! ', 'woocommerce' ), $allowed_html ),
'<strong>' . esc_html( $current_user->display_name ) . '</strong>',
esc_url( wc_logout_url() )
);
?>
</h2>
<img id="welcome" src="https://encrypted-tbn0.gstatic.com/images?q=tbn:ANd9GcSBg81lLt4o-uEuBTgrMCwhDhX1HJKLCPTSxA&usqp=CAU"/>
<h3>
<?php
/* translators: 1: Orders URL 2: Address URL 3: Account URL. */
$dashboard_desc = __( 'This is your account main dashboard: ', 'woocommerce' );
if ( wc_shipping_enabled() ) {
/* translators: 1: Orders URL 2: Addresses URL 3: Account URL. */
$dashboard_desc = __( 'This is your account main dashboard:', 'woocommerce' );
}
printf(
wp_kses( $dashboard_desc,$allowed_html),
esc_url( wc_get_endpoint_url( 'orders' ) ),
esc_url( wc_get_endpoint_url( 'edit-address' ) ),
esc_url( wc_get_endpoint_url( 'edit-account' ) )
);
$ul_list = __('<ul>
<li>View your <a href="%1$s">recent orders</a></li>
<li>Manage your <a href="%2$s">shipping and billing addresses</a></li>
<li><a href="%3$s">Edit your password and account details</a></li>
</ul>');
$div_contact = __('
<div class="acc_contact">
<span class="acc_images" >
<a href="#link to send whatsapp message"><img src="http://localhost/Sampler/wp-content/uploads/2020/12/whatsapp-icon.png"/></a>
<a href="#link to facebook profile"><img src="http://localhost/Sampler/wp-content/uploads/2020/12/fcbk-icon.png"/></a>
<a href="#link to twitter profile"><img src="http://localhost/Sampler/wp-content/uploads/2020/12/twitter-icon.png"/></a>
<a href="#link to send email"><img src="http://localhost/Sampler/wp-content/uploads/2020/12/email-icon2.png"/></a>
</span>
</div>');
$div_footer=__('
<div id="acc_footer">
<h4><i>Built with love !</i></h4>
<img src="http://localhost/Sampler/wp-content/uploads/2020/08/ql-logo-300x65.png"/>
</div>');
?>
</h3>
<p>Manage profile and personal information here. Fill out all the fields so we can know about you. All editions made in your account will be reflected in the website immediatly, so other users can know about you and your current needs without any delay</p>
<?php
echo $ul_list.$div_footer.$div_contact;
If you have a look at the code, you’ll see that all of the original code that we copied from the default template is still there. We’ve just modified some strings and re-ordered links as a list. On top of that, we’ve used additional scripts to add more content to the tab. To better understand the changes we’ve made, you can check the default dashboard.php.
Adding Images
To display images on the My Account page, you need to replace the URLs of the images. The same applies to the social icons image links.
CSS customizations
Another way to customize the My Account page – and any other page – is to use CSS scripts. This is the CSS script we’ve used to style our custom dashboard.php file:
.woocommerce-MyAccount-content > h2:nth-child(2),
.woocommerce-MyAccount-content > h3:nth-child(4){
text-align:center;
}
.acc_contact{
padding-top:20px;
text-align:center;
}
.acc_contact > h3{
float:left;
}
.acc_images{
margin:auto;
width: 50%;
display: block;
}
#welcome{
margin:auto;
}
.acc_images img {
margin-left:4px;
margin-right:4px;
display:inline-block;
width:55px;
}
#acc_footer{
margin-top:15px;
background-color: #202020;
text-align: center;
border-radius: 15px;
}
#acc_footer > h4{
padding-top:20px;
color:rgb(235, 228, 228);
font-weight:bold;
}
#acc_footer > img{
margin:auto;
padding-bottom:20px;
}
You can take this code as a base, paste it on the style.css file of your child theme and customize it to the look and feel of your site.
2. Edit WooCommerce My Account Page with hooks
The second method to edit the My Account page programmatically is by using some WooCommerce hooks. For this, you’ll need to have a basic understanding of how hooks work in WooCommerce. If you’re not familiar with hooks, we recommend you check out this guide.
A) Rename Tabs
This script will rename the Address tab to Your addresses.
add_filter( 'woocommerce_account_menu_items', 'QuadLayers_rename_acc_adress_tab', 9999 );
function QuadLayers_rename_acc_adress_tab( $items ) {
$items['edit-address'] = 'Your addresses';
return $items;
}
B) Remove Tabs
To completely remove any tab, use the unset() function like this:
add_filter( 'woocommerce_account_menu_items', 'QuadLayers_remove_acc_address’, 9999 );
function QuadLayers_remove_acc_address( $items ) {
unset( $items['downloads'] );
return $items;
}
In the above script, we’ve removed the Downloads tab. You can find the full list of tabs slug in the $items array, so you can choose the one you want.
$items = array(
'dashboard'       => __( 'Dashboard', 'woocommerce' ),
'orders'          => __( 'Orders', 'woocommerce' ),
'downloads'       => __( 'Downloads', 'woocommerce' ),
'edit-address'    => _n( 'Addresses', 'Address', (int) wc_shipping_enabled(), 'woocommerce' ),
'payment-methods' => __( 'Payment methods', 'woocommerce' ),
'edit-account'    => __( 'Account details', 'woocommerce' ),
'customer-logout' => __( 'Logout', 'woocommerce' ),
);
C) Merge Tabs and Content
Another option to customize the My Account page is to merge tabs. For example, let’s see how to remove the Addresses tab and move its content to the Account tab.
// -----------------------------
//  1. Remove the Addresses tab
add_filter( 'woocommerce_account_menu_items', 'QuadLayers_remove_acc_tab', 999 );
function QuadLayers_remove_acc_tab( $items ) {
unset($items['edit-address']);
return $items;
}
// -------------------------------
// 2. Insert the content of the Addresses tab into an existing tab (edit-account in this case)
add_action( 'woocommerce_account_edit-account_endpoint', 'woocommerce_account_edit_address' );
Now, the Account tab will look like this: 
D) Add a new tab with custom content
Now, let’s see how to add content to the My Account page. In this example, we are going to add a new tab called Support where users can easily have a look at their support tickets. We’ll use two shortcodes provided by a third-party plugin to display some interesting content but you should be able to use any shortcode you want in your new tab.
However, be aware that some shortcodes may not work due to incompatibilities with WooCommerce. To add a Support tab with custom content to the WooCommerce My Account page, paste the following code in the functions.php file of your child theme.
// 1. Register new endpoint
// Note: Resave Permalinks or it will give 404 error
function QuadLayers_add_support_endpoint() {
    add_rewrite_endpoint( 'support', EP_ROOT | EP_PAGES );
}
add_action( 'init', 'QuadLayers_add_support_endpoint' );
// ------------------
// 2. Add new query
function QuadLayers_support_query_vars( $vars ) {
    $vars[] = 'support';
    return $vars;
}
add_filter( 'query_vars', 'QuadLayers_support_query_vars', 0 );
// ------------------
// 3. Insert the new endpoint
function QuadLayers_add_support_link_my_account( $items ) {
    $items['support'] = 'Support ™';
    return $items;
}
add_filter( 'woocommerce_account_menu_items', 'QuadLayers_add_support_link_my_account' );
// ------------------
// 4. Add content to the new endpoint
function QuadLayers_support_content() {
echo '<h3>Support</h3><p>Welcome to the support area. As a premium customer, manage your support tickets from here, you can submit a ticket if you have any issues with your website. We\'ll put our best to provide you with a fast and efficient solution</p>';
echo do_shortcode( '[tickets-shortcode]' );
echo do_shortcode( '[wpforms id="1082"]' );
}
add_action( 'woocommerce_account_support_endpoint', 'QuadLayers_support_content' );
If you get a 404-page not found error when clicking on the new tab, open the permalink page by going to the WordPress dashboard > Settings > Permalinks and click the Save button at the bottom.
Note that the script is divided into four sections. Each of them accomplishes a different task, so you use the sections that you want to add to your store. Also keep in mind that in the last section of the script (4), you can replace the shortcode in the do_shortcode() function. This will be the final result for the new Support tab. 
Conclusion
All in all, the default My Account page has the basic information users need but it’s pretty basic. So if you want to improve the user experience on your store, you should customize the My Account page. Not only will this help you enhance a very important section of your store but also boost your sales.
There are several plugins to customize the My Account page. However, if you don’t want to install any more plugins and you have coding skills, you can edit the WooCommerce My Account page programmatically. For that there are two options:
- Override template files
- Use WooCommerce hooks
Both methods will get the job done but as a general rule, we recommend you use hooks when possible. It’s less risky and it’s one of the best practices that WordPress recommends. In this guide, we’ve seen several examples of things you can do using both methods. We recommend you take these scripts as a guide, use them to get some ideas, and play around to make the most of the My Account page in your store.
Finally, for more guides to make the most of the My Account page, have a look at these guides:
- How to customize WooCommerce My Account with and without plugins
- Best plugins to customize WooCommerce My Account Page
What changes have you made to your My Account page? Did you have any issues following our tutorial? Let us know in the comments section below!

Hi,
Thank you so much for your generous tutorials …
As I was applying the snippet code of removing ‘downloads’ item (which you mentioned above) on my own website, I’ve realized that there is a tiny syntax error in the code.
in fact, the apostrophe at the end of ” ‘QuadLayers_remove_acc_address’ ” should be like this ” ‘ “…
Hi Masha
Thank you for the correction. But also note that single quotes (‘) might change when you copy & paste scripts.
Regards
Hi
Thanks for your posting.
I want to add ultimate member image upload form to dashboard
How can i do that?
Please help me
Hi there
If the plugin you mention provides a shortcode, you can use it in the code with the
do_shortcode();function, just like you can see in point D)Hi,
Thanks for the great article. Is it possible to have a message which shows prior to logging in to account but which is hidden once logged in ? eg my page says ‘if you have an account with us please login here’ followed by the form but I would like to hide this once logged in. Thank you.
Hello colin. I’m so happy you like the post.
Yes, sure. You can achieve what you want with enough developer skills.
The is_user_logged_in() function might be useful for your custom solution
Great article! I am having trouble with the membership and subscriptions tabs as they do not work when using “member_area” or “subscriptions” in the hook.
Hey Rh Kirsch
So glad you liked it ! But it’s not clear exactly what are you trying to achieve
Hi, I want to add a search bar in orders tab of my account. Please help
Hi Babar
You could edit the template file as described in section 1) and use a shortcode to add a search bar.
You just need to edit the
orders.phpfile instead ofdashboard.phpUse a search plugin so you can use its shortcode like this
echo do_shortcode('[search-shortcode-here]');Great content! Thank you for sharing. I got one question, How will you change the language of the added tabs in the account page based on the website current language?
Hi Ricardo
You can translate any content using a translator plugin.
Another solution would be to translate manually the string using a CSS / PHP script
Hello,
Is it possible to show the amount of sales of a certain product in the My Account area? Woocommerce?
Hi there, I started with testing out tiny changes to the .php file (which is indeed in the exact same file structure you suggest) and the changes aren’t reflected on the browser. I’ve flusher server cache and browser cache and nothing changes…
This is what’s on my default Woocommerce dashboard.php, except that I changed “Hello” to “Hi”, and that change doesn’t reflect at all.
Any idea what it could be??
if ( ! defined( ‘ABSPATH’ ) ) {
exit; // Exit if accessed directly.
}
$allowed_html = array(
‘a’ => array(
‘href’ => array(),
),
);
?>
<?php
printf(
/* translators: 1: user display name 2: logout url */
wp_kses( __( 'Hi %1$s (not %1$s? Log out)’, ‘woocommerce’ ), $allowed_html ),
‘‘ . esc_html( $current_user->display_name ) . ‘‘,
esc_url( wc_logout_url() )
);
?>
<?php
/* translators: 1: Orders URL 2: Address URL 3: Account URL. */
$dashboard_desc = __( 'From your account dashboard you can view your recent orders, manage your billing address, and edit your password and account details.’, ‘woocommerce’ );
if ( wc_shipping_enabled() ) {
/* translators: 1: Orders URL 2: Addresses URL 3: Account URL. */
$dashboard_desc = __( ‘From your account dashboard you can view your recent orders, manage your shipping and billing addresses, and edit your password and account details.’, ‘woocommerce’ );
}
printf(
wp_kses( $dashboard_desc, $allowed_html ),
esc_url( wc_get_endpoint_url( ‘orders’ ) ),
esc_url( wc_get_endpoint_url( ‘edit-address’ ) ),
esc_url( wc_get_endpoint_url( ‘edit-account’ ) )
);
?>
<?php
/**
* My Account dashboard.
*
* @since 2.6.0
*/
do_action( 'woocommerce_account_dashboard' );
/**
* Deprecated woocommerce_before_my_account action.
*
* @deprecated 2.6.0
*/
do_action( 'woocommerce_before_my_account' );
/**
* Deprecated woocommerce_after_my_account action.
*
* @deprecated 2.6.0
*/
do_action( 'woocommerce_after_my_account' );
Is it possible to show/hide specific menu items based on user roles? Example; I would like to show a specific tab on the My Account page to a specific user role, user role of “customer” would not see the Bookings tab, but user role of “parent” would see the bookings tab.
Thanks.
This content: echo $ul_list.$div_footer.$div_contact;
Dont show links correctly.
Greetings.
Thank you so much
I get a php error when adding this code to remove an item from the my account page.
add_filter( ‘woocommerce_account_menu_items’, ‘QuadLayers_remove_acc_address’, 9999 );
function QuadLayers_remove_acc_address( $items ) {
unset( $items[‘downloads’] );
return $items;
}
Here is the error: syntax error, unexpected ‘downloads’ (T_STRING), expecting ‘)’