
How to edit WooCommerce product page programmatically
Looking for ways to customize the product page in your eCommerce store? In this guide, we’ll show you how to edit the WooCommerce product page programmatically.
Customizing the Product Page
Even though you can customize anything on your store, the two main pages where most customizations occur in WooCommerce are the shop page and the products page. If you want to boost your sales and optimize the beginning of the purchase process, you need to work on both. We’ve already seen how to customize the Shop page, so today we’ll show you how to edit the Product page programmatically (with code).
A neat design that focuses on providing the best customer experience will help you improve the overall purchase process and increase your conversion rates. There are two main ways to customize the Product page:
- With plugins
- Programmatically
Even though some plugins can help you, finding the one that has all the features you want can be a long process. So if you have some basic developer skills, an excellent option is to edit the WooCommerce product page programmatically. Not only can you avoid installing any third-party tools but you’ll also have much more flexibility to customize anything you want.
If you want to customize the product page with plugins and page builders, check out this guide.
How to edit the WooCommerce product page programmatically
In this section, you will learn how to edit the WooCommerce product page for single products. We’ll cover the following topics.
- Using hooks
- Remove elements
- Reorder elements
- Add new elements
- Apply conditional logic
- Logged in user and user role
- Product IDs and taxonomies
- Edit Product tabs
- Support for variable products
- Override WooCommerce template files
- Edit the meta-information
- Switch to a custom template for a specific product category
- Edit the single-product.php file
- Create a new content-single-product.php file
- Create custom template editing your new content-single-product.php file
- Customizing the product page with CSS scripts
WooCommerce Product Page Layout
Before starting with the tutorial, let’s have a look at the default product page in WooCommerce for single products and identify each element. Pay attention to the different sections in the template and how the information is organized because we’ll refer to them later in the guide. 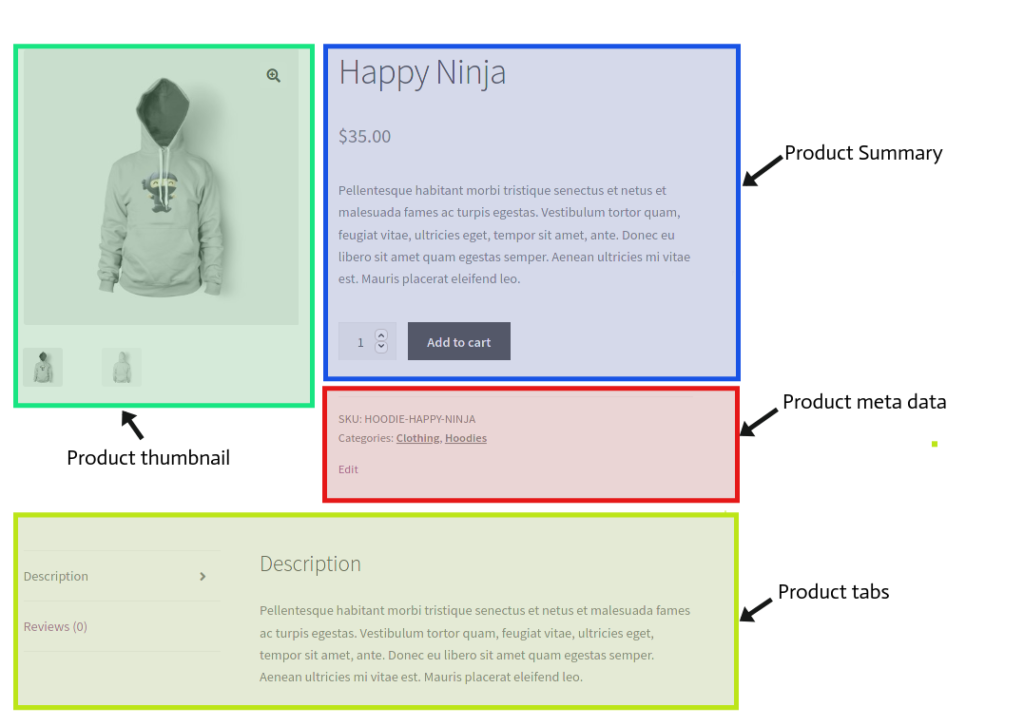 There are two main WooCommerce files responsible for the product page’s output.
- single-product.php: It builds the required template for the current layout
- content-single-product.php: This file prints the content in the template
Both files can be overwritten using a child theme. This is common practice to overwrite WooCommerce template files. However, you should try to use WooCommerce hooks instead of overwriting template files where possible because it’s one of the best practices that WordPress recommends when customizing your site.
On the other hand, for complex tasks that include functions or objects, you might need to edit the template files. Combining both techniques you should be able to achieve nearly any customization you want. So in this tutorial, we’ll show you how to edit the WooCommerce product page using both methods.
Before we start, make sure you create a child theme to test your scripts or use a plugin to generate one. Let’s see some practical examples so you can learn how each one of these techniques works to make the most of your store.
1) Edit the WooCommerce product page using hooks
NOTE: If you’re not familiar with WooCommerce hooks and how to use them, check out this guide.
1.1) Remove elements from single product pages
There are several WooCommerce hooks you can use to remove any element on a single product page. Each of them will work with a group of specific elements, so you need to use the right hook, the right WooCommerce callback function, and the right priority value.
For example, if you want to remove the title of all products pages, you will use the following script in the functions.php file of your child theme.
remove_action(/* hook -> */'woocommerce_single_product_summary',
                /* callback function ->*/ 'woocommerce_template_single_title',
                /* position ->*/5 );
You will find all hooks and their related parameters here or in the comments in the content-single-product.php file of the WooCommerce plugin. Now, let’s have a look at some other sample scripts to remove different elements and customize the product page.
// remove title
remove_action( 'woocommerce_single_product_summary', 'woocommerce_template_single_title', 5 );
// remove  rating  stars
remove_action( 'woocommerce_single_product_summary', 'woocommerce_template_single_rating', 10 );
// remove product meta
remove_action( 'woocommerce_single_product_summary', 'woocommerce_template_single_meta', 40 );
// remove  description
remove_action( 'woocommerce_single_product_summary', 'woocommerce_template_single_excerpt', 20 );
// remove images
remove_action( 'woocommerce_before_single_product_summary', 'woocommerce_show_product_images', 20 );
// remove related products
remove_action( 'woocommerce_after_single_product_summary', 'woocommerce_output_related_products', 20 );
// remove additional information tabs
remove_action('woocommerce_after_single_product_summary ','woocommerce_output_product_data_tabs',10);
1.2) Reorder elements
Reordering the elements of the product page is quite simple. First, you need to remove the hook in the same way we’ve done before, and then you need to add it again with a different priority/order number. For example, the following script will move the product description right below the title:
// change order of description
remove_action( 'woocommerce_single_product_summary', 'woocommerce_template_single_excerpt', 20 );
add_action( 'woocommerce_single_product_summary', 'woocommerce_template_single_excerpt', 6 );
As you see, we remove the action and then add it again with a different priority (6 instead of 20). Why did we choose a priority/order of 6? We know that the title element has a priority value of 5, so this allows us to know the priority value we need to assign to our customized hook to display the callback element right after the title (6).
Using the information we provided you in point 1.1, you can do the same with any hooks and callbacks and place them in any order you want.
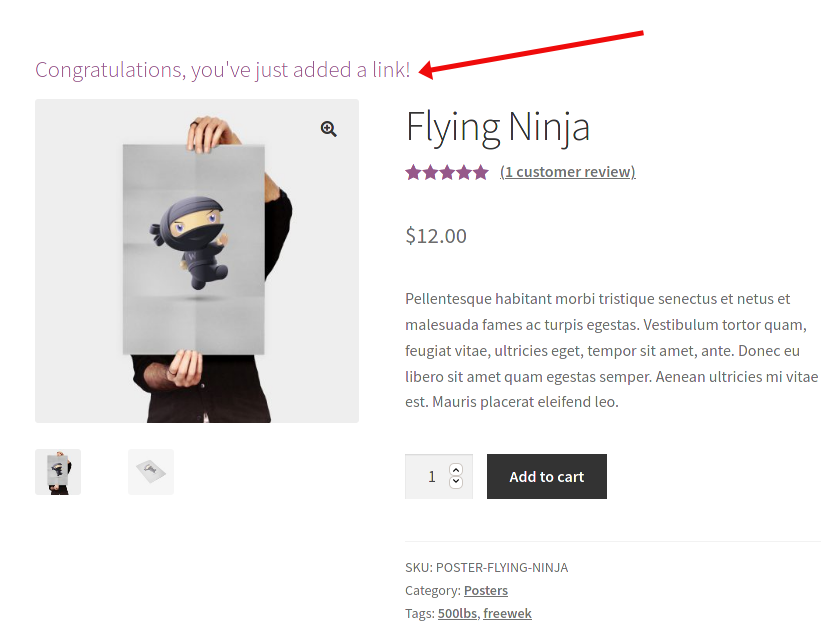
1.3) Add new elements
If you need to customize the WooCommerce product page by adding new content, you might need to consider overriding the template files. However, you can also use the following hook to add new content:
add_action('woocommerce_before_single_product_summary',function(){
  printf('<h4><a href="?added-content">Congratulations, you\'ve just added a link!</a></h4>');
}
);
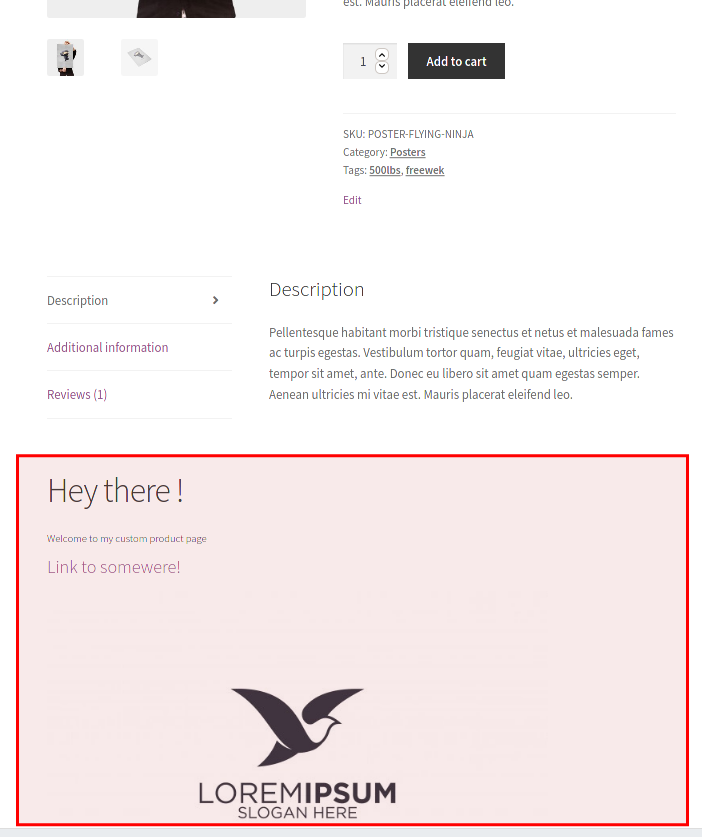
 Alternatively, you can create your own function:
add_action('woocommerce_after_single_product_summary','QuadLayers_callback_function');
function QuadLayers_callback_function(){
    printf('
    <h1> Hey there !</h1>
    <div><h5>Welcome to my custom product page</h5>
    <h4><a href="?link-to-somewere">Link to somewere!</a></h4>
    <img src="https://img.freepik.com/free-vector/bird-silhouette-logo-vector-illustration_141216-100.jpg" />
    </div>');
}
1.4) Conditional logic on a single product page
We’ve previously seen how to add conditional fields on the checkout page but you can also add them to the product page. You can create conditional logic to meet the requirements you want using any of the WordPress native functions. Let’s have a look at a few examples.
1.4.1) Logged in user and user role
The user_is_logged_in() is a default WordPress function used to validate website visitors. Additionally, we can use the wp_get_current_user() function to retrieve all the information related to the logged-in user. In the following script, we are simply adding some content based on if the user is logged in and their role, but you can add your custom functions for more complex functionalities
add_action('woocommerce_before_single_product','QuadLayers_get_user');
function QuadLayers_get_user() {
    if( is_user_logged_in() ) {
    $user = wp_get_current_user();
    printf ('<h1>Howdy ' .$user->user_nicename.'!</h1>');
    $roles = ( array ) $user->roles;
        if($roles[0]=='administrator'){
            echo "<h4><b>You are $roles[0]</h4></b>";
        }
    }
    else {
    return array();
    }
}
1.4.2) Product IDs and taxonomies
Similarly, we can retrieve the product ID and/or product categories. The difference is that we are going to use the global WP $post object to get the ID and the get_the_terms() function to obtain the product categories.
add_action('woocommerce_before_single_product','QuadLayers_get_product_taxonomies');
function QuadLayers_get_product_taxonomies(){
    global $post;
    $term_obj_list = get_the_terms( $post->ID, 'product_cat' );
    $terms_string = join(', ', wp_list_pluck($term_obj_list, 'name'));
    if($terms_string=='Posters'){
        echo "
<h1>This is one of our best $terms_string</h1>"; echo "<h2>Product ID: $post->ID"; } }
The above script will return a single category. If you need to retrieve multiple categories or tags, you will need to create a more complex function. You’ll have to loop over taxonomies before applying your conditionals as shown below:
add_action('woocommerce_before_single_product','QuadLayers_get_multiple_taxonomies');
function QuadLayers_get_multiple_taxonomies(){
    global $post;
    $args = array( 'taxonomy' => 'product_tag',);
    $terms = wp_get_post_terms($post->ID,'product_tag', $args);
    $count = count($terms);
 if ($count > 0) {
        echo '<div class="custom-content"><h4>Tag list:</h4><ul>';
        foreach ($terms as $term) {echo '<li>'.$term->name.'</li>';}
        echo "</ul></div>";
    }
}
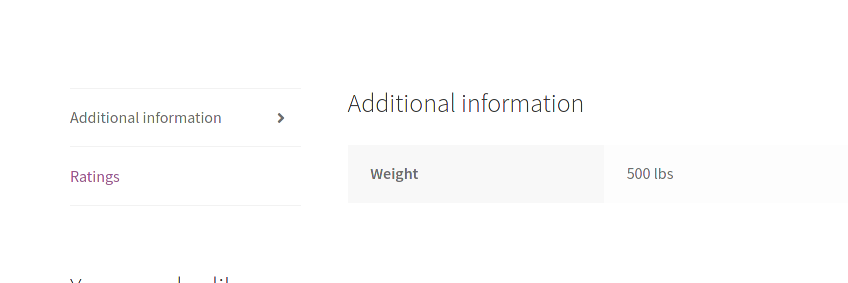
1.5) Edit product tabs
The woocommerce_product_tabs filter hook allows us to remove, add, reorder, or add a new tab in the Additional Information section. The following script will remove the Description tab and its content, rename the Reviews tab, and change the priority of Additional information to the first place.
add_filter( 'woocommerce_product_tabs', 'woo_remove_product_tabs', 98 );
function woo_remove_product_tabs( $tabs ) {
    unset( $tabs['description'] );    	// Remove the Description tab
    $tabs['reviews']['title'] = __( 'Ratings' );	// Rename the Reviews tab
    $tabs['additional_information']['priority'] = 5;	// Additional information at first
    return $tabs;
}
 To edit the content of a tab, you need to use a callback function like this:
add_filter( 'woocommerce_product_tabs', 'woo_custom_description_tab', 98 );

function woo_custom_description_tab( $tabs ) {
	$tabs['description']['callback'] = 'woo_custom_description_tab_content';	// Custom description callback
	return $tabs;
}
function woo_custom_description_tab_content() {
	echo '
<h2>Custom Description</h2>
'; echo 'Here\'s a custom description'; }
Similarly, we can create a new tab as follows:
add_filter( 'woocommerce_product_tabs', 'woo_new_product_tab' );
function woo_new_product_tab( $tabs ) {
	// Adds the new tab
	$tabs['test_tab'] = array(
		'title' 	=> __( 'New Product Tab', 'woocommerce' ),
		'priority' 	=> 50,
		'callback' 	=> 'woo_new_product_tab_content'
	);
	return $tabs;
}
function woo_new_product_tab_content() {
	echo '<h2>New Product Tab</h2><p>Here\'s your new product tab content</p>.';
}
In this example, we’ve just created a new tab called “New Product Tab”. This is how it looks in the front end. 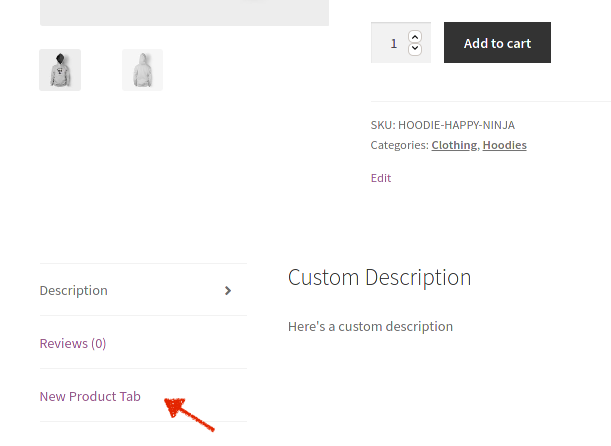
1.6) Support for variable products
Product variations is a WooCommerce default feature and you can create and use variable products without any kind of customization. However, you must follow WooCommerce guidelines to make a custom solution compatible with product variations.
It’s important to note that any custom solution must be integrated with the overall website and not with a single page. So, keeping this in mind, we can still use some of the available hooks related to variable products. These hooks will only trigger when they’re on a variable product page.
woocommerce_before_variations_formwoocommerce_before_single_variationwoocommerce_single_variationwoocommerce_after_single_variation
2) Customize the product page overriding WooCommerce template files
The second alternative to edit the WooCommerce product page programmatically is to override the template files. As this method is a bit riskier than the previous one, we recommend that you create a full backup of your site before starting. If you aren’t sure how to do it, check out this guide on how to back up a WordPress site.
Overriding WooCommerce template files is similar to overriding any other file in your child theme, so to avoid losing your customizations when you update your theme, we recommend you create a child theme or use any of these plugins if you don’t have one.
2.1) Edit the meta-information
To edit the meta-information, we need to override the template file responsible to print the corresponding data. The meta.php file located in the WooCommerce plugin follows this path: woocommerce/templates/single-product/meta.php
Now edit your child theme files directory and create a WooCommerce folder. Then, create another folder inside it called single-product and paste the meta.php file there: Child_theme/woocommerce/single-product/meta.php
After this, you should be able to edit the meta.php file and see your changes in the frontend. The following meta.php sample file will:
- Change the label of SKU to ID
- Change the tags to Published under
- Remove the category label
global $product;
?>
<div class="product_meta">

	<?php do_action( 'woocommerce_product_meta_start' ); ?>

	<?php if ( wc_product_sku_enabled() && ( $product->get_sku() || $product->is_type( 'variable' ) ) ) : ?>

		<span class="sku_wrapper"><?php esc_html_e( 'ID:', 'woocommerce' ); ?>
			<span class="sku"><?php echo ( $sku = $product->get_sku() ) ? $sku : esc_html__( 'N/A', 'woocommerce' ); ?>
			</span>
		</span>
	<?php endif; ?>
	<?php echo wc_get_product_category_list( $product->get_id(), ', ', '<span class="posted_in">' . _n( '', '', count( $product->get_category_ids() ), 'woocommerce' ) . ' ', '</span>' ); ?>
	<?php echo wc_get_product_tag_list( $product->get_id(), ', ', '<span class="tagged_as">' . _n( 'Published under:', 'Published under:', count( $product->get_tag_ids() ), 'woocommerce' ) . ' ', '</span>' ); ?>
	<?php do_action( 'woocommerce_product_meta_end' ); ?>
</div>
2.2) Switch to a custom template for a specific product category
Now let’s try a more complex task. We will override the single product template only when the current product belongs to a specific category.
2.2.1) Edit the single-product.php file
First, copy the single-product.php file and paste it in your child theme folder, in the WooCommerce directory:
Child_theme/woocommerce/single-product.php
Then, open the file and check line 37: wc_get_template_part('content','single-product');
This is how the content-single-product.php file comes into action, printing all the elements of the current product to complete the loop and build the layout.
We want to override this file only when the product belongs to the specified category, so we will delete line 37: wc_get_template_part( 'content', 'single-product' ); and replace it with the following script:
$terms      = wp_get_post_terms( $post->ID, 'product_cat' );
				$categories = wp_list_pluck( $terms, 'slug' );

				if ( in_array( 'posters', $categories ) ) {
					wc_get_template_part( 'content', 'single-product-posters' );
				} else {
					wc_get_template_part( 'content', 'single-product' );
				}
Note that we are using the sample products provided by WooCommerce, so there is a category called “Posters” which we are using for this example. Simply replace “posters” with an existing product category of your website.
Remember that you can find the slug of all your product categories in the main WordPress dashboard > Products > Categories.
2.2.2) Create a new content-single-product.php file
Now we need to create a new file that will override the default content-single-product.php one. This file will have the category slug in its name.
Have a look at the above example to see how the content-single-product-posters.php file is called. This is important because the name of the file must match the code in the previous step, so your file should be called content-single-product-/*YOURCATEGORYSLUG*/.php.
This way, wc_get_template_part( 'content', 'single-product-YOURCATEGORY' ) will trigger the content-single-product-YOURCATEGORY.php file and will override the default WooCommerce template file.
Simply paste the default content-single-product.php file in the WooCommerce folder of your child theme, rename it following the instructions explained above and make some editions to test it.
2.2.3) Create a custom template editing your new content-single-product.php file
This is a sample product page that will be displayed only when the current product belongs to the “posters” category. You’ll see that we’ve added some content, added and removed elements, reordered them, and run some shortcodes.
Despite being a basic example, it will give you an idea of what you can do on a template page and will allow you to explore new possibilities.
// remove product summary elements
remove_action( 'woocommerce_single_product_summary', 'woocommerce_template_single_title', 5 );
remove_action( 'woocommerce_single_product_summary', 'woocommerce_template_single_rating', 10 );
remove_action( 'woocommerce_single_product_summary', 'woocommerce_template_single_excerpt', 20 );
remove_action( 'woocommerce_single_product_summary', 'woocommerce_template_single_add_to_cart', 30 );
remove_action( 'woocommerce_single_product_summary', 'woocommerce_template_single_price', 10 );

		// Custom content
		printf('<h1>This is the <b>'.$post->post_name.' </b>poster</h1>');
		printf('<h4>A full customized product page for the "posters" category products</h4>');
		// Description
		printf('<h5>'.$post->post_excerpt.'</h5>');
		//thumbnail
		do_action( 'woocommerce_before_single_product_summary' );

		//add meta
		do_action( 'woocommerce_single_product_summary');
		// shortcodes
		echo do_shortcode('[add_to_cart id="'.$post->ID.'" show_price="false" style="border:none;" class="my-addtocart"]'); echo "<h3>Contact:</h3>".do_shortcode('[wpforms id="1082"]'); echo "<h3>More posters:</h3>".do_shortcode('[product_category category="posters" orderby="desc" limit="4"]');
Now if we check the frontend, we’ll see the following: 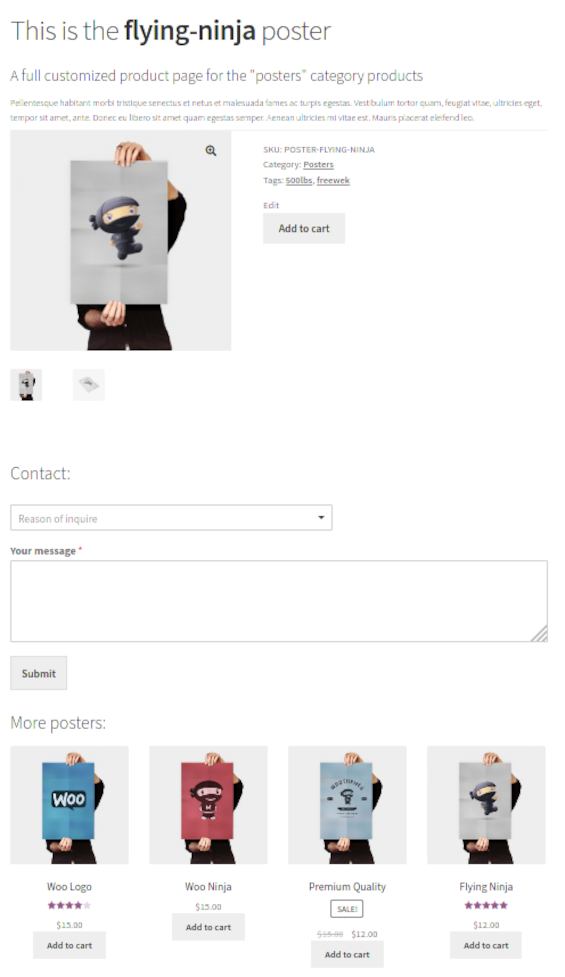 Note that we are using the global post object.
 var_dump($post); to show you all the available information related to the current product. You can use any of its data just like we’ve done in the sample script with the description of the product: $post->post_excerpt.
3) Customize the product page with CSS script
Another handy and simple way to edit the WooCommerce product page (and any other page) programmatically is by using CSS code. This will help you style the product page and give it the look and feel of your business.
-
- First, you need to create a new file in your child theme with the .css extension so you can add your CSS scripts there. We recommend you name it
single-product.cssor something similar so it’s easy to find. - Then, place the file in the child theme main folder at the same level as
functions.phpandstyle.cssfiles. - After that, paste the following script in the
functions.phpfile of your child theme and replace the name of your CSS file if necessary.
- First, you need to create a new file in your child theme with the .css extension so you can add your CSS scripts there. We recommend you name it
add_action( 'wp_enqueue_scripts', 'load_custom_product_style' );
      function load_custom_product_style() {
        if ( is_product() ){
        wp_register_style( 'product_css', get_stylesheet_directory_uri() . '/single-product.css', false, '1.0.0', 'all' );
          wp_enqueue_style('product_css');
        }
	  }
The if(is_product()) conditional will check if the current page is a product page. This prevents unnecessarily loading the CSS file when it’s not a product page.
4. After adding this snippet, you should be able to edit the style of the product pages by adding your custom CSS rules to your CSS file.
Even though this method is quite simple and will provide you with a fast and easy solution, it might not be ideal for some cases. As CSS can be edited from the frontend, if a user knows how to use the browser developer tools, they could easily make visible any hidden element by editing the CSS.
Edit WooCommerce single product page with CSS
Let’s see a few other examples of changes you can do on the product page using a bit of CSS.
To apply the following scripts, on your WordPress dashboard, go to Appearance > Customize > Additional CSS.
Change the title font size
This will change the font size of your page product titles to 32. Simply adjust the code to select the size you want.
.woocommerce div.product .product_title {
        font-size: 32px;
}
Change the title color
You can also customize the color of the title of your product page. To do that, simply use the following code and adjust the color. For this example, we’re using orange. We recommend you use a hex code selector like this one to choose the color you want.
.woocommerce div.product .product_title {
            color: #FFA500;
}
Change the color of the Buy Now button
Similarly, you can change the color of the Buy Now button. In this example, we’re using dodger blue, but you can choose any other color you want by adjusting the code.
.woocommerce div.product .button {
        background: #1E90FF;
}
Conclusion
In summary, customizing your online store is key to standing out from your competitors. Product pages are some of the most important pages in any store and there’s a lot you can do to improve customer experience and boost your sales.
Even though you could use plugins for this, we recommend you edit the WooCommerce product page programmatically if you have some coding skills. It provides you a lot of flexibility to customize any element of your store without the need of installing any additional tools. In this guide, we’ve seen how to customize the product page in three different ways:
- Using hooks
- Overriding WooCommerce templates
- With CSS scripts
When possible, you should try to use WooCommerce hooks instead of overwriting template files. It’s one of the best practices that WordPress recommends and it’s less risky. However, for complex tasks that include functions or objects, you might need to edit the template files. If you manage to combine both techniques, you’ll be able to customize anything you want in your store.
Finally, have a look at the complete child theme that includes all the sample scripts we’ve used in this tutorial. For more information on how to customize your store, check out the following guides:
- Learn to customize WooCommerce template files
- How to Customize the WooCommerce Shop Page
- Customize the Add to Cart button in WooCommerce
- How to remove WooCommerce related products
- How to edit the WooCommerce Checkout (Coding & Plugins)
Did you have any issues following our tutorial? Let us know in the comments section below and we’ll do our best to help you out.

This was great for creating the product template I needed!! I wanted to remove the single_price on only products in one category. Worked great. NOW-how can I accomplish the same thing for the category LIST of products for that one specific category? I did some work with a plugin to add options WITH quantity fields, so I had to set the price at “$0” and don’t want to have that price showing in the category.
Hey Susan.
I’m happy that this helped you! But I’m afraid It’s hard to know the right answer to your question without more information.
I want that it would be done immediately. u do it done for me.
thank u very much. all the best.
You’re welcome
hi
i want change product-label for offer product
it’s “-20%” want be “20%”
how do this?
i’m using woodmart theme.
.
.
Hi, I have a lot of trouble with my woocommerce shop and I was wondering if you could help me out. I am also looking to edit my woocommerce product page. I would like to get my product pages that are automatically built with wordpress and woocommerce being overwritten by another product page that I built myself with a plug in called cartflows (it makes better designs from my view)
Do you know how I can override the link that is provided with woocommerce to the link (to the page made with cartflows) that will send people to the correct product page?
I will send snipboard screenshots so you can see what I mean.
So here I added a few links with descriptions:
https://snipboard.io/aC4Osv.jpg >> this is the link where you see the product back end, you can also see the standard permalink that woocommerce gives the product, that will send you to a woocommerce product page.
https://snipboard.io/ezIg1V.jpg >> this is a link to the back end of the product page (same as above) where you can see what can be adjusted from the permalink.
https://snipboard.io/lDCL3q.jpg >> this is the product page that I made with cartflows and where I want people to go when they click on the product permalink. This link is completely different from the product permalink that woocommerce makes for you and I need to get the product permalink to this link.
Thanks in advance for your response!
Greetings,
David
Hey david
I think this is not related to product page template, but to the custom solution applied by the plugin you mention (cartflow)
Thank you for your valuable woocommerce blogs.
But I want to request you to give Single Product’s review and Single Blog’s Comments Section Customization blogs/posts.
Thanks
hi admin, i am trying to replace woocommerce_product_thumbnail with ACF File.
but I can’t replace it, it still shows image placeholder default:
function replacing_template_loop_product_thumbnail() {
remove_action( ‘woocommerce_product_thumbnails’, ‘woocommerce_template_loop_product_thumbnail’, 10 );
function wc_template_loop_product_replaced_thumb() {
$file = get_field(‘chose_file_view’);
if( $file ) {
//wp_get_attachment_url( $file );
//echo do_shortcode(‘[embeddoc url=”‘$file'”]’, “chose_file_view”, true);
echo do_shortcode( ‘[embeddoc url=”‘ . $file . ‘”]’ );
//echo do_shortcode( ‘[doc id=200]’ );
}
}
add_action( ‘woocommerce_product_thumbnails’, ‘wc_template_loop_product_replaced_thumb’, 10 );
}
add_action( ‘woocommerce_init’, ‘replacing_template_loop_product_thumbnail’ );
Please help me, and Thank’s.
Hello, first of all your article is very detailed you wrote about every basic functions in this article. thanks for that. i have a question which is next step of customization. can you plz guide me and community how can we add a full width section or row at the bottom of product page (after related product or after woo product page “container”).i cant found any article about that so plz if you can explain it would be very helpful for all.
you already write about extra content after_product_summary but that is added in container. if we want to add after container something fullwidth? guide me about that.
Hi usman.
You can try using the same hook you mention and add the .alignwide class to your custom html content. But all content is wrapped inside the container, in order to add content outside the wrapper, you will need to edit the template files.
hello i have some thing in mu product page i wanna remove that
can u please help me
i have a link and box in product page and i cant find in where can i remove that
When i want to move the short description below the buy button and use this hook > remove_action( ‘woocommerce_single_product_summary’, ‘woocommerce_template_single_excerpt’, 20 );
add_action( ‘woocommerce_single_product_summary’, ‘woocommerce_template_single_excerpt’, 30 );
The short description is indeed moved correctly……but is still also visible on the other location as well….so it is in here double……seems like it is not “moved” but copied into the new position.
Ok. Finally got this working. The theme uses its own style. That’s why it is doubling content. Now I want to position the title and price directly under the variations selections 😉
Thanks for the explanation, however the way you are describing to add a custom template to a category is not working. I have followed your steps 3 times and woocommerce is not updating my custom template. I include this code:
$terms = wp_get_post_terms( $post->ID, ‘product_cat’ );
$categories = wp_list_pluck( $terms, ‘slug’ );
if ( in_array( ‘posters’, $categories ) ) {
wc_get_template_part( ‘content’, ‘single-product-posters’ );
} else {
wc_get_template_part( ‘content’, ‘single-product’ );
}
Unfortunately the corresponding page is not updated 🙁
Furthermore, I have tried to set a custom file as default.
The default:
wc_get_template_part( ‘content’, ‘single-product’ );
my code attempting to update:
wc_get_template_part( ‘content’, ‘single-product-hallo’ );
Not works. It seems like Woocommerce is not responding in anyway to the custom templates.
Any advice on how to fix it?