
How to edit WooCommerce shop page programmatically (CSS and PHP)
Looking for ways to customize your shop page? In this tutorial, we’ll show you how to edit the WooCommerce shop page programmatically using both PHP and CSS.
In any online store, it is crucial to edit and optimize the shop page to increase your conversion rates. The shop page is where you display your products and it can make or break your business. If you’re running a WooCommerce store, we highly recommend you customize the shop page and make the most of it. In this guide, we’ll show you how to edit the WooCommerce shop page programmatically.
Why is it important to edit the shop page in WooCommerce?
The shop page is one of the most important pages in WooCommerce. It’s where you display your products to your visitors so it can have a huge effect on your store’s performance. A good shop page can improve user experience, increase conversion rates, and help you generate user engagement. A bad shop page, on the other hand, can do the exact opposite and stifle your business.
That’s why you must optimize it to maximize your sales. You can do that with plugins and page builders but if you have coding skills, creating your own solution is the way to go.
How to edit the WooCommerce shop page programmatically
We have previously seen different methods to customize the shop page. However, in this tutorial, we’ll focus on how to edit the WooCommerce shop page programmatically using a bit of CSS and PHP code. It’s worth noting that in this guide, we’ll work on a child theme and we will also edit the WooCommerce default shop template. We’ll put our focus on the WooCommerce template files and some references to the functions.php file of the child theme.
In this tutorial, you’ll learn how to edit the WooCommerce shop page programmatically to:
- Disable the default WooCommerce shop page template
- Customize headers and content
- Most popular products
- Best-selling products
- Top-rated
- Display products by taxonomies
- Customize WooCommerce shop page in functions.php
- Edit the layout of products loop and apply CSS stylesheet
- Edit default columns count per row
- Apply CSS Style to the shop page
- Edit the loop files of the WooCommerce shop page
- Replace the default “sale” text for an animated gif
- Remove sorting options and pagination
Before you start
Please note that the following guide involves advanced coding so if you don’t have technical skills, we recommend you follow this other tutorial instead.
Before you start, we also recommend you install a child theme. You can check out our guide on how to create a child theme or use a plugin to do it in a few clicks. On top of that, as you’ll be changing core files, it’s a good idea to do a complete backup of your site.
So now, let’s see how to customize the shop page in WooCommerce with coding.
1. Disable the default WooCommerce shop page template
To customize the shop page, there are two possible approaches:
- You can overwrite the WooCommerce file responsible for printing the shop page
- Add customized scripts to the
functions.phpfile of your child theme using WC hooks
You can edit the WooCommerce HTML template just like the functions.php file of the child theme, overwriting the core files to prevent deletion when there’s an update. However, as things don’t work exactly like in the functions.php file if WooCommerce decides to update these files, your customizations might not work anymore.
But this is nothing to worry about. WooCommerce is aware of this so they rarely update template files in a way that can break your scripts. The problem of working with the functions.php file is that the default WooCommerce shop page will still show up after you add your hooks.
So, first of all, you need to disable the default WooCommerce template shop page to create your template from scratch.
The archive-product.php file
In WooCommerce, the file responsible for the output on the shop page is called archive-product.php, and you can find it in the WooCommerce templates folder (WooCommerce > Templates > archive-product.php). 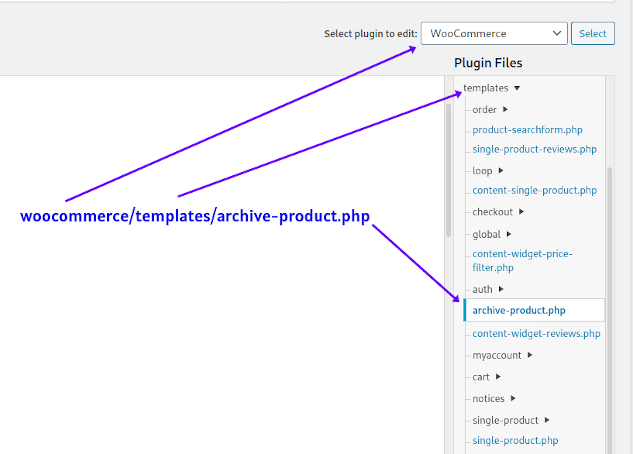
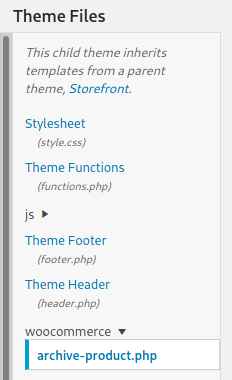
To overwrite this file, you need to copy and paste it in the WooCommerce folder in your child theme as shown below:
 Now, let’s have a look at the
 archive-product.php file so you can see how WooCommerce displays the shop page. To do that, open your favorite integrated development environment (IDE), go to the templates folder of the WooCommerce plugin, and open the file. You can edit it and play around with it, the same way you can customize any other WC template file.
Before you do that, make sure you have a backup of the original file to undo any changes if necessary.
In the archive-product.php file, you will see several do_action() functions. These functions are used to create currently available WooCommerce hooks for the shop page. To completely disable the WooCommerce shop page, simply delete the loop responsible for printing the products:
if (wc_get_loop_prop('total')) {
    while (have_posts()) {
        the_post();
        do_action('woocommerce_shop_loop');
        wc_get_template_part('content', 'product');
    }
}
You can make more changes here, but to simplify it, we’ll only delete the loop and leave everything else as it is. If you decide to make more changes, keep in mind that if you remove some of the do_action() functions, the corresponding shortcode will not work anymore on any page of the website.
After deleting the loop for printing products, the archive-product.php file will look like this:
defined('ABSPATH') || exit;
get_header('shop');
do_action('woocommerce_before_main_content');
if (woocommerce_product_loop()) {
    do_action('woocommerce_before_shop_loop');
    // here we’ve deleted the loop
    do_action('woocommerce_after_shop_loop');
} else {
    do_action('woocommerce_no_products_found');
}
do_action('woocommerce_after_main_content');
do_action('woocommerce_sidebar');
get_footer('shop');
That’s it! You have disabled the default shop page template and edited the WooCommerce shop page programmatically! Now you have an empty shop page so you can start designing your own.
2. Customize headers and content of WooCommerce shop page programmatically
The content and the headers can be any HTML markup that may include images, tables, or links. Or even something like an empty container to run an external JavaScript file. For this, you’ll need basic knowledge of WooCommerce shortcodes, since you are going to use them to display products on the shop page. If you’re not familiar with WC shortcodes, have a look at this guide.
Now, let’s edit the WC shop page and display products by most popular, best-selling, top-rated, and taxonomies. Additionally, we’ll show you how to add some headings and content outside the loop.
2.1 Display the most popular products
To display the most popular products you need to edit the archive-product.php file of your child theme. First, use the following shortcode
[products orderby="popularity"]
Right where the loop was before you deleted it. # display the most popular products: 2 products in 2 columns
do_action('woocommerce_before_shop_loop');
echo '<h1>MOST POPULAR !!</h1>';
do_shortcode('[products orderby="popularity" class="m-popular" columns="2" limit="2"]'); do_action('woocommerce_after_shop_loop');
In the shortcode, you will add a class called m-popular, which you can use later on when applying styles. In the above example, we set it to display 2 products in a single 2 columns row (columns=”2″ limit=”2″). Note that you can’t use shortcodes here in the same way you use them in a post or a page.
You must use the do_shortcode() function for the shortcodes to work. If everything went well, now you should see this on the shop page: 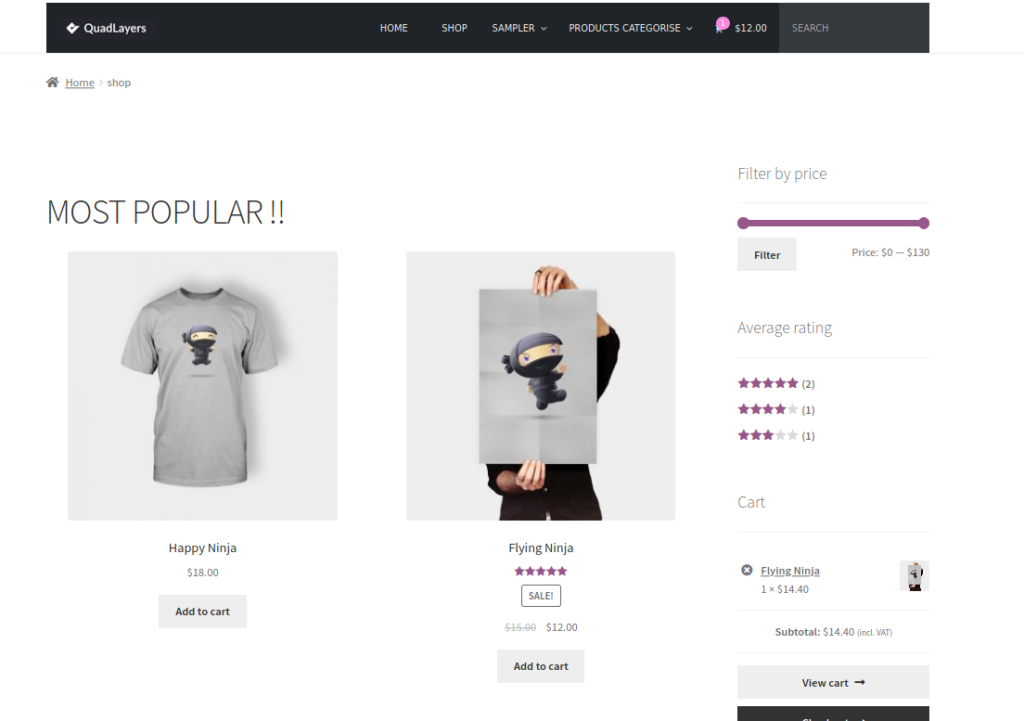
2.2 Best selling products
Another way to customize the WooCommerce shop programmatically is by sorting the products by best-sellers. For this, besides echoing the shortcode, you will add some content using a simple HTML markup (<h1>). Here, you can add any other type of content matching with proper HTML format.
Let’s display the best-selling products, this time in a layout of 2 rows and 3 columns. To do that, simply paste this right after the echo do_shortcode() line you’ve inserted in the previous step 2.1:
echo '<h1>Best Sellers</h1>';
do_shortcode('[best_selling_products limit="9" columns="3" class="b-sellers"]');
And what you get is this: 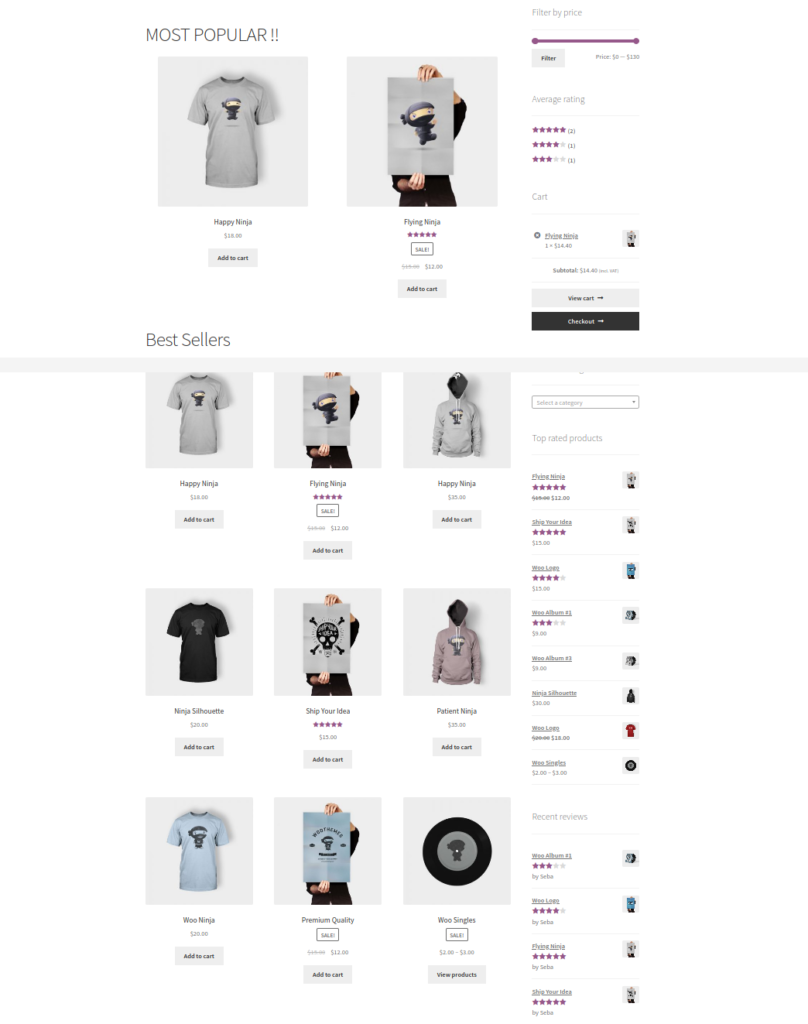 If you only want to add Best sellers instead of the Most popular products, just replace the
 echo line in 2.1 with the one in 2.2.
2.3 Top rated products
Now, let’s play some more with shortcodes and display top-rated products. This time, we’ll use a shortcode without more attributes than a class.
echo '<h1>Top Rated</h1>';
do_shortcode('[top_rated_products class="t-rated"]');
Let’s see what happens after this: 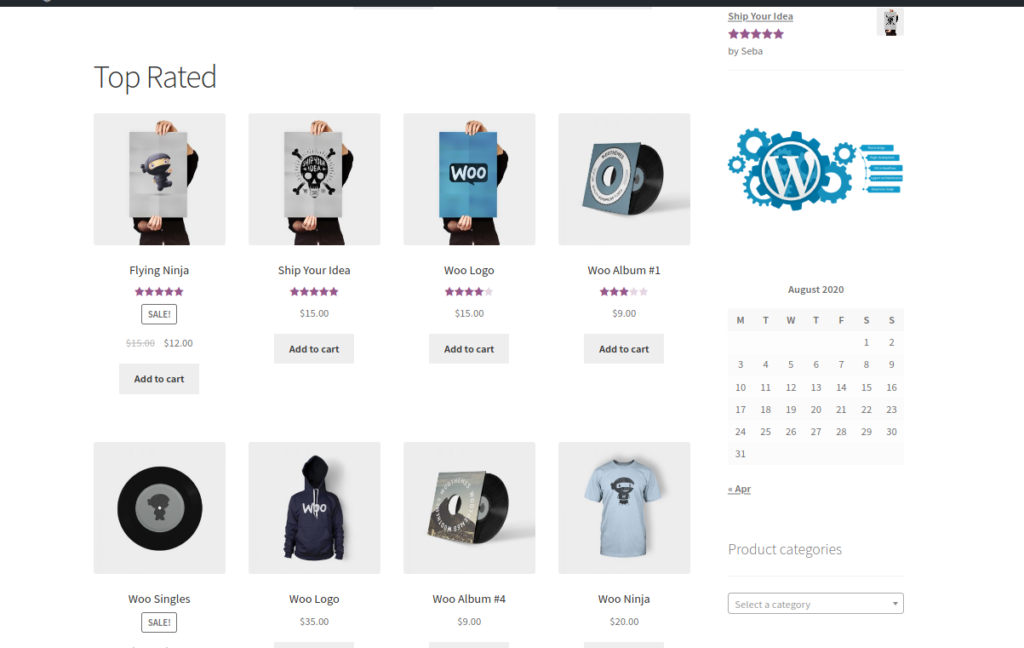 As you can see, the WooCommerce default layout has 4 columns. Let’s leave it like that for now, we’ll come back to it later.
2.4 Display products by taxonomies on the shop page
Apart from displaying best-selling or top-rated products, you can also display them by taxonomies. For example, the following code will print products for the Posters and Clothing categories, using the same attributes you used before but changing the number of columns to 5.
echo '<h1>Clothing taxonomy:</h1>';
do_shortcode('[products category="Clothing" columns="5" limit="10" class="t-clothing"]'); echo '<h1>Posters taxonomy:</h1>'; echo '<h2>Take the best posters to your wall</h2>'; do_shortcode('[products category="Posters" limit="4" class="t-posters"]');
And this is how your archive-product.php should look now:
<header class="woocommerce-products-header">
       <h1 class="woocommerce-products-header__title page-title"></h1>
</header>
<?php
if ( woocommerce_product_loop() ) {
	do_action( 'woocommerce_before_shop_loop' );

	echo '<h1>MOST POPULAR !!</h1>';
        do_shortcode('[products orderby="popularity" class="m-popular" columns="2" limit="2"]'); echo '<h1>Best Sellers</h1>'; do_shortcode('[best_selling_products limit="9" columns="3" class="b-sellers"]'); echo '<h1>Top Rated</h1>'; do_shortcode('[top_rated_products class="t-rated"]'); echo '<h1>Clothing taxonomy:</h1>'; do_shortcode('[products category="Clothing" columns="5" limit="10" class="t-clothing"]'); echo '<h1>Posters taxonomy:</h1>; echo '<h2>Take the best posters to your wall</h2>'; do_shortcode('[products category="Posters" columns="2" limit="4" class="t-posters"]'); do_action( 'woocommerce_after_shop_loop' ); } else { do_action( 'woocommerce_no_products_found' ); } do_action( 'woocommerce_after_main_content' ); do_action( 'woocommerce_sidebar' ); get_footer( 'shop' );
At this point, you should be able to understand how to use all the WooCommerce shortcodes and their attributes to build a custom shop page that can meet any design requirement.
2.5 Customize the WC shop page in functions.php
If you want to customize the WooCommerce shop page programmatically, you can also edit the functions.php file. For content outside the products loop, you can use some of the hooks seen in the archive-product.php file, running them from the functions.php file of the child theme. This way you make sure that your scripts will still work even if WC decides to update its templates files.
For this example, let’s add a custom header with a title, subtitle, description, and a banner. Paste this script in the functions.php file of the child theme:
add_action('woocommerce_before_shop_loop','shop_main_heading');
function shop_main_heading(){
	$content = '';
	$content.='<h1>Welcome to my fabulous shop page!</h1>';
	$content.='<h2>Built with love by myself</h2>';
	$content.='<p>Thanks for passing by and visiting my website shop page, please browse your most liked products and purchase all of them</p>';
	$content.='<img src="https://www.carpetright.co.uk/globalassets/static-pages/useful-links/samples/sample-banner.jpg"/>';
	echo $content;
}
This is how your shop page will look: 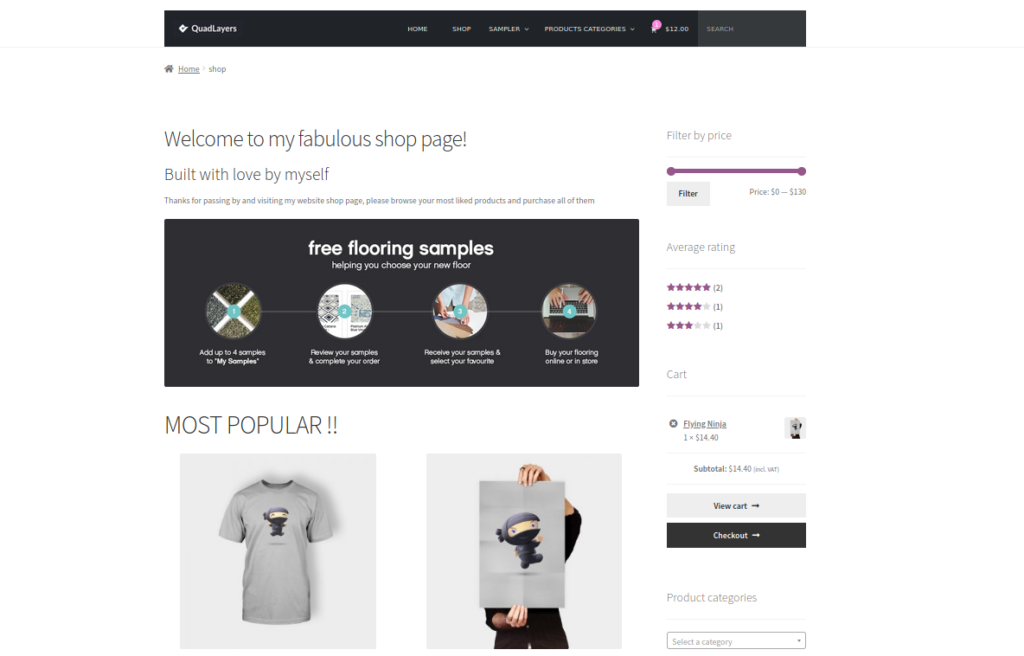 In the same way, you can use the
 woocommerce_after_shop_loop hook to display some content at the end of the shop page.
3. Edit the number of products per row & apply a CSS stylesheet to the WC shop page
By now, you should be able to display products, sort them by featured, taxonomies, best-selling, and any other way that you want using WooCommerce shortcodes. On top of that, you should be able to insert any kind of content in any place you want on your shop page. But what if you could go even further and take your shop page to the next level? You can edit the template layout and add some CSS styles to programmatically customize your WooCommerce shop page even more.
3.1 Edit default columns count per row
If you specify the column attribute of the WC shortcode, you can set the number of products each row will display. Additionally, you can set the total number of products for the shortcode with the limit attribute:
[product orderby=”popularity” columns=”3” limit=”3”]
However, if you don’t define the columns attribute, you can set the number of products that you want to print for each row using this script in the functions.php file of the child theme.
add_filter('loop_shop_columns', 'loop_columns', 999);
if (!function_exists('loop_columns')) {
    function loop_columns() {
        return 4 ;//4 products per row
    }
}
This will change the default number of products displayed per row only if there isn’t a column attribute in the WooCommerce shortcode.
3.2 Apply some CSS Styles to the shop page
To apply some CSS to the WooCommerce shop page, you can simply add your scripts in the template file like this:
<style>
* {
    background-color:#a2bcff;
}
</style>
This is ok for small pieces of CSS but it is not a recommended practice. To apply CSS Style the WordPress way, you need to use the wp_enqueue_scripts hook to load your scripts from a different file.
For this example, we are going to name this file shop_style.css and we’ll store it in our child theme main folder, at the same level of hierarchy as the default style.css file. After creating this file, paste the following script in your functions.php file:
add_action( 'wp_enqueue_scripts', 'quadlayers_enqueue_css' );
function quadlayers_enqueue_css(){
    if( is_shop() ) :
    wp_enqueue_style(  'checkout_style',
        get_stylesheet_directory_uri() . '/shop_style.css'
    );
    endif;
}
As you can see, the if(is_shop()): conditional is required to be true to enqueue the shop_style.css file. In this file, you will have all the style scripts that you want to apply only to the shop page. This is different from the style.css file in the child theme that will apply the scripts to the entire website frontend. For this guide, we will use the following shop_style.css file but feel free to use your CSS scripts or change this one:
div.storefront-sorting:nth-child(2){
	text-align:center;
}
#main div.storefront-sorting h1{
	font-style:normal;
}
#main h1,#main h2{
	font-weight:bolder;
	font-style: oblique;
	text-align:center;
}
#main > .m-popular,#main > .b-sellers,#main > .t-rated,#main > .t-clothing,#main > .t-posters{
	border: solid #b8b8b8 1px;
	border-radius: 25px;
	margin-bottom: 25px;
	padding-top: 35px;
	padding-left: 20px;
	padding-right: 20px;
}
#main > .m-popular{
	background-color:#dbad97;
}
#main > .b-sellers {
	background-color:#b4e6a3;
}
#main > .t-rated {
	background-color:#f0f695;
}
#main > .t-clothing {
	background-color:#95b4f6;
}
#main > .t-posters {
	background-color:#c88fe5;
}
In the CSS file, you will find some selectors that contain custom classes. We’ve created them before creating the shortcodes. For example, we’ve added the “b-sellers” class in the shortcode like this:
do_shortcode('[best_selling_products limit="9" columns="3" class="b-sellers"]');
So after adding the CSS Style to the WooCommerce shop page, you will get something like this (click the image to see it in full size): 
Click on the image to view it in full size.
Also, keep in mind that we have the StoreFront theme active and, as you may know, the CSS selectors can be different on each website even if they have the same theme. So to make this file work, you might need to edit the selectors for your specific site.
BONUS: How to change the number of products per page
Now, let’s say you want to change the number of products you display per page on the shop page. If you want to display 10 products per page for example, simply add the following code to the functions.php file:
add_filter( 'loop_shop_per_page', 'new_loop_shop_per_page', 20 );

function new_loop_shop_per_page( $cols ) {
  $cols = 10;
  return $cols;
}
Where $cols contains the number of products per page that takes the value from Options -> Reading and returns the number of products you want to display on each page.
4. Edit the loop files of the WooCommerce shop page
So far, we’ve seen how to edit the archive-product.php template file to customize the WooCommerce shop page programmatically. This file is where the WC loop runs to display all the products of the page. Now, open the WooCommerce plugin folder in the plugin editor or your IDE, and open the loop folder. You will find it at the same level as the archive-product.php file.
In the loop folder, you will find some files that you can also edit to customize the shop page even more. To overwrite this file, you need to create a cloned folder and file in your child theme. Create a new folder called loop below your previously created WooCommerce folder.
After this, copy the original sale-flash.php file from the plugin templates and paste it inside this loop folder in your child theme. 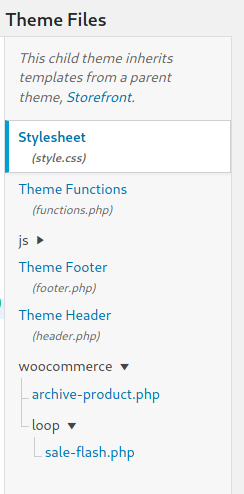 We’ll use the
 sale-flash.php file to add an animated gif to all the products that are on sale. If you have a look at the file, you will see that this is the script responsible for displaying the “SALE” message when a product is on sale.
4.1 Replace default “sale” text for an animated gif
In this section, we’ll show you how to disable the default on-sale message and replace it with an animated gif. You need to edit the flash-sale.php file of your child theme so it looks like this:
defined('ABSPATH') || exit;
global $post, $product;
if ( $product->is_on_sale() ) {
   $an_gif = '<img src="https://i1.wp.com/tamingchaos.net/wp-content/uploads/2020/04/Sale-Gif.gif" width="100px" height="60px"/>';
   echo $an_gif;
}
There you can replace the gif file with any other gif that you like.
4.2 Remove sorting options and pagination
Now, let’s have a look at how to disable the “sort by” selector and the pagination functionality on the WooCommerce shop page. Similar to what you’ve done with the sale-flash.php file, you can achieve this by simply saving an empty file with the same name.
Create both files in the loop folder and call them orderby.php and pagination.php. To completely disable both files, you should only put this script in each of the files:
defined('ABSPATH') || exit;
After doing this, you’ll have a cleaner header and footer on your shop page. On top of that, the pagination may not be very useful since you are displaying a large number of products. 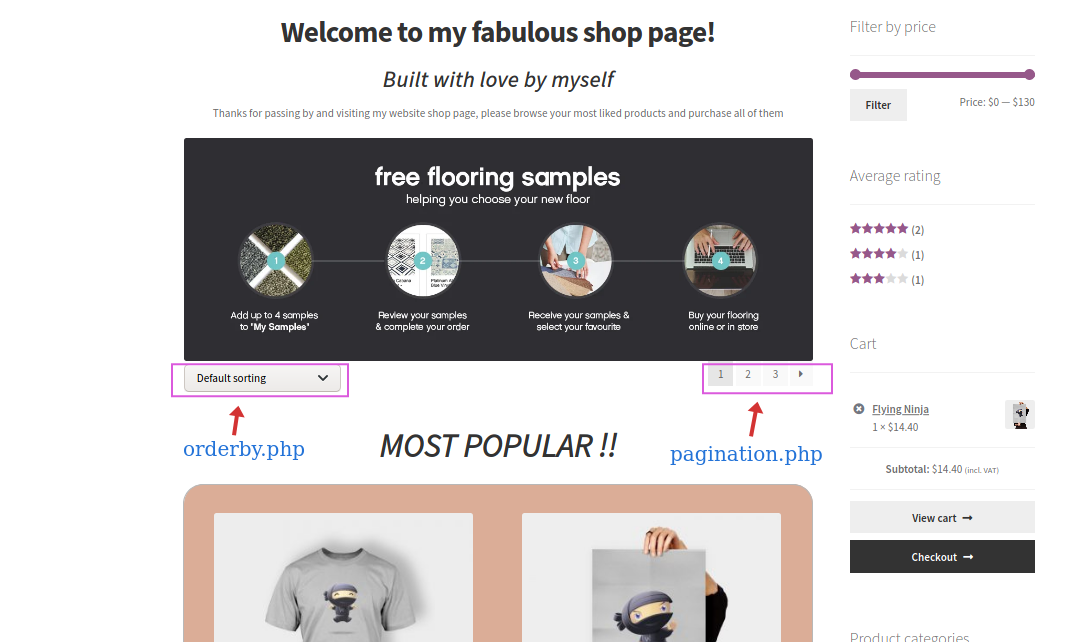 Note that in the
 sale-flash.php file, we’ve deleted the default WooCommerce behavior and added our own displaying an animated gif. This is a very basic task, but this technique offers a wide range of possibilities for advanced developers.
FINAL NOTES
- The WC template files of the child theme don’t prevent overwrites if WooCommerce decides to release an update of the templates. However, this rarely happens.
- These are sample scripts and must not be taken into production, they’re intended only for didactic purposes.
Bonus: Display Categories on the WooCommerce Shop Page
Finally, let’s see how you can add categories to the WooCommerce Shop Page using a bit of code. This method is recommended for users with coding skills. Apart from PHP, it’s recommended that you also know a bit of CSS to be able to style the code.
NOTE: Before starting, make sure you backup your site and create a child theme if you don’t have one already.
Add Categories to the Shop page
In your dashboard, go to Appearance > Theme Editor and open the child theme functions.php file. Click on the functions.php file on the right Theme Files sidebar and paste the following scripts to add your custom functions.
The below function will add your product categories before loading the other elements of your Shop page. This means that the shoppers will see all your product categories before the product catalog.
function product_subcategories( $args = array() ) {
$parentid = get_queried_object_id();

$args = array(
'parent' => $parentid
);

$terms = get_terms( 'product_cat', $args );

if ( $terms ) {
echo '<ul class="product-cats">';

foreach ( $terms as $term ) {
echo '<li class="category">';
woocommerce_subcategory_thumbnail( $term );
echo '<h2>';
echo '<a href="' . esc_url( get_term_link( $term ) ) . '" class="' . $term->slug . '">';
echo $term->name;
echo '</a>';
echo '</h2>';
echo '</li>';
}

echo '</ul>';
}

}

add_action( 'woocommerce_before_shop_loop', 'product_subcategories', 50 );
This function will add your Categories to the WooCommerce Shop page. However, keep in mind that they might not look exactly how you want, so you’ll have to style the new categories section with a bit of CSS. For more information about this, check out our post on how to display and style categories on the shop page.
Conclusion
All in all, the shop page is extremely important and can make or break your store. That’s why if you have coding skills, we recommend you edit the WooCommerce shop page programmatically and optimize it to increase your conversion rates.
In this guide, we’ve shown you how to add, remove, and customize different aspects of your store. However, these are just some examples and ideas that might help you find some inspiration and take your shop to the next level. Now it’s time for you to play around and develop your customizations.
For more guides to customize your WooCommerce store, we recommend you check out:
- WooCommerce AJAX add-to-cart
- How to add custom fields to the checkout page?
- WooCommerce add to cart function programmatically
Finally, if you want to connect Facebook Shop with WooCommerce, you should have a look at this complete guide. Have you customized your online store? What have you changed? If you have any questions, leave a comment below and we’ll do our best to help you out! You can also check out the full code in Github.

I’m really loving the theme/design of your blog.
Do you ever run ino any web browser compatibility problems?
A handful of my blog visitors have complained about my site not working correctly in Explorer but looks great in Firefox.
Do you have any ideas to help fix this issue?
Here iss my ebpage :: cpn apartment packages
Hi there
Yes, there might be some styling incompatibility between browsers.
Check this post : https://wpengine.com/resources/website-browser-compatibility/
hello mate, we recommend not offer internet explorer support, is a very old browser, kind regards
Thanks for sharing this very informative article. The way you explained it made this article really very interesting to read.
Thanks for sharing this very informative article
You’re welcome
Hi, is there something we can add to archive-product.php to make the shop page mobile responsive? Thanks.
Hi Edward, thanks for passing by
To make it responsive, you need to work on CSS using media querys.
You could build a completely hop page for responsive mode this way
Hi there,
So I edited the archive_product page as you can see below, and it works nicely to display products per category and category pages, unfortunately the Product search block doesn’t work, as it only displays all or none of the products. Any idea?
https://aypac.de/woocommerce/shop/
The original code is from here: https://gist.github.com/LWS-Web/bc8da3cba4d0d4071fd1b695d516835e
Here’s the code (header excluded):
‘product_cat’);
$product_categories = get_terms( $categories_args );
if ( is_admin() ) return false;
echo ”;
// now we are looping over each term
foreach ($product_categories as $product_category) {
$term_id = $product_category->term_id; // Term ID
$term_name = $product_category->name; // Term name
$term_desc = $product_category->description; // Term description
$term_link = get_term_link($product_category->slug, $product_category->taxonomy); // Term link
echo ”;
echo ”.$term_name.”;
$products_args = array(
‘post_type’ => ‘product’, // we want to get products
‘tax_query’ => array(
array(
‘taxonomy’ => ‘product_cat’,
‘field’ => ‘term_id’,
‘terms’ => $term_id,
),
),
);
$products = new WP_Query( $products_args );
if ( $products->have_posts() ) {
woocommerce_product_loop_start();
while ( $products->have_posts() ) : $products->the_post();
wc_get_template_part( ‘content’, ‘product’ );
endwhile;
woocommerce_product_loop_end();
wp_reset_postdata();
} else { do_action(‘woocommerce_no_products_found’); }
echo ”;
echo ”;
} else {
woocommerce_product_loop_start();
if ( wc_get_loop_prop( ‘total’ ) ) {
while ( have_posts() ) {
the_post();
do_action( ‘woocommerce_shop_loop’ );
wc_get_template_part( ‘content’, ‘product’ );
}
}
woocommerce_product_loop_end();
}
do_action( ‘woocommerce_after_shop_loop’ );
}
else { do_action( ‘woocommerce_no_products_found’ ); }
do_action( ‘woocommerce_after_main_content’ );
do_action( ‘woocommerce_sidebar’ );
get_footer( ‘shop’ );
How do we get filters work with the product shortcode we use in archive-products page. I am getting products by category like
So i want a filter sidebar with category options, price etc
does that work with the above shortcode?