
How to edit WooCommerce Thank You page programmatically
Do you want to customize the Thank you page on your store? In this guide, we’ll show you different ways to edit the WooCommerce Thank You page programmatically.
Why should you customize the WooCommerce Thank You page?
The Thank you page is the page users see after they complete an order. By default, it simply thanks the shoppers for their purchase and provides basic information about the order such as order number, items purchased, price, payment method, and so on. There’s nothing wrong with that but you can make much better use of this page.
The Thank You page is often overlooked but can be extremely powerful. Keep in mind that all your shoppers will see it after they place an order, so it’s a great opportunity to upsell or give useful information to your customers. By customizing the Thank You page, you can offer a much better after-purchase experience to your shoppers.
If someone sees your Thank You page it is because they’ve placed an order from your store. This means that they trust you (at least enough to buy from you). As you probably know, it’s much easier to sell to someone who has already bought from you than to new customers. Even though your main goal might not be to sell something, you can work to turn that shopper into a returning client.
For example, you can edit the Thank You page and add useful guides, referral links that users can share to get a reward, exclusive offers, discounts on future purchases, and more.
There are several ways in which you can customize the Thank You page to improve UX and make customers return to your store. In the following section, we’ll show you different methods to edit the WooCommerce Thank You page programmatically.
How to edit the WooCommerce Thank You page programmatically: 2 methods
There are two main ways to edit the Thank you page programmatically in WooCommerce:
- Using hooks
- Overwriting template files
Additionally, you can also combine both methods depending on each specific requirement.
Let’s have a closer look at both ways.
NOTE: As we’ll edit some core files, before you start we recommend you create a full backup of your site and install a child theme. If you’re not sure how to do it, check out this guide to create one or use any of these plugins.
1) Customize the Thank You page using hooks
To run WooCommerce hooks, we will work on the functions.php file of the child theme. We need this file to overwrite the one from the parent theme.
Some of the hooks that WooCommerce provides work on the Thank You page such as woocommerce_before_thankyou and woocommerce_thankyou. Additionally, you can edit the title and content with filter hooks such as woocommerce_endpoint_order-received_title and woocommerce_thankyou_order_received_text.
To use any of these hooks, you will trigger each of them by adding the following snippet to the functions.php file of the child theme:
add_action('woocommerce_before_thankyou','QuadLayers_before_thankyou');
function QuadLayers_before_thankyou(){
    echo "TEST";
}
Filter hooks work in a similar way, but they must return a value. The ‘woocommerce_before_thankyou’ filter hook will edit the title of the Thank You page as follows:
add_filter( 'woocommerce_endpoint_order-received_title', 'QuadLayers_thank_you_title' );
function QuadLayers_thank_you_title( $old_title ){
     return 'You\'re awesome!';
}
2) Edit Thank You page overwriting template files
Another way to edit the WooCommerce Thank You page programmatically is by overwriting template files. It’s worth noting that overwriting template files gives you a lot of flexibility, but when you overwrite a template file, the hooks that work on that file won’t work anymore.
To overwrite template files, you need to copy the thankyou.php file located in the WC plugin templates folder and paste the file with the same name in the WooCommerce folder of your child theme including the checkout sub-folder as follows:
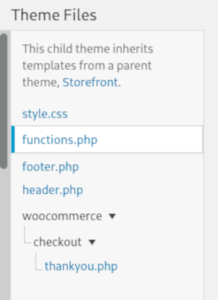
To learn more about how to customize template files in WooCommerce, check out this guide.
After that, you’ll be able to freely edit the thankyou.php file of your child theme and overwrite the default one.
Sample scripts to edit the WooCommerce Thank You Page programmatically
In this section, we’ll show you different scripts that you can use to edit your WooCommerce Thank You page programmatically. For this tutorial, we’ll use the Storefront theme, so it might look a bit different if you use a different theme.
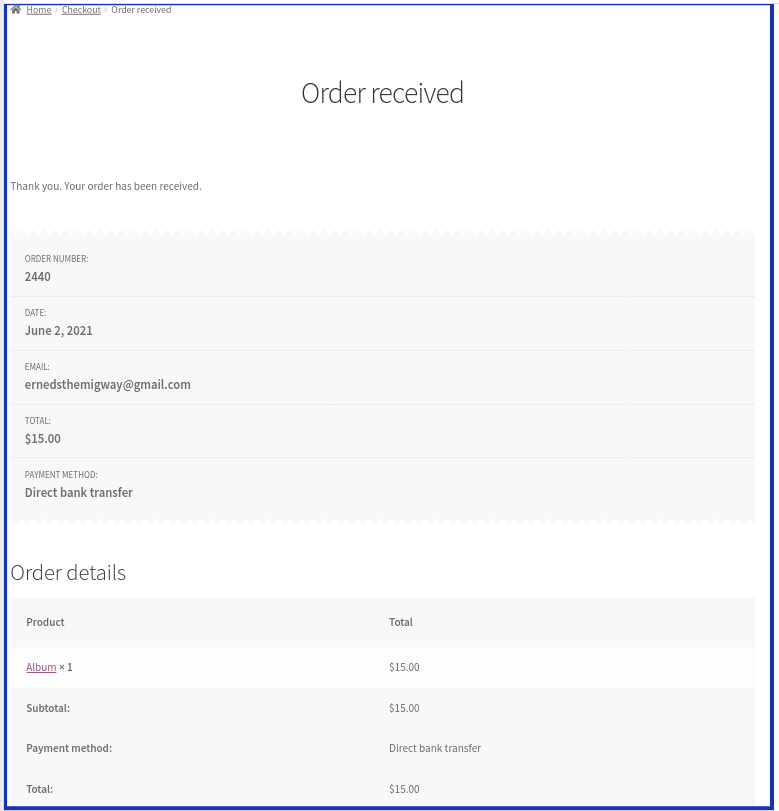
This is how the default Thank You page in WooCommerce looks:
1) Add custom content to the Thank You page
As seen before, we can use WooCommerce hooks to add a custom title. This time we’ll add more useful content, so customers can follow us on social media.
Paste the following code on the functions.php file of your child theme:
add_filter( 'woocommerce_endpoint_order-received_title', 'QuadLayers_thank_you_title' );
function QuadLayers_thank_you_title( $old_title ){
     return 'You\'re awesome!';
}
add_filter( 'woocommerce_thankyou_order_received_text', 'QuadLayers_thank_you_details', 20, 2 );
function QuadLayers_thank_you_details( $thank_you_title, $order ){
    $str= '<h3><b>Oh ' . $order->get_billing_first_name() . '</b>, thank you so much for your order!</h3>';
    $str.='<p>We will get in touch with you shortly to deliver your purchase.</p>';
    $str.='<p>Stay tuned to get latest announcements and follow us on our social media profiles</p>>';
    $str.= '<div><div><a href="#twitter.com"><img src="https://upload.wikimedia.org/wikipedia/commons/c/ce/Twitter_Logo.png" /></a></div>';
    $str.='<div><a href="#facebook.com"><img src="https://upload.wikimedia.org/wikipedia/commons/5/51/Facebook_f_logo_%282019%29.svg" /></a></div>';
    $str.='<div><a href="#instagram.com"><img src="https://cdn2.iconfinder.com/data/icons/social-media-2285/512/1_Instagram_colored_svg_1-512.png" /></a></div></div>';
   $str.='<p>Here is all information about your order. Cheers!</p>';
    return $str;
}
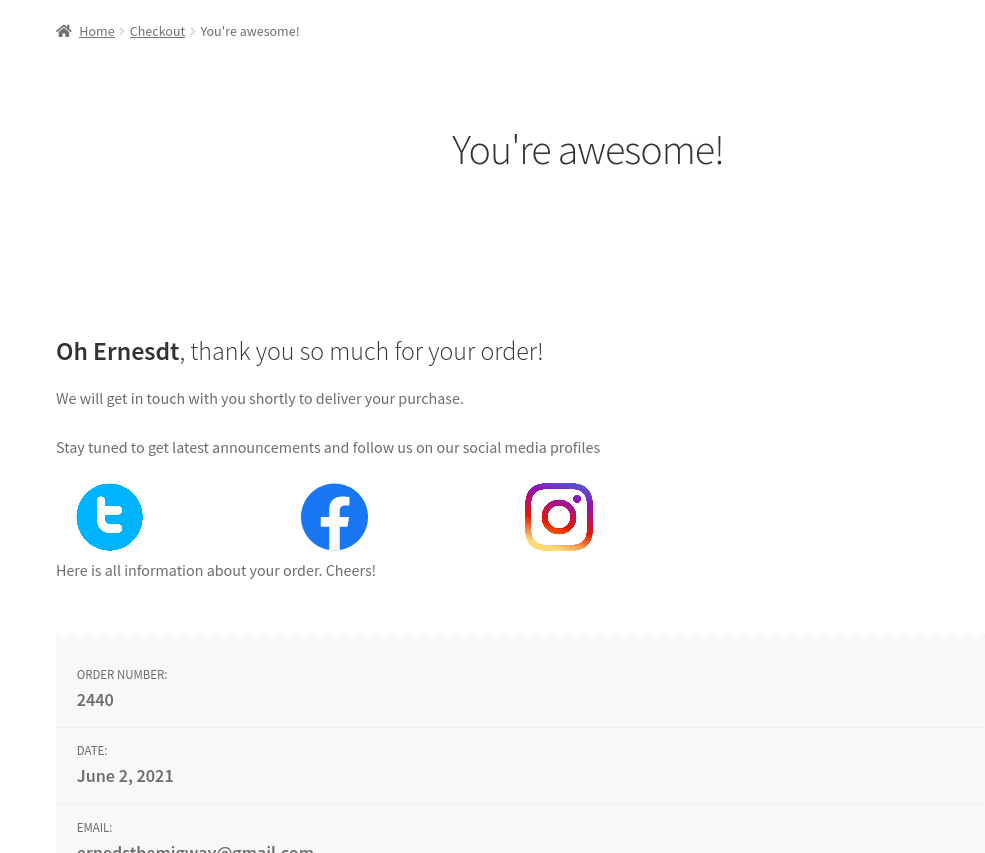
Remember to replace the image URLs with your own website URL path. On top of that, you need to insert backlinks to your social media profiles, so when users click on the link, they will become followers.
This will be the result:
2) Display product information on the Thank You page
Another interesting alternative is to display other products, so customers can buy other items they’re interested in. To display specific products, you can use WooCommerce shortcodes like this:
add_action( 'woocommerce_thankyou', 'QuadLayers_thankyou_page', 10, 2 );
function QuadLayers_thankyou_page(){
   $sh = '<h4>You might want to check these other products. </h4>';
  $sh .='<div class="tx_account">'.do_shortcode('').'</div>';
    echo $sh;
}
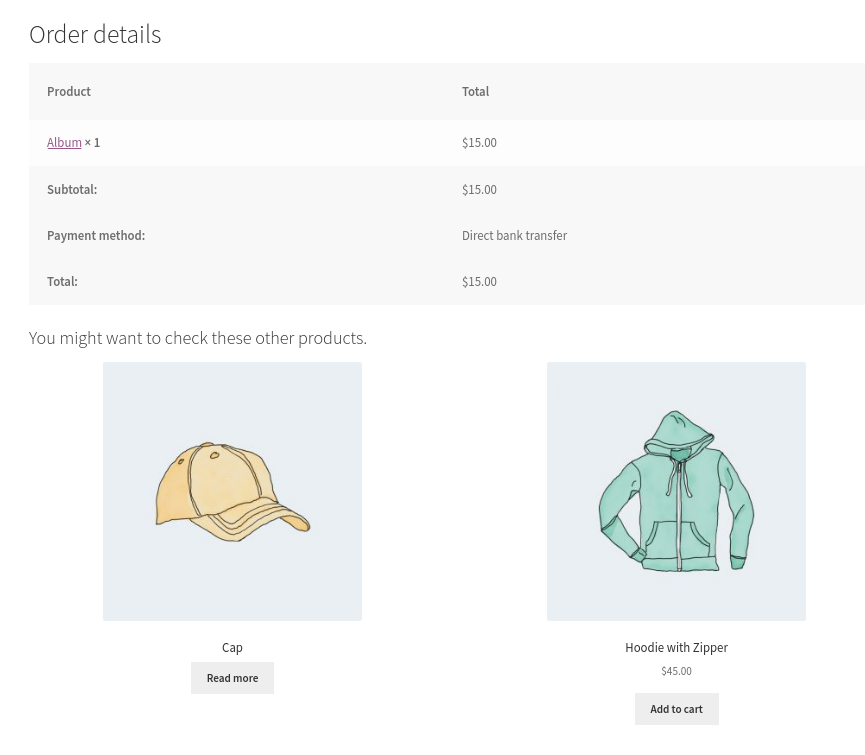
Here we are using the product shortcode to display featured products and the result is this:
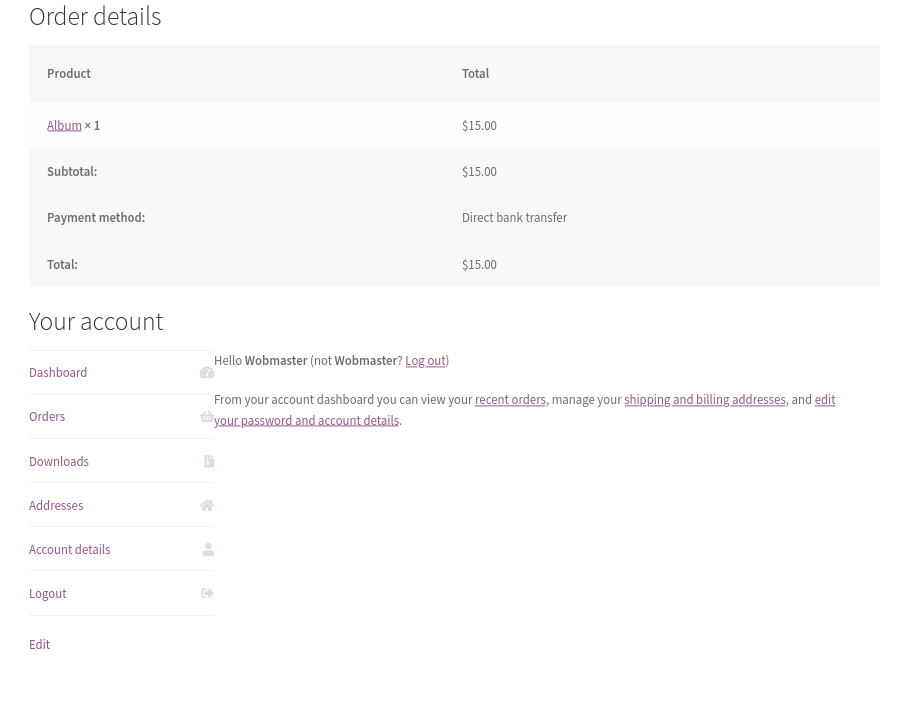
3) Show account details on the Thank you page
Similarly, we can attach details of the user’s account and display useful tabs with their orders, address, account information, and more.
add_action( 'woocommerce_thankyou', 'QuadLayers_thankyou_page', 10, 2 );
function QuadLayers_thankyou_page(){
   $sh = "<h2>Your account</h2>";
   $sh .='<div class="tx_account">'.do_shortcode('[woocommerce_my_account]').'</div>'; echo $sh; }
After pasting this on functions.php file, your Thank You page should look like this:
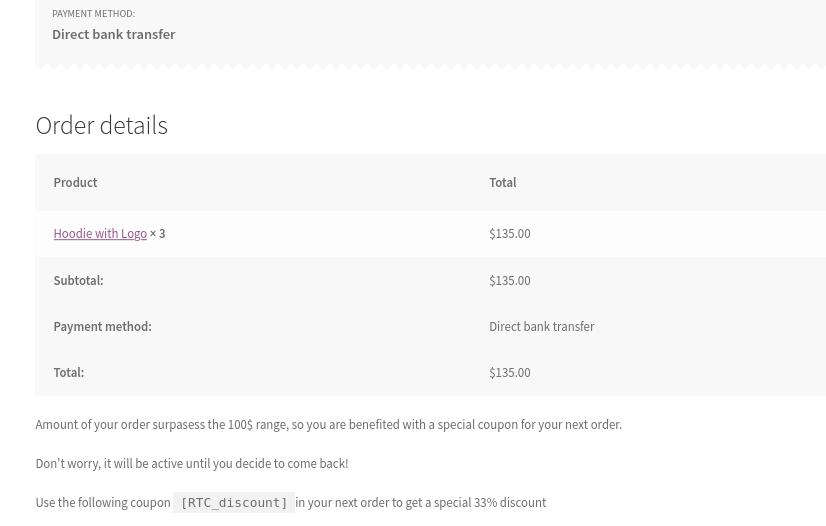
4) Give coupons when purchases exceed a certain total price
Customizing the Thank You page can be a great way to turn an occasional shopper into a loyal customer. Discount coupons for future purchases are an excellent way to achieve this.
The following script will add a text at the end of Thank You page when the order total price is higher than $100.
add_action( 'woocommerce_thankyou', 'QuadLayers_thankyou_order', 10, 2 );
function QuadLayers_thankyou_order($order_id){
    $order = wc_get_order( $order_id );
    $total=0;
    foreach ($order->get_items() as $item_key => $item ):
        $item_data=$item->get_data();
        $item_total=intval($item_data['total']);
        $total+=$item_total;
    endforeach;
    if($total>100):
        echo "<p>Amount of your order surpasess the 100$ range, so you are benefited with a special coupon for your next order.</p><p> Don't worry, it will be active until you decide to come back!</p><p> Use the following coupon <code>[RTC_discount]</code>in your next order to get a special 33% discount</p>";
    endif;
}
In this example, we chose $100 but make sure you adjust the value in line 8 – if($total>100): – to something that makes sense for your business.
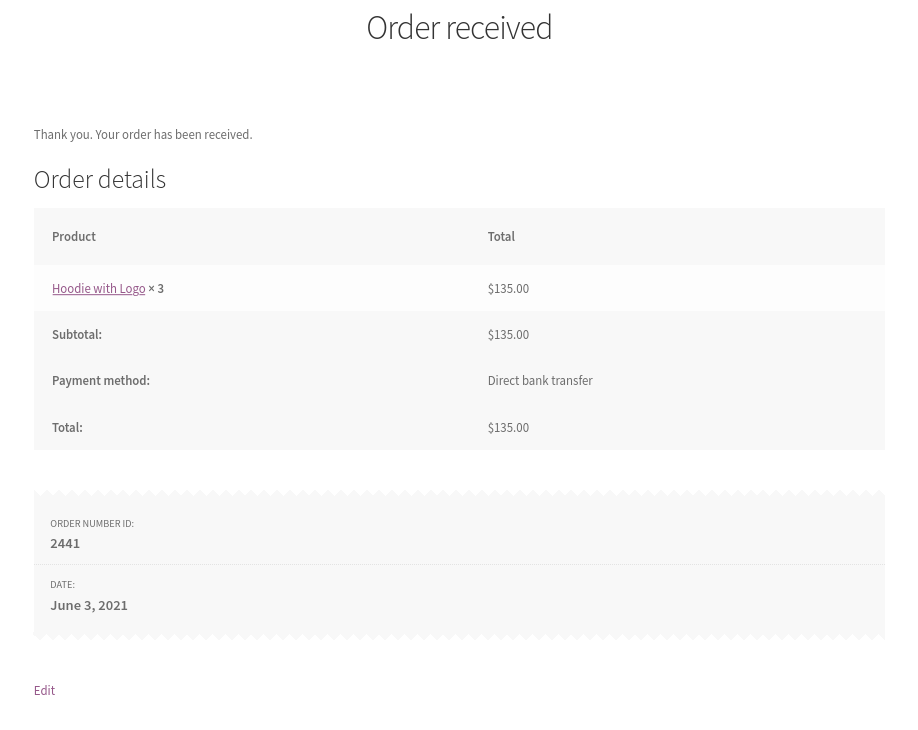
5) Remove and edit order details on the Thank You page
Now let’s have a look at a more complex example and make some changes to the WooCommerce thankyou.php template file. If you’re not familiar with editing template files, you can have a look at this guide.
In the following example, we will remove the email, total amount, and payment method from the order page, since they are also displayed on the order details. This means that we are only going to leave the order ID number and the date of the order.
At the same time, we have moved the order details list to the top and edited the labels.
To do this, create a thankyou.php file on your child theme as explained in the previous section and paste the following code in it:
<?php defined( 'ABSPATH' ) || exit;?>
<div class="woocommerce-order">
<?php  if ( $order ): do_action( 'woocommerce_before_thankyou', $order->get_id() );  ?>     <?php if ( $order->has_status( 'failed' ) ) : ?>
<p class="woocommerce-notice woocommerce-notice--error woocommerce-thankyou-order-failed"><?php esc_html_e( 'Unfortunately your order cannot be processed as the originating bank/merchant has declined your transaction. Please attempt your purchase again.', 'woocommerce' ); ?></p>
<p class="woocommerce-notice woocommerce-notice--error woocommerce-thankyou-order-failed-actions"><a href="<?php echo esc_url( $order->get_checkout_payment_url() ); ?>" class="button pay"><?php esc_html_e( 'Pay', 'woocommerce' ); ?></a><?php if ( is_user_logged_in() ) : ?><a href="<?php echo esc_url( wc_get_page_permalink( 'myaccount' ) ); ?>" class="button pay"><?php esc_html_e( 'My account', 'woocommerce' ); ?></a><?php endif; ?></p>
<?php else : ?>
<p class="woocommerce-notice woocommerce-notice--success woocommerce-thankyou-order-received"><?php echo apply_filters( 'woocommerce_thankyou_order_received_text', esc_html__( 'Thank you. Your order has been received.', 'woocommerce' ), $order ); ></p>
<?php  do_action( 'woocommerce_thankyou', $order->get_id() ); ?>
<ul class="woocommerce-order-overview woocommerce-thankyou-order-details order_details">
<li class="woocommerce-order-overview__order order"><?php esc_html_e( 'Order number ID:', 'woocommerce' ); ><strong><?php echo $order->get_order_number(); // phpcs:ignore WordPress.Security.EscapeOutput.OutputNotEscaped ?></strong></li>
<li class="woocommerce-order-overview__date date"><?php esc_html_e( 'Date:', 'woocommerce' ); ?><strong><?php echo wc_format_datetime( $order->get_date_created() ); ></strong></li>
</ul>
<?php endif; ?>
<?php else : ?><p class="woocommerce-notice woocommerce-notice--success woocommerce-thankyou-order-received"><?php echo apply_filters( 'woocommerce_thankyou_order_received_text', esc_html__( 'Thank you. Your order has been received.', 'woocommerce' ), null );>
</p><?php endif; ?>
</div>
If everything went well, you should see something like this:
Conclusion
All in all, the Thank You page is often overlooked but it can have a great impact on your business. By adding referral links, exclusive offers, and discounts for future purchases, you can increase your sales and boost the number of returning customers.
In this guide, we’ve seen two ways to edit the WooCommerce Thank You page programmatically:
- With hooks
- Overwriting template files
Both methods are effective and can work in different situations, so choose the one that best suits your specific requirements.
By now you should be able to customize your Thank You page and:
- Add custom content such as social media links
- Display products
- Show account details
- Give discounts when the customer reaches a certain minimum spend
- Remove and edit order details
Finally, note that the same hooks defined on the WooCommerce template files are the ones you can use on the functions.php file of the child theme. So if you remove the hooks from the template file, they will stop working on your website.
For more guides to customize your store, have a look at:
- How to customize the Shop Page in WooCommerce
- Edit the WooCommerce Product Page programmatically
- How to customize the WooCommerce My Account Page
Have you customized your Thank You page? Which method did you use? Let us know in the comments section below!
