How to Enable Maintenance Mode in WordPress: A Step-by-Step Guide
Do you need to enable maintenance mode in WordPress? Whether you’re rebranding your WordPress site, troubleshooting an error, or making a substantial update to an existing page, you may need to put your site into maintenance mode because a faulty or half-built site hardly screams professionalism.
But you can lose your substantial audience if you don’t put your WordPress site into maintenance mode before making changes. Therefore, it’s always better to let your visitors know what’s going on by displaying a user-friendly notice and when your WordPress site will be back. So in this guide, I will walk you through the process of enabling maintenance mode on your website.
Besides that, I will also explain why to set and customize a WordPress site into maintenance mode.
What is Maintenance Mode?
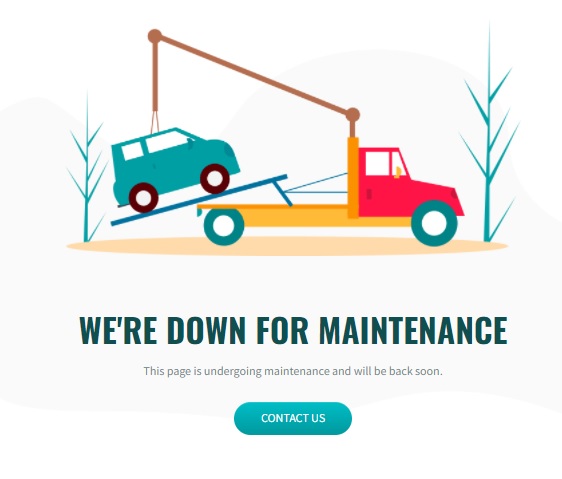
When you put your WordPress website in maintenance mode, it will be unavailable so that you can work on it while the site is down. Visitors will be able to see what is going on while you are working because of a pleasant notice posted nearby.
If customers arrive at your website and find it to be broken, they will believe you have been hacked or that anything has gone tragically wrong. It is customary to create a single page or an alert message explaining that the website will be unavailable for maintenance.
Have you ever seen anything like this before?
Let me help you out with how you can enable maintenance mode for your WordPress Site.
Why and When is it necessary to Enable maintenance mode in WordPress?
There is a multitude of reasons to enable maintenance mode on your WordPress website. It may include a complete redesign, installation of new plugins, and customization or updating of themes to your company’s preferences.
It’s best to do these upgrades and maintenance behind closed doors. If there are problems with the update, you’ll end up with a broken website. Therefore, you should go offline before making any major changes to your website to prevent making a bad impression on your website visitors. Another important instance in which maintenance mode can be used is while your website is in the process of being built, and you can use a Coming Soon message to keep potential visitors interested.
However, a maintenance mode isn’t required for all website problems. Minor upgrades to your site’s overall functionality, such as managing or publishing new content, uploading an image, upgrading simple plugins, addressing a minor bug, or changing blog content, will have no major effect on your site’s front end. As a result, doing them while the site is up and running is safe and your traffic and visitors would not be disrupted. That being said, not all updates are as straightforward as clicking the “update now” button without any problem with your website.
Enabling the maintenance mode is all that you need to know for all complex updates and tweaks.
Benefits of Enabling Maintenance Mode in WordPress
Additionally, there are a few other bonus benefits of using maintenance mode. I have enlisted the most important one underneath.
Promote Website through “Coming Soon Page”
It is also possible to use the WordPress maintenance mode to notify or advertise a currently under construction website.
While you’re working on the site, you can use the same WordPress plugins to display a “Coming Soon” landing page to keep visitors informed about the progress of the business. Once the site is complete for welcoming the visitors to your newly designed website, just turn off the maintenance mode.
Enhances Brand’s Professionalism and Legitimacy
A defective website screams unprofessionalism, negatively impacts website traffic, lowers conversion rates, and jeopardizes the brand’s credibility.
To avoid such a problem, WordPress offers a wide range of maintenance modes or under-construction plugins that may be customized to match the website design.
This professional method of enabling maintenance mode keeps consumers informed and enhances customer satisfaction.
Avoids Security Breaches and Risks
WordPress maintenance mode can also protect your website visitors’ information, which is crucial if you’re trying to fix security issues. Putting it on maintenance mode is the wisest option rather than jeopardizing visitors’ safety by exposing them to a dangerous link.
How to Enable Maintenance Mode in WordPress
WordPress doesn’t let you put your website on maintenance mode by default. Therefore, the best way to enable a maintenance mode in WordPress is by using a plugin as they help in increasing the functionality of your website.
You can easily make use of a WordPress maintenance plugin to include something more intriguing and engaging to your website. Not only that, but it will also allow you to include important information. For example, you can provide contact information, share insights into what’s to come or even urge interested clients to fill out a brief form relating to their inquiries on your website on the maintenance page.
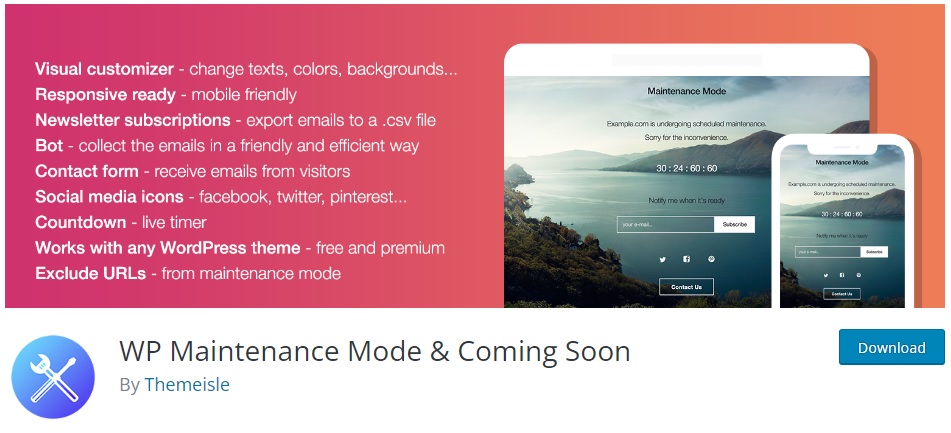
In this demonstration, we will be using the WP Maintenance Mode & Coming Soon plugin. It is very easy to use and comes with tons of features that can be helpful to customize your maintenance page. Furthermore, you can even add a number of forms, social media icons, and so on to increase engagement with your visitors.
But to start using the plugin, you have to install and activate it first.
Step 1: Install and Activate the Plugin
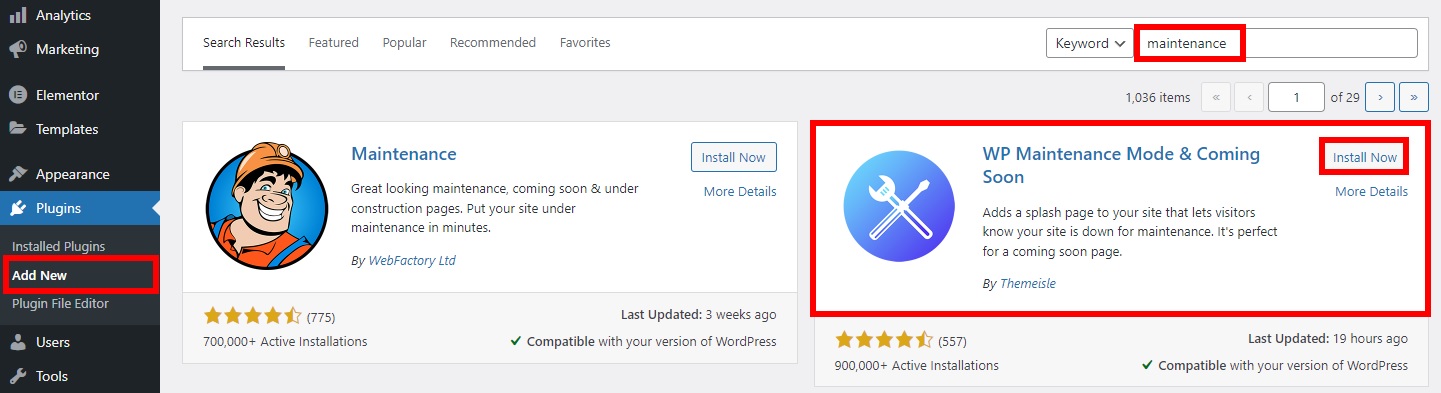
To install the plugin, login to your WordPress Admin Dashboard, and go to Plugins > Add New. After that, enter the keywords for the plugin in the search bar at the top-right of the screen.
Then, click on Install Now for the plugin after it is displayed in the search results. The plugin will be installed in a while.
After the plugin is installed, Activate it as well. Then, you can start configuring the settings of the plugin to enable maintenance mode on your WordPress website.
However, you have to install the plugin manually if it’s not included in the official WordPress plugin repository.
Step 2: Configure the Plugin Settings for Maintenance Mode
After activating the plugin, go to Settings > WP Maintenance Mode to make any necessary changes to the plugin’s configuration.
The Settings page has five tabs: General, Design, Modules, Manage Bot, and GDPR.
Let’s take a deeper look at each of these tabs.
2.1. General Settings
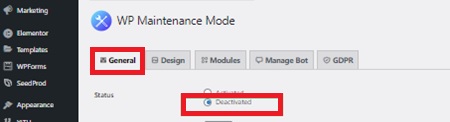
The General tab consists of all the default settings of the plugin. Here, the first option that you’ll see is Status which is set to Deactivated by default. In order to enable your WordPress website into maintenance mode, you must first set it to the Activated status.
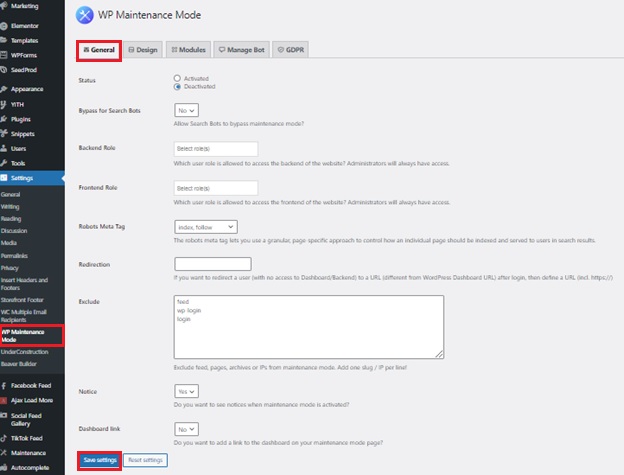
If you want search engines to be able to see your website when it is in maintenance mode, click the ‘Bypass for Search Bots’ option to Yes.
The next two entries are the Back end Role and Front end Role. You can select which user roles have access to the back-end while the website is in maintenance mode. If you do not see this option, only the Administrator will be able to update it.
Furthermore, you can also find some more settings in here for redirections, notice, and outbound links. Once you make all the necessary changes, make sure that you save the settings.
2.2. Design
Next, you can open the Design tab, which allows you to change the visual appearance of your maintenance page.
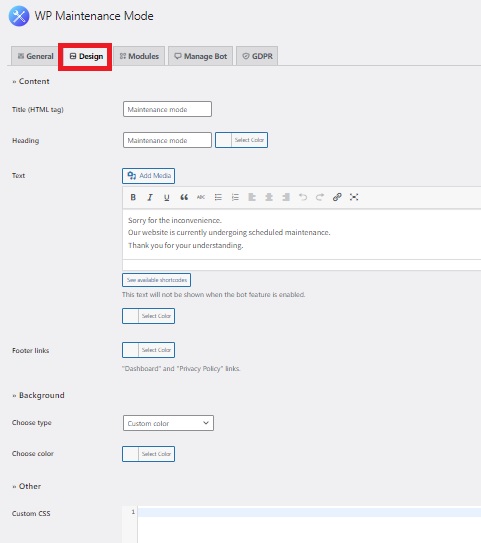
Go to the Title (HTML tag) section and type in your title to start making a splash page. Then, input the Heading and Text to personalize the maintenance notice that will appear on the screen in the appropriate fields. Similarly, you can even add footer links to your maintenance page from here.
After that, you can customize the background color of the page according to your preference as well. Another option is to utilize a custom background image to improve the page’s visual appearance.
Finally, you can even add Custom CSS to your WordPress maintenance page after you enable it. This can be helpful if you want to make any visual changes to the page that is not included with the plugin.
2.3. Modules
It is possible to configure the countdown timer in the Modules section. You have the option of choosing the start time as well as the duration of the timer. This is an excellent feature because it allows your customers to be notified when your website is back online.
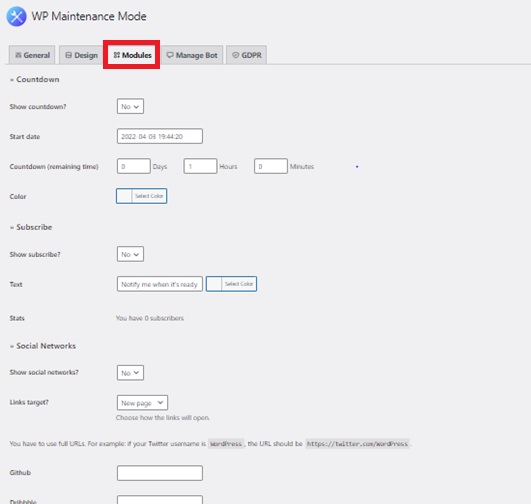
The next portion of the Modules tab is dedicated to subscription options. Here, you can select the option to show the subscribe button. You can also add some additional text to it and see the stats for the total subscriptions through the maintenance page.
The final section is concerned with linking your social media accounts to the maintenance page of your WordPress website. Insert the link to your social media account into the corresponding box, and the plugin will display the social media icons on the maintenance page.
2.4. Manage Bot
In the manage bot area, you may create conversation questions for subscribers and friendly inquiries about their email addresses. You can generate leads by having a bot communicate with users who land on your maintenance page through it. Hence, customized messages can be configured under the Manage Bot tab.
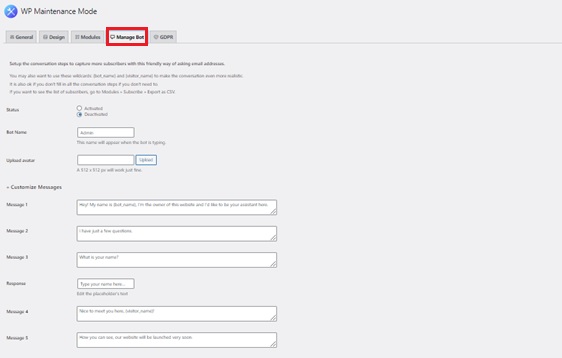
For that, you can create an interactive subscription form to encourage new subscribers to join your mailing list. On the surface, the idea is that when a user visits the maintenance mode page, they will be able to engage in dialogue with a bot.
A total of 10 personalized messages and 4 response options are available. By employing this method, you can collect the names and email addresses of the users.
2.5. GDPR
This tab contains the GDPR compliance settings. If you are collecting information via the splash page’s subscription form, you must configure this.
To proceed, you must first activate the GDPR status, located under this tab. Then connect the Privacy Page and create acceptance checkboxes for the contact form and the subscription form.
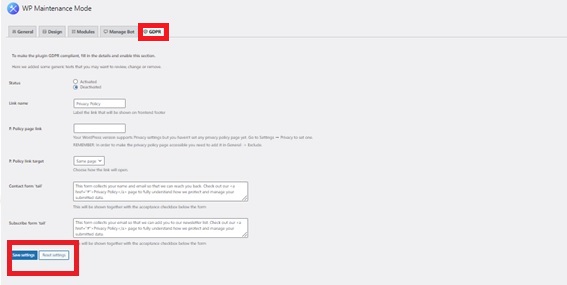
If you haven’t previously set a privacy page, go to Settings > Privacy to create a Privacy Page.
Upon completing the GDPR configuration, click Save settings to make your maintenance mode ready for use.
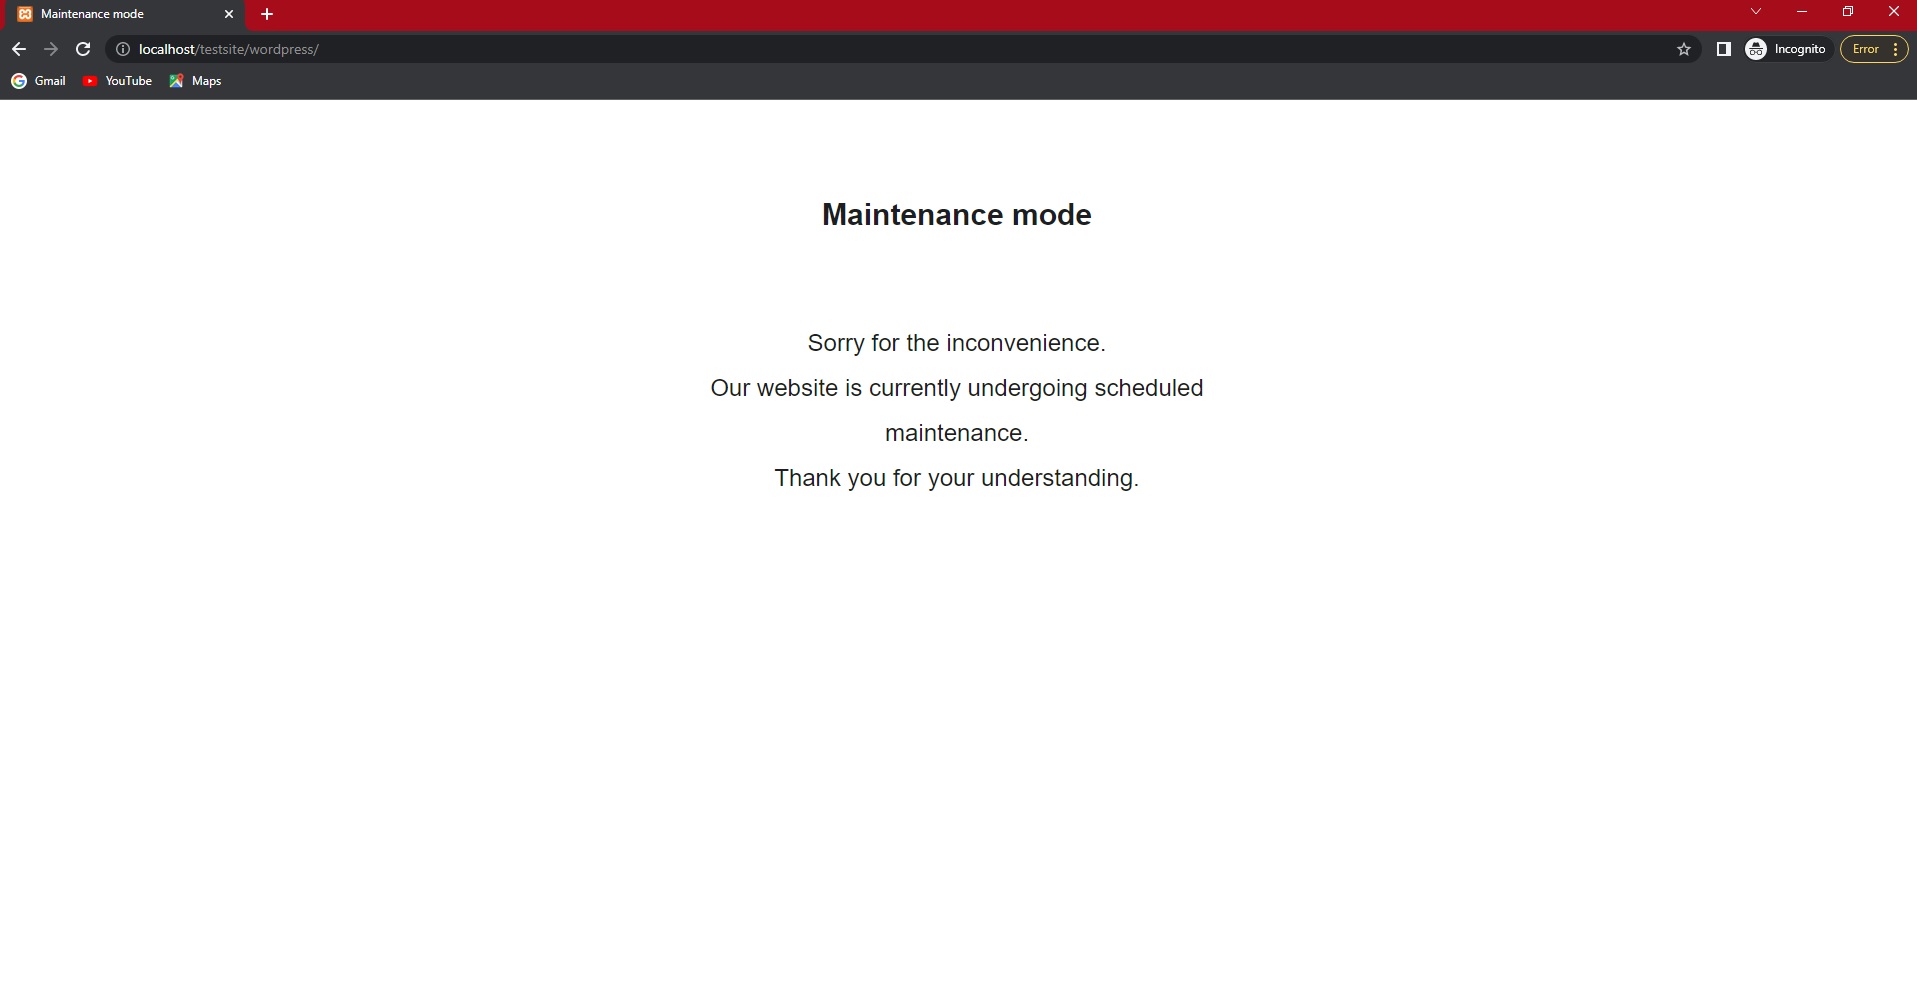
You will be able to seeyour new maintenance page once you preview your website. Make sure you logout from your WordPress dashboard or use a incognito tab. This is because, the admin user won’t be able to see the maintenance page since it needs to make changes to the website.
Turning off the Maintenance Mode
Once you enable the maintenance mode in your WordPress website, you’ll make certain changes to it. After you’ve completed making the necessary edits to the website, you’ll need to turn off the maintenance mode to let your visitors know that the site is ready for them.
If so, you can easily turn off the maintenance mode with the plugin. All you need to do is go to Settings > WP Maintenance Mode once again and select the Deactivate option under the General tab.
That’s it! Your website is now ready to use for your website visitors and is fully functional.
Conclusion
So this is how you can enable maintenance mode on your WordPress website. Setting your website for maintenance mode is a must when you want to make any major changes in it. This can also be a great way to notify your website visitors that your site is currently going through customizations.
To summarize, the best way to put your website on maintenance mode is by using a plugin. All you have to do is install and activate the plugin and make necessary changes to it so that you can enable maintenance mode in your website according to its preferences.
Similarly, you can also add a coming soon page to your website. If you need help regarding it, we have a detailed guide on how to create a coming soon page along with a list of some of the best coming soon page plugins.
So, which of the plugins mentioned above will you choose to update your website?
Meanwhile, here are some more helpful tutorials to customize your WordPress website from our QuadLayers blog.

Thanks buddy
I was struggling to find the solution. finally, got it. Helpful content so far.