How to Fix the Missed Schedule Error in WordPress
Having issues when scheduling posts on your site? We’ve got you covered. In this guide, we will show you different ways to fix the missed schedule error in WordPress.
What’s the WordPress Missed Schedule Error?
The WordPress post editor comes with a lot of features. One of the most interesting ones is the possibility to schedule the publication of an article. You can select a specific date and time and the post will be published automatically. This is extremely useful when you publish content often and allows you to manage the publications with ease. However, WordPress sometimes misses the schedules and doesn’t publish those articles.
Now let’s understand why that happens. WordPress uses a feature called cron job for repetitive tasks such as checking for theme and plugin updates, publishing scheduled posts, deleting post revisions, removing the spam comments, and so on. If WordPress fails to publish scheduled posts, it means that the cron job isn’t working properly.
WordPress uses a dedicated function called WP_Cron to handle Cron jobs. Unless you are on a dedicated server or use enterprise-level hosting, hosting companies usually don’t allow you to modify the server-level settings. So WordPress will only check for the pending tasks (cron job tasks) when a user lands on your website. The problem is that WordPress can’t complete those tasks if you don’t receive any visits on your site and have pending tasks. When this happens, it will likely cause the missed schedule error.
Additionally, even if you have regular visitors, the WordPress missed schedule error may also occur when there’s a conflict with the cron processes. Caching plugins can interference with the cron tasks and cause the scheduling feature to fail.
Now that we better understand what it is and the main causes, let’s explore different options to fix the missed schedule error.
How to Fix the Missed Schedule Error in WordPress
There are several ways to fix the WordPress missed schedule error:
- Check the wp-config.php file
- Update the timezone settings
- Clear the WordPress cache
- Clear the browser cache
- Increase the WordPress memory limit
- Use a dedicated WordPress plugin
- Modify the cron job
- Contact your hosting company
Let’s have a closer look at each method below, so you can pick the most appropriate one for you.
NOTE: As some methods require editing some WordPress core files, we recommend creating a complete backup of your site before moving forward. If you aren’t sure how to do it, you can follow this step-by-step guide on generating backups.
1) Check the wp-config.php file
Sometimes, your hosting service may limit the use of cron executions and cause the missed schedule error. By inspecting the wp-config.php file, you can verify if that’s the case.
To do this, you need to use an FTP client or a dedicated file manager plugin. For this tutorial, we will use the File Manager plugin for file modifications. If you are comfortable with an FTP client such as FileZilla, you can move forward with it.
First, go to the WordPress installation directory, right-click on the wp-config.php file, and select the Code Editor option.

Then, look for this line of code in the file:
define (‘DISABLE_WP_CRON’, true);
This line of code disables the WP_Cron feature sitewide, so it may be causing the scheduling feature to fail. The easiest way to look for it is to use use the browser’s inbuilt search feature pressing Ctrl + F or Cmd + F on Mac.
If you can’t find the code, it means that the WP_Cron feature isn’t disabled in your installation. On the other hand, if you find the code in the wp-config.php file, it means that the function is disabled. Simply remove the code and update the file to enable the function.

That’s it! This way, you can check the wp-config.php file and make sure that the cron isn’t disabled.
If that wasn’t causing the issue, continue with the next method.
2) Update Timezone Settings
When you schedule a post or page, you have to select a certain publishing date and time. The date and time are determined by the timezone you use in your WordPress installation.
To update the timezone you use, go to Settings > General in your WordPress dashboard. There, you can select a timezone for your website either by selecting a city or UTC. Keep in mind that this is the timezone WordPress will use across your site.
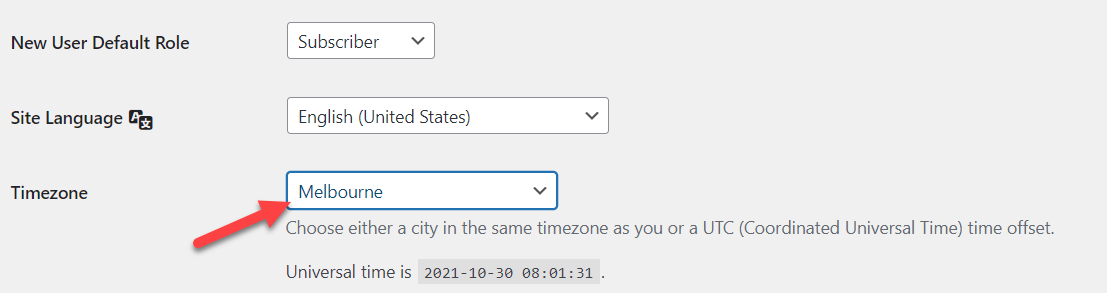
When you’re done, remember to save the changes.
3) Clear your browser cache
Another quick solution is to clear your browser cache. This process depends on the browser you use but it’s similar for most browsers. In this demonstration, we’ll show you how to do it using Chrome.
Open Chrome, press the three-dot icon on the top right, and go to More Tools > Clear Browsing Data.
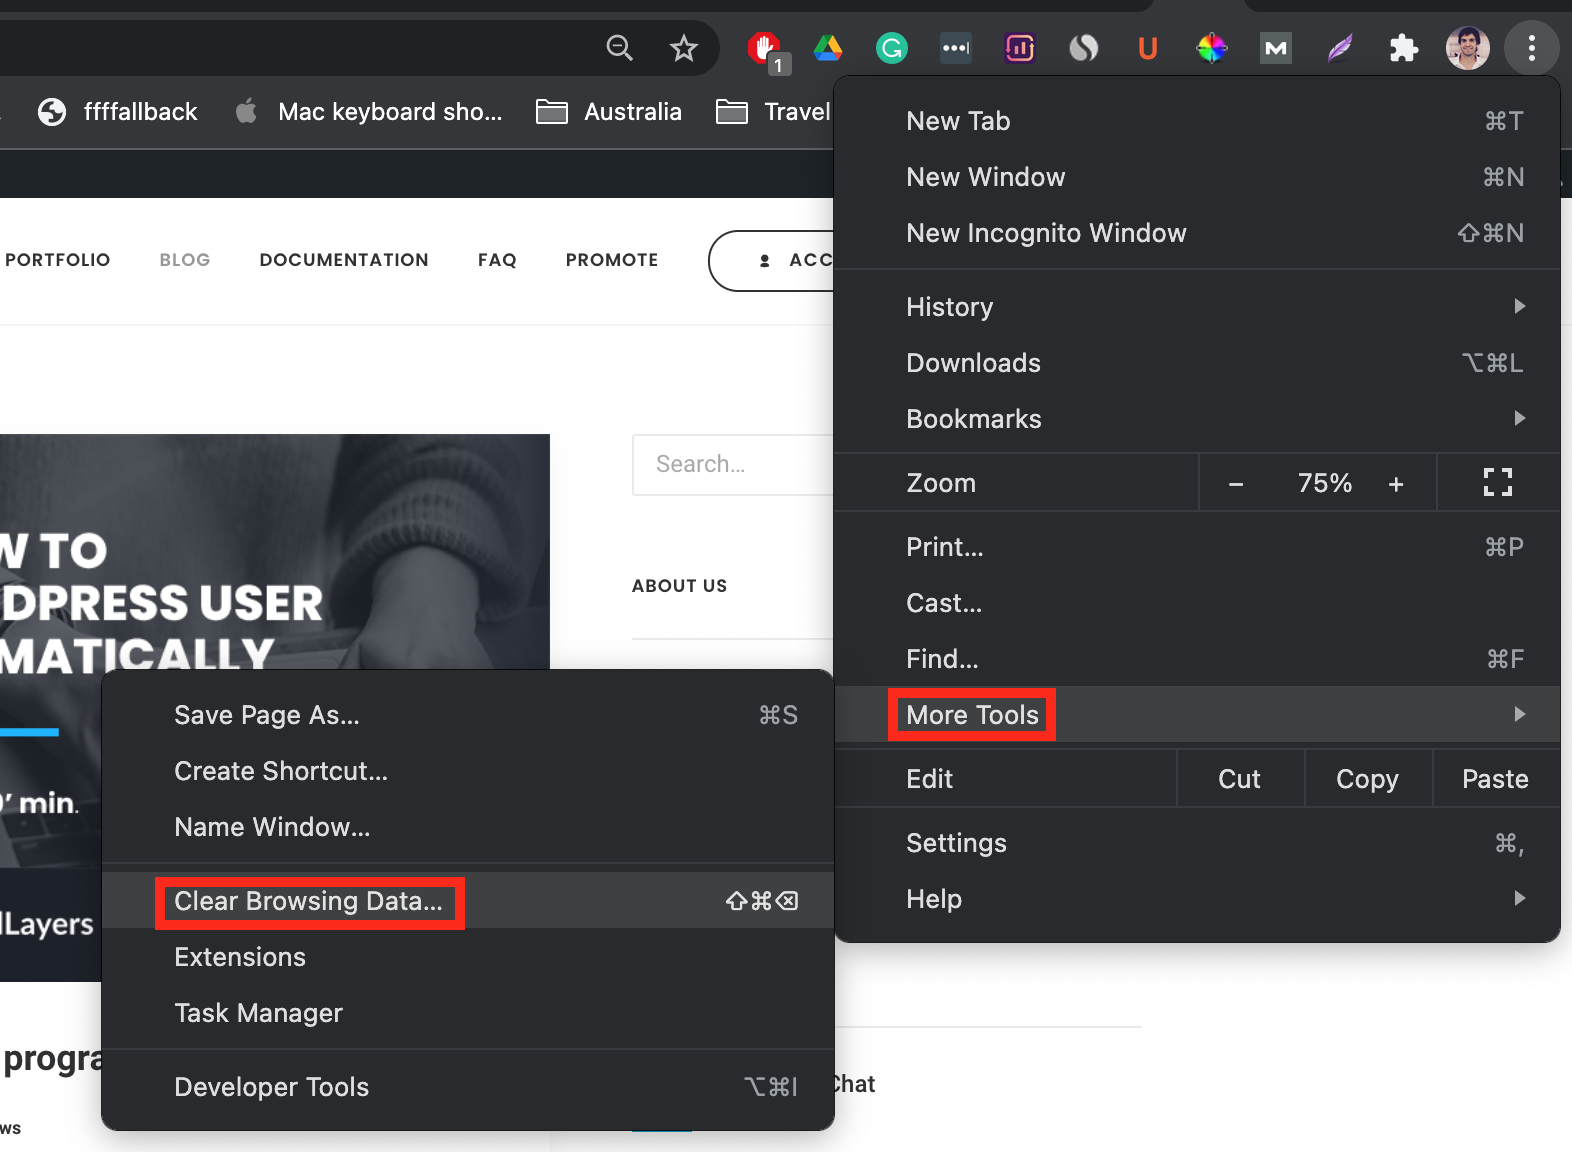
After that, go to the Advanced tab, select the Cookies and other site data and Cached images and files options and press Clear data.
![]()
If this doesn’t work, you’ll need to clear the WordPress cache.
4) Clear WordPress Cache
To optimize your WordPress site for the best performance, using a caching plugin is a good option. However, sometimes the cache may cause the missed schedule error, so you should clear the cache.
Each caching plugin comes with different configuration options. Here, we will show you how to clear the cache using a few different popular tools.
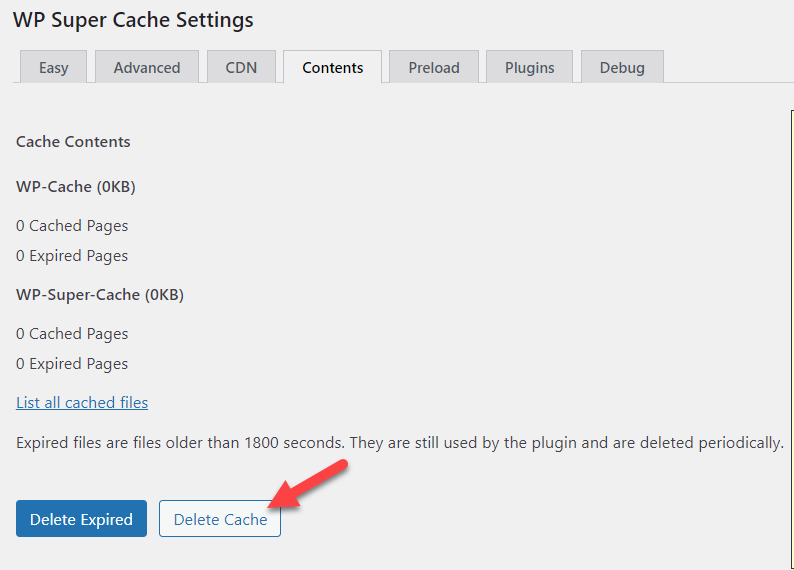
4.1) WP Super Cache
First, go to the plugin’s settings and you will see a tab called Contents. From there, you can clear the cache by simply pressing Delete Cache.
4.2) WP Fastest Cache
Clearing the cache generated by WP Fastest Cache is very simple. The plugin has an option in your primary navigation bar. Simply hover over it and press Clear All Cache.

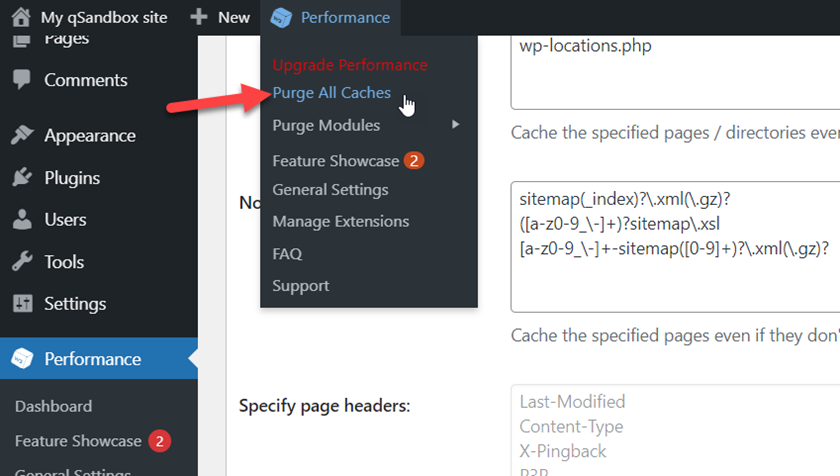
4.3) W3 Total Cache
Similar to WP Fastest Cache, W3 Total Cache also has an option in the navigation bar to clear the cache. Hover over it and press Purge All Caches as shown below.
4.4) WP Rocket
To clear the cache using WP Rocket, open the plugin’s settings and you will see a Clear Cache button on the right-hand side.
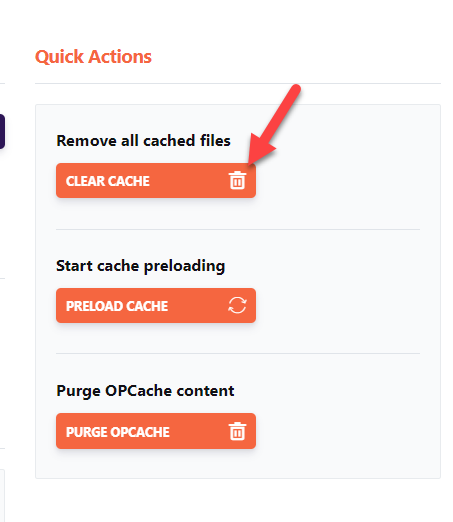
Simply click on the button to remove all the cached files.
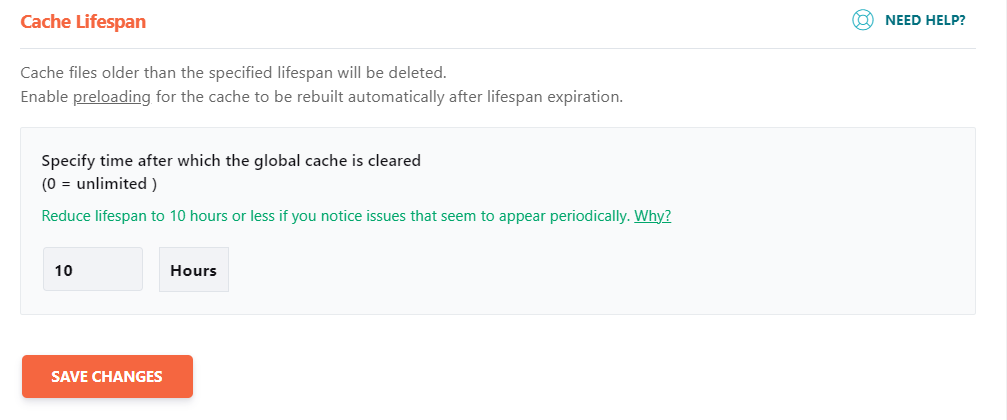
Alternatively, you can set up a custom cache lifespan. WP Rocket comes with an interesting feature that allows you to automatically delete the cache every certain amount of time.
If this doesn’t do the trick, you can try the following method.
5) Increase the Site’s Memory Limit
A low memory limit can cause the missed schedule error to occur more often. To fix this, you can increase the website’s memory limit to make sure that tasks aren’t interrupted due to lack of memory. In this section, we will show you how to increase the site’s memory limit with a few lines of code. This is the same technique you can use to fix the White Screen of Death (WSoD) error and to solve issues with the WordPress login.
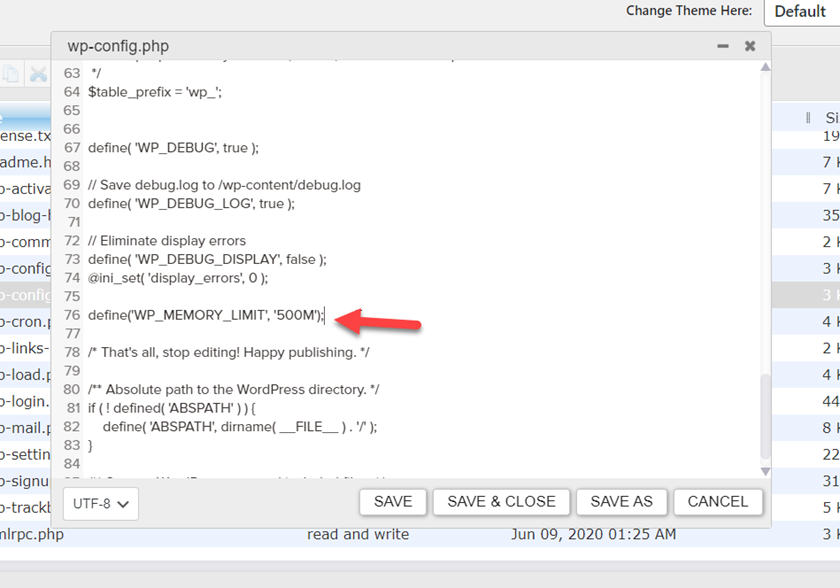
To increase the memory limit, copy the below code:
define('WP_MEMORY_LIMIT', '500M');
This will increase the limit to 500MB which should be enough for most sites.
Then, you need to paste it in the wp-config.php file before the line says /* That’s all, stop editing! Happy publishing. */.
Finally, you can also change the limit to 256MB for example by simply changing the code as follows:
define('WP_MEMORY_LIMIT', '256M');
Most WordPress installations don’t come with this by default, so specifying a custom memory limit is quite helpful.
6) With Plugins
Another solution to fix the missed schedule error in WordPress is to use plugins. There are several tools out there, but for this tutorial, we’ll use Missed Schedule Posts Publisher. It comes with minimal configuration options and can be a great addition to your site if the scheduling feature fails frequently.
First, install and activate the plugin. In your admin dashboard, go to Plugins > Add New, look for the plugin and install it.
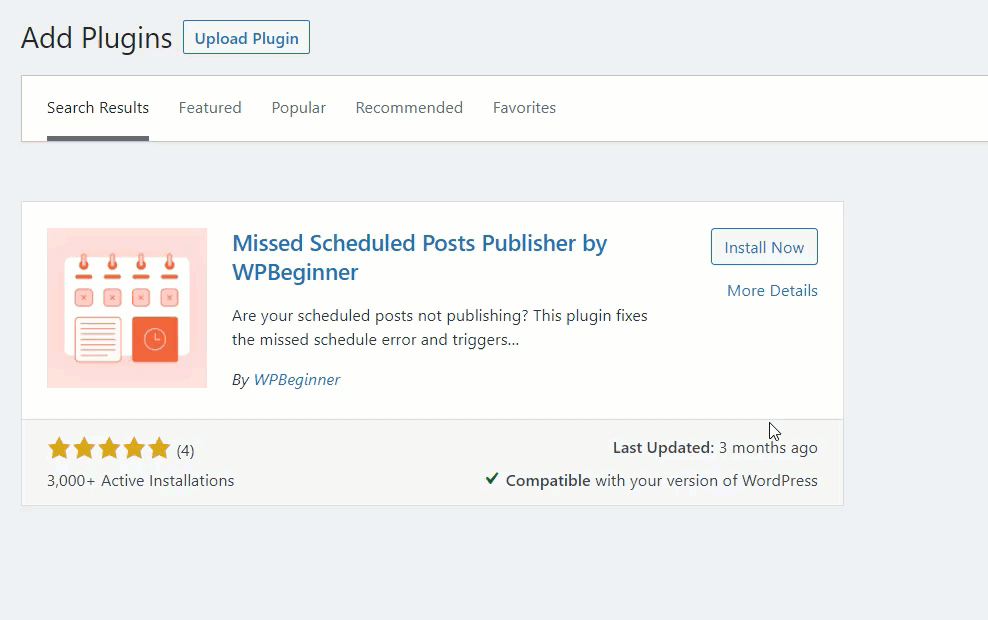
The plugin doesn’t require any additional configuration. Once you activate it, it will scan your website for missed scheduled posts every 15 minutes. When it finds one, it will publish the post automatically.
7) Edit the Cron Job
Finally, if none of the above methods worked, you can try editing the cron job. Sometimes, the WordPress cron job system fails and doesn’t work as expected. In that case, disabling it and using an external cron job system is a good option to fix the missed schedule error. For example, if you use a shared hosting provider, you can access cron jobs via your cPanel. Let’s see how to do that step-by-step.
The first thing you need to do is disable the WordPress inbuilt cron system.
7.1) DIsable WordPress Cron System
You can disable the cron job system by pasting the below code into your wp-config.php file.
define (‘DISABLE_WP_CRON’, true);
Make sure you paste it before the line says /* That’s all, stop editing! Happy publishing. */.

After that, save and update the file. Now you need to use the cPanel cron system.
7.2) Add External Cron System
Log in to your web hosting account and cPanel. This process might be slightly different depending on the hosting you use but you should be able to follow it without any issues.
For this demo, we will use Cloudways. Go to the Application settings and head to Cron Job Management to access the cron jobs.
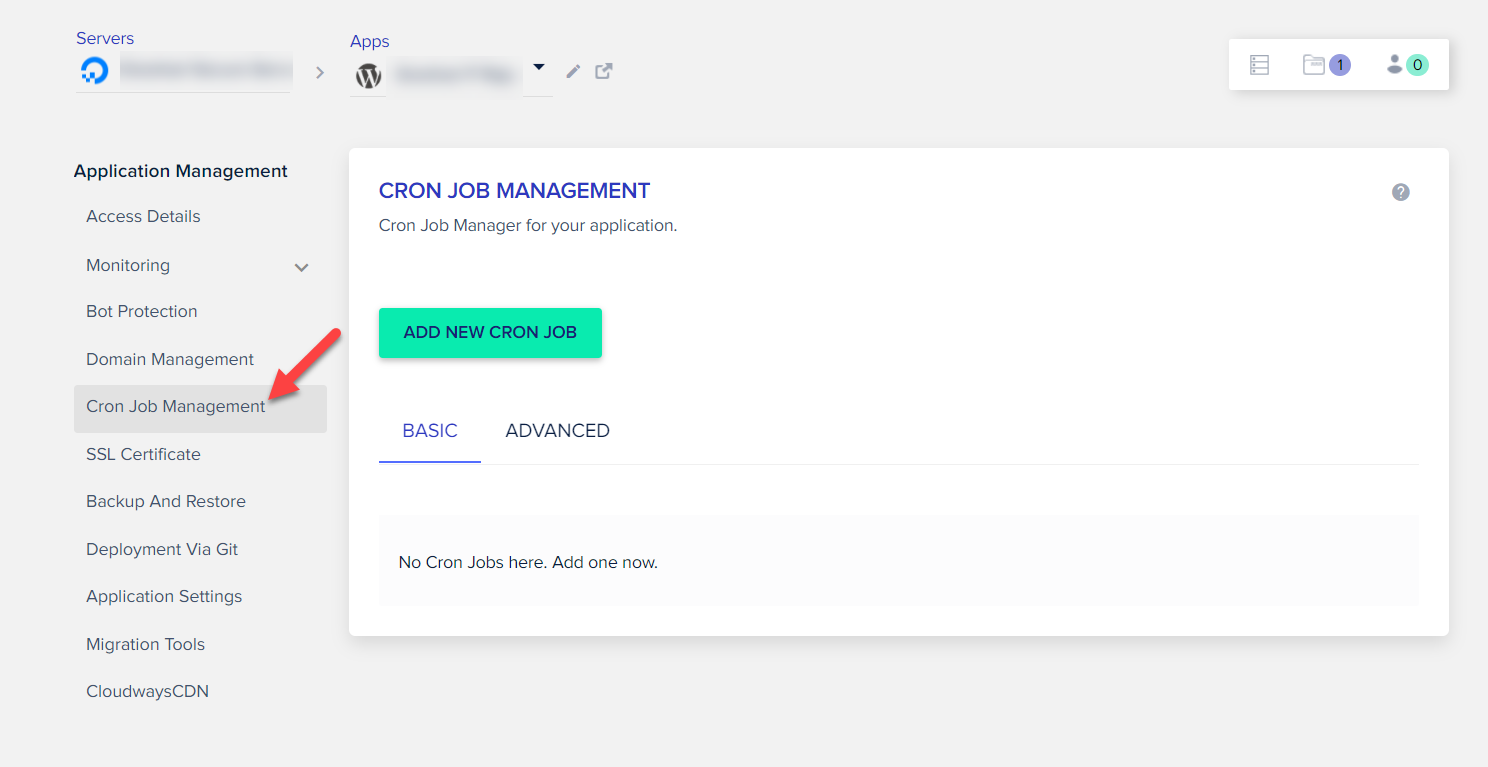
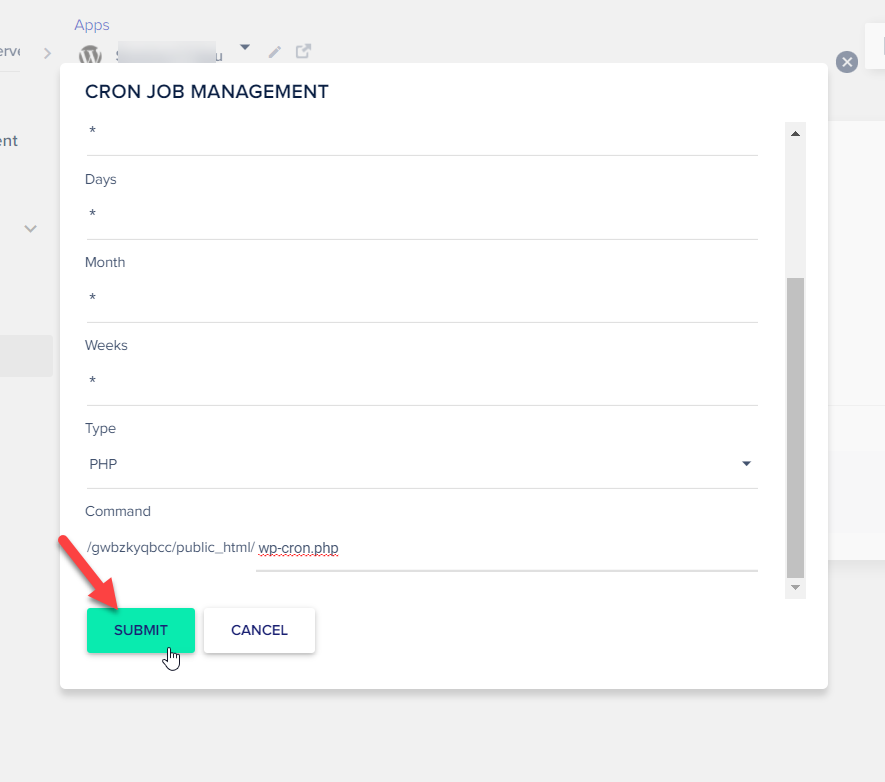
Then, press Add New Cron Job and choose an interval for the job. For example, let’s select twice an hour.

After that, you have to mention the file path you need to use for the cron job. In this example, we will use this cron job for the wp-cron.php file. You can locate the file in your WordPress installation directory.
For example, if you have installed WordPress on the root domain, the path to the wp-cron.php file would be www.example.com/wp-cron.php. If you have installed WordPress on a subdirectory, the path would be something like: www.example.com/directory/wp-cron.php.
Then, according to your installation path, fill in the command field and press Submit.
That’s it! From now on, the external cron job service will execute the file according to the interval you have chosen to make sure the scheduling issue doesn’t happen again.
8) Contact your hosting company
If none of the above methods worked or you don’t feel comfortable with some of the solutions, you can contact your hosting company for help. Explain to them the issue and let them guide you to solve it.
Conclusion
All in all, scheduling posts is a handy feature that allows you to better organize your articles and make sure you post at the best time. However, sometimes that feature fails and causes headaches to site admin.
In this guide, we’ve learned that WordPress uses cron jobs to manage repetitive tasks and that issues with cron jobs might create conflicts with scheduled posts. If that’s your case, we recommend you follow these methods to fix the missed schedule error in WordPress as soon as possible:
- Inspecting the wp-config.php file
- Updating the timezone settings
- Clearing the browser cache
- Purging the WordPress cache
- Upgrading the memory limit
- Relying on a dedicated plugin
- Manipulating the cron job system
- Contact your hosting company
The first thing you need to look at is the wp-config.php file. If your WordPress hosting company is limiting the usage of WordPress cron, you can remove the specific code from the file and update it. Also, make sure that you are using the correct timezone. This simple solution sometimes fixes the issue and is often overlooked for most beginners. If that doesn’t work, clearing the browser and WordPress cache and increasing the memory limit can help you solve the issue.
If after that you’re still experiencing issues when scheduling posts, using a plugin can be a good solution. As a last resource, if none of the solutions deliver results, you can edit the cron job system using the cPanel.
Finally, if nothing worked or you don’t feel comfortable with these methods, simply contact your web hosting company and ask for help.
Have you found a solution? Which method did you use? Let us know in the comments section below.
If you enjoyed the read, these articles might interest you:

Thank you very much for sharing the best article here.
You are welcome, Jennifer.