How to Fix the “No Update Required” WordPress Loop
Have you tried updating WordPress but encountered a message that says “No Update Required: Your WordPress database is already up to date” even when you know it isn’t? We’ve got something for you. In this guide, we’ll show you how to fix the “No Update Required” WordPress loop.
The “No Update Required” issue is one of the most annoying ones. It says that your installation is up to date when it’s not and in some cases, it might even lock you out of your admin dashboard. Every time you log in to your dashboard, you face the No Update Required loop.
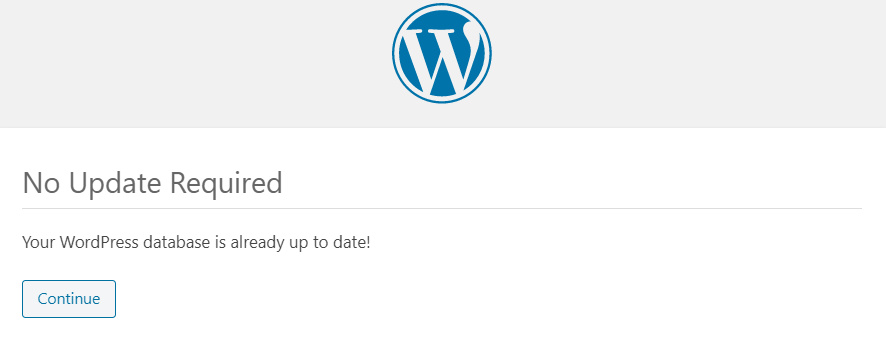
So how do you get around this dreaded loop and get access to your site? First, you should know that this is a common problem. Your database hasn’t been corrupted, and your site is still secure. In this article, we will teach you several ways to bypass the No Update Required loop.
Before we go into all the options you have to fix it, let’s better understand why the error happens in the first place so that you can take the necessary precautions to avoid it in the future. Let’s have a quick look at the reasons behind the WordPress No Update Required loop.
Why does the “No Update Required” Loop Occurs?
Most times, the WordPress No Update Required loop is triggered because of a caching issue. However, this doesn’t happen all the time, even with caching enabled, which indicates that not every type of cache is responsible for this issue. To be more specific, object caching is the main trigger behind this annoying problem. But what is object caching?
Object Caching
Object caching is a specific type of caching in which database queries are cached into memory so that they can be retrieved quickly when needed in the future. WordPress comes preloaded with a built-in object cache called WP_Object_Cache.
Object caching enhances the performance of a WordPress website by reducing the processing burden on the server. This becomes more prominent if your site has a massive database with high traffic volume. In such cases, querying the database can quickly become overwhelming for the server. That’s where object caching helps by serving database queries from the cache memory instead of adding queries to the server.
Now let’s better understand how object caching triggers the No Update Required issue.
How Object Caching Triggers the “No Update Required Loop”?
When you try to update WordPress, it looks for a file in the database to see if WordPress is already up to date or a new version is available. Because of object caching, that file had already been cached at some point earlier, so the cached file appears “up-to-date” for WordPress.
This is important because when you try to update your installation, instead of the actual file in the database, WordPress reads the file from the cache. Since the cached file says WordPress is already up to date, you get the No Update Required message, even when an update is available.
If you are in such a situation, keep reading. In the next section, we’ll have a look at different options to solve the No Update Required loop.
How to Fix “No Update Required” Loop in WordPress
Some of the common methods to resolve the No Update Required error are:
- Clear the site and server cache
- Rename the object-cache.php file
- Check for plugin and theme conflicts
- Restart PHP or server
- Contact your hosting company
Let’s go through each of the above solutions one by one.
1. Clear the Site and Server Cache
Since it’s a caching-related issue, the first you need to do to fix the “No Update Required” WordPress error is to clear your site’s cache. This will remove all the cached content that includes the cached WordPress update information. Let’s see how you can get rid of your site’s cache.
Clearing Cache using a caching plugin
The easiest way to clean your site’s cache is using a caching plugin. This step varies depending on the tool you use, but in most cases, it follows similar steps. First, go to your site’s admin dashboard and navigate to your caching plugin settings. Look for the clear cache option to clear all the site’s cache. For more information on how to do this using SiteGround, check out this post. To look for the best caching plugins, have a look at this guide.
However, clearing the cache with a caching plugin is only possible when you have access to your admin dashboard. In some cases, the No Update Required loop might restrict users from accessing their dashboards. If that’s your case, you’ll need to do the following.
Clear Cache with WP-CLI
WP-CLI is a command-line tool that allows you to access your WordPress site via a command-line interface. It is a powerful tool that allows you to execute WordPress code without accessing your dashboard.
The first thing you need to do is connect to your server’s command line via SSH and install WP-CLI. From the command line, change the directory to your site’s root directory using the following command.
cd ~/your/website/path //replace it with your site’s actual path
Once you are in the site’s root directory, execute the following command to purge all the cache.
wp cache flush
You can also check out further documentation of the wp-cache flush command on the official webpage.
Clear Cache Using SSH
If you aren’t comfortable using WP-CLI or want to avoid it for any reason, you can clear your site’s cache via the Linux command line. First, you have to connect to your server’s command line via SSH and then use the following command to purge all the cache if your site is using Redis.
redis-cli flushall async
If your site uses Memcached, use the following commands.
telnet localhost 11211
flush_all
quit
Clear Cache via Host’s Control Panel (e.g., SiteGround)
Another way to clear your site’s cache is via your host’s control panel. Most hosting companies allow you to do that. This step varies depending on your hosting provider, but most of them follow a similar pattern. Alternatively, you may also ask your hosting provider to clear all cache for you.
For demonstration purposes, in this section, we will show you how to clear SiteGround’s cache using their control panel.
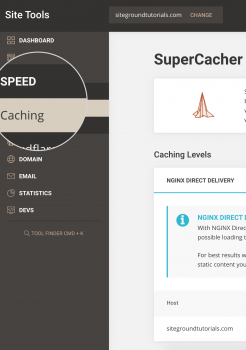
Go to your SiteGround control panel and navigate to Site Tools > Speed > Caching. There, you will find two tabs for Dynamic cache and Memcached, respectively.
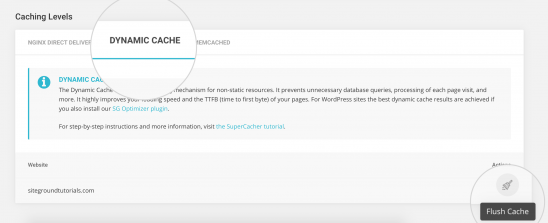
Go to the Dynamic Cache tab to clear the site’s Dynamic Cache. It is worth noting that you can clear the dynamic cache for each site individually. Simply select your site, and hit the Flush Cache button.
Next, you need to clear Memcached as well. Unlike Dynamic Cache, you can clear Memcached for all the sites at once. Go to the Memcached tab and hit the Flush Cache button at the bottom.
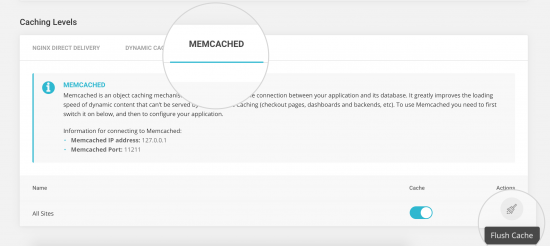
Now go back to your site and check if the No Update Required loop is fixed. If your site’s issue is resolved, congratulations! You are good to go. However, if it didn’t solve your issue, move on to the next step.
2. Rename the object-cache.php File
If clearing the cache didn’t work for you, you may need to manually discard the object-cache.php file. This file stores all the object cache, so by renaming it, it will drop all the object cache stored.
To do that, navigate to your site’s root directory using the host’s control panel or an FTP client like FileZilla. Once you are in the site directory, go to the wp-content folder and locate the object-cache.php file.
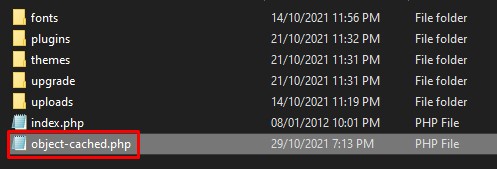
Rename the file to anything else, like object-cache-old.php or whatever you like. This will disregard the currently cached content in the file and will give you access to your admin dashboard.
After that, navigate to your admin dashboard and look for your caching plugin settings. Clear all the site’s cache from the plugin. Then, go to your site’s root directory again, and look for the object-cache.php file. If the file has been recreated, that means that WordPress has discarded the previous file and has now created a new cache file.
Finally, try updating WordPress once again it should work this time. However, if it still doesn’t fix the issue, the next thing you should do is check for a plugin or theme conflict.
3. Check for Plugins or Themes Conflicts
A plugin or theme conflict is one of the most common causes of WordPress errors. It’s possible that one of your plugins, especially the caching plugins, has created a conflict with another plugin or theme. If some other plugin on your site has caching capabilities, that may cause conflicts with your main caching plugin. Regardless of the cause, this can trigger the No update required loop.
To fix this issue, you need to identify the problematic plugin. For this purpose, deactivate all your plugins. If you aren’t sure how to do this, check out our guide on how to deactivate plugins in bulk.
For this demonstration, we’ll show you how to do it from the admin dashboard. Navigate to Plugins > All Plugins, select all of them with the top-left checkbox, set the Bulk Action to Deactivate, and hit the Apply button. This will deactivate all your plugins.
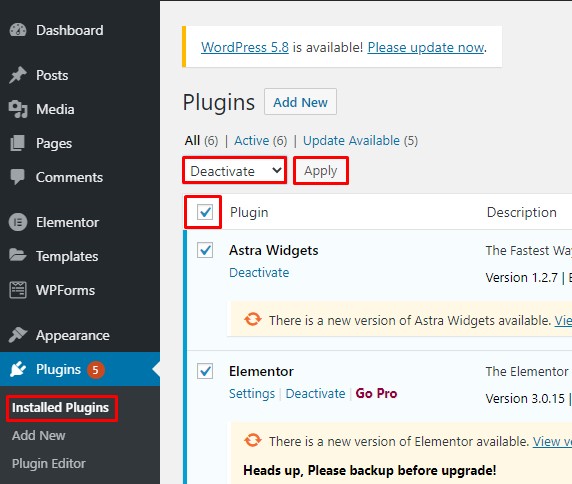
Contrarily, if you can’t access your WP Admin Dashboard, you can still deactivate all your plugins from your site’s root directory. You can access your site’s root directory via your host control panel or an FTP client like FileZilla.
Once you are in the site’s root directory, locate the plugins folder in the wp-content folder. Then, rename it to anything else like plugins-old or whatever you like to disable all your plugins at once.

After deactivating all the plugins, go to your site and try accessing the Admin Dashboard. If you don’t see the No Update Required error, it confirms that the problem lies with a plugin.
Next, you need to identify the faulty plugin. To do this, start activating each plugin one by one until you encounter the error again. Once you have identified the plugin that’s causing the issue, you can roll back to a previous version or contact the developer for technical support. Alternatively, you can try some other plugin to achieve the same functionality. For instance, here is a list of the best caching plugins for WordPress in 2021.
If none of the above solutions worked to fix the “No Update Required” WordPress loop, continue to the next solution.
4. Restart PHP and Server
With the previous methods, most users should be able to solve the No Update required issue. However, sometimes you may face this problem even when you don’t have an active caching plugin installed on your site.
WordPress itself has some object caching mechanism that stores cache without any caching plugin. While the WP_Object_Cache is only stored for a short duration, in rare cases, it might trigger the No Update Required error.
If that’s the case, you can try restarting PHP using your host’s control panel or contacting their customer support team. Alternatively, you can also try restarting your server to clear all forms of cache which will hopefully resolve your problem.
5. Contact Host Provider
So far, we have seen all the possible fixes that you can perform on your end to fix the “No Update Required” WordPress loop. Hopefully, by now, most of you must have been able to solve the issue.
However, if you are still facing the same problem even after trying all the above solutions, it is time to contact your hosting provider. Unfortunately, there is nothing more you can do on your end, so better to contact an expert support team.
Hopefully, your hosting provider has a capable team that can help you find a solution to this annoying problem.
Conclusion
All in all, keeping WordPress up to date is extremely important as new updates come with useful features and crucial bug fixes. Not being able to update your site can be quite annoying and the No Update Required loop can be one of the causes.
The issue arises primarily because of a conflict with object caching. While caching is essential for improving your site’s performance, if it’s not handled properly, it can create issues on your site.
In this article, we have discussed the causes and different methods to fix the No Update Required WordPress loop. We have seen how object caching can trigger the dreaded error and might even lock you out of your admin dashboard. Additionally, we had a detailed look at all the possible solutions to fix the issue.
To sum up, the first thing you can do is clear the site’s cache. If that doesn’t solve the issue, you need to manually rename the object-cache.php file. If the issue persists, a good idea is to check for conflicts between plugins/themes. In most cases, after that, the No Update Required error will be gone, but if that’s not your case, restarting PHP or your server can be the solution. Finally, if nothing worked, you should contact your hosting provider for technical support and help you fix the No Update Required loop.
Have you ever encountered the annoying No Update Required loop on your site? How did you get around it? Any suggestion you might want to share? Let us know in the comments below.
If you liked this guide, we recommend you check out the following tutorials to fix common WordPress errors:
