
How to Fix WooCommerce Image Size Issues
Are you having problems with the image sizes on your online store? You’ve come to the right place. In this guide, we’ll show you different ways to fix the most common WooCommerce image size issues.
WooCommerce is one of the best eCommerce platforms, but once in a while, you might encounter some issues. We’ve already seen how to fix the most common problems on the checkout and what to do when the Add-to-Cart button isn’t working. In this tutorial, we’ll show you different solutions to fix image size issues.
These problems can happen due to various reasons such as theme or plugin incompatibility, wrong image sizes, image fields missing, and so on. Before we see how to solve the various image size problems, let’s have a look at the different types of images in WooCommerce.
Types of Images in WooCommerce
There are many types of images that you can add to your website, but the primary 3 types used in WooCommerce are product, catalog, and product thumbnail images.
- Single product images: Single product images are large size pictures used to view a single product. This is the major image of the product that you display to customers when they open the particular WooCommerce product page. You can add more than one product image to show the product from various angles.
- Catalog images: They are medium-sized images of products typically used on the WooCommerce shop page. If you have a separate category page in your online store, these catalog images can also be seen on the product categories or the products themselves.
- Product thumbnail images: These are thumbnail images that are very small in size. They are displayed to identify the products on various WooCommerce pages such as cart pages, widget areas, or even in the order pages.
Common Problems with WooCommerce Image Sizes
Now you have a better understanding of the various types of WooCommerce images and the difference in their sizes. Images are extremely important to help you convert visitors into customers, so having problems with your images can be a big headache.
To be able to fix WooCommerce image size issues, you need to identify your problem first. The tricky part is that there are several issues that you may face regarding image sizes. Some of the most common ones are:
1. Blurry images
This is one of the most common problems. The images that you upload for your products or thumbnails appear blurry and might not be clearly visible even if the original image wasn’t compressed, was clearly visible and had great quality.
Not only do blurry images look bad, but also give the impression that your site isn’t professional.
Original Image
Blurry Image
2. Low-quality image
Similar to blurry images, some pictures on your website might be of lower quality after you have uploaded them. They might seem pixelated or not have as smooth lines as that of the original ones.
This can happen even if the uploaded image has an excellent quality. We’ll see why and how to fix it in the next section.
3. Wrong image sizes
Sometimes, you might also notice that the uploaded images have different sizes than that of the original ones. This is a very common issue if you don’t adjust your images settings according to the theme requirements.
For example, let’s say your theme requirement for catalog images is at least 250 x 250 pixels, but the WooCommerce image settings of your store are set up to 200 x 200 pixels. Since the settings aren’t configured according to the theme requirements, your image might be automatically readjusted with the wrong image size.
4. Zoom, lightbox, or slider issues
WooCommerce provides you with zoom, lightbox, and slider options to preview your images. This was a new feature that was added to WooCommerce with the release of version 3.0. If your theme hasn’t been updated according to its specifications, you might face some problems.
5. Image width and thumbnail fields Missing
You might also notice that the width and thumbnail fields of your WooCommerce images are missing from the Customizer under Appearance > Customize > WooCommerce > Product Images.
This can be the case if your theme has very strict image sizes, so you can’t change the theme image sizes through the admin at all. In that case, you will need some programmatic knowledge which we will discuss in the solutions below.
Now that we better understand the types of images and the most common problems, let’s see different solutions to fix image size issues in WooCommerce.
How to Fix WooCommerce Image Size Issues
Since you are familiar with some of the most common WooCommerce image size issues, let’s fix them as well. But, the image size issues that you encounter might be caused by various reasons. So, there might not be a particular solution for them.
Therefore, we would recommend you to use some of the common solutions given below regarding any image size problems. We are sure that one of the solutions will be able to fix the WooCommerce image size issues.
1. Initial Checklist to keep in mind
Before we go through the specific solutions to fix image size issues, there are some things you need to keep in mind. First, make sure that you have properly set up WooCommerce without missing any steps. You might face issues with your website if it’s not installed correctly.
Second, we would like to remind you to check if everything on your website is updated. There can be problems in your store if you haven’t updated your theme or plugins to the latest version.
Similarly, ensure that you update WooCommerce to the latest available version. To know if you have pending updates, go to Plugins > Installed Plugins on your WordPress dashboard. If there are notices asking you to update WooCommerce, click Update now.

Moreover, if you have updated WordPress with the Gutenberg editor, make sure that WordPress is also updated to the latest version. On the other hand, if you use WordPress with the classic editor, it’s best to update it with the latest version of WordPress 4.9.
Once you’ve done all this, if you still have issues with the image sizes, continue to the next solution.
NOTE: We will use the Divi theme for this tutorial so some of the pages might look different than your website if you use another theme. However, you should be able to follow every single solution without any problems. If you’re looking for a new theme compatible with WooCommerce, have a look at this article.
2. Set Custom WooCommerce Image Sizes
Adding custom image sizes is one of the most common ways to fix the WooCommerce image size issues. Since most of the problems occur due to the change in the default image sizes, this should be your first move.
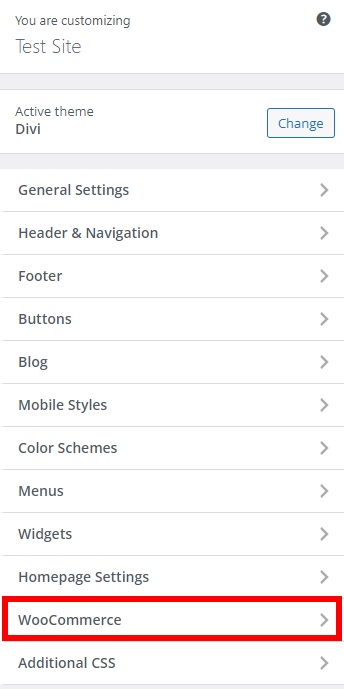
Setting up a custom image size is quite easy. On your admin dashboard, go to Appearance > Customize and open the WooCommerce tab to access the Customizer.
Then, open the Product Images option. Here you can resize the product page and thumbnail images of your products. To edit the main image of the product page, add the image size you want to the Main Image Width section.
You can also edit the thumbnail sizes and cropping here. If you want to adjust the thumbnail image size, edit the Thumbnail Width option.
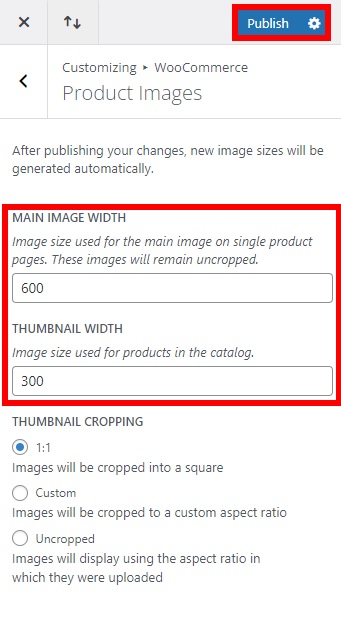
Furthermore, there are three options to adjust the thumbnail cropping: 1:1, custom, and uncropped. To minimize the image issues for both functionality and appearance, 1:1 cropping is the best option. After you have made all the necessary changes, click Publish.
3. Check your Theme’s Product Image Dimensions
If you are still facing some problems even after adding the custom image sizes, then maybe the image size is incorrect. As mentioned earlier in the wrong image size problem, there are specific theme requirements for image sizes in WooCommerce. If those sizes don’t meet the requirements, you may face some problems.
To fix these WooCommerce image size issues, the best option is to check the theme’s product image sizes first. Open the product page of any of your products and use the inspect element developer tool on your web browser to see the theme image size.
For example, if you’re using Google Chrome, right-click on the product image and press Inspect. You will be able to see the image size in the inspect element developer tool as shown below.
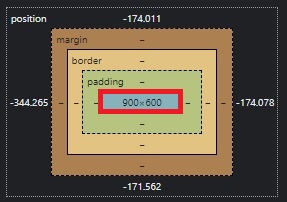
In this case, the product image size is 900×600. If the image requirements of your theme are different, you may have problems.
You can adjust the product image size accordingly from the Customizer using the method we described in point 2. Similarly, you can inspect the thumbnail image size the same way and further edit it in the Customizer if needed.
4. Change Default Image Sizes
If you have tried all the above solutions, but you’re still facing image issues, you might need to adjust the default WordPress image sizes.
To do that, go to Settings > Media on your WordPress dashboard and you will see the size options for thumbnail, medium, and large-size images.
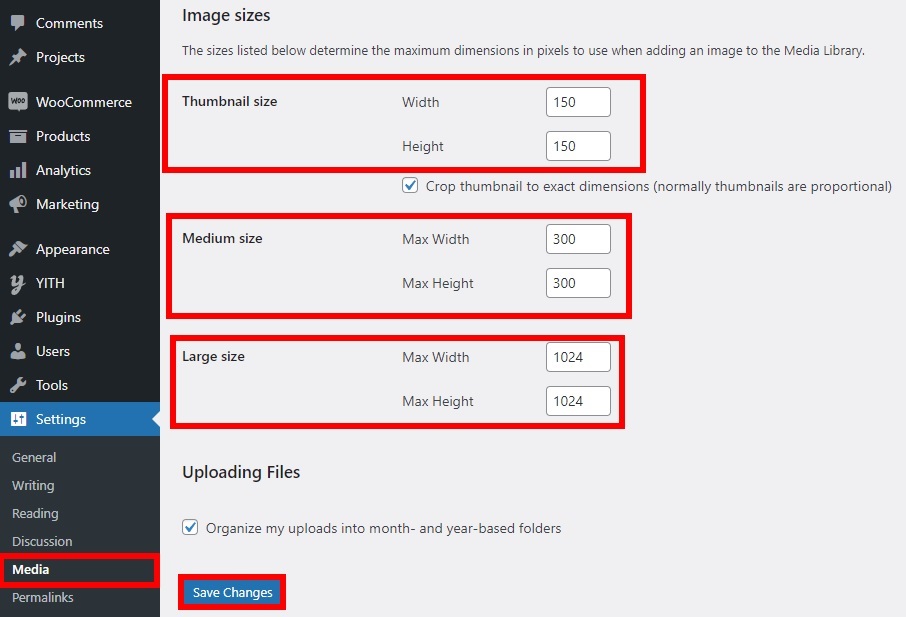
Set the image sizes according to the theme requirements and save the changes.
Additionally, you can remove some of the default sizes if you don’t use them. To learn more about that, check out our guide to remove WordPress default image sizes.
5. Fix WooCommerce Image Size Issues with Plugins
Another alternative is to fix the WooCommerce image size issues is to use a dedicated plugin. There are several tools that you can use for this. In this section, we will show you a few so you can prevent further image size issues on your website.
Let’s have a look at some of the best tools you should use.
5.1. Perfect Images and Retina Support
in simple terms, Retina Support is a display option for images on your website with a very high resolution and quality. A retina-ready display ensures that any image seen on any device with any screen size is sharp and without any visible pixelated lines or borders.
This is a perfect solution if the uploaded pictures on your site are blurry or of low quality. If you want to create a retina-ready image manually, you need to double the image size and dimensions, optimize them, and then re-upload them. However, you can use a plugin, so your images are retina-ready automatically. For this, Perfect Images is one of the best plugins out there.
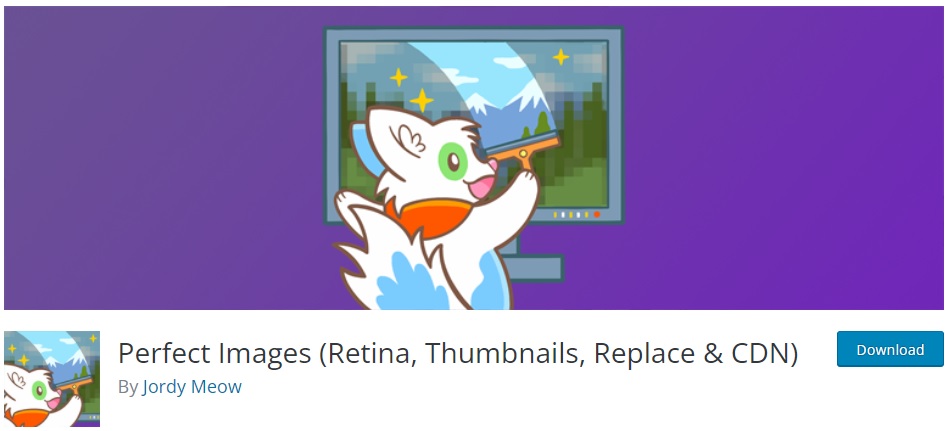
Perfect Images is a simple plugin to add images with retina display to your site. It automatically detects any images with retina issues and creates a retina-ready copy of them. On top of that, you can create individual retina-ready images or do it in bulk to save time.
Now, let’s see how to use this plugin.
5.1.1. Install and Activate the Plugin
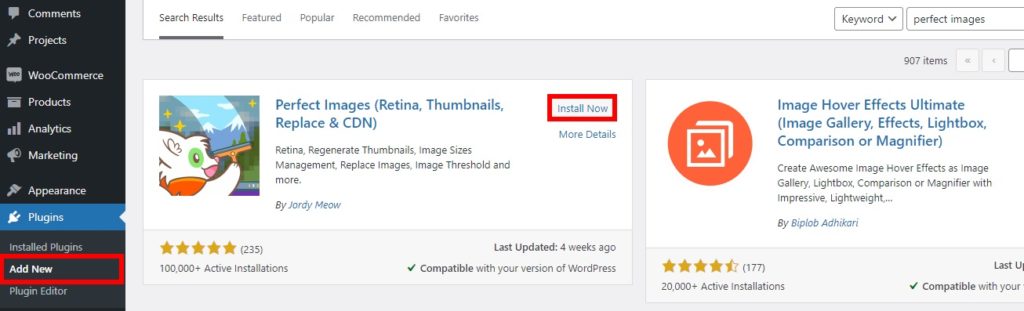
First, you need to install it and activate it. In your WordPress dashboard, go to Plugins > Add New, look for the plugin and click Install Now.
After the installation is complete, Activate the plugin. Alternatively, you can install it manually. If you aren’t sure how to do that, have a look at our guide to install a WordPress plugin manually.
5.1.2. Configure the Image Options for Retina Display
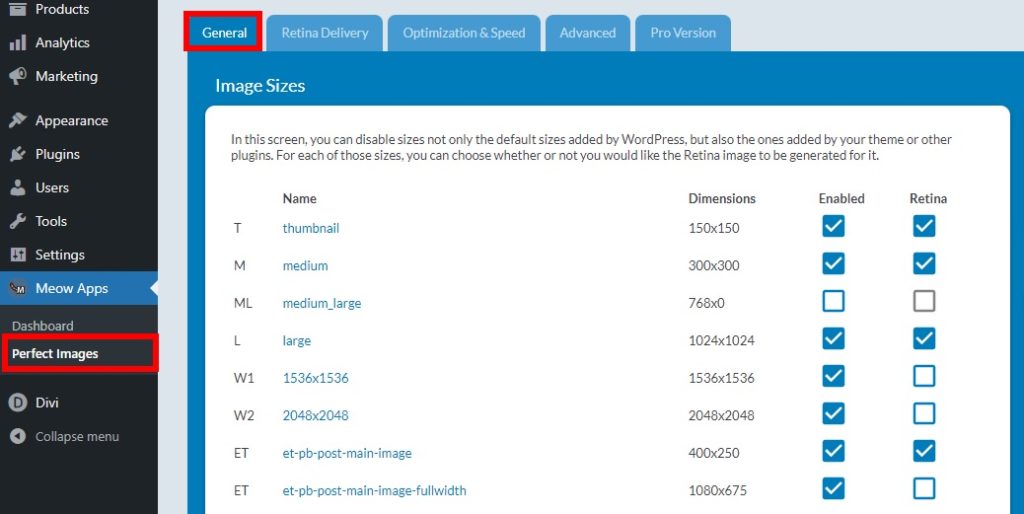
After activating the plugin you have to configure the retina options for your WooCommerce or website images. Go to Meow Apps > Perfect Images and you will see all the options for your retina images in the General tab. The default options are ok for most websites as they create retina images for the most common image sizes.
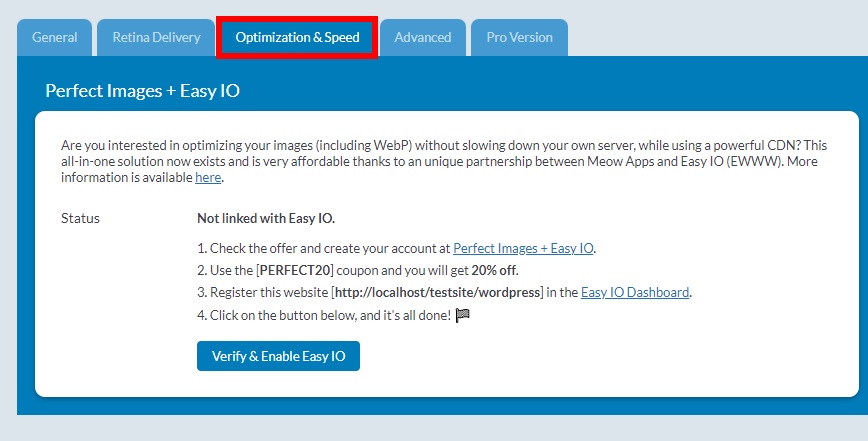
However, after the images are converted into retina-ready, they might need to be optimized. Retina-ready images tend to be very large and might slow your website down. This can be a major turn-off for your customers since most users use mobile devices for online shopping.
To make sure that the retina images don’t drain your website speed, you need to make sure that they are well optimized. You can do this from the plugin by going to the Optimization and Speed tab. Keep in mind that for that you will need to subscribe to their premium plan that includes Easy IO for optimization and costs 10 USD per month.
Alternatively, you can also optimize them manually using an image optimization plugin or service such as TinyPNG or Smush.
5.1.3. Convert Images for Retina Support
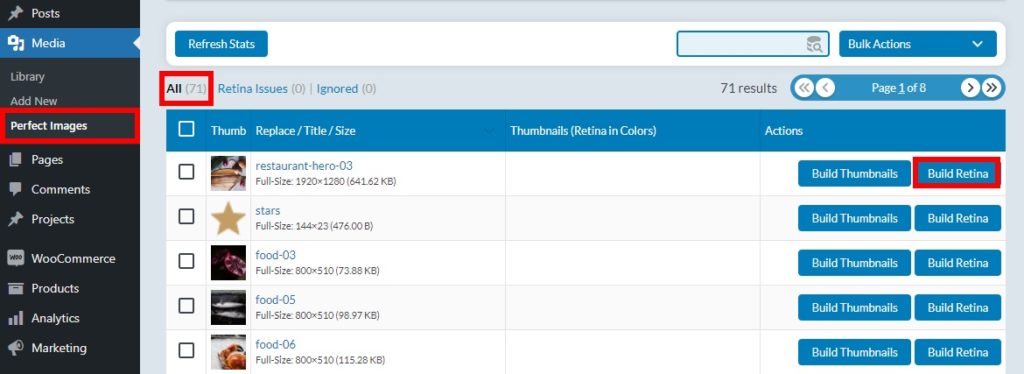
After you have configured all the necessary options for your retina images, you can start converting them. First, go to Media > Perfect Images and you will be redirected to the Retina Issues tab. Here you can create retina-ready images to fix the WooCommerce image size issues.
You can also generate thumbnails and retina images by selecting the images you want.
5.2. Regenerate Thumbnail
Regenerating thumbnails is also an excellent way to solve problems with image sizes, especially with thumbnail images.
These problems usually occur when you have recently changed your theme. The new theme might have different theme requirements for image sizes, so you need to re-adjust them.
If you have a large number of thumbnails on your website, you can use Perfect Images. All you need to do is configure the image size options just like we did in steps 5.1.1 and 5.1.2. Then, go to Media > Perfect Images, open the All tab and you will see all the images on your site. Similar to the retina support step, you can regenerate thumbnails for particular images or in bulk.
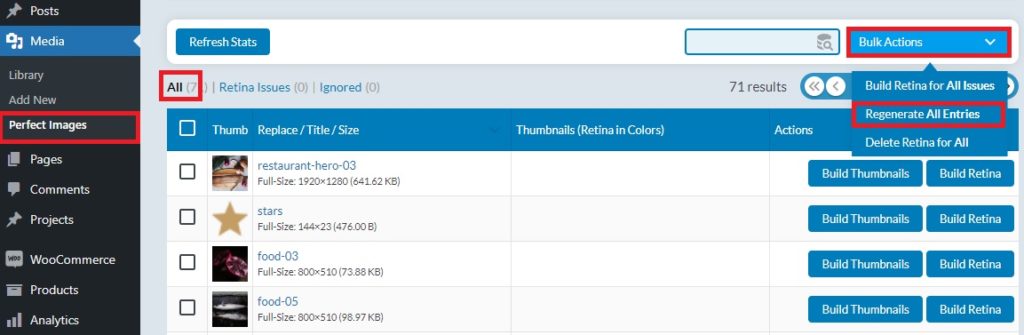
To regenerate images in bulk, press Bulk Actions and select Regenerate All Entries to regenerate thumbnails. Keep in mind that this may take a few minutes if you have many images on your site.
6. Programmatic Solution
If you’ve come this far, you have tried to fix the image size issues with the default WooCommerce options and even with plugins. If nothing worked and you are still facing problems, there is one more thing you can do. To use this solution, we recommend you have a basic knowledge of programming since we will use a bit of code.
There are some code snippets that you can use to fix image issues, but keep in mind that the snippet that we will use will change the image sizes on your website. This can be useful when the main image widths and thumbnail fields are missing in your theme Customizer and you want to set custom WooCommerce image sizes.
As we’ll edit some core files, before we start, we would recommend you backup your WordPress website. Additionally, it’s a good practice to create a child theme or use any of these WordPress child theme plugins.
Change Image Size using Code Snippets
To change the image sizes when the image width and thumbnail width are missing in the Customizer, you can use the following code snippet. Go to Appearance > Theme Editor and open the functions.php file.

Then, just add the following code snippet at the bottom of the editor.
add_theme_support( 'woocommerce', apply_filters( 'divi_woocommerce_args', array(
   'single_image_width' => 600,
   'thumbnail_image_width' => 300,
   'product_grid' => array(
   'default_columns' => 3,
   'default_rows' => 4,
   'min_columns' => 1,
   'max_columns' => 6,
   'min_rows' => 1
   )
) ) );
This snippet will change the product image width to 600 and the thumbnail width to 300, which are the default parameters. Adjust these values according to your requirements and don’t forget to update the file.
7. Support Options
If you have tried every solution mentioned here but you couldn’t find the solution to the image size issues, either the problem you are facing is rare or there is an issue with the core files of WooCommerce or your theme.
At this point, the best option is to contact customer support. WooCommerce has excellent support options so you can contact them about your image size issues. Alternatively, if you think your theme may be the issue, you can contact your theme provider and ask them for help.
Conclusion
All in all, there are different image types (single product, catalog, and product thumbnails) and several common problems with image sizes. The most common ones are blurry or low-quality images, wrong image sizes, zoom, lightbox, and slider options, and missing width and thumbnail fields.
In this guide, we’ve seen different solutions to fix the most common WooCommerce image size issues.
- Update your theme and plugins to the latest version, including WooCommerce
- Set custom WooCommerce image sizes
- Check your theme’s image product dimensions
- Change default image sizes
- Use plugins
- Programmatic solution with a bit of code
- Contact WooCommerce or your theme’s support team
If this article was helpful for you, share it on social media and help your friends get rid of these problems. Have you faced these issues before? How did you solve them? Let us know in the comments below.
For more useful guides, here are articles that you might find interesting:

I usually use plug-ins: Resize for WooCommerce
It works pretty well so the photos don’t get ugly cropping.
Hmm is anyone else having problems with the pictures
on this blog loading? I’m trying to find out if its a problem on my end or if it’s the blog.
Any feed-back would be greatly appreciated.
Keeep on writing, great job!