
How to edit Header in WordPress – 3 Easy Methods
The header is one of the most important areas of any website. It’s at the top of the page and it appears on nearly every page of your site so you should customize it and use it smartly. A lot of our users had doubts about this so here’s a step-by-step guide on how to edit the header in WordPress.
Self-hosted WordPress is the best and most comfortable Content Management System (CMS) out there for creating anything you want. When you’re starting a site, all you need is to sign up for hosting, install WordPress, and write content. It’s that simple. However, if you want to unleash all the power of WordPress and make the most of it you should customize it.
One of the most simple and crucial customizations every user needs is changing the website header. In this article, we are going to show you how you can edit the header in WordPress without hiring any freelancer.
What’s the WordPress header?
In WordPress, the header is the element at the top of the web page. This element appears on every single page of the site and usually contains a logo, a menu to access different sections of the site, a search bar, and contact information. In eCommerce stores, it’s also common to see the cart and the products you’ve added to it. For example, at QuadLayers, the header is the top bar that you see on every page.

Why edit the header in WordPress?
The header is one of the most important areas on your website. It’s the first thing that visitors see when they get to your site and, as you probably know, first impressions matter. According to a recent study, users decide in 0.05 seconds if they like your website or not, and hence if they’ll stay or leave.
Additionally, research carried out by Nielsen Norman Group, showed that, on average, a visitor remains on a site for only 10-20 seconds. It doesn’t matter if your content is great. If they don’t like what they see and leave, they’ll never get to that amazing content. So, you must have an appealing header that makes users stay on your site.
The WordPress header also has important information to help users navigate your site and many calls-to-action (CTAs). So, to make the most of it, you must customize the header.
How to edit the header in WordPress – 3 Methods
There are several ways to edit the header in WordPress. Here, we have outlined 3 beginner-friendly ways that you can follow:
- Using a plugin
- Editing the theme’s header.php file
- With an FTP client
Let’s have a closer look at each of them.
1) Customize the Header using a plugin
If you prefer WordPress plugins over coding and modifying the core files, this is the best option. In the WordPress plugins repository, there’s a free plugin available called “Insert Headers and Footers“. This simple tool doesn’t need any additional complex configurations. So, let’s see step-by-step how you can edit the header using Insert Headers and Footers plugin.
- First, log in to your WordPress backend.
Go to Plugins > Add New. From there, you can install new WordPress plugins by searching the repository or by uploading the plugin files. In the search bar, type Insert Headers and Footers.
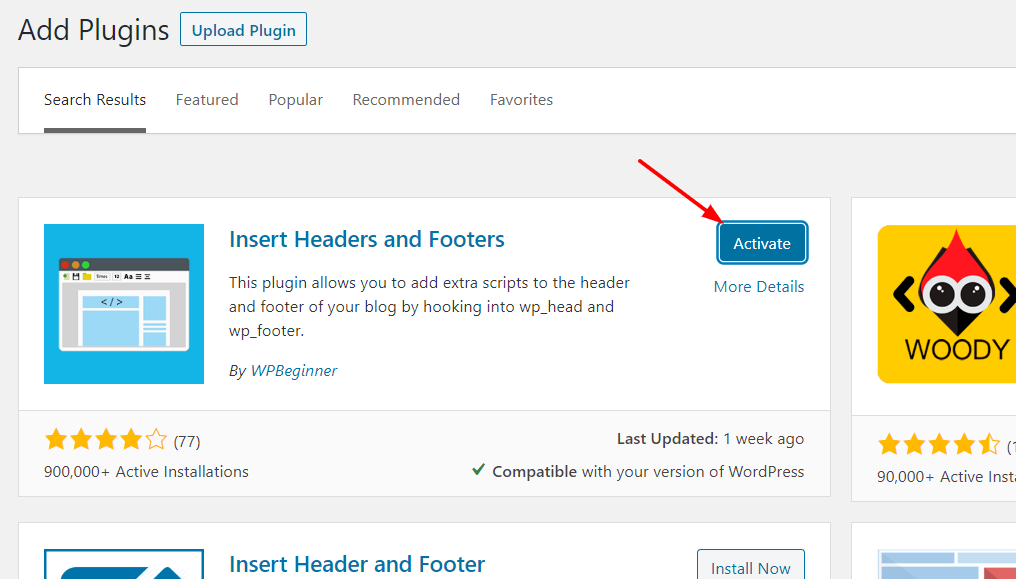
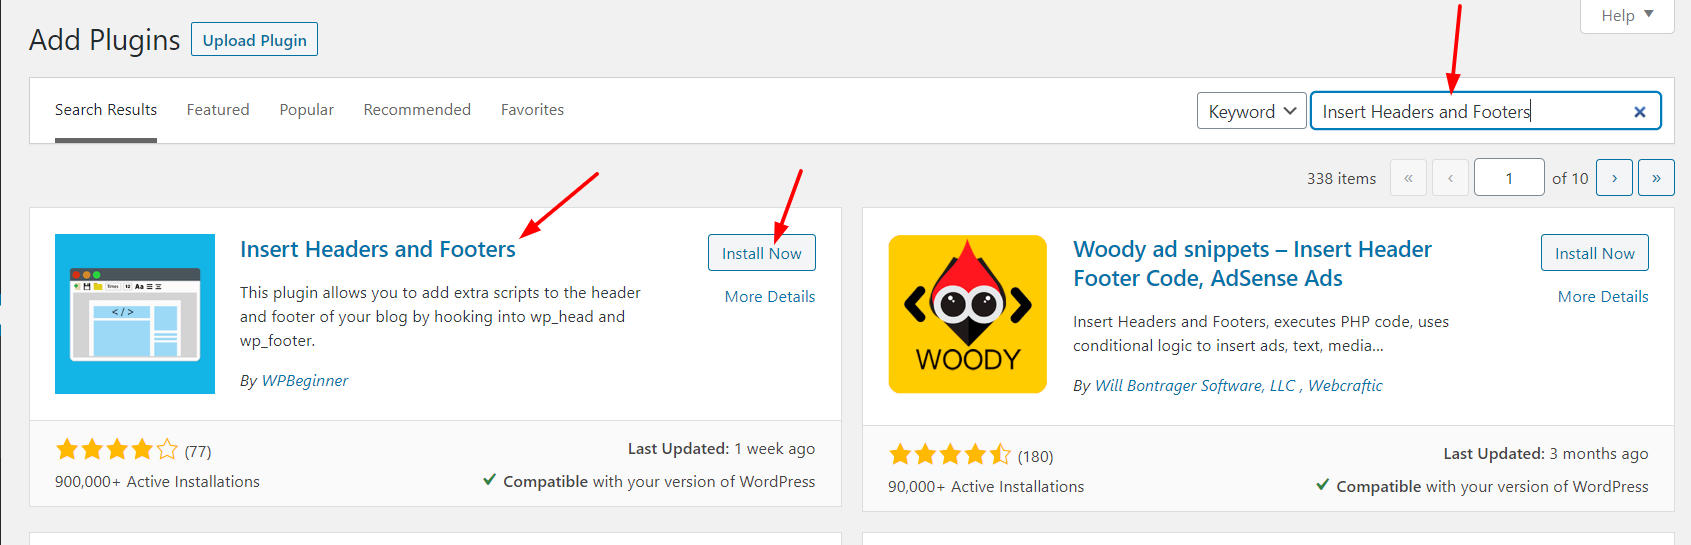 3. Select the correct option and install it. Then, activate it.
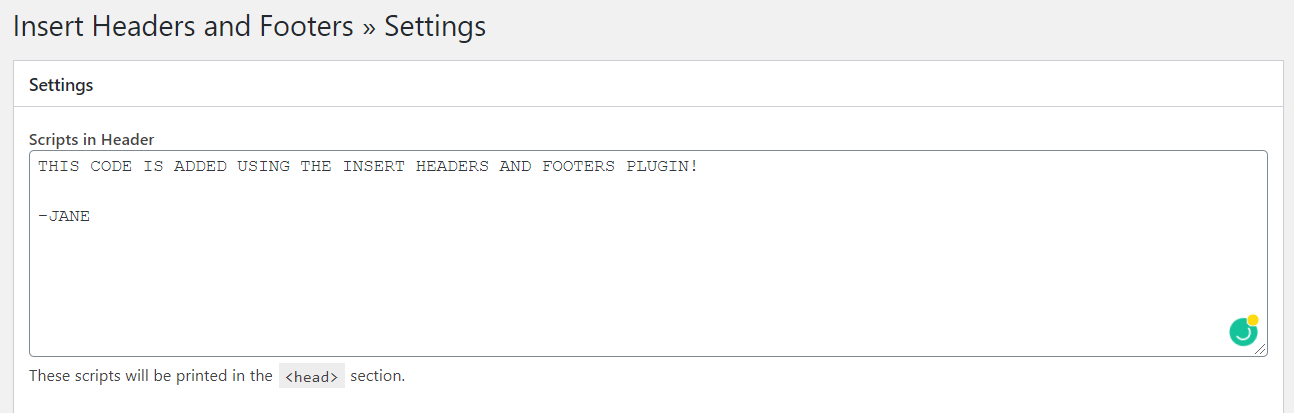
4. Now, we are ready to configure it. Under the Settings section, you’ll see the Insert Headers and Footers Settings as shown below.
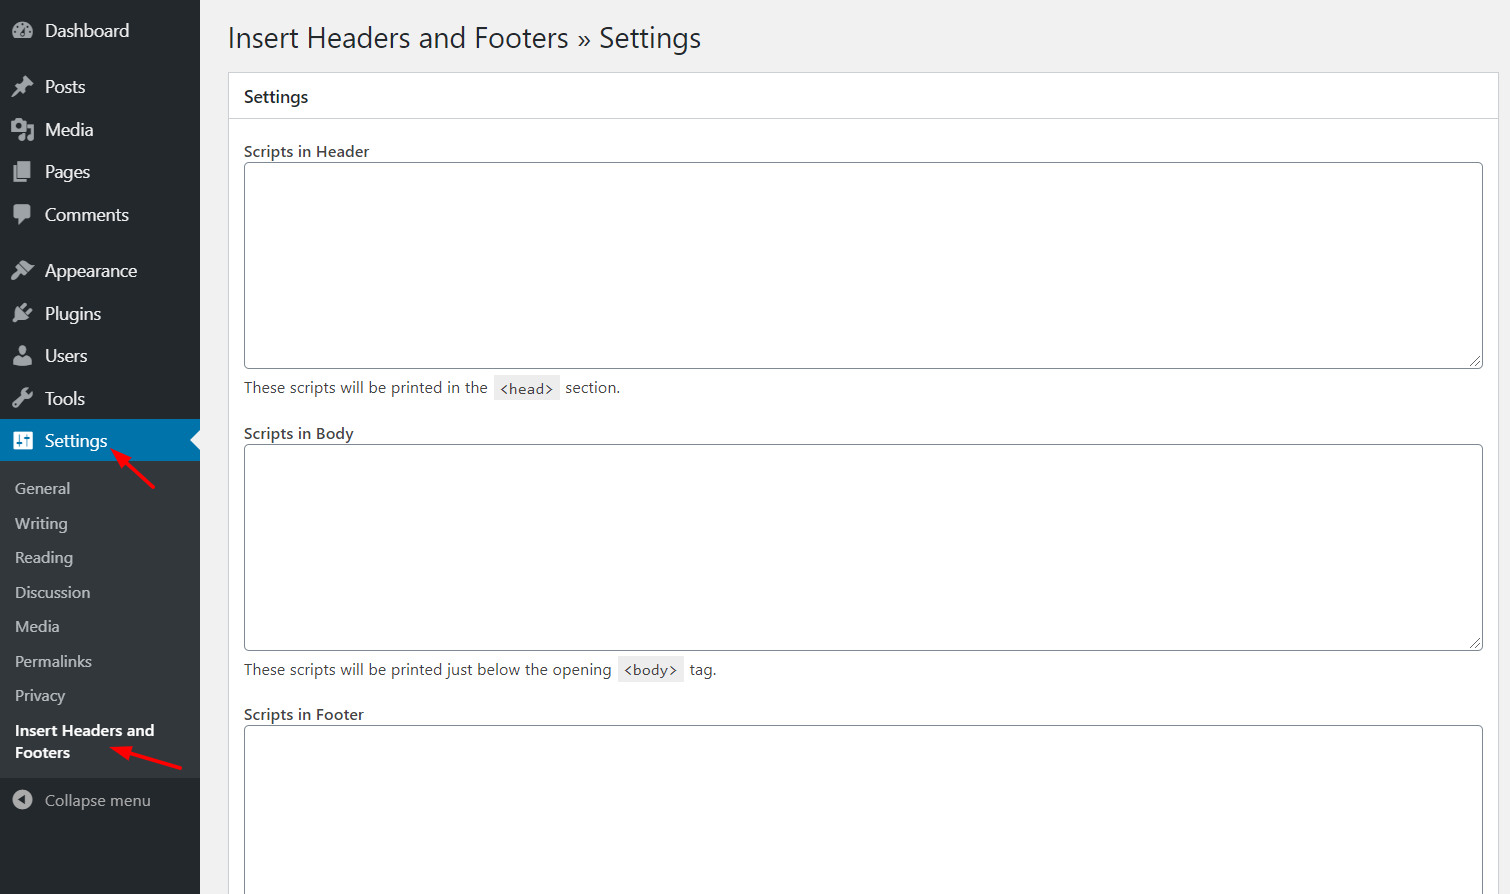
There, you’ll see that you can edit three sections:
- Header
- Body
- Footer
If you add a code in the header section, it will be visible before the </head> tag. The same goes for the body and the footer. Codes will appear before the </body> and </footer> tags respectively. In this case, you are editing the header, so look for the </head> tag. 5. In Scripts in the Header section, add the code you want to go under the head tag.
 6. Once you have added the code, don’t forget to save the changes by clicking Save.

7. That’s it! The code will be added to your header. All in all, using Insert Headers and Footers is super simple so it’s an excellent choice for those who want to edit their WordPress header without any hassle or coding.
2) Change the theme’s Header.php file
If you want to have more control over your header and have some basic coding skills, there are other options. If you’re not a fan of using too many plugins to avoid slowing down your website or you simply don’t want to use the Insert Headers and Footers plugin, don’t worry. Here we’ll show you how you can still edit your WordPress header with a bit of coding step-by-step.
To do this, you’ll need to modify the theme’s core files. So, before you start, we recommend you create a child theme. You can create one manually or using a child theme plugin. Once you’ve created the child theme, let’s see how you can modify the header file using the WordPress admin dashboard.
- First, log in to the admin section.
2. Under the Appearance section, you’ll see the Theme Editor. 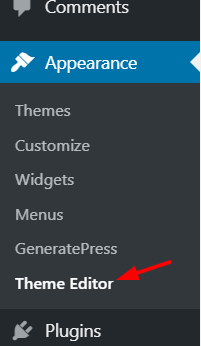
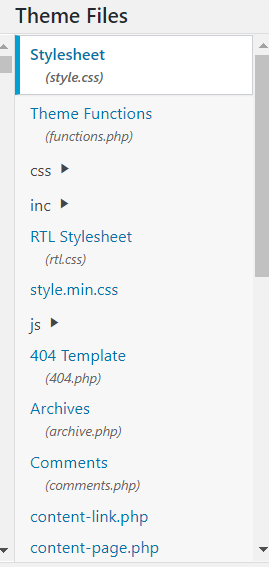
3. Here you can make changes to the theme’s core files. By default, the editor will pull the current theme’s style.css file to edit and it’ll look something like this.

4. On the right side, you will see all the files and folders available in your current theme’s directory.
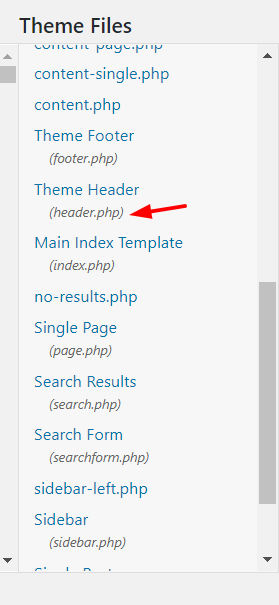
5. Scroll down the list until you find the header.php (under the Theme Header).
6. Select the file, and it will open in your editor. To create this guide, we’re using the GeneratePress WordPress theme so it looks like this.
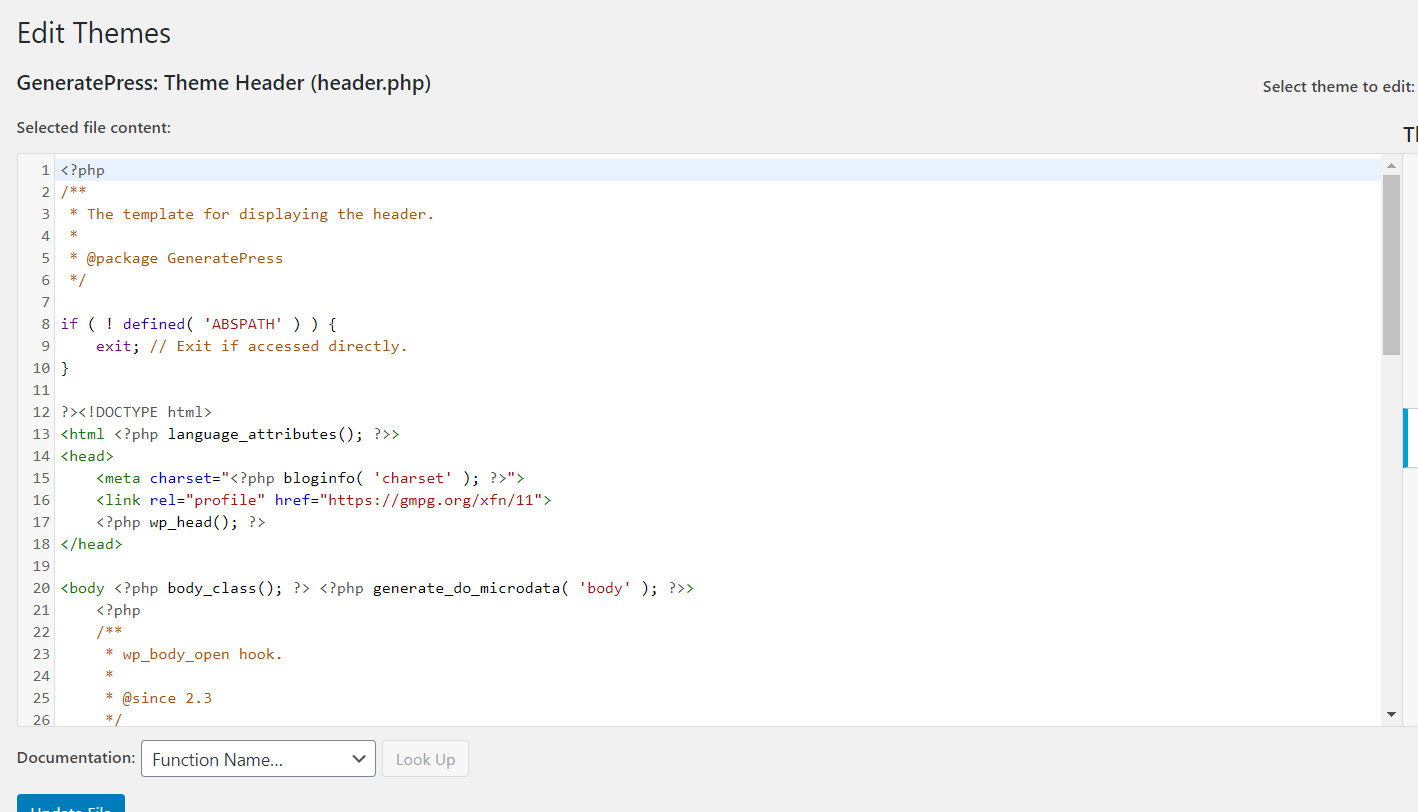
7. Now, the fun begins. While editing the header.php file and adding your custom code, make sure that you add the snippet between the <head> and </head> tags. In this case, we are going to add a sample text right before the </head> tag.
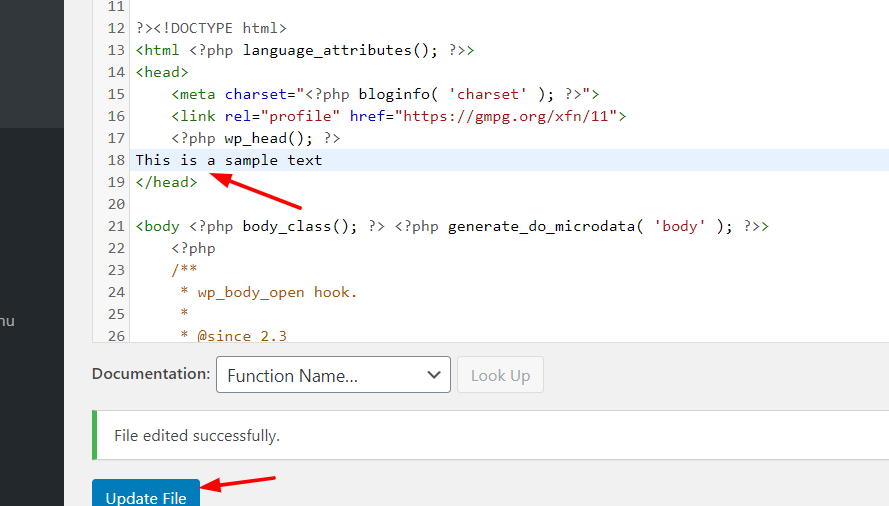
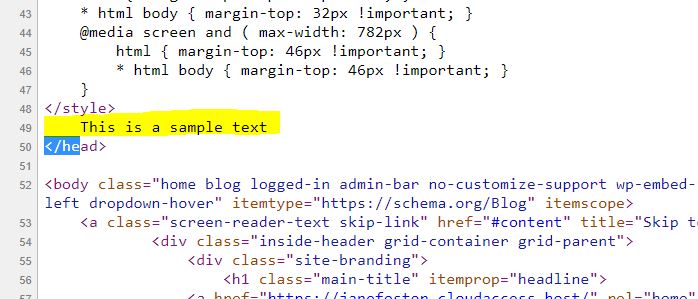
8. Click Update File to save the changes. If you see the File edited successfully message, the changes are saved correctly. You can verify it by going to your site’s frontend and viewing the source.
That’s it! That’s how you edit the header in WordPress via the header.php file. It can also be useful to add some other customizations to the header. Let’s have a look at some of them.
Add Tracking codes
If you want to add a Google Analytics tracking code, Google AdSense auto ads code/ verification code, Facebook Pixel, or even Google search console verification code, you should place it right before the </head> tag. If you do this, make sure that you have updated the file after adding the snippets, otherwise, it won’t work.
PRO TIP: Change the Font Size and Style of WordPress Header
In some cases, apart from editing the text, you may want to change the font or style of the WordPress header. Let’s have a look at how you can do it. To change the style of your header, you need to know a bit of CSS. However, here we are going to show you how you can edit the font size in a very simple way.
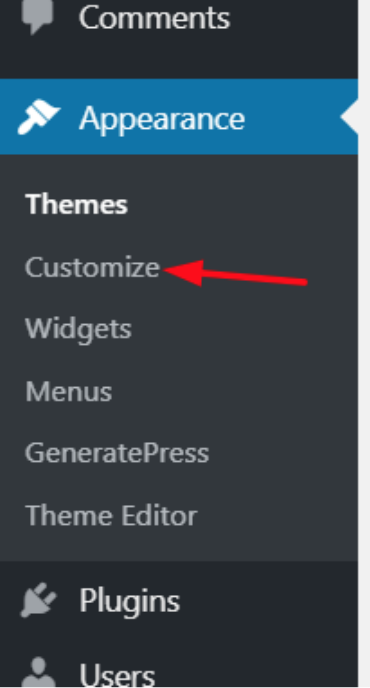
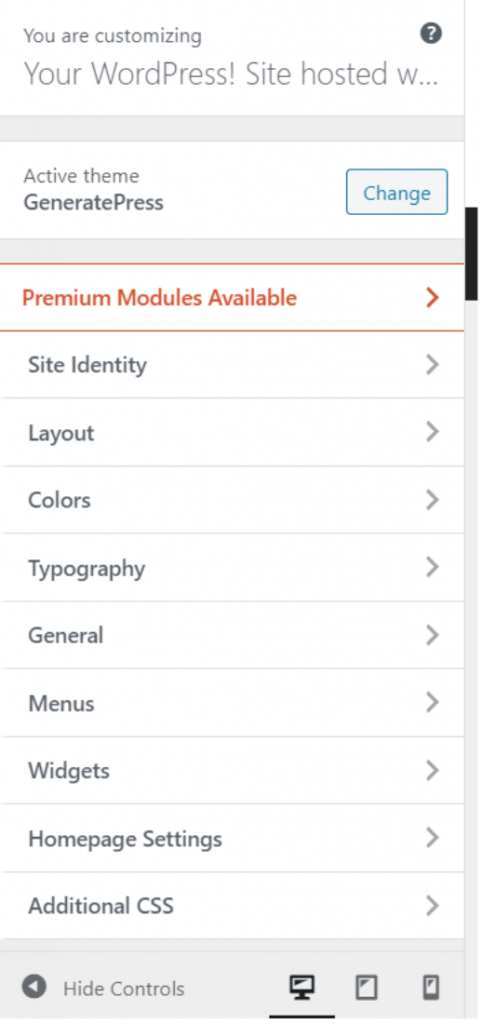
- To add a bit of CSS code to your blog, you have to go to the Appearance section, and click Customize.
 2. There, you’ll find several configuration options. You can configure your entire website according to your installed theme’s configuration and some premium themes like Divi or GeneratePress also allow you to have custom configurations in the customizer.

3. Even though these configurations might be different depending on your WordPress theme, you’ll be able to understand how to do it with one example. In our case, we are using the GeneratePress Lite WordPress theme so we click Additional CSS.
4. Here, you can edit the CSS code of your existing theme to customize your header. First, check the page source to find the right CSS class. In our case, it’s the main-title so that’s what we should edit.
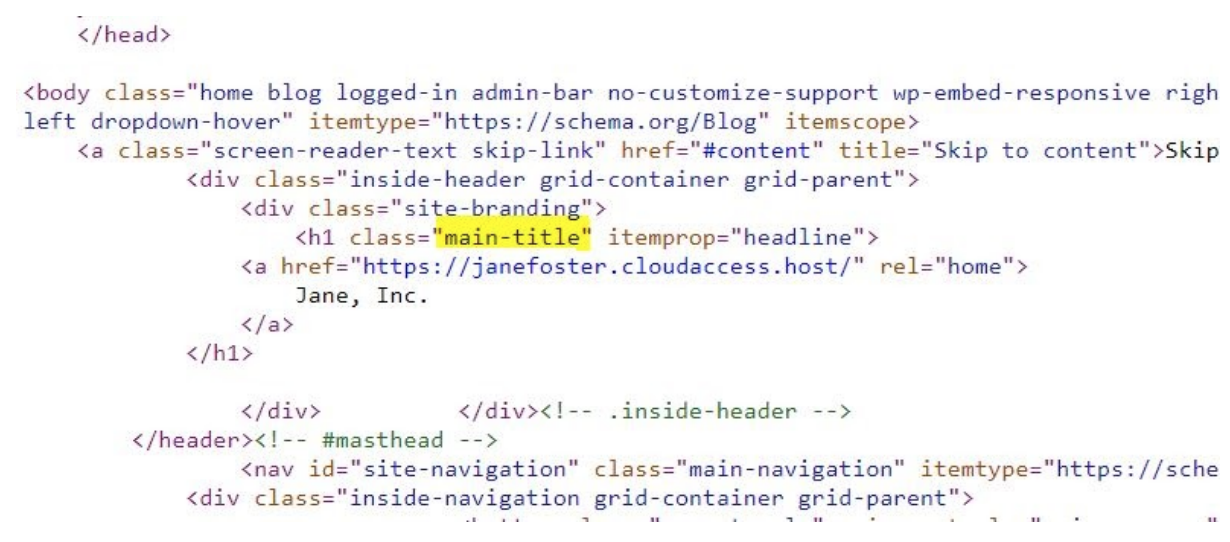 For example, let’s say that you need to change the font style of your header and make it italic. Simply add:
.main-title {

font-style: italic;

}
And that’s it. You’ve changed the font style of your WordPress header. Additionally, you can assign custom CSS to change other things such as:
- Font-family: font: Arial – This will change the font to “Arial”
- Size: font-size: 16px – This will change the font size to 16 pixels so if you want to set a size of 24 for example, simply write 24 instead of 16 in the code.
3) Edit Header Via FTP
This is also an easy way for beginners. If you have issues with the WordPress theme editor, you could use an FTP client. For this tutorial, we are using FileZilla because it’s our favorite but if you like a different one, any will do. Now, let’s see how to edit the WordPress header via FTP.
- To connect FTP to your server, you need an FTP account. From the hosting cPanel, you can create one. Then, with the username, hostname, password port, connect the FTP client with your server.
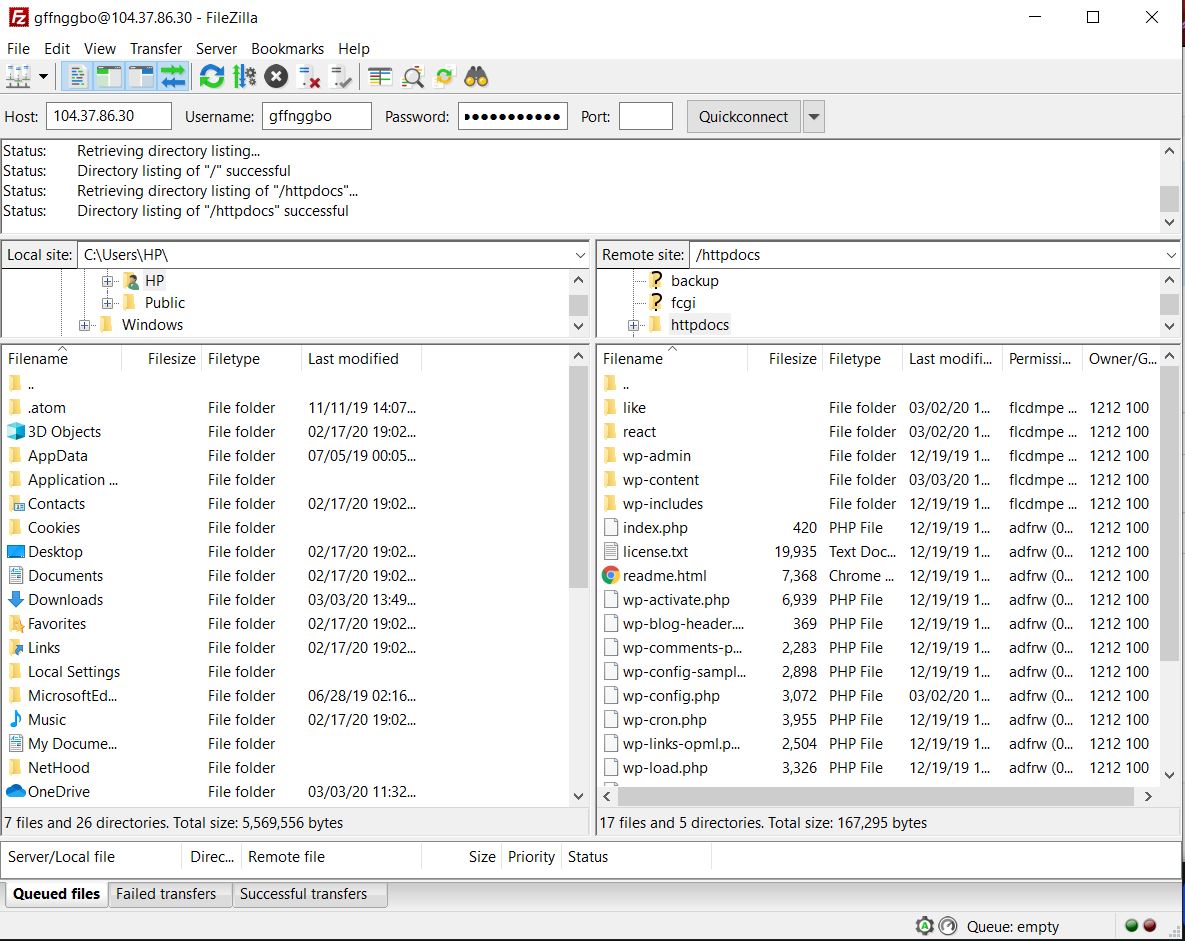
2. On the left side, you will see the local storage, and on the right side, the server storage. To edit the header file, go to your active theme’s directory.
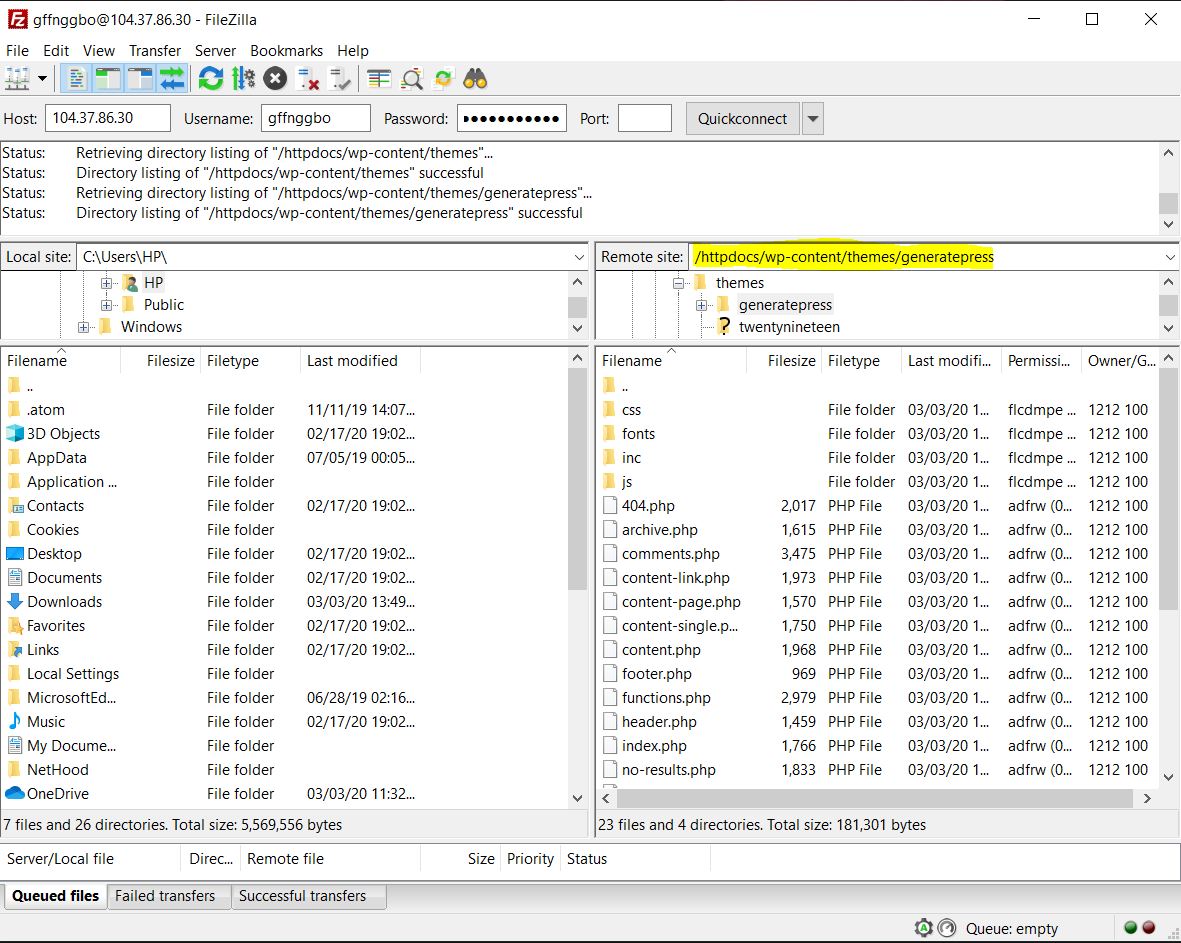
3. The path will be /wp-content/themes/theme-name/. There, you will see the header.php file.
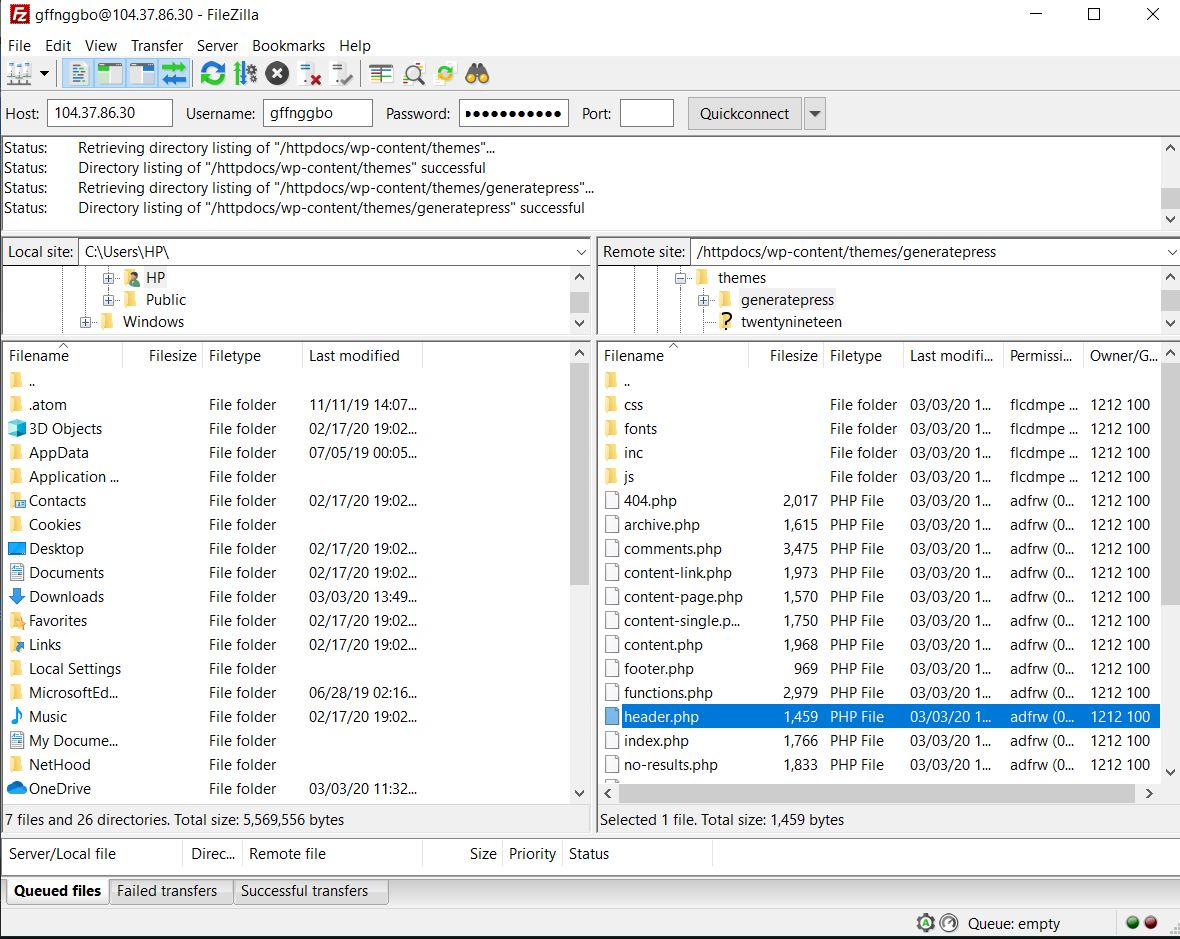
4. Right-click on it and choose the editing option. The file will be saved to your local storage and it will be opened with a file editor like Notepad or Notepad++.

5. Here make the changes you want right before the </head> tag. After making the changes, save the file, and upload it back to the server.
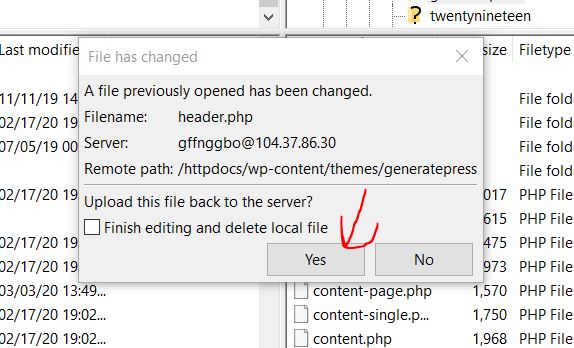
6. That’s it! You’ve edited the file and changed the WordPress header of your site! You can verify the changes by viewing the website’s source code. It’s worth noting that this method has one main drawback.
Once you have changed the theme, you will lose all your previous customizations, so if you are planning to change themes in the future, this might not be the best option for you. On the other hand, if you need to modify your new theme’s header with the old code, a simple copy-pasting will do the job.
Bonus
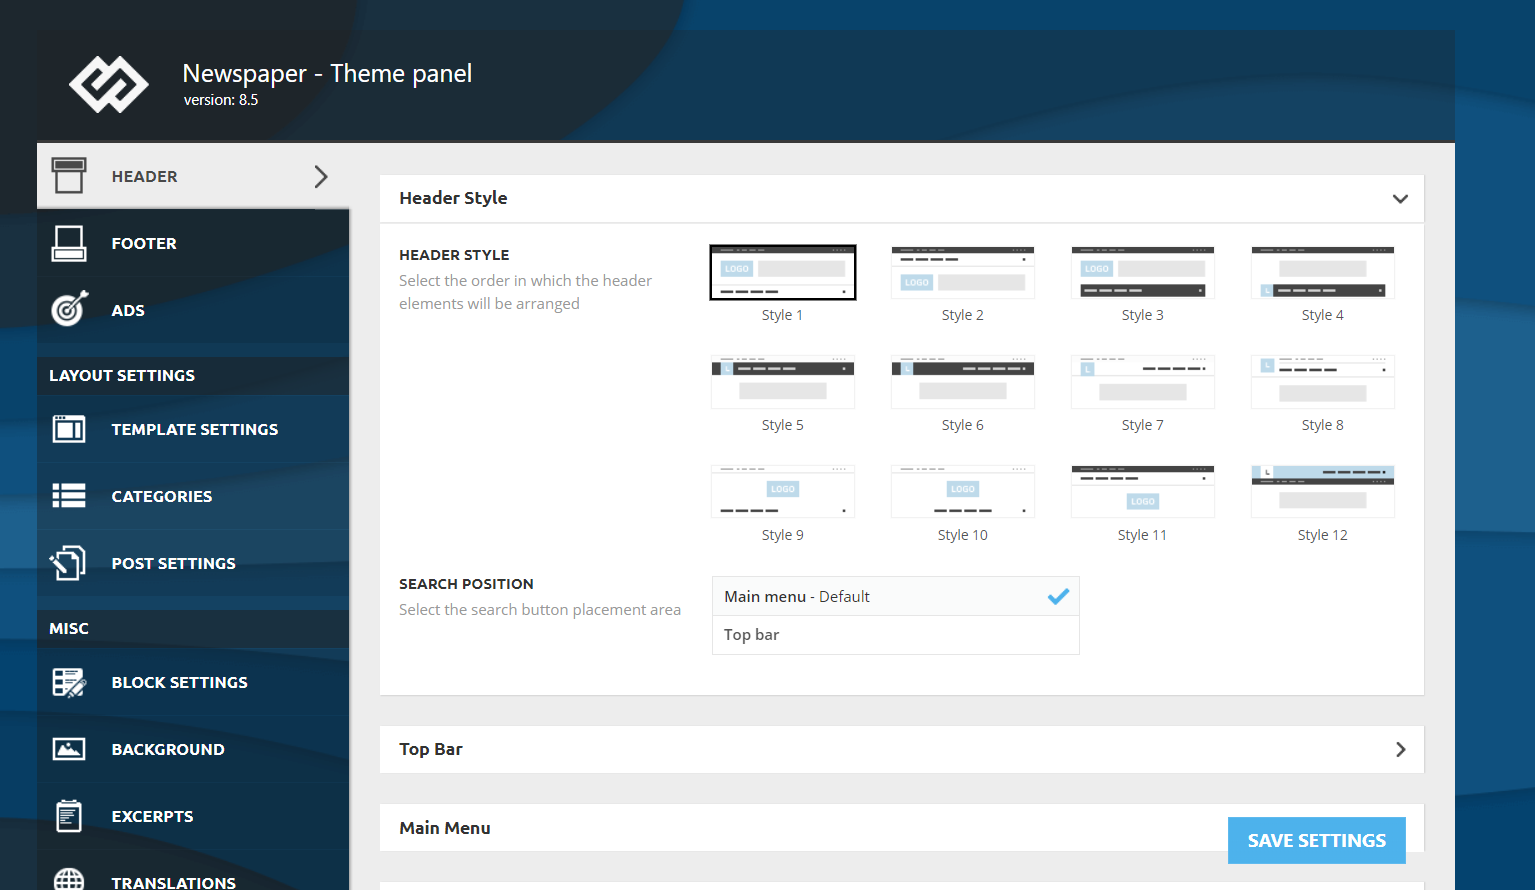
Some WordPress themes like Newspaper, Newsmag, and others allow you to edit the theme header. Most WordPress themes come with a dedicated theme panel. From there, you can customize the theme. As an example, take a look at the theme panel offered by the Newspaper WordPress theme below.
To add the Google Analytics code, the team added a dedicated section to the panel.
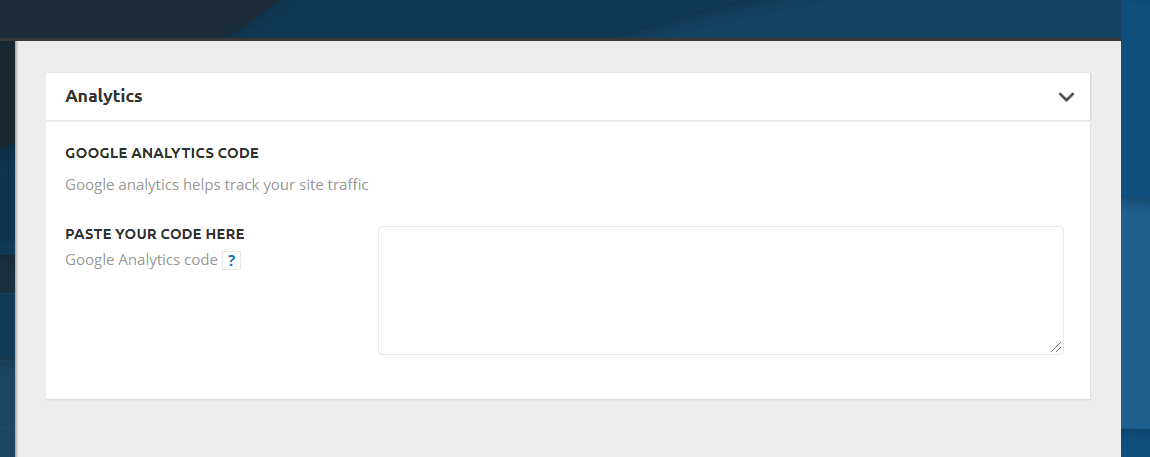
The code will be added to the <head> section of your website. After adding the code, simply save the changes, clear your website’s cache, and you are good to go! If your theme doesn’t support this to edit the header, you can use one of the methods mentioned above.
What to add in the Header?
So now that you know how to edit your WordPress header, let’s have a look at what you can add to it:
- Google Analytics Tracking Code
- Verification Code
- Auto Ads Code
- Facebook Pixel
- Search Console Verification Code
- Mobile Bar Color Code
- Images and Videos
- Pinterest Verification Code
As you can see, almost every verification can be done through the header modification. Plus, if you need it, you can also add a widget to your header. This might be visible to your website visitors and it can be very useful because you can use the widget to add a CTA button, display advertising, or anything you want.
How to add an image to the header in WordPress
Another possible customization is to add images to the WordPress header. To do that simply follow these steps:
- Log in to your WordPress admin dashboard
- Go to Appearance > Header. Please note that some themes don’t have the header option so you’ll have to go to Appearance > Theme Editor > Header and modify the header PHP files
- Then, go to the Header Image section and click Add New Image
- After that, select the image you want to use in your header
- Then, you will go to the Crop Image section where you can decide what part of the image you want to display.
- Once you’re done, click Publish.
- That’s it! You’ve customized the WordPress header with a new image
When you add an image to your header, remember to:
- Use photos that catch the visitors attention and communicate what you do and your values
- Use pictures that fit your branding and are consistent with what you want to communicate. For example, if you’re a sports brand, don’t show pictures of fast food or cars. This might sound obvious but there are plenty of sites where the images don’t match what they do and end up confusing the costumers
How to add a video to the header in WordPress
For some businesses, it might make sense to add a video to the header to attract the users’ attention. So here, we’ll show you how to do it in 2 different ways.
- Add a YouTube video to the header
- Add an mp4 video
Let’s have a closer look at each method.
1) Add a YouTube video
Before starting with these steps, go to YouTube and copy the URL of the video you want to add to the WordPress header. After that, do the following:
- Log in to your WordPress admin dashboard
- Then, go to Appearance > Header
- There, go to the Header Media section and paste the URL of the YouTube video in the corresponding field under Header Video
- Press Publish and that’s it
2) Add an mp4 video
A second option to add a video to the WordPress header is to upload an mp4 video file. Keep in mind that the file can’t weigh more than 8 MB. Additionally, the dimensions will need to adjust to your theme’s container size. So, to add an mp4 video to the header, in the WordPress dashboard, you have to:
- Go to Appearance > Header
- Then, go to the Header Media section press Select Video under Header Video
- Search for the file and upload it to the Media Library
- Then press Choose Video and Publish it
- That’s it! You’ve added a video to the WordPress header!
NOTE: One advantage of the YouTube method is that it allows you to add any video, whereas if you upload a video file, the file can’t be bigger than 8 MB and it has to adjust to the theme sizes.
BONUS: How to access header tag in WordPress
The two easiest ways to access the tag to edit your header in WordPress are:
- From the WordPress dashboard: Go to Appearance > Theme Editor > header.php file. Near the top of the file, you should see the <head> and </head>. Simply add your code in between the tags.
- Via URL: Alternatively, you can access the header tag by adding /wp-admin/theme-editor.php?file=header.php to your domain URL. For example, for QuadLayers, it would be http://quadlayers.com/wp-admin/theme-editor.php?file=header.php.
If you use WordPress Network, you’ll need to use a different link: http://quadlayers.com/wp-admin/network/theme-editor.php (remember to change the URL with your domain)
What if my theme doesn’t have a header.php file?
Some child themes don’t have their own header.php files. If that’s your case, there are 2 options to customize your header:
- Move the parent theme’s header to the child theme and edit it from there
- Use a hook: To add code and edit your header you can add the following to the functions.php file of the child theme.
function QL_your_function() {
echo 'your code';
}
add_action( 'wp_head', 'QL_your_function' );
Note that this is an example code to give you a structure, you’ll need to adapt it and add your own code to it.
I’ve tried to edit the WordPress header but it didn’t work
Let’s say that you followed every step of this tutorial but the code wasn’t added to your site’s header. First, make sure you have edited the right file and added code to the right section. If you have done everything correctly and it still doesn’t work, there’s one simple solution. If you’re using a WordPress caching plugin on your site to optimize the speed and performance, simply clearing the cache will fix this issue in most cases.
Conclusion
To sum up, these are simple ways to edit the header of any WordPress website. For beginners, we recommend using the Insert Headers and Footers plugin because it is simple to use and manage.
On the other hand, if you are not planning to change your WordPress theme soon, editing the theme’s header.php file is an excellent choice for you.
Finally, it’s important to note that if you edited the header.php file of your WordPress theme and changed the theme, all the customizations will be lost although you can also copy and paste them. So, choose between the available options and find out which one is the best for you.
If apart from the header you also want to customize the footer of your site, check out our guide on how to edit the footer in WordPress.
Still, need help? Feel free to comment below and we will help you with whatever you need!

I found the guide very helpful, with newspaper theme I needed to put the code into the newspaper CS/JS theme, because pasting in header.php from wordpress “appearance” menu seemed not working.
Hi Angelo,
If you are not able to edit the theme files through the Theme Editor, feel free to use an FTP client such as FileZilla. It will work 🙂
This is really awesome to edit header and footer section using plugin. This is very helpful to me for making edits in my website
Thanks Manoj. We’re glad that you liked the tutorial
hello there !
I find this article helpful . but Still I’m in a trouble . can I edit the existing header html , which I see in the inspect area ? because when I click header my account icon there comes 2 option , one is ‘sign in ‘ and another is ‘ registration ‘ . as i separate my woocommerce sign in and registration page so i have to put a new registration page link in the header -my account- ‘registration’ option .but i’m not finding the html file from header.php ! so please can you help ?
We have a phone number showing at the very top of the screen, which I cannot find to edit out. The number is no longer valid and should be removed, but can anyone tell me how that is done?
It is not showing in ‘header.php’, as described in this article.
Go to Appearance > Customize > Header, click on the element that contains the phone number (probably HTML) and delete/edit its content.
I Am Getting Multiple H2 Tag Error while Auditing My Site On WordPress, But I don’t See any Headers in WordPress, do u know any other alternative way of fixing it? , please help
Buen trabajo, super detallado y útil, gracias
Muchas gracias
It is an amazing post and you explained in a detailed way. Nice to see this here. I will bookmark your blog for more details. Keep sharing the new things like this.
Hi Good people. May I kindly request your assistance since I am actually stuck. I am using Lawyer lite WordPress theme for my site. I actually want to add a second logo on the opposite of the far left logo, which means on the far right. How can I add it so that I have 2 logos (1 on far left and 1 on far right). I would greatly appreciate
I had a tough time finding header.php. Thank you very much for the detailed instruction with images. Images helps a lot for a beginner like me.
We’re glad it was helpful, Sharika
Hi
I found the article very useful
Thanks a lot
Thank you for sharing with us. Good article, by the way.
Great article, Thanks for sharing
Do you know how can i show the header section on my blog posts?
https://miorix.com/what-is-vps
Many thanks! I forgot about how to access header.php to add the new google analytics 4 tag.
Hi. My theme is not a child theme, but there is still no header.php under Theme File Editor. How do I locate and edit the header.php then? I’m looking to remove the GTM script instead of installing it, so the plugin doesn’t work in this case. Thank you!
I have read your blog on How do I customize the header and footer of my WordPress website.It was very interesting and helpful but I can add some extra points in your article. Here some extra points:
1.Go to WordPress Dashboard
2.Templates
3.ThemeBuilder
4.Click Add New Template and choose Header (or Footer) Name your header template and click Create Header (or Footer)
These are some extra points to add to your article.
Hi Lauren,
Some themes come with a header and footer template option.
It is another excellent way to modify the header of the website.
Thanks for pointing it out.