
How to embed Google Calendar in WordPress – 3 Easy Methods
Google Calendar is a handy app that allows you to organize your schedule, manage and share events, and be more productive. That’s why so many people around the world use it and you should too. And what if you could integrate it with your site? Wouldn’t that be amazing? In this guide, we’ll show you how to embed Google Calendar in WordPress step-by-step.
To give you an idea of how useful this tool can be, let’s take me as an example. Long before working with WordPress, I was a university student with a hectic life schedule. It was fun, but I failed to keep up with lots of things since I had so many deadlines to meet and so little memory to remember them all. Then, Google Calendar was launched, and it has saved me since then – not me but many others as well.
Nowadays, there are over 250,000 websites that are categorized as Google Calendar customers, and nearly 100,000 of them use Google Calendar. If you’re not familiar with Google Calendar you may be wondering what does it do to get so much recognition? Google Calendar helps you schedule meetings, create reminders, manage, and respond to meeting invitations, share and view calendars, and many other things.
However, as we are talking about Google Calendar for WordPress websites, there is more to it than you’ve ever known. In this guide, we will show you how to embed WordPress in Google Calendar and how you can make the most of this excellent tool.
Introduction to Google Calendar
Everyone is familiar with the tech giant Google. Among Google’s various applications, Calendar stands out as one of the most effective tools for everyday tasks and activities. In short, it helps organize users’ life, both by working alone and by cooperating with other Google apps like Gmail.
For businesses, Google Calendar is useful because it allows you to create events, send invitations to guests, create recurring events, manage who participates, and set optional attendees, among other things. Additionally, there are many other functionalities of Google Calendar for G Suite premium users, such as setting up video conferences as well as adding and managing venues.
Why embed Google Calendar in WordPress?
Now that we understand why individuals, groups, and businesses use this tool, let’s move on to why you should add Google Calendar to your WordPress site:
- Let your customers know about future events: Using Google Calendar for your website gives you the ability to inform your customers about upcoming events so that they can make time to participate. This way, you can ensure that everyone is aware in advance and join the events.
- Manage personal appointments: If the above is for the sake of users, this purpose is solely for you. You can manage all of your activities by listing them here, adding notes, reminders, and everything needed to simplify your working hours. This is the primary purpose of Google Calendar for personal use, but now as it is integrated with your website, the advantages will be multifold.
Integrating Google Calendar with your WordPress site is an excellent way to inform your users about upcoming events. Additionally, it’s an amazing tool for creating events and recurring meetings, managing who participates and arranging video calls, among other things. There are indeed many other plugins that have similar functionalities. So then, why should you stick to Google Calendar? Even though Google hasn’t been the only brand that saw the importance of developing a schedule and management tool for WordPress businesses, Google Calendar has remained on top since the start because its features are undefeatable.
Additionally, it’s Google, so brand recognition is very powerful. Other plugins have different functionalities, but the truth is that usually, they’re not very helpful. Also, although most plugins require you to pay for premium features, those functionalities do not match Google Calendar. So, if you have to pay, you’re better off using your money to expand Google Calendar’s functions.
How to embed Google Calendar in WordPress? A Step-by-Step Guide
There are 3 different ways to add Google Calendar to WordPress:
- With a plugin
- Via the WP block editor
- Using HTML
These methods are very effective, so you should choose the one that best suits your skills and needs. Now, let’s have a closer look at each option.
1) Embed Google Calendar in WordPress with a plugin
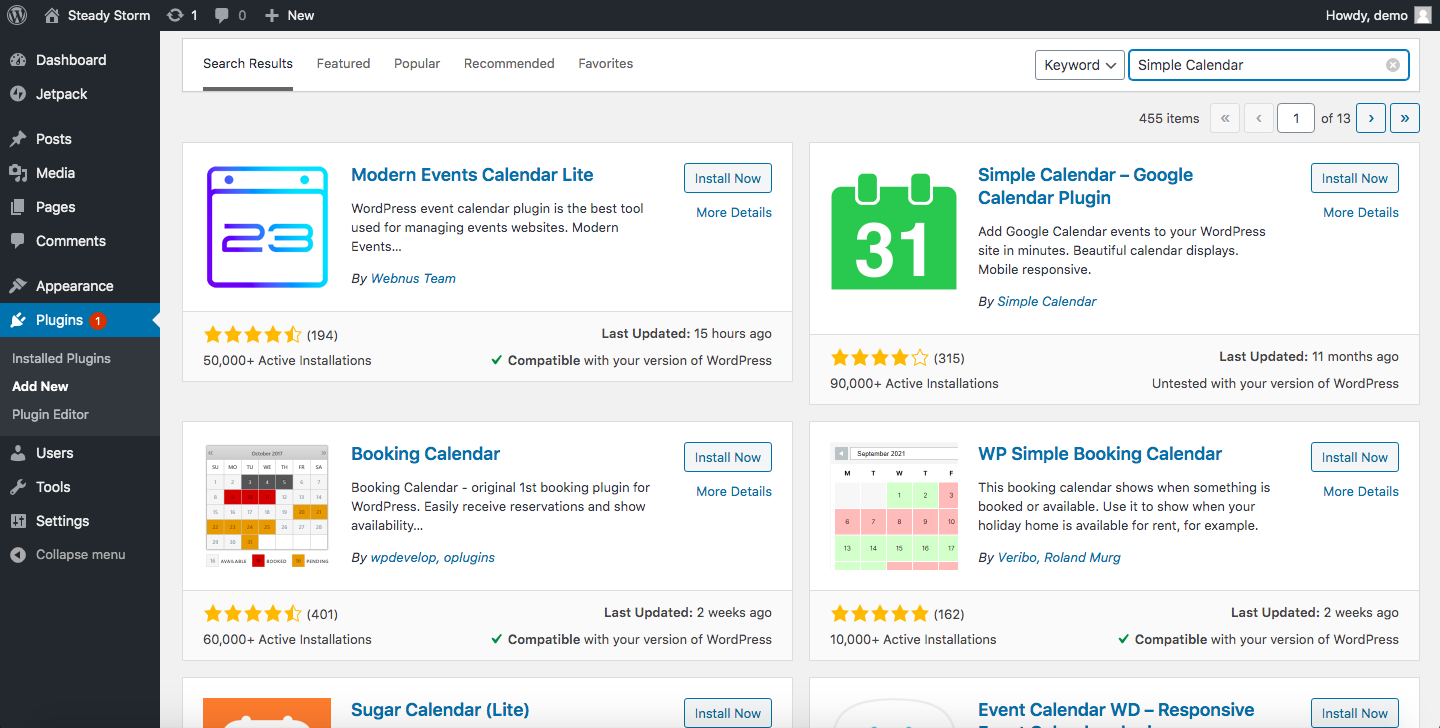
Let’s look at how to make this integration happen in three easy steps. Several support plugins help you embed Google Calendar in your WordPress site. However, we’ll use the highest-recommended plugin in this tutorial: Simple Calendar. This tool helps you display Google Calendar in WordPress very easily.
Besides showing events by week or month or under a list format, it also syncs with your Google Calendar, meaning you won’t have to add anything to WordPress. Moreover, you can customize its look and go further by using its many add-ons or connecting with other plugins.
Step 1: Add Simple Calendar to WordPress
The first step to adding Google Calendar to WordPress is to install Simple Calendar on your site. To do this, simply:
- In your WordPress dashboard, go to the Plugins section
- Click Add New and then type Simple Calendar in the search box
- There you’ll see the Simple Calendar – Google Calendar Plugin. Click Install Now and wait a few moments until it finishes
- Go to the Installed Plugins section, and activate it
After you’ve done that, look at your sidebar and you should see a Calendars section with a little calendar icon. That means that you have successfully installed Simple Calendar!
Step 2: Connect Your Site with your Calendar
Once you’ve installed and activated Google Calendar, connect it to your WordPress site. So to configure the plugin, click Calendars – Settings. There, you will see the tab Event Sources, and you will see that it asks for a Google API key. Here you can find how to get the API coming along, but if you don’t want to read the whole thing, we will brief it for you.
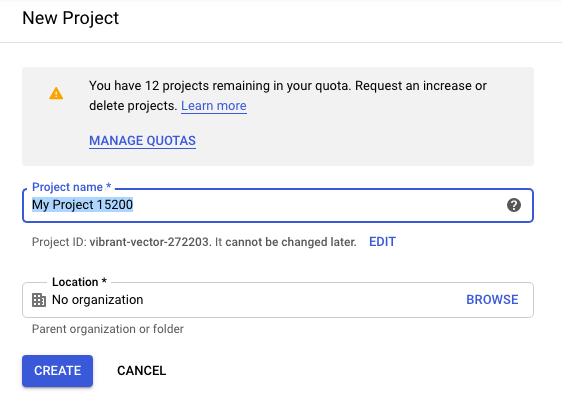
- Open Google Developers Console
- On the top right of the screen, click Create Project. Then type the name you want, and click Create
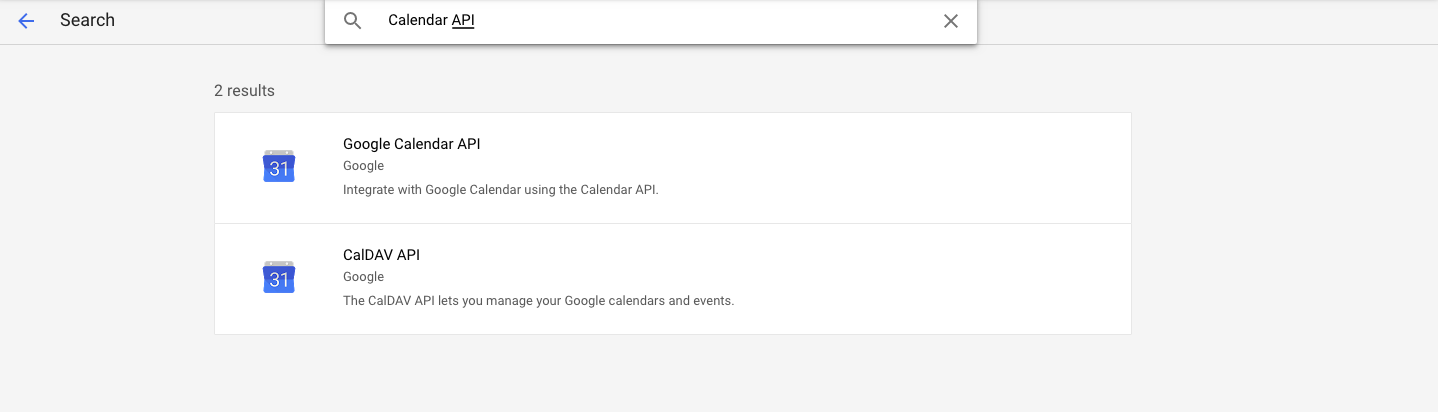
- You will then be taken to the APIs and Services page. Here, click Enable APIs and Services to get through to the API Library
- On the next screen, you will see a search box. Type Calendar API, choose the suggested result Google Calendar API and enable it
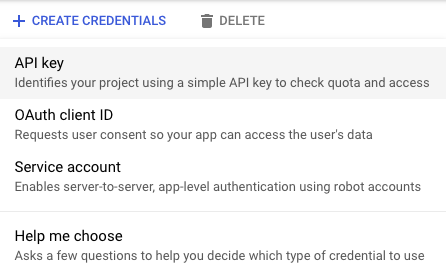
- After that, go to the Credentials tab, click Create Credentials, and choose API Key as shown below
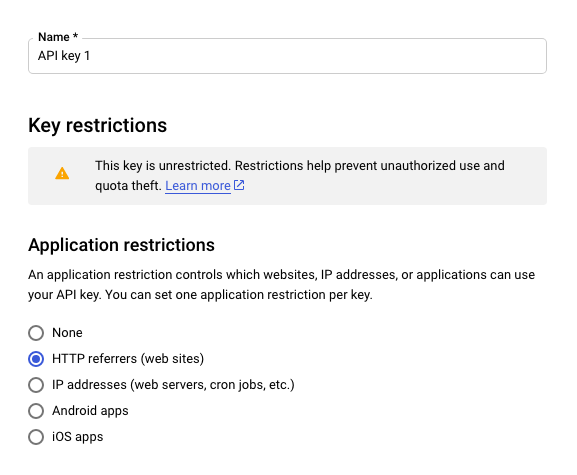
- Now you will see the API key generated for you. Click Restrict Key for safety measures
- You will be taken to the API key detail page, where you will see several options
- In the Application restriction part, choose HTTP referrers (websites)
-
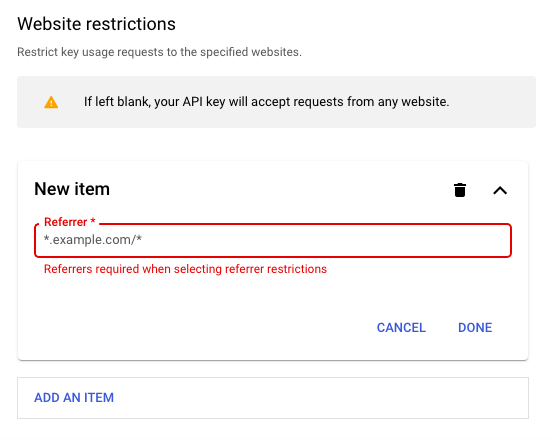
- In the Website restrictions section, select Add an item and enter your site URL. Once you’ve done that, click Done
-
- In the API restrictions section, choose Restrict Key and Google Calendar API when selecting APIs, then click Save
Great! You have safely navigated through the hardest part. Now feel free to copy the API key, go back to the box inside the Calendars Settings WordPress dashboard where it asks for a Google API key, and paste the key. Click Save changes, and move on to the following step. You’re almost there.
Step 3: Display Google Calendar in WordPress
This is the final step, where you’ll find out how to display Google Calendar and show it to the visitors of your WordPress website.
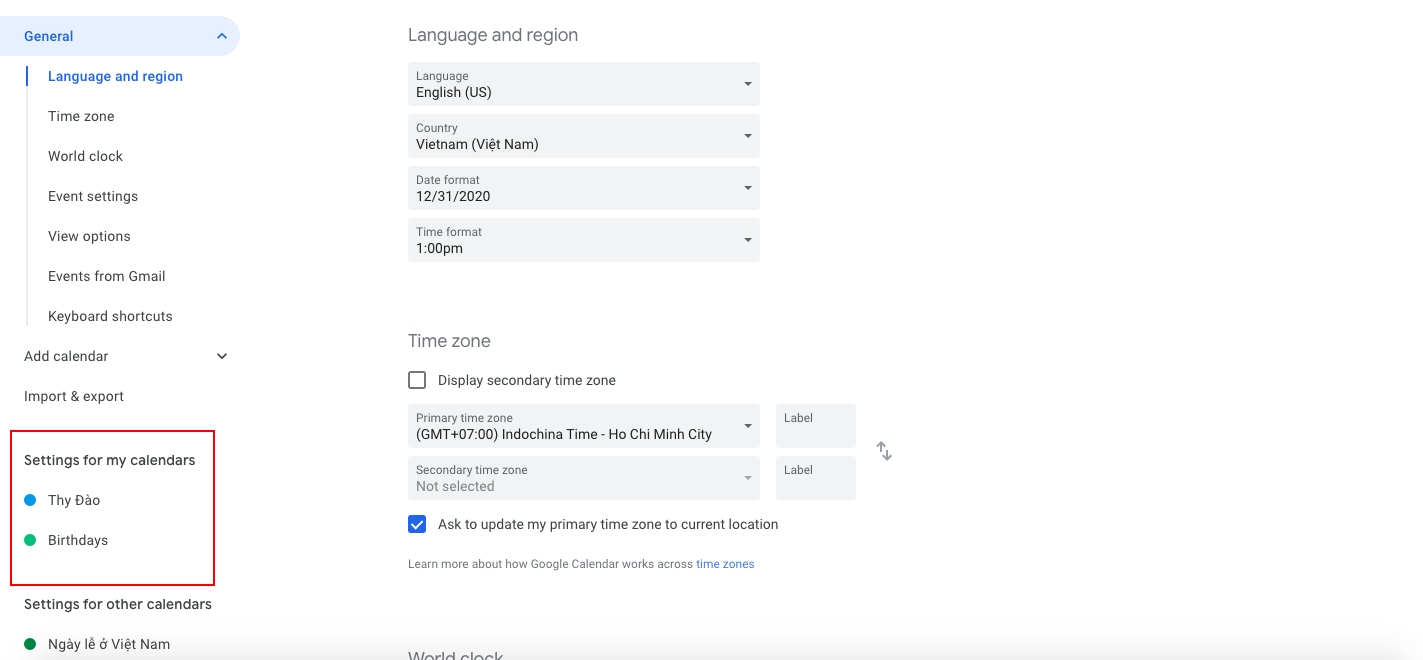
- First, visit Google Calendar and click Settings. You will see a left sidebar; scroll down to find Settings for my calendars, and opt for the calendar you want to display on WordPress.
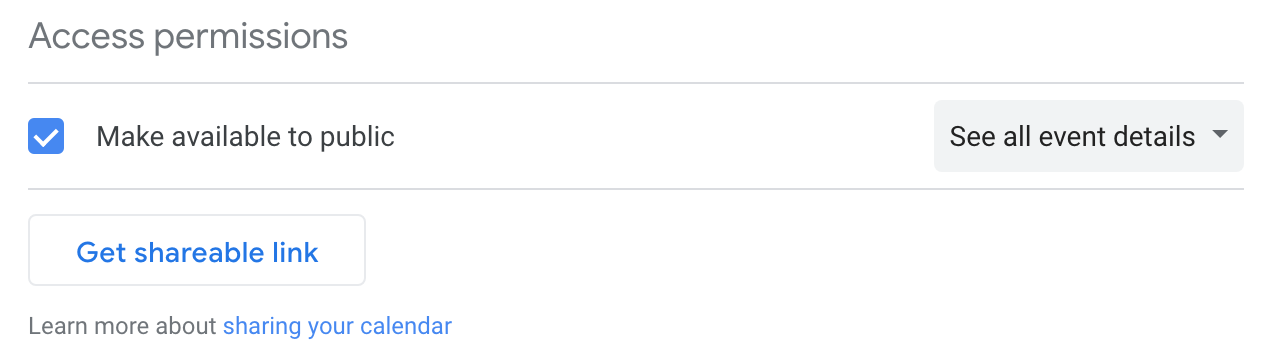
- After clicking on the calendars you want to show, you will see a dropdown where you will click the Access Permissions. Tick the Make available to the public option
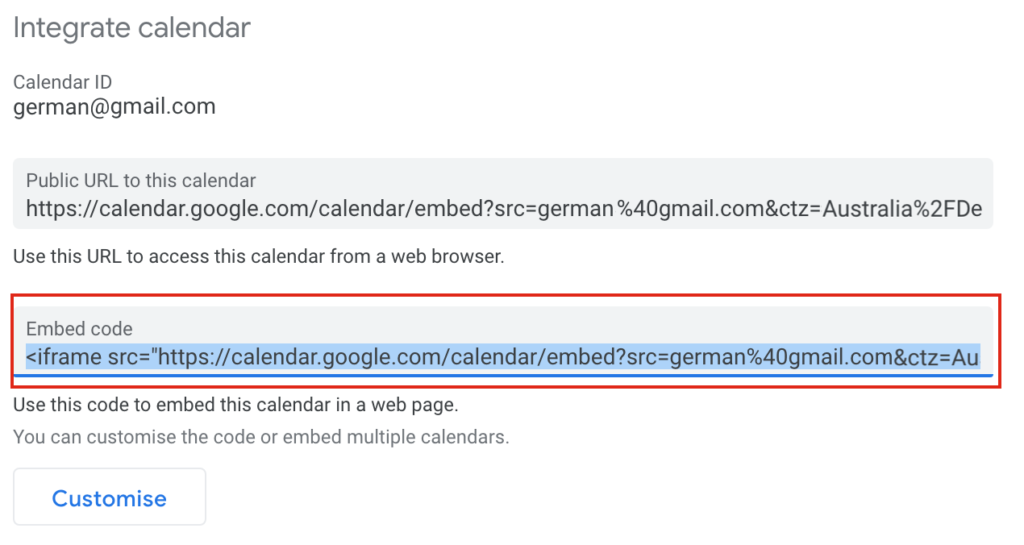
- Then, click Integrate calendar on the same dropdown. Here, copy the ID under the Public address in iCal format
- Now, go back to the WordPress dashboard, and in the Calendars tab, choose Add New
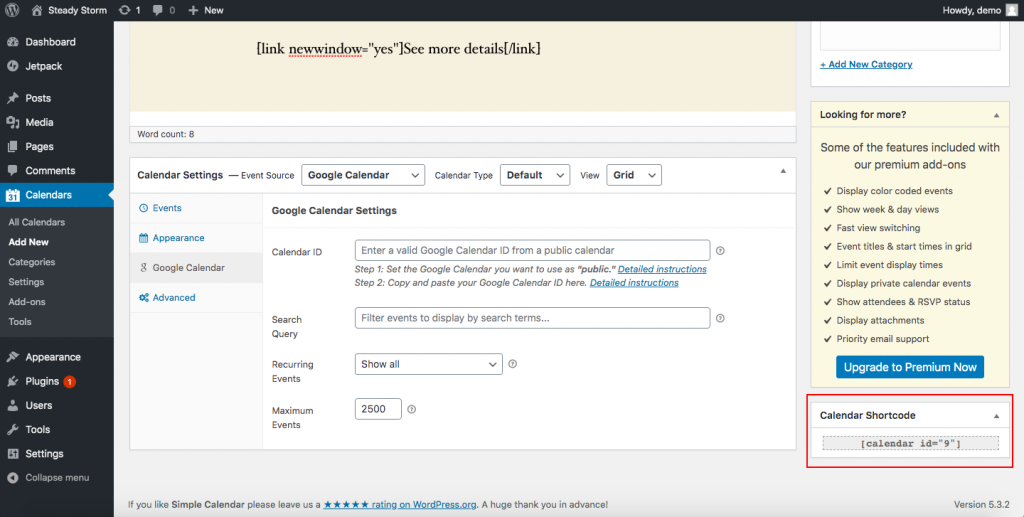
- Type the title you want for your Calendar and then scroll down until you see the Calendar settings. There, choose the tab Google Calendar and you will see this:

- Paste the ID you copied in the third step above (Public address in iCal format) to the Calendar ID box
- Click Publish
Congratulations! You have just embedded Google Calendar.
What if you don’t want to use any third-party tools? We’ve got you covered. Let’s look at other methods to add Google Calendar to WordPress without a plugin.
2) Add Google Calendar with the WordPress block editor
Another option to add Google Calendar to any post or page on your site is to use the Google Calendar Block. This method is very simple and effective and doesn’t require any coding.
-
- So, to include the Google Calendar Block on your website, go to a page or post where you want to add the Calendar and click Add Block
- Then, type Google Calendar and select the corresponding block
- After adding the block, you’ll need to enable permissions for the calendar you want to share and paste the calendar embed code into the corresponding field
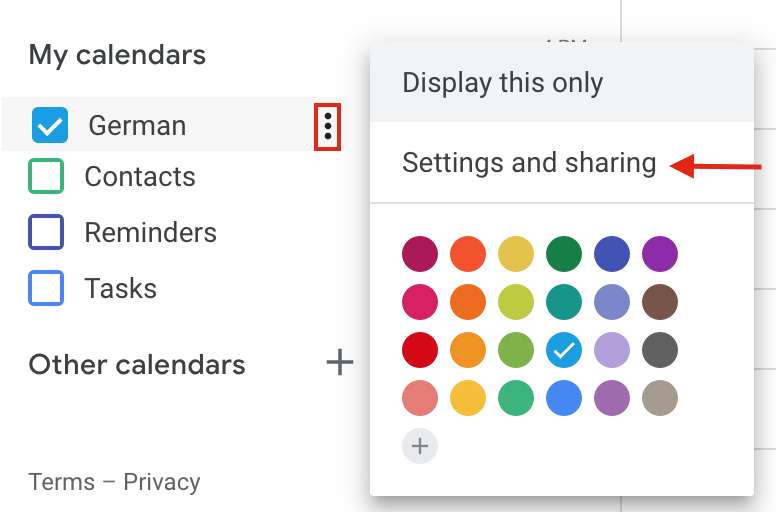
- So, to get the embed code you need in step 3, go to Google Calendar, click on the 3 dots next to the calendar, and press Settings and sharing
- After that, go to the Access Permissions section and make your calendar public by ticking the Make available to the public option. You’ll get a warning saying that this will make all your events visible. Click Ok

- Then, go to the Integrate Calendar section and copy the Embed code. You’ll use this code to add your calendar to your site. If you check the code, you’ll see that it has your email in it, so make sure you’re ok with the calendar being public
- Finally, go back to the post or page where you want to display your calendar and paste the embed code in the corresponding field. Then press Embed and save the changes
- That’s it! You’ve just embedded Google Calendar on your WordPress site!

You can also customize your calendar by clicking on the Customise button. You can personalize the colors, buttons, sizes, tabs, icons, and more. 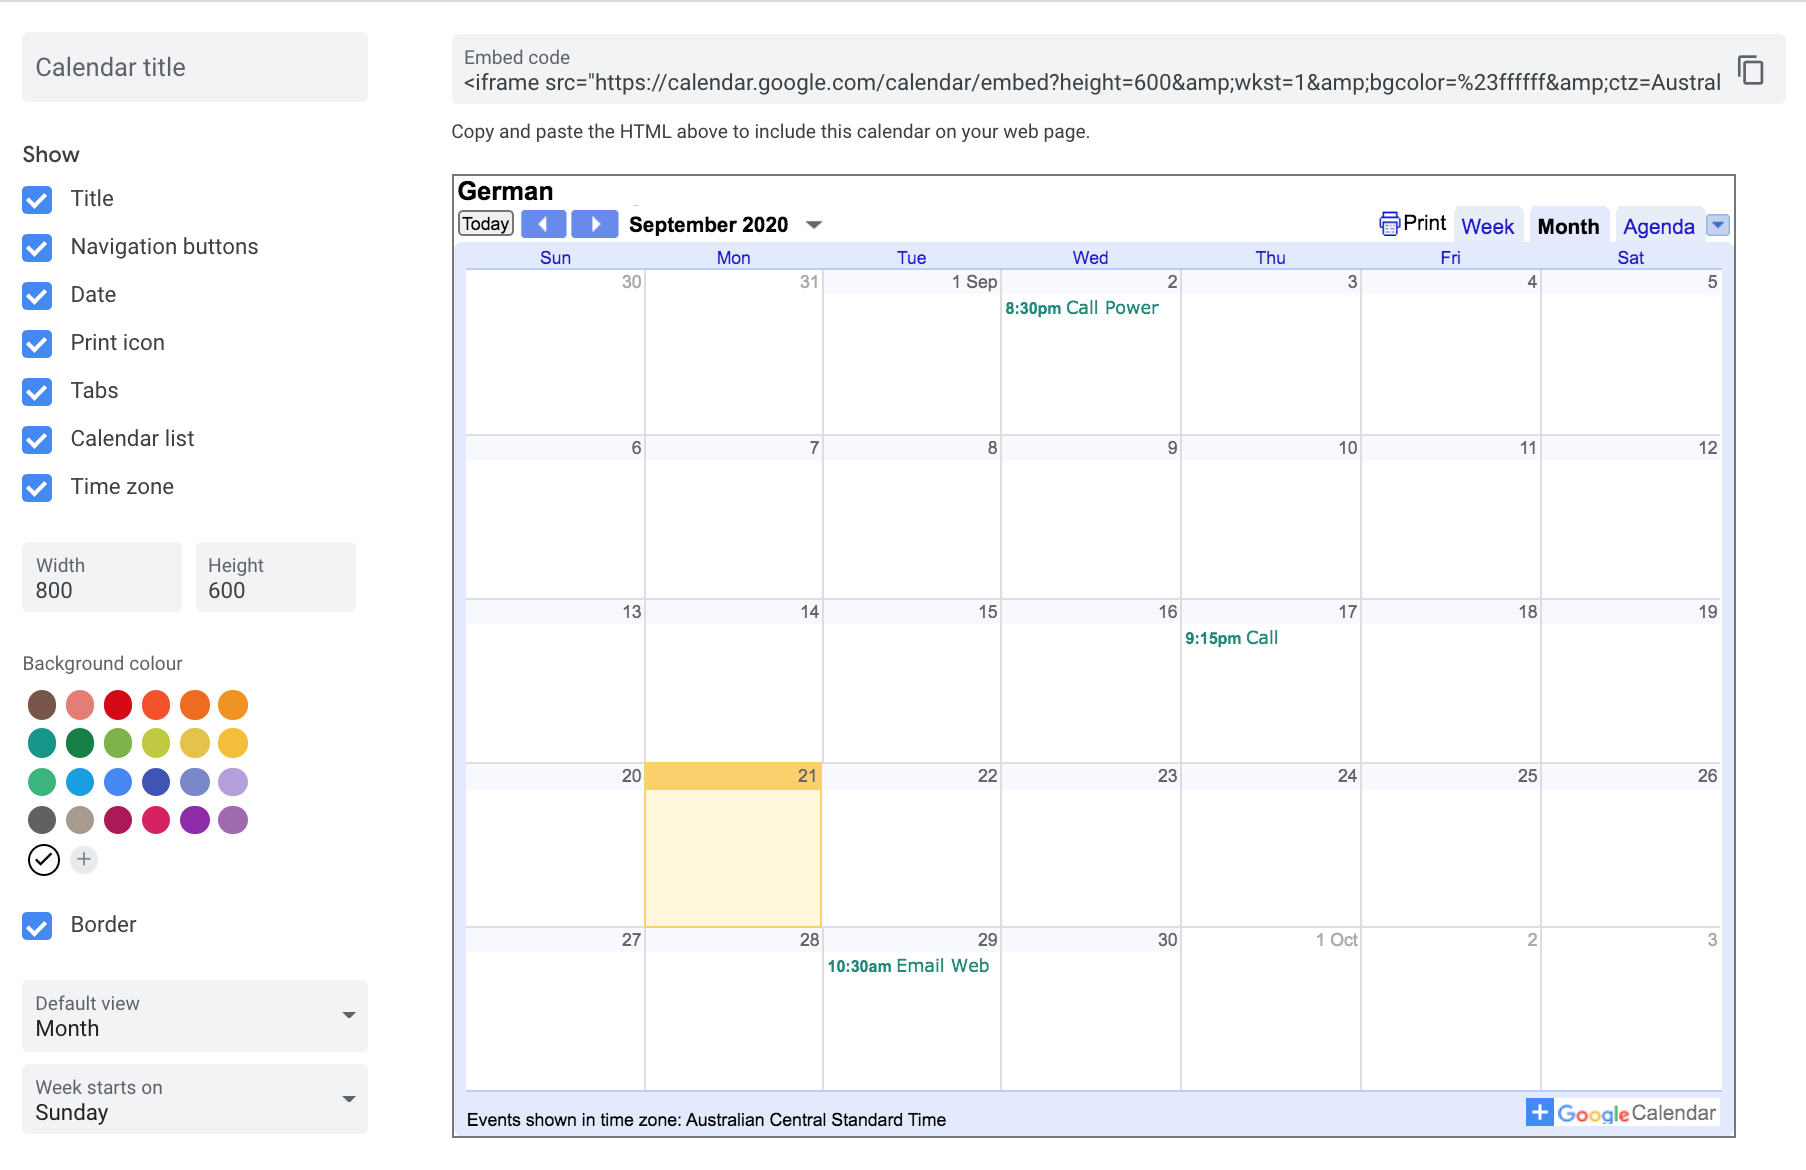
3) Embed Google Calendar in WordPress via HTML
Another easy way to embed Google Calendar in your WordPress site is via HTML. Don’t let the name discourage you if you’re not a developer. This method doesn’t require any coding skills and is very effective.
- So, to add Google Calendar to your site using HTML, first go to the page or post where you want to include your calendar
- Then, add a new Custom HTML Block. Here you’ll need to paste your calendar’s embed code
- To get it, you must repeat steps 4 to 6 of the previous block editor method. You’ll need to go to Google Calendar, click on the 3 dots next to your calendar, and then go to Settings and sharing. Then make your calendar public under Access permissions, go to the Integrate Calendar section, and copy the Embed code
- Once you got your calendar’s link, paste it into the HTML Block and save the changes
- You’ve just added your Google Calendar to WordPress!
Now that you have learned how to display Calendar on your site, let’s have a look at how you can make the most of it.
Tips on Customizing Google Calendar on WordPress
Simple Calendar is the most complex method to add Google Calendar to WordPress so here we’ll give you some tips to make the most of it. What’s great about Simple Calendar is that it allows you to customize the styles of your calendars.
To make it happen, go to your Calendars and choose the All Calendars tab. Then, specify the calendar whose appearance you wish to tweak and open the editor. Scroll the mouse to find Calendar Settings and click the Appearance tab. There the fun begins and you can customize the colors, design, and so on. All in all, some things you can do to customize your calendars are:
- Choose among a Light and Dark theme for your calendar
- Decide which specific color you want to indicate your calendar’s active day as well as event-dates
- Play with your calendar’s color scheme and find one that suits your website’s style
Shortcodes and Widgets to Embed Google Calendar on Posts and Pages
After you’ve integrated added Google Calendar to WordPress, when you create a new post or page, you’ll see an Add Calendar button as shown below.
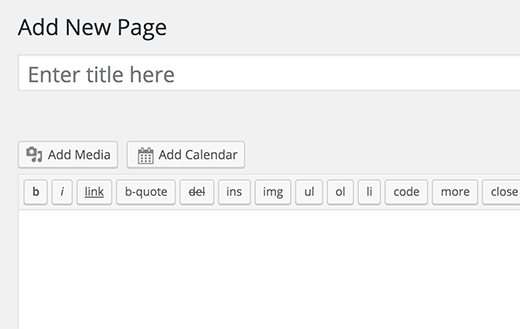
This button works just like Add Media and lets you insert the calendar anywhere in the thread. If for some reason, you don’t have this button, there are other ways you can add a calendar to your posts/pages: through shortcodes and widgets.
Shortcodes
If you look carefully when adding a new calendar on the Calendars tab, you will see that a shortcode is given to you at the bottom right of the screen. To embed this calendar to your posts/pages, type this shortcode anywhere you want to display it.
Widgets
The Simple Calendar plugin provides a widget you can display on your site. To activate this option, go to Appearance > Widgets in your WordPress Dashboard. Here you will see the available widgets, and you have to drag and drop the Simple Calendar widget to the spot you would like it displayed.

These are easy ways to display your calendar in different parts of your site to make the most of the WordPress and Google Calendar integration.
Tips to make the most of Google Calendar
Embedding Google Calendar in your WordPress site is the first step to better organizing your meetings and events. Most people use Calendar to simply create meetings, but this tool can do much more for you. Let’s look at some tips to make the most of Google Calendar.
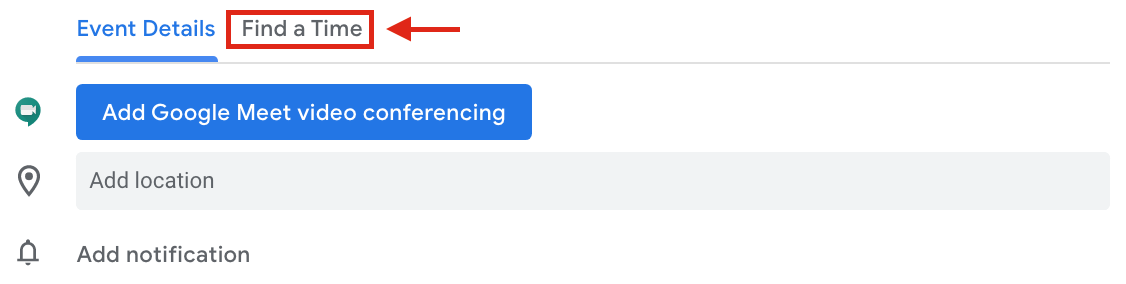
- Find a time: When you need to organize a meeting with several people, it can be hard to find a slot that works for everyone. The good news is that Google Calendar has a functionality called Find a time that makes finding the right time much easier. Simply create an event, invite the people that you want, and then go to the Find a time tab to find a slot where everyone is available.

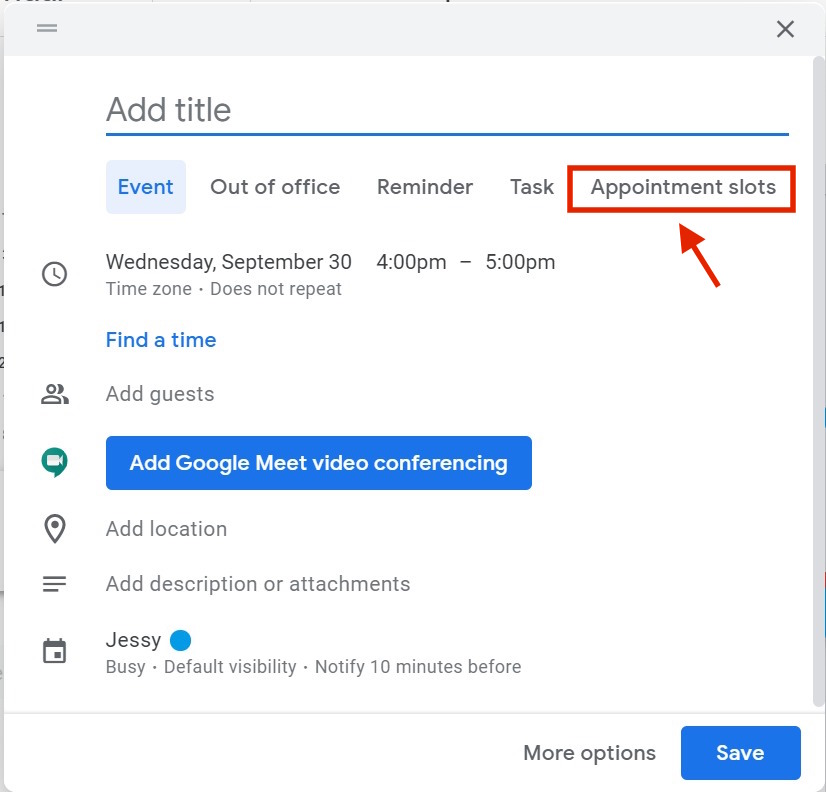
- Block Appointment slots: Tired of receiving invitations for meetings at inconvenient hours? If you’re using GSuite, you can avoid that by blocking appointment slots. This way, you block the time in which your teammates can schedule meetings with you. To activate this functionality, simply create an event for the time you’re available for meetings and then go to Appointment slots. You’ll see a link that says “This calendar’s appointment page.” Click it and you will be redirected to a web version of your calendar that you can share.
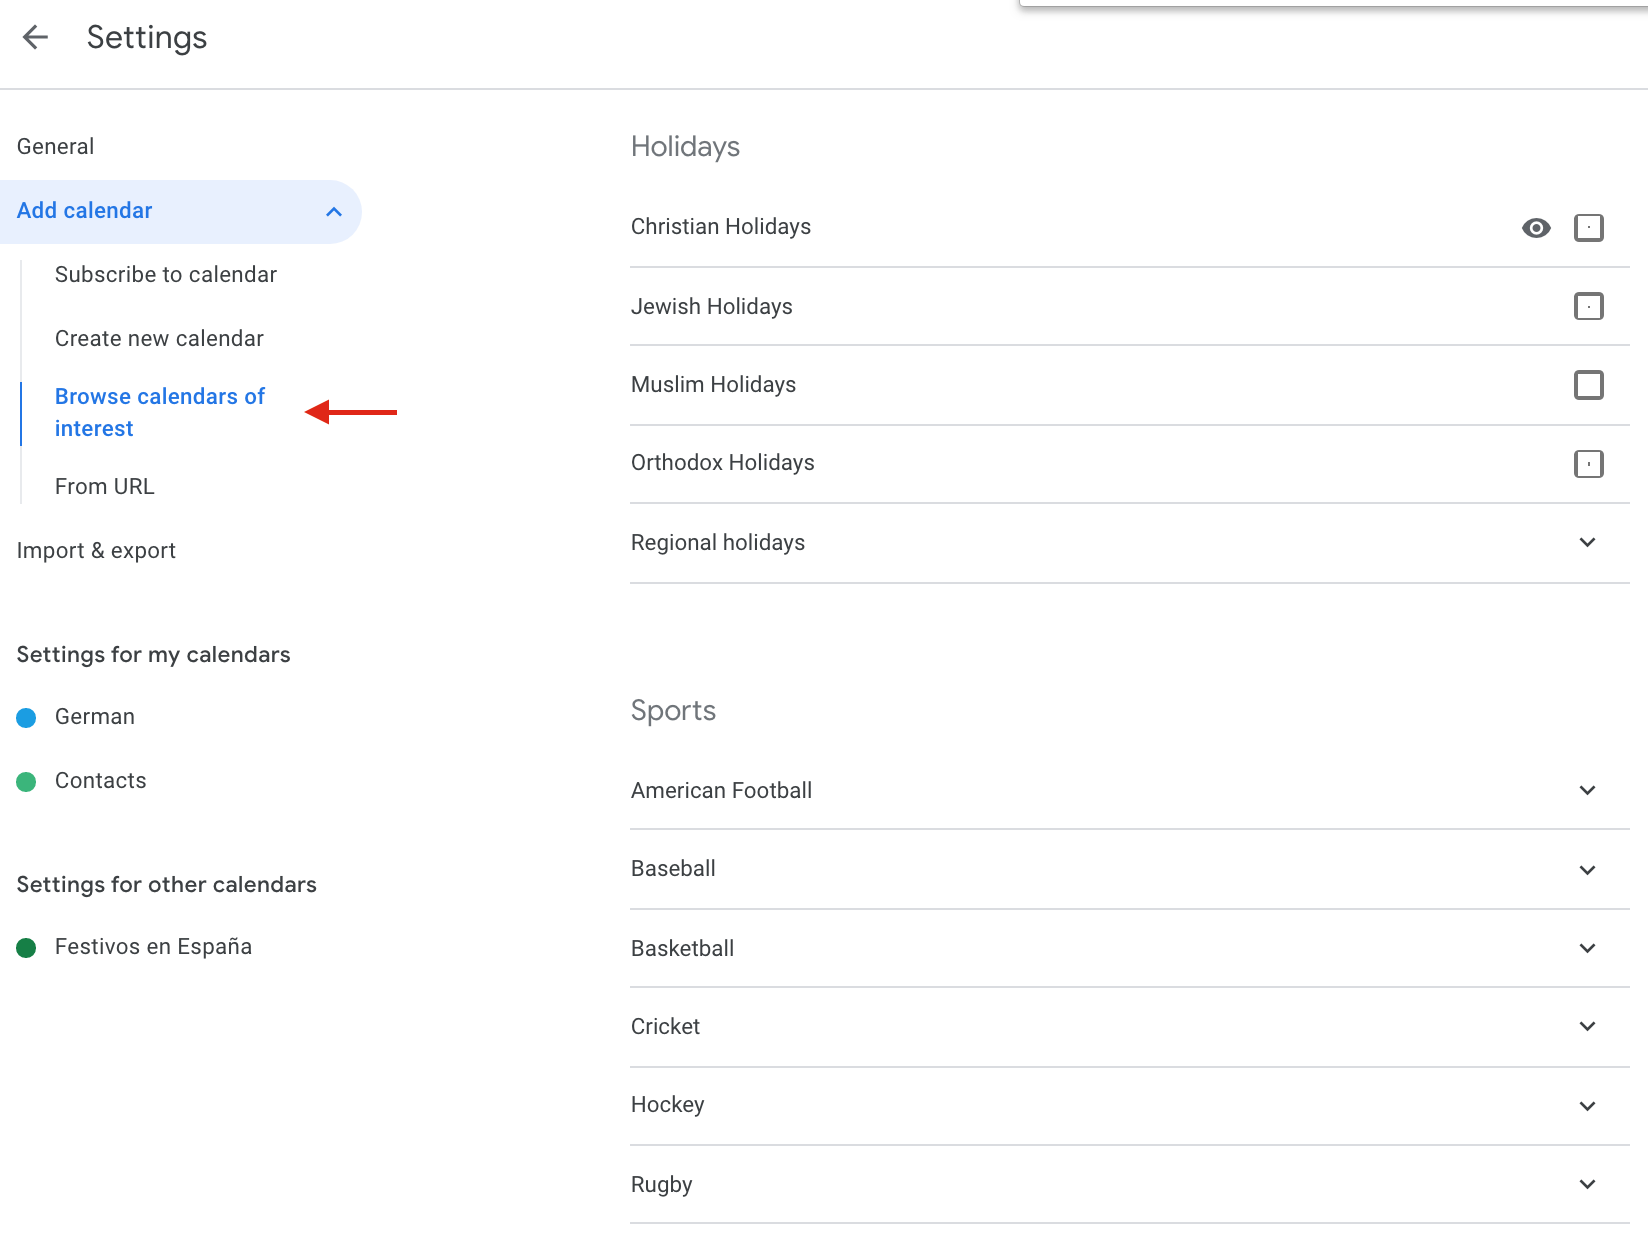
- Add holidays and other events: The calendar allows you to add all types of events, such as holidays, sports events, ad phases of the moon. To add this option, click on the 3 dots next to your calendar and go to Settings and sharing.
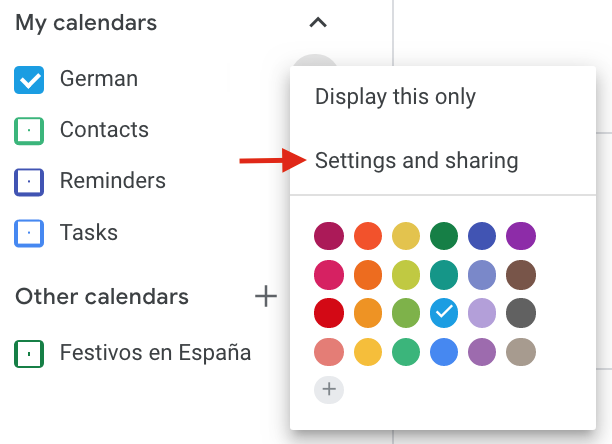 Then, in the Add Calendar section, go to Browse calendars of interest and select the ones you want to activate. Once you finish, you’ll find the events you selected in the Other calendars section.
- Time Zones: Nowadays there are more and more teams that work from different parts of the world and with different time zones. If that’s your case, this tip is perfect for you. Google Calendar allows you to set both primary and secondary time zones, so you always find a good time for your meetings. To activate this option, click on the 3 dots next to your calendar and go to Settings and sharing. Then, press the Set my primary time zone button under Calendar settings. There, tick the option to activate the secondary time zone and select the one you want.
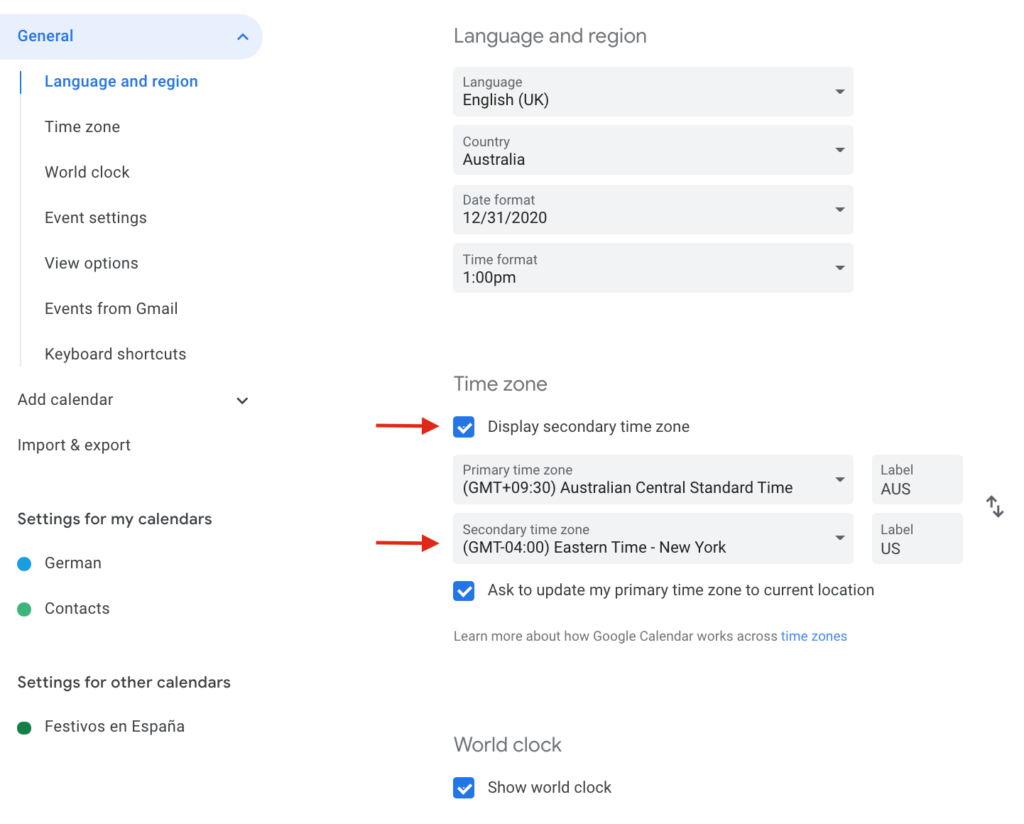 Additionally, you can add labels to your time zones and display a world clock.

Bonus: Best WordPress Appointment Booking Plugin – MotoPress
If you are looking for a WordPress plugin that can help you with appointment bookings, you should check out WordPress Appointment Booking by MotoPress.

Appointment Booking by MotoPress is an elegant WordPress plugin for creating an appointment booking website without hassle. The plugin has many features, such as online payment gateway integration, cash-on-delivery option, WooCommerce integration, unlimited services, unlimited employees, flexible scheduling, etc.
Since the plugin lets you create unlimited services and have unlimited employees, you can create as many services as you need. This feature will come in handy if you are representing a larger business. plus, you can accept payments from clients online through payment gateways like PayPal or Stripe. On the other hand, you can also set up cash on delivery in the plugin settings, so the clients do not need to make pre-payments.
With their WooCommerce payment gateway extension add-on, you can add more useful payment gateways to your appointment booking form.
The latest version of the plugin also comes with the Google calendar sync feature. Using this feature, employees can sync their schedules with their Google Calendar and plan the day accordingly. It is a great feature to have in any appointment booking business.
Overall, if you want a reliable and easy-to-use WordPress appointment booking plugin with cutting-edge features, you should use Appointment Booking by MotoPress.
Features
- Online/Offline Payment Options
- Optimized for WooCommerce
- Flexible Schedules
- Unlimited Services and Employees
- Custom Discount Coupons
Pricing
Appointment Booking by MotoPress is a freemium WordPress plugin. The free version tool comes with limited features and capabilities. You can directly download it from the WordPress plugins repository. On the other hand, if you think about having unique features, you need to upgrade to the premium version.
Their premium plans start at $59/year for a single website license and $199/year for unlimited licenses. On top of that, MotoPress products also come with a 30-day money-back guarantee. If the product is not working as expected, you can get a complete refund.
Conclusion
All in all, Calendar not only will help you organize your schedule but also manage and share events so your customers can keep up with your events and important dates. If you add Google Calendar to WordPress, you’ll add more functionalities to your website, provide value to users, and stand out from your competitors. We’ve seen 3 different methods to embed Calendar on your site:
- With the Simple Calendar plugin
- Using the WordPress block editor
- Via HTML
These methods are beginner-friendly, and they’re all very effective, so choose the one that best suits your needs. Additionally, we’ve seen different ways to customize your calendar and add them using shortcodes and widgets. Finally, we’ve seen some tips to help you make the most of Google Calendar. Have you tried this guide? Did you find it useful? Please share your thoughts with us in the comments section below!
More useful guides to making the most of your site:

This is a very helpful post.
One thing that was not addressed is the relative performance of the 3 different approaches. I want to share our company events on a few different wordpress sites. One critical issue for me is making sure our sites load as quickly as possible. Can you shed any light on which approach might meet this criteria?
Currently, the options that doesn’t require a plugin will be faster regardless of how efficiently the plugin author developed their code.
In the case of this article, options 2 (via gutenberg block) and 3 (via HTML embed) will be more performant than option 1.
Knowing how MUCH faster unfortunately requires some time and testing to figure out.
This doesn’t take into account the ability to style the calendar.
The main benefit of using a plugin — making the calendar look like your site — can’t be underestimated. One of the biggest challenges with integrating Google Calendar through a plugin can be the means the plugin uses to connect to Google Calendar. Google’s API setup can be extremely confusing — even for experienced developers — and if your site gets a lot of traffic, you may hit their access limit and be required to pay for continued access.
There’s an easier way: Google Calendar (as well as Office 365, Mac Calendar, and most other calendar systems) also lets you use a subscribe URL (iCalendar feed) to subscribe to a calendar. I created a plugin called ICS Calendar that uses these feed URLs rather than the API. It’s much easier to set up and doesn’t risk hitting the API access limit, but it still gives you the benefit of a clean, well-designed calendar that actually looks like part of your site.
The other big benefit it offers for performance is that it loads the full calendar directly, rather than using AJAX. While AJAX can be hugely beneficial in the right circumstances, it’s not so great for loading a relatively small amount of plain text data, if the interface is constantly making additional AJAX calls. With ICS Calendar, switching between months in the calendar view is instantaneous, because the data is already loaded in the browser.
The biggest “pain point” for performance is loading the calendar data from the source (Google Calendar) into WordPress. ICS Calendar caches calendar data for one hour, so it doesn’t hit the source on every page load, yet it still picks up calendar changes quickly.
This is what I was looking for, I wanted to add a google calendar on the site but it failed. It works very well now. Thank you.
We’re glad the guide was useful
I have several calendars including two for our local Village Hall. I made one of the Village Hall ones public and used the HTML method to embed it into a page on the Village Hall free WordPress website.
All works well, except that if I click on a calendar event I see a ‘more details’ link. Clicking on that opens a new tab with all my calendars listed. I can see the contents of all my calendars even though they, individually, are NOT public.
Is there a way round this?
Thanks