How to Translate WooCommerce: The Full Guide
Are you looking for different solutions on how to translate WooCommerce websites? We have the perfect guide for you.
WooCommerce is one of the biggest online platforms for creating an eCommerce website. And one of the reasons it has been so successful is also because of its translation capabilities to other languages. You can translate your entire online store very easily with WooCommerce and WordPress.
But before we go through the process, let’s look at why you may need to translate your WooCommerce store.
Why Should We Translate a WooCommerce Store?
You may need to translate your WooCommerce store due to various reasons. But one of the most common reasons to translate your store is if you want to start selling your products globally. This includes extending your business beyond the international boundaries of your country.
Moreover, if you sell downloadable or virtual products, they can be purchased by anyone from any part of the world instantly. And since it is known that customers prefer shopping in their native language more, it can be a helpful strategy for you to translate your website in order to increase the number of customers.
The same reason can be applied if you want to sell physical products to the international market using an eCommerce website.
Apart from these obvious reasons, here are some more advantages of making your website multilingual.
- Translating your WooCommerce store can also help you rank higher in search engines. When you translate your website, you can also optimize the translated content to be indexed on SERPs. This shows that you’ve also performed additional SEO optimization for your translated content.
- If you want to sell specific products for a specific region or country, translating your store according to the region can help you bring more potential customers from that particular area.
- Even if most of your purchases are made locally, you can establish genuine trust with your local customers too. A translatable website with the potential for international scale will always be well-praised by customers.
These are some of the major reasons why you should make your website multilingual. Now, let’s go ahead and see how to translate your WooCommerce store.
Plugins to Translate WooCommerce Store
The easiest way to translate your WordPress website is by using plugins. Plugins help you increase the flexibility of your website and also provide more functionalities for your website visitors. So we will be using them to translate a store on this tutorial too.
There are many translation plugins for WordPress that can help you make your store multilingual. So let’s look at some of the best plugins to translate a website before we show you how to translate a WooCommerce store.
TranslatePress
TranslatePress is a very popular translation plugin in WordPress to translate a full website. It has a very easy-to-use interface that can be suitable for any type of website, including a WooCommerce store. You can even translate the entire website at once or choose specific areas of it to translate using this plugin.
It also provides you with live preview options when you translate your website. This can be very helpful to ensure that the correct translations are applied to your website when you translate it.
Key Features
- Automatic and manual translations
- Live preview for translation of pages
- Easy Google Translate integration
- Fully compatible with WooCommerce
Pricing
TranslatePress is a freemium plugin. You can get the free version from the official WordPress plugin repository. The premium version starts at 89 Euros per year for 1 site license and 1 year of updates and premium support with a 15-day money-back guarantee.
WPML
WPML is one of the best WordPress translation plugins when it comes to translating your website. You can translate everything on your website from pages, posts, custom post types, taxonomy, menus, and so on. Additionally, it works great with WooCommerce, too, if you need to translate your eCommerce website.
The plugin also has advanced features for multilingual SEO. This can be helpful to search engines to rank your website for appropriate users with particular languages.
Key Features
- Translate custom post types, menus, taxonomy, and more
- Advanced multilingual SEO options
- Translation management-based user roles
- Compatible with major WordPress plugins and themes
Pricing
WPML is a premium plugin. It starts at 39 USD per year, which includes 1 year of support and updates and a 30-day money-back guarantee.
How to Translate WooCommerce
Now that we had a look at some of the best plugins to translate a store, you can go ahead and start using them. So let’s see how to translate WooCommerce stores using the following steps.
We will be using the TraslatePress plugin since it is also available for free on the official WordPress plugin repository. Of course, like any plugin, you have to install and activate it first.
1. Install and Activate the Plugin
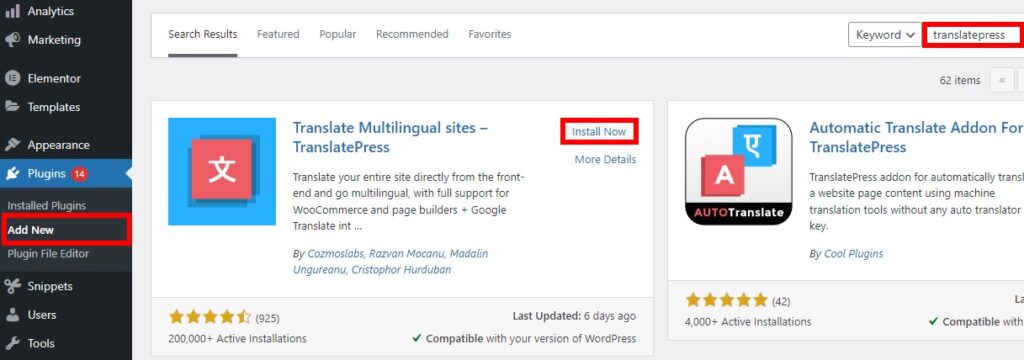
Go to Plugins > Add New from your WordPress dashboard and search for the keywords of the plugin. After you see the plugin on the search result, click on Install Now to install the plugin.
The installation will take only a few seconds. Once it’s completed, Activate the plugin.
You can also upload and install the plugin manually if you want to use a paid plugin or if the plugin is not in the official WordPress plugin repository. We also have a complete guide on how to install a WordPress plugin manually for more information regarding it.
2. Add Languages to Plugin Settings
After activating the plugin, you must first decide which languages you want to add and how to translate your WooCommerce store. You can either add new languages to your store or change the default language of the website entirely. We’ll start with adding new languages.
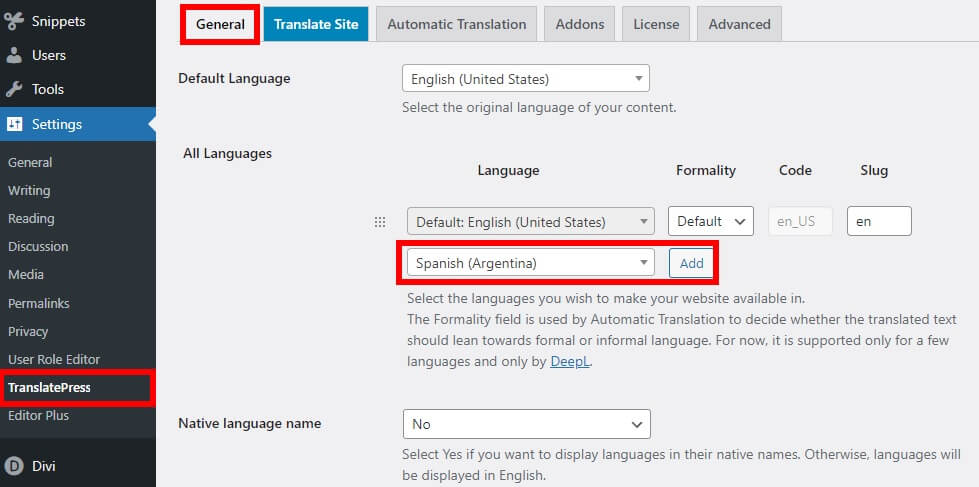
Just go to Settings > TranslatePress from your WordPress dashboard and open the General tab. Here, you will be able to see all the general language options related to translating your store. In the All Languages section, select a language that you want to translate your store into and click on Add.
For this demonstration, we will be adding the language Spanish (Argentina). But you can add the language of your preference based on how you want to translate your WooCommerce store.
Then, you can also change the formality of the word to a formal or informal format when the language is translated. You can leave it as Default if you are unsure about it.
Similarly, you can even change the slug for the language that you add. But, the default slugs of the languages are adequate for us.
You can also add more languages again if you need to translate your store to multiple languages. Once you have made all the necessary changes, just click on Save Changes. Now you can start to translate various sections of your store.
Alternatively, you can also change the entire default language of your website using this plugin. But changing the default language using the plugin can invalidate the existing translations of your store.
3. Translate WooCommerce using the plugin
You can translate everything in your WooCommerce store after you add the new languages. There are many WooCommerce elements that you can easily translate.
Let’s go through some of the examples.
3.1. Translate WooCommerce Product Title
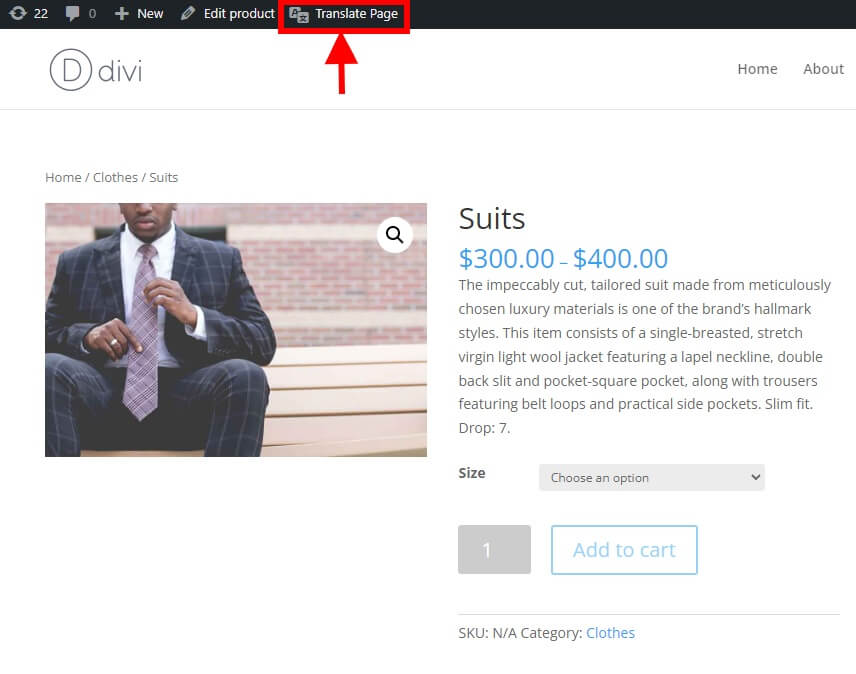
To translate the WooCommerce product titles, go to the front end of your store and open the single product page of the product that you want to translate.
Then, click Translate Page on the top admin bar of the page. This will open the TranslatePress editor page to translate your page.
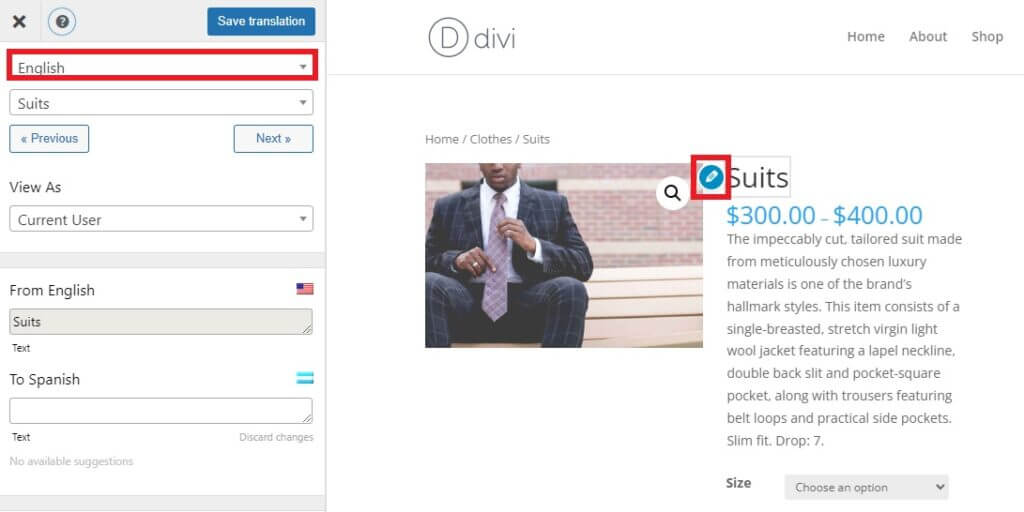
Now, you can change and translate your page from the options provided on the left side of your screen. Here, select the language as English on the options.
On the right side of the screen, you will see the live preview of your web page and can start translating the page from here too. Since we will be translating the product title here, just hover over the product title on the preview, and an edit icon will appear beside it. Click on the Edit Icon. This will show you the option to translate the product title on the left side of your screen.
You can also switch the strings on the left side of your screen by selecting from the dropdown menu to edit the title. Just click on the Next or Previous button until the appropriate string is shown to you.
Once you’ve selected the required product title string, you’ll also see the translation section a bit further below. Here, the default translation of the product title will be shown as From English. In this example, it’s Suits.
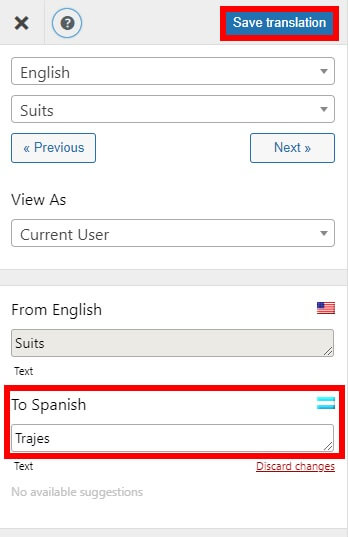
Now, you have to add the Spanish word for Suits in the To Spanish section. It will also provide you with translation suggestions if they are available.
After you have made all the translation changes to it, just click on Save translation for the page.
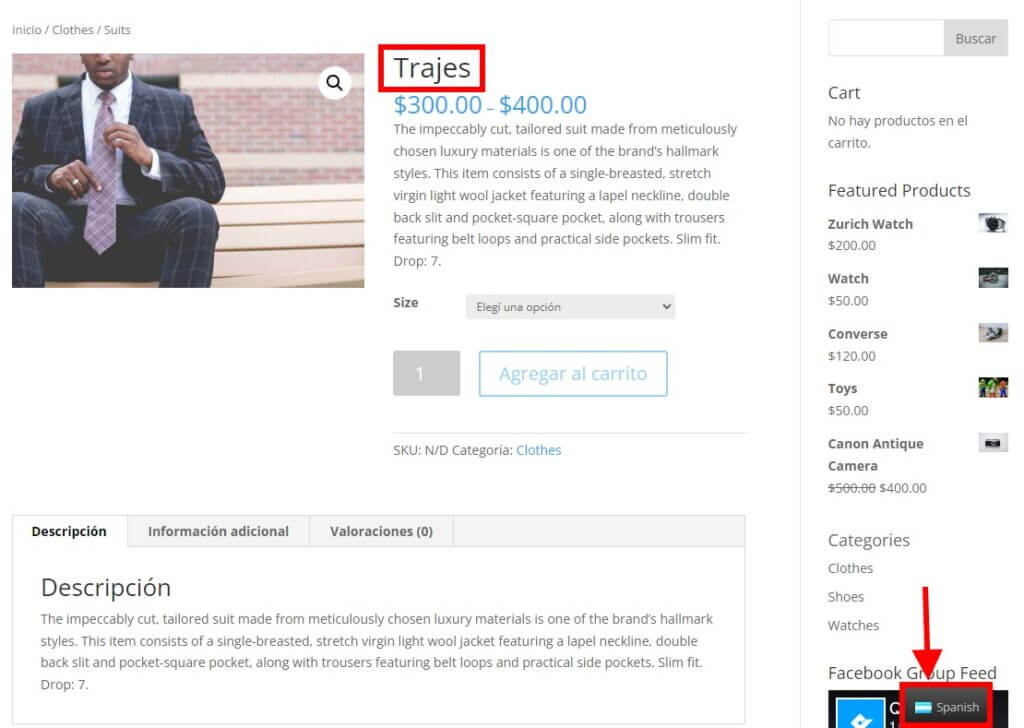
You’ll be able to see the changes on the front end after you select the language button on the bottom right of your screen.
3.2. Translate Product Descriptions
Similar to product titles, you can also translate the variable product details of your WooCommerce store. Go to the front end and click on Translate Page, just like the previously mentioned steps.
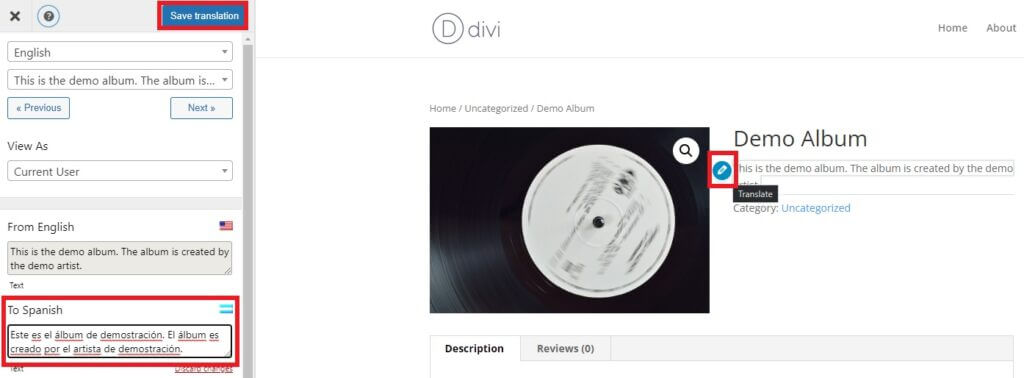
Now, hover your cursor over the product description and click on the Edit button to translate the description. You can enter the translation for the product description on the left side of your screen inside the To Spanish textbox.
Don’t forget to click on Save translation once you’ve made all the changes.
The translated text will appear on your website once you preview the particular page. Just don’t forget to switch the language.
3.3. Translate Variable Products
The product titles and descriptions are one of the simplest WooCommerce elements that you can translate using the plugin. But if you want, you can even translate the details of the variable products.
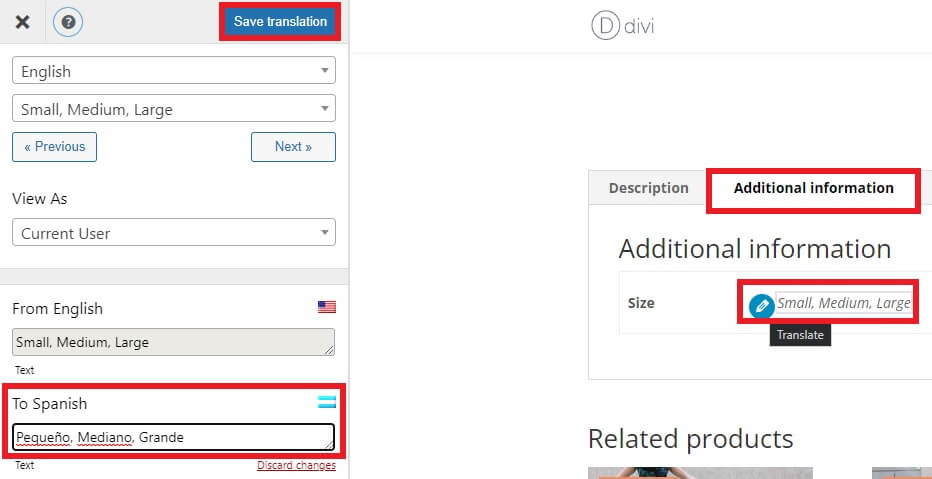
For example, if you consider the following screenshot, we can see that the variable product has multiple size options on the Additional information product tab.
To translate them, you’ll need to click on the Translate page button on the header menu and open the TranslatePress editor page again. Now, hover your cursor over the size variations and click on the Edit icon. Again, add the appropriate translation for these texts in the text box on the left side of your screen.
Finally, click on Save translation to apply your changes on the page.
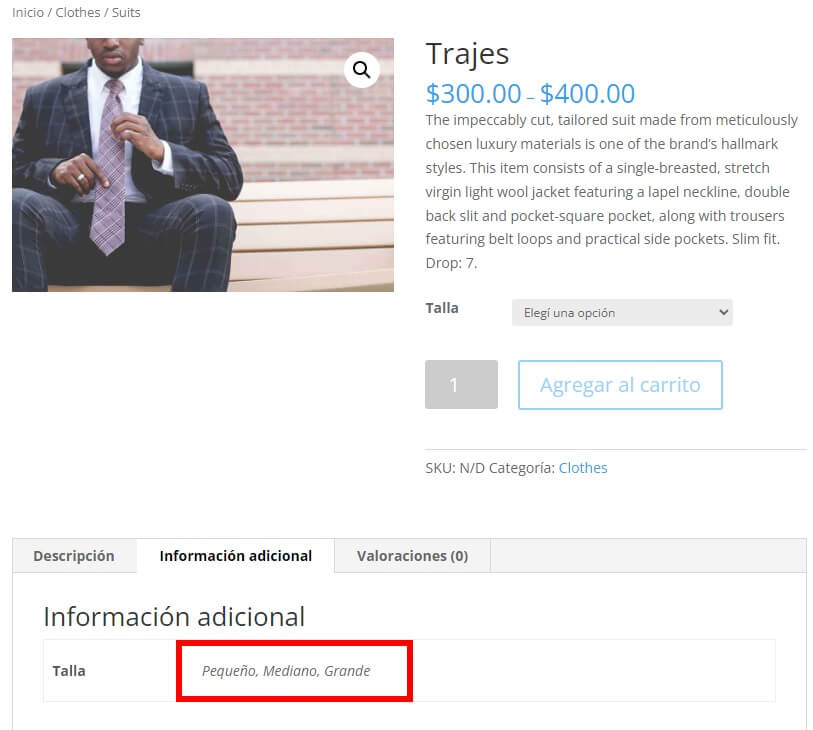
As you can see, the product variations on the additional information product tab have been translated after selecting the language.
4. How to Translate WooCommerce Store Automatically
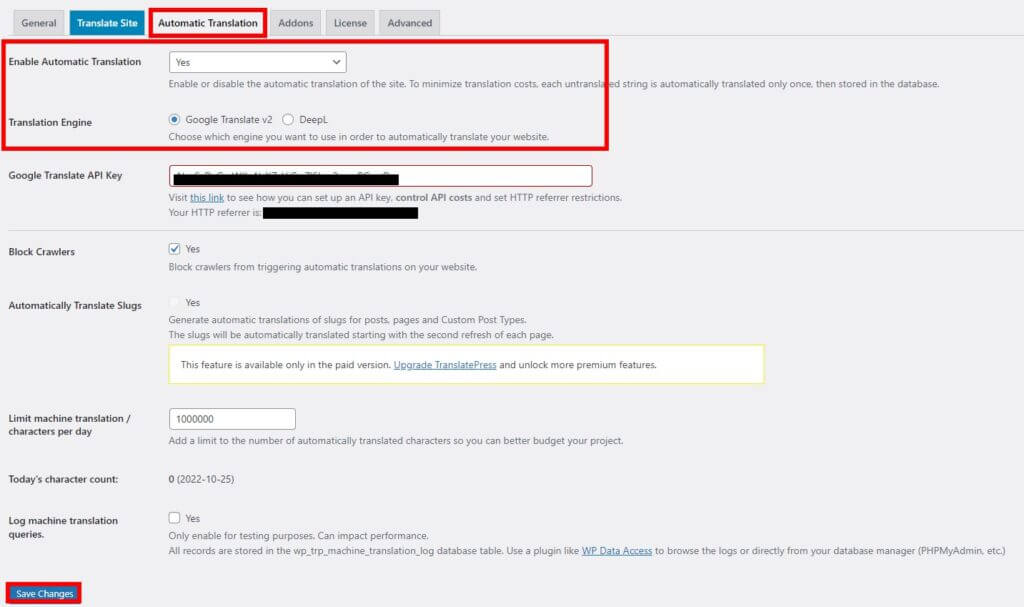
You can also translate your entire WooCommerce store automatically using TranslatePress. In order to do that, just go to Settings > TranslatePress from your WordPress dashboard once again. Then, click on the Automatic Translation tab and select Yes for Enable Automatic Translation option.
After that, you’ll need to select the translation engine to translate your website automatically. You can select between Google Translate v2 and DeepL for your translation engine.
However, only the Google Translate engine is available on the plugin’s free version. To use the DeepL engine, you have to upgrade to the paid version.
You can also add the Google Translate API key for the Google Translate engine. Have a look at this link if you need any help with setting up the API key.
After you’ve made all the necessary changes, click on Save Changes.
Now, all the details of your WooCommerce store will be translated automatically.
But if you still need to translate your website properly in some areas, you can do so by using the steps mentioned earlier for WooCommerce.
Conclusion
This brings the end to our complete guide on how to translate a WooCommerce store. It can be very helpful to do so if you want to increase the sale of your business beyond international boundaries. Translating your website can also help you grow your website overall.
To summarize, we’ve shown you a couple of plugins that you can use to translate your WooCommerce store. And since using a plugin is the easiest way to translate your website, we’ve also shown you a step-by-step tutorial on how to use it. The major steps include:
- Adding a new language
- Translating WooCommerce elements using the plugin
Moreover, the plugin that we’ve used for demonstration also enables you to translate the entire website automatically if needed.
We hope this guide helps you translate your WooCommerce store into another language. Have you tried translating your store? How has your experience been? Let us know in the comments if you’ve tried it.
Meanwhile, here are some more posts that you might find helpful in modifying your WooCommerce store:


That’s what I need! Very helpful guide. I’m starting work ASAP.