
How to import products in WooCommerce
Are you setting up a new online store and need to import your products? You’ve come to the right place. In this guide, you’ll learn different methods to import products in WooCommerce (no coding required).
Even though with WooCommerce it’s quite easy to start an online store, there are some things that can be time-consuming. Adding products is one of them. If you’re setting up a new WooCommerce store from scratch or migrating your products to another store, creating products one by one can be a nightmare, especially if you sell many items. That’s why in this tutorial, we’ll show you different ways to import products to WooCommerce and save a lot of time.
How to import WooCommerce products
There are two main ways to import products in WooCommerce.
- With the built-in Importer
- Using plugins
Both options will get the job done, so choose the one that best suits your needs.
Export WooCommerce Products
Before you import your products, you’ll need to export them from your store. You can do this with the WooCommerce built-in explorer or with a plugin. For this demonstration, we’ll show you how to export your products with WooCommerce explorer. For more information, check out this guide.
- The easiest way to export products from your store is by using the WooCommerce built-in explorer. In your WordPress dashboard, go to Products > All Products and press Export at the top.
- You’ll see options to export the products based on columns, product types, and categories. The default option allows you to combine them and export the products based on all of them as well as select specific columns, product types, or categories. Simply click on their respective field and select the columns, product types, or categories of the products you want to export.
- After you have selected the corresponding options, click Generate CSV. That’s it! You have just exported all the products from your store in a CSV file.
The process is quite easy but if you want a more detailed explanation or more options to export products, check out this complete step-by-step tutorial.
Now that you’ve exported your items, it’s time to upload them to the new store, so let’s have a look at 2 methods to import WooCommerce products.
1) WooCommerce Built-in Importer
WooCommerce comes with a built-in importer that allows you to easily upload products to your store. If you’ve just followed the steps described above, you’ll be able to upload the CSV file with all your products without any issues.
Alternatively, you can create your own CSV file to import. Make sure that the CSV file contains all the necessary basic information of the product such as title, identification number, description, price, sale price if present, category of the product, and the URL of the product’s image. Here’s a sample file that you can use as a reference.
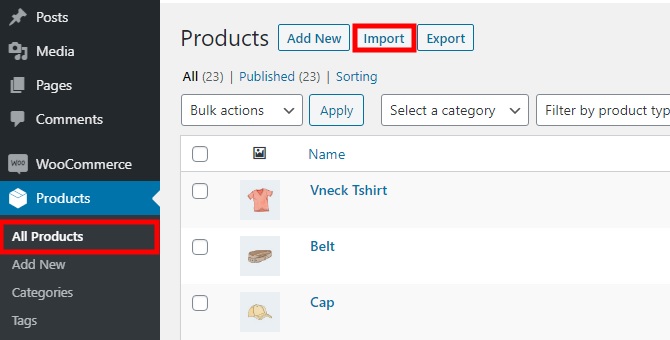
Once you have your CSV ready, it’s time to import the products to your store. In your WordPress dashboard, go to Products > All Products and click Import.
Now, you’ll start a 4-step process. Don’t worry, it won’t take more than a few minutes.
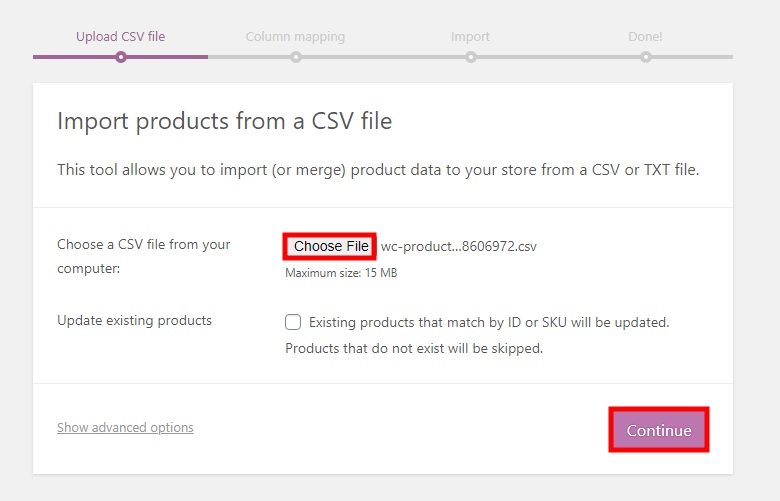
1.1) Upload CSV file
To start the import process, press the Choose File button and select the CSV file that you’ve created in the previous step. If you’re importing products that you’ve already created in your new store, you can check the option to Update existing products by ID or SKU. Additionally, there are advanced options that allow you to enter the path to the CSV file on your server, choose a CSV delimiter, and a checkbox to use previous column mapping preferences.
Once you have uploaded the CSV file, press Continue.
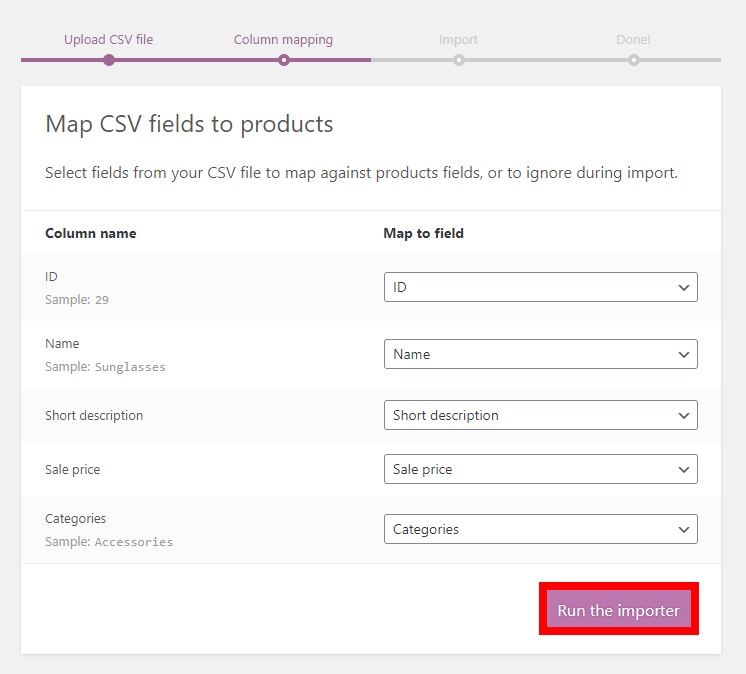
1.2) Map the columns
In the second step, you’ll have to map the columns to their corresponding fields. In most cases, the mapping is quite accurate but make sure that everything is mapped correctly so your file doesn’t have any errors and all the information is uploaded correctly. If there’s a column that you don’t want to import, select Do not import from the dropdown.
After that, click Run the importer to move to the next step.
1.3) Import the products
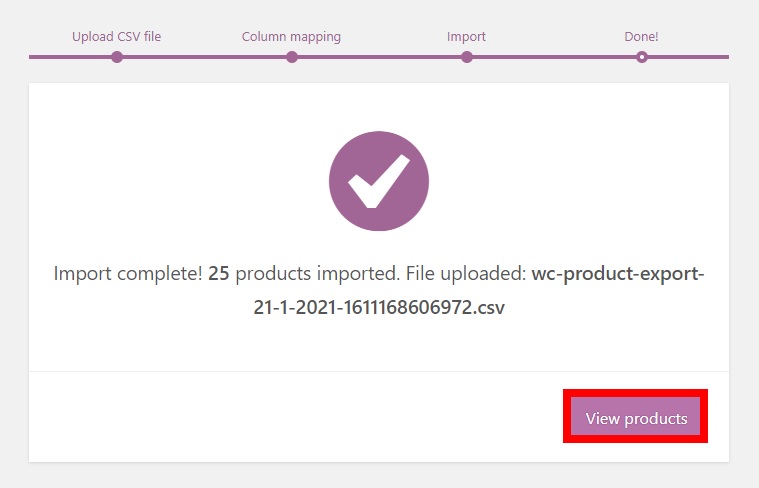
Now, the import process will begin and you’ll see a progress bar. This can take a few minutes, especially if you have many products.

After the import finishes, you’ll see a success screen that indicates that the process has finished and you’ve just imported your products to WooCommerce. To make sure that everything is ok, press View products.
The in-built explorer does the job but if you want more flexibility and advanced options when importing products, you should use a dedicated tool. Let’s have a look at how you can upload your products with a plugin.
Import WooCommerce Products with a plugin
There are several plugins to import products in WooCommerce. Let’s have a look at some of the best ones.
1. Product CSV Import Suite
This is one of the most famous plugins to import products. Product CSV Import Suite is a premium plugin developed by WooCommerce that allows you to easily import thousands of products in a couple of clicks. On top of that, it supports complex products and can handle custom data such as bookings, product vendors, brands, and more with ease.
This tool comes with a lot of great features, so if you’re willing to spend some money on a plugin to import products, Product CSV Import Suite is the perfect alternative to the default WooCommerce explorer.
Product CSV Import Suite is a premium tool that costs 49 USD per year and includes a 30-day money-back guarantee.
2. WP All Import
WP All Import is another excellent tool to import products in WooCommerce. It has a user-friendly interface and advanced options that allow you to upload product data to your store in no time. You can import simple, variable, grouped, affiliate products, and even subscriptions, and use Excel, XML, CSV files, and Google Sheets.
On top of that, this tool allows you to import images to galleries from any source such as a URL or your laptop. Additionally, it can match images that you have uploaded already to WordPress and includes full support for featured images, product galleries, and metadata.
Finally, WP All Import automatically detects custom categories, tags, taxonomies, brands, and any other custom taxonomy and allows you to add and update products in a schedule.
This is a premium tool that starts at 149 USD (one-time payment). Even though it’s an expensive tool compared to similar alternatives, it offers a 90-day money-back guarantee.
3. Product Import Export for WooCommerce
If you’re looking for a free option, Product Import Export for WooCommerce is your best choice. This freemium plugin comes with lots of features that make the importing process easy and reliable.
As its name suggests, this tool lets you import and export products to your WooCommerce store. However, it’s worth noting that with the free version you can only import simple products. If you need to import other types of products and want more advanced functionalities, you’ll need to get one of the paid plans that start at 69 USD per year.
All these are excellent plugins. For this demo, we’ll use Product Import Export for WooCommerce but feel free to use any tool that you like and follow the instructions below.
Importing products to WooCommerce with a plugin
First, install and activate the plugin. We’ll import simple products so the free version is good enough. In your WordPress dashboard, go to Plugins > Add New and search for Product Import Export for WooCommerce. Then, press Install and activate the plugin.
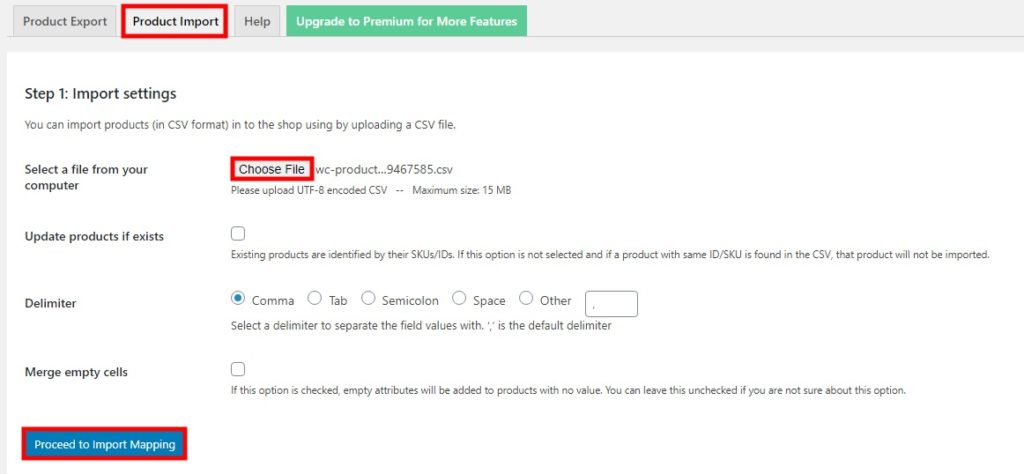
After that, go to Products > Product Im-Ex > Product Import tab. Here, you will have to upload the CSV file with all your products. Press Choose File and upload the file with all your exported products that you created in the previous step.
Similar to the WooCommerce built-in explorer, you can update existing products, select the delimiter, and merge empty cells. Once you’re happy with your options, click Proceed to Import Mapping.
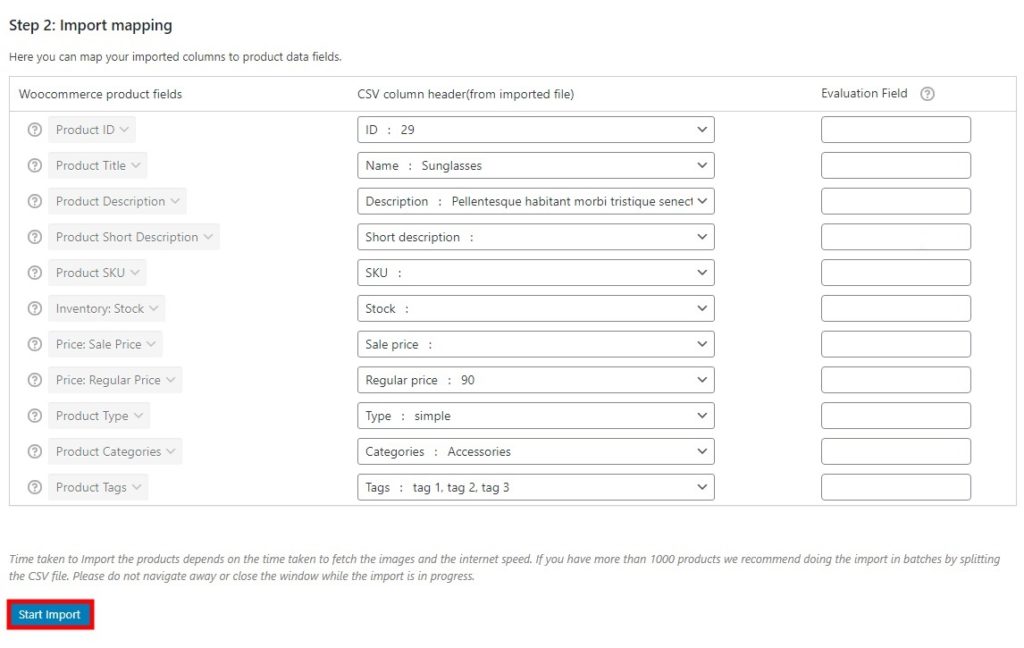
Now, map the columns to the corresponding product data fields. The plugin will do this automatically but make sure that you select the corresponding CSV column header with the product fields you want to import to your WooCommerce store. Once you’re done, click Start Import.
 The import process will begin. If you have many products this may take a few minutes so be patient. Once the process finishes, go to Products > All Products to check that you imported all the products to your WooCommerce store.
BONUS: Guidelines when creating a CSV file
When you create your CSV, make sure it fulfills the following:
- The format of the CSV file should be UTF-8 format. You can change the format while saving the CSV file by going to Tools > Web options
- Use the store’s local timezone
- Use 1 and 0 for Boolean values
- Separate values with commas
- Use the URLs for the products’ images
For more information about this, check out this Column Header Reference Guide.
Conclusion
In summary, adding products is one of the most time-consuming tasks of starting an online store, especially if you sell many different items. The good news is that WooCommerce provides you with a few options to import your products and save a lot of time.
In this guide, we’ve shown you different ways to upload products:
- Using WooCommerce in-built importer
- With a plugin
The WC in-built importer is an excellent tool that’s very easy to use and gets the job done. However, if you have complex products or want to import products such as bookings, images, metadata, and so on, a dedicated plugin is your best choice.
Additionally, we’ve seen how to export products in the right way to make sure that you don’t face any issues during the import process. If you need more information about this, check out our step-by-step guide on how to export WooCommerce products.
What method did you choose to upload your products? Do you know any other options that we should include? Let us know in the comment section below!
