How to Improve WordPress Accessibility
Are you working on improving the accessibility of your WordPress website? You have come to the right place. We understand that improving your site accessibility can be quite tricky as there are a lot of factors to account for. But, don’t worry! We got you covered. In this article, we will show you how to improve WordPress accessibility.
But, before we dive into that, let’s better understand what an accessible site means? And why is there a need to improve your site accessibility? Let’s have a look.
What is an Accessible Site?
The concept of Web Accessibility was introduced to enable people with disabilities to interact with the web. Since the advent of the web, little focus has been put into making the web accessible for disabled people. People with disabilities often had great trouble interacting with the web to an extent that it rendered the web useless for them in some cases.
To tackle the issues faced by the disabled communities, people at the World Wide Web Consortium (W3C) introduced the concept of Web Accessibility. An accessible website is designed in such a way to allow people with any form of disability to perceive, understand, navigate, interact, and contribute to the web – W3C. They have established a set of guidelines for web accessibility, Web Content Accessibility Guidelines (WCAG).
All the websites on the internet should be compliant with the WCAG 2.1 at level A at least. So, let’s now dive a bit deeper and understand why you need to improve your site accessibility.
Why Improve your WordPress site Accessibility?
According to the CDC (Center for Disease Control and Prevention), 1 in 4 US adults has some form of major disability, which accounts for approximately 61 million people in the US only. Imagine such a huge chunk of our population unable to interact with the world in a fully functional manner.
Therefore, it is our duty to make sure that our systems are accessible to disabled people while designing a website. As a web designer, your goal must be to design the web in such a way to allow people with impairments to perceive, understand, navigate, interact, and contribute to the web – W3C.
Besides ethical and moral responsibility, web accessibility is now a legal matter as well. To alleviate the disabled community, ADA (Americans with Disabilities Act) has mandated the government, public, or private institutions to make their services accessible to all parts of the community and prohibits disability-based discrimination.
Since the act has passed, we have witnessed an immense rise in web accessibility lawsuits. As per a New York Law Journal report, 2258 ADA web accessibility lawsuits were filed in 2018 alone. A similar trend continued in 2019 with around 2256 lawsuits. However, since then, companies have taken web accessibility quite seriously, and the curve now appears to be flattening out.
Now, we have seen why improving your site accessibility should be a concern for you. So, let’s move on to the next step and see how to improve WordPress accessibility.
How to Improve WordPress Accessibility?
Web Accessibility is more than a single tool or a single button fix. In order to improve WordPress accessibility or web accessibility in general, you need to account for different types of disabilities and come up with solutions for each case.
One practice you can do is imitate a disability and observe the hurdles you face. Then, make the necessary adjustments accordingly. Let us consider some examples:
- Stop using a mouse and try interacting with the site. Identify the areas you can’t access or need improvements to offer better access.
- Similarly, you can imitate visual impairment by turning off your screen and trying to navigate the site using a screen-reader. Analyze your experience, identify the areas which need improvement, and make necessary adjustments. Just like that, you can imitate other forms of disability and identify areas for improvement.
Below, we have compiled a list of the most common and essential measures you can take in order to improve WordPress accessibility. Let’s have a look at each of them one-by-one.
1. Improve WordPress Accessibility with Online Scans
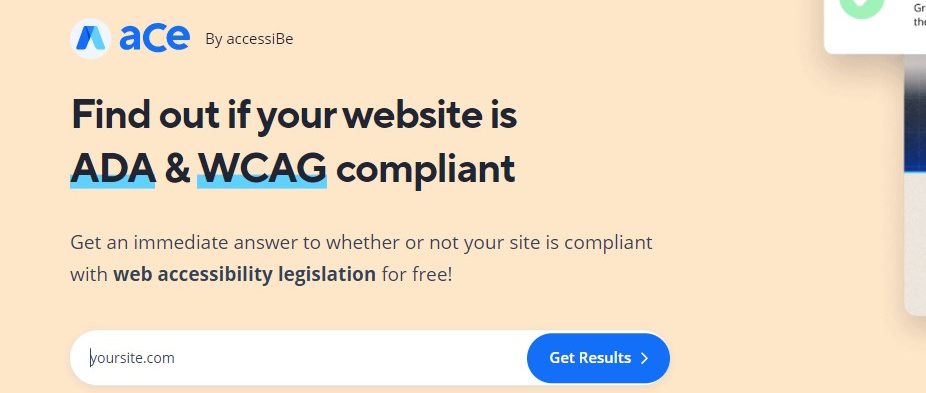
The first step to improving your site accessibility is identifying the areas which need improvement. One great way of doing this is using online accessibility scans like accessiBe and WAVE (Web Accessibility Evaluation Tool). These tools perform a complete scan of your web pages and provide a report identifying areas that are compliant and non-compliant to web accessibility guidelines. Once you have identified the issues, you make the necessary adjustments to rectify them.
Using these tools is pretty straightforward. Just go to their homepage, enter your site’s URL in the search box, and hit Enter.
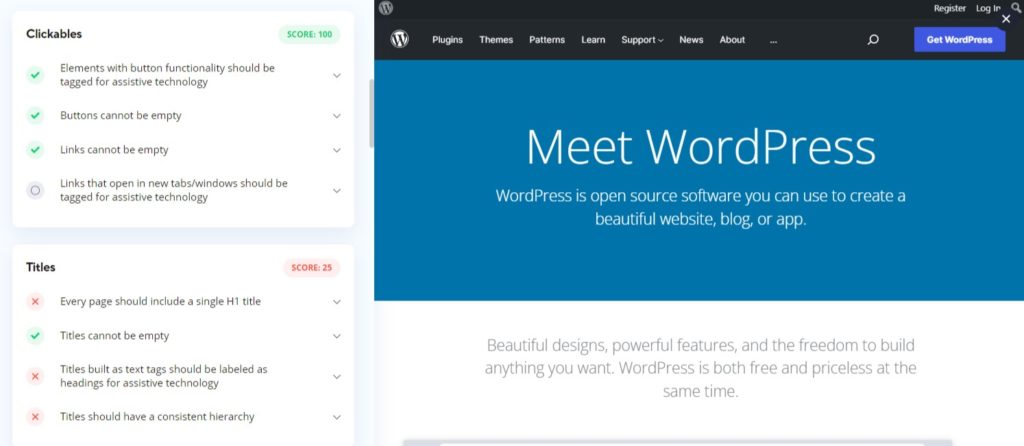
After that, they will take some time to analyze your web page and then generate a report based on its analysis. In the case of accessiBe, you will see a breakdown of your web page accessibility in the left section. You will see a detailed analysis of your web page, so you can identify areas that need improvement.
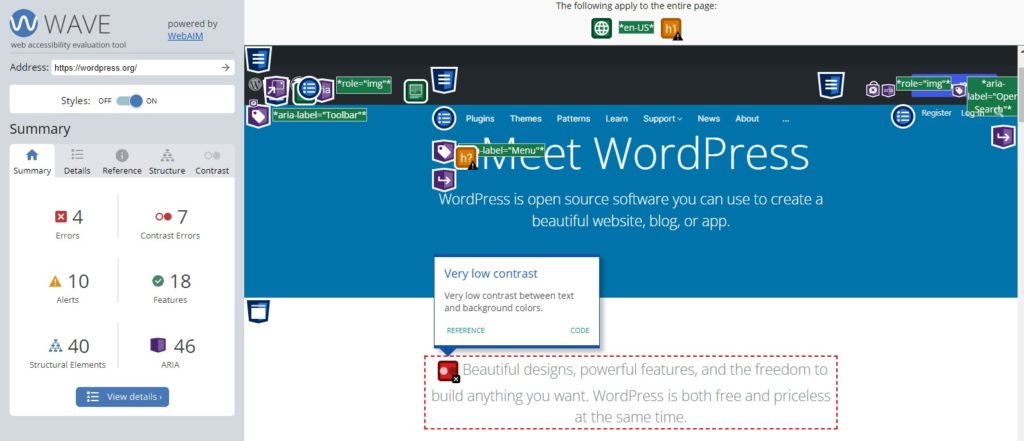
In the case of WAVE, the output differs in the respect that WAVE displays an annotated version of your web page. The annotated version highlights all the page elements based on their compliance with Web Accessibility guidelines. You can identify accessibility issues from their colored icons which will expand and give you more details when you click on them.
The point of using the online web accessibility scans is to identify areas of the web page that need accessibility improvements. This will give you a starting point, so you can take appropriate actions to improve your site accessibility.
2. Accessibility-Ready Themes to Improve WordPress Accessibility
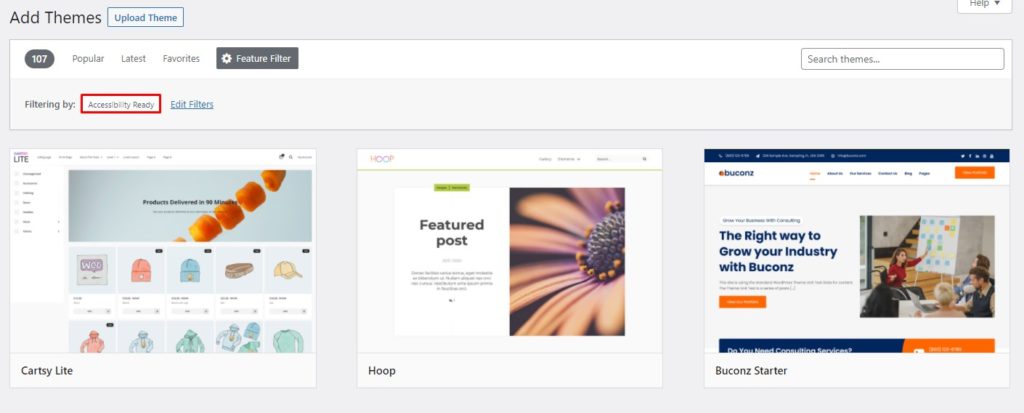
Using accessibility-ready themes can come in handy while improving WordPress accessibility. WordPress has established a set of guidelines that must be fulfilled for a theme to be deemed accessibility-ready.
Accessibility-ready themes differ from regular WordPress themes in the sense that they are designed keeping the web accessibility guidelines in mind. Thus, it is easier to optimize your site while working with an accessibility-ready theme compared to a regular theme.
While working with non-accessibility-ready themes, you may sometimes encounter issues where the theme doesn’t support some accessibility features or something similar. Such cases are pretty challenging to mitigate. Therefore, having an accessibility-ready theme is extremely beneficial when it comes to improving WordPress accessibility.
Nowadays, almost all the popular WordPress theme options come accessibility-ready like Divi, GeneratePress, and so on. So you can enjoy their extensive features along with the benefit of being accessibility-ready.
Besides the WordPress default theme directory, you can explore third-party theme stores like Theme Forest. They also have a great range of accessibility-ready WordPress themes.
3. Improve WordPress Accessibility with Plugins
Besides accessibility-ready themes, WordPress accessibility plugins are a quick way to improve WordPress accessibility. These accessibility plugins come with a set of features to improve your site accessibility.
Most of these tools provide the visitors with an accessibility interface containing various accessibility controls. Some more advanced options even integrate AI to better analyze your site and automatically make necessary adjustments to improve your site accessibility.
Let’s have a look at some of the best plugins to improve WordPress accessibility.
3.1. Web Accessibility by accessiBe
Web Accessibility by accessiBe is easily one of the top-tier options when it comes to improving WordPress accessibility. The plugin provides an accessibility interface and a powerful AI application that analyzes and automatically performs necessary accessibility adjustments.
Starting with the Accessibility interface, it provides tools for adjusting the site’s interface to improve readability. It allows users to change the font size, adjust color contrast, pause gifs, use an on-screen keyboard, and many more. On top of that, it comes with a built-in dictionary that can come in very handy.
The highlight of the plugin is its powerful AI-based application, which performs a deep analysis of the website and automatically makes necessary adjustments at the code level. These improvements make your site friendly for keyboard navigation, on-screen readers, etc., by automatically adding image alt text, aria attributes, and more.
Moreover, the plugin scans your website every 24 hours for any new additions or changes in the website and performs the necessary adjustments. With this plugin, you can achieve accessibility compliance to WCAG 2.1 at level AA and even AAA for some components.
Features
- Compliance with WCAG, ADA, and other web accessibility guidelines
- Feature-rich accessibility interface
- Powerful AI application to analyze and improve your site accessibility
- Scans the website every 24 hours to keep the site automatically compliant for any new additions to your website
- Customizable to match the design language of your site
Pricing
accessiBe is a premium plugin and is a bit on the expensive side. The cheapest premium plan starts at $490/year. But, there is a 7-day trial period, so you can try out the plugin before making an investment.
3.2. Accessibility by UserWay
Accessibility by UserWay is one of the most popular WordPress accessibility plugins. This plugin offers a wide range of accessibility improvements and offers complete WCAG and ADA compliance that can prove to be a game-changer. Just like accessiBe, it comes with an AI-powered application and a feature-rich accessibility widget.
The powerful AI compliance application scans and analyzes your whole site’s code for violations of accessibility guidelines. Based on this analysis, it takes remedial actions to automatically resolve accessibility issues with keyboard navigations, missing alt attributes for images, broken links, etc. It also features an impressive screen-reader, accessible forms and popups, accessible eCommerce pricing, and much more.
Besides the AI application, the plugin comes with a feature-packed accessibility widget. Using the widget, users can adjust the font size, color contrast, font spacing, text spacing, etc., and even includes a dyslexia font. The screen reader included in the widget is just spectacular and works wonders in improving content readability.
Last but not least, the widget is highly customizable, and you can modify it to match the look and feel of your website.
Features
- Complete WCAG and ADA compliance
- Powerful AI compliance application that analyzes and fixes accessibility issues automatically at the code level
- Accessibility widget with all necessary features like font resizing, line spacing, contrast, link highlights, and more
- Impressive screen reader
- Legible and Dyslexia friendly fonts
Pricing
This plugin comes in a free and premium version. The premium plans start at $49/month or $490/year. You can also avail of a 10-day free trial before making an investment.
3.3. One-Click Accessibility
One-Click Accessibility is another great tool to improve WordPress accessibility. The plugin comes packed with multiple accessibility features. Though it doesn’t come with the powerful AI system of the previous plugins, it’s a great alternative if you are not comfortable with a plugin tinkering with your site’s code.
Just like any other accessibility plugin, Once Click Accessibility comes with a feature-packed accessibility widget. The widget comes loaded with all the necessary accessibility features like font resizing, improving contrast, grayscale, readable fonts, links underlining, a link to sitemap, and more.
Besides the widget tools, it offers other accessibility features such as link skipping, focus outlines, removing target attributes from links, and more. On top of that, the plugin allows for maximum customizability. So, you can customize the accessibility widget via the theme customizer and match the design language of your site.
Features
- Feature-packed accessibility widget with features like font adjustment, link highlight, contrast improvement, grayscale, etc.
- Accessibility features like link skipping, focus outlines, removal of target attribute from links, etc.
- Customizable to match the look and feel of your website and integrated into the theme customizer
- Easy to set up in just a few simple steps
Pricing
Once click accessibility is a free plugin. So, it can be a great alternative to the other two plugins on our list. Though it saves money, it loses out on the AI features which is a trade-off you have to make.
4. Additional Tips to Improve WordPress Accessibility
Besides online accessibility scans and using accessibility-ready themes and plugins, there are a few other basic guidelines that you must keep an eye on to improve WordPress accessibility. The next steps are quite basic yet crucial as they have a huge impact on your site accessibility. So, let’s dive into that.
Structure
To improve WordPress accessibility, make sure to structure your content in proper logical order. Always use proper heading tags to structure the content. For instance, h1 is usually reserved for the page or post title and should not be used twice on the same page.
You can structure the rest of the page using heading levels h2 to h6. Make sure that the content follows the logical hierarchy, e.g., h3 should be nested inside h2, h4 should be nested inside h3, and so on. If at any point you need a heading level lower than h6, consider restructuring your content as it is an indication that the content is not well structured.
Well-structured content is not only easier to follow but is also essential for navigation. It is especially beneficial for screen readers since it’s easier to pick content from a well-structured site compared to one with a messy content structure.
Accessible Font and Font Size
While most users will easily interact with your site irrespective of the font, people with disabilities may find it challenging. People with a vision defect may find your stylized font hard to read or distinguish the characters from each other. Therefore, while choosing your site’s fonts, make sure it’s legible to all users without any overly stylized fonts.
Besides font legibility, text size is another factor that plays a big role in the readability of your content. People with visual impairments find it very hard to read small text. Therefore, avoid using smaller text on your site as much as possible. Always go with a decent size font.
However, providing your users to change the text size and font as per their requirements is the best strategy. There are multiple WordPress accessibility plugins out there to achieve this functionality. Some of them we have already discussed above, but you can also visit our guide to find more WordPress accessibility plugin options.
Images with Alt Text
Image alt text is a brief description of an image. In cases where the internet was unable to load the image due to slow connection, the image alt text is displayed to describe the image to the users.
However, image alt text has now become even more important since it is used by screen readers to read out the description of the image to visually impaired people. Since they cannot see the image, screen readers are their only source of knowing what is shown on the web page.
Therefore, always write meaningful and descriptive image alt text to give your reader a clear understanding of what you intend to show on the screen. Alt text can be used on buttons, links, images, etc. Make sure to use it properly.
Multimedia Accessible
Just like images, multimedia, e.g., audio and video, must also be accessible to everyone. While people with vision deficiency cannot see the content of the video, people with hearing impairment are unable to hear any sort of audio.
To account for people with visual impairment, you can add audio descriptions for parts that need an explanation like images, gestures, body language, volume and playback controls, etc.
For hearing impaired people, you can provide text captions or transcripts to enable them to understand the content of the video or the audio. Minor adjustments like these can make the multimedia enjoyable for both categories of people, vision or hearing impaired.
Color and Contrast
Color and contrast play a key role in the readability of the content on a website. The higher the contrast, the better the readability and vice versa.
Lower contrast between the background and text, e.g., green text on a red background makes it hard to read. Whereas black text on a white background is considered best for readability.
However, you can also go with other high contrast combinations, e.g., yellow text on a blue background, etc. Just make sure that the contrast is good enough to distinguish text from background. Secondly, avoid using thin fonts, especially on colored backgrounds, as it gets difficult to distinguish the characters, making it hard to read.
Keyboard Navigation
Another thing you can do to improve WordPress accessibility is to make sure that your whole site is navigable using the keyboard only. Blind or visually impaired people do not have the ability to use a mouse since it is a visually controlled device. However, they use special types of keyboards with raised letters and symbols, which enable them to interact with the computers.
Therefore, all the elements on your site must be accessible via keyboard only to accommodate visually impaired users whose primary mode of interaction with the web is a keyboard. All the parts of your site, e.g., the drop-down menus, forms, call to action buttons, dialog boxes, widgets, etc., should be accessible via the keyboard.
Minimize Use of Tables
Tables have long been a great tool to organize a webpage in the form of rows and columns. However, screen readers find it difficult to read such content in a way that is meaningful to the user.
Normally, the way we humans read a table follows a more visual order than reading it row by row or column by column. It also depends a lot on the kind of content and the way it is distributed.
However, screen readers are not that intelligent. They can only read tabular data, either row by row or column by column, which is not the best approach in most cases. There is no mechanism for screen readers to understand the visual order a human follows and stick to it.
Therefore, it is always recommended to minimize the use of tables as much as possible and use them only if necessary. Wherever possible, use CSS to structure content in the form of sections and columns. And if you must use tables for any reason, make sure to give proper labels to each data element to make them meaningful when narrated by screen readers.
Activate Accessibility in Mac and Windows
Above, we have seen multiple ways to improve WordPress accessibility. Let’s now take a step away from WordPress and look at the accessibility features provided by the two most popular operating systems, Windows and macOS. Let’s dive in.
Accessibility – Mac
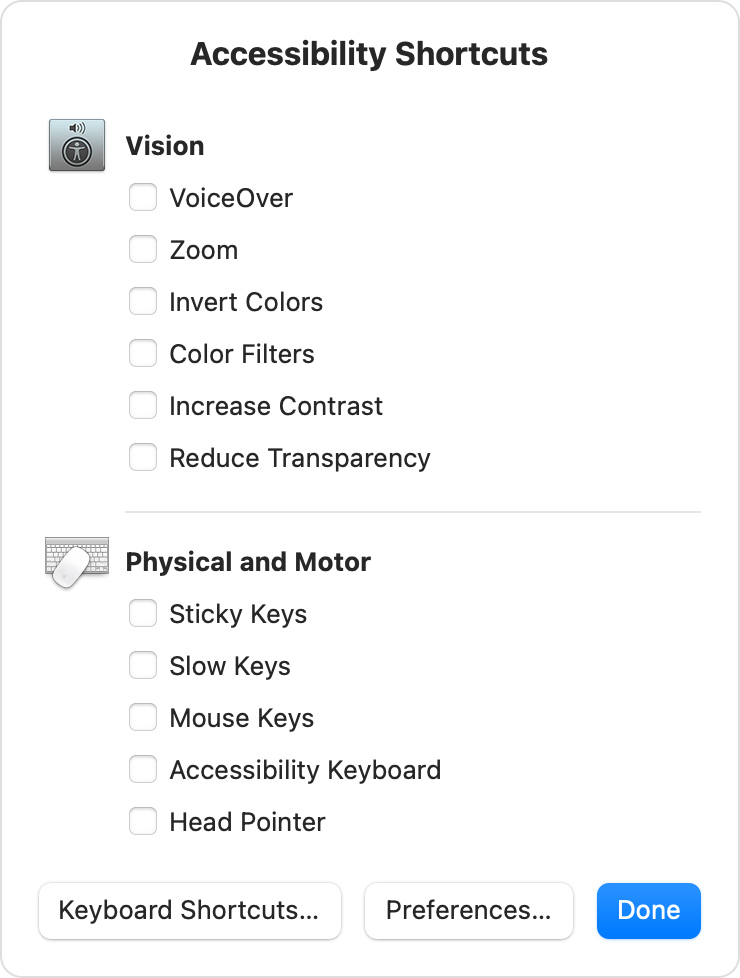
macOS features quite a few accessibility shortcuts to help disabled people better navigate the system. These accessibility features also help the user when interacting with the web. macOS accessibility shortcuts can be accessed via the Accessibility menu in the Settings app or using the shortcut Option(⌥), Command(⌘), and F5 pressed altogether.
macOS divides the accessibility shortcuts into two sections, vision and physical or motor. The vision section offers features related to vision impairments. The list of shortcuts includes voice-over, zoom, invert colors, color filters, contrast, and reducing transparency.
Likewise, the physical and motor accessibility section contains features like sticky keys, slow keys, mouse keys, accessibility keyboard, etc.
With the help of these accessibility features, motor-impaired and vision-impaired users can better interact with their computers and enjoy the web.
Ease of Access – Windows
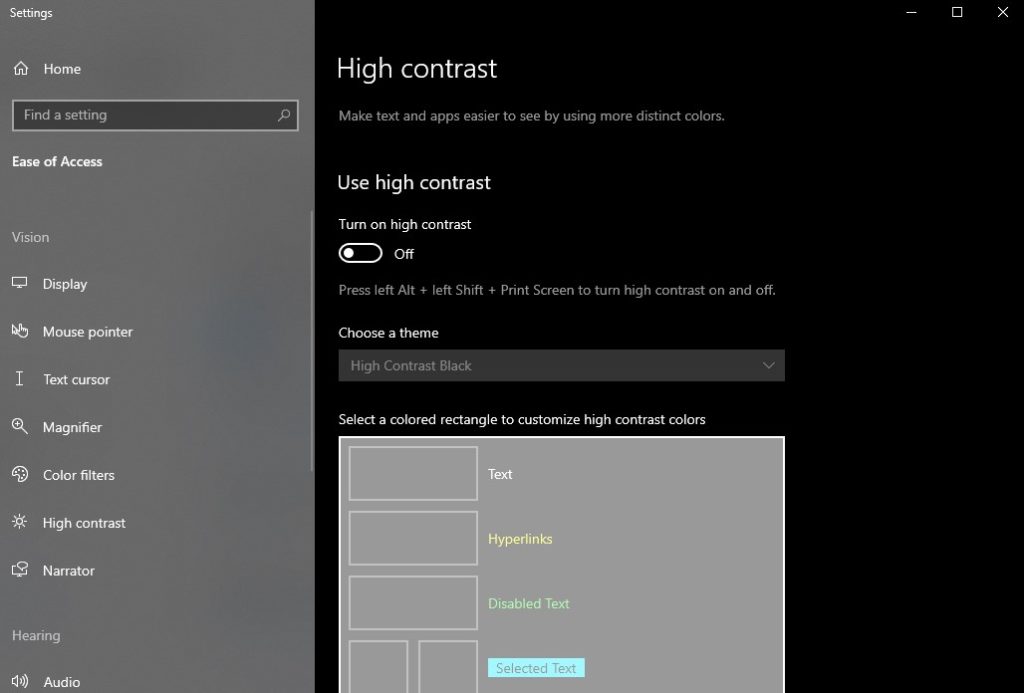
Similar to Accessibility Shortcuts in macOS, Windows provides its set of accessibility features under the title, Ease of Access. To access the Ease of Access setting menu, select the start button and go to Settings > Ease of Access, where all the accessibility settings are provided.
Compared to macOS, windows offer an extensive set of accessibility features. With windows, users have a magnifier to zoom the text, high contrast mode for better readability, and more. In terms of keyboard usage, there are sticky keys, filter keys, toggle keys, and an on-screen keyboard. For the mouse, you can change pointer size or enable mouse keys to use the keypad to control the mouse.
Moreover, Windows packs a fully featured screen reader that it calls narrator. Some of the commonly used accessibility features like the narrator, magnifier, on-screen keyboard, and a few more are provided from the sign-in screen for quick access as well.
Conclusion
All in all, having the web accessible to all the parts of our community is essential in today’s world. It is our responsibility, while designing systems, to account for the people with various disabilities so they can also become fully functional members of society. Besides moral responsibility, web accessibility is now a legal matter with all the legislation in place.
In this article, we have discussed multiple ways to improve WordPress accessibility. The first step is to get a site analysis via online tools like accessiBe or WAVE and identify areas that need accessibility improvements.
Once you have identified areas for improvement, you can customize them either manually or using a WordPress accessibility plugin. Similarly, using accessibility-ready themes helps with site accessibility too since they are built in accordance with web accessibility guidelines and easy optimization.
Additionally, make sure your content is also well-structured with optimal color and contrast, optimized images and multimedia, keyboard navigation, and minimal tables to help increase accessibility.
Lastly, we had a quick look at some of the accessibility features in popular operating systems macOS and Windows. They come with basic accessibility shortcuts that enable disabled people to interact with the operating system. If you want to further improve the accessibility of your website or any particular page of it like the checkout page, you can optimize the page using plugins like Direct Checkout for WooCommerce and WooCommerce Checkout Manager as well.
Have you considered improving your WordPress accessibility before? What shortcomings did you find out, and how did you improve them? Let us know of your experience in the comments below.
Meanwhile, here are some more posts to help you improve your WordPress website:
