
How to integrate WooCommerce with MailChimp
MailChimp is one of the most powerful marketing tools out there so it’s no surprise that it’s one of the most crucial plugins for WooCommerce. Its ability to generate new marketing opportunities through emails is extremely valuable for online businesses who want to grow. Additionally, its functionalities to track sales, create automated offers, follow up emails, and send custom generated product recommendations are great tools that add enormous value to e-Commerce sites. But before you get all the benefits of this amazing plugin, you need to integrate and synchronize it with your site. That’s why in this guide, we’ll have a look at how to integrate WooCommerce with MailChimp step by step.
However, before we jump into the process, let’s better understand why connecting your MailChimp account with your WooCommerce store is a good idea and what advantages it brings.
What is MailChimp?
MailChimp is the most popular email marketing tool on the market. Both big and small businesses around the world use it to automate their email marketing campaigns, keep track of metrics such as open rate and clicks, improve lead generation and sales, customer targeting, and social advertisement.
Mailchimp is a very complete tool that simplifies the process of targeting offers to your customers in conjunction with your mailing lists, helping you automate many processes involved in running marketing campaigns and social advertisements. The sheer amount of features it provides makes it the quintessential plugin needed for an e-Commerce website.
Integrate WooCommerce with MailChimp: Advantages
Apart from its powerful features, if you’re running an e-commerce store, the perfect compatibility between MailChimp and WooCommerce makes it an excellent choice for any online business. So why not open new avenues for marketing and growing your business by connecting WooCommerce and your customer data along with MailChimp’s marketing features.
Some of the strongest features the WooCommerce MailChimp integration provides are:
- Better marketing and automation tools to improve customer relationships
- Create customized emails and promotions based on users activity
- Use gathered customer data to send post-purchase emails, product recommendations, and even email abandoned shopping carts
- Sync email lists and customer data as well as tracking/categorizing customers based on purchase history and frequency
- Build landing pages and pop-up forms for your website for better lead generation
- Add dedicated coupon codes for email ads and promo content blocks
- It’s completely free and very easy to set up and use
So, now that we’ve highlighted why this plugin is an absolute must for your business needs let’s have a look at how you can install it on your WooCommerce store and integrate it with your MailChimp account.
How to set up MailChimp for WooCommerce
1) The first thing you need to do to start with the installation is to download the plugin package from the WooCommerce website. Simply click Download Now on the far right. You’ll need to log in to your WooCommerce/ WordPress.com account.
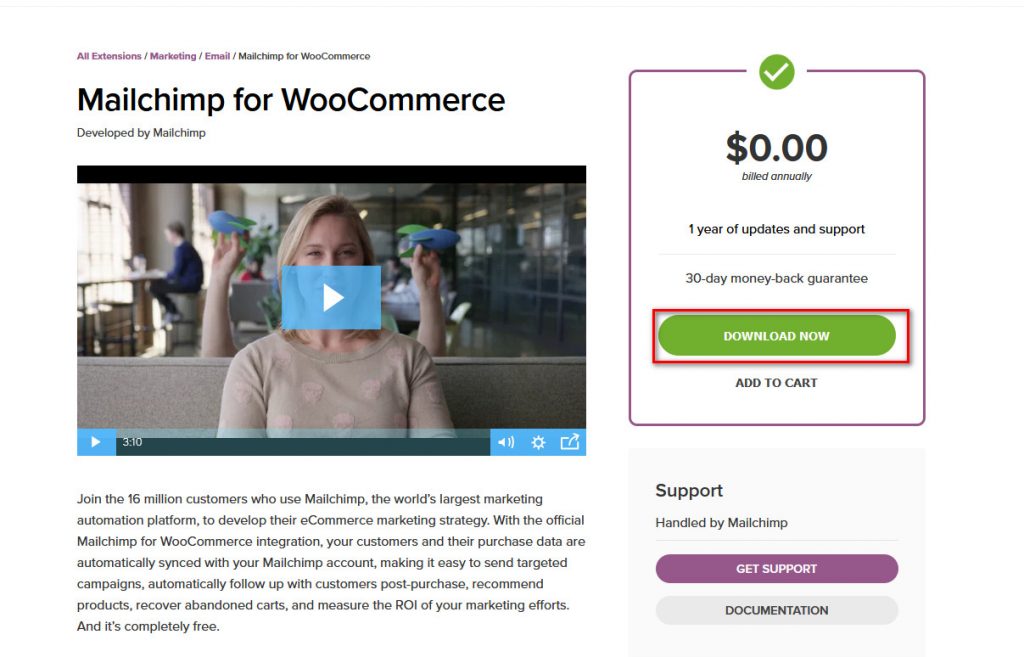
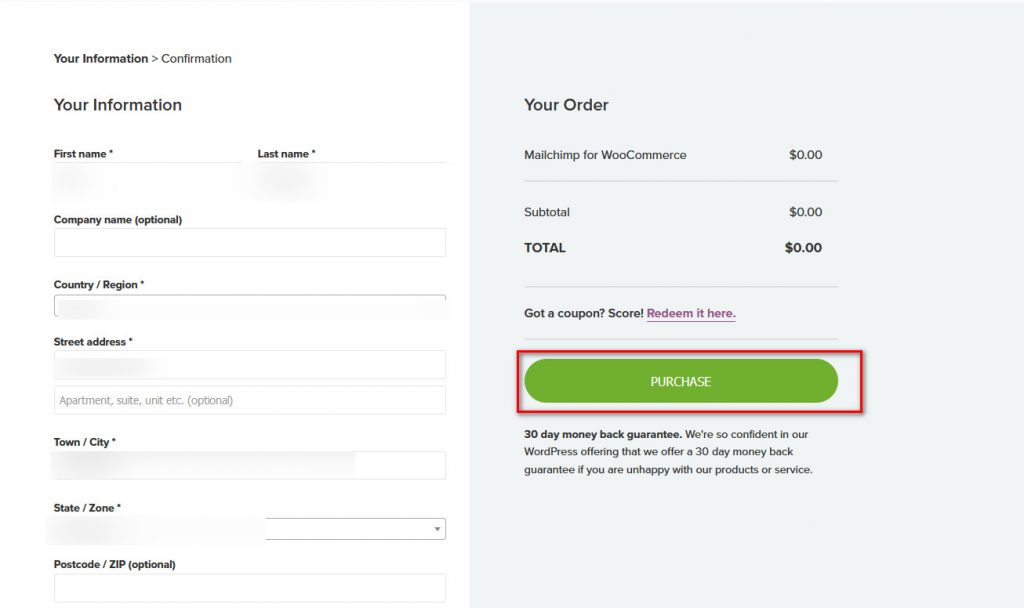
2) After you sign up or register, you’ll get the plugin for free. On the next screen, fill in the checkout form and click Purchase. Don’t worry, you don’t have to enter any credit card details to get it.
3) Then you’ll get a link to download MailChimp. Once you receive the zip file, save it.
4) Next, open your WordPress Admin dashboard and hover over Plugins on your sidebar. Then, click on Add New, and after that press Upload plugin on the top right.

5) On the next page, click Browse, and then you will need to select the MailChimp .zip file you just downloaded in the previous step.

6) Once you’ve found the file, click Install Now, and then you’ll install MailChimp for WooCommerce. After the installation finishes, remember to click Activate to activate the plugin and start working with your MailChimp integration.
Please note that you need to have WooCommerce installed for the plugin to work. Once you’ve installed and activated the plugin, you’ll be able to integrate WooCommerce with MailChimp.
MailChimp Login and WooCommerce Setup
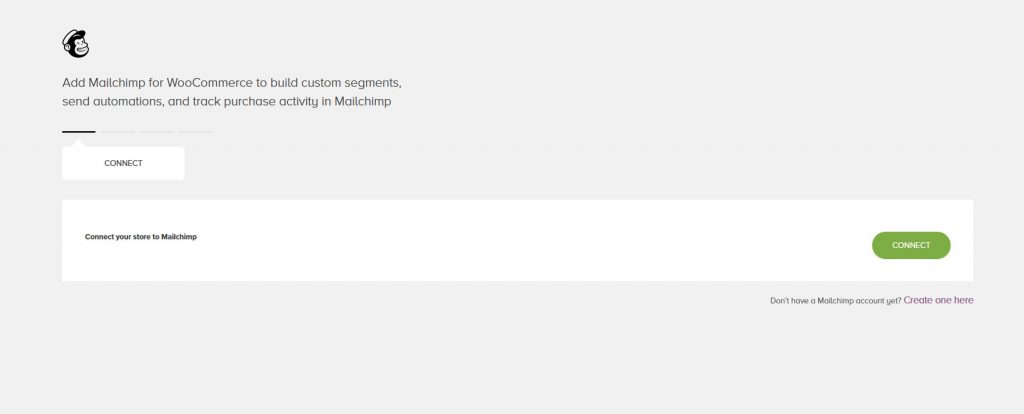
After you finish the installation, you’ll be taken to the Connect interface. Alternatively, you can click on the MailChimp tab on your WordPress Dashboard Sidebar. Here, you can link your MailChimp account with your WordPress and WooCommerce installation.
To start the process, press Connect.
Then, you’ll have to log in to your MailChimp account.
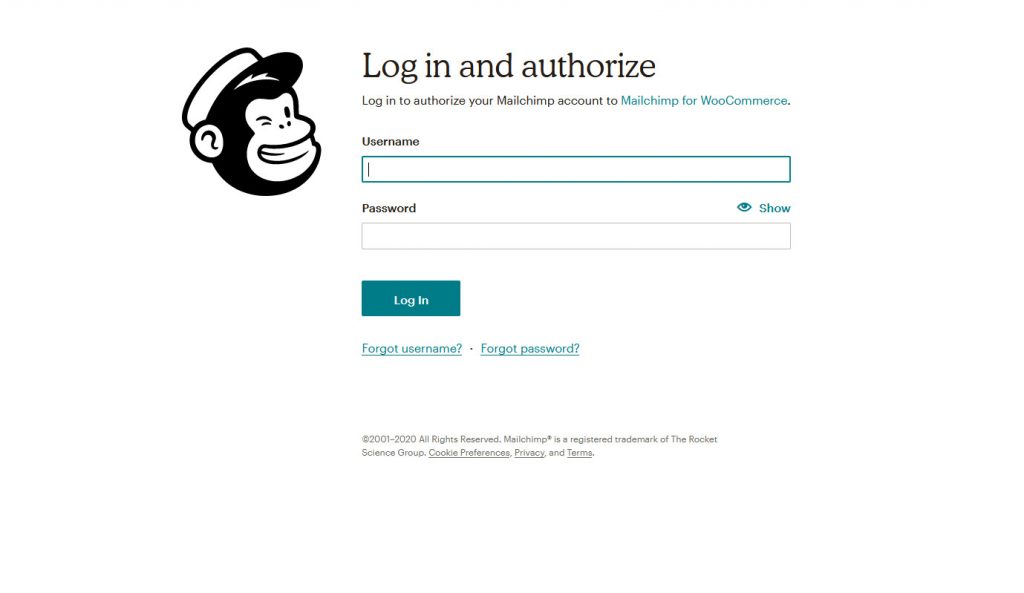
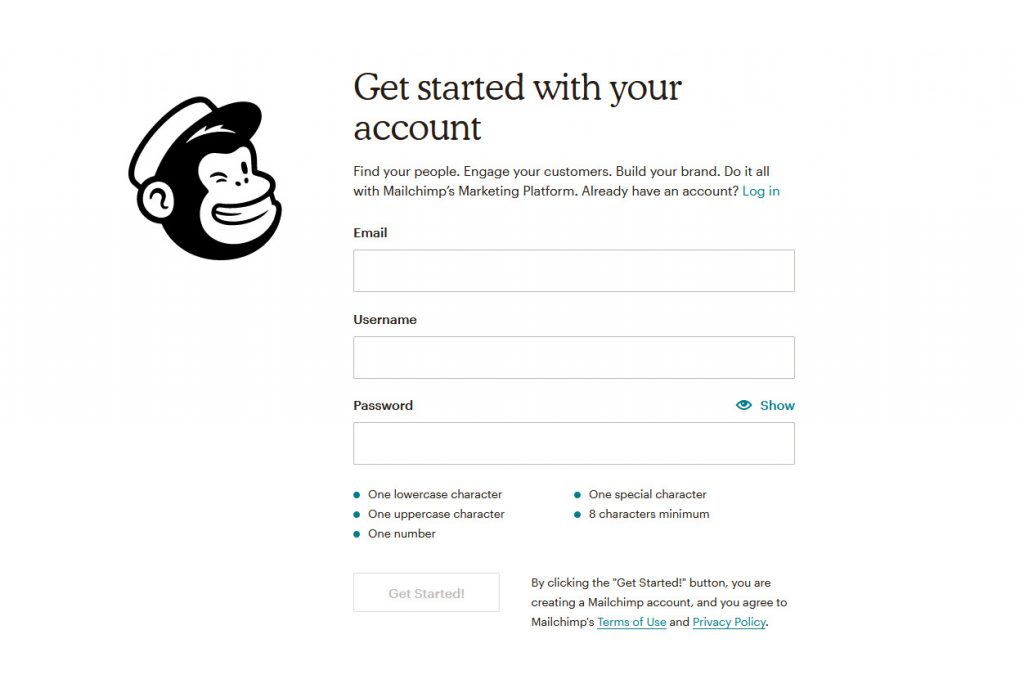
If you didn’t create an account previously, now is the perfect time to do so. The sign-up process is identical to any other account signup. All you need to do is enter your email address, password, username, and then verify your email. After signing up, you might need to set up your account with a few details, but that should only take a few minutes.
To set up your WooCommerce Mailchimp integration, log in to your MailChimp account on your browser pop-up.
Setting up your MailChimp Store and Audience Settings
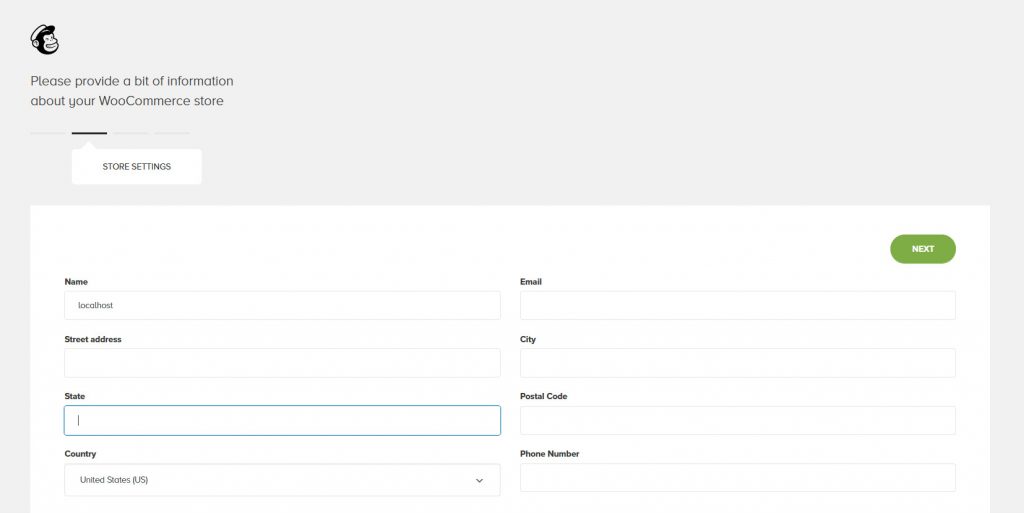
Then, you’ll need to set up your Store settings. Simply enter the details such as your Store name, address, email, city, and additional information in the correct fields.
Additionally, you’ll also be required to set up Locale settings, which include your WooCommerce currency, Locale, and Timezone. You can also set up the Permission level to manage MailChimp for WooCommerce using the Optional store settings.
Once you’re done, click Next to move on.
After that, you need to set up your Audience Settings. This includes the Default email you’ll be sending the mail from, the default name that will be displayed as well as the default subject for your mails. You can also set up a Permission reminder message as well.
Next, you need to Sync your Audience settings for your store. Enter the name for the audience of your WooCommerce store, and then click Start Sync to create a New audience data set. You can also choose to sync your already existing customer audience as well. Moreover, you can also check out the Optional Audience Settings for additional customer sync and audience settings such as customizing your Opt-in checkbox display for your newsletters, customizing the subscriber tags, and more.
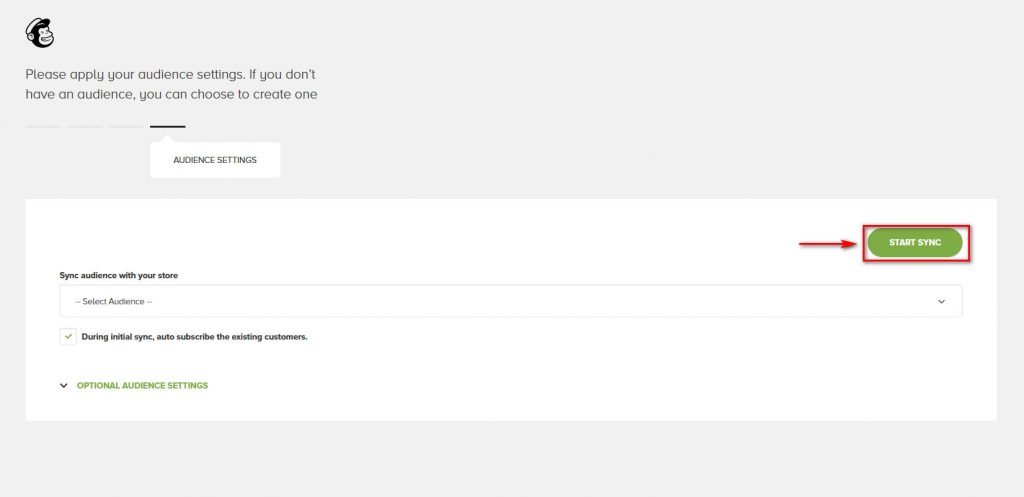
Once you click on Start Sync, your store data sync process will begin. Please keep in mind that this could take some time.
After the process is completed, the plugin will take you to the Overview page, which will show you data regarding your MailChimp integration and your WooCommerce store.
Customize MailChimp for WooCommerce Interface
At any point, you can change your MailChimp for WooCommerce settings by simply clicking on MailChimp on your WordPress Dashboard sidebar.
Here, you can see the overview page for your WooCommerce store. You can check the sync status and the connected websites on the right. Additionally, you can also click on the Force ReSync button to resync your store data again.
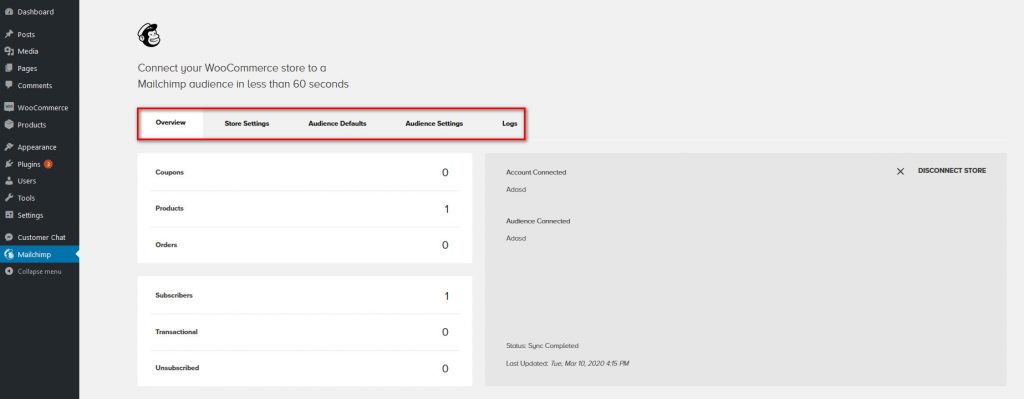
On the left, you can see store data such as Coupons, Orders, Products, Subscribers, and more.
Using the different tabs on the top, you can also check out different settings pages and customize your WooCommerce MailChimp integration accordingly.
Additionally, if you want to view details regarding your Connect website, you can open your MailChimp account and view the Connected Sites page to check what sites you’ve linked with your MailChimp account.
And that’s it! You’ve connected WooCommerce with MailChimp so you’re ready to start sending automated emails and grow your business.
MailChimp for WooCommerce: Tips and first steps
If you’re new to MailChimp you may not know what to do first. So once you’ve finished the integration here are some tips and things you can try out:
- Make sure your email campaigns are mobile-friendly. It’s something very important but usually overlooked
- Keep your subscribers’ list clean and send emails only to people who want to receive them. Even if a small percentage of users unsubscribe after you send them an email, MailChimp may consider you spam
- Check the subscribers’ source to get insights about how you got your subscribers (pop-up, users who bought from you, etc). Then you can build specific campaigns for each group, change things that aren’t working well, and so on.
- Check the subscribers rating so you could create special campaigns or offers to the hot subscribers who are ready to buy
- Test different subjects and calls to actions. Check which one has a better open rate and click-through-rate (CTR) to optimize your campaigns
- Automatically send order receipts, store offers, shopping carts, invoices, and other automated store emails directly to your customers
- Design targeted campaigns, coupon deals, and purchase based segments
- Track user-product sales and send recommendations accordingly
There are many other things you can do with MailChimp for WooCommerce but that’s a good start. If you have any questions regarding functionalities, feel free to ask us in the comments section.
MailChimp for WooCommerce not syncing? Here’s how to fix it
Your WooCommerce store doesn’t sync with MailChimp? Don’t worry, in this section, we’ll show you the most common solution to this problem.
- In your WP dashboard, go to Plugins > Installed Plugins
- Look for Mailchimp for WooCommerce and press Deactivate
- Then, click Delete and confirm the action in the pop-up
After that, simply reinstall the plugin and all the information from your store will sync with your Mailchimp account
2) Check the requirements: Another potential cause for MailChimp for WooCommerce not syncing is that you don’t meet all the requirements. For example, WooCommerce requires PHP 7 or greater. Additionally, make sure you’re using the latest versions of both WooCommerce and Mailchimp for WooCommerce to avoid compatibility issues.
3) Force re-sync: Another alternative is to re-sync your store with MailChimp. To do that, go to the MailChimp settings in your WordPress dashboard and press Force Re-sync. If you don’t see the resync button, in the syncing tab apply &resync=1 to the URL in the browser. That will force the button to show up and you will be able to re-sync.
4) Compatibility issues: As mentioned before, compatibility issues with your themes or plugins can create problems with the synchronization. To find which tool is creating the conflict, you can deactivate all your plugins except WooCommerce and Mailchimp for WooCommerce, and activate them one by one until you find out which one causes the problem. To learn more about how to do this, check out our guide on how to deactivate plugins in bulk.
NOTE: If you use the Order Notifications automation in MailChimp for WooCommerce, you should disable the notifications in WooCommerce. Otherwise, you’ll send duplicate emails to your users.
Conclusion
All in all, MailChimp is a very powerful marketing tool that can help you grow your subscribers’ list and increase your sales. On top of that, setting it up takes a few minutes, it’s very easy to use, and it’s free.
In this guide, we’ve seen how to set up and integrate WooCommerce with MailChimp step-by-step. The process requires a bit of attention but if you follow our tutorial you won’t have any problems. Finally, you’ve learned the possible causes and solutions to the most common syncing issue.
Have you tried MailChimp for WooCommerce on your site? Did you have any issues with the integration? Let us know in the comment section below!
If you want to improve your store, you can also check out the following guides:

Will the address that MailChimp for WooCommerce asks from me be included in any of the receipts or campaigns that I send out? I don’t have a physical storefront and am concernced about using my own home address for fear that it will be made public or get sent to my members.
Hi Nadine, you can change the design of the emails to hide the address. However, if you want to display it, keep in mind that the address that will be included in the emails is the one from “Audiences in this account”.
You can edit that info from Account > Settings > Contact Information > Audiences in this account. This address can be different from the Primary account contact and billing info.
Hi, This is super powerful but how can the order notification emails be localised? I have 7 stores in 6 languages.
It’s impossible to edit most of the content in these mails which is a challenge right now.
Hi Adrian, thanks for your comment. I’ve never done it to be honest so I’m not 100% sure. Have you tried the *|TRANSLATE:XX|* or *|MC_LANGUAGE|* merge tags?
I’ve used them to translate campaigns, maybe they’re helpful to translate the order notification emails too. For more info check out this page.
Hope it helps
Thank you for this post. Is there a way to add to a specific audience based on which product(s) the customer purchases? For example, people who sign up for my membership should be added to an audience for the membership and receive email “a” while people who purchase a tee-shirt would be added to a general audience and receive email “b”
Thanks for your comment Kim. As a general rule, it’s recommended to have one audience and then segment it using groups/tags. For example, for your case, you could have 1 audience and then split it into 2 groups: Membership and General. You can use tags and then create an automation to send them emails based on those tags. For more info, you can check out this link.
Hope it helps
After setting up the MailChimp integration with WooCommerce, when an already existing MailChimp subscriber makes a purchase, all of the previous info in MailChimp goes away! First and Last name, address, phone, etc. All that is left is the email address, and no tag that I set up to be attached to an order… Any idea what is happening?
Hi Don, it may be a problem with the synchronization. Try reconnecting and setting it up again.
Thank you for the detailed description of the setup.
I‘m trying to send an email from Mailchimp 10 days after a purchase that includes a link to the order in woocommerce. Any idea what merge tag I can use to do so?
Thanks!
Hi Chris, I understand you know how to create the automation but you’re having problems with the merge tags.
Check this link and this one. If you don’t find the answer there, check out this page.
Hope that helps.
Cheers!
Hi, I wonder how can I send an automated email each time I add a new product to woocommerce. Thank you