
Everyone knows that having a well-designed website is key to drawing more visitors. One way to make your website look appealing but not compromise on usability is by utilizing the right fonts. In this article, we’ll explore how you can optimize Google fonts in WordPress for better performance and improved user experience.
Before we start, let’s take a look at what exactly google fonts are and why we must optimize Google fonts in WordPress.
What are Google Fonts?
Google Fonts is a library of free fonts, with over 1300 open-source fonts created by the Google team that you can use on your website. They are available in a variety of styles and weights. You can find them in both the Serif and Sans-Serif families, as well as a range of Display and Handwriting fonts. You can use these fonts as body text or headings, on your website, in your emails, or even in your printed documents.
If you’re not sure which font to choose, Google provides a handy preview tool so you can see how each font looks on your website. The library also includes a large range of international fonts, with support for more than 200 languages. When using Google Fonts, you don’t need to install any software on your computer or worry about copyright issues. All you need to do is link the font to your website, and you’re good to go.
Google Fonts is also designed to fit different screen sizes, making it easy to use on any device. Google Fonts also makes it easy to be creative with typography. With hundreds of fonts in its library, you can create stunning designs that stand out from the rest. And, if you want to use a single font for multiple designs, you can also combine fonts for a unique look.
Why We Must Optimize Google Fonts in WordPress?
Many people often use Google Fonts because they’re free and easy to use. However, when too many fonts are used on a single website, it can result in extremely slow loading times. This is due to the fact that each font must be loaded separately from the server before it can be displayed on the page.
But by optimizing the Google fonts, the number of requests that the browser makes is reduced, resulting in faster loading speed. Faster loading times can make a big difference in your website’s performance, as it increases user engagement and reduces bounce rate.
Besides that, one of the most obvious benefits is the improved appearance of your website. With better typography, your website will be more visually engaging and enticing to visitors. Additionally, Google Fonts also offers a range of international fonts, which can improve the usability of your website. By incorporating fonts from different languages, you can make your website more accessible for people from different backgrounds.
And finally, optimizing Google Fonts can help to improve your website’s SEO. By using fonts that are optimized for search engines, you can improve the rankings of your website in the search results.
Now you might be wondering how we can add Google fonts to WordPress. Let’s find out in the next section.
How to Add Google Fonts to WordPress?
There are various methods to add Google fonts to WordPress. However, we’ll be using a quick and easy method which is, of course, the plugin method.
For this demonstration, we’ll be using the Google Fonts Typography plugin because it is one of the best free tools that allow you to include Google Fonts on your website without having to write a single line of code.

Before moving to the tutorial, remember that the majority of WordPress themes come with integrated Google fonts support. If you use a theme that includes Google Fonts integration, you can change the typography of your site from the theme panel or the WordPress customizer. So, before you begin the process of including Google Fonts on your site, we recommend that you first check to see if your theme already includes Google Fonts.
Now let’s begin by installing the activating the Google Fonts Typography plugin.
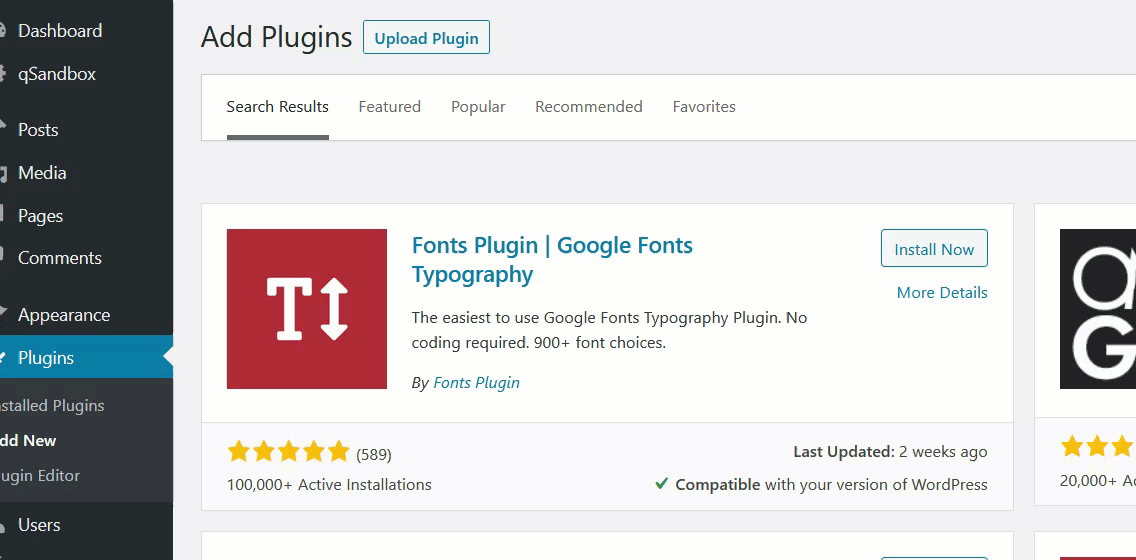
Step 1: Install and Activate the Google Fonts Typography Plugin
To install the plugin, navigate to Plugins > Add New in your WordPress dashboard. Enter the plugin’s keywords here and search for it in the WordPress plugins repository.
When you find the plugin in the search results, click Install Now. It only takes a few moments to install. After the installation, click the Activate button to activate the plugin on your website.
You can also manually install the plugin. For more information, please see our guide on how to manually install a WordPress plugin.
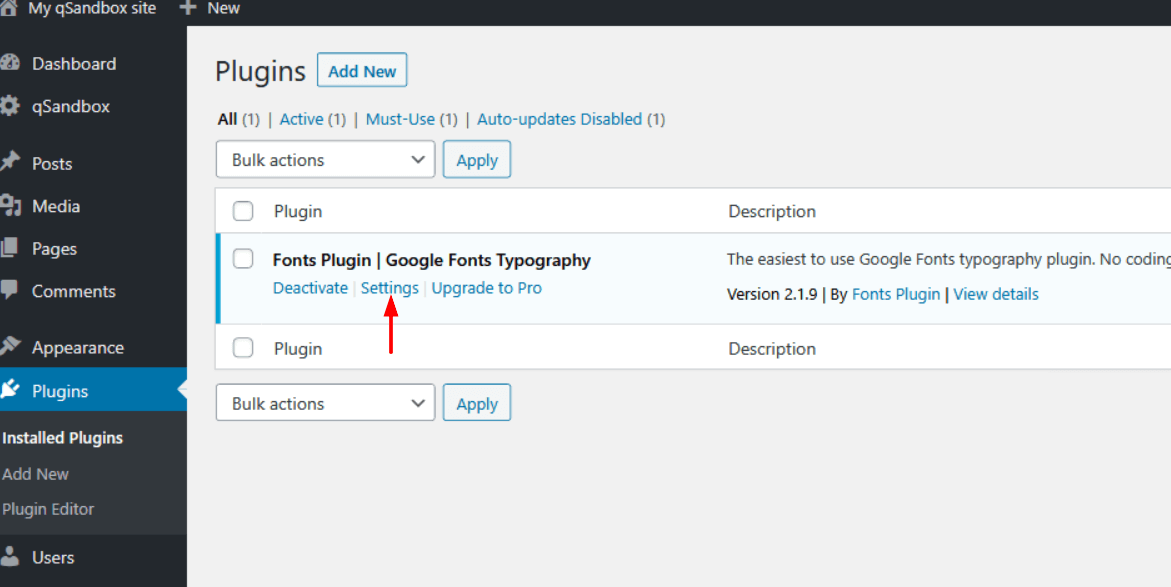
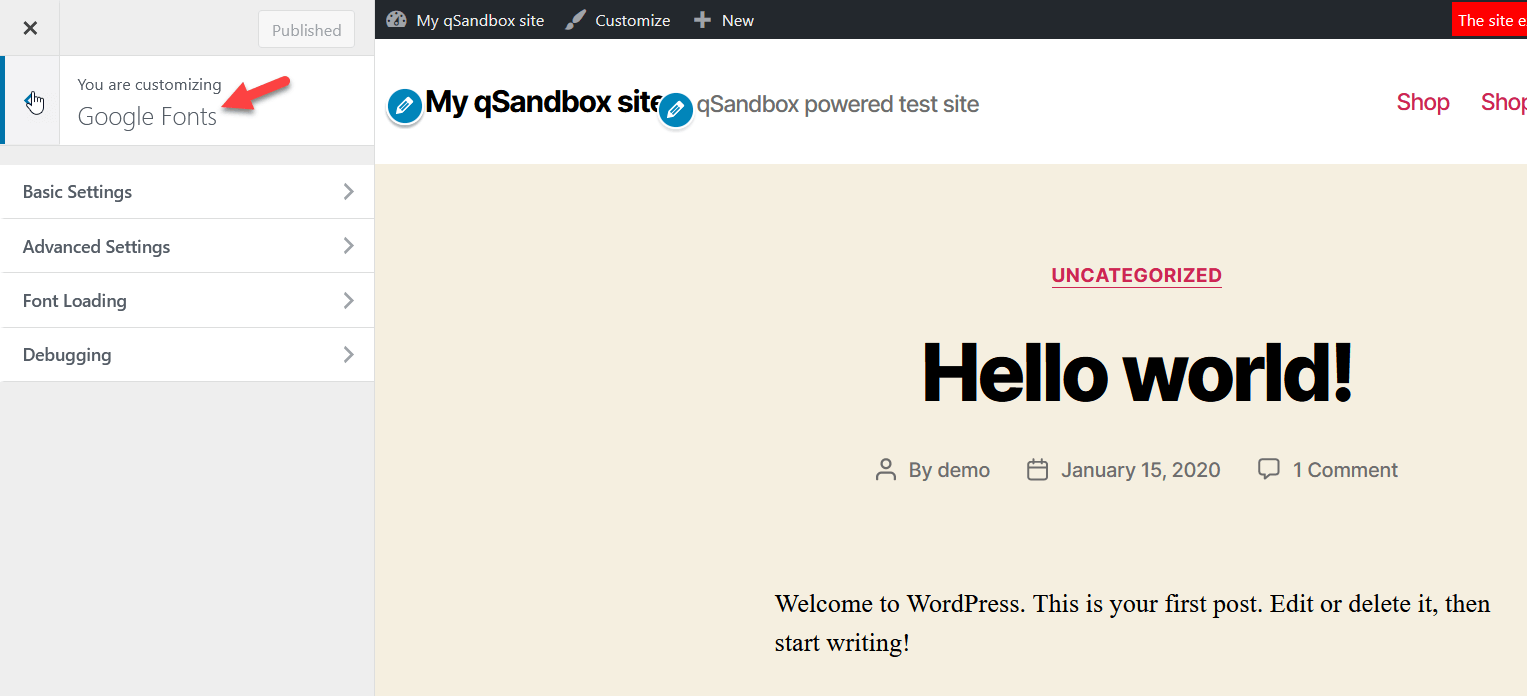
Then, navigate to Plugins and check the plugin’s settings. When you click it, you’ll be redirected to the WordPress customizer. From there, you can take control of your website’s typography.
There are 4 main settings that you can configure.
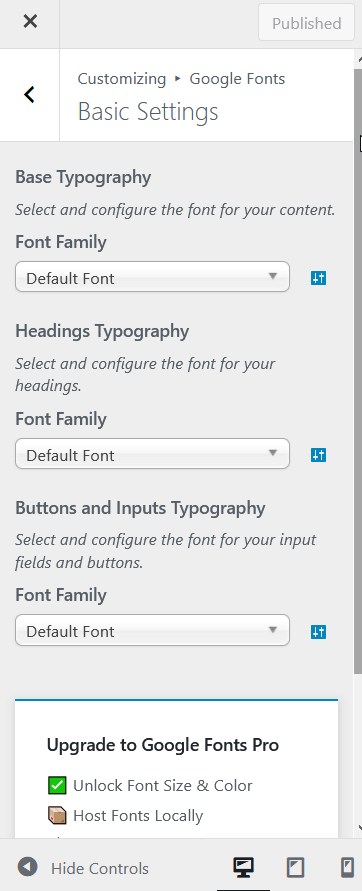
Step 2: Configure Plugin’s Setting
From the basic settings, you can select your default font family for the body, heading, and input fields from the basic typography section. You can select any of the hundreds of Google Fonts from the dropdown menu under each Font Family section. If you know what font you want, just type it into the search box.
On the other hand, from the advanced setting, you can select the font family for your branding, navigation, content, sidebar, and footer. This is a useful feature if you intend to use different fonts on different sections of your website.
Another setting option is Font Loading. You can simply uncheck any font weights you don’t require. Then click Publish. At last, you can find a setting option which is Debugging. Within this setting, you can reset all of your fonts and start from scratch, and also you can clear the font cache.
And that’s it. Using these steps, you can easily add Google font to your WordPress website,
Tips to Optimize Google Fonts in WordPress
Now that you have added Google fonts to your website. Here are the tips that you can use to optimize Google fonts in WordPress.
1. Use the Correct Font stack
A font stack is a collection of fonts that displays text on a website. The fonts in a font stack are usually chosen so that they can display text in a variety of different languages. When it comes to using the correct font stack for your web project, there are a few things to keep in mind.
First, you’ll want to make sure that the fonts you’re using are ones that will be widely available on most devices. Secondly, you’ll want to use a font stack that includes a few different fonts in case one of the fonts you’re using is not available on a particular device.
And lastly, you need to make sure that the fonts you choose display the text in the languages you want to support. Also, make sure that the fonts you choose are compatible with the browsers your users will be using and also readable on all kinds of devices.
2. Specify Character Sets
When creating a new document, you can specify which character set to use. It is important to specify the character set that is being used so that the text can be displayed properly, especially if you are working with languages that use non-Latin characters, such as Arabic, Chinese, Japanese, or Russian.
If you are not sure which character set to use, you can consult a list of character sets supported by different languages. Once you have selected a character set, be sure to save your document using that character set.
There are many different character sets that can be specified when working with text. The most common character set is the ASCII character set, which includes all of the standard English alphabet and numbers. Other character sets can be used for other languages.
3. Don’t Rely on Automatic Fallbacks
When it comes to optimizing Google fonts in WordPress, it’s important not to rely on automatic fallbacks. This is because automatic fallbacks can often lead to unexpected results and can even cause your site to break.
Instead, it’s always best to test your site in as many browsers and devices as possible and to make sure that it works as intended. If possible, try to provide manual fallbacks or alternative solutions that can be used in case the automatic fallbacks fail.
4. Use the Right Weights and Styles
It’s important to use a hierarchy in your fonts so that readers can easily scan the page and know where to find the most important information. The weight and styles you use for your headings should be distinct from those you use for your body text. For body text, a light to medium weight is best, with a simple, sans-serif font. For headings, you can use a bolder weight, and you may want to consider using a serif font.
When in doubt, simpler is better. Stick to a few basic weights and font styles, and don’t be afraid to experiment. First, you need to decide what kind of message you want to convey to your visitors. If you want your text to be serious and professional, then you will want to use a heavier-weight font. If you want your text to be fun and playful, then you can use a lighter-weight font.
5. Optimize Your CSS Delivery
You should minimize and compress your CSS files to optimize your CSS delivery. Minifying your CSS means reducing the file size of your CSS files by removing unnecessary whitespace, comments, and other code. Compressing your CSS means reducing the file size of your CSS files by reducing the size of the individual files.
One way to do this is to use a CDN to host your CSS files. Alternatively, you can inline your CSS code directly into your HTML files. This can be a good option if you have a small amount of CSS to deliver.
Whatever approach you take, make sure you test your website thoroughly to ensure that there are no delivery issues.
6. Use Italics Sparingly
Italics are mainly used to add emphasis to a word or phrase or to denote a title. Overuse of italics can make your writing look like you are trying too hard to be dramatic or interesting. While the overuse of italics also may make your writing look cluttered. When used correctly, however, they can add emphasis and help to break up long blocks of text.
7. Consider Using a Web Font Loader
If you’re looking to improve the performance of your web fonts, consider using a web font loader. This can help avoid the Flash of Invisible Text (FOIT) that can happen when web fonts aren’t properly loaded. A web font loader improves the loading time of your web fonts while displaying them correctly.
This simple tool can dramatically change the look of your site, and it’s easy to use. Just select the web font you want to use, and then add the code to your site. The web font loader will take care of the rest, ensuring that your site looks its best.
8. Use font-display: swap;
Font-display is a CSS property that tells browsers how to render fonts that are not yet loaded. The swap value tells the browser to render the fallback font first and then swap it out for the Google Font when it’s ready.
This ensures that users don’t see a blank space while the font is loading and also helps improve performance by reducing the number of HTTP requests needed to load the page. Chrome and Safari have supported this property since versions 60 and 63, respectively.
9. Combine Multiple Fonts into a Single Request.
When it comes to using multiple fonts in your web designs, there are a few different ways to go about it. One approach is to simply include multiple font files within your CSS, each pointing to a different font family. However, this can often result in a lot of extra HTTP requests, which can add up and slow down your page loading times.
Another approach is to combine all of the fonts you want to use into a single file using a technique called font embedding. This can help reduce the number of HTTP requests and can also help speed up page loading times. There are a few different ways to embed fonts, but one popular method is to use the @font-face CSS rule.
10. Use a CDN for Served Fonts.
Many web developers choose to use a content delivery network (CDN) to serve their fonts. CDNs can help improve performance by caching your fonts on their servers, which means that visitors to your site will have faster loading times. This can be a great way to improve the performance of your site, as well as reduce the amount of bandwidth that you use.
However, there are a few things to keep in mind when using a CDN for your fonts. First, you’ll need to make sure that the CDN you choose supports the type of font you’re using. Second, you’ll need to make sure that CDN you choose uses SSL to serve the font, as many CDNs will only serve fonts over HTTPS.
Third, you’ll need to make sure that your site’s design won’t be adversely affected by the use of a different font. There are a number of different CDNs that offer font serving, so be sure to do your research to find one that best suits your needs. Once you’ve found a CDN that you’re happy with, simply upload your fonts to their servers.
By following these simple tips, you can make sure that your website loads quickly and efficiently and that the Google Fonts look great on all devices! So go ahead – get optimizing!
Conclusion
Google Fonts is an incredible resource, allowing you to easily add some personality and style to your website without spending a fortune. By optimizing the fonts used in your WordPress site, you can ensure that your visitors have a great user experience while also improving the performance of your website.
Whether your goal is to make your site look more sleek and professional or just add some style, getting familiar with the power of font customization can take your website from average to extraordinary. With the proper setup, a few changes here and there on fonts, sizes, and kerning can really make all the difference when it comes to making an impact with visitors.
Also, besides the tips to optimize Google fonts on your site, we discussed how we can add Google fonts to WordPress by using the Google Fonts Typography plugin.
We hope that this article has helped you understand how to optimize Google Fonts in WordPress. If yes, then you can support us by sharing this post on your social media.
Meanwhile, we would like you to check out these other related blog posts to improve your WordPress website.
