
WooCommerce Checkout Optimization – The Complete Guide
Do you want to improve your customer’s shopping experience and boost your sales? In this guide, we’ll show you different strategies to improve the checkout and increase your conversion rates. Have a look at our complete guide on WooCommerce checkout optimization.
Why improve the WooCommerce checkout page?
The checkout is one of the most important pages for any WooCommerce store. It’s where you convert visitors into customers and close the sale. Even though this may sound obvious, recent studies show that nearly 70% of shoppers abandon their cart during the checkout. And one of the main reasons is that the checkout is too long or complicated.  Considering how difficult it is to attract users to your site, you have to make sure that the WooCommerce checkout is optimized. This way, you will provide customers with a better buying experience and you’ll increase your conversion rates. To improve the checkout, you must eliminate distractions and annoyances that make the process slower and create friction. As it’s the page where users pay, you should also generate trust and provide ample payment options.
Now that we better understand its benefits, let’s have a look at some WooCommerce checkout page optimization tips to boost your sales.
WooCommerce Checkout Optimization Tips & Tricks
To optimize the WooCommerce checkout, your goal should be to create a checkout page without unnecessary fields, with convenient checkout features, additional payment options, and no distractions. So, here we’ll show you different ways in which you can achieve that.
- Customize the checkout page
- Shorten the checkout process
- Remove unnecessary fields
- Autocomplete orders
- Generate trust badges
- Show prices in local currencies
- Add an exit-intent pop-up
- Use recovery cart emails
- Wide range of payment options
- Allow users to create an account
- Add conditional fields
Each of these elements improves different aspects of the checkout page so you can apply the ones that make more sense for your store. Let’s have a closer look at each of them.
1) Customize the checkout page
Let’s start with something simple. The easiest idea that you can apply for WooCommerce checkout optimization is by customizing your checkout page. The default WooCommerce WooCommerce checkout page can be a bit bulky to fill out when your customers buy something from your website. So you can take extra steps to remove some needless fields here and there. Additionally, you can also reorder your fields to make them easier to fill out and add additional extendable fields. For this purpose, the best solution is to use a plugin.
There are many checkout tools out there but for this demo, we’ll use WooCommerce Checkout Manager. Checkout Manager is an excellent freemium plugin that lets you add, edit, and customize all the crucial elements of your checkout fields. This includes renaming them, so they’re easier to understand, and highlighting the crucial ones, so your customers don’t skip them. And that’s just barely scratching the surface. You can also add notes and messages, or enable the account creation process before checkout.
Moreover, you can also force customers to include a shipping address before checking out and enable upload fields on the checkout page. So, let’s look at how you can optimize your WooCommerce checkout process using WooCommerce Checkout Manager.

Using WooCommerce Checkout Manager
First, you need to install the WooCommerce Checkout Manager plugin. So, open your WP Admin Dashboard and go to Plugins > Add New. Then, use the search bar on the top right to search for Checkout Manager for WooCommerce. Click Install on the Checkout Manager for the WooCommerce search card and then press Activate. 
Now, to access the Checkout Manager options, go to WooCommerce > Checkout on your Dashboard sidebar.
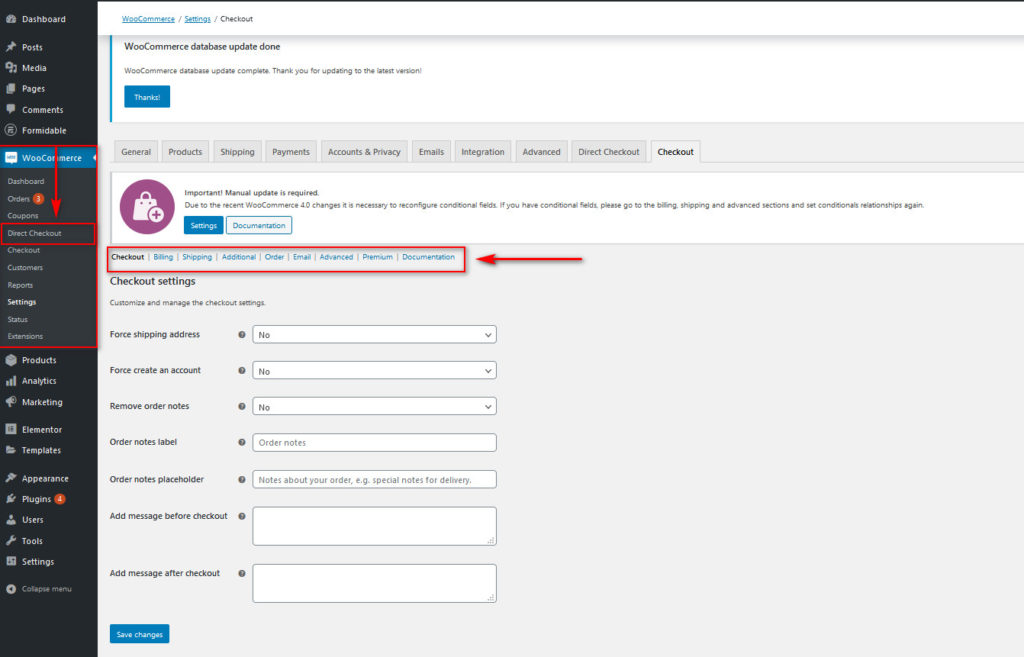 From here, you can check out multiple tabs to customize various fields on your checkout page. For demonstration, let’s enable Force Shipping Address on the checkout page and add a message before and after checkout.
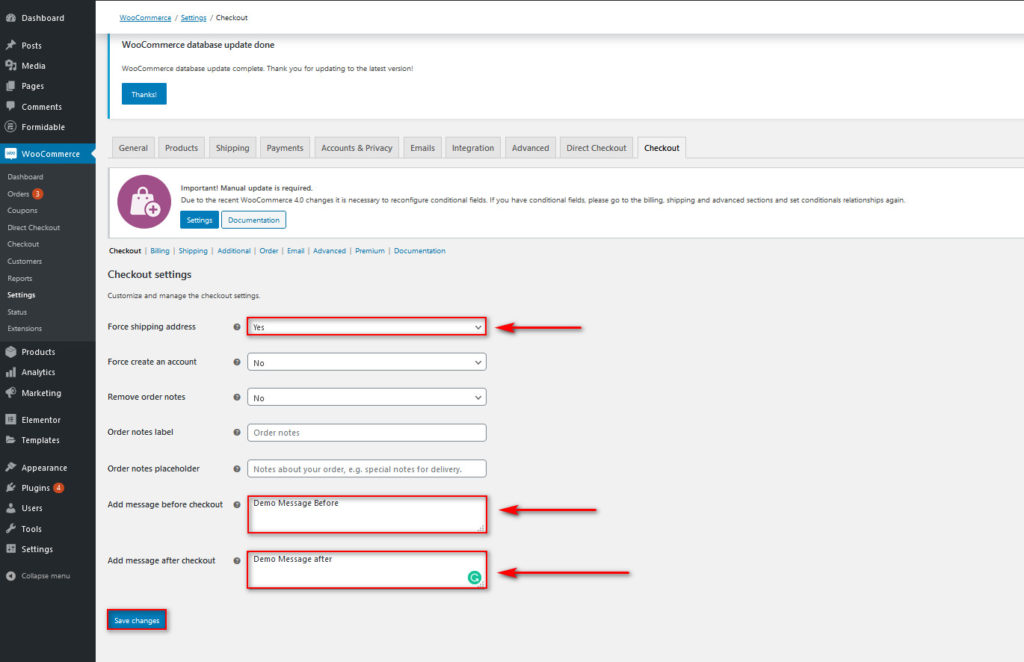
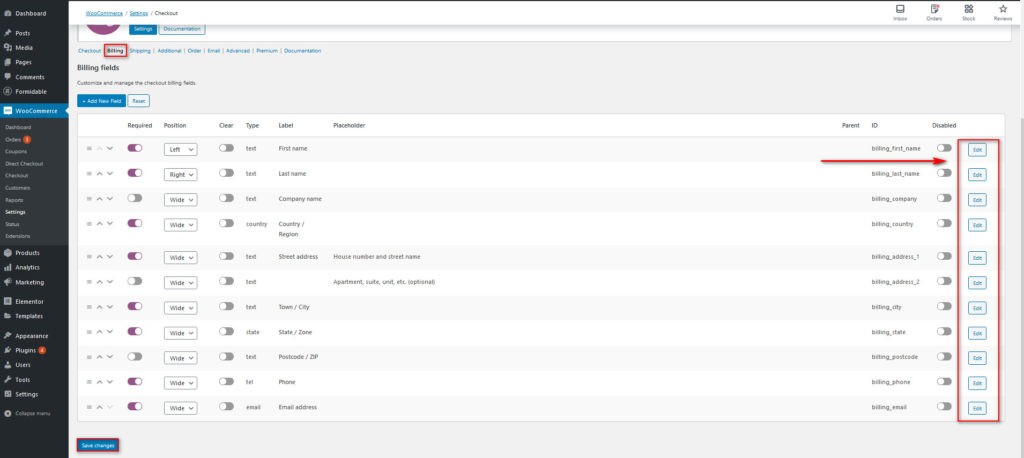
After selecting the options you want to customize, press Save Changes. Additionally, you can enable many more personalized fields for your checkout page and customize the already existing ones. Simply go to the different tabs such as Billing, Shipping, Additional, Emails, and so on and add, delete, or customize each field. You can change field labels, positions, or force them for the user’s checkout process. The amount of freedom you have with this plugin is simply immense.
You can also choose to customize your WooCommerce checkout fields using dedicated PHP hooks manually. You can learn more about these and many other things in our tutorial on How to customize the WooCommerce checkout fields. Once you’re done, you can compare how comfortable the plugin makes the checkout page for your customers, with more tidied up fields and checkout customizations.
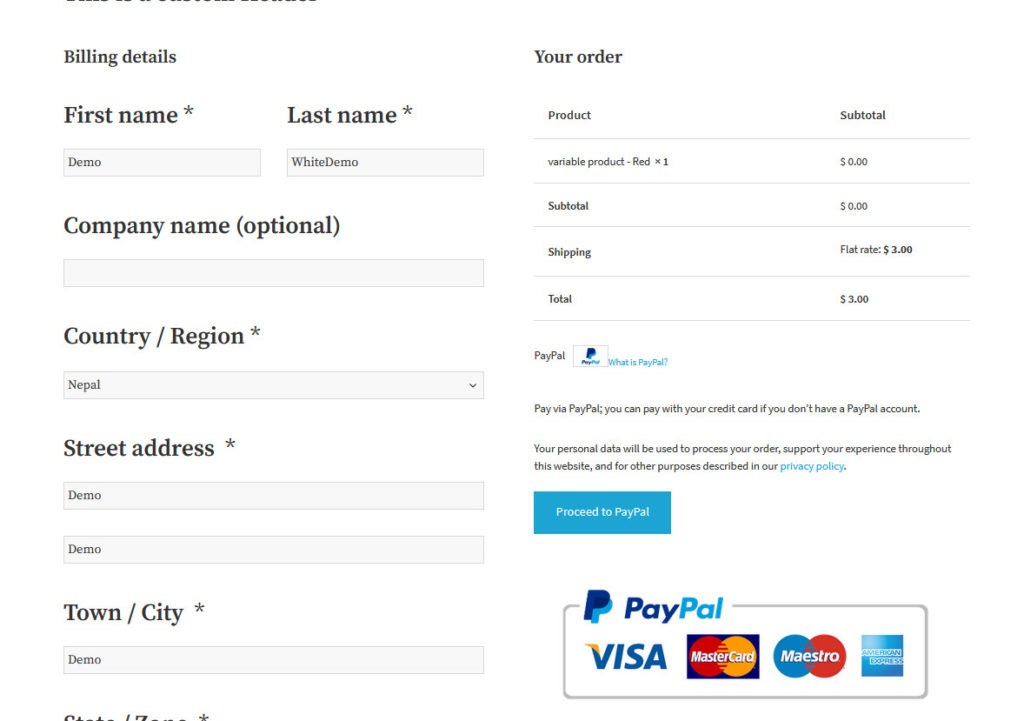
Before Checkout customization
Before the customization, the checkout page has 8 fields. That’s a bit too many considering that we can optimize it and make the process much smoother.
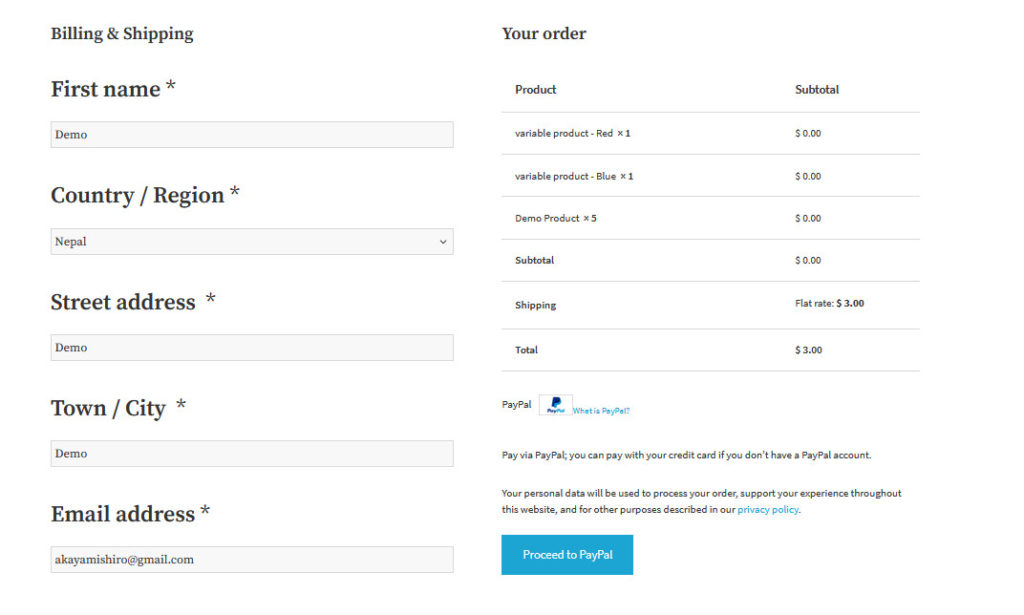
After checkout customization
Now, let’s have a look at the checkout page after making the changes we described before:
- Add a message before and after checkout
- Disable company name, country/region, town/city, and state/zone fields
- Enable Force Shipping Address
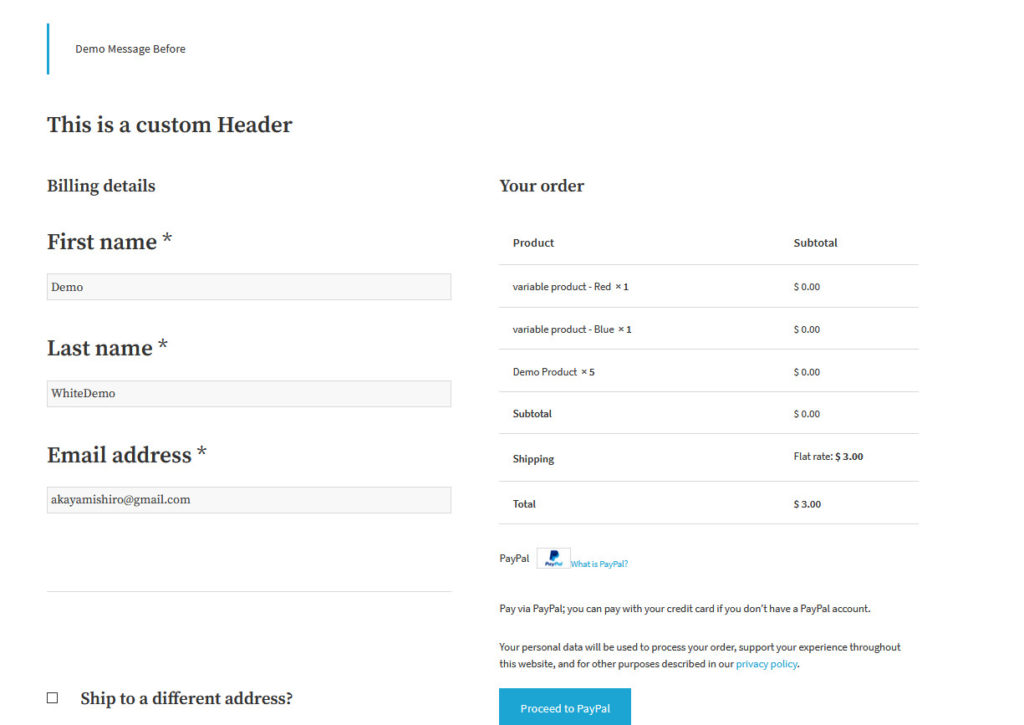
As you can see, shoppers only have to fill in 3 fields making the checkout much faster and helping you improve the conversion rates.
2) Shorten the checkout process
We saw that one of the main reasons for cart abandonment is that the checkout is too long. So, another great option for WooCommerce checkout optimization is to shorten the checkout process and even automate it. For example, you can shorten your shop browsing and checkout experience by creating direct checkout links. You can also consider creating a one-page checkout page, so your users don’t get lost between steps. Or even adding a quick purchase button on your shop/products so shoppers can completely skip the process of adding items to the cart and buy what they want in a few clicks. You can do this and much more using Direct Checkout for WooCommerce.
This tool is designed to simplify the checkout process and increase your conversion rates. This plugin comes with great WooCommerce checkout features such as skip add-to-cart links, quick purchase buttons, removing and changing checkout fields, and even customizing your Add to Cart buttons. So let’s take a look at how you can choose to shorten your checkout process and optimize the WooCommerce checkout on your store.
Enabling the WooCommerce Checkout Plugin
Let’s start with Installing the plugin. In your WordPress dashboard, go to Plugins > Add New and use the search bar on the top right to search for Direct Checkout for WooCommerce. Then, click Install and finally activate it to finish the installation process.
Now, you can use all the features of Direct Checkout for WooCommerce by clicking on WooCommerce > Direct Checkout on your Dashboard sidebar. To show you how the plugin works, let’s enable a few of the features that the plugin provides you with. For starters, under the General section of the Direct Checkout plugin, enable the option that says Added to Cart Redirect to. Then, change the option that says Added to cart redirect to Checkout and save the changes.
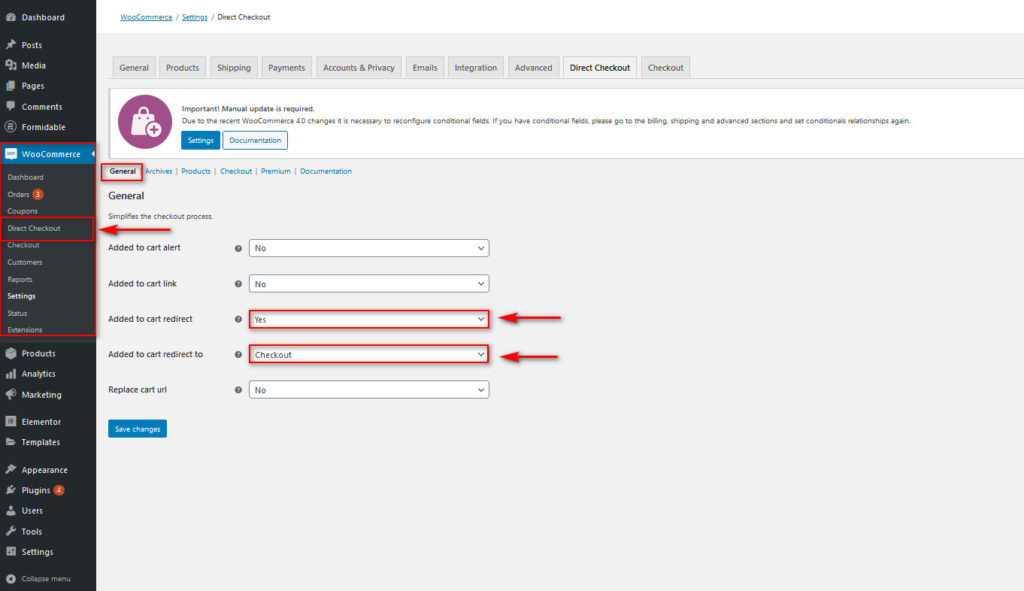
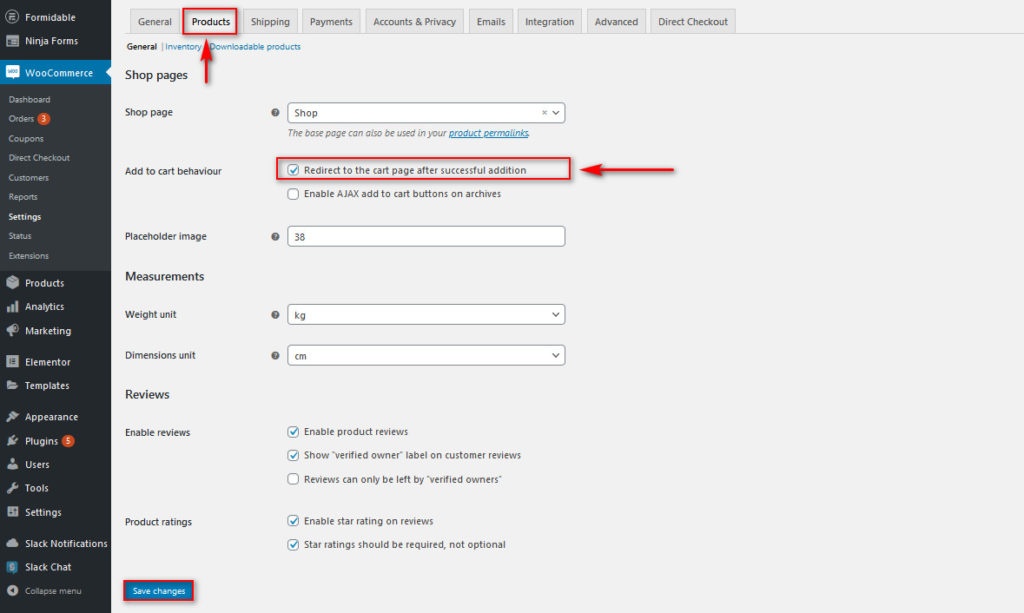
After that, go to WooCommerce > Settings > Products tab and enable the Redirect to the cart page after a successful addition option. This will enable quick purchase options for your products and help you shorten the checkout process.
Now, once your customers click the Add to cart/Quick purchase button, the plugin will take them directly to the checkout instead of simply adding the item to the cart. If you want to learn more about removing steps from the checkout, you can check out this article that explains the entire process in much more detail.
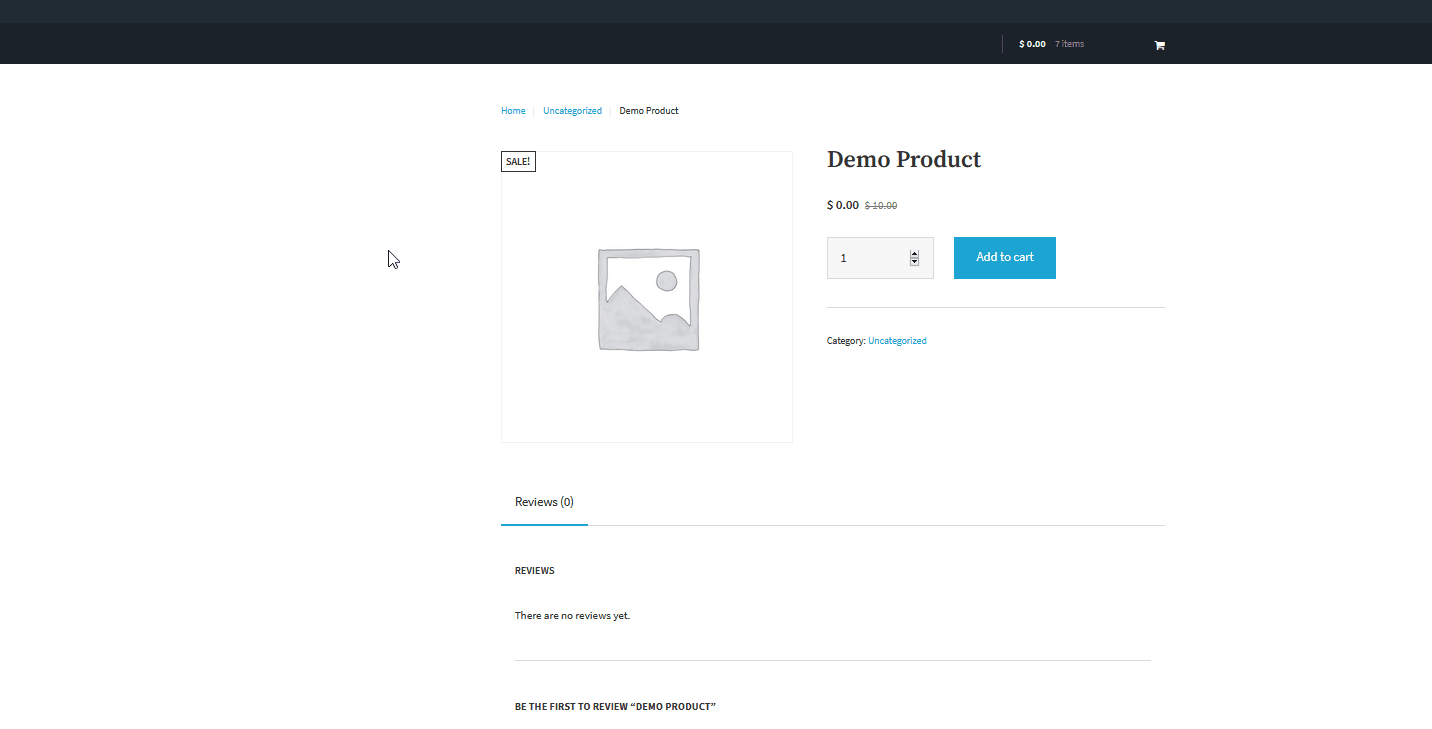
Before enabling cart redirect
Before you enable the cart redirect feature, after the customers add a product to the cart they stay on the same page and receive a notification informing them that they’ve added a product to the cart. If they want to check out, they have to go through a few more steps to get to the checkout page.
After enabling cart redirect
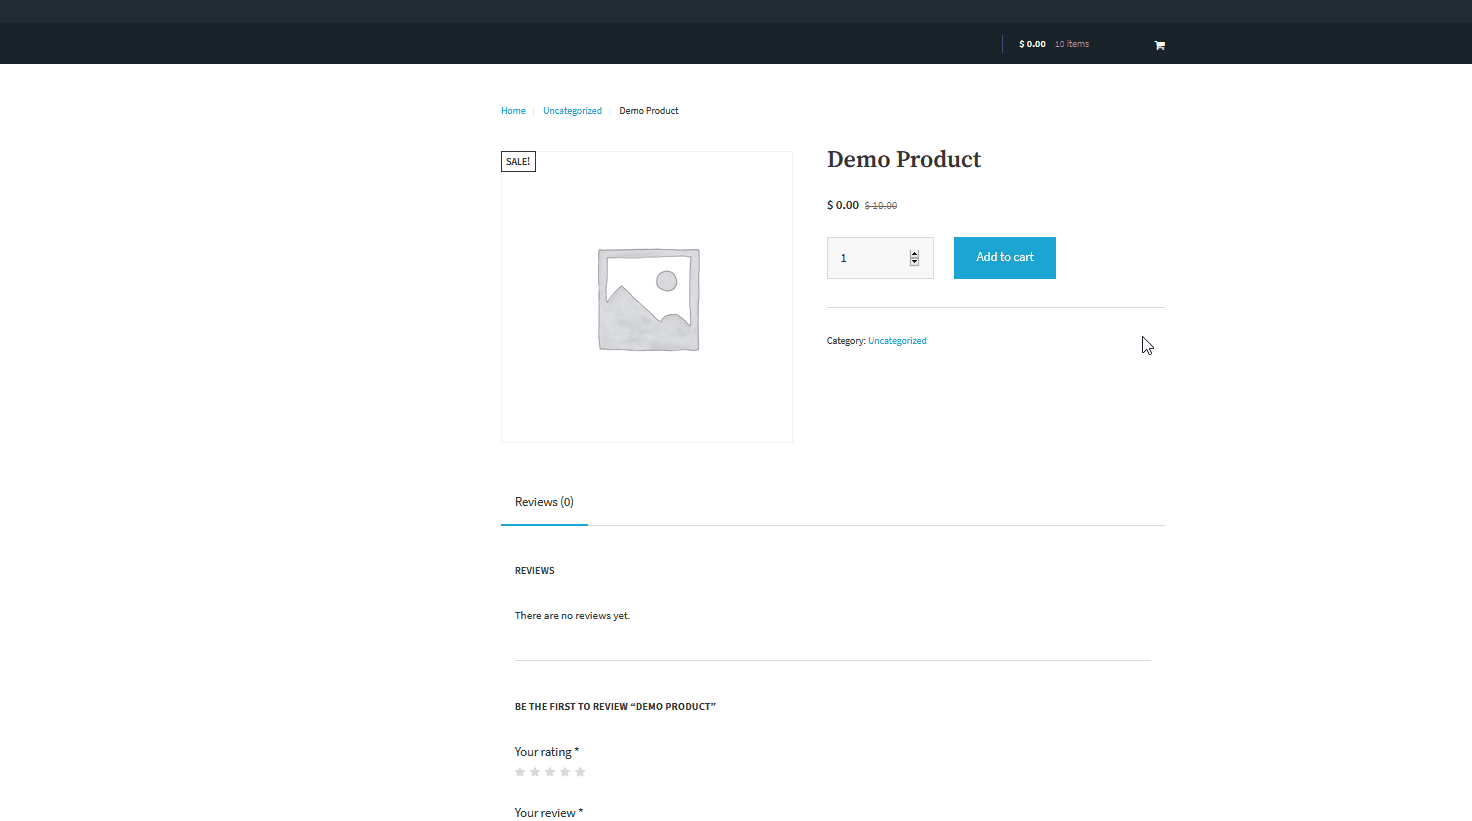
Now, let’s see what happens after you enable cart redirect in WooCommerce Direct Checkout. After adding a product to the cart, customers can review their orders and directly checkout from that page. This makes the checkout process much shorter, saving a lot of time for the users.
3) Remove unnecessary fields
Another powerful tip for checkout optimization in WooCommerce is to disable unnecessary fields so your customers can have a better buying experience. This can include several fields like extra address fields or shipping details fields. For example, why bother your customers by asking them for their address if you don’t need to ship the products? These things create friction in the process and can affect your conversion rates.
To remove unnecessary fields, you can use a bit of PHP or a plugin. Direct Checkout for WooCommerce is a great tool to disable unnecessary fields from the WooCommerce checkout page so that’s what we’ll use for this demo. So, let’s enable a few options to shorten your checkout process.
After installing and activating the plugin, go to WooCommerce > Direct Checkout and open the Checkout section. Here, you can easily remove a few checkout fields and additional items. For example, you can remove the checkout shipping address or the order comments by just enabling the options. Additionally, you can decide which fields you want to display and hide in the checkout. Once you’ve decided which checkout fields you want to remove to customize your checkout, save the changes.

As you can see, Direct Checkout allows you to optimize the checkout in WooCommerce in a few clicks. However, you can also remove fields using PHP scripts. To know more about how to disable fields from the checkout, you can have a look at this guide, which explains all the different options in much more detail.
Before removing unnecessary fields
A standard checkout page that isn’t optimized will look like the one below. It has too many fields making the checkout process long and slow. 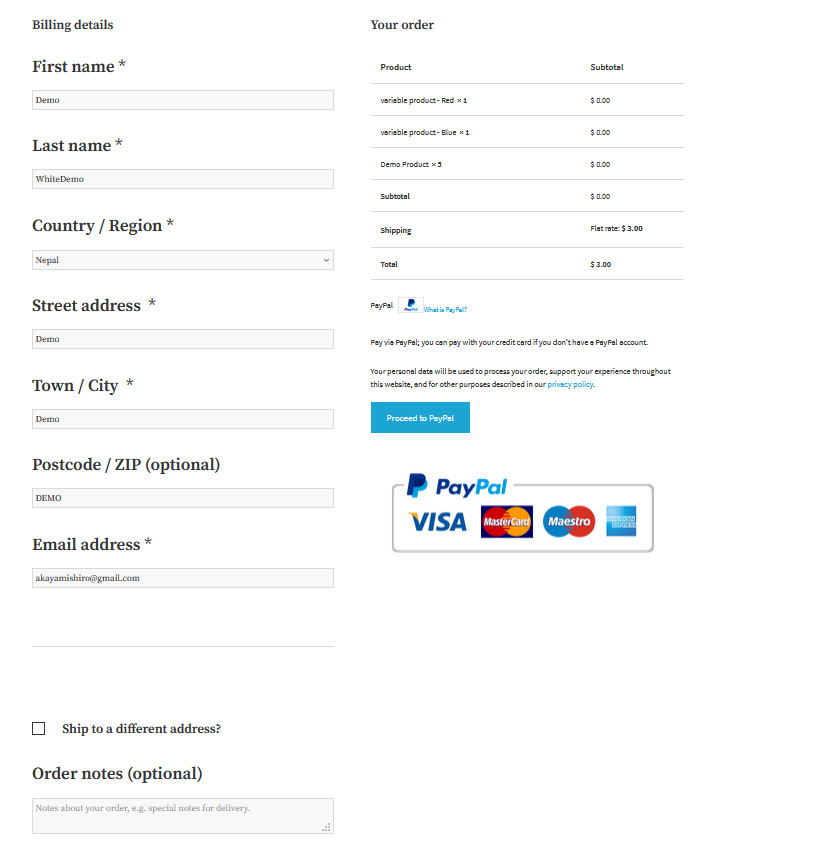
After removing unnecessary fields
After removing a few fields, the checkout looks much more streamlined. Depending on your business and the information you need from users, you can remove even more fields. For example, if you sell virtual or downloadable products, you can get rid of all the country, city, and address fields.
4) Autocomplete orders
Providing users with the option to purchase items quickly is a great strategy to improve conversion rates, especially if you’re dealing with virtual products. For example, you can use dedicated PayPal plugins to let users quickly use Paypal Checkout on your checkout page. This gives shoppers the convenience of not having to constantly check and submit their checkout details while also being fully secure as you’re using PayPal’s checkout services.
However, the main drawback of these payment gateways is that sometimes they take hours or even days to confirm the payments. So, for even better integration with PayPal or Stripe, an excellent feature for WooCommerce checkout optimization is to allow users to autocomplete all their orders. This way, customers have their orders confirmed in no time making the process smoother. The best way to do this is by using the Autocomplete Orders plugin. This tool lets your users quickly purchase items without having to enter all the checkout details repeatedly. And on top of that, customers don’t have to wait for their orders to be confirmed because the plugin does it too.
Autocomplete Orders’ intuitive features allow you to change autocomplete details based on your orders. This makes autocompleting orders for both virtual and physical orders quite convenient. Additionally, the plugin also works with PayPal, Stripe, and Sagepay so that you can guarantee full trust regarding your users’ payment details. So, if you’re looking for the means to remove the hassle of waiting for order confirmations for your customers, this plugin is the one to check out! Now, let’s have a look at how to use this plugin to make the most of it.
Installing the AutoComplete Orders plugin
To install AutoComplete Orders, you have to open the WordPress admin dashboard and go to Plugins > Add New. Then, use the search bar on the top right to search for AutoComplete Orders and install and activate the plugin.  To access AutoComplete Order’s settings, simply go to WooCommerce > Settings and click on the AutoComplete Orders tab.
Then, to turn on the plugin’s features, use the Mode drop-down option to enable AutoComplete Orders on one of the three options:
- Paid orders of virtual products only
- All paid orders of any product
- Any order (paid or unpaid)
The names are self-explanatory so you can choose to enable autocomplete orders for the option you want. Then, save the changes to enable AutoComplete Orders. It’s important to note that you need to enable WooCommerce PayPal. This includes setting up a PayPal token, so let’s go ahead and set up a PayPal identity token for your AutoComplete Orders.
Setting Up AutoComplete Orders
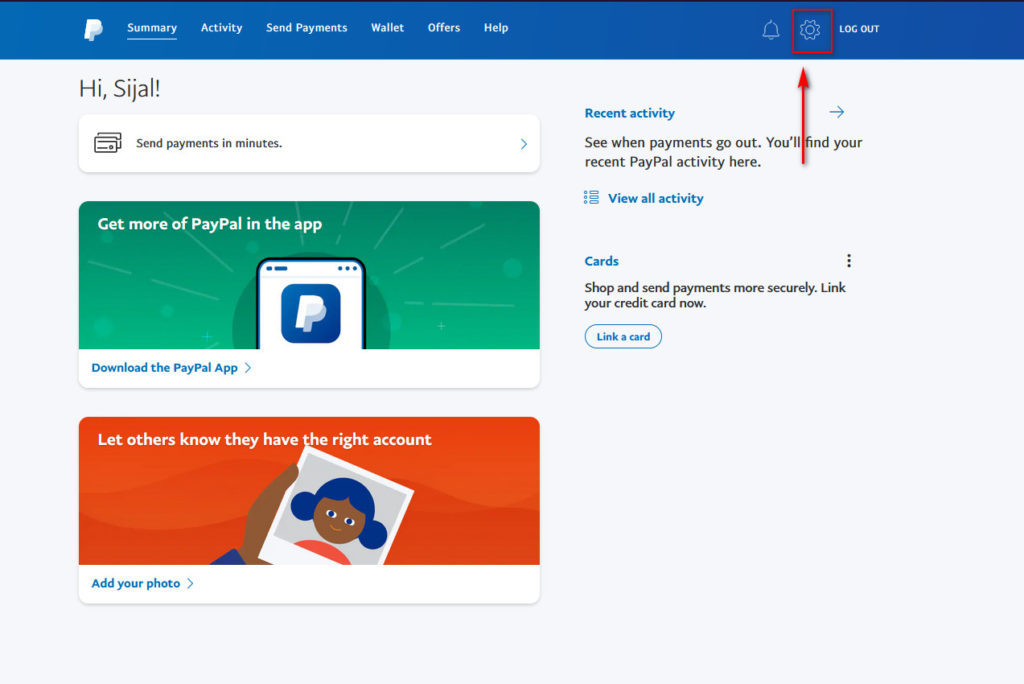
First, you need to login into your Paypal Business/Merchant account to set up your PayPal Identity token. Then, go to your profile settings by clicking on the Settings icon.
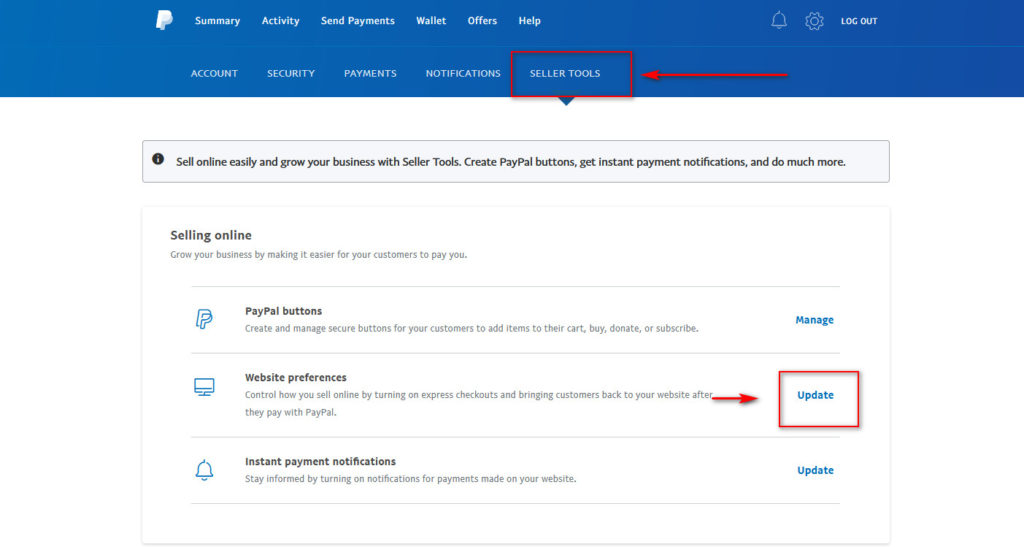
Next, go to the Seller tools, go to Website Preferences, and click Update.
Scroll down to Auto Return and change the option to On. Then, write your return URL page. This is the page that your customers will be automatically redirected to once they finish their checkout. This can be a thank you page, a page where you display related products, or any other page that you want.
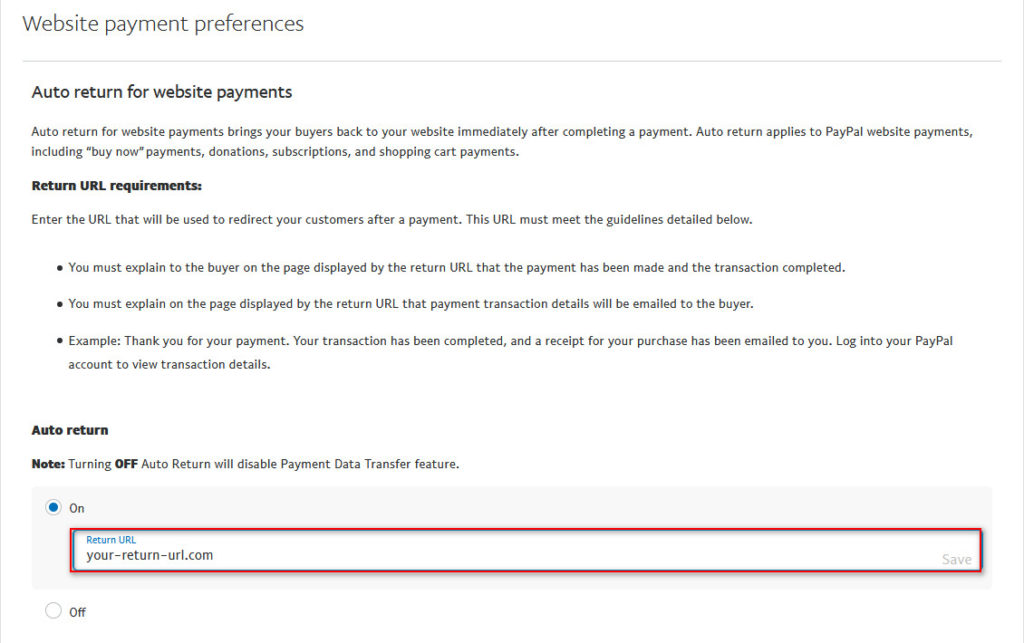
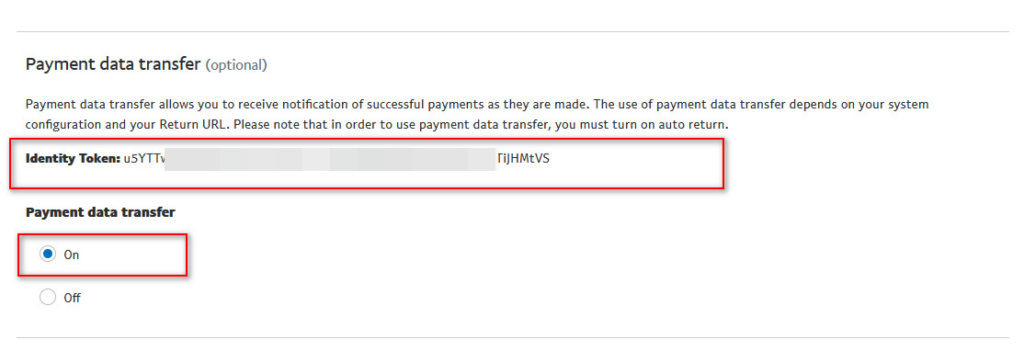
Add the return URL and press Save. Then, scroll down and turn on the Payment Data Transfer option. This will give you your Payment Data Transfer token that you will need to use for WooCommerce. Save this token for now and move back to your WordPress Admin Dashboard.
Additionally, if you haven’t set up a PayPal standard for WooCommerce yet, now would be a good time to do so. This requires you to set up your PayPal API keys. You can check out this guide to learn more about the entire process.
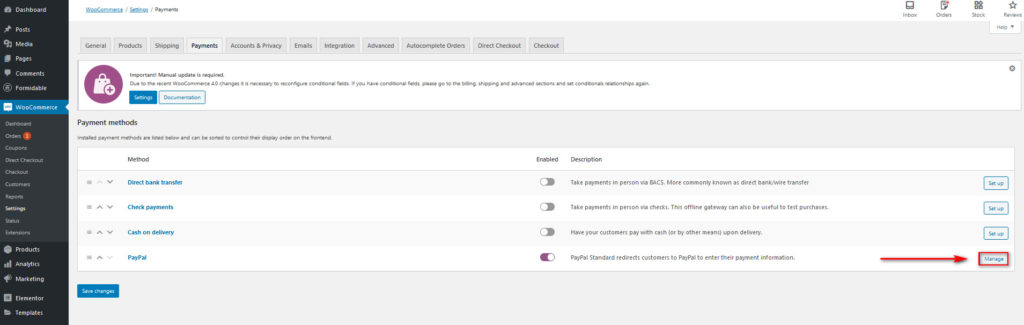
Integrating PayPal Payment Data Transfer (PDT) and AutoComplete Orders
First, open your WooCommerce settings by going to WooCommerce > Settings on your Dashboard sidebar and clicking on the Payments tab. Then, press Manage, next to PayPal to move to the PayPal WooCommerce options. 
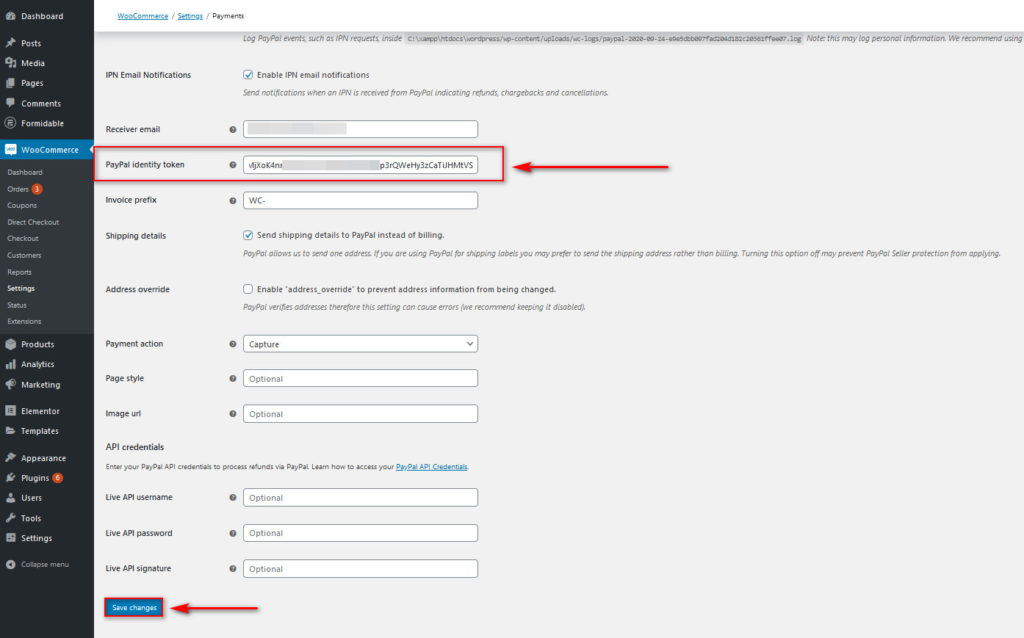
Scroll down until you find the PayPal identity token field and paste the Identity token that you saved in the previous step. Edit the rest of your PayPal settings and once you finish, save the changes.
Now, your AutoComplete Orders plugin should be set up for your website! Check out the plugin’s documentation to learn more about its full range of features and what you can enable with it.
5) Generate Trust Badges
As people buy more and more products online, cybersecurity is becoming a very important topic. That’s why it’s no surprise that 17% of shoppers abandon their carts during the checkout because they don’t trust the site. As a result, to optimize the checkout in WooCommerce and ensure that your customers’ data is secure, you can add Trust badges on your checkout page. This includes adding badges for payment gateway services like Paypal and Stripe, so your users know that your website has full support for all these payment methods. This not only makes it easy for shoppers to pay but also generates trust and allows them to buy their products without worrying about having their payment details, and personal information misused.
To add a Trust Badge on your checkout page, you’ll have to edit your functions.php file under your theme. So, open your theme file customization page by clicking on Appearances > Theme Editor.
![]()
Then, use the Theme files list on the far right and click on the Theme Functions file. This is your functions.php file, and you can add custom functions to your website. Open the file and use the editor in the middle to add the following PHP code:
add_action( 'woocommerce_review_order_after_payment', 'add_content_on_checkout' );

function add_content_on_checkout() {
echo "<img src='https://www.heresylab.com/wp-content/uploads/2019/01/paypal-1.png' >"; //add the image url in the src attribute
}
![]()
Preferably, paste this at the bottom of the editor and click Update File. That’s it! Now, your trust badge should appear on your WooCommerce checkout page.
![]()
You can also add many more elements to your checkout page using WooCommerce hooks. To learn more about how to fully customize your checkout page, we recommend you check out this guide.
6) Display the users’ currency
Making your products globally available is also an important concern for every eCommerce business. While using the American dollar or the Euro as your shop currency is a valid option, it’s better to give users the option to see prices in their local currency.
That’s why enabling a currency switching option in your store is an excellent WooCommerce checkout optimization idea. This way, your customers know exactly how much they’re paying when they use your products. They won’t need to open any other tab to convert the currency values so they’ll get a better purchase experience. This is especially convenient when your customers are finishing checking out so they can verify that they’re comfortable with the amount they’re paying in their local currency. The best way to do this is by using a multi-currency plugin so we recommend you have a look at our guide on the best currency switcher plugins for WooCommerce.
7) Add Exit Intent Pop-up
Another smart tactic to improve your lead generation is to enable an exit-intent pop-up. This way, you can solve cart abandonment by just providing a user with a pop-up when they might decide to close their carts or your shop pages without finishing their checkout.
Even though some might think that exit pop-ups are annoying, the truth is that they’re pretty effective. Studies show that they can help you increase conversions by up to 10%. Call-to-action pop-ups and landing pages, in general, serve a great amount of purpose in lead generation but adding an exit-intent popup helps you save your users from accidentally dropping their carts or closing their checkout pages.
There are many options to add exit-intent pop-ups on your site both free and paid. You can try Hubspot, Popup Maker, Optin Monster, or any other tool that you like.
8) Recovery cart emails
Considering that most of your users will abandon their carts, another interesting tip for checkout optimization in WooCommerce is to send them recovery cart emails. To do that, first, you need to capture the customers’ emails.
Recovery cart emails are very effective and that’s why so many eCommerce stores around the world use them. These emails can vary a lot depending on the store and the industry. They may consist of one email with the products you left in your cart or a series of emails where they end up giving you a discount. Whatever option you choose, the goal is to remind shoppers of any items they left in their carts and convince them to buy.
To learn more about abandoned WooCommerce carts and how to recover carts using emails, check out this article.
9) Provide customers with a wide range of payment options
Providing shoppers with a wide range of payment options is a great way to reduce cart abandonment and optimize the WooCommerce checkout. In the current context of eCommerce, tons of payment services have paved the way for secure online transactions. And each of these payment gateways offers different options for different users around the world. So, to make it even more convenient for your users to pay for your products, you should consider enabling multiple payment options for your website. Remember that there are people using services such as PayPal, Stripe, Authorize.net, and many others.
WooCommerce fully supports these payment gateways and integrating them with your website is pretty easy. So, if you want your customers to have a faster and more secure checkout process, enabling a payment gateway service on your store is a must. Our articles on how to integrate PayPal and Stripe with WooCommerce will clarify the advantages of using payment gateways in your store and the best ways to do so.
10) Allow users to create an account
Allowing users to create an account works for a lot more than just community needs. For example, you can allow logged-in customers to save preferences regarding their shop options and filters. But that’s not all! You can also let them save their cart details and their checkout options.
Moreover, with an account, you can also enable a lot more lead generation opportunities. You can offer products related to the last one they bought, offer exclusive deals, or create specific discount coupons that shoppers can receive directly in their accounts or emails. On top of that, integrating account features and your checkout options allows your customers to save their payment methods and personal information. This way, they have all that information filled in by default on the checkout page. Additionally, this is very effective if you combine it with quick buy buttons or direct checkout links.
11) Add conditional fields
Adding conditional fields is another excellent checkout optimization tip for WooCommerce. Conditional fields allow you to display or hide a field depending on the value of a different field. That way, you can improve the user experience and increase conversions. For example, let’s say your customers can choose to pick up the items they buy or get them delivered to their houses. Instead of having a bunch of optional fields that the shoppers have to field in with their addresses, you can create a conditional field so that the address fields are only displayed if users choose the delivery option.
The best way to add conditional fields to WooCommerce is by using Checkout Manager. With this plugin, you can easily create both simple and complex logic to customize your checkout and speed up the checkout process. It has both a free version that you can download from here and 3 premium plans that start at 19 USD. The plugin is very easy to use but if you need some guidance on how to add conditional fields, check out this step-by-step guide.
Time to apply these WooCommerce checkout optimization tips
All in all, checkout is one of the most important pages for any online store. Its design can have great effects on your conversion rates and cart abandonment so you must make sure that you keep improving it. In this WooCommerce checkout optimization guide, we’ve seen how to improve different aspects of the checkout for better lead conversion rates. There are many things that you can do but here we’ve shown you the ones that can have a greater impact.
To sum up, let’s summarize some of the things you can do to optimize the checkout page:
- Customize your checkout page
- Shorten the checkout process using the quick purchase and quick add to cart buttons
- Autocomplete orders and quick order verification
- Remove unnecessary checkout fields
- Display trust badges on the checkout page
- Display shop price in user-specified currencies
- Add exit-intent pop-ups to your checkout page
- Recovery cart notifications and emails
- Add multiple payment gateway options
- Integrate accounts with checkout options
There’s a lot more you can do to better manage your checkout page. If you’re looking for more tools to improve the checkout, we recommend you have a look at our list of the Best WooCommerce Checkout plugins that you can use to optimize the WooCommerce checkout process.
What other strategies do you use to improve your conversion rates? Let us know in the comment section below!

Can I remove the EMAIL? and add address autofill?
Hi Josh, we haven’t personally tried but you can try this:
https://wordpress.org/support/topic/disable-autocomplete-4/
And use this tool for the address.
Hope it helps