
How to Redirect a WordPress Page (with and without plugins)
Do you want to redirect a page on your site using a beginner-friendly method? We’ve got you covered. In this guide, you will learn how to redirect a WordPress page both with and without plugins.
Types of Redirect in WordPress
There are several types of redirections:
- 301: This is the most popular redirection. It is also known as permanent redirection. When you use this type of redirection, search engines will know that the destination page has been moved permanently, and they will pass all the link benefits. This can help the new destination link with better ranking opportunities.
- 302: This is used for temporary redirections. It tells search engines that the destination link changed momentarily but not forever. When it comes to link juice and ranking, we can’t expect much results with this redirection.
- 303: 303 redirection is also known as “See Other” and indicates that the page has been temporarily replaced and is available at a different location. In most cases, a page with a payment form or a page related to personal data uses this type of redirection. The good thing about 303 redirect is that the website admin can prevent the page from refreshing.
- 307: This redirection is similar to 303 but it’s known as “Temporary Redirect“. It indicates that the page the user is trying to access has been temporarily moved to a different URL.
- 308: Together with 301, this is another type of permanent redirect. These types of redirect are a good choice when you’re restructuring your website or migrating it from HTTP to HTTPS as we’ll see later in the post.
Now that we better understand the different types of redirect, let’s have a look at the benefits of redirecting a page in WordPress.
Why Redirect a WordPress Page?
There are several situations in which you may need to redirect a WordPress page:
- Changed domain name: If you have changed your primary domain name, all your internal links will be pointing to the old domain and posts. The best way to deal with this situation is by setting up a redirection.
- For better SEO: Online businesses rely on SEO for better sales, conversions, and revenue. If your permalink isn’t SEO-ready, you should edit it. When you edit a permalink, you need a redirection, so users won’t see a 404 not found page in the front end.
- You have deleted some pages: Deleting pages ranked on the search engines is a bad practice. And if you are deleting published pages or posts, you need to configure a redirection, so users don’t encounter a 404 page.
- A page requires updating: When you redesign a page or run an A/B test, you can enable the maintenance mode or set up the redirection option. This is a good practice to show visitors content and avoid showing them an under-construction page.
- Running limited-time deals: When you run a WooCommerce store and you sell physical or digital products, you may offer limited-time deals as a marketing strategy. Once the deal is over, you don’t need to keep the page. Instead of deleting it, we recommend you redirect the page to the original product page.
Regardless of how hard you try and how many redirects you set up, your users will end up seeing a 404 page at some point. To make the most of it, you should customize it. For more information about this, check out our guide on how to edit the 404 page in WordPress.
Now that you know why redirecting a WordPress page is a good practice, let’s learn how to do it.
How to Redirect a WordPress Page
There are two main methods to redirect a WordPress page:
- With plugins (beginner-friendly)
- Programmatically (advanced)
- With WordPress
Let’s have a look at both, so you can choose your preferred method from below.
1) Redirect a WordPress page with plugins
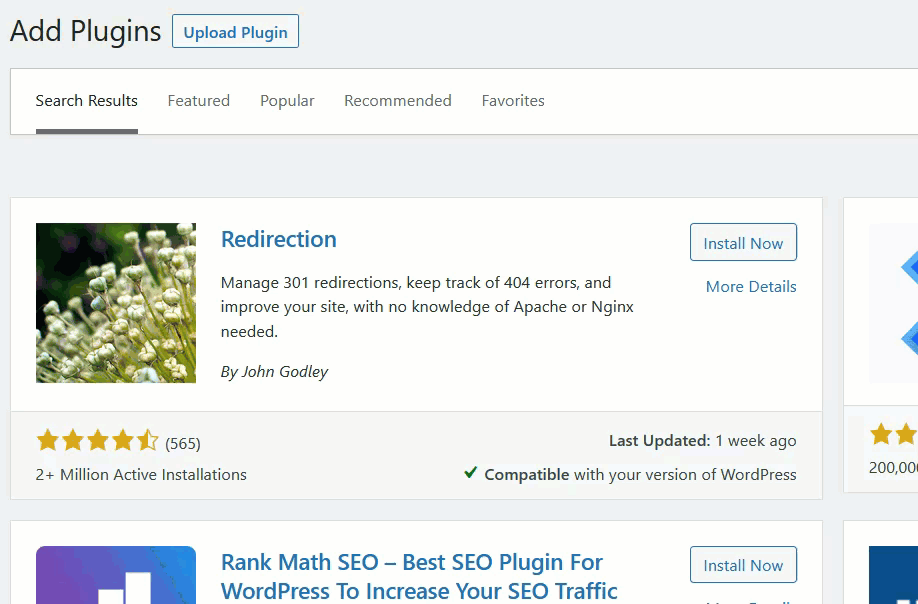
Plugins are the most efficient and straightforward way to customize a WordPress installation. If you’re looking for a tool to redirect your pages, check out Redirection. It is one of the most popular redirection plugins and it’s free.
1.1) Install Redirection
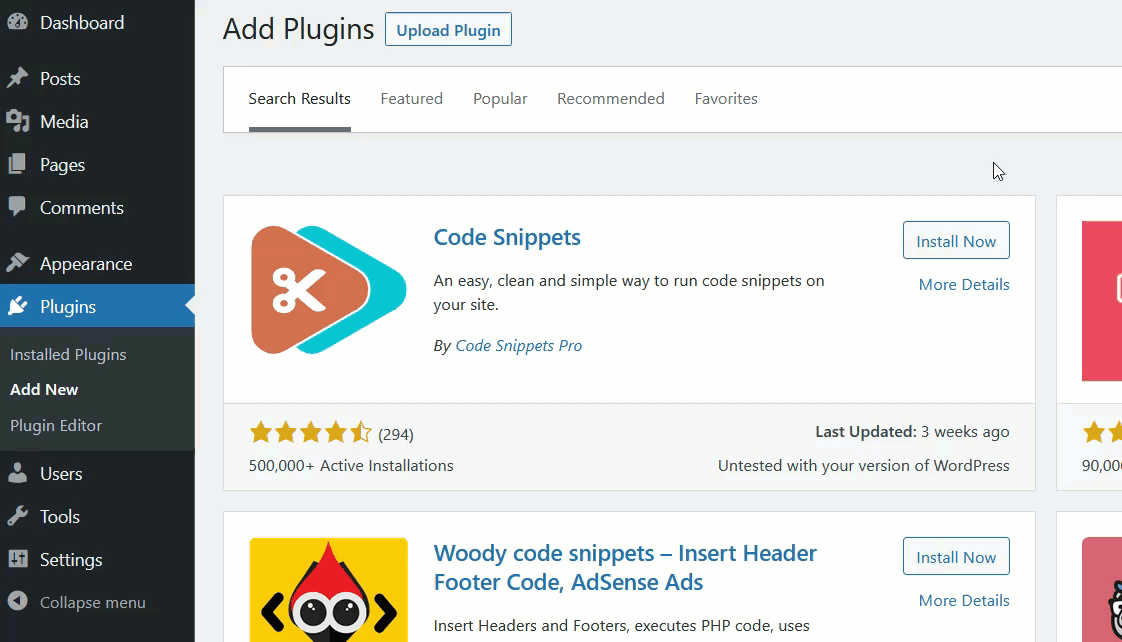
First, install the plugin. In your WordPress dashboard, go to Plugins > Add New, and search for Redirection. Once you find the plugin, install it and activate it.
After that, you will see the plugin’s settings under the WordPress Tools section.
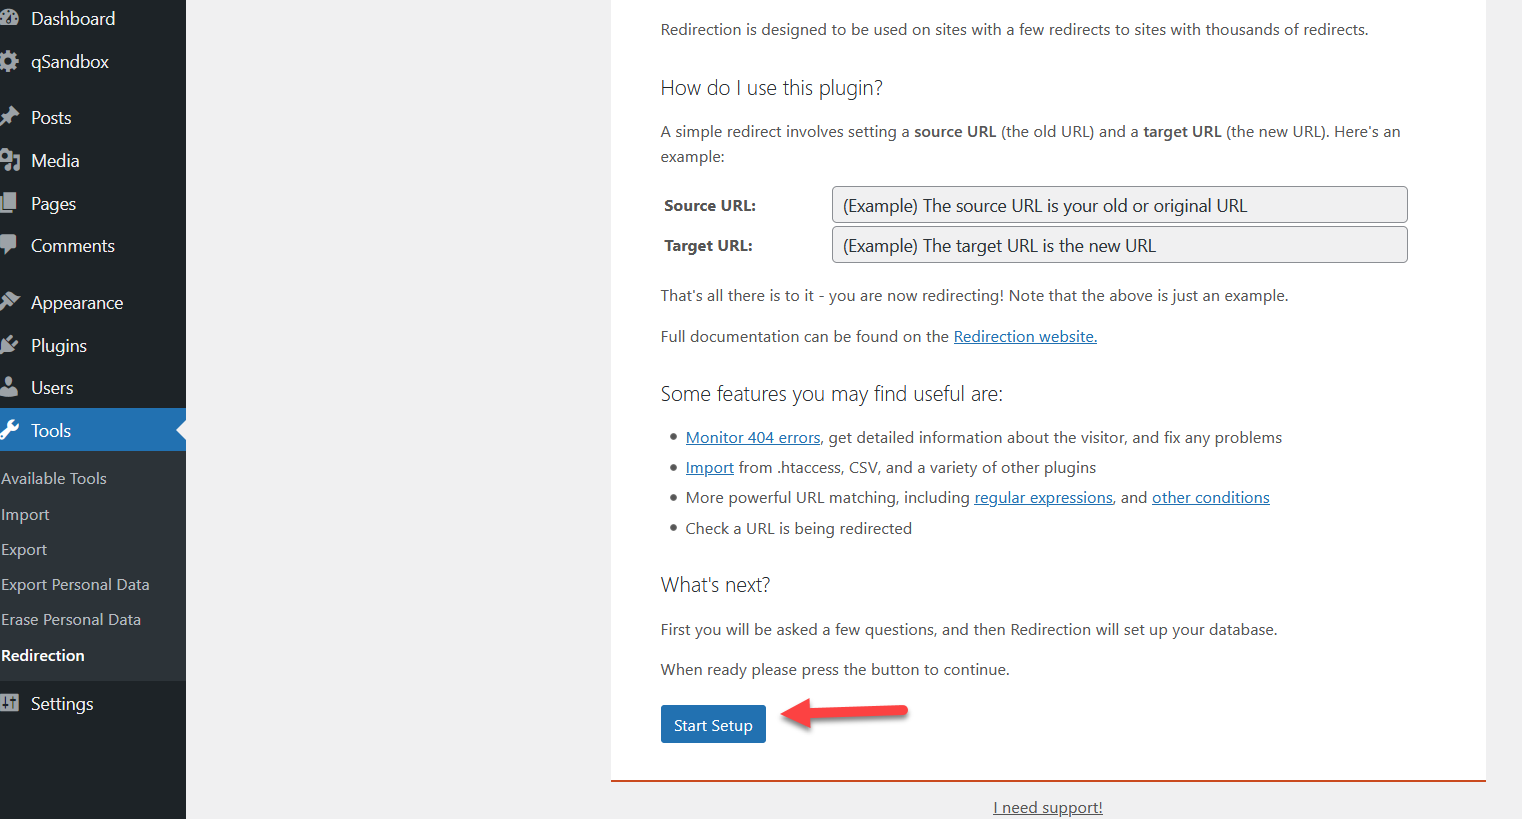
1.2) Set it up
The settings page gives you instructions on how to use the plugin and describes some of the most useful features. Once you read that, click on the Start Setup button.
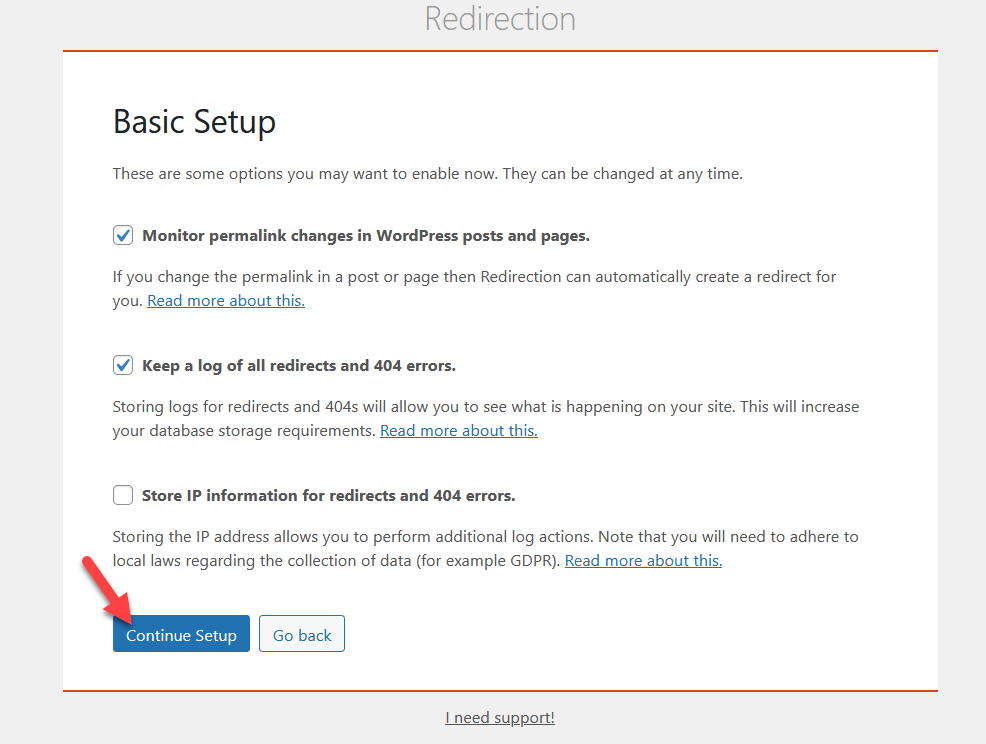
 Then, you will see some basic configuration options regarding permalinks, log of all redirects and 404 errors, and IP information of those redirects and 404 errors. Select the options you want and press Continue Setup.
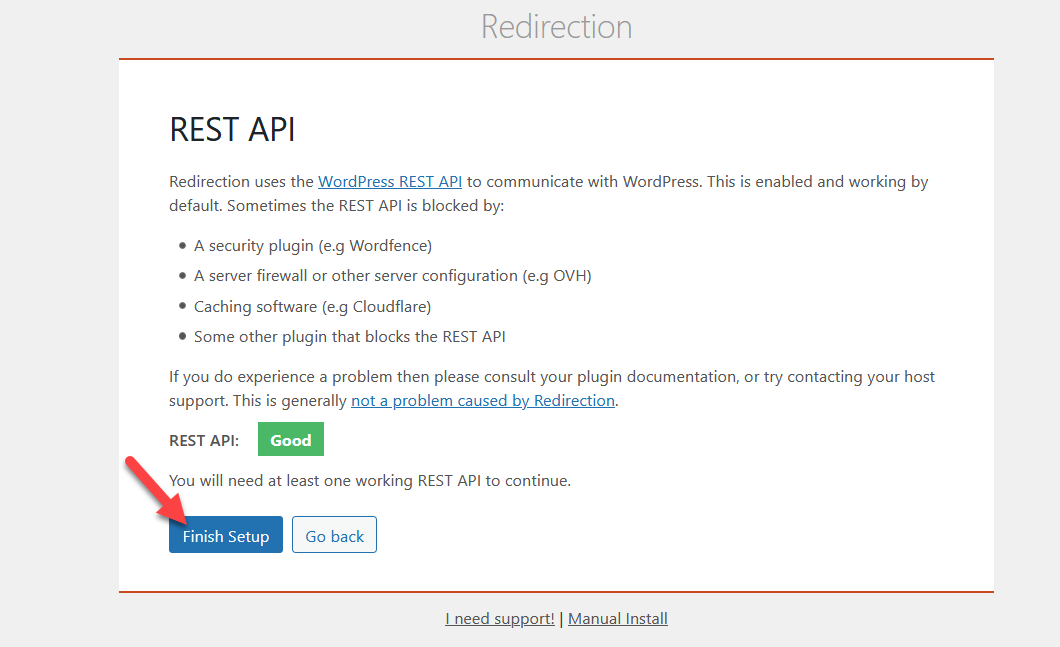
The plugin will now test the REST API feature. After that, finish the setup.
1.3) Start using Redirection
After that, you will see the plugin’s dashboard where you will see two sections:
- Redirected URLs
- Add new redirection
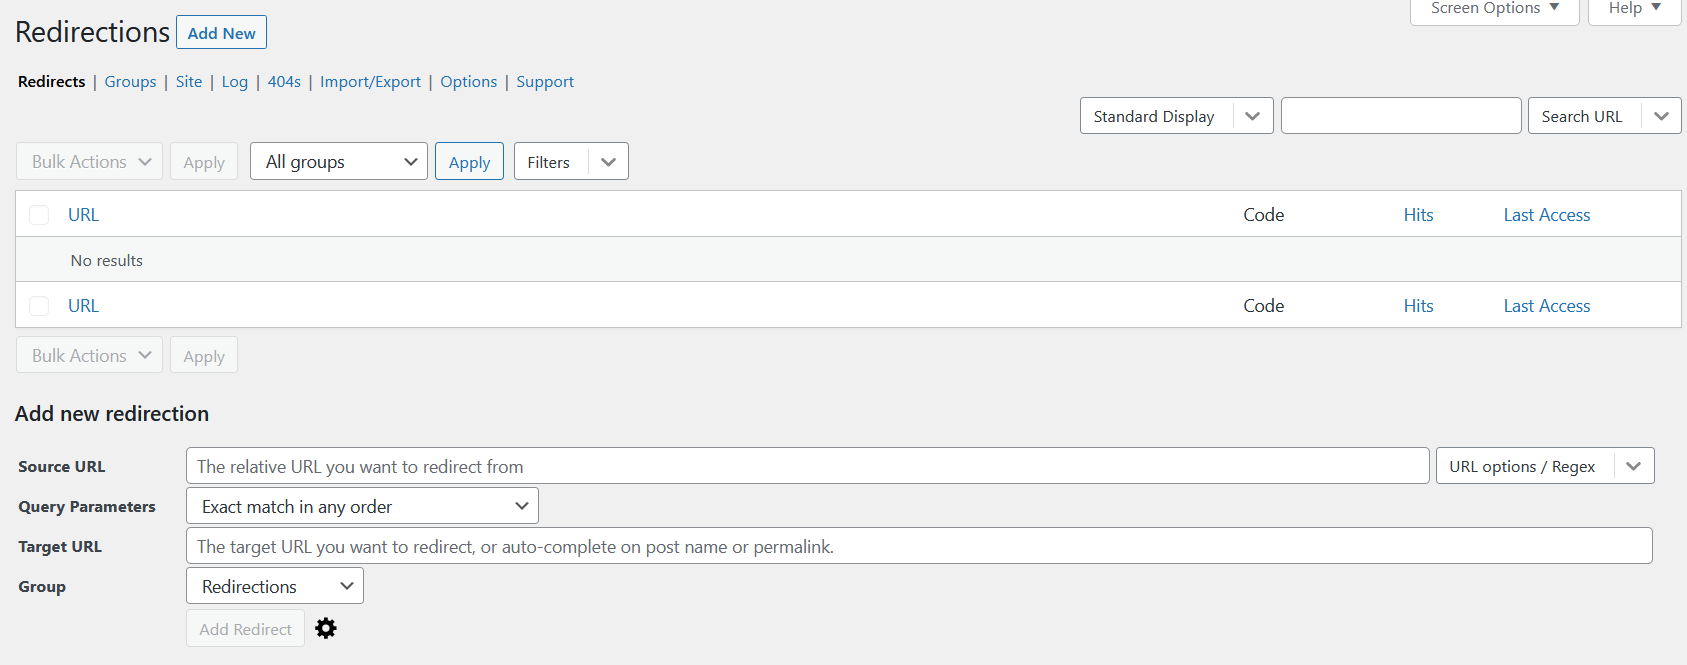
For this tutorial, we will add a new redirection. To create a redirection you need:
- A source URL (from URL)
- A target URL (to URL)
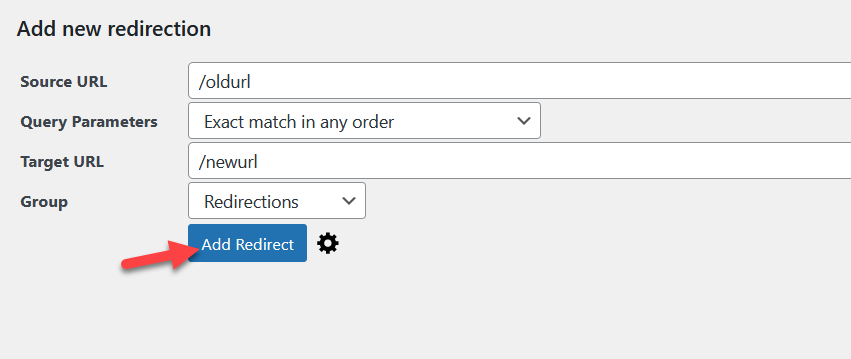
For example, if you need to redirect traffic from your old site, www.example.com/oldurl would be the source URL, while in the target URL, you would enter the new URL (www.example.com/newurl).
You don’t need to enter your domain name inside the submit box. Instead, you can simply enter the part after the /, which can be the page’s permalink. Then, complete the redirection options for both from and to URLs and press Add Redirect.
This way, you can set up any redirection you want. If you are an advanced user, click on the gear icon, and you will see some additional customization options.
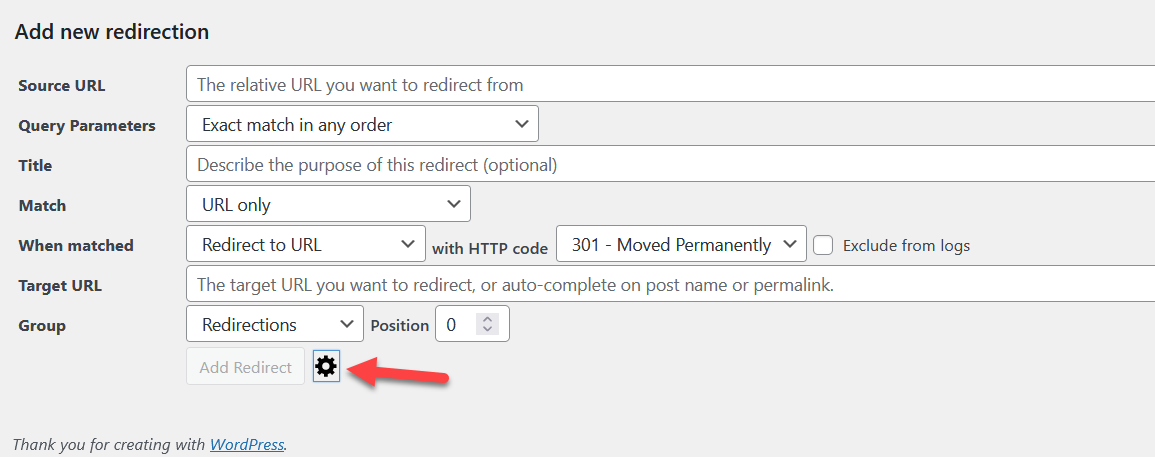
For example, you can choose the type of redirect. By default, the plugin will add 301 redirections, but you can change the HTTP code from the dropdown. Once you’re done, save the changes and in the dashboard, you will see all the redirected URLs, their HTTP code, and URL hits.

That’s it! As you can see, this simple method allows you to redirect a WordPress page in a matter of minutes.
On the other hand, if you use an SEO plugin like Rank Math, you will have the inbuilt redirection feature. Most SEO plugins come with the redirection feature by default. Simply check the plugin’s settings page/modules to enable or disable it.
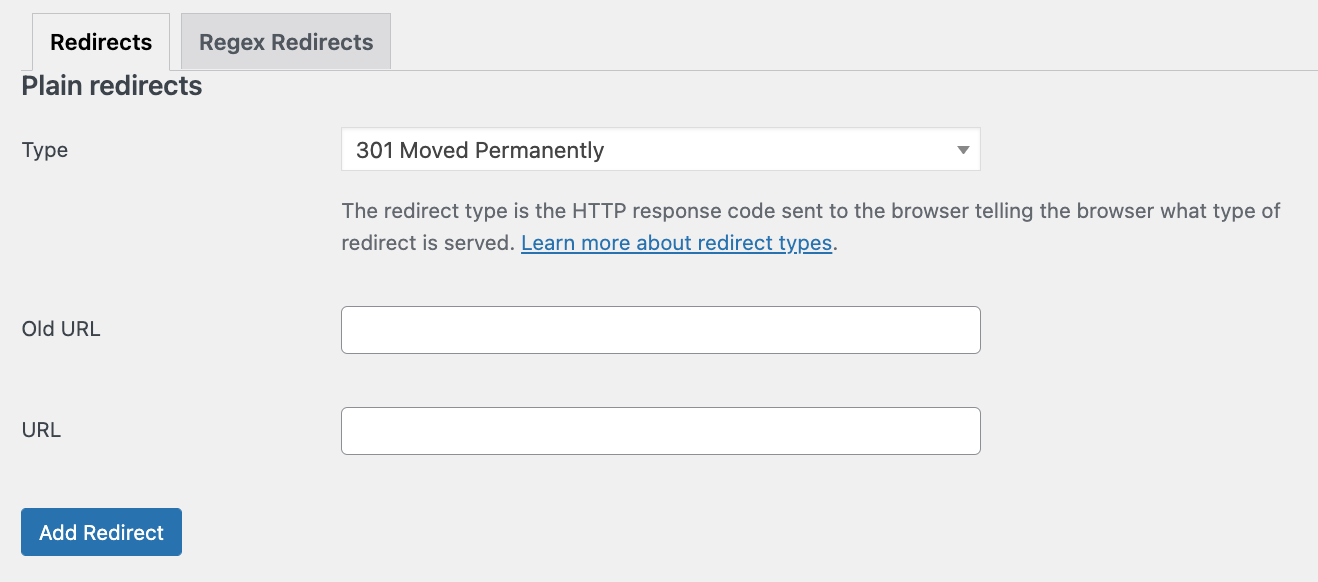
Redirect with Yoast SEO
Yoast SEO is one of the most popular SEO plugins out there, so chances are you’re using it too. This tool comes with a Redirect section that’s super easy to use. In your WordPress dashboard, head to Redirects on the left side menu and select the type of redirect, the old URL, and the new URL. Once you’ve done that, press “Add Redirect“.
2) Redirect a page programmatically
If you prefer not to install third-party tools and like coding, there’s another way to redirect your pages. In this section, we will show you how to redirect WordPress pages by editing the functions.php and .htaccess files.
NOTE: As we will edit some theme files and WordPress core files, make sure that you generate a complete website backup before moving forward. If you do not know how to create a backup, check out our step-by-step guide. Additionally, make sure you’re using a child theme. You can either create one or use a dedicated plugin.
2.1) Functions.php file
To modify our functions.php, we’ll use a site-specific plugin called Code Snippets. It is one of the best tools for these types of tasks and it’s free.
First, install and activate the plugin on your site.
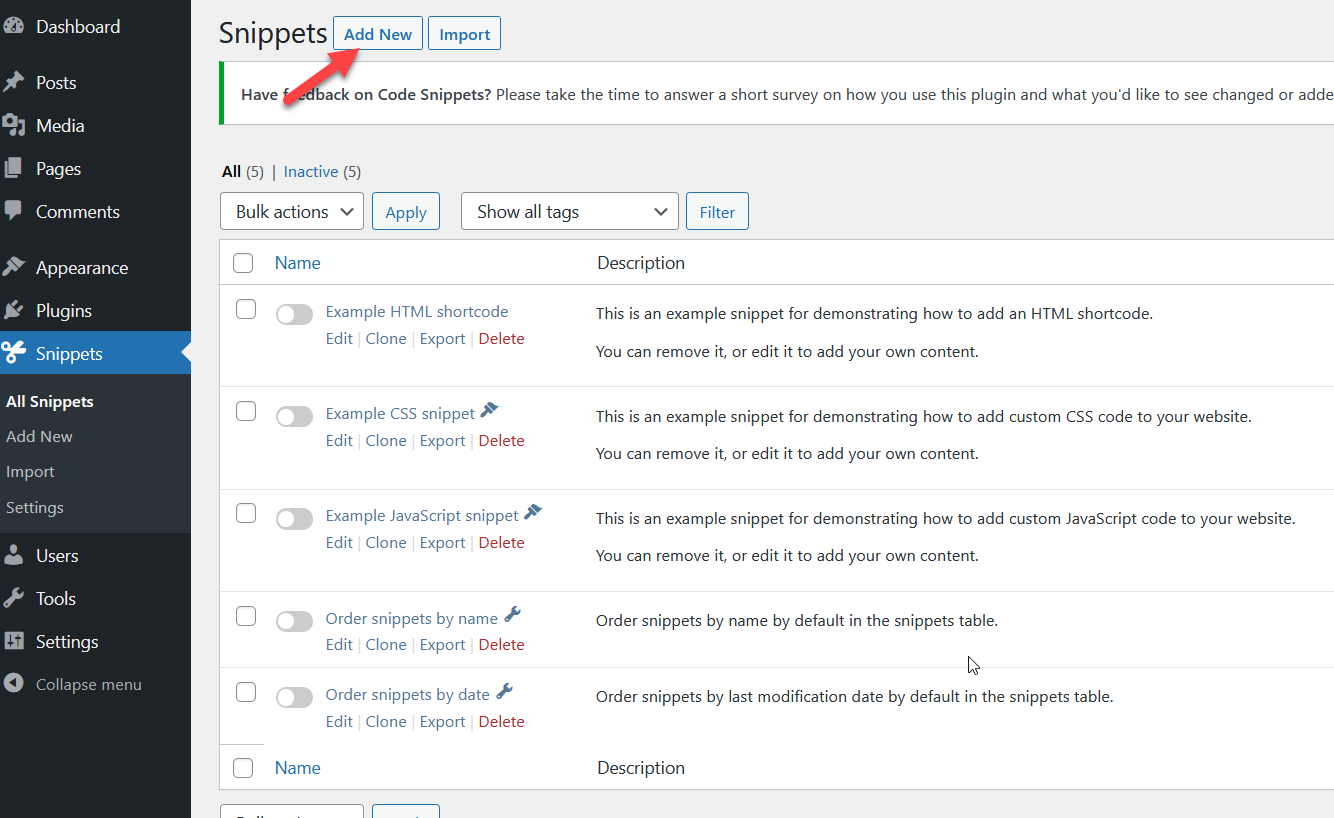
Then, go to the plugin’s settings and press Add New to create a new snippet.
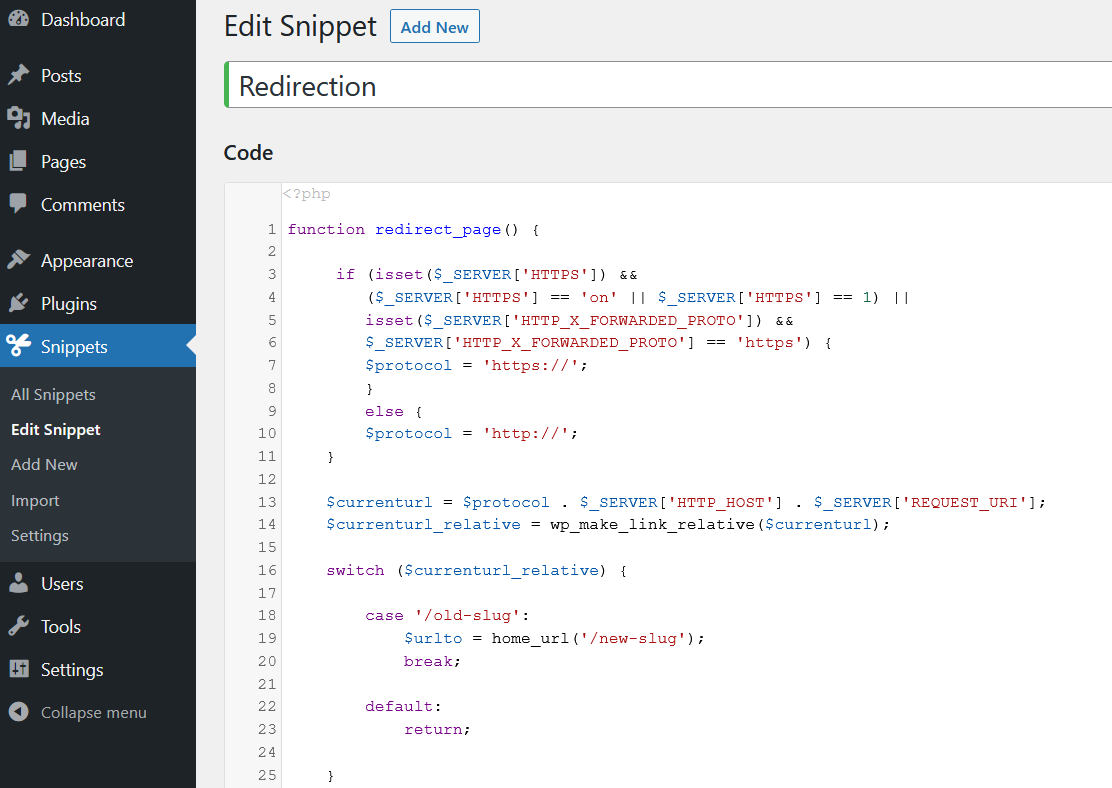
Name your snippet and then paste the following snippet.
function quadlayers_redirect() {

if (isset($_SERVER['HTTPS']) &&
($_SERVER['HTTPS'] == 'on' || $_SERVER['HTTPS'] == 1) ||
isset($_SERVER['HTTP_X_FORWARDED_PROTO']) &&
$_SERVER['HTTP_X_FORWARDED_PROTO'] == 'https') {
$protocol = 'https://';
}
else {
$protocol = 'http://';
}
$currenturl = $protocol . $_SERVER['HTTP_HOST'] . $_SERVER['REQUEST_URI'];
$currenturl_relative = wp_make_link_relative($currenturl);

switch ($currenturl_relative) {

case '/old-slug':
$urlto = home_url('/new-slug');
break;

default:
return;

}

if ($currenturl != $urlto)
exit( wp_redirect( $urlto ) );
}
add_action( 'template_redirect', 'quadlayers_redirect' );
Customizing the snippet
Let’s have a closer look at the code to understand what it does.
As you can see, we are using a function called
quadlayers_redirect()
to add a redirection and we’re using the HTTPS protocol when possible.
The next thing you need to check is this section:
switch ($currenturl_relative) {

case '/old-slug':
$urlto = home_url('/new-slug');
break;

default:
return;

}
Those are the old and the new slug. These values will act as your from and to URL, so you should customize them. For example, if you’re redirecting users from /blogging-tips to /blog/tips, the from will be /blogging-tips and the to would be /blog/tips.
So now if you add those slugs to the code, it will look like this:
function quadlayers_redirect() {

if (isset($_SERVER['HTTPS']) &&
($_SERVER['HTTPS'] == 'on' || $_SERVER['HTTPS'] == 1) ||
isset($_SERVER['HTTP_X_FORWARDED_PROTO']) &&
$_SERVER['HTTP_X_FORWARDED_PROTO'] == 'https') {
$protocol = 'https://';
}
else {
$protocol = 'http://';
}

$currenturl = $protocol . $_SERVER['HTTP_HOST'] . $_SERVER['REQUEST_URI'];
$currenturl_relative = wp_make_link_relative($currenturl);

switch ($currenturl_relative) {

case '/blogging-tips':
$urlto = home_url('/blog/tips');
break;

default:
return;

}

if ($currenturl != $urlto)
exit( wp_redirect( $urlto ) );


}
add_action( 'template_redirect', 'quadlayers_redirect' );
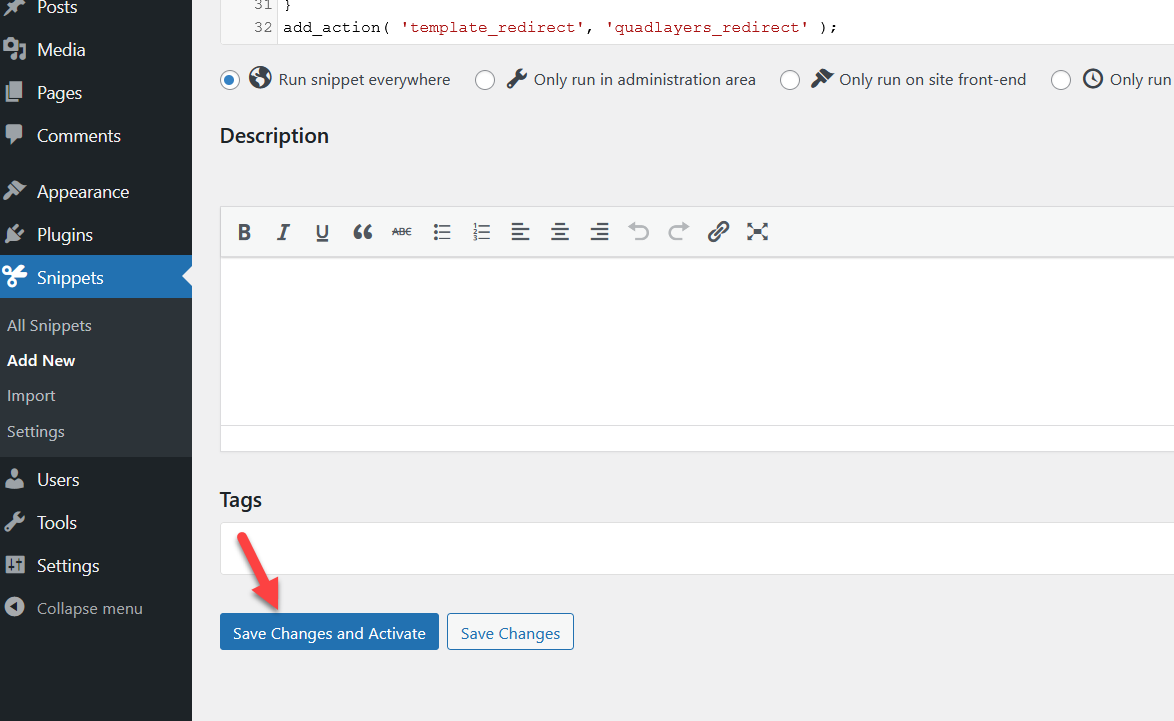
After customizing the code with your own slugs, save the changes and activate the snippet. From now on, visitors will be redirected to the destination link.
Adding multiple redirections
Above, we have shown you how to redirect a page in WordPress. But what if you want to add multiple redirections to your page? You can add various options by including an if conditional in the snippet. For example, have a look at the snippet below:
case '/first-url':
$urlto = home_url('/first-to' );
break;

case '/second-url':
$urlto = home_url('/second-to' );
break;
You can add that to the original snippet as follows:
function quadlayers_redirect() {

if (isset($_SERVER['HTTPS']) &&
($_SERVER['HTTPS'] == 'on' || $_SERVER['HTTPS'] == 1) ||
isset($_SERVER['HTTP_X_FORWARDED_PROTO']) &&
$_SERVER['HTTP_X_FORWARDED_PROTO'] == 'https') {
$protocol = 'https://';
}
else {
$protocol = 'http://';
}

$currenturl = $protocol . $_SERVER['HTTP_HOST'] . $_SERVER['REQUEST_URI'];
$currenturl_relative = wp_make_link_relative($currenturl);

switch ($currenturl_relative) {

case '/blogging-tips':
$urlto = home_url('/blog/tips');
break;
case '/second-url':
$urlto = home_url('/second-to' );
break;

case '/third-url':
$urlto = home_url('/third-to' );
break;
default:
return;

}

if ($currenturl != $urlto)
exit( wp_redirect( $urlto ) );


}
add_action( 'template_redirect', 'quadlayers_redirect' );
Make sure you update the snippet after modifying it. This way, you can use the Code Snippets plugin to redirect a WordPress page.
Now let’s see how to do the same via the htaccess file.
2.2) .htaccess File
The .htaccess file is one of the most important files for any WordPress installation, so before editing it, we recommend you download it to your local computer and keep it as a hard copy.
Now let’s see how to redirect a WordPress page using the .htaccess file method.
First, you need to access the .htaccess file. You can do that by using an FTP client such as FileZilla or using a dedicated file manager. If you have access to the WordPress dashboard, using a file manager is the easiest option. On the other hand, if you don’t have access to the site, are locked out, or prefer not to install third-party tools, try the FTP method.
Installing and activating the plugin
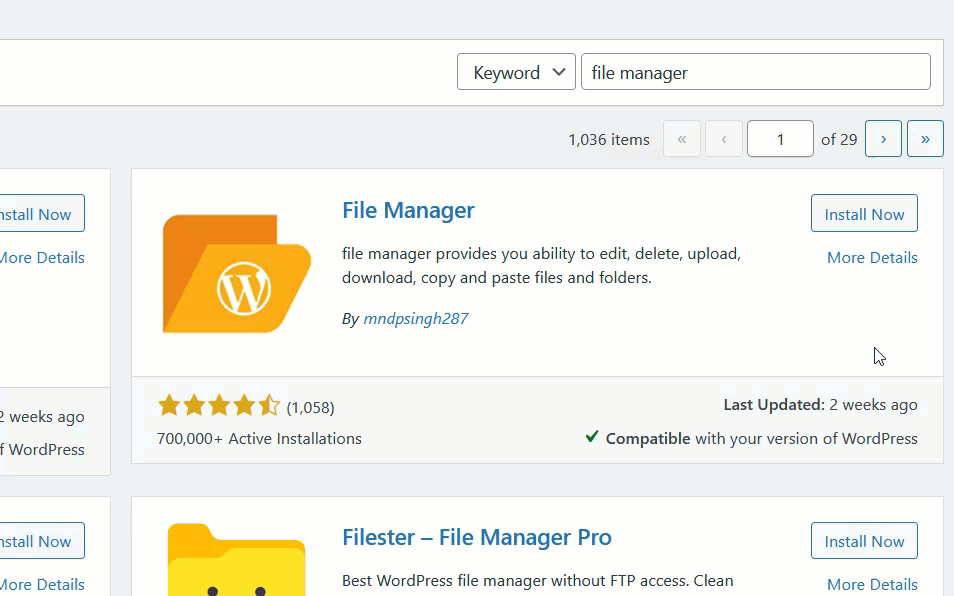
In this tutorial, we will use a plugin called File Manager. Simply go to your dashboard > Plugins > Add New, look for the plugin, install it, and activate it.
After activation, run the plugin and you will see the settings on the left menu.
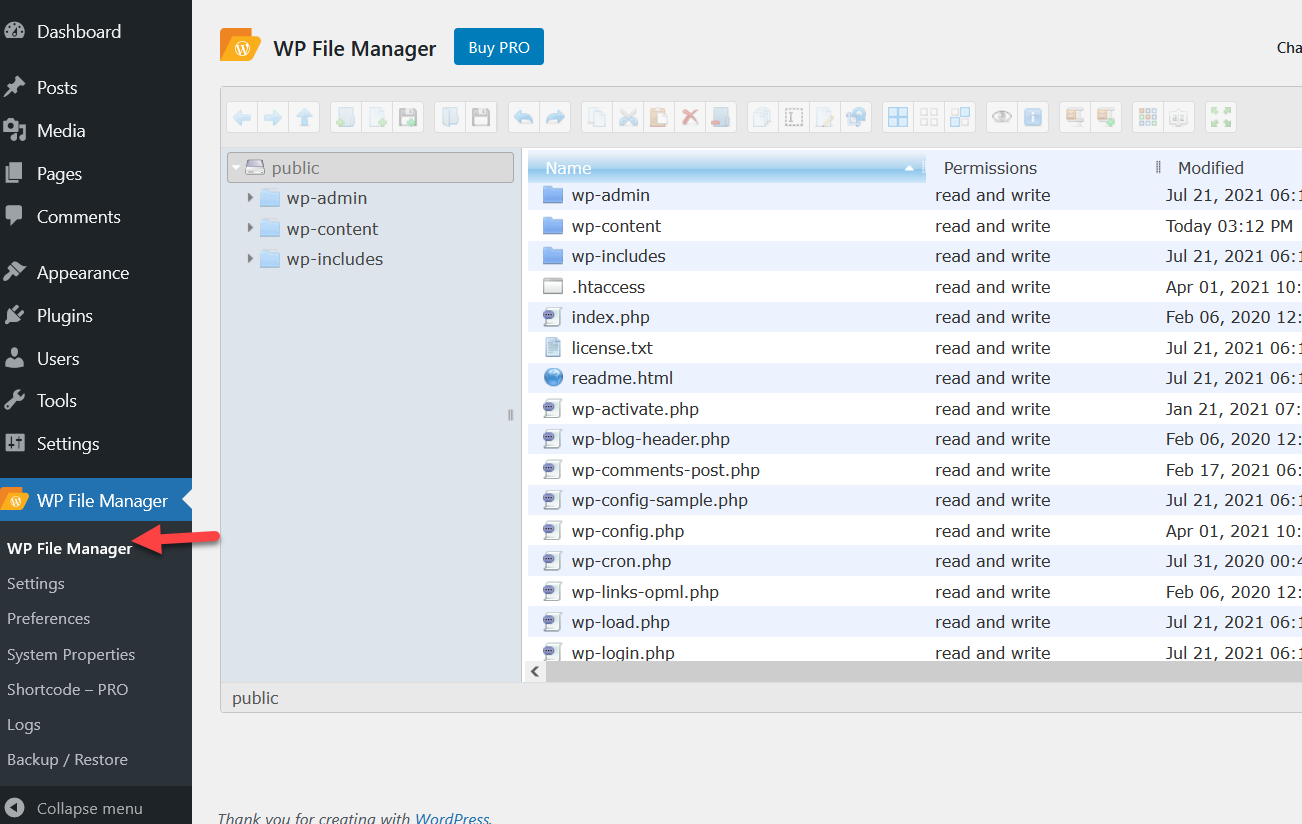
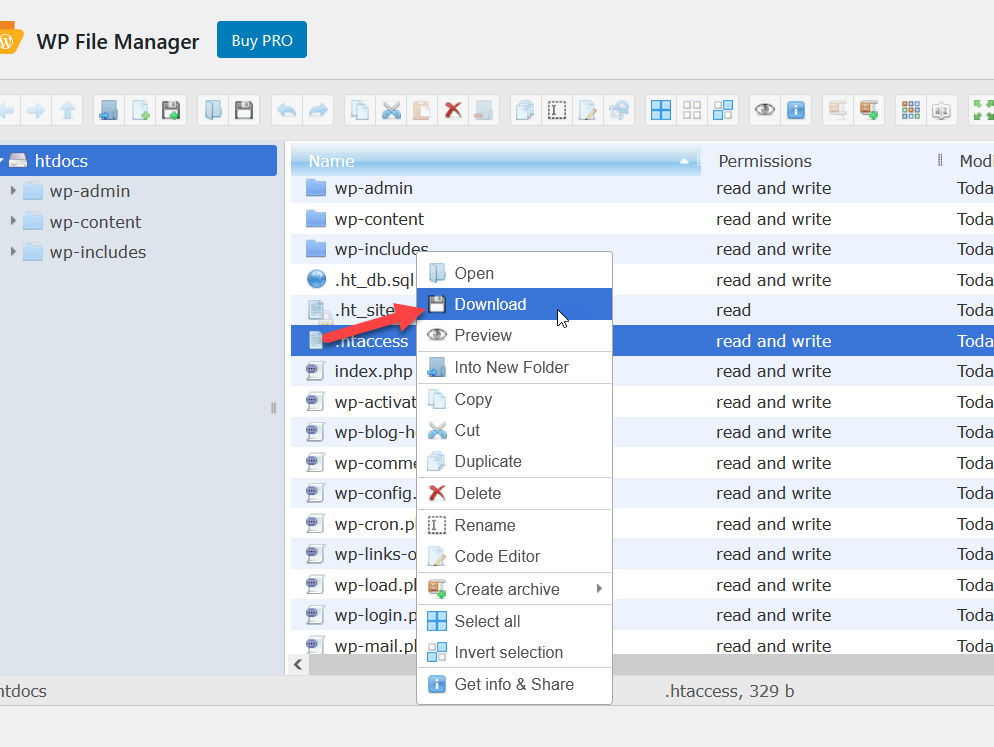
By default, you will see the .htaccess file in the WordPress core. As mentioned earlier, it’s a good idea to download it before starting the process, so right-click on the file and press Download.
Editing the .htaccess file
Now, the plugin will download the file to your local computer. After that, select the Code Editor option to start editing and customizing the .htaccess file.

To set up a 301 redirection on your website, copy the code below.
Redirect 301 /old-url http://www.example.com/new-url
When someone lands on the old-url (permalink), they will be immediately redirected to new-url (slug). Simply adjust the code according to your requirements. Similar to what we saw above, you can add multiple redirection options by using if conditionals.
Simply paste the code and update the .htaccess file.

That’s it! Now when someone enters the old URL in a browser, the .htaccess file will redirect users from the old URL to the new URL. You can test it by entering the old URL using an incognito window in your browser.
Set up a manual redirect in WordPress
Alternatively, you can redirect a WordPress page manually. This can be an interesting option if you want to redirect users that land on one post to another one or you want to redirect users to a different domain.
To redirect a page manually, go to Tools > Redirection in your WordPress dashboard and head to the Add new redirection section. There you’ll have to specify:
- Source URL: URL you want to redirect users from
- Target URL: URL you want to send users to
- Group: Select Redirections or select Modified posts if want to send traffic from the old version of the post to the new one.
Once you’ve done that, press Add Redirect.
Bonus: How to Redirect HTTP and WWW to HTTPS
When possible, it’s a good idea to redirect HTTP or WWW traffic to HTTPS. By using the HTTPS protocol, you make sure that all the web traffic you receive is encrypted adding a layer of security to your site.
To use the HTTPS protocol, you need an SSL certificate. Most web hosting companies offer a free SSL certificate powered by Let’s Encrypt when you purchase one of their plans. On the other hand, if you rely on a CDN (Content Delivery Network) like Cloudflare for your performance boost, they will also give a free SSL certificate with an auto-renewal feature.
In this section, we’ll see how to redirect HTTP and WWW to HTTPS using two different methods.
1) Cloudflare
Cloudflare is a freemium CDN service used by millions of bloggers and businesses. The good news is that if you are using Cloudflare and need to redirect all website traffic to HTTPS, you don’t need any extra tools.
First, log in to your Cloudflare account, and in your dashboard, select the website you need to edit.
Then, select the SSL/TLS option and make sure that you have enabled the SSL certificate on your domain.

Once you have enabled the encryption, move to the Edge Certificates tab.

Scroll down until you see the Always Use HTTPS feature. If it is disabled, turn it on.

That’s it! From now on, Cloudflare will take care of it and redirect users using the HTTPS protocol when someone enters your website address with HTTPS or WWW.
This is how you can use Cloudflare for redirection. As you can see, it’s super easy and it takes less than a minute! If you have doubts or need additional help, contact Cloudflare’s support team.
2) Coding Method
If you are not using a CDN and need to do the redirection manually, this section is for you. Here, we will show you how to use some snippets to redirect HTTP visitors to HTTPS.
To do this, we will edit the .htaccess file. If you followed the steps we described above, you already know how to find the .htaccess file and edit it. Once you have found the .htaccess file, paste the below code inside it.
RewriteEngine On
RewriteCond %{HTTPS} off
RewriteRule (.*) https://%{HTTP_HOST}%{REQUEST_URI}
In some cases, WordPress or other plugins will add the RewriteEngine On line to the .htaccess file. If your .htaccess file already has that line, you don’t need to add it. Then, save or update the file.
That’s it! From now on, the .htaccess file will redirect all the website traffic to the secure version of your website. When you do this, make sure you have an active SSL certificate installed on your domain.
If you need more information about this, check out our step-by-step guide on how to redirect HTTP and WWW to HTTPS.
How to Fix the Mixed Content Error
Once you have migrated your website from HTTP to HTTPS, you may find some mixed content errors in the website’s front end. This will mainly occur when your site is serving files based on the HTTP and HTTPS protocols together. If you are experiencing this issue, we’ve got a quick solution for you.

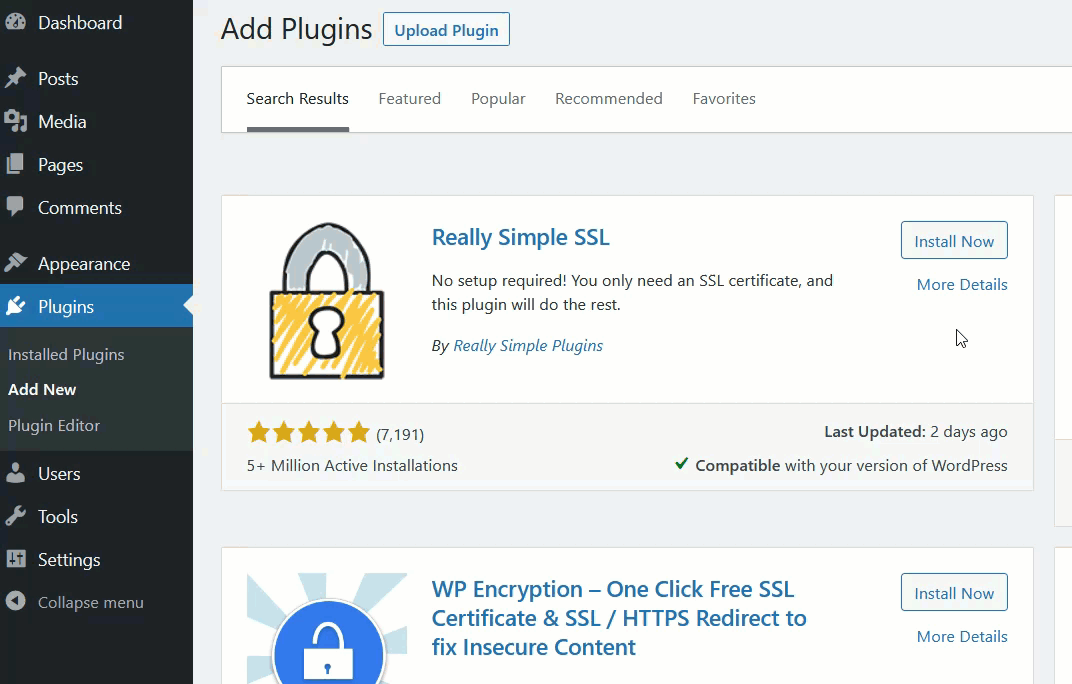
By using the Really Simple SSL free plugin, you can fix mixed content errors. Once you’re in your WordPress dashboard, install and activate the plugin.
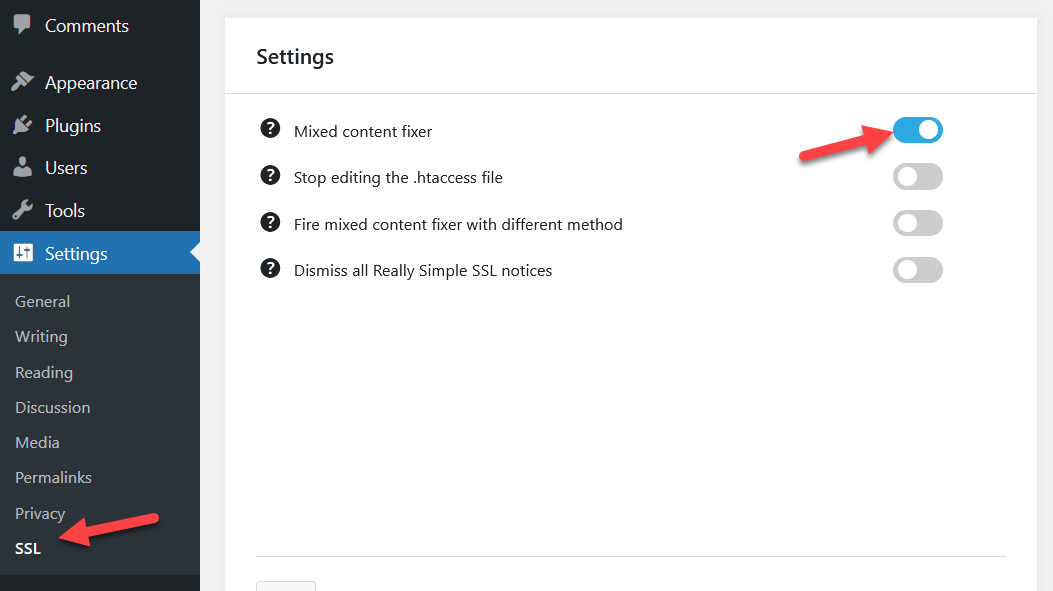
After that, go to the SSL settings under the WordPress settings page and enable the Mixed content fixer option. By default, it should be enabled but it’s worth having a look to make sure it’s enabled.
That’s it! This will stop the mixed content warnings.
Conclusion
In summary, there are different types of redirections that have different functions and can be temporary or permanent. Redirections are important in the following situations:
- When changed your domain name
- If you want to improve your SEO
- When you have deleted some pages on your site
- There’s a page that needs an update
- When you run limited-time deals
In this tutorial, we’ve seen two main ways to redirect a WordPress page:
- Using plugins
- Programmatically
The plugin method is straightforward, so it’s perfect for beginners. On the other hand, if you love coding, you can also set up redirections programmatically.
Finally, we have seen how to redirect WWW and HTTP to HTTPS to make your site more secure and how to fix mixed content errors.
Have you started redirecting pages on your site? Which method do you prefer? Let us know in the comments below.

This is such great content. Your discussion is well detailed. Redirecting pages without plugin is awesome. Thanks for sharing this awesome article.
Thanks for leaving feedback, James.
Hi Jane,
Without coding or using plugins, I think editing the “slug” also provides redirection, but I suppose it is more limited.
Thank you so much i was looking how to do this.
You’re welcome, glad our tutorial was helpful.
Hi Jane, Thanks for this great article but I tried the Code Snippet method today and couldn’t get it to work for me so had to use the Redirection plugin instead. Not sure if I’ve got something wrong or whether the code has changed in the couple of years since you wrote this article. This is what I added…
function pretreat_redirect() {
if (isset($_SERVER[‘HTTPS’]) &&
($_SERVER[‘HTTPS’] == ‘on’ || $_SERVER[‘HTTPS’] == 1) ||
isset($_SERVER[‘HTTP_X_FORWARDED_PROTO’]) &&
$_SERVER[‘HTTP_X_FORWARDED_PROTO’] == ‘https’) {
$protocol = ‘https://’;
}
else {
$protocol = ‘http://’;
}
$currenturl = $protocol . $_SERVER[‘HTTP_HOST’] . $_SERVER[‘REQUEST_URI’];
$currenturl_relative = wp_make_link_relative($currenturl);
switch ($currenturl_relative) {
case ‘/project/specialty-chemicals’:
$urlto = home_url(‘/speciality-chemicals-for-metal-pretreatment’);
break;
case ‘/project/aluminium_alloys’:
$urlto = home_url(‘/speciality-chemicals-for-aluminium-and-alloys’ );
break;
case ‘/project/mild-steel-galvanised-steel’:
$urlto = home_url(‘/specialised-chemicals-for-mild-and-galvanised-steel’ );
break;
default:
return;
}
if ($currenturl != $urlto)
exit( wp_redirect( $urlto ) );
}
add_action( ‘template_redirect’, ‘pretreat_redirect’ );
Hi Alan,
Thanks for pointing it out.
I will check the code and update the article.
The plugin and .htaccess methods are working fine, by the way.