
How to Redirect HTTP and WWW to HTTPS
Want to improve your site’s security? Apart from installing some plugins, there’s a lot more you can do. In this guide, we’ll show you different ways to redirect HTTP and WWW to HTTPS to keep your site safe from hackers.
As we do more and more things via the Internet, there are more and more people developing malware and trying to gain access to our systems. Considering that WordPress powers around 35% of all sites worldwide, it’s a very attractive platform for hackers. We’ve recently seen that even some of the most popular tools such as WooCommerce have vulnerabilities that hackers exploited.
The good news is that as the risks increase, there are more and more technologies that protect Internet users from these vulnerabilities. One of the main ones is SSL (Secure Sockets Layer). SSL is a security protocol that helps create encrypted links between a web server and a browser. It makes sure that the data traveling between the two ends is encrypted and kept safe.
At this point, your HTTP and WWW will turn into HTTPS, ensuring smooth and shielded data transmission. In this article, we’ll show you different ways to redirect HTTP and WWW to HTTPS.
Why redirect HTTP and WWW to HTTPS?
We’ve just mentioned that HTTPS URLs are more secure and transmit data more securely. But let’s dig a bit deeper. Have you ever seen security warnings when you visit a website using Firefox or Chrome? If you have, then that site wasn’t equipped with an SSL certificate. The same would happen to your website if you fail to establish an SSL-encrypted connection for it. What happens is that Chrome and Firefox will label your site as insecure and will warn your visitors that it may be risky to stay on your site.
But that’s not the only reason you should redirect HTTP and WWW to HTTPS. An SSL-encrypted connection is beneficial in many other ways:
- It improves security: By ensuring encrypted data transmission, it protects data secrecy and creates trust among your website visitors.
- Improves SEO: HTTPS is a new ranking criterion that Google uses when assessing how good a site is. Even though this element on its own won’t take your posts to the first page in Google, it will help you get there.
- It’s free (or very cheap): In many cases, having an SSL certificate and redirecting your users to HTTPS costs nothing. There are many ways to get the SSL certificate for free or for very little money so even sites with very small budgets can benefit from it.
How to redirect HTTP and WWW to HTTPS?
Now, let’s see how to actually redirect users from HTTP and www to HTTPS. There are many ways to do it but In this guide, we’ll have a look at the top 3.
- Edit the .htaccess file
- Using Apache
- With Cloudflare
They all get the job done so choose the one that suits your site best.
1. Edit .htaccess file
There are multiple ways to edit the .htaccess file, so in this example, we will show you the easiest and most accessible way. That is, using the cPanel. cPanel, or control panel, is a standard web hosting panel provided by most hosting providers that’s super easy to use.
To start editing, log into the cPanel, go to Files > File Manager > Document Root, and select your domain name. Then, turn on the hidden files. After that, you will see a new window/tab where you can find the root directory of your site. Search for the .htaccess file in the public_html folder, right-click on it, choose Code Edit, and follow the cPanel instructions to start editing.
After that, it’s time to redirect HTTP and WWW to HTTPS, so add the following code at the end of the .htaccess file:
RewriteEngine On
RewriteCond %{HTTPS} off
RewriteRule (.*) https://%{HTTP_HOST}%{REQUEST_URI}
Please note that if there’s already a line that says RewriteEngine On in your file, you don’t need to add it. Simply copy and paste the other two lines of the code.
What if you want to redirect users that go to a specific domain or folder? That requires different codes, so below we’ll show you how to redirect visitors from a specific domain and a specific folder.
1.1. Redirect from a Specific Domain
To redirect users from a specific domain to HTTPS without altering the other domains, add the following code:
RewriteEngine On
RewriteCond %{HTTP_HOST} ^yourdomain\.com [NC]
RewriteCond %{SERVER_PORT} 80
RewriteRule ^(.*)$ https://www.yourdomain.com/$1 [R,L]
1.2. Redirect from a specific folder
If you want to redirect to HTTPS from a specific folder, you should use the following code:
RewriteEngine On
RewriteCond %{SERVER_PORT} 80
RewriteCond %{REQUEST_URI} folder
RewriteRule ^(.*)$ https://www.yourdomain.com/folder/$1 [R,L]
When editing the .htaccess file, use the above codes as a base and remember to replace your domain and /folder with your actual domain and folder respectively.
2. Using Apache
Another method to redirect requests from HTTP and WWW to HTTPS is to use Apache. Apache is one of the oldest and most trusted web servers in the world. Developed by the Apache Software Foundation, it’s open-source, free, and claims to power approximately 40% of all websites in the world.
As Apache is module-based and highly customizable, its modules have additional functionalities that can be turned on and off by server administrators. There are modules for security, caching, password authentication, URL rewriting, and many more. Now, let’s see how you can redirect HTTP and WWW to HTTPS with Apache.
First, log in to your Apache server and choose the equivalent path. Then, go to the conf folder and create a backup of the httpd.conf file. Now as you have a backup, open the file using your favorite VI editor. Check if the mod_rewrite module below has loaded:
LoadModule rewrite_module modules/mod_rewrite.so
If the module is commented (it has a # at the beginning of the line), uncomment it deleting the #, and add the following code at the end of the file:
RewriteEngine On
RewriteCond %{HTTPS} off
RewriteRule (.*) https://%{HTTP_HOST}%{REQUEST_URI}
Finally, restart the webserver and that’s it.
3. With Cloudflare
Cloudflare is a great tool to improve your site’s performance and security and allows you to easily redirect HTTP and WWW to HTTPS. There are two ways to do it and they only take a few seconds.
- Enable Always use HTTPS
- Create page rules
Note that both options will do the job so choose the one that you like best.
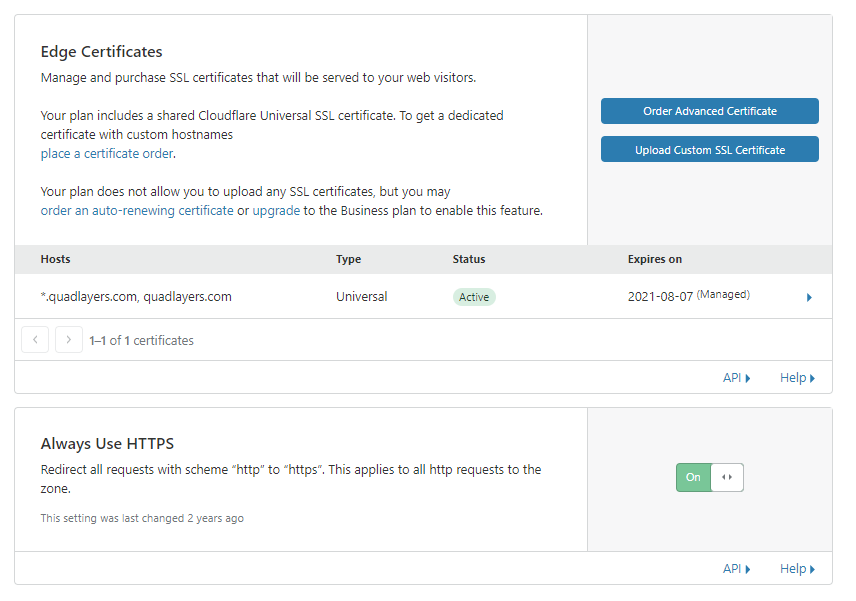
3.1. Enable “Always Use HTTPS”
Since 2017, Cloudflare comes with an option to Always Use HTTPS. This allows you to easily redirect users to HTTPS with a few mouse clicks.
Just log in to your Cloudflare account and choose the site you want to redirect to HTTPS. Then, go to the SSL/TLS > Edge Certificates, and you will see a toggle switch just like the picture below.
Switch it on and that’s it. You’ll redirect HTTP and www to HTTPS.
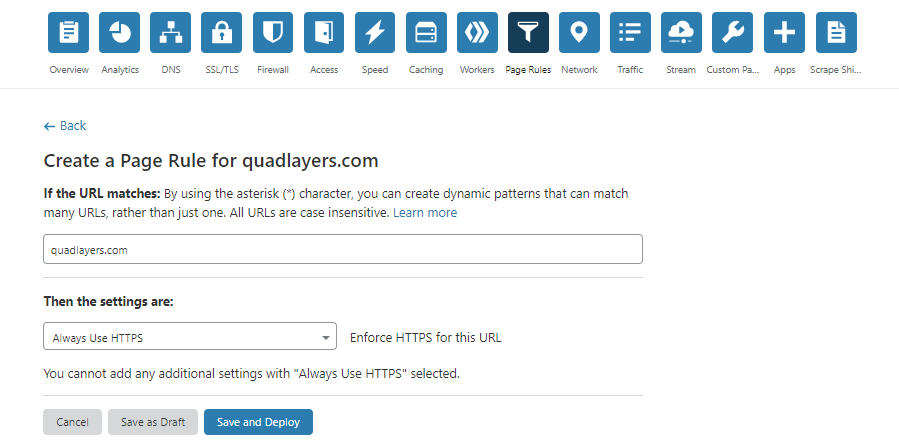
3.2. Create Page Rules
The second option is to create page rules. This method might seem more complicated but it’s actually the same. You can redirect HTTP and WWW to HTTPS by following these simple steps:
- Go to Page Rules and click Create Page Rule
- Enter your URL. Remember to put the asterisk (*) at the end so the system understands that the redirection should happen to all URLs
- Click Add a Setting and choose Always Use HTTPS from the dropdown
- Finally, click Save and Deploy
After deploying the rule, wait a few seconds to test if your website is accessible through HTTPS. It should work right out of the box.
Conclusions
All in all, security is one of the top priorities when it comes to building and running a website and HTTPS plays a big role in it.
Redirecting HTTP and WWW to HTTPS is very simple and has many advantages. Not only is it the secure version of HTTP, but it also comes with other advantages such as data encryption, better SEO, enhanced reputation for your website, and more. Additionally, it can also help you improve your conversion rates since customers have more confidence in your site.
HTTPS is an ongoing trend and will be the future of all websites shortly. Soon, non-HTTPS websites will be the minority, and search engines will impose stricter criteria in terms of SEO. Predictably, websites that don’t use HTTPS will be penalized, so we recommend you redirect HTTP and WWW to HTTPS as soon as possible. It’s very easy and there are free solutions so it’s a no-brainer.
For more information about this topic, check out our tutorial on how to redirect a WordPress page.
Do you have any questions? Please let us know in the comment section. Finally, if you want to know more about security, we recommend you check out these tips and tricks.

Hi
Great post. I use a plugin called Really Simple SSL. It has been working great for me. I do however use the .htaccess file to redirect from my former domain name to my new domain.
Hi Thomas, thanks for the info. Really Simple looks awesome