How to Remove Added to Cart Message in WooCommerce
Are you looking for a quick way to remove the added to cart message? Then you’ve come to the right way. Enjoy our beginner-friendly guide on removing the WooCommerce added to cart message as well as customizing it! But first, let’s take a look at why you’d consider removing it from your website.
Why hide Added to Cart message?
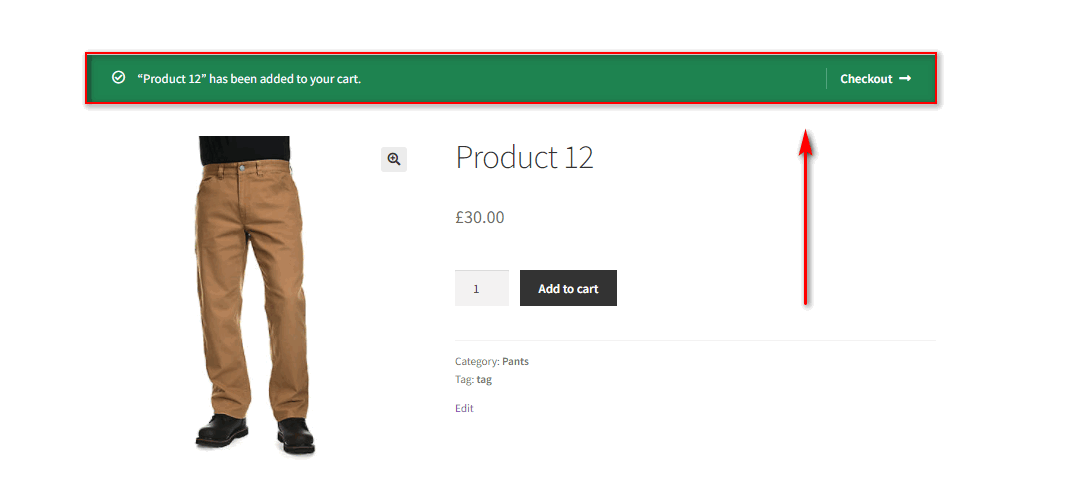
Whenever a product is added to the cart, WooCommerce alerts your customers regarding the addition with an added to cart message. This message is also accompanied by a link to your cart or your checkout page for convenience’s sake. It depends on the customizations that you have made or your active WooCommerce theme.
While it’s a great feature to have on your website, the message may not be always necessary for your customers. In these cases, the message cannot be changed through the default WooCommerce Dashboard.
Furthermore, if you’re a website owner and want your website to have a clean interface, you might need to hide some obvious and unnecessary messages. Hiding them from your customers is one of the best ways to keep your website clean.
Speaking of which, the added to cart message does fall under one of the most obvious message alerts. It just mentions that an item is added to the cart when the customer clicks on the add to cart button. So, hiding it can make your website look clean without losing any vital details and also increase the customer experience.
Similarly, making sure that your website stands out from the default WooCommerce experience can be an important thing. Uniqueness is quite an important factor when it comes to selling products online and hiding the added to cart message can help you with it too. So if you don’t remove or customize it, this message will look the same as any other WooCommerce website.
How to Remove the Added to Cart Message in WooCommerce
The easiest way to remove the Added to Cart Message in WooCommerce is by adding a PHP snippet to your theme’s functions.php file. You need to open your Theme editor and add a code snippet to your theme files.
So we recommend you create a child theme programmatically or by using one of the WordPress child theme plugins for this step. A child theme saves all your changes to the functions.php file even after you update your WordPress theme. In addition, if you want to revert your changes, you can always go back to your main theme. But make sure that you backup your WordPress website before you make any modifications.
Once you switch to your child theme, open your WordPress Admin Dashboard and go to Appearance > Customize. Then, click on functions.php on the right side Theme files sidebar.
Now, go ahead and add the following line of script to your editor. If you aren’t comfortable in making changes to the theme files, you can use code editor plugins like Code Snippets too. Just install the plugin and update the following code to your WooCommerce store using the plugin.
add_filter( 'wc_add_to_cart_message_html', '__return_false' );
Click on Update file once you add the code here and you should be done. This should be enough to remove the added to cart message on your website.
As shown in the demonstration below, the added to cart message won’t be displayed to your customers after they click on the “Add to Cart” button.
How to customize the Added to Cart message
Let’s say you don’t want to completely remove the added to cart message. Instead, you just want to make some minor changes to it. If that’s the case, a similar method can be used to customize this message too.
Then, you can show a custom message to your customers when they add a product to the cart. All you have to do is copy and paste the following code snippet to your functions.php file just like the previous step. After that, make some modifications to the code to suit your needs.
add_filter( 'wc_add_to_cart_message_html', 'quadlayers_custom_add_to_cart_message' );
function quadlayers_custom_add_to_cart_message() {
$message = 'Your product has been added to cart. Thank you for shopping with us!' ;
return $message;
}
Simply replace the text inside the $message = section of the code with your custom message just like this:
add_filter( 'wc_add_to_cart_message_html', 'quadlayers_custom_add_to_cart_message' );
function quadlayers_custom_add_to_cart_message() {
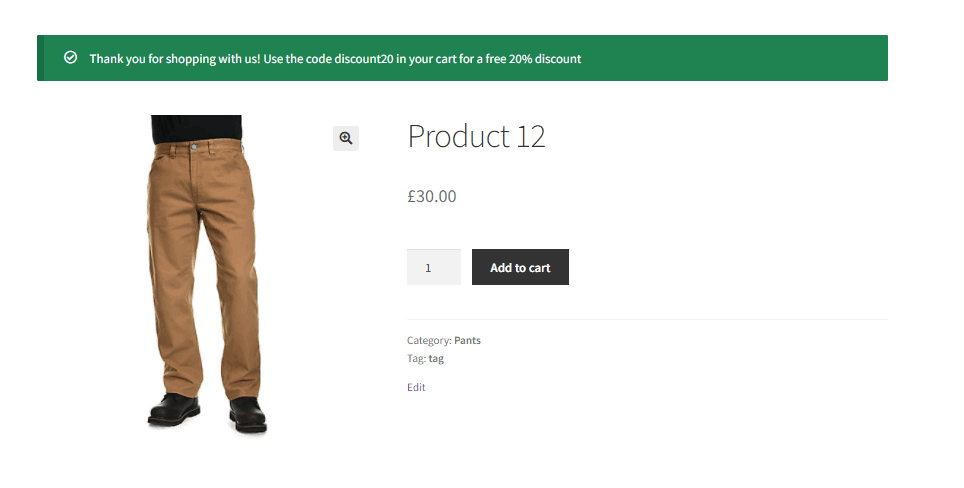
$message = 'Thank you for shopping with us! Use the code discount20 in your cart for a free 20% discount';
return $message;
}
In this demonstration, we have displayed the message “Thank you for shopping with us! Use the code discount20 in your cart for a free 20% discount”.
You can also use a different code snippet to display the name of the product in the message when it’s added to the cart. Just add the following code snippet to your functions.php file:
add_filter( 'wc_add_to_cart_message', 'quadlayers_custom_wc_add_to_cart_message', 10, 2 );
function quadlayers_custom_wc_add_to_cart_message( $message, $product_id ) {
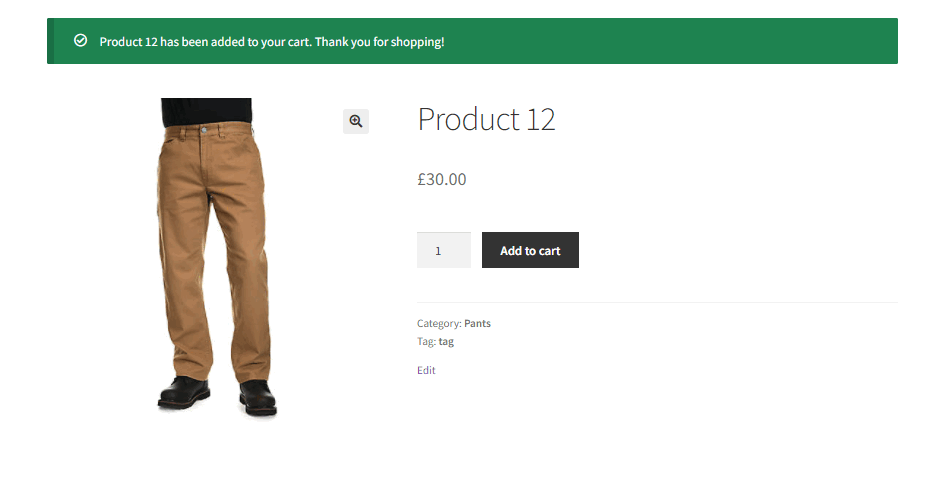
$message = sprintf(esc_html__('%s has been added to your cart. Thank you for shopping!','tm-organik'), get_the_title( $product_id ) );
return $message;
}
Now, when your customers click on the add to cart button, they will be able to see the name of the product in the added to cart message as well.
Once you click on Update file, your changes should be present on your website when a product is added to the cart. You can perform some more customizations to this message as well. If you want to learn more about changing your added-to-cart messages, have a look at our guide here.
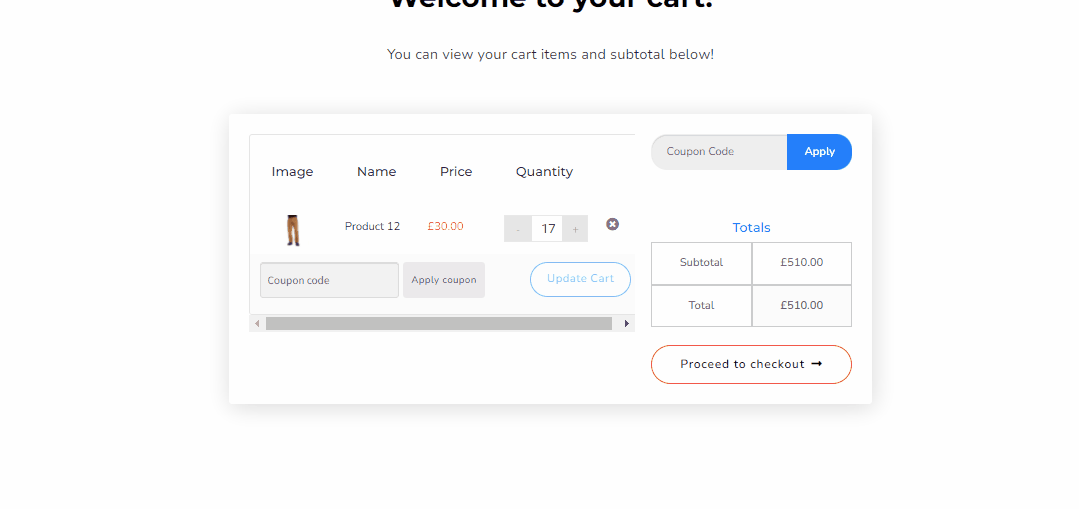
Hide “Product was removed from cart” message
You already know how to remove the added to cart message. However, when a product is removed from your cart, a similar message is also shown to your customers. This message informs them about the removal of the product which also has an undo button by default.

Since you want to keep a clean interface with your website, removing this message can also help with your needs. Besides, you have already removed the added to cart message. So it makes sense that you should remove the product removal message from your website too.
If you’d like to remove this notification you can choose to do so by adding a custom snippet to your functions.php file. So just like above, go to Appearance > Theme Editor from your WordPress dashboard to open your theme editor. Then, click on functions.php on the theme files sidebar.
Now, go ahead and paste the following code snippet in the editor:
add_filter( 'woocommerce_cart_item_removed_notice_type', '__return_false' );
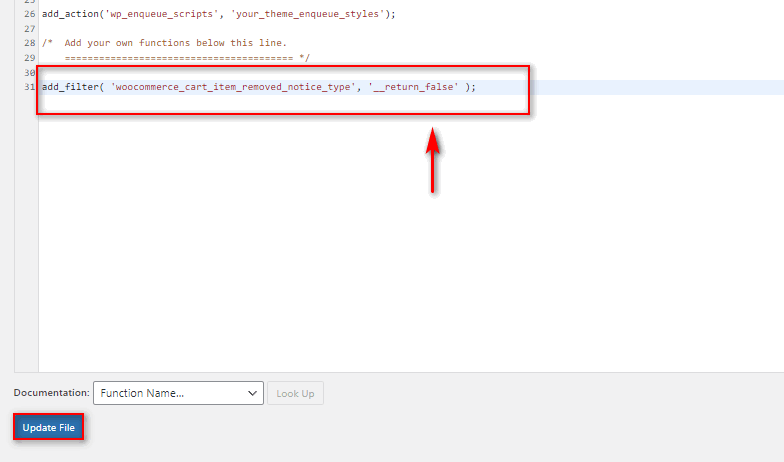
Click on the Update file button and your changes will be made saved. The next time a customer removes a product from the cart, the product removal message will not be displayed.
Bonus: Redirect to Cart or Checkout Page
By now, we hope that you can confidently remove the added to cart message. When you remove this message, you can also customize the add to cart button to redirect it directly to the cart page or the checkout page. So instead of just receiving a message, your customers will be redirected straight to their cart page or the checkout for an easier checking out process.
1. Redirect Add to Cart Button to Cart Page
First, let’s take a look at how you can enable redirects to the cart page. This is a fairly simple process that can be done from the WooCommerce Dashboard itself.
To redirect the add to cart button to the cart page, open your WP Admin Dashboard and go to WooCommerce > Settings. Then, click on the Products tab and enable the Redirect to the cart page after the successful addition option.
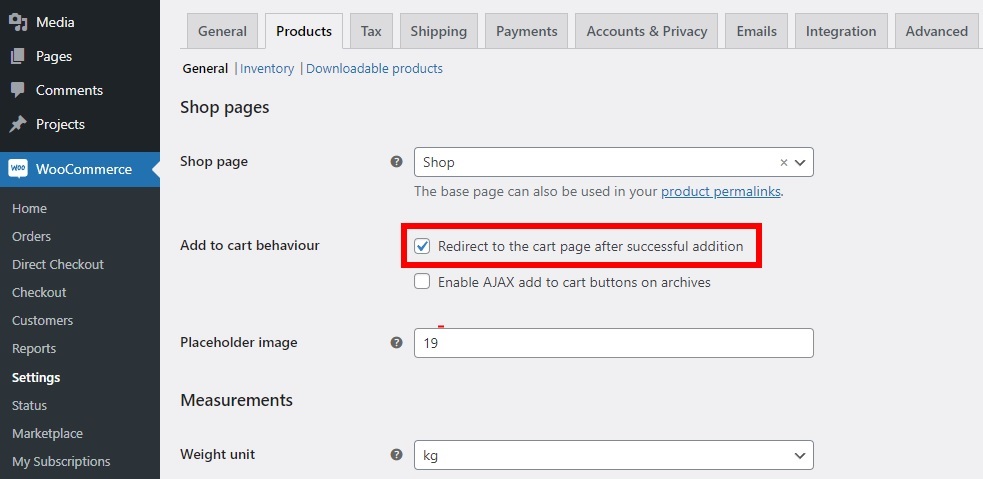
After you have checked this option, don’t forget to save the changes.
With this enabled, when your customers add a product to the cart, they’ll be redirected straight to the cart page. This is a great alternative when you remove the added to cart message. It is also more convenient for the customers as well.
2. Direct Checkout for WooCommerce
If you’d like to instead have your customers be redirected to your Checkout page directly, you can use a PHP snippet. However, please make sure both of these options are disabled under the Products tab of your WooCommerce settings.
Now, the next step requires you to add your code to the functions.php file of your child theme as above. Once again, go to Appearance > Theme Editor from your WordPress dashboard and open the theme editor. Then, click on the functions.php from the theme files sidebar.
Finally, add the following code in the editor and click on Update File.
add_filter('add_to_cart_redirect', 'quadlayers_add_to_cart_redirect');
function quadlayers_add_to_cart_redirect() {
global $woocommerce;
$lw_redirect_checkout = $woocommerce->cart->get_checkout_url();
return $lw_redirect_checkout;
}
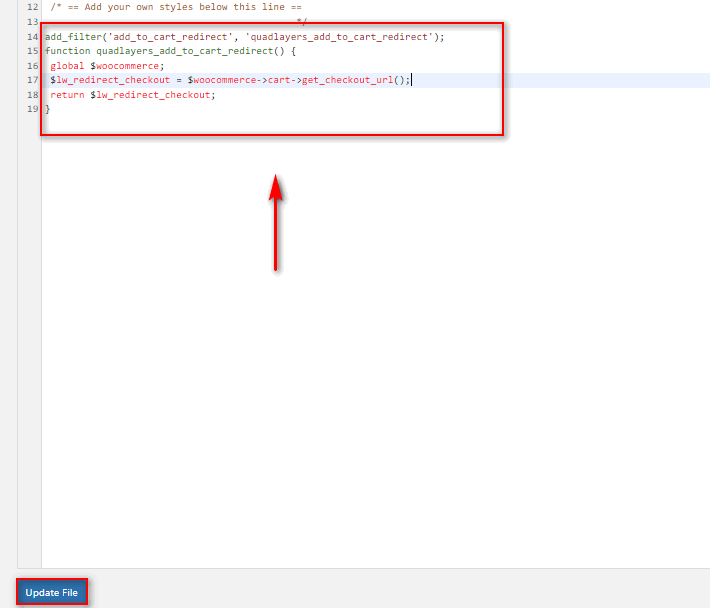
After you add this code, the add to cart button will redirect your customers to the checkout page instead of the cart page. In this case, the added to cart message is also unnecessary since they can see the products on the checkout page itself.
You can also use Direct Checkout for WooCommerce if you want an easier approach for this modification. We even have a detailed guide for creating a WooCommerce direct checkout link if you need more information on it.
Conclusion
And that ends our guide on How to Remove Added to Cart message from WooCommerce. Removing or editing it can be a useful option if you want to remove certain unnecessary elements from your website that clog your customer’s shopping experience. And all it requires to do so is adding your custom PHP snippets to your functions file.
Let’s do a quick summary of all the processes we covered in today’s post:
- Removing Added to Cart Message using a code snippet
- Customizing the Added to Cart Message
- Hiding ‘Product was removed from cart’ message from WooCommerce
The snippets we’ve shown in today’s article are fairly customizable and simple to add. You can easily customize them and change the message to fit your website. However, if you come to face issues with adding them to your website or customizing them please let us know in the comments section. We’ll do our best to help you!
We have even included a section to redirect the add to cart button to the cart or the checkout page. It is also a great option to add to your website when you remove the added to cart message.
Moreover, if you’re looking for other ways to customize your WooCommerce shop experience, why not check out some of our other articles:
