How to Easily Hide and Remove WooCommerce Checkout Fields (Plugins and PHP)
The checkout is one of the most important steps in any eCommerce store. If you want to be successful and boost your sales, you need to keep it lean. That’s why today we’ll show you how to hide and remove WooCommerce checkout fields.
Some days ago, we gave you some tips on how to optimize your site. However, the last step of the sales funnel is crucial to close the sale so it needs special attention.
Why disable WooCommerce checkout fields?
Did you know that more than 75% of users add a product to the cart but then leave the website without buying anything? One of the main reasons for shopping cart abandonment is that the checkout is too long or complicated.
To avoid this, the checkout page must be simple and have only the necessary fields. This is especially important if you sell digital or virtual products such as software, music, ebooks, and so on. As this type of product doesn’t need to be shipped, they should have a specific checkout page where you don’t ask for details such as address or postal code for example.
To know more about how to improve the checkout for digital products, you can check out this article. So, to boost conversions, you should hide the fields that simply add distractions and friction to the checkout page.
Let’s have a look at how to delete checkout fields in WooCommerce and speed up the checkout process.
How to remove checkout fields in WooCommerce?
As it’s not possible to delete WooCommerce default checkout fields from the WordPress dashboard, in this tutorial, we’ll show you how to hide and remove checkout fields in two different ways:
- Using a plugin
- With a PHP script
Using a plugin is the easiest way if you’re not a developer. The PHP script, on the other hand, allows you to hide any existing checkout fields and customize your WooCommerce store with a bit of coding. There’s no better or worse method. You’ll get the same result with both of them so depending on your skills, you can choose the one that best suits you.
1) Remove WooCommerce checkout fields using a plugin
There are many tools to disable and hide fields on the checkout page. Here we’re going to show you how to do it using two free plugins:
- WooCommerce Checkout Manager
- Direct Checkout for WooCommerce
These tools work similarly but have some differences. Let’s have a closer look at how these plugins can help you delete some checkout fields.
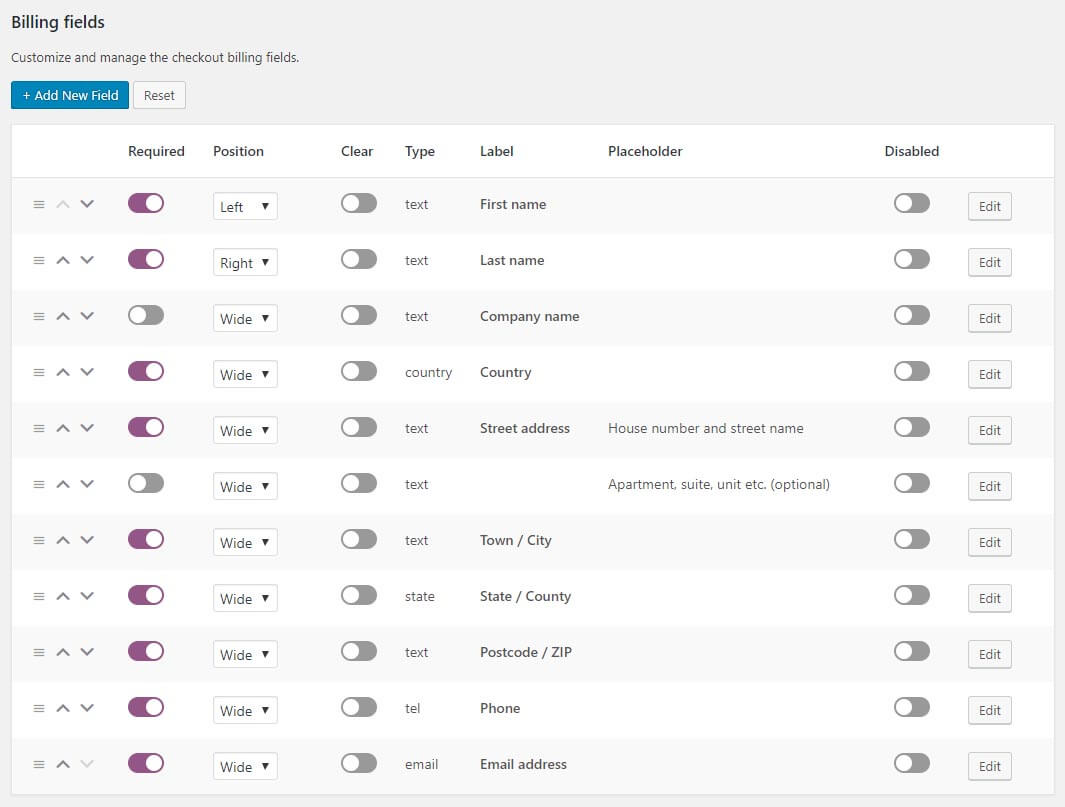
1.1 – Delete checkout fields with WooCommerce Checkout Manager
WooCommerce Checkout Manager is one of the best tools to remove checkout fields. This freemium plugin has a free version and 3 premium plans that start at 19 USD (one-time payment).

To disable any of the WooCommerce checkout fields simply follow these steps:
-
- Install and activate WooCommerce Checkout Manager. You can either go to Plugins > Add New and search for “WooCommerce Checkout Manager” or download it for free from this link. The tool has a pro version with more advanced features but for this task, the free version is enough.
- Go to the WooCommerce tab in your WordPress dashboard
- Click on Checkout and then on the Billing tab.
- You’ll see a list of all the fields you can hide so just activate the disable option on the field you want to remove.
- After that, you can go to the Shipping and Additional tabs and disable the fields you want to delete.
- After you hide all the fields you don’t want on the WooCommerce checkout page, remember to save the changes and that’s it!
Short and sweet, wasn’t it? Apart from removing fields, this plugin also lets you add new fields, make fields optional or required, change the order in which you display the fields, apply conditional logic, and much more. So, if you want a tool to customize the checkout, WooCommerce Checkout Manager is an excellent option.
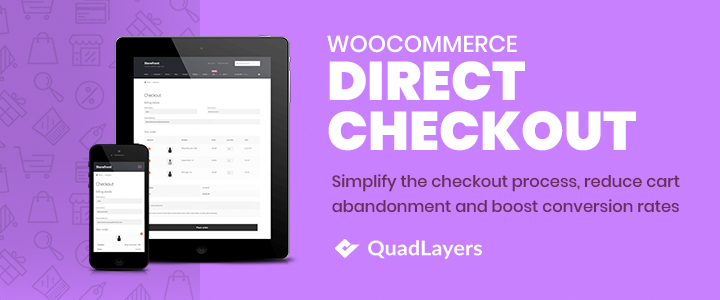
1.2 – Remove checkout fields with Direct Checkout for WooCommerce
WooCommerce Direct Checkout is an excellent plugin designed to simplify both the checkout process and the checkout page. This tool aims to speed up the checkout to provide users with a better buying experience. Unlike WooCommerce Checkout Manager that allows you to both enable and disable fields, Direct Checkout helps you remove unnecessary fields and increase conversion rates.
This is a freemium tool. It has a free version with basic features and 3 premium plans that start at 19 USD (one-time payment). To delete fields from the WooCommerce checkout page with Direct Checkout you need to:
- Install and activate WooCommerce Direct Checkout. In your WP dashboard, you can go to Plugins > Add New and search for “WooCommerce Direct Checkout” or download it for free from this link.
- Go to the WooCommerce tab in your WordPress dashboard.
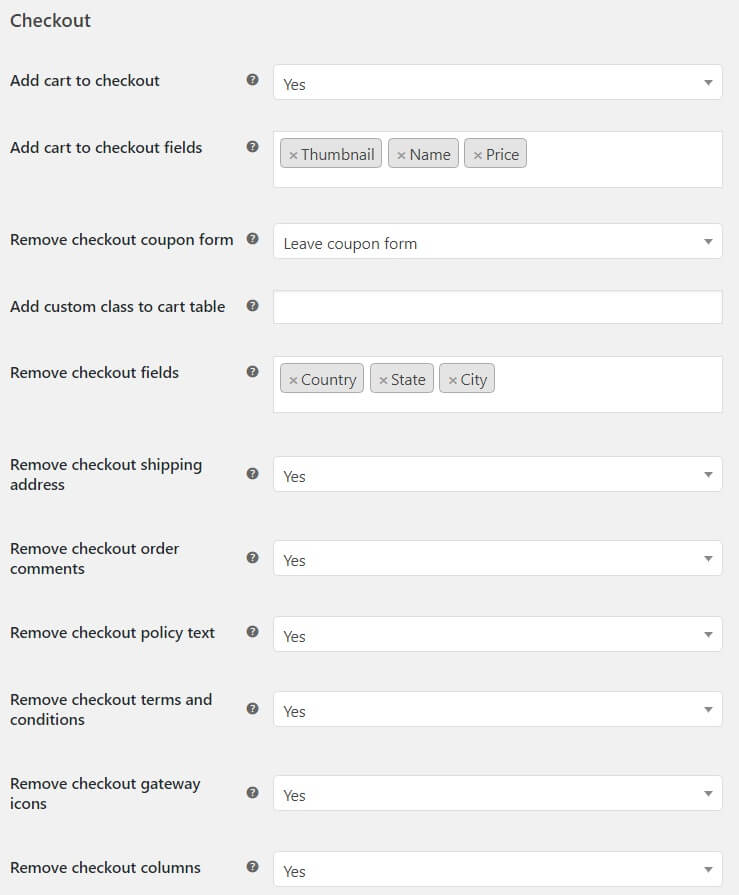
- Press Direct Checkout and then go to the Checkout tab.
- Here, you’ll see a list of all the fields you can remove such as country, state, order comments, policy text, columns, and more. From the General tab, you can also direct the users from the product page directly to the checkout from the Added to cart redirect to option.
- Once you delete the fields you don’t want on the checkout page, simply save the changes.
In conclusion, if you want a quick and straightforward solution, these two plugins are an excellent choice. They allow you to remove WooCommerce checkout fields in a few clicks and optimize your store.
Apart from being very easy to use, these tools have excellent performance and are two of the best checkout plugins for WooCommerce. The main drawback of this method is that when you install a plugin, you’re modifying the code of your website. This increases its complexity and the chances of breaking something. As a result, a customized script could be a good method if you’re comfortable with writing a few lines of code.
2) Remove WooCommerce checkout fields with PHP script
NOTE: Before we start, we recommend you create a child theme. This way, instead of customizing the parent theme’s files, you’ll modify the child theme so your customizations won’t be overridden when you update the parent theme. If you don’t want to create a child theme, you can generate a complete backup of your site in case something goes wrong.
In this section, we’ll show how you can delete checkout fields from the WooCommerce checkout coding your own solution. If you’ve checked our tutorial on how to edit checkout fields, you’ll be familiar with WooCommerce hooks. In this case, we will use the woocommerce_checkout_fields hook and we’ll call it quadlayers_remove_checkout_fields as follows:
add_filter( 'woocommerce_checkout_fields' , 'quadlayers_remove_checkout_fields' );
This is a type of filter hook, which means that it must return something when you execute it. And what is it going to return? The data with the fields you want to remove.
Remove the last name
For example, if you want to delete the last name field, you can use the following:
unset($fields['billing']['billing_last_name']);
After that, you need to insert it into a function with the same name you’ve used in the filter hook in the first step (quadlayers_remove_checkout_fields):
function quadlayers_remove_checkout_fields( $fields ) {

unset($fields['billing']['billing_last_name']);

return $fields;

}
Finally, insert the full script to remove the WooCommerce field last name in the functions.php file of a child theme as shown below:
add_filter( 'woocommerce_checkout_fields' , 'quadlayers_remove_checkout_fields' );

function quadlayers_remove_checkout_fields( $fields ) {

unset($fields['billing']['billing_last_name']);

return $fields;

}
Delete any other fields
So, if you want to delete any other field, you need to add the corresponding line. Below you can find the available names of fields that you can remove:
unset($fields['billing']['billing_first_name']);
unset($fields['billing']['billing_last_name']);
unset($fields['billing']['billing_company']);
unset($fields['billing']['billing_address_1']);
unset($fields['billing']['billing_address_2']);
unset($fields['billing']['billing_city']);
unset($fields['billing']['billing_postcode']);
unset($fields['billing']['billing_country']);
unset($fields['billing']['billing_state']);
unset($fields['billing']['billing_phone']);
unset($fields['order']['order_comments']);
unset($fields['billing']['billing_email']);
unset($fields['account']['account_username']);
unset($fields['account']['account_password']);
unset($fields['account']['account_password-2']);
How to show checkout fields that you have previously removed?
What can you do if you have deleted some checkout fields that you want to display again? Simply remove the line of code that hides the specific field you want to show. For example, if you disabled the postcode field from the billing section and now you want to add it again, you have to remove the following line from the functions.php file of your child theme:
unset($fields['billing']['billing_postcode']);
Similarly, if you want to display several fields at the same time, you can delete several lines at once.
Bonus: How to remove the Additional Information Tab in WooCommerce?
The Additional Information tab comes by default in WooCommerce. As this tab is displayed only when the product has weight, dimensions, or attributes, sometimes it’s not very useful. There are two ways to disable the Additional Information tab:
- Via PHP: Editing the functions.php file.
- Via CSS: Editing the style.css file.
In terms of performance, the PHP method is better because it stops the tab from loading (instead of loading it and then hiding it). So here we’ll show you how to remove the Additional Information tab with a PHP script.
NOTE: To avoid losing your customizations when you update your theme, we recommend you apply these changes to your child theme.
- Go to your FTP and open the wp-content folder. Then, go to the theme and open your child_theme folder.
- There, open the functions.php file.
- Go to the bottom and insert the following code:
add_filter( 'woocommerce_product_tabs' , 'quadlayers_remove_product_tabs' );
function quadlayers_remove_product_tabs ( $tabs ) {
unset( $tabs['additional_information'] );
return $tabs;
}
Remember to save the changes and then refresh the page. That’s it! You’ve removed the Additional Information tab!
Remove the description tab and reviews
Additionally, you can get rid of the description tab and the reviews tab with the following code:
add_filter( 'woocommerce_product_tabs' , 'quadlayers_remove_product_tabs' );
function quadlayers_remove_product_tabs( $tabs ) {
unset( $tabs['description'] );
unset( $tabs['reviews'] );
return $tabs;
}
Which WooCommerce checkout fields should you remove?
So which checkout fields should you remove? It depends on whether you sell physical or digital products and how much information from your customers you want to get. However, keep in mind that longer checkout forms usually have lower conversions. Customers tend to avoid long checkouts so here are some tips to keep the checkout page short:
- If you sell digital products, hide all the fields related to shipping such as the address, postal code, city, and so on.
- Only display mandatory fields. You can hide or collapse optional fields such as company name.
- Disable the postcode validation to reduce friction on the checkout page.
- If you sell physical products, make the billing details the shipping details by default to hide unnecessary fields.
- When possible, use autofill to reduce the time users spend filling in the form.
- Use only one field for name. Instead of displaying 3 fields (first name, middle name, and surname), you could use a Full Name field.
Another option to reduce the steps on the checkout page and increase conversions is to use a quick buy button for WooCommerce. Most big eCommerce players users because it’s a very effective way to speed up the purchase process and let the shoppers buy in one click.
Conclusion
In conclusion, your checkout page can have a huge impact on your business and give you a competitive advantage. Therefore, it’s key to optimize it and improve it as much as you can.
In this tutorial, we’ve seen two different ways to remove and disable WooCommerce checkout fields. Each of them has its pros and cons so you should choose the one that best suits your skills and needs.
WooCommerce Checkout Manager and Direct Checkout are great plugins that allow you to disable fields in a fast and easy way. However, they make the code of the store more complex. The PHP function, on the other hand, requires some coding but it’s cleaner and won’t consume any resources. Apart from removing checkout fields, you can also improve the purchase process on your site by creating sales funnels.
Finally, if you want to improve your checkout page, we recommend you have a look at our tutorial to customize the checkout in WooCommerce and our guide on how to edit checkout fields.
Which method did you choose? Do you know any other way to remove WooCommerce checkout fields? Leave a comment below and share your experiences with us.

Hi, I tried this…
add_filter( ‘woocommerce_checkout_fields’ , ‘ quadlayers_remove_checkout_fields ‘ );
function quadlayers_remove_checkout_fields( $fields ) {
unset($fields[‘billing’][‘billing_last_name’]);
return $fields; }
and it remove every field.
Hello Jason
Make sure you’re returning the $fields variable
The Code mentioned in the tutorial has spaces in Callback function name, remove that and try.
Remove the spaces. Use ‘quadlayers_remove_checkout_fields’ instead of ‘ quadlayers_remove_checkout_fields ‘ in the code, and it will work.
Post edited.
Thanks for the correction
Thank You Sir Very Much love you so much
dear sir how we can change field title please give me code i want change first name to your name kindly reply me as soon as possible
Thanks