
How to automatically send blog posts via email with Mailrelay V3
As a website owner, keeping your customers engaged with your content and reaching potential clients is key. One of the most effective ways to do this is by including your new blog posts in a newsletter that you send to your subscribers. But how can you do that without spending a lot of time? In this guide, we’ll show you how to automatically send blog posts via email step-by-step.
That sounds good, but how can you create an automated system that will send these newsletters each time you publish a new post? In this article, we’ll show you how to automatically include newly published posts in an email that you can send way to your followers. We’ll also cover newsletter creation and customization with any kind of content, including links and images, on different layouts.
How to automatically send blog posts via email
The easiest way to do this is to use a dedicated tool. There are several out there but we recommend Mailrelay v3, an excellent email marketing platform that’s very easy to use. Let’s get started!
1) Get the RSS feed of your blog posts
First, you need to get the RSS feed of your blog posts. This means that you have to search the feed URL in the website source code. You can do that by right-clicking on a blank area of the screen and selecting Source code.
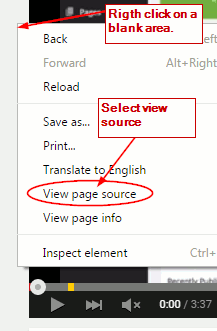
Next, search the feed URL in the <head> section, copy it, and save it for later use. You can locate it by looking for a link that contains /feed/.

Note that some plugins may interfere with this feature, so always get the feed URL manually. If you’re having issues, you can try disabling maintenance mode.
2) Create a campaign on Mailrelay v3
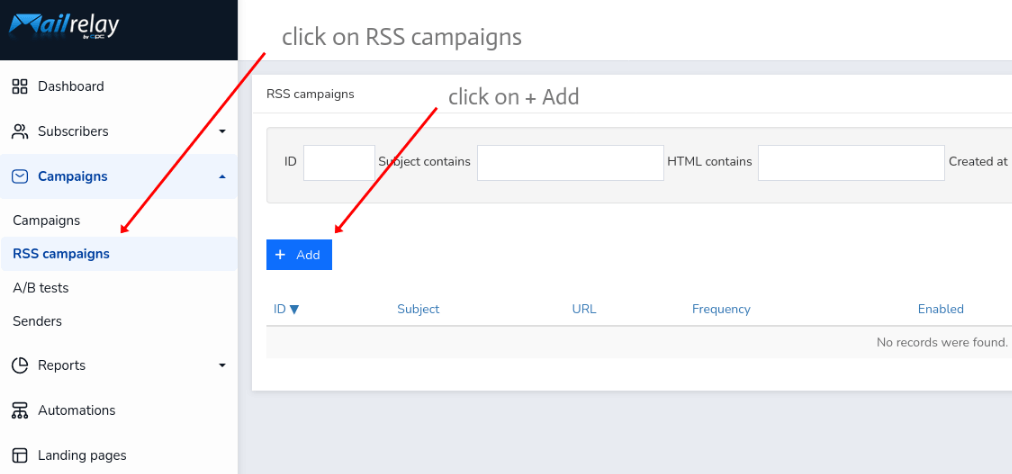
Once you have the RSS feed, sign up for Mailrelay v3 for free and create a campaign by clicking on RSS campaigns and hitting the + Add button.
On the next screen, press Create campaign and fill out the form with the relevant settings that will define your feed. These include the subject, preview text, sender, group or segment, URL, number of entries, and frequency.
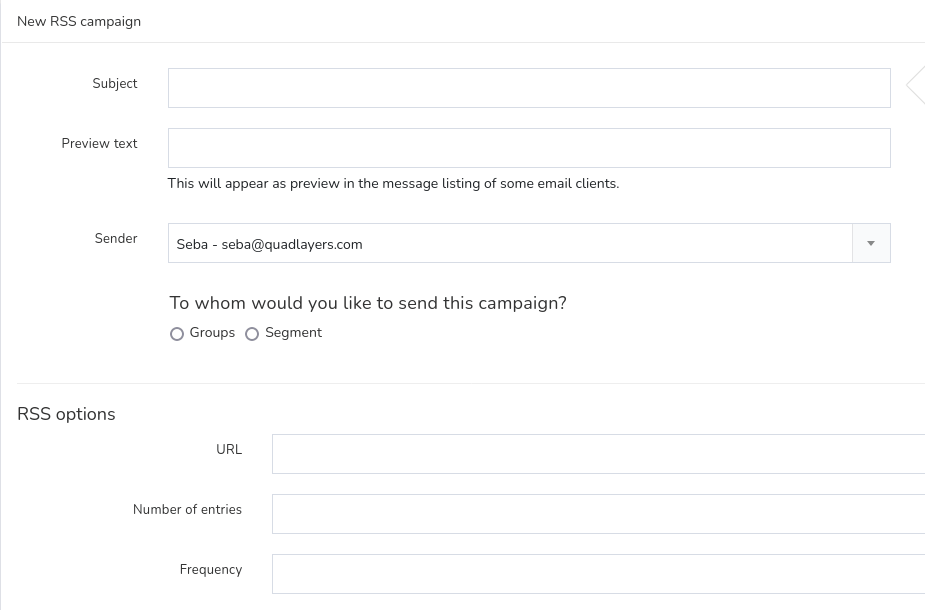
This section is very important, so you need to have a clear understanding of what each field means. Let’s have a look.
- Subject: The subject of the email is what subscribers see in their inbox when receiving it
- Preview text: An excerpt text that will be included in the emails. This will be displayed before users open the email
- Sender: The sender of the email
- Group or Segment: Who will receive the email? You should upload the subscriber list and each segment that you may have to target different users.
- URL: The feed URL you copied on the first step
- Number of entries: Number of posts that you want to include in each mail
- Frequency: Period of time between emails. It can be daily, weekly, or monthly, or you can create a custom one manually
Mailrelay allows you to show the title of the post on the subject using this tag: { first_rss_entry.title }}. You can also combine it with plain text as follows: New post { first_rss_entry.title }}.
After completing the form, your newsletter is fully configured. Now it’s time to create it so you can automatically send blog posts via email to your subscribers.
3) Create a newsletter on Mailrelay v3
To build your newsletter, simply choose a template and start customizing it. You’ll see a rich editor with default content that you can customize to design your newsletter and the content you’ll send in your emails.
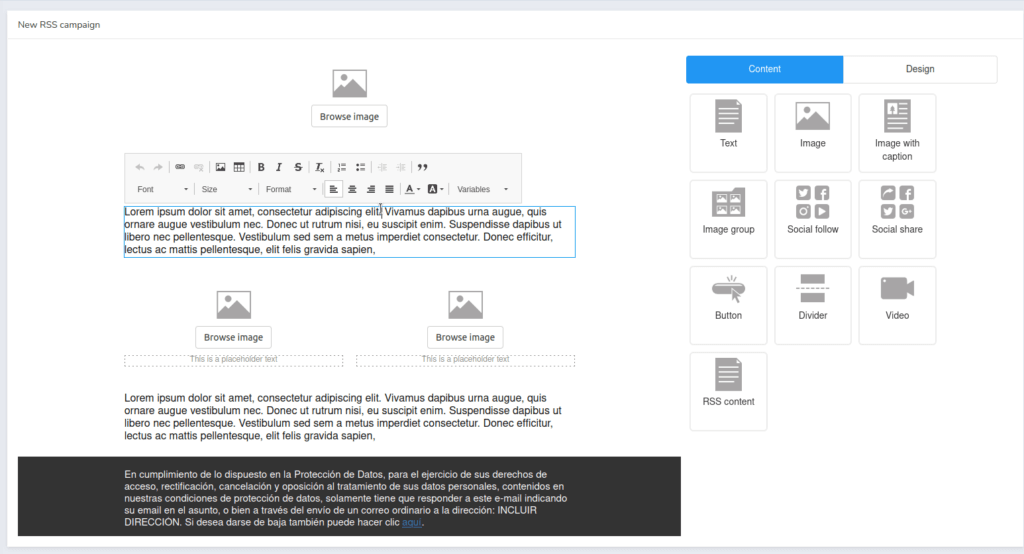
To customize the content, remove the default text and select Variables on the editor toolbar. Then, select the Loop for RSS entries option.
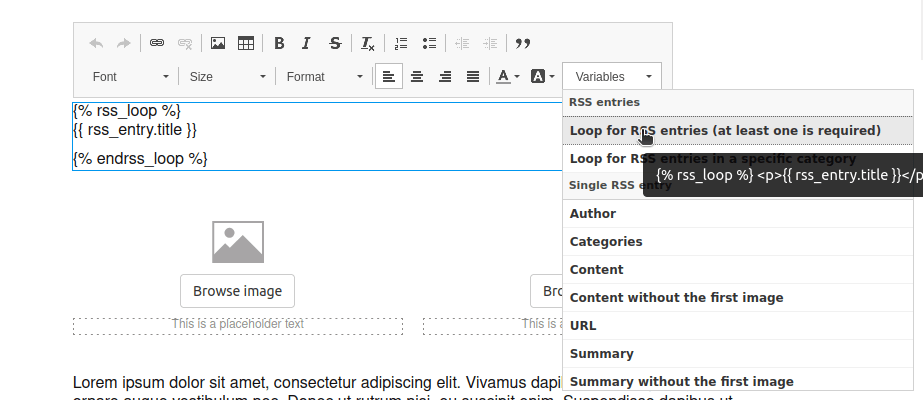
You’ll see that the following piece of code will be automatically added to the text block.
{% rss_loop %}
{{ rss_entry.title }}
{% endrss_loop %}
This is the basic structure that Mailrelay v3 uses to automatically blog posts via email. Note that without this, the emails won’t be sent.
You can edit or remove the first and last lines of code, but you should leave the other tag – {{ rss_entry.title }} in this case. In this example, we’ve used the title tag. This is similar to the one we used before when setting the subject of the emails.
Make sure all the other tags, like {{ rss_entry.title }}, are within the required lines.
NOTE: The availability of RSS tags depends on the configuration of your website RSS feed. If your website doesn’t provide a specific tag, this won’t work on the emails, so check your RSS configuration to ensure that everything works correctly.
All the available variables are grouped based on their usage and you can use any of them. However, some of them need to be configured in a different way. Let’s have a look at a few examples.
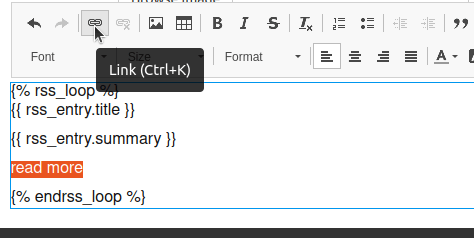
Inserting a link using an RSS feed
To insert a link, select the variable URL from the dropdown. This will return the following: {{ rss_feed.url }}. As you can see, this isn’t a link but the URL of the feed.
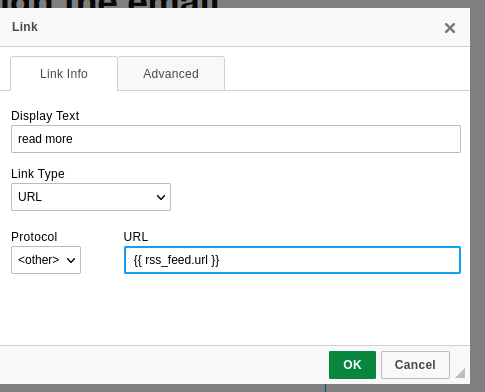
To use this URL on a link, you need to insert a link in the editor. Type the anchor text and click on the link icon as shown below. You can do the same on any other rich text or editor.
A popup will open and you’ll have to insert the URL. The problem is that you don’t have the real URL but the tag given by the feed.
To fix this, select <other> on the protocol option, so you can use the feed tag on the URL field:
Inserting image of post on the newsletter
Similarly, you can insert images coming from the RSS feed. To do that, click on the image icon on the text editor and then enter the image variable on the popup:
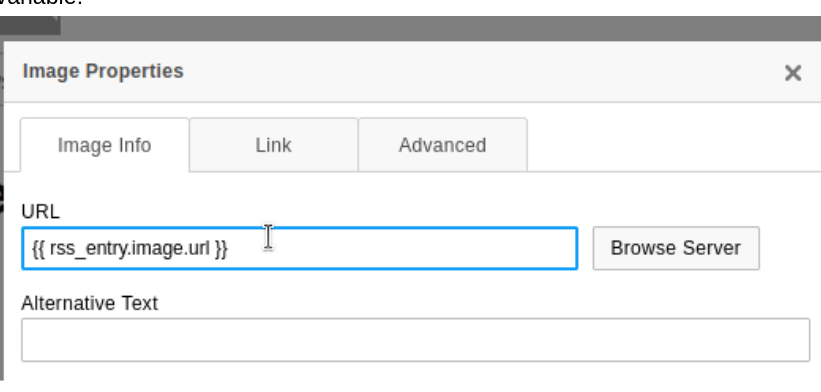
Images won’t appear when working on this editor, but they will be displayed in the emails if everything is properly set.
Remember that the RSS feed must have images, otherwise, there will be no images to display in the newsletter. In some cases, the RSS might not provide any image even if the post has one or more images.
4) Test the newsletter
Finally, once you’ve set up and designed your newsletter, it’s time to test it. You can do this by sending an email to yourself or someone from your team.
To do this, go back to the RSS campaign listing and you’ll see your campaign. Hover over it and on the right side you will find several options. Click on the email icon and enter the desired email address on the following screen.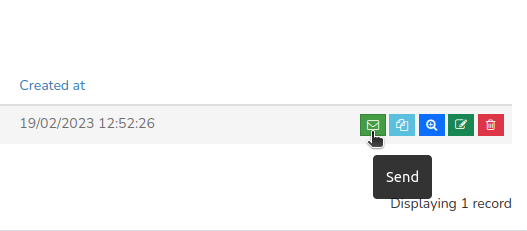
You can use one or more email IDs to send a test.
Check your inbox to check that everything works as expected. If there’s something wrong, you may need to go through some additional configurations to fix it. Mailrelay v3 will show you explanations of what is wrong in the sending test mail screen.
Conclusion
All in all, sending newsletters to subscribers is one of the best ways to maintain users engaged and keep your site top of mind. Instead of having to do that manually, you can easily create a system that sends emails automatically when you publish new content.
In this guide, we’ve seen how you can automatically send blog posts via email using Mailrelay V3 every time you publish a new blog post. We’ve seen how to configure the tool as well as how to create, customize and test the newsletter. It’s important that you take the time to configure the tool correctly, so you do it once and then relax.
Mailrelay V3 is a powerful tool to create automation to send newsletters and emails. It’s very easy to use and the best part is that you can use it for free!
Finally, it’s worth noting that for this to be as successful as possible, newsletters should be part of your marketing strategy and not something isolated.
Have you used Mailrelay v3? What did you think about it? Do you know of any other tools to share blog posts with your followers? Let us know in the comments below!
If you liked this post, you’ll probably enjoy these ones too:
